C68 - Bike Vevor - Free user manual and instructions
Find the device manual for free C68 Vevor in PDF.

| Product Type | Balance Bike for Children |
| Brand | Vevor |
| Model | C68 |
| Recommended Age | 3-6 years |
| Usage | Balance learning |
| Frame Material | Steel |
| Wheel Material | Rubber |
| Adjustable Seat Height | Yes |
| Adjustable Handlebar Height | Yes |
| Maximum Child Weight | Approximately 25 kg |
| Dimensions (L × W × H) | Approximately 85 × 38 × 50 cm |
| Net Weight | Approximately 3.5 kg |
| Power Source | None (muscle-powered) |
| Assembly | By an adult (instructions included) |
| Safety | Wear a helmet, adult supervision, do not use on roads |
| Maintenance | Lubricate rotating parts every 6 months, clean with a dry cloth |
| Spare Parts | Available via Vevor support (www.vevor.com/support) |
| Warranty | Electronic warranty certificate (www.vevor.com/support) |
| Number of Wheels | 2 |
| Brakes | None |
Frequently Asked Questions - C68 Vevor
User questions about C68 Vevor
0 question about this device. Answer the ones you know or ask your own.
Ask a new question about this device
Download the instructions for your Bike in PDF format for free! Find your manual C68 - Vevor and take your electronic device back in hand. On this page are published all the documents necessary for the use of your device. C68 by Vevor.
USER MANUAL C68 Vevor
Technical Support and E-Warranty Certificate www.vevor.com/support
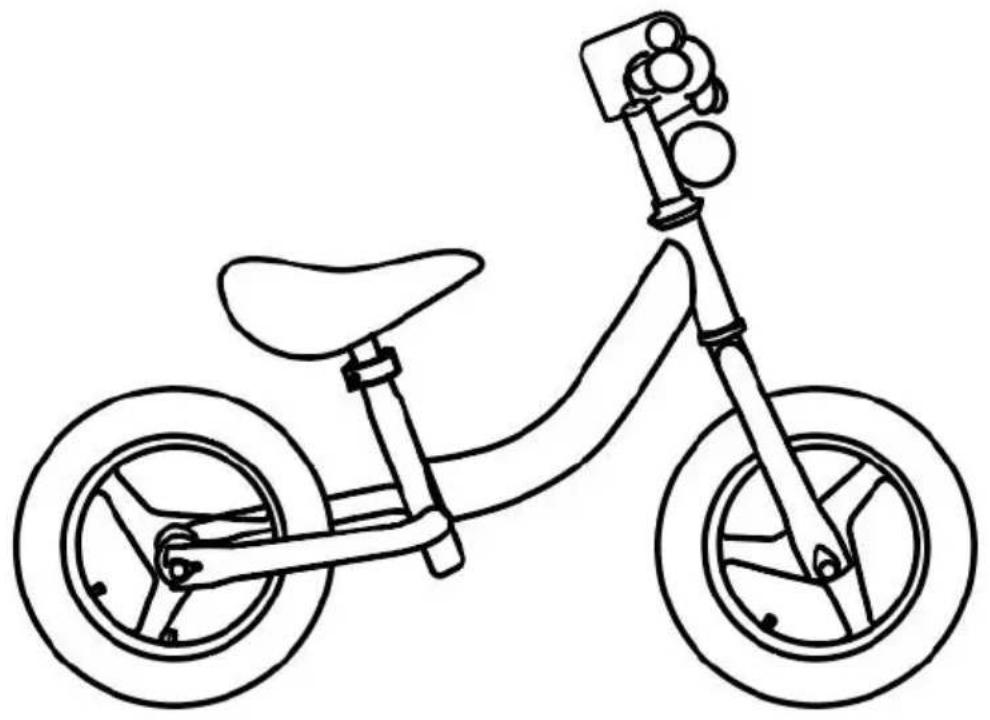
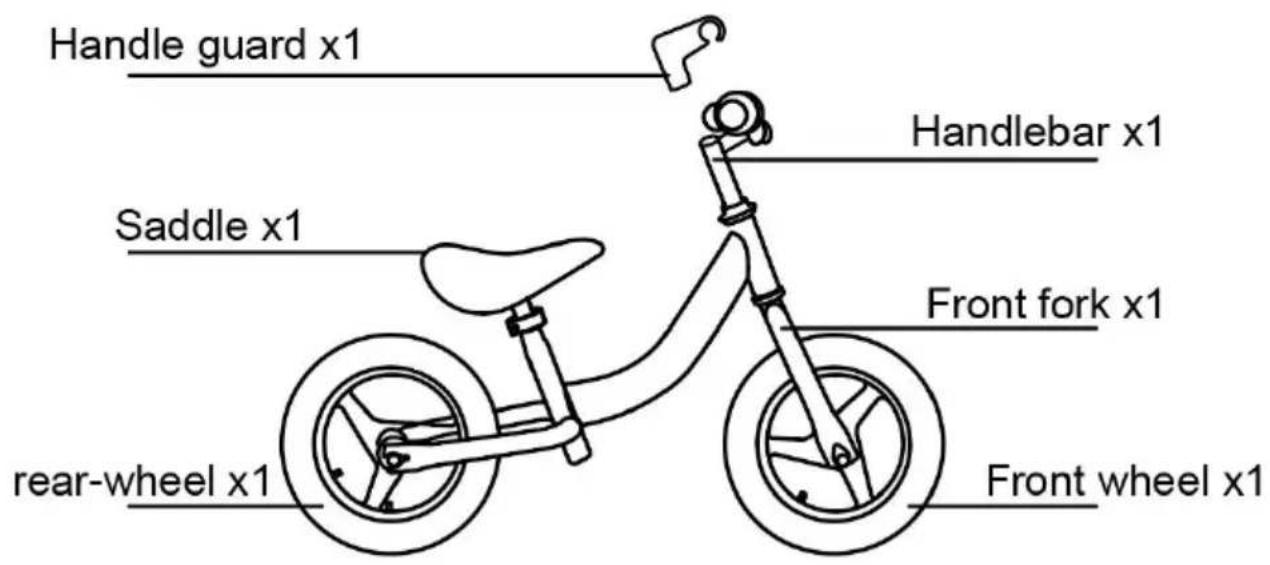
Kids' Balance Bike
MODEL: C68
We continue to be committed to provide you tools with competitive price. "Save Half", "Half Price" or any other similar expressions used by us only rep estimate of savings you might benefit from buying certain tools with us compared top brands and does not necessarily mean to cover all categories of tools offered are kindly reminded to verify carefully when you are placing an order with us actually saving half in comparison with the top major brands.
VEVOR®
TOUGH TOOLS, HALF PRICE
Kids' Balance Bike
MODEL: C68
natural_image
Line drawing of a children's tricycle with wheels and seat (no text or symbols)NEED HELP? CONTACT US!
Have product questions? Need technical support? Please feel fr contact us:
Technical Support and E-Warranty Certificate www.vevor.com/support
This is the original instruction, please read all manual instruction carefully before operating. VEVOR reserves a clear interpretation user manual. The appearance of the product shall be subject to product you received. Please forgive us that we won't inform you there are any technology or software updates on our product.
INSTRUCTIONS
Thank you very much for choosing this Kids' Balance Bike. Please read of the instructions before using it. The information will help you achieve best possible results.
WARNING:
Please read this manual carefully before using the product. Failure to may result in serious injury. For safe driving of your baby the following warnings must be noted:
- Assembly and adjustment of the product must be carried out by a Please keep children away from moving parts. This product contains s parts. If swallowed, it will pose a choking hazard. Keep these small away from children when assembling!
- Children should ride under adult supervision.
- This bike is a children's toy and shall not be used as a means transportation on highways and streets
- Children must wear safety helmets when riding.
- Do not ride on bumpy terrain.
- Before each use, the balance car should be inspected to ensure
- Use as intended only. Do not stand on the product.
- inspect before every use. Do not use it if parts are loose or dan
- If any parts are missing, broken, damaged, or worn, stop using the until repairs are made and actory replacement parts are installed.
Age of application: 3-6 years old.
Installation and use

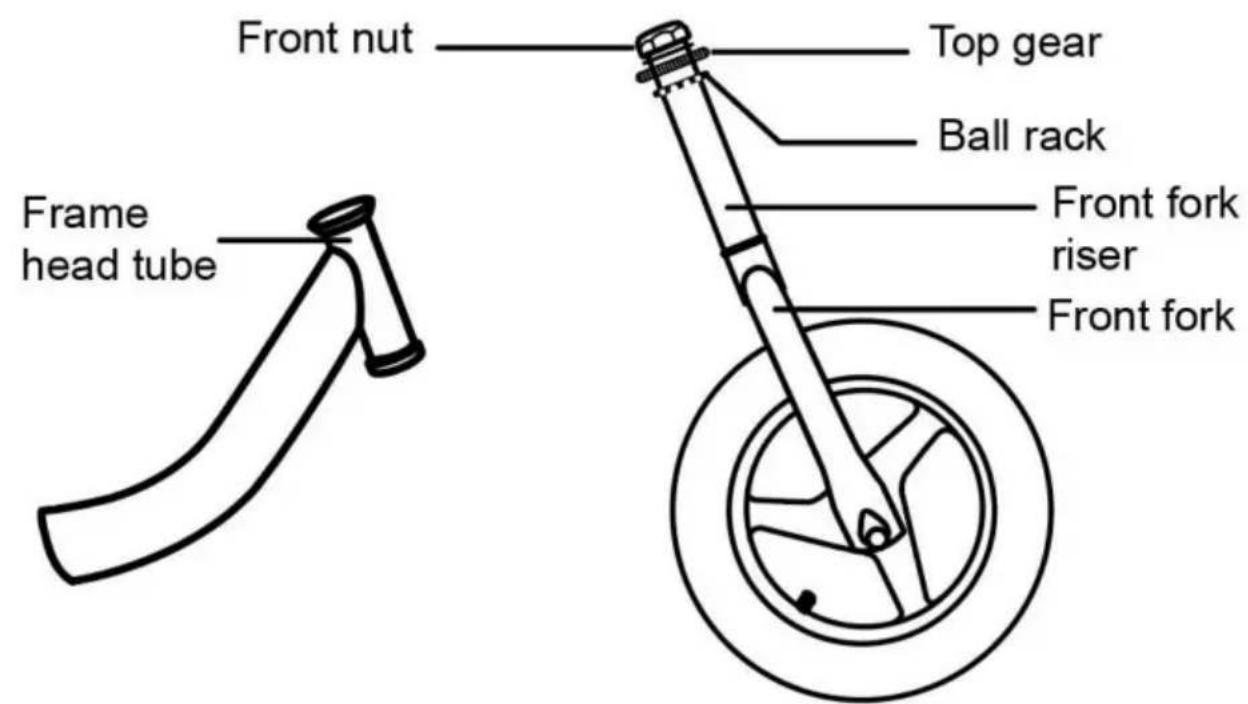
1. Install the front fork
① Remove the front fork lock, gasket, upper stop and ball carrier ② Keep the front wheel pattern consistent with the rear wheel, and put the front riser into the head tube of the frame, and then install carrier (exposing the steel ball side down), the upper stop and tighter then install the gasket in turn, and lock the front mother and tighten.
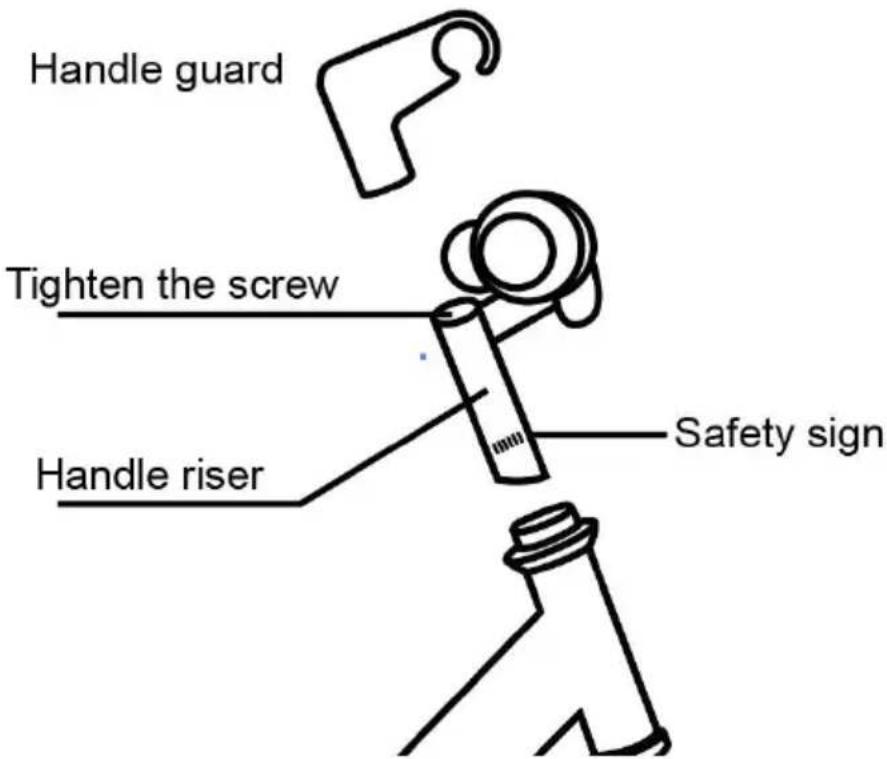
2. Install handlebars
① Remove the vertical cover, use the hex tool to loosen the lifting tool. ② inserted the riser into the front fork riser, adjusted the handlebar direction, so that the handlebar is perpendicular to the direction of the bicycle, adjusted the height of the handlebar, to suit the height of the (note: the maximum height of the handlebar can not see the safety I tightened the lifting screw (tightening torque is not less than 18N.m), Finally snap into the handle stand cover.
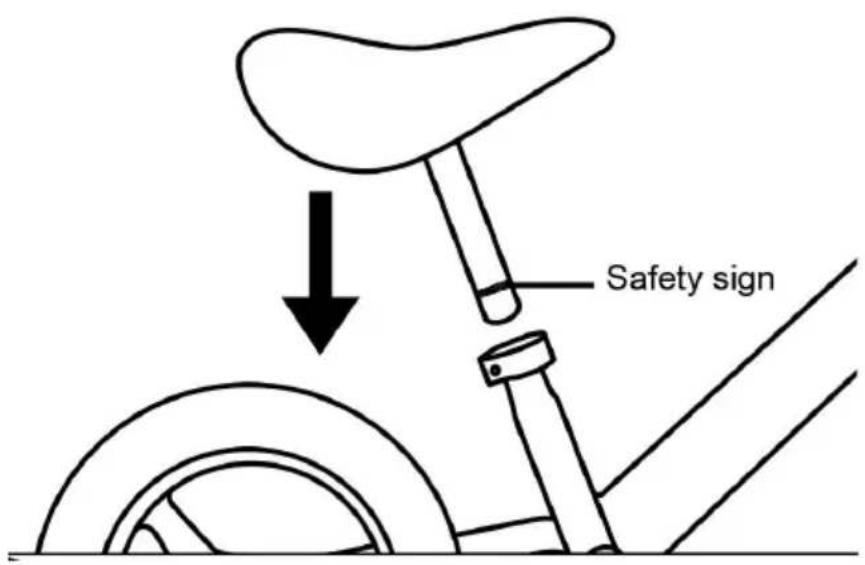
3. Install the saddle
① Loosen the saddle chuck hex socket screw with a wrench.
② Insert the saddle tube into the frame riser, adjust the saddle to a rider's height (note: the maximum height of the saddle is subject to the safety mark of the saddle tube), and then lock the saddle chuck hex (locking torque is not less than 12N.m).
Maintenance and repair
- When a new car is used for about two weeks, it is necessary to the rotating front axle, rear axle and wheels to maintain normal opera
- The rotating parts of the balance car should be constantly lubricate with butter to extend the service life. Disassemble and wash the who every six months, and fill the rotating part with butter.
- Paint: The surface should not be wrapped in plastic bags and clo not wipe with a wet cloth, so as to avoid loss of light, bubbles, pee case of luster decline, you can choose high quality car wax wipe, incr brightness.
- Electroplating parts: If the surface is found to be yellowish-brown network, you can use neutral oil or sewing machine oil to wipe frequency prevent the network from expanding.
- The front bowl is loose: first loosen the front and lock the mother remove the gasket, and then adjust the gap between the upper bowl the steel ball with a wrench, and then install the gasket and tighten and lock the mother.
- If the front axle is loose or too tight, it will affect the operation of. When adjusting, first loosen the nut on one side of the front axle, the adjust the tight nut with a wrench, and support the wheel in the front middle, and finally tighten the nut.
VEVOR®
TOUGH TOOLS, HALF PRICE
Technical Support and E-Warranty Certificate
www.vevor.com/support
VEVOR®
TOUGH TOOLS, HALF PRICE
natural_image
Line drawing of a children's tricycle with wheels and seat (no text or symbols)BESOIN D'AIDE? CONTACTEZ-NOUS!

- Installez le guidon
3. Installez la selle
natural_image
Line drawing of a children's tricycle with wheels and seat (no text or symbols)BRAUCHEN SIE HILFE? KONTAKTIERE UNS!

2. Lenker montieren
www.vevor.com/support
VEVOR®
TOUGH TOOLS, HALF PRICE
natural_image
Line drawing of a children's tricycle with wheels and seat (no text or symbols)HO BISOGNO DI AIUTO? CONTATTACI!
1. Installare la forcella
3. Installare la sella y
natural_image
Line drawing of a children's tricycle with wheels and seat (no text or symbols)
1. Instale la horquilla delantera
2. Instalar manillares
3. Instale la montura
natural_image
Line drawing of a children's tricycle with wheels and seat (no text or symbols)POTRZEBUJE POMOCY? SKONTAKTUJ SIĘ Z NAMI!

www.vevor.com/support
VEVOR®
TOUGH TOOLS, HALF PRICE
Technische ondersteuning en e-garantiecertificaat www.vevor.com/support
natural_image
Line drawing of a children's tricycle with wheels and seat (no text or symbols)HULP NODIG? NEEM CONTACT MET ONS OP!

natural_image
Line drawing of a children's tricycle with wheels and seat (no text or symbols)BEHÖVS HJÄLP? KONTAKTA OSS!

2. Montera styret
www.vevor.com/support