8102E-8L - Slicer Vevor - Free user manual and instructions
Find the device manual for free 8102E-8L Vevor in PDF.

| Product Type | Manual Tile Cutter |
| Brand | Vevor |
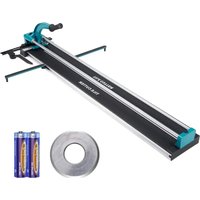
| Model | 8102E-8L (available in 32", 40", 48" versions) |
| Max Cutting Length | 800 mm (32"), 1000 mm (40"), 1200 mm (48") |
| Max Cutting Thickness | 15 mm |
| Cutting Wheel Diameter | 22 mm |
| Cutting Wheel Bore | 6 mm |
| Cutting Wheel Thickness | 6 mm |
| Power Supply (Laser Guide) | 2 AAA batteries (1.5 V) |
| Laser Guide | Yes, adjustable (4 adjustment screws) |
| Cut Types | Straight and Diagonal |
| Compatible Materials | Ceramic, glazed, porcelain, polished tiles |
| Package Contents | 1 tile cutter, 1 ruler, 2 AAA batteries, 1 spare cutting wheel |
| Safety | Wear protective goggles and gloves |
| Maintenance | Clean after use, store in a dry and safe place |
| Repair and Spare Parts | Contact ServiceClient@vevor.com |
Frequently Asked Questions - 8102E-8L Vevor
User questions about 8102E-8L Vevor
0 question about this device. Answer the ones you know or ask your own.
Ask a new question about this device
Download the instructions for your Slicer in PDF format for free! Find your manual 8102E-8L - Vevor and take your electronic device back in hand. On this page are published all the documents necessary for the use of your device. 8102E-8L by Vevor.
USER MANUAL 8102E-8L Vevor
Support and E-Warranty Certificate https://www.vevor.com/support
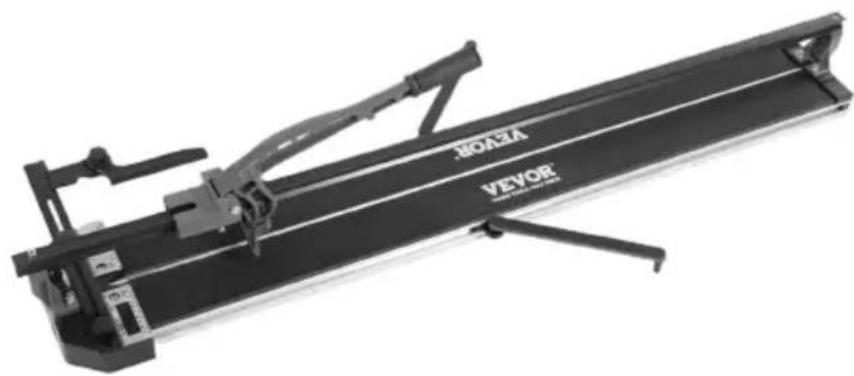
TILE CUTTER
MODEL:8102E-8L
We continue to be committed to provide you tools with competitive price. "Save Half", "Half Price" or any other similar expressions used by us only represent of savings you might benefit from buying certain tools with us compared top brands and doses not necessarily mean to cover all categories of tools offered are kindly reminded to verify carefully when you are placing an order with us actually saving half in comparison with the top major brands.
VEVOR®
Tile Cutter
8102E-8L
8102E-8L
natural_image
Black VEVOR mechanical device with articulated arms and mounting base (no visible text or symbols)NEED HELP? CONTACT US!
Have product questions? Need technical support? Please feel from contact us:

CustomerService@vevor.com
This is the original instruction, please read all manual instruction carefully before operating. VEVOR reserves a clear interpretation user manual. The appearance of the product shall be subject to product you received. Please forgive us that we won't inform you there are any technology or software updates on our product.
SPECIFICATIONS
| Model | 8102E-8L/32" | 8102E-8L/40" | 8102E-8L/48" |
| Maximum Cutting Length | 800mm | 1000mm | 1200mm |
| Maximum Cutting Thickness | 15mm | 15mm | 15mm |
| Cutting Wheel Size | Φ22*Φ6*6mm | ||
SAFETY INFORMATION
| Symbol | Symbol Description |
 | Warning - To reduce the risk of injury, user must read in manual carefully. |
 | This symbol, placed before a safety comment, indicates a precaution, warning, or danger. Ignoring this warning may be an accident. To reduce the risk of injury, fire, or electrocussion please follow the recommendation below. |
 | Warning- Be sure to wear eye protectors when using this |
 | Warning- Be sure to wear gloves when using this product. |
Warning

Read and understand all instructions before using this tile cutter. The operator must follow basic precautions to reduce the risk of personal injury a damage to the equipment.
Please familiarize yourself with the hazard notices found in this manual. A list is an alert that there is a possibility of property damage, injury or death if it is instructions are not followed.
WORK AREA
- Operate in a safe work environment. Keep your work area clean, well-lit and of distractions.
- Keep anyone not wearing the appropriate safety equipment away from the area.
- Store new tools properly in a safe and dry location to prevent rust or da Lock tile cutter away and keep out of the reach of children.
- Always place the tile cutting machine on a level and firm surface.
PERSONAL SAFETY
WARNING!
Wear personal protective equipment approved by the Canadian Standards Association (CSA) or American National Standards Institute (ANSI).
PERSONAL PROTECTIVE EQUIPMENT
-
Always wear impact safety goggles that provide front and side protection f eyes. Eye protection equipment should comply with CSA Z94.3-07 or ANSI Z8 standards based on the type of work performed.
-
Wear gloves that provide protection based on the work materials or to reduce the effects of tool vibration.
-
Caution! The edges of cut tiles are sharp.
PERSONAL PRECAUTIONS
Control the tile cutter, personal movement and the work environment to avoid personal injury or damage to tile cutter.
- Do not operate any tile cutter when tired or under the influence of drugs or medications.
- Avoid wearing clothes or jewelry that can become entangled with a tool's parts. Keep long hair covered or bound.
SPECIFIC SAFETY PRECAUTIONS
- The tile cutting machine is fitted with replaceable circular blade. Keep the cutter and blade away from children.
- Use the correct tile cutter for the job. This tile cutter was designed for a function. Do not modify or alter this tile cutter or use it for an unintended p
- After use, the machine must be stored in a safe and dry place.
- This machine has been designed for cutting and breaking ceramic, glazed, porcelain, and polished tile, and which surface must be flat. Shall not be used any other purpose.
WARNING!
DO NOT let comfort or familiarity with product (gained from repeated use) restrict adherence to the tile cutter safety rules. If you use this tool unsafely or incorrectly, you can suffer serious personal injury.
WARNING!
Direct exposure of pressurized air or fluids to skin could result in severe body injury.
SAVE THESE INSTRUCTIONS

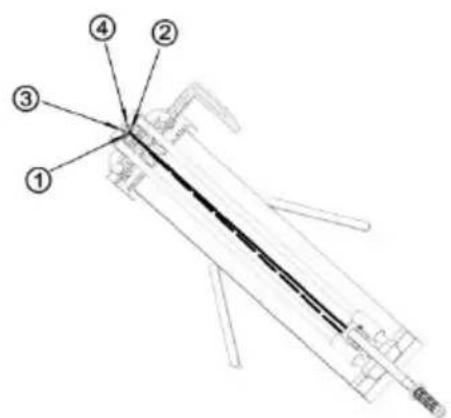
① Cutter *1PCS
② Ruler *1PCS
③ AAA Battery*2PCS
④ Spare Cutting Wheel
Φ22xΦ6x6mm *1PCS
Operation
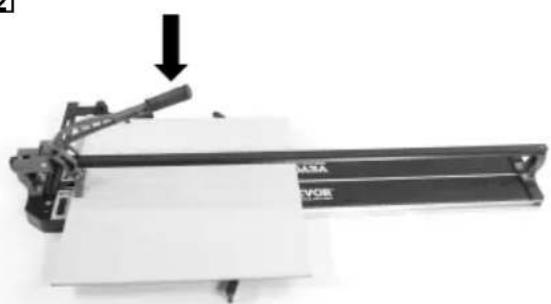
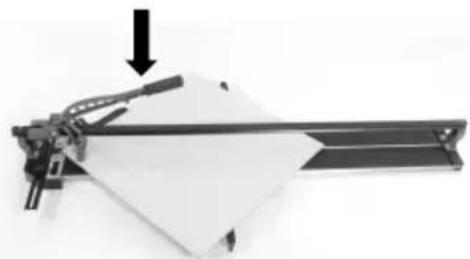
Straight Cutting
1
natural_image
Mechanical assembly with a lever and paper plane, no visible text or symbolsPlace the cutting wheel on the rear edge of the tile.
natural_image
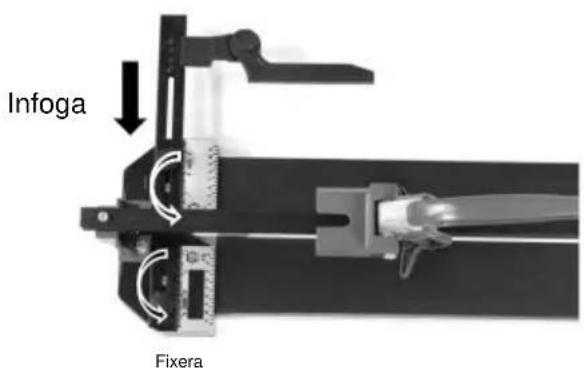
Mechanical clamp bracket connecting a black rod (no text or symbols visible)Make sure the breaker is upward to magnet on the sliding bar.
natural_image
Mechanical assembly diagram showing a rotating component and a clamping mechanism (no text or symbols)Slide the wheel forward by pushing the handle down with medium pressure.
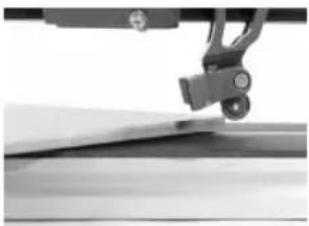
Scoring the tile surface glaze as the handle is pushed forward.
It is important to make one continuous motion, scoring the surface only once time.
2
natural_image
Mechanical device with a lever and paper strip, no visible text or symbolsAfter scoring and without moving the tile position, the breaker is slightly in the edge of the tile and front stop.

natural_image
Mechanical assembly diagram showing a motor with rotation arrow and a bracket mechanism (no text or symbols)Raise the handle a little and release the breaker so that the breaker is flat tile.
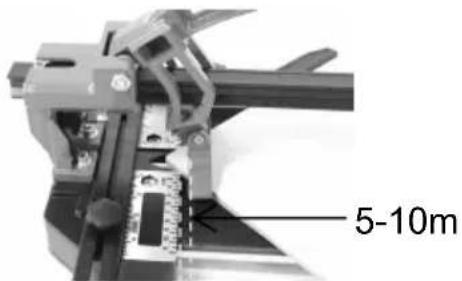
Apply increasing pressure on the handle until the tile snaps along the score
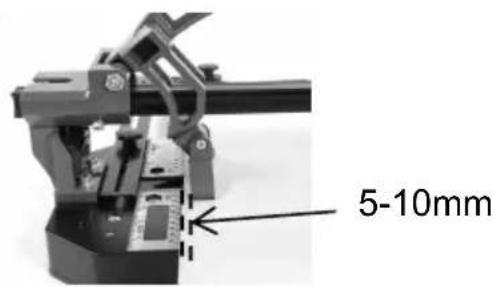
Tips: After scoring, it is better to pull back the handle to let the breaker slide backtrack 5-10mm, it's the best position to break the tile.

natural_image
Two identical 3D printer or scanner diagrams showing mechanical components with downward arrows indicating compression or disassembly (no text or symbols present)Tips: Do not press in the middle or the end.
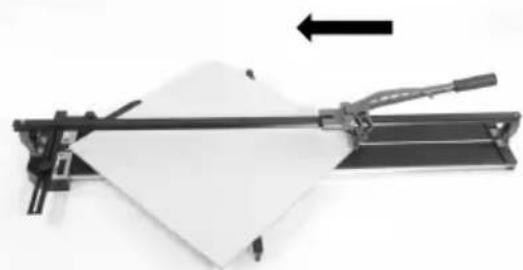
Diagonal Cutting
1
natural_image
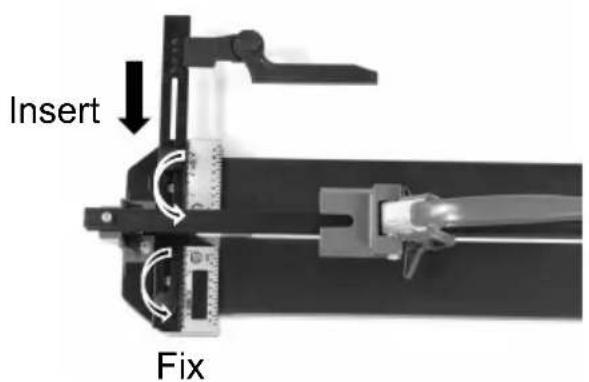
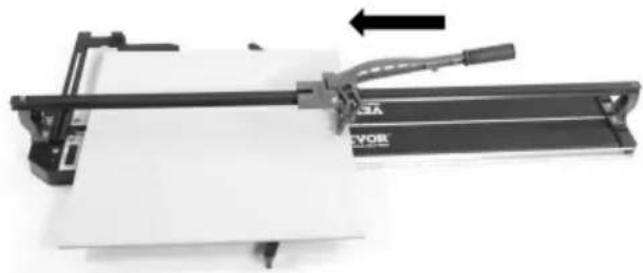
Mechanical device with a paper sheet being cut by a tool, showing an arrow indicating motion (no text or symbols visible)Put tile on the machine against the adjusted angle ruler.
natural_image
Close-up of a mechanical assembly with a clamp and lever mechanism (no visible text or symbols)Place the cutting wheel on the rear edge of the tile.
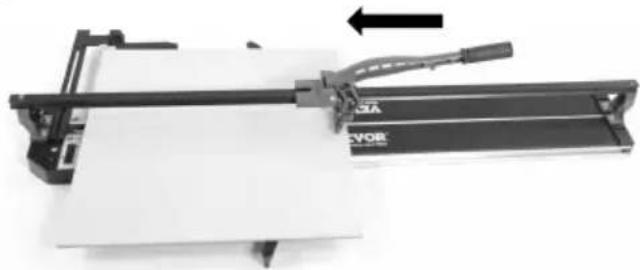
Slide the wheel forward by pushing the handle down with medium pressure.
Scoring the tile surface glaze as the handle is pushed forward.
It is important to make one continuous motion, scoring the surface only once time.
natural_image
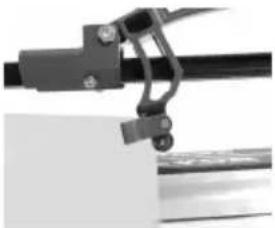
Mechanical assembly with a downward arrow indicating force or motion (no visible text or symbols)After scoring and without moving the tile position, the breaker is slightly in the edge of the tile and front stop.
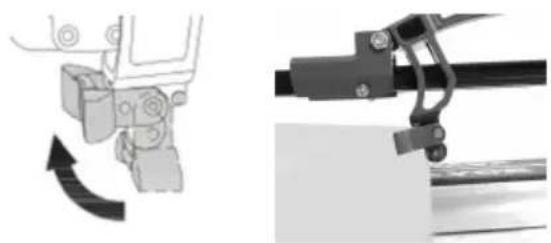
Raise the handle a little and release the breaker so that the breaker is flat tile.
Apply increasing pressure on the handle until the tile snaps along the score
Tips: After scoring, it is better to pull back the handle to let the breaker slide backtrack 5-10mm, it's the best position to break the tile.
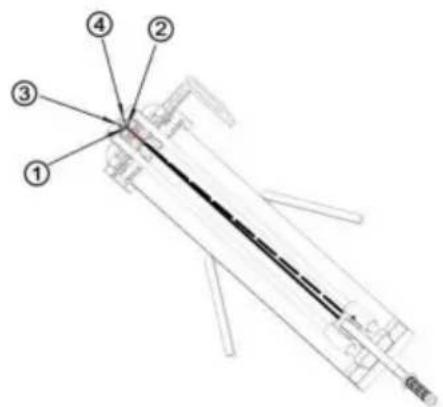
Use Screwdriver to replacement the blade

natural_image
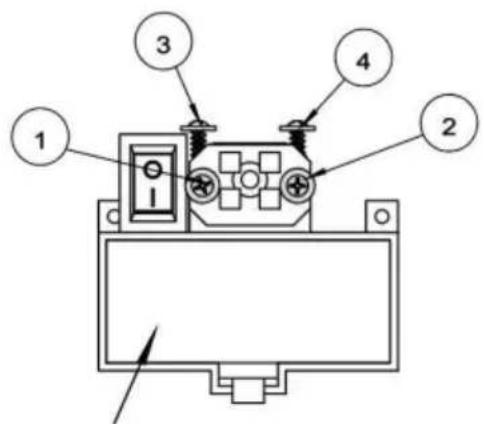
Close-up of a mechanical component with a circular knob and metallic ring (no visible text or symbols)Laser Device Instruction
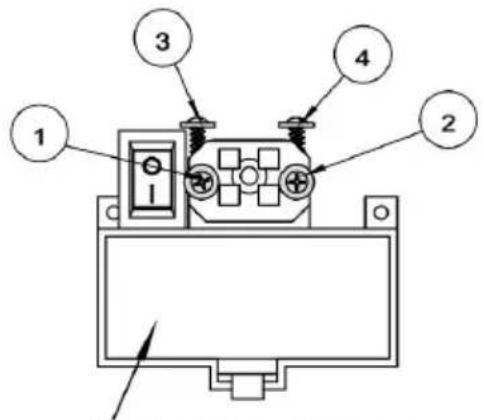
Required: 2pcs AAA battery
- There are four screws for laser device.
2, If the laser is biased to the I adjust the No. 2 screw clockwise the No. 1 screw counterclockwise.
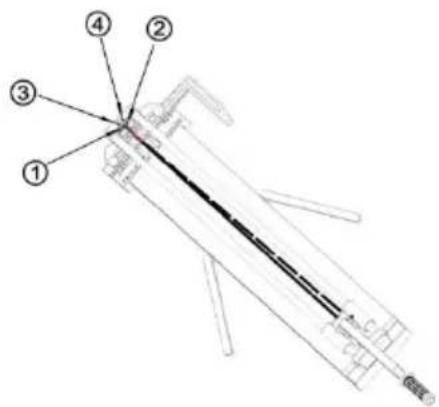
3, If the laser is biased to the adjust the No. 1 screw clockwise the No. 2 screw counterclockwise.
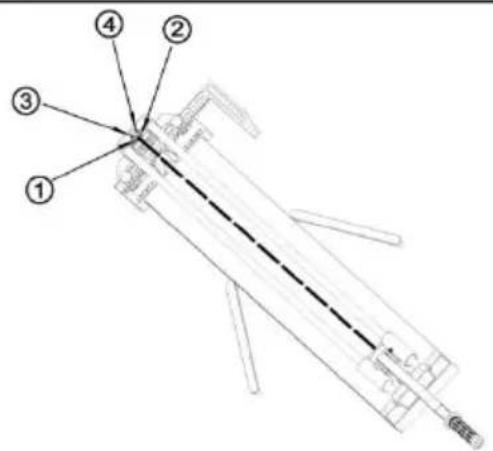
4, When the laser irradiation is to far/high, adjust the No. 3 and 4 screws clockwise.
- When the laser irradiation is close/low, adjust the No. 3 and screws counterclockwise.
Address: Baoshanqu Shuangchenglu 803long 11hao 1602A-1609shi Shanghai
Imported to USA: VEVOR STORE INC, 9448 RINCHMOND PL #E
RANCHO CUCAMONGA, California, 91730 United States of America
| UK | REP |
Pooledas Group Ltd
Unit 5 Albert Edward House, The Pavilions
Preston, United Kingdom
| EC | REP |
SHUNSHUN GmbH
Römeräcker 9 Z2021, 76351
natural_image
Black VEVOR rail roller with adjustable arms and mounting feet (no text or symbols visible)BESOIN D'AIDE? CONTACTEZ-NOUS!
natural_image
Technical diagram of a VEVOR mechanical device with labeled components (no readable text or symbols beyond branding)natural_image
Mechanical assembly with a lever and paper plane, no visible text or symbolsnatural_image
Mechanical clamp assembly with metal railings and mounting bracket (no visible text or symbols)natural_image
Mechanical assembly diagram showing a rotating component and a bracket mechanism (no text or symbols)natural_image
Mechanical assembly with a lever and paper plate, no visible text or symbolsnatural_image
Mechanical assembly diagram showing a robotic arm with rotation arrow and mechanical bracket (no text or symbols)natural_image
Mechanical assembly with a lever and paper plate, showing a downward arrow and a cross symbol (no readable text or labels)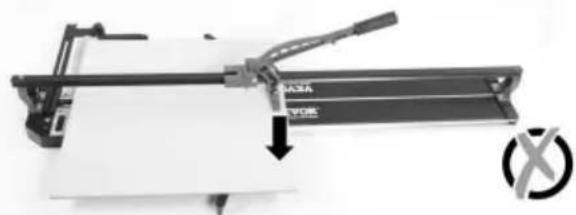
natural_image
Mechanical assembly diagram showing a cutting tool with a labeled component (no readable text or symbols)natural_image
Mechanical device with a paper sheet being cut by a lever, showing an arrow indicating motion (no text or symbols visible)natural_image
Close-up of a mechanical tool interacting with a surface (no visible text or symbols)natural_image
Mechanical assembly with a downward arrow indicating force or motion, no visible text or symbolsnatural_image
Close-up of a mechanical device with a circular button and star-shaped knob (no visible text or symbols)Required: 2pcs AAA battery
natural_image
Black VEVOR rail-mounted device with adjustable arms and mounting base (no visible text or symbols)Kundenservice@vevor.com
natural_image
Mechanical assembly with a lever and paper plane, no visible text or symbolsnatural_image
Mechanical clamp or bracket assembly with metal railings (no visible text or symbols)natural_image
Mechanical assembly diagram showing a rotating component and a clamping mechanism (no text or symbols)natural_image
Mechanical assembly with a lever and paper plate, no visible text or symbolsnatural_image
Mechanical assembly diagram showing a robotic arm with rotation arrow and mechanical bracket (no text or symbols)natural_image
Two identical mechanical clamping setups showing a lever mechanism with downward force arrows, no text or symbols present.natural_image
Mechanical device with a paper sheet being cut by a lever, showing an arrow indicating motion (no text or symbols visible)natural_image
Close-up of a mechanical tool interacting with a surface (no visible text or symbols)natural_image
Mechanical assembly with a downward arrow indicating force or motion (no visible text or symbols)natural_image
Close-up of a car wheel with a metallic knob (no visible text or symbols)Required: 2pcs AAA battery
natural_image
Black VEVOR rail-mounted device with adjustable arms and mounting base (no visible text or symbols)natural_image
Mechanical assembly with a lever mechanism and a paper sheet, no visible text or symbolsnatural_image
Mechanical clamp assembly with metal railings and mounting bracket (no visible text or symbols)natural_image
Mechanical assembly diagram showing a rotating component and a clamping mechanism (no text or symbols)natural_image
Mechanical assembly with a lever and paper plate, no visible text or symbolsnatural_image
Two mechanical components: a robot arm and a robotic arm with articulated joints, shown side by side without any text or symbols.natural_image
Mechanical device with a lever and paper sheet, showing a downward arrow and a cross symbol (no readable text or labels)
natural_image
Mechanical assembly diagram showing a cutting tool with a labeled component (no readable text or symbols)natural_image
Mechanical device with a paper sheet being cut by a lever, showing an arrow indicating motion (no text or symbols visible)natural_image
Close-up of a mechanical tool interacting with a surface (no visible text or symbols)natural_image
Mechanical assembly with a paper holder and directional arrow indicating motion (no text or symbols)natural_image
Close-up of a mechanical device with a circular button and star-shaped knob (no visible text or symbols)Required: 2pcs AAA battery
natural_image
Black VEVOR rail-mounted device with adjustable arms and mounting base (no visible text or symbols)natural_image
Technical diagram of a Vevor mechanical device with labeled parts (no readable text or symbols beyond branding)natural_image
Mechanical assembly with a lever and paper plane, no visible text or symbolsnatural_image
Mechanical clamp assembly with metal railings and mounting bracket (no visible text or symbols)natural_image
Mechanical assembly diagram showing a rotating component and a clamping mechanism (no text or symbols)natural_image
Mechanical assembly with a lever and paper plate, no visible text or symbolsnatural_image
Mechanical assembly diagram showing a robotic arm with rotation arrow and mechanical bracket (no text or symbols)natural_image
Two identical mechanical assembly diagrams showing a lever mechanism with downward force arrows, no text or symbols present.natural_image
Mechanical device with a paper sheet being cut by a lever, showing an arrow indicating motion (no text or symbols visible)natural_image
Close-up of a mechanical tool interacting with a surface (no visible text or symbols)natural_image
Mechanical assembly with a downward arrow indicating force or motion, no visible text or symbolsnatural_image
Close-up of a mechanical device with a circular button and star-shaped knob (no visible text or symbols)Required: 2pcs AAA battery
natural_image
Black VEVOR rail-mounted device with adjustable arms and mounting base (no visible text or symbols)POTRZEBUJESZ POMOCY? SKONTAKTUJ SIĘ Z NAMI!
natural_image
Technical diagram of a Vevor mechanical device with labeled parts (no readable text or symbols beyond branding)natural_image
Mechanical assembly with a lever and paper plane, no visible text or symbolsnatural_image
Mechanical clamp assembly with metal railings and mounting bracket (no visible text or symbols)natural_image
Mechanical assembly diagram showing a rotating component and a bracket mechanism (no text or symbols)natural_image
Mechanical assembly with a lever and paper plate, no visible text or symbolsnatural_image
Mechanical assembly diagram showing a robotic arm with rotation arrow and mechanical components (no text or symbols)natural_image
Two identical mechanical assembly diagrams showing a tool interacting with a flat plate, each with a downward arrow indicating motion (no text or symbols present)natural_image
Mechanical device with a paper sheet being cut by a lever, showing an arrow indicating motion (no text or symbols visible)natural_image
Close-up of a mechanical device with a lever and handle, no visible text or symbolsnatural_image
Mechanical assembly with a paper holder and directional arrow indicating motion (no text or symbols)natural_image
Close-up of a mechanical component with a circular knob and star symbol (no text or symbols visible)Required: 2pcs AAA battery
natural_image
Black VEVOR rail-mounted device with adjustable arms and mounting base (no visible text or symbols)HULP NODIG? NEEM CONTACT MET ONS OP!
Klantenservice@vevor.com
natural_image
Mechanical assembly with a lever and paper plane, no visible text or symbolsnatural_image
Mechanical clamp or bracket assembly with no visible text or symbolsnatural_image
Mechanical assembly diagram showing a rotating component and a bracket mechanism (no text or symbols)natural_image
Mechanical assembly with a lever and paper plate, no visible text or symbolsnatural_image
Mechanical assembly diagram showing a robotic arm with rotation arrow and mechanical bracket (no text or symbols)natural_image
Two identical mechanical clamping setups showing a lever mechanism with downward force arrows, no text or symbols present.natural_image
Mechanical device with a paper sheet being cut by a lever, showing an arrow indicating motion (no text or symbols visible)natural_image
Close-up of a mechanical tool interacting with a surface (no visible text or symbols)natural_image
Mechanical assembly with a downward arrow indicating force or motion (no visible text or symbols)natural_image
Close-up of a mechanical component with a circular knob and star-shaped end (no visible text or symbols)Required: 2pcs AAA battery
Unit 5 Albert Edward House, De Paviljoens
natural_image
Black VEVOR rail-mounted device with adjustable arms and mounting base (no visible text or symbols)BEHÖVER HJÄLP? KONTAKTA OSS!
① Cutter *1 STK
② Linjal *1st
③ AAA-batteri*2st
④ Reserv skärhjul
ÿ22xÿ6x6mm *1st
Drift
Rak skärning
ÿ1
natural_image
Mechanical assembly with a lever and paper plane, no visible text or symbolsnatural_image
Mechanical clamp assembly with metal railings and mounting bracket (no visible text or symbols)natural_image
Mechanical assembly diagram showing a rotating component and a clamping mechanism (no text or symbols)natural_image
Mechanical assembly with a lever and paper plate, no visible text or symbolsnatural_image
Mechanical assembly diagram showing a robotic arm with rotation arrow and mechanical bracket (no text or symbols)natural_image
Mechanical device with a lever and paper sheet, showing a downward arrow and a cross symbol (no readable text or labels)
natural_image
Mechanical assembly diagram showing a cutting tool with a labeled component (no readable text or symbols)natural_image
Mechanical device with a paper sheet being cut by a lever, showing an arrow indicating motion (no text or symbols visible)natural_image
Close-up of a mechanical tool interacting with a surface (no visible text or symbols)natural_image
Mechanical assembly with a paper holder and directional arrow indicating motion (no text or symbols)natural_image
Close-up of a mechanical component with a circular knob and star symbol (no text or symbols visible)Laserenhetsinstruktion
Required: 2pcs AAA battery
Enhet 5 Albert Edward House, The Pavilions