CSP42Pro - Saw SCHEPPACH - Free user manual and instructions
Find the device manual for free CSP42Pro SCHEPPACH in PDF.


User questions about CSP42Pro SCHEPPACH
0 question about this device. Answer the ones you know or ask your own.
Ask a new question about this device
Download the instructions for your Saw in PDF format for free! Find your manual CSP42Pro - SCHEPPACH and take your electronic device back in hand. On this page are published all the documents necessary for the use of your device. CSP42Pro by SCHEPPACH.
USER MANUAL CSP42Pro SCHEPPACH
natural_image
Black-and-white photo of a double-guard OREGON 91 chain saw with visible branding and mounting bracket (no text-heavy elements)CSP42Pro
| DE | Benzin-KettensägeOriginalbetriebsanleitung | 11 - 33 |
| GB | Petrol Chain SawTranslation of the original instruction manual | 34 - 54 |
| FR | Tronçonneuse ThermiqueTraduction des instructions d'origine | 55 - 77 |
text_image
1 2 79 134 12 14 OREGON 23 15 18 20 3 OREGON DOUBLE GUARD 91 1 2 2a 16 4 OREGON DOUBLE GUARD 91 17 10 8 2 2 24 25 2 19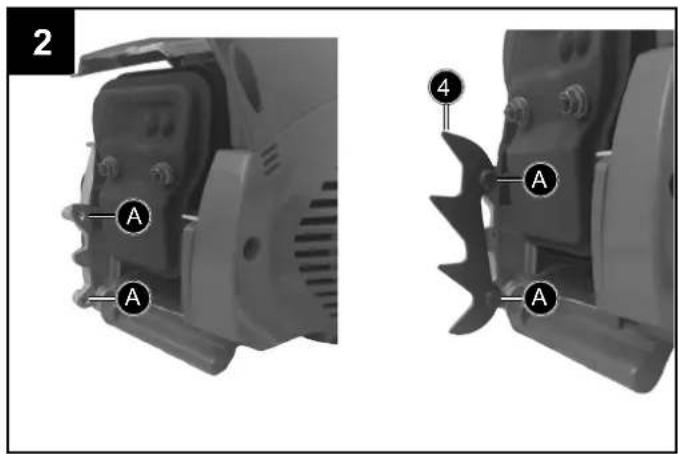
text_image
2 A A A 4 A A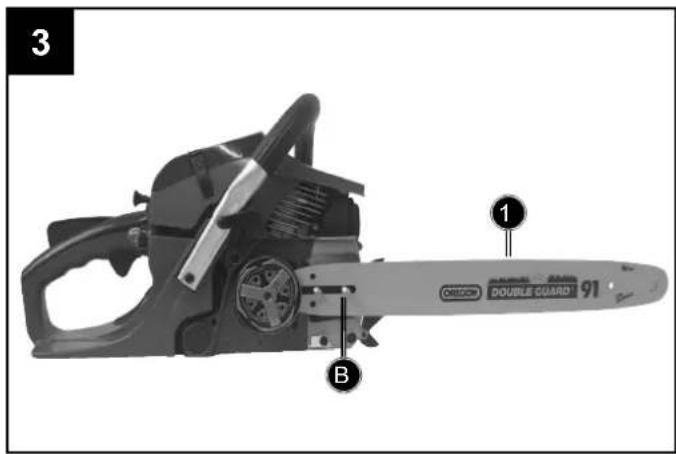
text_image
3 1 DOUBLE GUARD 91 B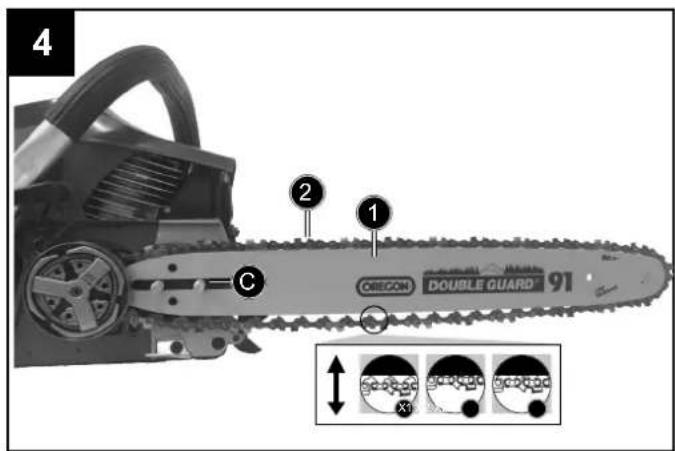
text_image
4 2 1 C ORI-CON DOUBLE GUARD 91 X3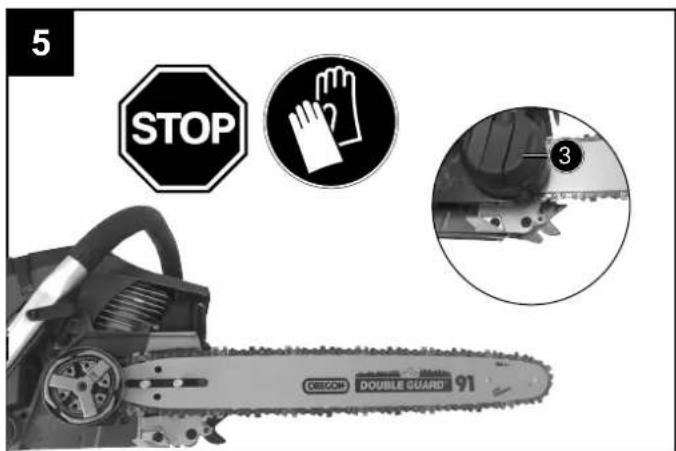
text_image
5 STOP 3 DOUBLE GUARD 91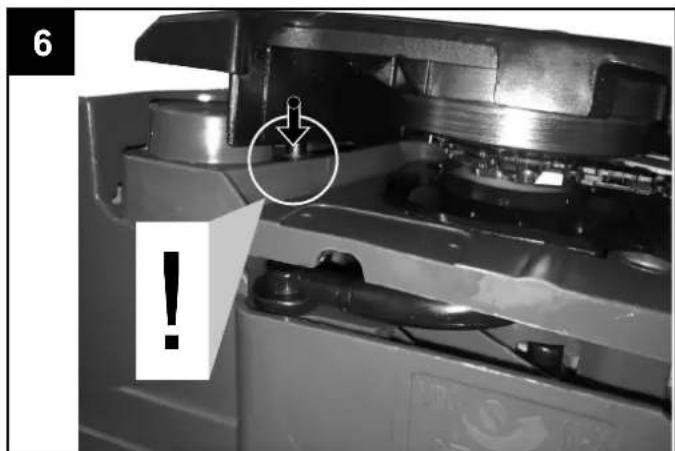
natural_image
Close-up of a mechanical device with a warning symbol and an exclamation mark, no readable text or symbols present.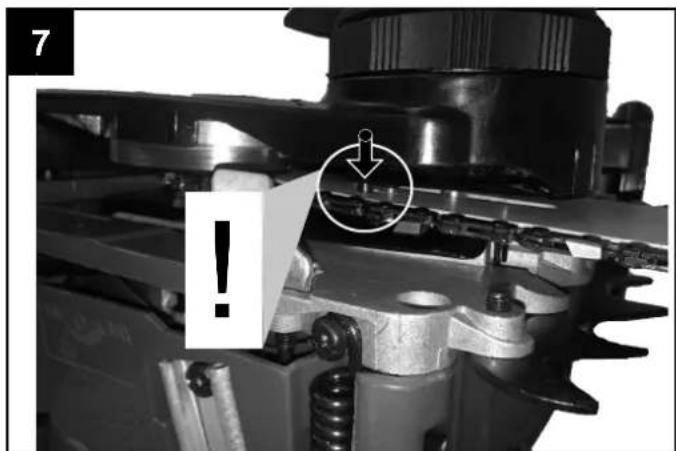
natural_image
Close-up of a mechanical assembly with a warning symbol and magnified detail (no readable text or symbols)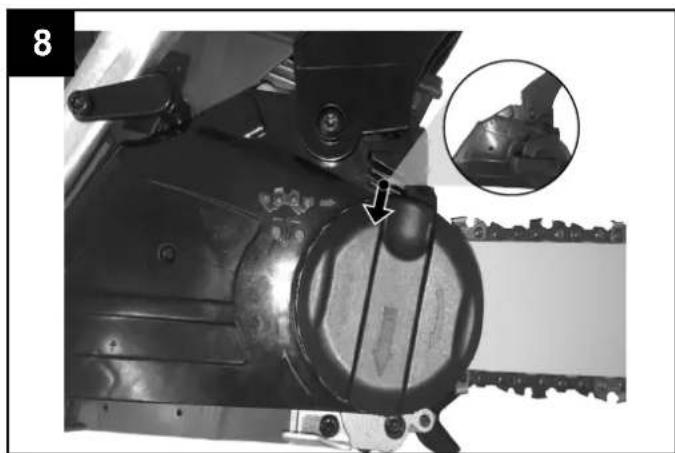
natural_image
Close-up of mechanical components with a magnified inset showing a detail (no visible text or symbols)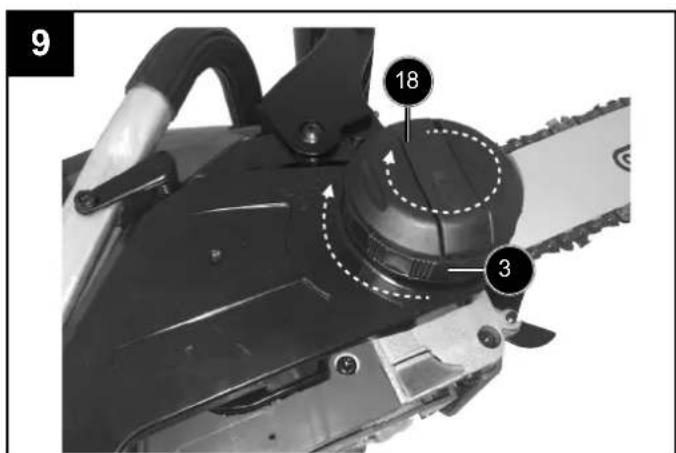
text_image
9 18 3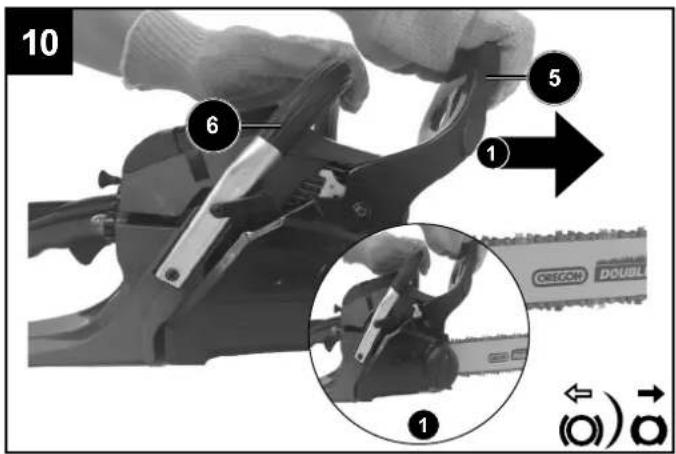
text_image
10 6 5 1 ORESCON DOUBLE ① ②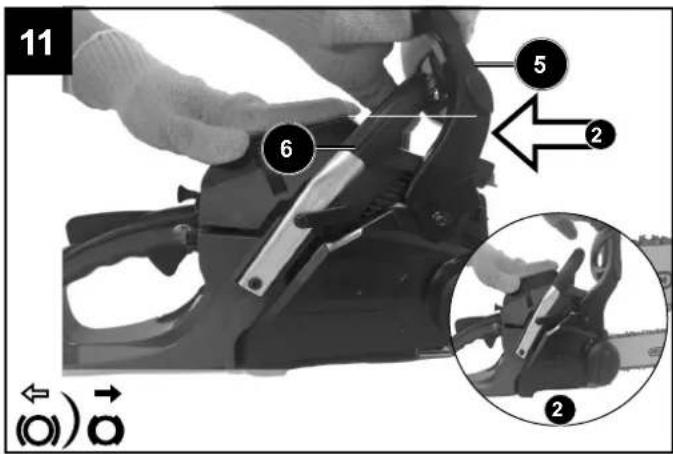
text_image
11 6 5 2 2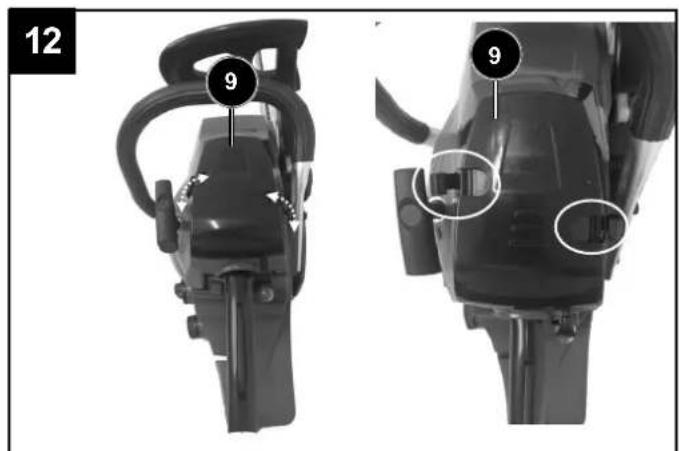
text_image
12 9 9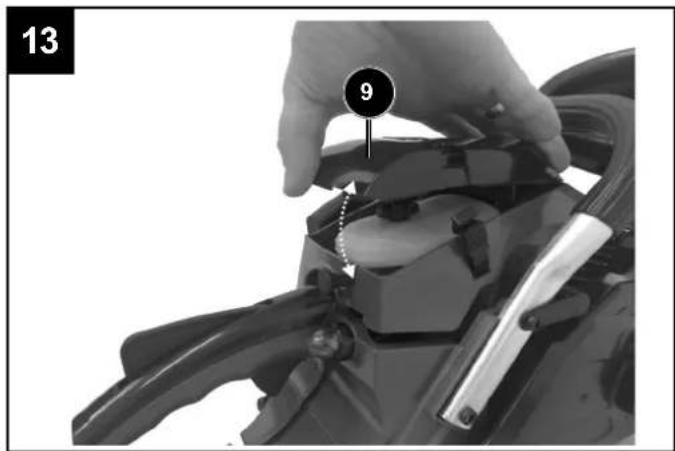
text_image
13 9
natural_image
Close-up of a mechanical device with a numbered component (9) and light path indicator, no visible text or symbols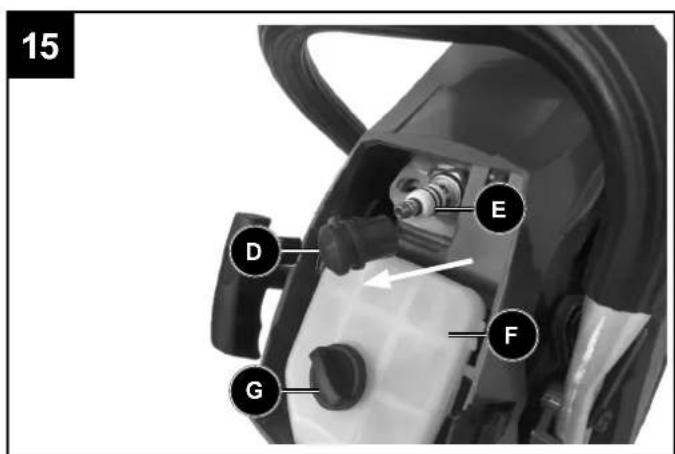
text_image
15 D E F G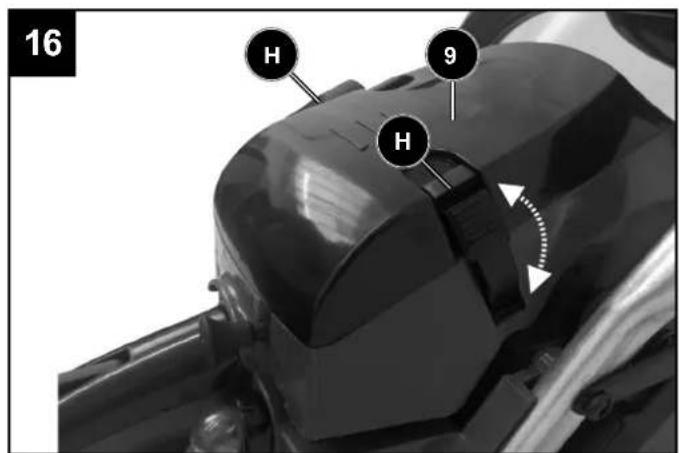
text_image
16 H 9 H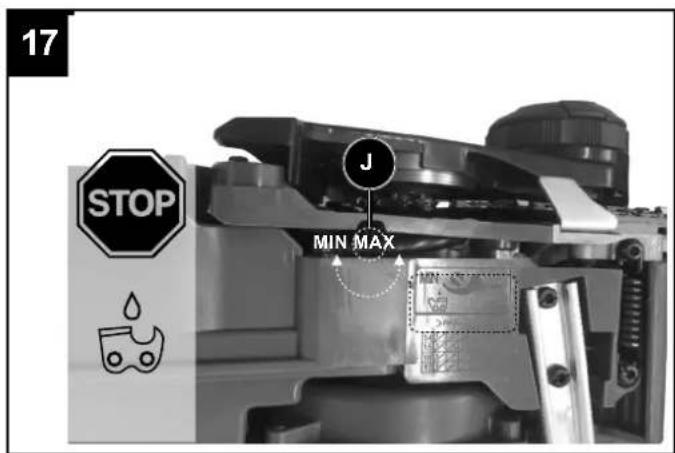
text_image
17 STOP J MIN MAX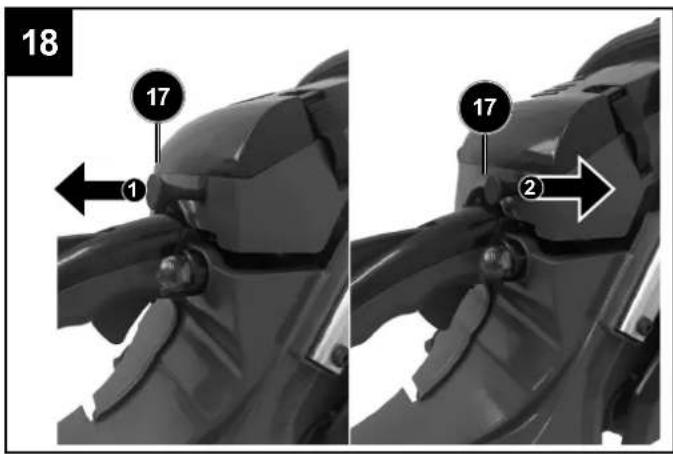
text_image
18 17 1 17 2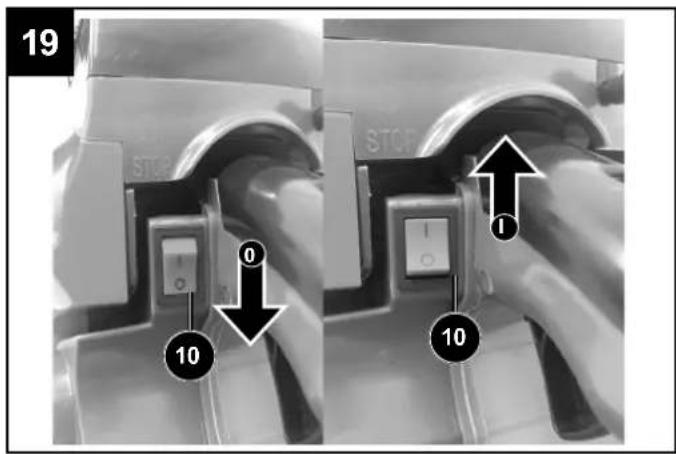
text_image
19 0 1 10 10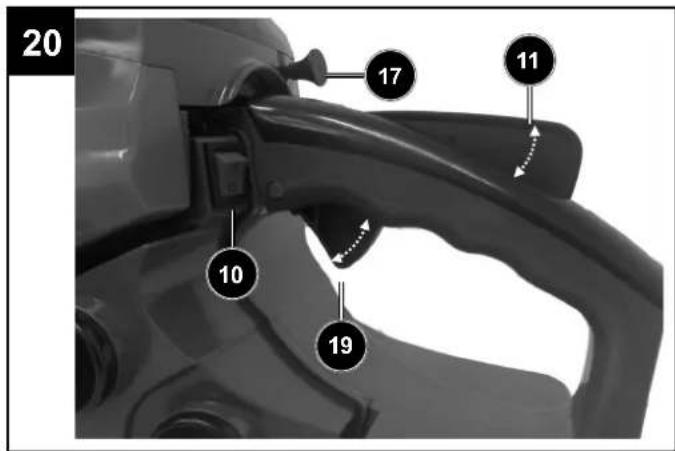
text_image
20 17 11 10 19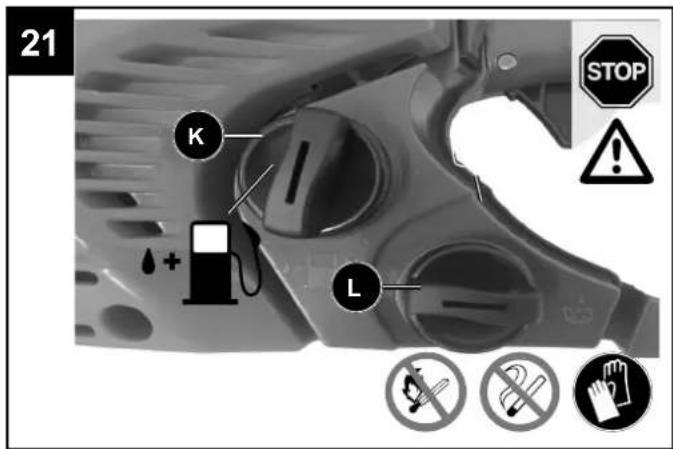
text_image
21 STOP ! K L +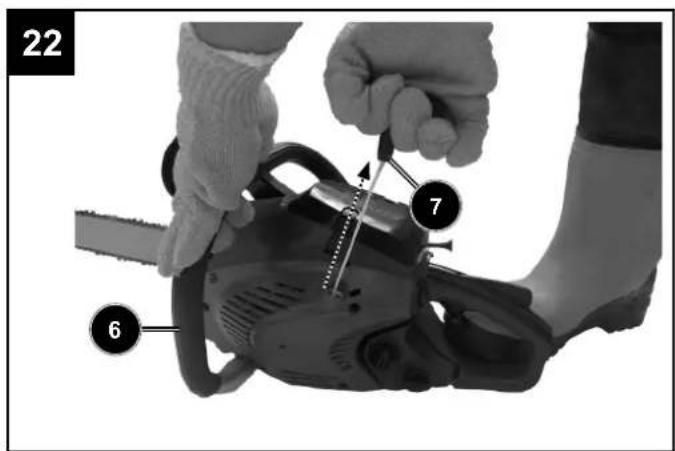
text_image
22 7 6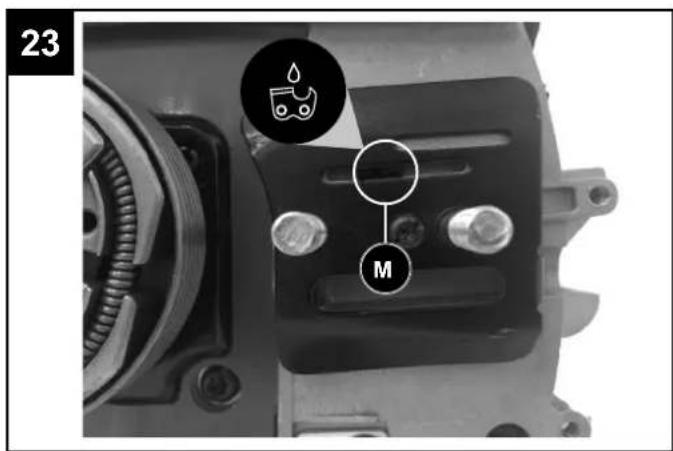
text_image
23 M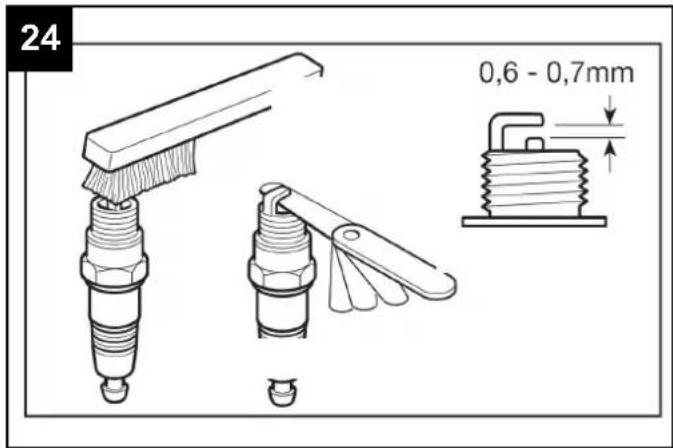
text_image
24 0,6 - 0,7mm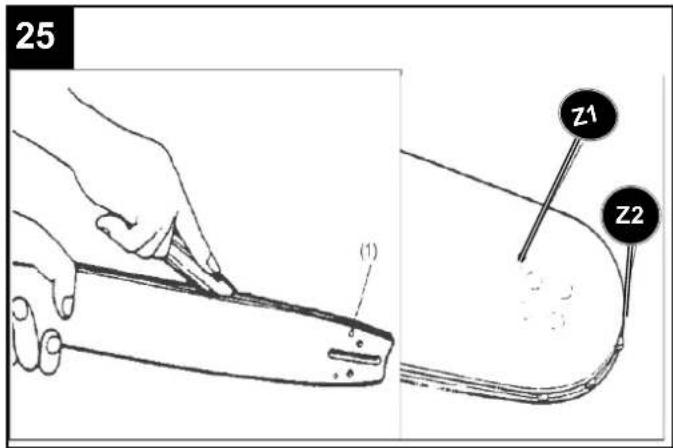
text_image
25 (1) Z1 Z2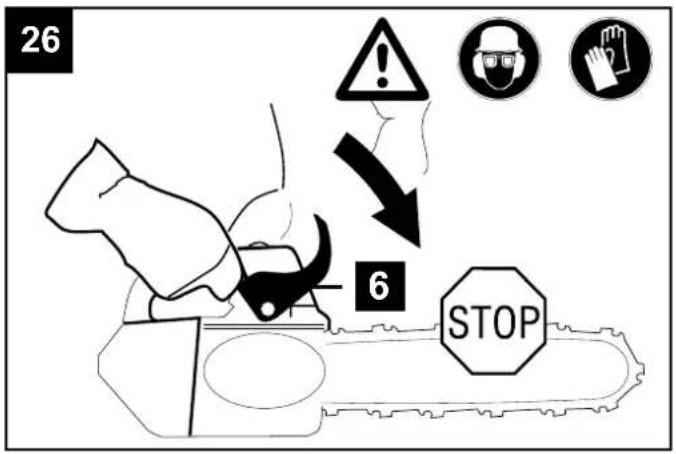
text_image
26 6 STOP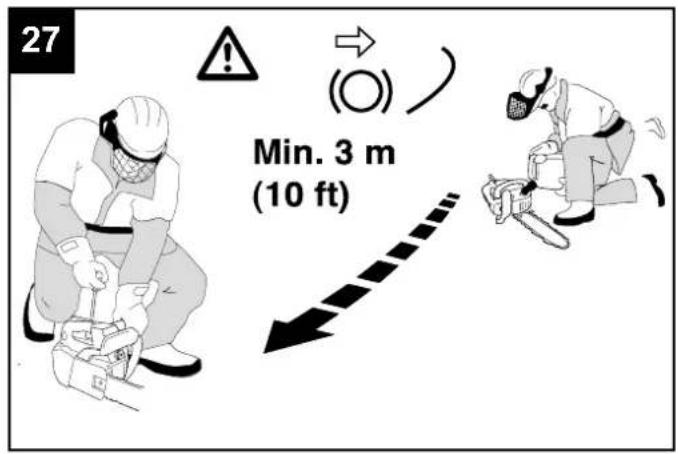
text_image
27 Min. 3 m (10 ft)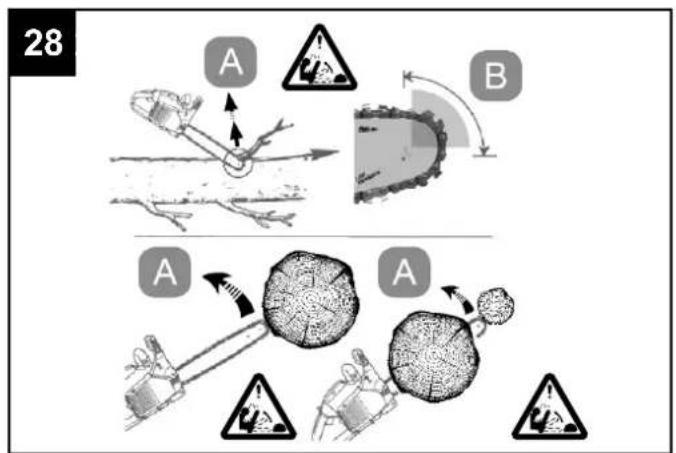
text_image
28 A B A A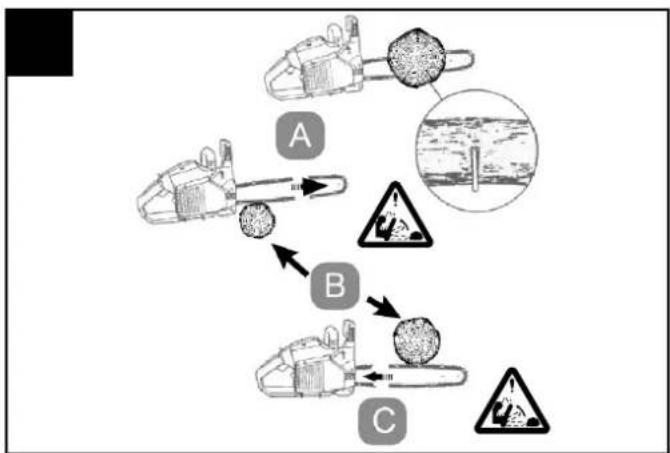
flowchart
graph TD
    A["Car Collision"] --> B["Collision"]
    B --> C["Collision"]
    C --> A
    style A fill:#f9f,stroke:#333
    style B fill:#ccf,stroke:#333
    style C fill:#cfc,stroke:#333
natural_image
Close-up of a person using a chainsaw to cut a single bar, showing blade and gear details (no text or symbols on the main subject)
text_image
30 T L H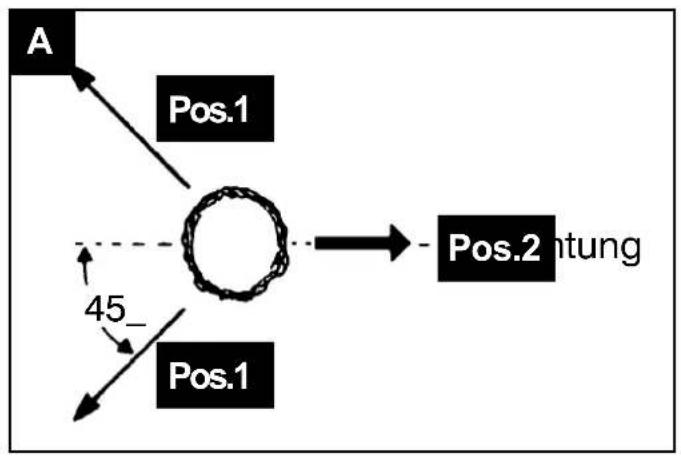
flowchart
graph TD
    A["A"] -->|Pos.1| Center((Center))
    Center -->|Pos.2| Ntung["Pos.2"]
    Center -->|45_-| A
    A -->|Pos.1| A
text_image
B Pos.1 5 cm Pos.2 Pos.3 5 cm Pos.4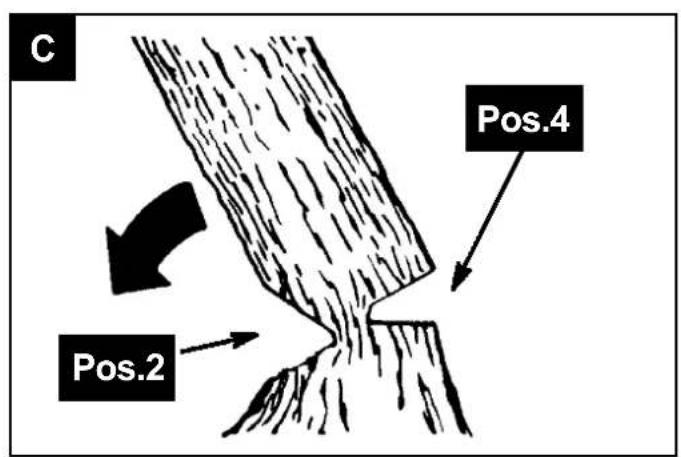
text_image
C Pos.2 Pos.4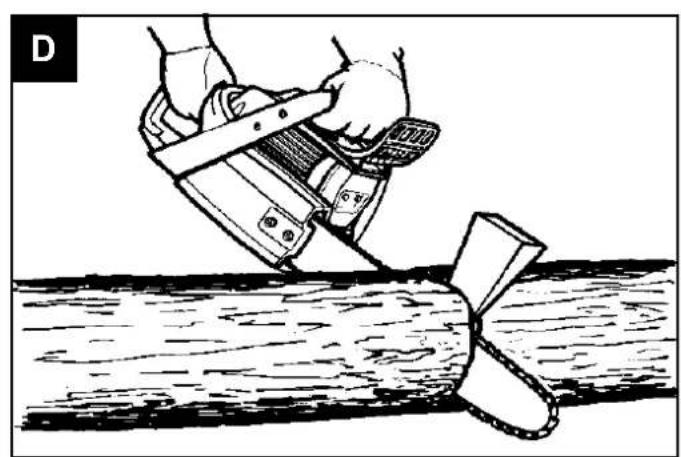
natural_image
Illustration of a person using a chainsaw to cut a wooden plank (no text or symbols present)
text_image
E: Pos.1 HittUnterschnitt Pos.2 Pos.1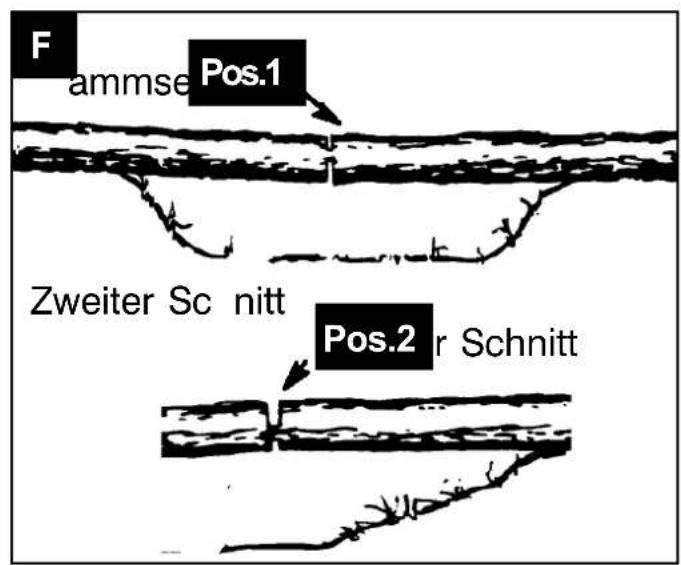
Günzburger Straße 69
D-89335 Ichenhausen
Verehrter Kunde,
Explanation of symbols
The use of symbols in this manual is intended to draw your attention to possible risks. The safety symbols and the explanations that accompany them must be perfectly understood. The warnings in themselves do not remove the risks and cannot replace correct actions for preventing accidents.
 | Read, understand and follow all warnings | |
 | Warning! Chance of kickback (kickback). Beware of a check of the chain saw and avoid contact with the tip of the bar. | |
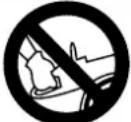 | Do not use the device with one hand | |
 | Use the device with both hands. | |
 |  | Always wear safety glasses, hearing protection and a safety helmet |
 | Read the complete user guide before using the appliance | |
 | Wear security and anti-vibration gloves when you use the device | |
 | Always wear non-skid safety shoes with cut protection when using this product | |
 | It is important you wear the protection clothing for feet, legs, hands and forearms. | |
 | Mixing Fuel filler cap | |
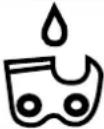 | Filling hole for chain oil. | |
 | Choke knob |
| LHT | Adjustments for carburettor:L Low Speed (It is not allowed to adjust)H High Speed (It is not allowed to adjust)T Idle Speed |
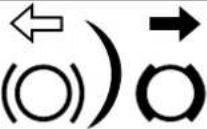 | Setting chain brake:White arrow: Chain brake inactiveBlack arrow: Chain brake active |
 | Installation direction of chain |
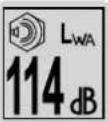 | Guaranteed sound power level of the device. |
 | Declaration of conformity (see chapter, Declaration of conformity'). Products marked with this symbol fulfill all relevant Community regulations for the European Economic Area |
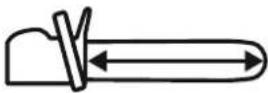 | Cutting length |
 | Weight |
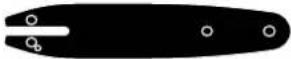 | Blade lenght |
 | Avoid contact with the blade top |
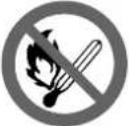 | Fire forbidden |
 | Hot surface |
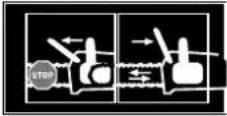 | Chain brake active / inactive |
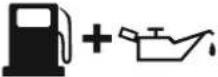 | Mixing ratio fuel - oil |
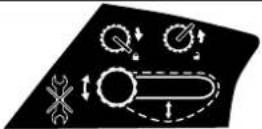 | Setting the chain tension |
Table of contents: Page:
- Introduction 37
- Device description 37
- Scope of delivery 37
- Intended use 38
- Safety notices 38
- Technical data 45
- Set up 46
- Operation 48
- Cleaning 49
- Maintenance and servicing 50
- Storage 53
- Transportation 53
- Disposal and recycling 53
- Troubleshooting 53
- Admitted saw chain and chain bar combination 54
16 Spare parts 78
17 Declaration of Conformity 79

ATTENTION!
Read the operating instruction manual carefully and follow all safety regulations before first using!
This petrol chain saw may only be operated by persons with appropriate training and risk education („participation certificate of chainsaw training course with country-typical training standard“)!
Preserve this manual carefully!
Note:
Please note that some national regulations may restrict the use of the machine.
1. Introduction
Manufacturer:
scheppach
Günzburger Straße 69
D-89335 Ichenhausen
Dear Customer,
we hope your new tool brings you much enjoyment and success.
Note:
According to the applicable product liability laws, the manufacturer of the device does not assume liability for damages to the product or damages caused by the product that occurs due to:
- Improper handling,
• Non-compliance of the operating instructions,
• Repairs by third parties, not by authorized service technicians,
• Installation and replacement of non-original spare parts,
• Application other than specified,
We recommend:
Read through the complete text in the operating instructions before installing and commissioning the device.
The operating instructions are intended to help the user to become familiar with the machine and take advantage of its application possibilities in accordance with the recommendations. The operating instructions contain important information on how to operate the machine safely, professionally and economically, how to avoid danger, costly repairs, reduce downtimes and how to increase reliability and service life of the machine.
In addition to the safety regulations in the operating instructions, you have to meet the applicable regulations that apply for the operation of the machine in your country. Keep the operating instructions package with the machine at all times and store it in a plastic cover to protect it from dirt and moisture. Read the instruction manual each time before operating the machine and carefully follow its information. The machine can only be operated by persons who were instructed concerning the operation of the machine and who are informed about the associated dangers. The minimum age requirement must be complied with.
In addition to the safety notices contained in this operating manual and the particular instructions for your country, the generally recognised technical regulations for the operation of identical devices must be complied with.
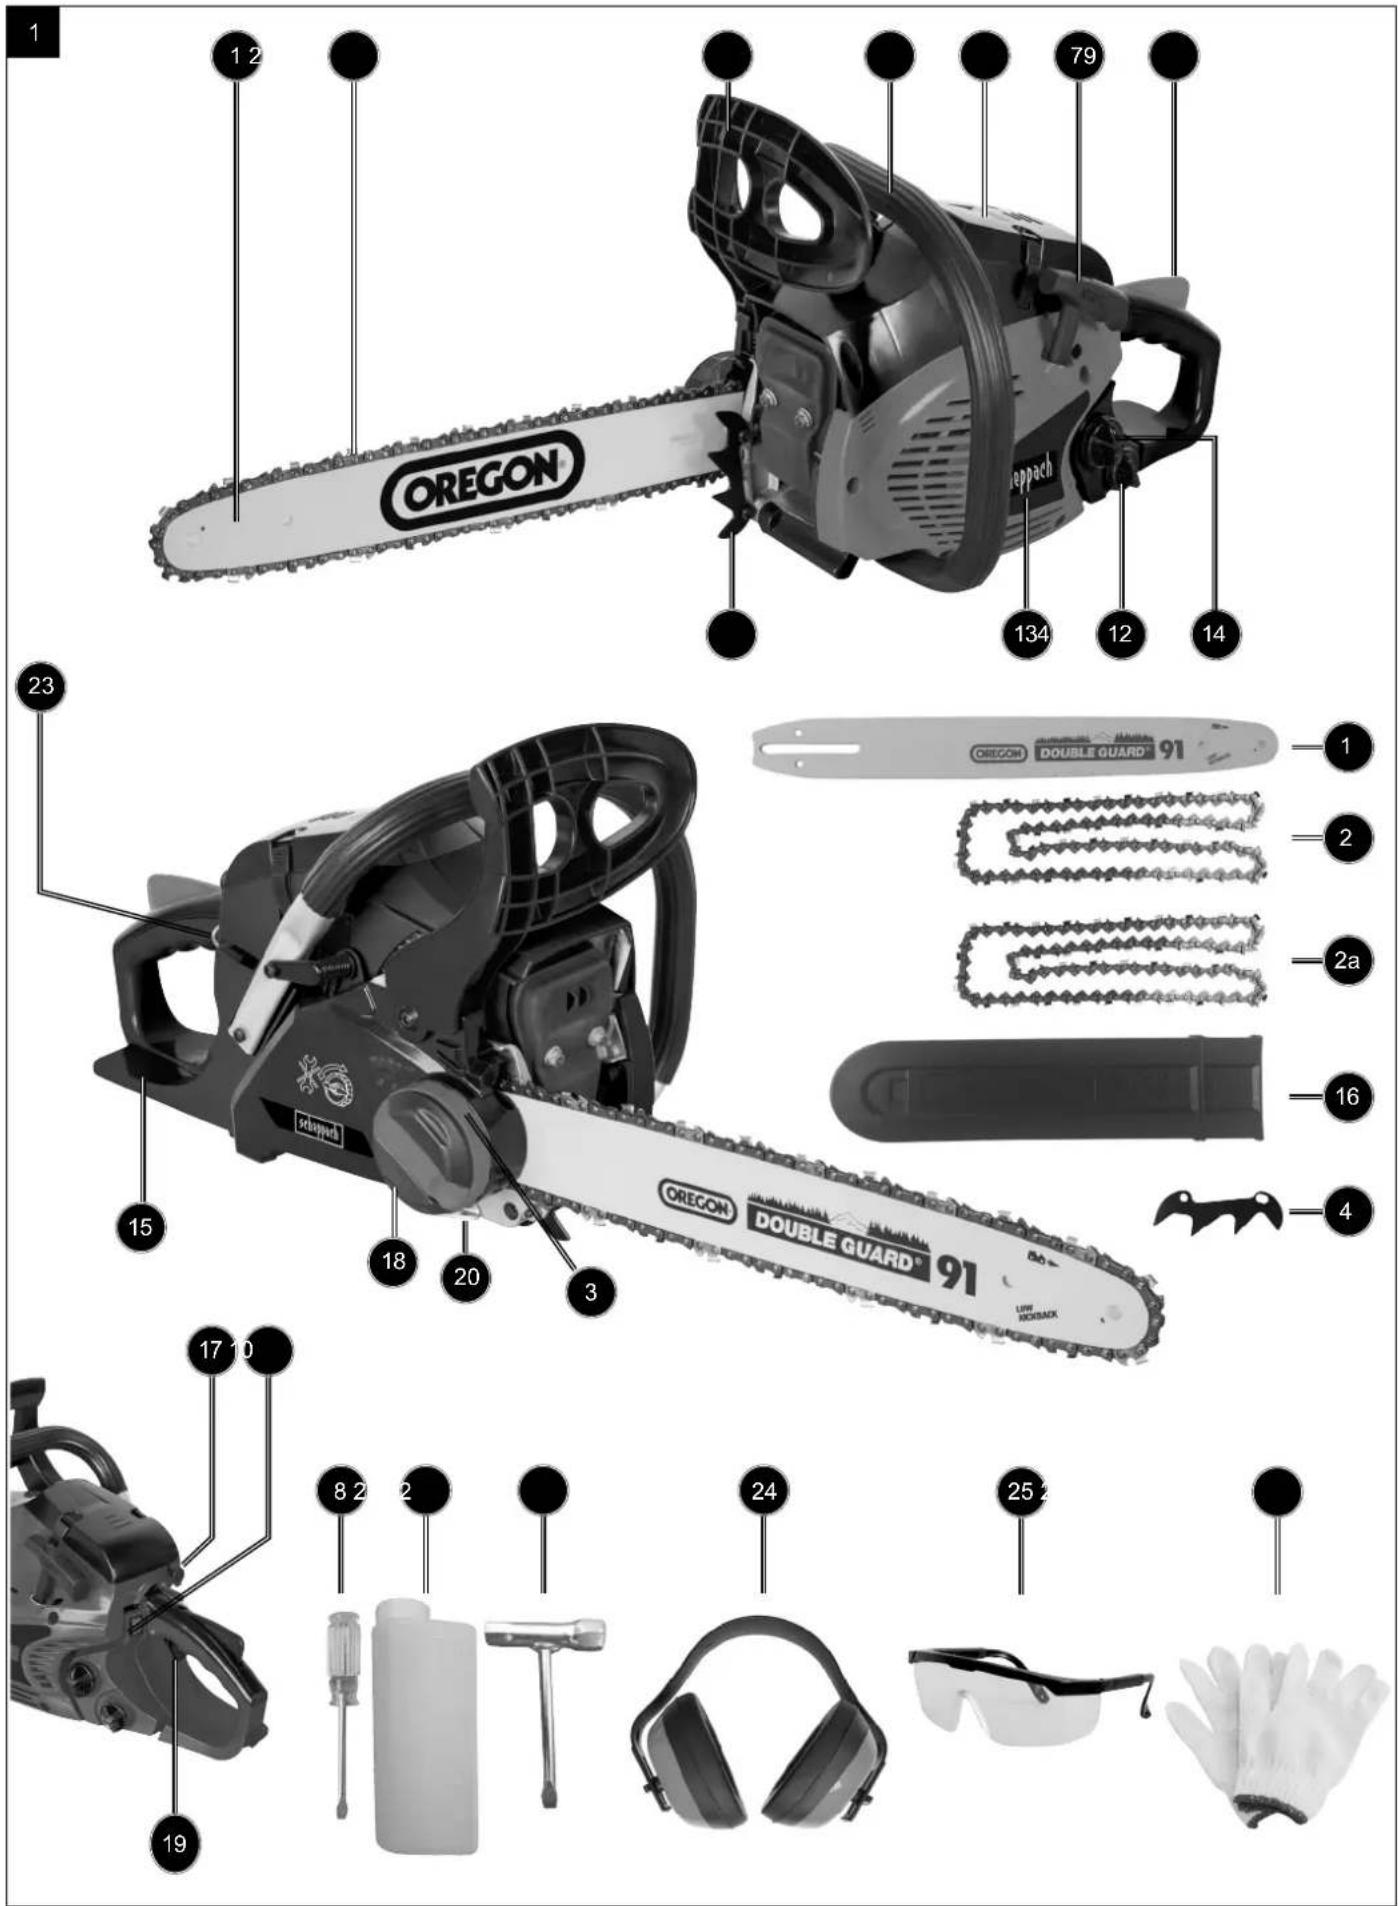
2. Device description (Fig. 1)
- Bar
- Chain Oregon, 2a Kangxin
- Tensioning wheel
- Claw Stop
- Front Hand Guard / Chain Brake Lever
- Front Handle
- Starter Handle
- Screwdriver
- Air Filter Cover
- On/Off Switch
- Throttle Lock
- Oil Tank Cap
- Fan housing
- Fuel Tank Cap
- Rear Handle
- Bar Cover
- Choke Knob
- Sword fastening knob and lever
- Throttle
- Chain Catcher Protection
- Mixing tank
- Spark plug wrench
- Fuel pump
24 Hearing protection
25 Safety glasses
26 Gloves
3. Scope of delivery (Fig. 1)
- Chainsaw
- Manual
- spark plug wrench
- Bar Cover
- screwdriver
- Fuel mixing container
- Hearing protection, safety glasses, gloves, spare chain
- Open the packaging and remove the device carefully.
- Remove the packaging material as well as the packaging and transport bracing (if available).
- Check that the delivery is complete.
- Check the device and accessory parts for transport damage.
- If possible, store the packaging until the warranty period has expired.
⚠ Attention!
The device and packaging materials are not toys! Children must not be allowed to play with plastic bags, film and small parts!
There is a risk of swallowing and suffocation!
4. Intended use
The chain is designed exclusively for sawing wood. You may only fell trees if you have received the appropriate training. The manufacturer cannot be held liable for damage caused by improper or incorrect usage.
Do not operate a chainsaw whilst working in a tree. The machine is to be used only for its prescribed purpose. Any other use is deemed to be a case of misuse. The user / operator and not the manufacturer will be liable for any damage or injuries of any kind caused as a result of this.
Please note that our equipment has not been designed for use in commercial, trade or industrial applications. Our warranty will be voided if the machine is used in commercial, trade or industrial businesses or for equivalent purposes.
The operating instructions as supplied by the manufacturer must be followed at all times to ensure that the equipment is used properly. Any use which is not expressly permitted in the manual may result in damage to the equipment and place the user in serious danger. Observe the restrictions in the safety instructions.
⚠ DANGER! Cut only wood with this chainsaw. Due to the high risk of physical injury to the user, the equipment must not be used for purposes which it was not intended. For example do not use the chainsaw for cutting plastic, masonry, or non-wood building materials. For safety reasons, the equipment is not allowed to be used as a drive unit for other tools of any kind.
Non-permitted users:
Persons who are not familiar with the operating manual, children, young people under the age of 16 as well as persons under the influence of alcohol, drugs or medication do not operate the unit.
5. Safety notices
In this user manual, we have marked sections concerning your safety with this sign: m
The user manual also contains other important text marked with the word "CAUTION!"
⚠️ CAUTION!
When using machines, safety measures must be complied with in order to prevent injury and damage. Therefore, carefully read this operating manual/these safety notices. If you hand over the machine to others, please also pass on this manual/these safety notices. We are not liable for accidents or damage caused by non-compliance with this manual and these safety notices.
DANGER
If this instruction is not complied with, there is a considerable danger to life or the risk of life-threatening injuries.
⚠ WARNING
If this instruction is not complied with, there is a danger to life or the risk of severe injuries.
⚠️ CAUTION
If this instruction is not complied with, there is a slight to medium risk of injury.
NOTICE
If this instruction is not complied with, there is a danger of damaging the motor or other objects.
5.1 General safety notices
⚠ CAUTIONI: When working with tools that use fuel, the following basic rules must be followed in order to minimise the risk of physical injury and/or damage to the machine.
Read these notices before using the saw, and store them safely.
- Do not use the saw when you are tired, ill or under the influence of alcohol and/or drugs.
- Be careful when handling fuel. Use the saw at a distance of at least 3m from the fuel filling location.
- Start cutting only when the working environment has been tidied, when you have established secure footing and planned an escape route from the falling tree.
- Before starting the chainsaw, make sure it is not in contact with any objects.
- Carry the chainsaw only when the motor has stopped running, the blade cover is on the chain bar and the exhaust is facing away from you.
- Do not start a chainsaw that is damaged, incorrectly set up or assembled incompletely or loosely. Ensure that the chainsaw stops when the chain brake is activated.
- Turn off the motor before putting the chainsaw down.
- When cutting small bushes and saplings, be particularly careful because the thin branches can become caught in the saw and be ejected towards you or unbalance you.
- When cutting a branch under tension, be aware of potential kickback when the tension is suddenly released.
- Ensure that handles are dry, clean and free from oil or fuel.
- Do not cut trees with this chainsaw unless you have the relevant training.
- The overall maintenance of this chainsaw, apart
from the points specified in this manual and these maintenance instructions, must be carried out by an authorised customer service.
- For transport and storage of the chainsaw, fit the blade cover to the chain bar.
- Do not work with the chainsaw next to or in the presence of flammable liquids or gases, neither indoors nor outdoors. There is a risk of explosion and/or fire.
- Do not fill with fuel, oil or lubricant when the chainsaw is running.
- Only cut suitable material: Only cut timber. Do not use the chainsaw for work for which it is not suitable. Do not use the chainsaw for cutting plastic, masonry or building materials which are not made of wood, for example.
- The power tool produces poisonous exhaust fumes as soon as the motor starts. Never work in closed or badly-ventilated rooms.
- In order to locate significant damage or faults, it is necessary to inspect the machine before use and in case you drop it.
- If liquid is spilled when filling the oil or fuel tank, the machine must be cleaned before use.
As a chainsaw user, you must follow several points in order to carry out your sawing work without accidents and injuries.
- A basic understanding of kickback can reduce or exclude the element of surprise. Sudden rash reactions can lead to accidents.
- When the motor is running, hold on to the saw tightly with both hands, with the right hand on the handle at the back and the left hand on the handle at the front. Thumbs and fingers must firmly clasp the chainsaw's handles. A secure hold helps you to absorb kickback and keep the saw under control. Do not let go.
- Ensure that the area where you are cutting is free from obstacles. The tip of the chain bar must not come in contact with tree trunks, branches and similar when cutting with the saw.
- Use a fast motor speed.
- Do not lean too far forwards and do not cut above your shoulder height.
- Sharpen and maintain the chainsaw in accordance with the manufacturer's instructions.
- If the tool becomes jammed during cutting, it has to be turned off immediately and freed carefully. Afterwards, the machine has to be checked for damage (e.g. bent chain bar) and a test run has to be carried out.
- To cut with the chainsaw, place the stop directly on the wood to be cut. It is also recommended to use the stopper claw to cut branches of large diameter.
- The stopper claw is firmly attached to the wood before cutting with a running chainsaw. Lift the end of the chain saw with the rear handle and
guide it with the bow handle. The claw serves as a fulcrum. The transfer takes place by lightly pressing the handle. The saw can thus be easily withdrawn. Insert the claw and raise the rear handle again.
Use only admitted chan saw and chain bar combination (see chapter 15)!
The cutting equipment supplied is optimally matched to this chain saw.
When pairing of components do not match, the cutting attachment can be irreparably damaged after only a short operating time and cause injury.
NOTICE
The following information is mainly for the end user or the infrequent user. This chainsaw has been designed for occasional use by home owners, garden owners and campers, for general work such as clearing, cutting firewood etc. It is not intended for longer work. During longer work, because of vibrations, there is a risk of circulation problems in the user's hands (white-finger-syndrome). White-finger-syndrome is a vascular disease where the small blood vessels in fingers and toes contract seizure-like. The affected areas are no longer supplied with blood and therefore look very pale. Frequent use of vibrating machines can cause nerve damage in people whose circulation is compromised (e.g. smokers, people with diabetes).
If you notice unusual impairment, immediately stop the work and consult a doctor. Observe the following notices in order to reduce risks:
- Keep your body, and particularly your hands, warm in cold weather.
• Take regular breaks during which you should move your hands to promote circulation. - Ensure the lowest possible vibration of the machine by regularly maintaining it and keeping components tight.
1.
5.2 Personal safety
- Never use only one hand when using the saw! Otherwise there is a risk that operating staff, helpers or onlookers may get injured. A chainsaw has been designed for use with both hands.
- Wear your Personal Protective Equipment (PPE), consisting of: Cut-resistant shoes, cut-protection trousers, hi-vis vest or jacket in signal colours, gloves and a helmet with visor and hearing protection.
- When starting the chainsaw or cutting with it, no other people should be close to you. Ensure on-lookers and animals cannot get into the working environment.
- When the motor is running, all body parts must point away from the chainsaw.
5.3 Safety notices for handling flammable fuels
- ⚠ WARNING!: Petrol is easily flammable!
- Store petrol in containers that have been designed specially for this purpose.
- Refill with petrol when you are outdoors, and do not smoke.
- Refill with petrol before starting the motor. Never remove the fuel tank filler cap or refill with petrol while the motor is running or when it is still hot.
- When fuel has been spilled, do not start the motor but remove the machine from the area of the spilled fuel and avoid all ignition sources until all petrol fumes have dispersed. Put the cap back securely on the fuel tank and on the canister.
Refuelling
- Turn off the motor before refuelling.
⚠️ CAUTION! Always open the fuel filler cap carefully so the existing pressure can be released slowly. - High temperatures are generated on the casing during work. Before refuelling, allow the machine to cool down fully.
⚠ CAUTION! If the machine has not cooled down sufficiently, the fuel could ignite during refuelling and cause severe burns. - Ensure that the tank is not overfilled. If you spill any fuel, it has to be wiped away immediately and the machine must be cleaned.
- Always close the screw plug on the fuel tank properly, so loosening is prevented from vibrations during operation.
DANGER
Never refuel the machine close to an open flame.
Special safety regulations for the use of internal combustion motors
DANGER
Internal combustion motors are a particular danger during operation and refuelling. Always read and follow the warnings. Non-compliance can lead to severe and even lethal injuries.
- Do not make any modifications to the machine.
- △ CAUTION! Risk of poisoning, Exhaust fumes, fuel and lubricants are poisonous. Exhaust fumes must not be inhaled.
- ⚠ CAUTION! Risk of burns!, Do not touch the exhaust system and the drive motor.
- Do not use the machine in unventilated rooms or easily flammable environments.
- △ Risk of explosion! Never use the machine in rooms with easily flammable substances.
- During transport, secure the tool against sliding and tilting.
-
Ensure that no fuel is spilled on the motor or the exhaust during refuelling.
-
Repairs and setting work must be carried out by authorised specialists.
- Do not touch mechanically moving or hot parts. Do not remove protective covers.
- The values specified in Technical Data under sound power level ( L_WA ) and sound pressure level ( L_PA ) are emission levels and do not necessarily represent safe working levels. As there is a connection between emission and immission levels, it cannot be used reliably to determine potentially required, additional safety measures. Factors influencing the current employee's immission level include characteristics of the working environment, other noise sources etc. such as the number of machines and other nearby processes and the time frame the user is exposed to the noise. The reliable immission level can also vary by country. However, this information will give the machine's user the opportunity to carry out a better risk assessment.
- Never put objects into the venting slots. This also applies when the machine is turned off. Non-compliance can cause injuries or damage to the machine.
- Keep the tool free from oil, dirt and other contaminants.
- Ensure that sound absorbers and air filters function properly. These parts act as flame protection in the event of misfire.
-
Turn off the motor:
-
Whenever you leave the machine
-
Before refuelling.
-
Never use the choke lever to stop the motor.
5.4 Safety functions of the chainsaw (Fig. 1)
A SAW-CHAIN WITH LOW KICKBACK (2) helps you with specially developed safety devices to reduce kickback forces so you can absorb them better.
(5) protects the left hand of the operator if it slides off the front handle when the saw is running.
THE CHAIN BRAKE (5) is a safety function to reduce injury based on kickback by stopping a running saw-chain within milliseconds. It is activated by the
CHAIN BRAKE LEVER. THE THROTTLE TRIGGER INTERLOCK (11) prevents accidental acceleration of the motor. The throttle can be activated only when the throttle trigger interlock is pressed.
THE ON/OFF SWITCH (10) immediately stops the motor when it is switched off. The stop switch must be turned to ON to start the motor (again).
THE CHAIN CATCHER (20) reduces the risk of injury if the saw-chain breaks or slips when the motor is running. The chain catcher is designed to catch a flailing chain.
NOTICE
Familiarise yourself with the saw and its components.
5.5 Warning notices for chainsaws
- When the saw is running, keep all body parts away from the saw-chain. Before starting the saw, ensure that nothing touches the saw-chain. When working with a chainsaw, a moment of carelessness can cause clothing or body parts to be caught by the saw-chain.
- Do not work with this chainsaw on a tree unless you are especially trained for this. In the event of improper use of a chainsaw on a tree, there is a risk of injury.
- When cutting a branch under tension, expect it to spring back. When the tension is released, the branch can hit the operator and/or take away control of the chainsaw.
- Be particularly careful when cutting undergrowth and young trees. Thin material can get caught in the saw-chain and be ejected in your direction or make you lose your balance.
- Carry the chainsaw by the front handle with the saw-chain not moving and the guide bar pointing backwards. During transport and storage of the chainsaw always attach the safety cover. Careful handling of the chainsaw reduces the likelihood of accidentally touching the running saw-chain.
- Follow the instructions for lubrication, chain tension and replacement of accessories. An improperly tensioned or lubricated chain can either break or increase the kickback risk.
- Keep handles dry, clean and free from oil and grease. Greasy, oily handles are slippery and cause loss of control.
Causes and prevention of kickback:
- Kickback can occur when the tip of the guide bar touches an object or when the timber bends and the saw-chain becomes caught in the cut.
- Contact with the guide bar tip can, in some cases, lead to an unexpected backwards reaction in which the guide bar is thrown up and in the direction of the operator.
- If the saw-chain becomes caught at the top of the guide bar, the guide bar can quickly kick back towards the operator.
• Each of these reactions can cause you to lose control over the saw and potentially to get severely injured. Do not exclusively trust the safety devices built into the chainsaw. As the user of a chainsaw, you should take different measures to work accident and injury free.
Kickback is the consequence of incorrect or erratic use of the machine. It can be prevented by appropriate safety measures such as described below:
- Hold the saw with both hands, ensuring thumbs and fingers clasp the handles of the chainsaw. Position your body and arms in such a way that
you can withstand kickback forces. If appropriate measures are taken, the operator can control kickback forces. Never let go of the chainsaw.
- Avoid an abnormal body posture and do not saw above shoulder height. This prevents accidental contact with the tip of the guide bar and it enables better control of the chainsaw in unexpected situations.
- Always use replacement guide bars and saw-chains specified by the manufacturer. Incorrect replacement guide bars and saw-chains can cause breaking of the chain and/or kickback. (see chapter 15)
- Follow the manufacturer's instructions concerning sharpening and maintenance of the saw-chain. Over-reduction of depth limiters increases kick-back tendency.
⚠ WARNING
Please pay attention to the following:
• Rotational recoil (Fig. 28)
- A = kickback distance / B = kickback reaction zone
- Rebound and Retraction Reactions on Impact / Blockage (Fig. 29)
- A = Drag / B = Fixed objects / C = Press
- To avoid withdrawal reactions, position the wood to be sawn against the claw stop. Use the claw stop as a fulcrum when sawing.
5.6 Safety notices for maintenance/storage
Have your machine repaired by qualified specialists and only with original spare parts. This ensures the safety of the machine.
-
Before use, always visually check the tool for wear and tear or damage. Replace worn or damaged components and bolts. Tighten all nuts, bolts and machine screws to ensure that the equipment is in a safe operating condition.
-
Regularly check the fuel system for leakage or signs of abrasion, for example from porous fuel lines, loose or missing clamps and damage to the tank or the tank lid. All faults must be resolved before use.
-
Before checking or adjusting the machine or the motor, remove the spark plug or the ignition cable, respectively, to prevent accidental start-up.
Storage
- Never store the equipment with fuel in the tank inside buildings where the fumes can come into contact with open fire or sparks.
- Before storing the chainsaw in a closed room, allow the motor to cool down.
- In order to reduce the risk of fire, keep the motor sound absorbers and fuel storage area free from organic material and excessive lubricant.
Long-term storage/packing away for winter
- If you are storing the machine long-term or for winter, remove all the fuel. Fuels are chemical compounds that change their properties when stored long-term. Removing the fuel must take place outdoors.
Do not store and use the chain saw at temperatures below 0^ C!
⚠ WARNING
Improper maintenance or non-compliance or not resolving a problem can become a hazard during operation. Only ever work with machines that have been serviced regularly and properly. This is the only way you can ensure that you can run your machine safely, economically and without problems.
Do not clean, service, adjust or repair the tool when it is running. Moving parts can cause severe injuries.
Do not use petrol or other flammable solvents to clean the machine components.
⚠ WARNING
Fumes from fuel and solvents can cause explosions.
After repairs and maintenance work, re-attach the safety devices to the machine.
Ensure the machine is operational, in particular, check the fuel system for leak-tightness.
Always clear the motor's cooling fins of contamination.
5.7 Operating instructions
⚠️ Important notices
-
Turn off the motor if the saw comes in contact with foreign objects. Check the saw and, if applicable, repair it.
-
Protect the chain from dirt and sand. Even small quantities of dirt can quickly make the chain blunt and increase the risk of kickback.
-
Start by cutting up smaller logs to practise in order to get a feel for the device, before attempting difficult tasks.
-
Activate the throttle at maximum, before starting sawing.
-
Press the casing of the chainsaw against the log when starting sawing.
-
Run the device at full throttle throughout the whole sawing process.
-
Let the saw do the work. Only use slight downwards pressure.
-
Release the throttle as soon as you have finished your work so the motor runs idle. If you let the machine run at full throttle without load, there will be unnecessary wear and tear.
-
So that you do not lose control of the device after the chain exits the wood, you should not apply any pressure to the saw towards the end of the cut.
-
Check after starting the idle setting. The cutting blade must be stationary during idling. If the cutting unit moves at idle, the idle speed must be
reduced (see "Setting the idle speed").
-
Turn off the device before putting it down.
-
If the device becomes jammed whilst cutting, it must be turned off immediately and carefully freed. Then the device should be checked for damage (e.g. bent guide bar) and then a trial run should be carried out.
-
Before carrying out the final cut, check to ensure that there are no bystanders, animals or obstacles are in the area where debris may land.
-
Branches that are tensioned must be cut from underneath in an upwards motion in order to ensure that the chainsaw does not become jammed.
-
In order to maintain full control at the moment of cutting all the way through, reduce the pressing force towards the end of the cut, without loosening your firm grip of the handles of the chainsaw. Ensure that the saw chain does not come into contact with the ground.
Kickback
- When working with the chainsaw, you may encounter a hazardous kickback.
- This kickback arises if the top area of the guide bar accidentally comes into contact with wood or another solid object.
- Before the chainsaw is guided into the cutting area, it can slip away to the side or jump up.
• (ATTENTION!: Increased risk of kickback!) - The chainsaw could be thrown or pushed towards the operator in an uncontrolled manner and with high energy (risk of injury!).
Observe the following in order to avoid kickbacks:
- Plunge work (directly plunging the tip of the bar into the wood) may only be performed by specially trained personnel!
• Always watch the tip of the bar. Take care when continuing cuts which have already been started. - Start the cut with the chainsaw running!
- Always sharpen the saw chain correctly. Pay particular attention to the depth limiter being at the correct height!
- Never cut through several branches at the same time! When removing branches, ensure that no other branch is touched.
- When cutting to length, pay attention to closely adjacent branches.
Felling trees - only with relevant training
CAUTION
Watch out for broken or dead branches which may fall down during sawing and which could cause severe injuries. Do not saw close to buildings or power lines if you do not know in which direction the felled tree will fall. Do not work at night because you can see less well, or during rain, snow and storms because the direction in which the tree will fall cannot
be anticipated.
- Plan your work with the chainsaw in advance.
- The working environment around the tree should be cleared so you have secure footing.
- The machine operator should always be positioned at a higher level in the working area because the tree will probably roll or slide down after felling.
- Watch out for broken or dead branches that may fall down and cause severe injuries.
The following conditions can influence the tree's falling direction:
• Wind direction and speed
- Leaning of the tree - The leaning direction cannot always be recognised because of uneven or sloping ground. Determine the leaning direction of the tree using a plumb line or a level.
- Branches growing (and therefore weight) only on one side
• Surrounding trees or obstacles
Look out for destroyed or decayed parts of the tree.
If the trunk is decayed, it can suddenly break and fall on you. Make sure there is sufficient space for the falling tree. Keep a distance of 212 tree lengths to the next person or other objects. The sound of the motor can drown out warning cries.
Remove dirt, stones, loose bark, nails, brackets and wire from the sawing area.
⚠ Ensure you have a free escape route (Fig. A)
Position 1: Escape route
Position 2: Falling direction of the tree
Felling of large trees - only with relevant training (from 15cm diameter)
The undercutting method is used for felling large trees. For this, a wedge is cut out from the side of the tree according to the required falling direction. After the dropping cut has been made on the other side of the tree, it will fall in the direction of the wedge cut.
NOTICE
If the tree has large prop/buttress roots, these should be removed before the wedge is cut. If the saw is used for removing the prop/buttress roots, the saw-chain should not touch the ground so the chain does not become blunt.
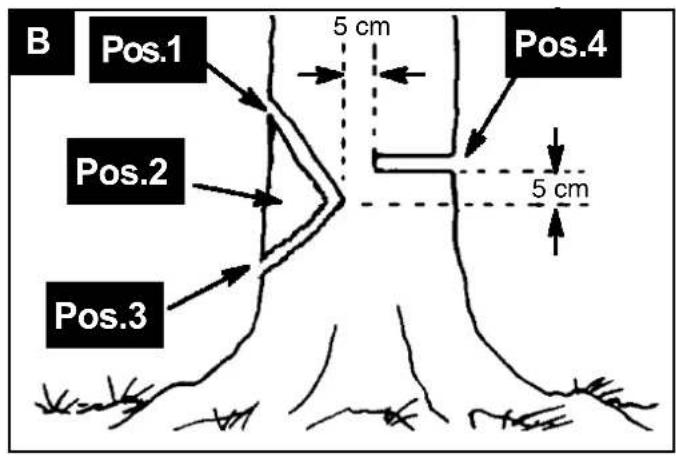
Undercut and felling the tree (Fig. B-C)
- For the undercut, first cut the upper part (Pos. 1) of the wedge (Pos. 2). Cut 1/3 of the way into the tree. Then saw the lower part (Pos. 3) of the wedge (Pos. 2). Now remove the wedge you have cut out.
- Afterwards, you can carry out the dropping cut on the opposite side of the tree (Fig. 4). For this, start about 5cm above the middle of the cut. In this way, there is enough wood between the dropping cut
(Pos. 4) and the wedge (Pos. 2) so that it functions as a hinge. This hinge is designed to guide the tree in the right direction when falling.
NOTICE
Before completing the dropping cut, if required, increase the cut using wedges to control the direction of the fall. Exclusively use wood or plastic wedges. Steel or iron wedges can cause kickback and damage to the device.
- Be aware of signs that the tree is beginning to fall: Cracking sounds, the dropping cut opening or movement in the upper branches.
- When the tree begins to fall, stop the saw, put it down and leave immediately via your escape route.
- To prevent injuries, do not cut partly felled trees with your saw. Beware especially of partly felled trees which are not supported. If a tree does not fall down completely, remove the saw and help the process along with a cable winch, a pulley or a towing vehicle.
Sawing a felled tree (log division)
The term „log division“ describes the cutting up of a felled tree into logs of the desired length.
CAUTION
Do not stand on the log you are currently cutting. The log could roll away and you may lose your footing and control of the device. Do not carry out sawing work on sloping ground.
Important notices
- Only ever saw one log or branch.
- Be careful when cutting split wood. You may be hit by sharp pieces of wood.
- Cut small logs or branches on a sawhorse. When cutting logs, no other person must hold on to the log. Do not secure the log with your leg or foot.
- Do not use the saw in areas where logs, roots and other parts of the tree are entangled. Pull the logs to a free area and cut the freed logs first.
Different cuts for log division (Fig. D)
CAUTION
If the saw is jammed in a log, do not pull it out with force. You may lose control of the device and suffer severe injuries and/or damage the saw. Stop the saw and drive a plastic or wooden wedge into the cut until the saw can be pulled out easily. Restart the saw and carefully continue with the cut. Never start the saw when it is jammed in a log.
Topping (Fig. E, Pos. 1)
Topping starts at the upper side of the log where you hold the saw against the log. Only use slight downwards pressure for topping.
Undercut (Fig. E, Pos. 2)
Start the undercut on the underside of the log and hold the top edge of the saw against the log. Only use slight upwards pressure for the undercut. Hold the saw securely to control the device. The saw will push backwards (in your direction).
CAUTION
Never hold the saw the wrong way round for an undercut. You do not have control of the device in this position. Always make the first cut on the compression side of the log. The compression side of the log is where the pressure of the log's weight is concentrated.
Log division without supports (Fig. F)
- Using topping (Pos. 1), saw 1/3 of the way into the tree.
- Turn the log around and make a second top cut (Pos. 2).
- When sawing on the compression side, make sure the saw does not get jammed. See Figure for cuts in logs on the compression side.
Log division with log or support (Fig. G-H)
- Always remember to make the first cut (Pos. 1) on the loaded side of the log.
- Cut 1/3 into the log for this.
• Make a second cut (Pos. 2).
Trimming and pruning
CAUTION
Always be careful and protect yourself from kickback. Never let the moving chain at the tip of the chain guide come in contact with other branches or objects during trimming or cutting branches. Such contact can lead to serious injuries.
CAUTION
Never climb into the tree for trimming or pruning. Do not stand on ladders, platforms etc. You could lose your balance and control of the device.
Important notices
• Work slowly and hold on to the saw with both hands. Ensure a secure standing position and balance.
- Beware of recoiling parts of the tree. Practise extreme caution when cutting small parts of the tree. Flexible material can get caught in the saw-chain and be ejected in your direction or make you lose your balance.
- Beware of recoiling parts of the tree. This particularly applies to bent or loaded branches. Avoid coming in contact with the branch or the saw when the tension on the wood is released.
- Keep your working area clear. Clear the path of branches so you do not trip over them.
Trimming
- Do not start trimming the tree before it has been felled. Only then can you carry out the trimming safely and properly.
- Leave larger branches underneath the felled tree and use them as a support while you continue working.
- Start at the foot of the felled tree and work your way up to the top. Remove smaller parts of the tree with one cut.
• Make sure that the tree is always between you and the saw. - Remove larger, supporting branches using the method from Section „Log division without support“.
- Always remove small freely suspended parts of the tree with a top cut. They may fall into the saw or trap it if you use an undercut.
Pruning (Fig. K)
CAUTION
Prune branches only at or below shoulder height. Never cut branches above shoulder height. Leave that kind of work to a professional.
- For the first cut (Pos. 1), cut 1/3 of the way into the lower part of the branch.
- Then cut all the way through the branch with the second cut (Pos. 2). The third cut (Pos. 3) is a top cut with which you separate the branch from the trunk at a distance of 2.5 to 5cm.
5.8 Remaining risks
⚠️ DANGER
Mechanical hazards
created by cutting and impact, related to the saw chain.
Electrical hazards
from contact with parts under high voltage (direct contact) or parts which have become under high voltage under faulty conditions (indirect contact).
Thermal hazards
which can result in burns, scalds and other injuries, created by possible contact of persons with objects or materials with high temperature including the radiation of heat sources.
Noise hazards
which can result in hearing losses (deafness) and other physiological disorders (e.g. loss of balance, loss of awareness), and interference with auditory signals and speech communication.
Vibration hazards
which can result in peripheral circulatory and nervous functional disturbances in the hand-arm system, such as white finger disease.
- Hazards from contact with or inhalation of harmful fluids, gases, mists, fumes and dusts related to exhaust gases.
- Hazards from unhealthy postures or excessive efforts related to machine use.
- Hazards from unexpected start-up, unexpected overrun/over-speed from failure/disorder of the control system related to failure in the handles and position of the controls.
- Hazards from failure of the control system related to handle strength, position of controls and marking.
- Hazards from break up (chain) during operation related to saw chain.
- Hazards from ejection of objects or fluids related to chip discharge and fuel spillage.
- Hazards from dropping the chain-saw while working in a tree.
Risk of injury!
Contact with the saw-chain can lead to fatal cutting injuries.
Never put your hands into the running saw-chain.
Risk of kickback!
Kickback can lead to fatal cutting injuries.
Risk of burning!
The chain and the guide bar heat up during operation.
Behaviour during an emergency
Start First Aid measures relevant to the injury and request medical help as quickly as possible. Prevent the injured person from further injury and keep him/her rested. For potentially occurring accidents, the First Aid kit, according to DIN 13164, should always be handy at the work place. Material taken from the First Aid kit must be replaced immediately. When you are requesting help, give the following information:
- Location of accident
- Type of accident
- Number of injured people
- Type of injuries
Store all safety notices and instructions for the future.
- Technical data
| Engine Capacity | 41 cm3 |
| Maximum Motor Capacity | 1,4 kW |
| Cutting Length | 37.5 cm |
| Chain bar type | Oregon 160SDEA041 |
| Bar Length | 16" (40 cm) |
| Saw chain type | Oregon 91P057X |
| Chain Division | (3/8"), 9.525 mm |
| Chain Thickness | (0.05"), 1.27 mm |
| Idle Speed | 3100 ± 300 min-1 |
| Chain Speed Max | 21 m/s |
| Maximum Speed with Cut-ting Attachment | 11000 min1 |
| Fuel Tank Capacity | 260 cm3 |
| Chain oil tank capacity | 210 cm3 |
| Anti-vibration function | yes |
| Toothing sprocket | 6 teeth x 9.525 mm |
| Chain Brake | yes |
| Coupling | yes |
| Automatic chain oiling | yes |
| Chain with low kickback | yes |
| Weight without bar and chain | 4.5 kg |
| Weight with bar and chain | 5.7 kg |
Subject to technical changes!
Wear ear-muffs.
The impact of noise can cause damage to hearing.
Keep the noise emissions and vibrations to a minimum.
- Only use appliances which are in perfect working order.
• Service and clean the appliance regularly. - Adapt your working style to suit the appliance.
- Do not overload the appliance.
- Have the appliance serviced whenever necessary.
- Switch the appliance off when it is not in use.
- Wear protective gloves.
Sound and vibrations
| Sound Pressure Level L_pA | 98,8 dB(A) |
| Uncertainty K_pA | 3 dB(A) |
| Sound Power Level L_wA | 114 dB(A) |
| Measured sound power level L_wA | 109.6 dB(A) |
| Uncertainty K_wA | 3 dB(A) |
| Vibration Front Handle a_hv | max. 6.17 m/s ^2 |
| Vibration Rear Handle a_hv | max. 5,83 m/s ^2 |
| Uncertainty K_hv | 1.5 m/s ^2 |
7. Set up
Before starting the equipment
CAUTION
Do not start the engine until the saw is fully assembled.
CAUTION
Wear protective gloves at all times when handling the chain.
Fit the chain bar
To ensure that the bar and the chain are supplied with oil, USE ONLY THE ORIGINAL BAR.
The oiling hole (Fig. 4/pos. C) must be kept clear of dirt and any build-up of residue.
- Make sure the Chain brake lever is pulled back into the DISENGAGED position (Fig. 11)
- Turn the chain tensioning wheel (Fig. 9/pos. 3) IN A COUNTER-CLOCKWISE DIRECTION until the TANG (Fig. 7) (projecting pin) is at the end of its sliding path in the direction of the clutch and gear wheel (Fig. 9).
- Fit the open end of the chain bar over the bar pins (Fig. 3/pos. B).
To install the saw chain
- Spread the chain out in a loop with the cutting edges (Fig. 4) pointing CLOCKWISE around the loop.
- Slip the chain around the sprocket behind the clutch as shown in figure 4. Make sure the links fit between the sprocket teeth.
- Guide the drive links into the groove and around the end of the bar as shown in figure 4 - 7.
NOTICE
The saw chain may droop slightly on the lower part of bar.
This is normal.
- Pull the chain bar forward until the chain is closely seated. Make sure that all the drive links are in the groove of the bar.
- Align the chain bar such that the TANG fits into the hole in the chain bar shown in figure 7.
- Align the Chain brake lever / front hand guard such that the Tang fits into the hole in the machine-case as shown in figure 6.
- Fit the Chain brake lever / front hand guard and turn the bar fastening knob & lever (Fig. 9/pos. 18) clockwise to secure it. The chain is not allowed to slip off the guide bar when you do this. Only loosely tighten the bar fastening knob & lever at this stage and then follow the instructions for adjusting the chain tension as described in the section ADJUSTING THE CHAIN TENSION.
2. If it is necessary to re-tension the chain
Adjusting the chain tension
The correct tension of the saw chain is extremely important and must be checked before starting and periodically during all sawing work. If you take time to adjust the saw chain correctly, you will be able to make better cuts and the life of the chain will be prolonged.
- Undo the bar fastening wheel (Fig. 9/pos. 18) by 1/2 of a turn COUNTERCLOCKWISE.
- Hold the tip of the chain bar upwards and turn the chain tensioning wheel (Fig. 9/pos. 3) IN A CLOCKWISE DIRECTION in order to increase the chain tension. If you turn the chain tensioning wheel IN A COUNTER-CLOCKWISE DIRECTION, the chain tension will be reduced. Check that the chain is seated around the entire chain bar (Fig. 4/pos. X3).
- After making the adjustment and with the tip of the bar still upwards, tighten the bar fastening wheel (Fig. 9/pos. 18). The chain is correctly tensioned when it is closely seated and can be pulled right around by hand, when the chain brake (5) is released.
⚠ WARNING
Wear high-strength gloves at all times when handling or adjusting the saw chain.
△ If the chain is hard to turn around the chain bar or jammed, it is too tightly tensioned. Make the following small adjustments:
-
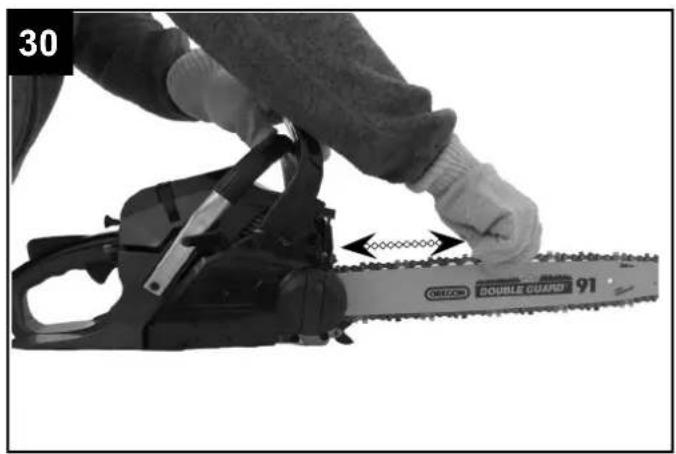
Undo the bar fastening wheel (Fig. 9/pos. 18) by 1/2 of a turn COUNTERCLOCKWISE. Then slacken the chain tension by slowly turning the chain tensioning wheel (Fig. 9/pos. 3) IN A COUNTERCLOCKWISE DIRECTION and then pull the chain back and forth on the bar (Fig. 30). Continue until the chain can be moved smoothly but is still closely seated (Fig. 4/pos. X2). Increase the tension by turning the chain tensioning wheel IN A CLOCK-WISE DIRECTION.
-
When the saw chain is correctly tensioned, hold the tip of the bar upwards and completely tighten the bar fastening wheel (Fig. 9/pos. 18).
△ A new saw chain stretches, requiring adjustment after as few as 5 cuts. This is normal with a new chain, and the interval between future adjustments will lengthen quickly.
△ If the saw chain is TOO LOOSE or TOO TAUT, the drive wheel, chain bar, chain and crank shaft bearing will suffer premature wear. Fig. 4/pos. X2 shows the correct tension (when cold) and Fig. 4/pos. X3 shows the tension (when warm). Fig. 4/pos. X1 shows a chain that is too loose.
3. Chain brake mechanical test
Your chainsaw is equipped with a chain brake that reduces the possibility of injury due to kickback. The brake is activated if pressure is applied against the brake lever when, as in the event of kickback, the operator's hand strikes the lever. When the brake is actuated, chain movement stops abruptly.
⚠ WARNING
The purpose of the chain brake is to reduce the possibility of injury due to kickback; however, it cannot provide the intended measure of protection if the saw is operated carelessly. Always test the chain brake before using your saw and periodically while on the job. (See below for details of how to perform a test of the mechanical brake).
4. To test chain brake
- The chain brake is DISENGAGED (chain can move) when the BRAKE LEVER (5) IS PULLED BACK (Fig. 11/pos. 2) AND LOCKED shown in Fig. 11.
- The chain brake is Activated (the chain is locked) when the brake lever (5) is pulled forward and the mechanism (shown in Fig. 10) can be seen. It should not be possible to move the chain (Fig. 30).
⚠ WARNING
The brake lever should snap into both positions. If strong resistance is felt, or the lever does not move into either position, do not use your saw. Take it immediately to a professional Service Centre for repair.
5. Fuel and oil – Recommended fuels
Use only a mixture of unleaded petrol and special 2-stroke engine oil. Mix the fuel mixture as indicated in the fuel mixing table.
CAUTION
Do not use a fuel mixture which has been stored for longer than 90 days.
CAUTION
Never use 2-stroke oil with a recommended mixing ratio of 1:40. The manufacturer's warranty will be voided in case of engine damage due to inadequate lubrication.
CAUTION
Only use containers designed and approved for the purpose to transport and store fuel. Pour the correct quantities of petrol and 2-stroke oil into the mixing bottle provided (see scale printed on the bottle). Then shake the bottle well.
Recommended fuels
Some conventional petrol are being blended with oxygenates such as alcohol or an ether compound to meet clean air standards. Your engine is designed to operate satisfactorily on any petrol intended for automotive use including oxygenated petrols. It is recommended to use unleaded petrol as fuel.
Lubrication of chain and chain bar
Whenever you refill the fuel tank with petrol you must also top up the level of chain oil in the chain oil tank. It is recommended to use standard chain oil.
6. Fuel mixing table
Mixing Procedure: 40 parts petrol to 1 part 2-stroke oil.
| Petrol 2-stroke oil | |
| 1 litre 25 ml | |
| 5 litres 125 ml | |
CAUTION
Never start or operate the saw unless the bar, chain and chain brake lever / front hand guard are properly installed. In addition, always start with the chain brake active. Proceed as follows for this:
- Grasp the rear grip with the right hand.
- Hold the front grip firmly with the left hand (fig. 1 / item 6) (not the chain brake lever) (fig. 1 / item 5).
- Pull on the chain brake (Fig. 10 / arrow 1).
- Fill the fuel tank with correct fuel mixture (Fig. 21/pos. K).
• Fill the oil tank with chain oil (Fig. 21/pos. L). - Be certain the chain brake is activated before starting the unit (Fig. 11/pos 5). Refer to section 8 under "Releasing the chain brake" for how to release the chain brake
Once you have filled the chain and oil tank, tighten the tank cover securely by hand. Do not use any tools to do so.
7. Idle speed adjustment
If the cutting attachment still rotates in idle speed, contact Authorized Service Centers for correct idle speed adjustment.
Note: When the engine is idling the cutting attachment must rotate under no circumstances!
8. Operation
Please note that the statutory regulations governing noise abatement may differ from one location to another.
Each time before use, check the following:
- That there are no leaks in the fuel system.
-
That the equipment is in perfect condition and that the safety devices and cutting devices are complete.
-
That all screws are securely fastened.
- That all moving parts move smoothly.
Starting the engine
(See Fig. 21 & Fig. 27)
Fill up the fuel tank with the relevant mixture of petrol and oil (Fig. 21), and also top up the chain oil (Fig. 21). See the section 'Fuel and oil'.
⚠️ CAUTION
Never start or operate the chainsaw if the chain and the chain brake lever or the front hand guard have not been properly installed. In addition, always start with the chain brake active. Proceed as follows for this:
- Hold the front handle (Fig. 1 / Item 6) (not the chain brake lever) (Fig. 1 / Item 5) with your left hand.
- Press the front handle (Fig.1/Pos.5) forward to activate the chain brake (Fig.10)
- Pull the choke (17) fully out until it locks (Fig. 18/arrow direction 1). When the engine is warm, it is not necessary to operate the choke.
- Push the primer bubble (23) 10 times (Fig. 1).
- Set the power switch (10) to position „ON“. (Fig. 19/right)
- Place the saw on a firm, level surface. Hold the saw firmly with the foot as indicated (Fig.22) Quickly pull the starter (7) multiple times and possible vertically upwards. Pay attention to the chain!
ATTENTION! Stop this process as soon as the engine of the chain saw audibly tries to start.
- Push in the choke lever as far as it will go (Fig. 18/arrow direction 2).
- Hold the saw firmly with the foot as indicated (Fig.22) Quickly pull the starter (7) multiple times and possible vertically upwards. The engine should start
- Pull the front handle (5) backwards into position 2 (Abb. 10) to release the chain brake.
- Let the engine warm up, controlling the throttle setting (10) and letting the chain run briefly.
CAUTION
Always pull the starter cable slowly (until you feel the initial resistance) before you then pull it quickly to start the engine.
Do not allow the starter cable to whip back of its own accord.
If the engine does not start up even after several attempts, read the section 'Troubleshooting'.
Always pull out the starter cable in a straight line. If it is pulled out at an angle, friction will occur on the eyelet.
As a result of this friction, the starter line will become frayed and will wear away faster. Always hold the starter cable when the starter line retracts.
Switching off the engine
Emergency Stop procedure:
To stop the engine in an emergency, activate the Chain brake lever / front hand guard (Fig. 26/pos. 5). This will immediately stop the chain. Then switch the ON/OFF (Fig. 19/left) switch to '0' Stop.
Normal procedure:
Let go of the throttle lever (Fig. 20/pos. 19) and wait until the engine has changed to idling speed. Then set the Stop switch (Fig. 19/left) to '0' Stop.
Practice all the work steps with the engine switched off before you start to use the equipment.
How to remove the chain or chain bar for replacement maintenance & cleaning
- Make sure the chain brake lever is pulled back into the Activated position (Fig. 10).
- Extend the lever on the Bar fastening knob (Fig. 9/pos. 18) & completely unscrew COUNTER-CLOCKWISE (Fig. 9).
- Then remove the complete side cover.
Complete any necessary replacement of parts, maintenance or cleaning.
(See other pages in this operating instruction guide).
9. Cleaning
CAUTION
Set the Stop switch to Stop (0) & disconnect the spark plug boot (Fig. 15/pos. D) before doing any cleaning and maintenance work!
Risk of electric shock, if the engine is running.
Carrying out any cleaning work
- The equipment should be cleaned thoroughly every time after it has been used. This applies particularly to the chain and bar.
- Keep the air vents and the motor housing free of dirt and dust as far as possible. Wipe the equipment with a clean damp cloth or blow it down with compressed air at low pressure.
- It is easiest to remove sawdust and wood chippings immediately after use.
- Clean the equipment regularly with a damp cloth and some soft soap. Do not use cleaning agents or solvents; these may be aggressive to the plastic parts in the equipment. Ensure that no water can get into the interior of the equipment.
10. Maintenance and servicing
Maintenance
CAUTION
All maintenance work on the chainsaw apart from the work described in this manual may only be carried out by authorised after-sales service personnel.
Chain brake operational test
Test the chain brake periodically to ensure proper function. Perform a chain brake test prior to initial cutting, following extensive cutting, and definitely following any Chain brake service.
Test chain brake as follows:
- Place saw on a clear, firm, flat surface.
- Start the engine.
- Grasp the rear handle with your right hand.
- With your left hand, hold the front handle (Fig. 1/pos. 6) (not chain brake lever) (Fig. 1/pos. 5) firmly.
- Squeeze the throttle trigger to 1/3 throttle, then immediately activate the chain brake lever (Fig. 10/arrow direction 1).
CAUTION
Activate the chain brake slowly and deliberately. Keep the chain from touching anything, don't let the saw tip forward.
- Chain should stop abruptly. When it does, immediately release the throttle trigger.
CAUTION
If chain does not stop, turn engine off and take your unit to the nearest Authorized Service Centre for service.
- If the chain brake functions properly, turn the engine off and return the chain brake to the DISENGAGED position.
Air Filter
NOTICE
Never operate the saw without the air filter. Dust and dirt will be drawn into the engine and damage it. Keep the air filter clean! The air filter must be cleaned or replaced after every 20 hours of service.
Maintenance and ordering of spare parts
Always switch off the equipment and disconnect the spark plug boot (Fig. 15/pos. D) before carrying out any maintenance work.
Cleaning the air filter
- Ensure the Stop switch is set to Stop (0).
-
Remove the top cover (Fig. 12/pos. 9) by removing the clips on the cover as shown in figure 12. You can then remove the cover (Fig. 13/pos. 9).
-
Disconnect the spark plug boot (Fig. 15/pos. D) from the spark plug (E) by pulling and twisting it simultaneously (Fig. 15).
- Remove the air filter fastening knob (Fig. 15/pos. G) by turning counterclockwise.
- Lift out the air filter (Fig. 15/pos. F).
- Clean the air filter. Wash the filter in clean, warm, soapy water. Rinse in clear, cool water Air dry completely before refitting. It is advisable to have a supply of spare filters.
- Insert the air filter. Turn the air filter fastening knob clockwise to secure the air filter. Refit the top cover for the engine / air filter (Fig. 16/pos. 9). Make sure that the cover fits perfectly when you do so. Tighten the clips for the cover (Fig. 16/ pos. H).
Fuel Filter
NOTICE
Never use the saw without a fuel filter. After 100 hours in operation the fuel filter should be cleaned or, in case of damage, replaced. Be sure to empty the fuel tank before changing the filter.
- Ensure the Stop switch is set to Stop (0).
- Remove the top cover & disconnect the spark plug boot.
- Remove the fuel tank cap (Fig. 21/pos. K).
- Bend a piece of soft wire.
- Reach into the fuel tank opening and hook the fuel line. Carefully pull the fuel line toward the opening until you can reach it with your fingers.
NOTICE
Do not pull hose completely out of tank.
- Lift the filter out of tank.
- Pull the filter off the fuel pipe with a twist and clean it. (If the filter is damaged, dispose of it and replace it with a new filter).
- Insert the end of the cleaned /new filter onto the fuel pipe. Place one end of the filter into the tank opening. Make sure that the filter is seated in the lower corner of the tank. If necessary, use a long screwdriver to move the filter to its correct position, taking care not to damage it in the process.
- Fill tank with fresh fuel / oil mixture. See the Section Fuel and Lubrication. Securely refit the fuel tank cap.
Spark plug (Fig. 24b)
NOTICE
To ensure that the saw's engine retains its power, the spark plug must be clean and have the correct electrode gap (0.6 mm). The spark plug must be cleaned or replaced after every 20 hours of service.
- Set the Stop switch to Stop (0).
- Remove the top cover.
- Disconnect the spark plug boot (Fig. 15/pos. D) from the spark plug (E) by pulling and twisting it simultaneously (Fig. 15).
- Remove the spark plug using the supplied spark plug wrench (Fig. 1/pos. 22). DO NOT USE ANY OTHER TOOLS.
- Clean the spark plug with a copper wire brush and refit it, or fit a new spark plug (Fig. 24). Then replace the top cover.
Carburettor and idling speed settings
Adjusting the idle speed (Fig. 31)
If the cutting device continues to run while the engine idles, you have to correct the idle speed.
- Remove the plug (T).
- Allow the engine to run warm for 3-5 minutes (no high speed).
- Turn the adjusting screw :
clockwisely
- idle speed increases (+)
counterclockwisely
- idle speed decreases (−)
Max. idle speed: 3,400 min-1
Contact the manufacturer if the cutting device still continues to run in idle mode.
Attention: Do not continue working with the hedge trimmer in such a condition.
Important: Do not make any adjustments to the L/H plug.
Carburetor setting
The carburetor has been set to its perfect adjustment at the factory. If it requires adjusting, take the saw to your nearest authorized after-sales service outlet.
NOTICE
Settings on the carburettor may only be made by authorised customer service personnel.
Chain bar maintenance (Fig. 25)
Regular lubrication of the chain bar (guide rail for the chain and teeth) is essential. The chain bar needs the maintenance described in the following section in order for the saw to work at an optimum level of performance.
NOTICE
The sprocket tip on your new saw has been pre-lubricated at the factory. Failure to lubricate the guide bar sprocket tip as explained below will result in poor performance and seizure, voiding the manufacturer's warranty.
To lubricate the sprocket tip
If the saw is used intensively it will be necessary to lubricate the guide bar sprocket tip (Z2) regularly (once a week).
To do this, first thoroughly clean the 2 mm hole at the tip of the guide bar (Z1), and then press in a small amount of multi-purpose grease.
Multi-purpose grease and grease guns are available in specialty retail trade.
NOTICE
The saw chain does not have to be removed in order to lubricate the sprocket tip of the chain bar. Lubrication is possible during work, with the engine switched off.
CAUTION
Wear heavy duty work gloves when handling the bar and chain.
Most guide bar problems can be prevented merely by keeping the chainsaw well maintained. Insufficient guide bar lubrication and operating the saw with a chain that is TOO TIGHT will contribute to rapid bar wear. To help minimize bar wear, the following guide bar maintenance procedures are recommended.
CAUTION
Always wear protective gloves during maintenance operations. Do not carry out maintenance when the engine is hot.
Turning the chain bar
The bar should be reversed every 8 working hours to ensure uniform wear. Keep the bar groove and lubrication hole clean (Fig. 25).
Check the bar rails frequently for wear and, if necessary, remove the burrs and square-up the rails using a flat file (Not supplied).
CAUTION
Never fit a new chain to a worn chain bar.
Oil passages
Oil passages on the bar should be cleaned to ensure proper lubrication of the bar and chain during operation.
NOTICE
The condition of the oil passages can be easily checked. If the passages are clear, the chain will automatically give off a spray of oil within seconds of starting the saw. Your saw is equipped with an automatic oiler system.
Automatic chain lubrication
The chainsaw is equipped with an automatic oil lubrication system with a toothed wheel drive. It automatically supplies the bar and the chain with the right quantity of oil. The moment the engine is accelerated, the oil also starts to flow through the bar plate
more quickly as well. The chain lubrication system has been set to its perfect adjustment at the factory. If it requires adjusting, take the saw to your nearest authorised after-sales service outlet.
A setting screw for adjusting the chain lubrication (Fig. 17/pos. J) is located on the underside of the chainsaw. Turning the screw counter-clockwise increases the chain lubrication, turning it clockwise decreases the chain lubrication.
To check the chain lubrication, hold the chainsaw, with the chain, over a piece of paper and run it at full speed for a few seconds. You will be able to judge the set amount of oil from the paper.
Chain maintenance
Chain sharpening
Chain sharpening requires special tools to ensure that cutters are sharpened at the correct angle and depth. For the inexperienced chainsaw user, we recommend that the saw chain be professionally sharpened by the nearest professional Service Centre. If
you feel comfortable sharpening your own saw chain, special tools are available from the professional Service Centre.
Chain sharpening
Sharpen the chain using protective gloves. After sharpening, the cutting links must all have the same width and length.
NOTICE
A sharp chain produces well-defined chips. When your chain starts to produce sawdust, it is time to sharpen.
After the blades have been sharpened 3-4 times, check the height of the depth limiter and if necessary lower it with a flat file and then round off the front corner.
Chain tension
Check the chain tension frequently and adjust as often as necessary to keep the chain snug on the bar, but loose enough to be pulled around by hand.
Breaking in a new saw chain
A new chain and bar will need chain readjustment after as few as 5 cuts. This is normal during the break-in period, and the interval between future adjustments will begin to lengthen quickly.
Chain lubrication
Always make sure the automatic oiler system is working properly. Keep the oil tank filled with Chain, Bar and Sprocket Oil.
Adequate lubrication of the bar and chain during cutting operations is essential to minimize friction with the guide bar.
| Instructions for sharpening a saw chain: | |||||
| Chainsaw type | File diameter Upper angle lower angle | Upper tilt angle (55°) | Standard depth | ||
 | 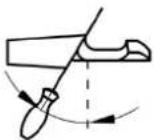 | 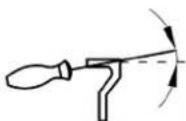 | 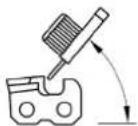 | ||
| Chucking rotation angle | Chucking inclination angle | side angle | |||
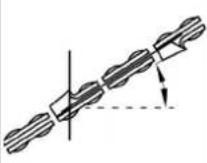 | 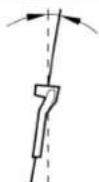 | 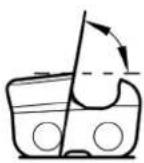 | |||
| 91P | ca. 4.0 mm | 30° | 0° | 80° | 0.64 mm |
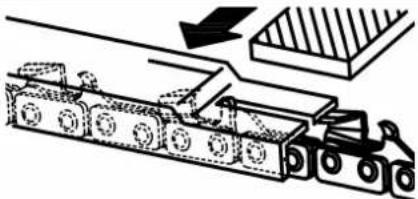 | 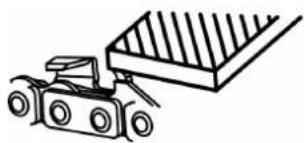 | ||||
| depth stop file | |||||
Never starve the bar and chain of lubricating oil. Running the saw dry or with too little oil will decrease cutting efficiency, shorten saw chain life, cause rapid dulling of chain, and lead to excessive wear of bar from overheating. Too little oil is evidenced by smoke or bar discolouration. Always check the oil mist on a light surface, by pointing the chainsaw towards this surface at full speed.
NOTICE
Store the equipment in a dry place and far away from possible ignition sources such as an oven, a gas-fired hot water boiler, a gas-fired dryer, etc.
Important hint in case of sending the equipment to a service station:
Due to security reasons please see to it that the equipment is sent back free of oil and gas!
Instructions for periodic maintenance
To ensure long life, prevent damage and ensure the full functioning of the safety features the following maintenance must be performed regularly. Guarantee claims can be recognized only if this work is performed regularly and properly. Failure to perform the prescribed maintenance work can lead to accidents! The user of the chain saw must not perform maintenance work which is not described in the instruction manual. All other work may only be performed by a specialist workshop.
| General Chain saw | Saw chainChain brakeGuide bar | Clean exterior, check for damage. In case of damage have repaired by a qualified service center immediately Sharpen regulary, replace in good timeHave inspected regularly at an authorized service centerTurn over to ensure even wear of bearing surfacesReplace in good time |
| Before each start Saw chain | Guide barChain lubricationChain brakeOFF switch, Safety lockingbutton, Throttle leverFuel/ oil tank cup | Inspect for damage and sharpnessCheck chain tensionCheck for damageFunctional checkFunctional checkFunctional checkCheck for tightness and leckage |
| Every day Air filter | Guide barGuide bar supportIdle speed | CleanCheck for damage, clean oil intake boreClean, in particular the oil guide grooveCheck (chain must not run) |
| Every week Fan housing | Cylinder spaceSpark plugMufflerSpark arrester screenChain catch sleeveScrews and nuts | Clean to ensure proper air coolingCleanCheck and replace if necessaryCheck tightness of mountingCleanCheck for damage, replace if necessary.Check their condition and that they are firmly secured. |
| Every 3 months Fuel filter | Fuel, oil tank | ReplaceClean |
| Storage Chain saw | Guide bar/ chainFuel, oil tankCarburretor | Clean exterior, check for damage. In case of damage, have repaired by a qualified service center immediatelyDemount, clean and oil slightlyClean the guide groove of the guide barEmpty and cleanRun empty |
11. Storage
CAUTION
Never put the equipment into storage for longer than 30 days without carrying out the following steps.
If you intend to store the equipment for longer than 30 days, it must be prepared accordingly. Otherwise the fuel still remaining in the carburettor will evaporate and leave a rubbery sediment. This can cause problems when starting up the equipment and may require expensive repairs.
- Slowly remove the fuel tank cap to release any pressure that may have formed in the tank. Carefully empty the tank of fuel.
- To remove the fuel from the carburettor, start the engine and let it run until the equipment stops.
- Leave the engine to cool (approx. 5 minutes).
- Remove the spark plug. You will need the supplied combined spark plug wrench/screwdriver.
- Add one teaspoon of 2-stroke engine oil into the combustion chamber.
- Slowly pull the starter cord several times to apply a layer of oil to all internal parts. Refit the spark plug.
Putting the equipment back into operation
- Remove the spark plug.
- Quickly tug on the starter line to remove excess oil from the combustion chamber.
- Clean the spark plug and check that the electrode gap is correct, or insert a new spark plug with the correct electrode gap.
- Prepare the equipment for operation.
- Fill the fuel tank with the relevant mixture of fuel and oil.
- Top up the chain oil in the chain oil tank.
12. Transportation
To transport the saw, empty the petrol tank. Remove coarse dirt from the saw with a bust or a hand sweep
13. Disposal and recycling
The unit is supplied in packaging to prevent its being damaged in transit. This packaging is raw material and can therefore be reused or can be returned to the raw material system. The unit and its accessories are made of various types of material, such as metal and plastic. Defective components must be disposed of as special waste. Ask about recycling in the store or in the local municipal administration!
14. Troubleshooting
The table below contains a list of fault symptoms and explains what you can do to remedy the problem if your equipment fails to work properly. If the problem still persists after working through the list, please contact your nearest service workshop.
⚠ IMPORTANT!
Hint in case of sending the equipment to a service centre: Due to safety reasons please see to it that the equipment is sent back free of oil and petrol!
Service information
Please note that the following parts of this product are subject to normal or natural wear and that the following parts are therefore also required for use as consumables.
Wear parts*: Saw chain, Guide bar, Saw chain oil, Engine oil, Spiked bumper, Chain catcher, Spark plug, air filter, fuel filter, saw chain oil filter
* Not necessarily included in the scope of delivery!
| Troubleshooting guide | ||
| Problem Probable cause Corrective Action | ||
| Unit won’t start or starts but will not run. | Incorrect starting procedures. Follow instructions in the User Manual. | |
| Incorrect carburetor mixture adjustment setting. | Have carburetor adjusted by an Authorized Service Center. | |
| Fouled spark plug. Clean / gap or replace plug. | ||
| Fuel filter plugged. Replace fuel filter. | ||
| Unit starts, but engine has low power. | Incorrect lever position on choke. Move to RUN position. | |
| Dirty air filter. Remove, clean and reinstall filter. | ||
| Incorrect carburetor mixture adjustment setting. | Have carburetor adjusted by an Authorized Service Center. | |
| Engine hesitates. | Incorrect carburetor mixture adjustment setting. | Have carburetor adjusted by an Authorized Service Center. |
| No power under load. Incorrectly | gapped spark plug. Clean / gap or replace plug. | |
| Runs erratically. | Incorrect carburetor mixture adjustment setting. | Have carburetor adjusted by an Authorized Service Center. |
| Smokes excessively. | Incorrect fuel mixture. | Use properly mixed fuel (40:1 mixture). |
| Poor performance when operated | Blunt chainLoose chain | Sharpen or replace the chainTension the chain |
| Engine dies | Empty petrol tankFuel filter in the wrong position in the tank | Fill up the petrol tankCompletely fill the petrol tank or or re-position the fuel filter in the petrol tank |
| Insufficient chain lubrication (the cutter rail and chain get hot) | Empty oil tank for the chain | Top up the oil tank for the chain |
| Oil lubrication openings moved | Clean the oil lubrication hole in the cutter barClean the groove in the cutter bar | |
15. Admitted saw chain and chain bar combination
| 16“ (40 cm) | |
| Saw chain 16“ | Oregon 91P057X |
| Guide bar 16“ | Oregon 160SDEA041 |
| Saw chain 16“ | Kangxin 3/8LP-57 |
| Guide bar 16“ | Kangxin AP16-57-507P |
| 14“ (35 cm) | |
| Saw chain 14“ | Oregon 91P053X |
| Saw chain 14“ | Oregon 91P052X |
| Guide bar 14“ | Oregon 140SDEA041 (295058) |
| Saw chain 14“ | Kangxin 3/8LP-53 |
| Guide bar 14“ | Kangxin AP14-53-507P |
Günzburger Straße 69
D-89335 Ichenhausen
CHERS CLIENTS,
text_image
Exploded view diagram of a car's internal components with numbered labels indicating parts like wheel, gear, and dashboard.CE - Declaration of Conformity
Standard references:
EN ISO 11681-1:2011; EN ISO 14982:2009
This declaration of conformity is issued under the sole responsibility of the manufacturer.