MO4NL - Induction cooktop Adventys - Free user manual and instructions
Find the device manual for free MO4NL Adventys in PDF.


User questions about MO4NL Adventys
0 question about this device. Answer the ones you know or ask your own.
Ask a new question about this device
Download the instructions for your Induction cooktop in PDF format for free! Find your manual MO4NL - Adventys and take your electronic device back in hand. On this page are published all the documents necessary for the use of your device. MO4NL by Adventys.
USER MANUAL MO4NL Adventys
Chere cliente, cher client,
Induc-NoLimit by ADVENTYS
Principe de l'induction
Induc-NoLimit by ADVENTYS
LES CAUSES POSSIBLES
QUE FAUT-IL FAIRE?
Professional induction hob MO4NL 16000 and MO4NL 32000
User and installation guide for your induction cooking appliance
HOST 2017 SMART LABEL
Dear customer,
Congratulations on purchasing this ADVENTYS product.
It has been manufactured using the most up to date techniques and with modern and safe electrical and electronic elements.
Take some time to read this user guide before you start using this appliance.
Thank you for your trust.
Summary
Technical information 25
Declaration of conformity and waste 25
How does your appliance work? 26
Installation of the product and set up. 28
Installation of the product and aeraulic 29
Electrical connections 30
How your device works 32
Pots and pans 39
How to preserve and maintain your device 39
Small breakdowns and remedies 42
Warranty 43
Meaning of the logos used. 44
Technical information
| Model: | MO4NL 16000 and MO4NL 32000 |
| Name: | Multi zone induction modular 800 |
| Materials: | Stainless steel and vitroceramic |
| Power: | 16.000W or 32.000 W |
| Electrical network: | Three-phase 360-440V, 50Hz or 60Hz |
| Current: | 24A per phase for MO4NL 16000 48A per phase for MO4NL 32000 |
| Power supply: | MO4NL 16000 : 2 power cords H07RNF5G-2.5 with 2.5mm² section each. MO4NL 32000 : 2 power cords H07RNF5G-4 with 4mm² section each. |
| Command: | Incremental encoder and 4-digit display |
| Vitroceramic dimensions: | 640 x 640 x thickness 6 mm |
| Inductor diameter | 16 inductors of respective diameters |
| Min. authorized pan diameter | 6 cm (bottom) |
Conformity and waste declaration
This product conforms to current EC directives. We certify this point in the EC declaration of conformity. If necessary, we can send you the declaration of conformity in question.
This appliance's packaging materials may be recycled. Recycle them and help protect the environment by placing them in the municipal containers provided for this purpose.
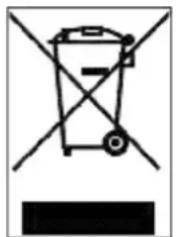
When the appliance reaches the end of its useful life, it must be destroyed in accordance with current national waste elimination and recycling regulations. We recommend contacting a specialist waste elimination company.
WARNING:
To eliminate any risks related to the destruction of the appliance, disconnect it from the mains and remove the mains cable from the appliance.
NOTE!
For the destruction of the appliance, respect the local decrees and the regulations which apply in your country or geographical zone.
How does your appliance work?
Induction principle
When the appliance is switched on, as soon as a power level is selected, the electronic circuits produce induced currents in the bottom of the container, which instantly directs the heat produced to the food.
The food is cooked with practically no energy loss and with a very high energy output.
For the attention of anyone who wears a cardiac pacemaker and active implants
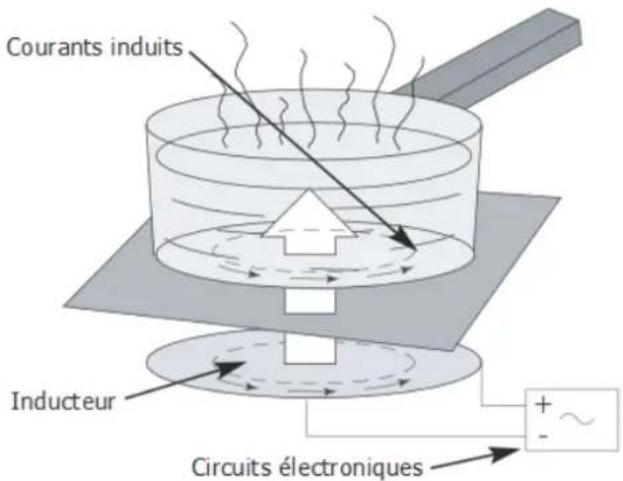
The appliance's operation conforms to current electromagnetic interference standards. Your induction cooking appliance therefore fully meets legal requirements (89/336/EEC directives). It has been designed to not disrupt the operation of other electric appliances as long as they respect these same regulations.
Your induction cooking appliance generates magnetic fields in its immediate environment. To ensure there is no interference between your cooking appliance and a cardiac pacemaker, this pacemaker must be designed according to its own regulations. In this respect, we can only guarantee you the conformity of our own product. You may contact the manufacturer of your cardiac pacemaker or your doctor for information on its conformity or any incompatibilities.

Disconnect the appliance immediately if a crack appears in the surface of the glass to prevent any risk of electric shock.
To do so, remove the fuses or activate the circuit breaker.
Do not use your appliance again until you have replaced the vitroceramic glass.
The appliance must not be used to store anything.
Make sure that the power cable of an electric appliance which is connected to a plug near the appliance is not in contact with the cooking zones.
When cooking, never use tin foil and never place any products wrapped in tin foil or any frozen products in aluminium trays directly on the appliance.
The aluminium will melt and damage your appliance beyond repair.
Do not clean your appliance with a large volume of water. Use a little domestic alcohol.
Do not use a steam cleaner.
If the power cable is damaged, it must be replaced by the manufacturer, their after sales department or someone with similar qualifications to prevent any danger.
This appliance is not intended to be used by anyone (including children) whose physical, sensory or mental capacities are impaired, or by anyone who does not have any experience or knowledge of it, unless they are monitored by someone responsible for their safety or have received instructions in how to use the appliance from them. Children must be supervised to make sure they do not play with the appliance.
When using the appliance, pay attention to any objects worn by the user such as rings, watches or similar objects which may heat up if they are placed very close to the cooking surface.
Only use containers of the type and size recommended.
Any repairs must be carried out only by people who have been trained or recommended by the manufacturer.
Make sure that the coating and surrounding areas do not contain any metal surfaces.
Your induction cooking hob is not intended to be used with an external timer or separate remote control system.
After use, switch off the power to the induction hob using its control. Do not rely on the pot sensor.
How does your appliance work?
Induc-NoLimit
by ADVENTYS
It is necessary for the user to take precautions and use personal protective equipment in case of spread of hot food. For example, prevention against the spread of hot water or hot oil or hot food of any kind. Warning to be taken into account regarding a possible slippery floor adjacent to the appliance. Caution, the appliances must be disconnected from their power supply during cleaning or maintenance
These devices are intended for use in commercial applications, e.g. in the kitchens of restaurants, canteens, hospitals and in commercial enterprises such as bakeries, butcher's shops, etc., but not for continuous mass production of food.
Installation of the product and set up
Dimensions of the multi-zone module
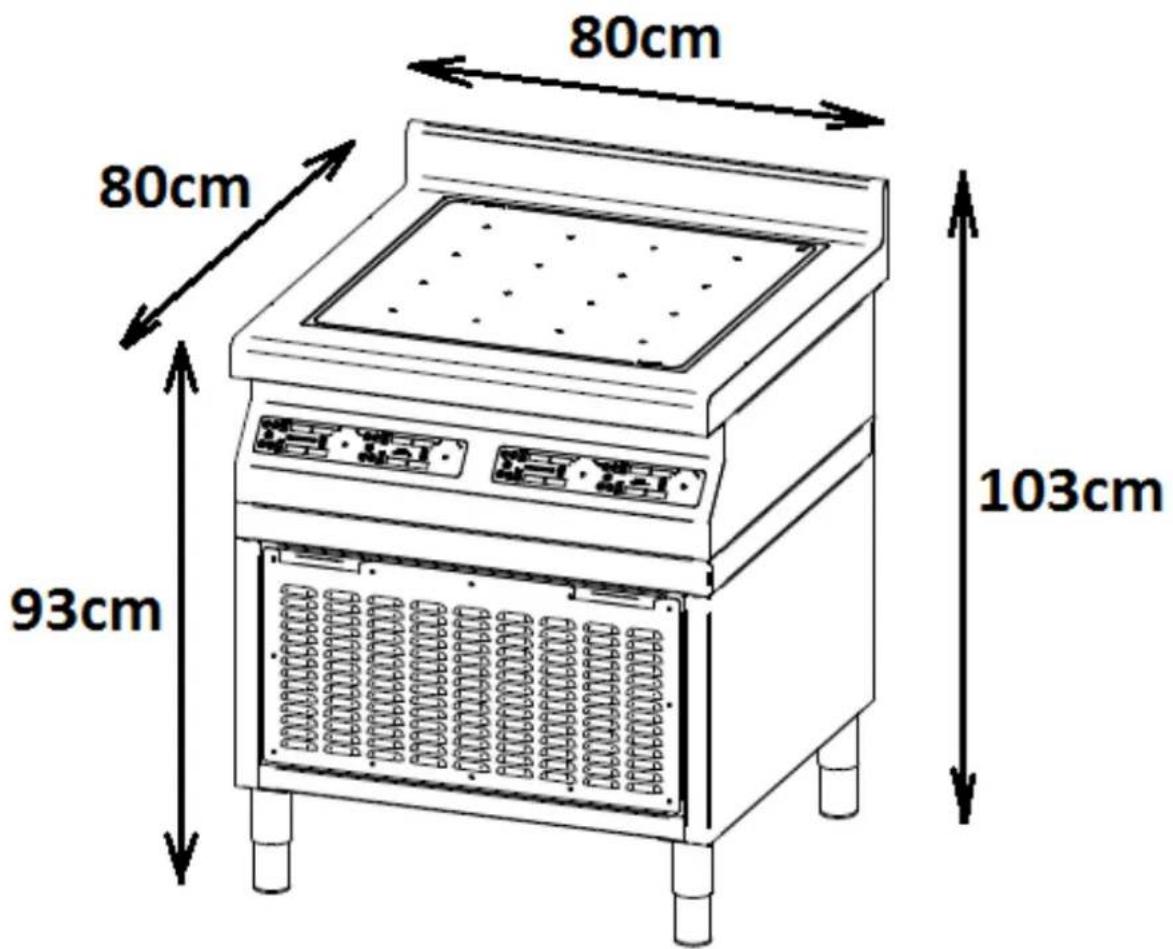
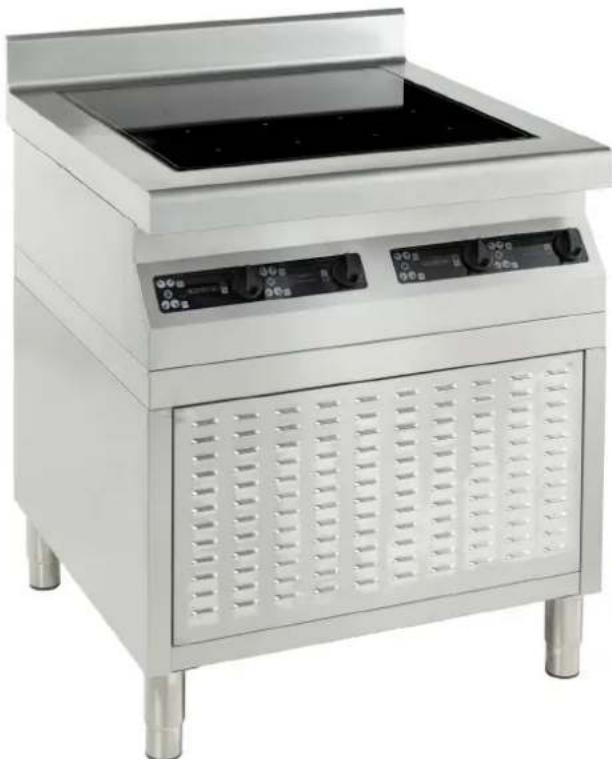
The NO LIMIT multi-zone cooking module is a modular piece of furniture to be placed on the floor on its 4 legs.
It is dimensionally designed to integrate perfectly with all the other modular products of the ADVENTYS range (HD flat, plancha and wok modules and also NO LIMIT module referenced MO2NL which has 8 inductors instead of 16).
Installation of the product and aeraulic
IMPORTANT:
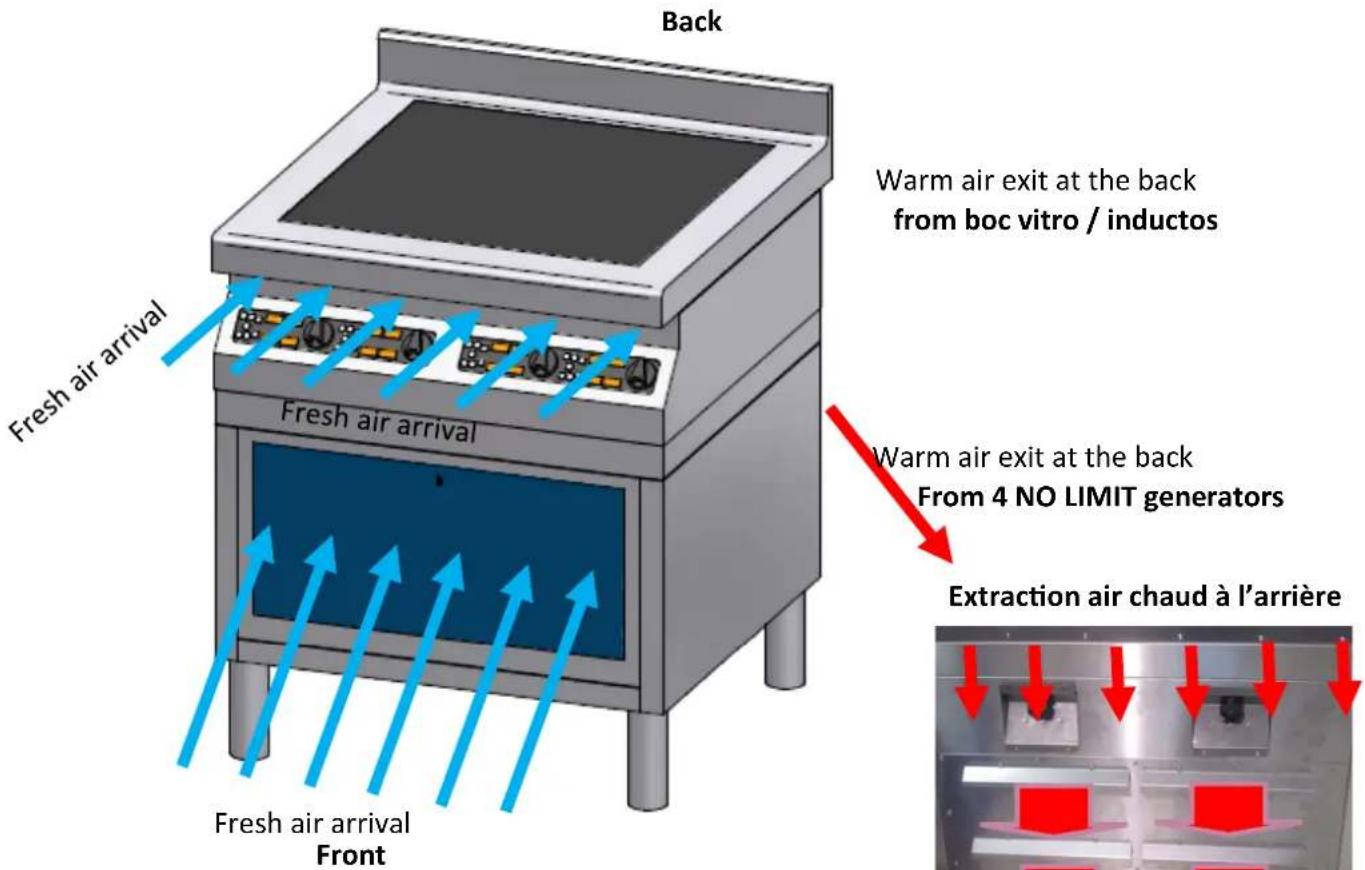
Fresh air is sucked in at the front of the MO4NL module with a flow rate of approx. 600m3/hour. The fresh air is necessary to ensure the best cooling of the electronic boards and the 16 inductors inside the cabinet.
The cabinet is equipped with several air filters. They are positioned on a plate accessible from the front of the cabinet (fresh filtered air to cool the generators) and also on the upper part above the 2 control panels (fresh filtered air for the inductors).
It is essential to position the cabinet in such a way that the hot air can be extracted from the outside of the cabinet as much as possible.
Electrical Connections
Connections and electrical connection of the furniture:
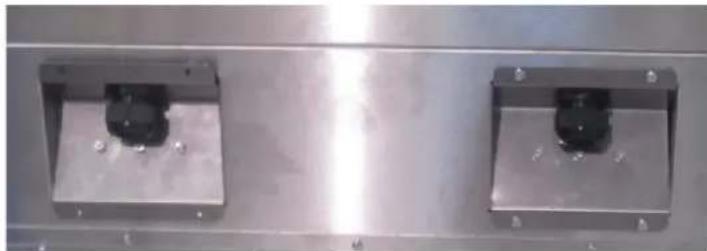
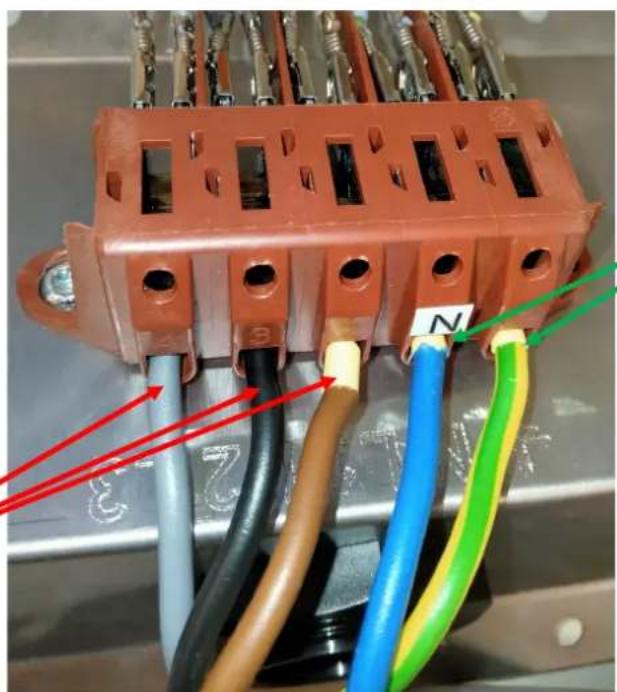
In order to connect the MO4NL cabinet to the three-phase power supply, it is necessary to access the 2 connection terminals on the 2 counter plates at the back of the cabinet.
The mains supply to be used is the three-phase mains 360-440VAC, 50Hz or 60Hz.
Each of the 2 power terminals must be connected using a power cord with the following characteristics and minimum cross-sections. It is considered that the lengths of the power cords can measure several meters:
For MO4NL 16000 = 2 cords H07RNF5G-2,5 of section 2,5mm2 each.
For MO4NL 32000 = 2 cords H07RNF5G-4 with 4mm2 section each
It is necessary to unscrew 4 fixing screws to access the terminal block present on each of the 2 counter plates.
View of the counterplates in position on the external side
Connections of the generator : Connection plate
At the rear of the generator
The generator bock must be connected to a 400V, 50 or 60Hz three-phase power supply line.
The power line must have 3 phases L1,2,3, a neutral N and an earth PE. The neutral will be used exclusively to supply an additional turbine under 230V (if connected).
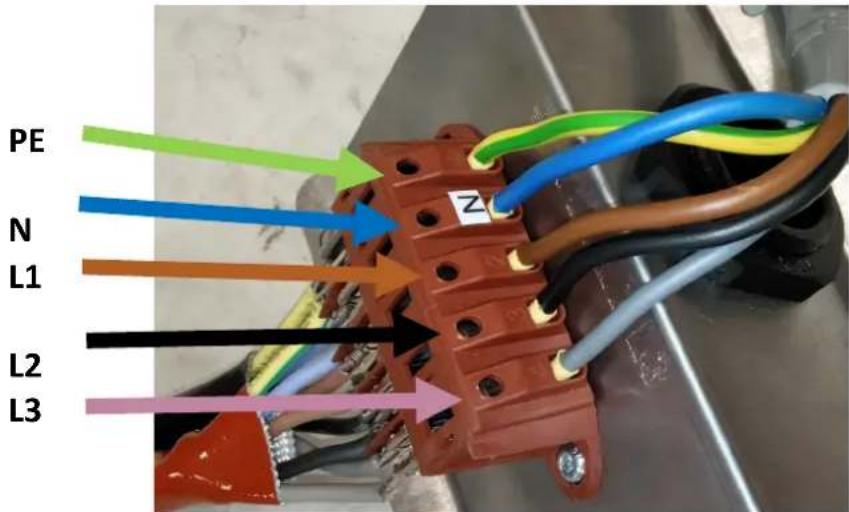
The mains supply connection is made at the rear of the generator. It is desirable that the 5 conductors be fitted with ferrules at their ends.

It is essential that the 2 supply lines used are each protected by an earth leakage circuit breaker of 30mA .
In the case of an after-sales service intervention during which 1 or more generator blocks should be disconnected from the electrical network (for replacement for example), it is necessary to provide on each of the 2 supply lines, a mains disconnection device accessible by the user and placed nearby.
It must be possible to operate the disconnecting devices manually. They must guarantee a total disconnection of the cabinet from the 3 phase conductors + the neutral conductor of each of the three-phase power lines used.
Connections of the generator: connection plate
CONNECTION TECHNIQUE
1 Insert the end of a flat screwdriver upwards. The maximum diameter of the rod must be 4mm
To be
2/Then lift the screwdriver to allow the lowering of the spring-loaded jaw of the terminal block contact.
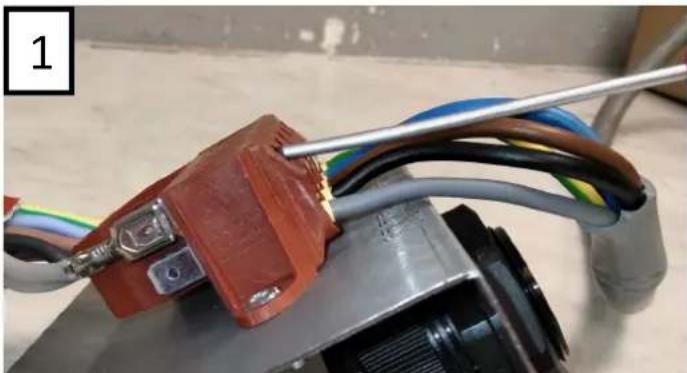
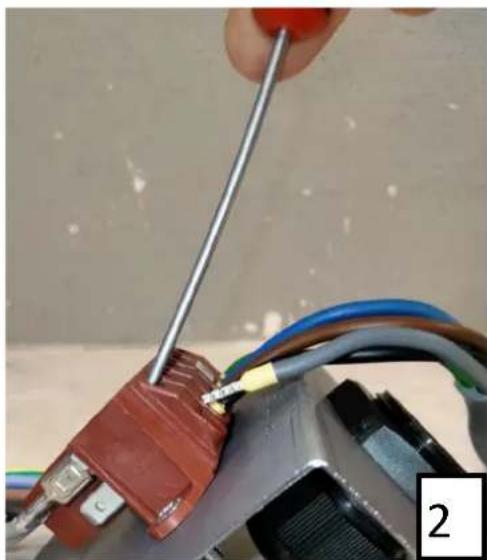

Repeat the previous steps for each wire to be connected
Be careful not to push the wire end too far into the jaw of the terminal block!!!
YES
NO
How your device works
NoLimit hob has 16 independently adjustable burners with different power and temperature settings.
Each hotplate is capable of delivering up to 1000 W (with MO4NL 16000) and 2000 W (with MO4NL
32000), and can be temperature controlled up to 250^ .
It is possible to use 16 small pans at the same time (1 small pan on each heater) with different power and/or temperature settings as desired.
It is also possible to place a larger pan (diameter >> 36 cm) on several fireplaces at the same time, by assigning an identical overall setting to each firebox. It is possible to reach
the maximum power supplied by the 4 generators equal to 16 × 1 = 16kW or 16 × 2 = 32kW if all the fireplaces are covered by small or large pans (Depending on whether MO4NL 16000 or MO4NL 32000)
Power adjustment for each of the 16 zones on 20 or 30 levels
| For each zone (1/16 de vitro) | |
| Level Power for MO4NL 16000 (W) | |
| 1 25 | |
| 2 50 | |
| 3 100 | |
| 4 150 | |
| 5 200 | |
| 6 250 | |
| 7 300 | |
| 8 350 | |
| 9 400 | |
| 10 450 | |
| 11 500 | |
| 12 550 | |
| 13 600 | |
| 14 650 | |
| 15 700 | |
| 16 750 | |
| 17 800 | |
| 18 850 | |
| 19 900 | |
| 20 1000 | |

When zones are covered simultaneously by the same pan, the maximum power set will be restored in full provided that the pan covers the set zones in a good way. This depends on the diameter of the pan used, and also on the material of which the pan is made.
| For each zone (1/16 de vitro) | |
| Level Power for MO4NL 32000(W) | |
| 1 25 | |
| 2 50 | |
| 3 100 | |
| 4 150 | |
| 5 200 | |
| 6 250 | |
| 7 300 | |
| 8 350 | |
| 9 400 | |
| 10 450 | |
| 11 500 | |
| 12 550 | |
| 13 600 | |
| 14 650 | |
| 15 700 | |
| 16 750 | |
| 17 800 | |
| 18 850 | |
| 19 900 | |
| 20 1000 | |
| 21 1100 | |
| 22 1200 | |
| 23 1300 | |
| 24 1400 | |
| 25 1500 | |
| 26 1600 | |
| 27 1700 | |
| 28 1800 | |
| 29 1900 | |
| 30 2000 | |
Temperature setting to the nearest degree for each of the 4 zones

Each zone is adjustable in temperature between 30^ and 250^ in steps of 1^ .
(!) For the optimum use of the temperature control mode, it is essential that the pot/pan covers a cross marked on the glass-ceramic, corresponding to the zone used.
Induc-NoLimit
by ADVENTYS
How your device works
The MO4NL multizone table (16000 or 32000) has 4 identical control keyboards.
Each of the control keyboards can control a 1/4 of the large table. There is the 1/4 front right, the 1/4 front left, the 1/4 back right and the 1/4 back left. The 4 keyboards are distributed under 2 glass control panels. Each keyboard controls 4 small zones
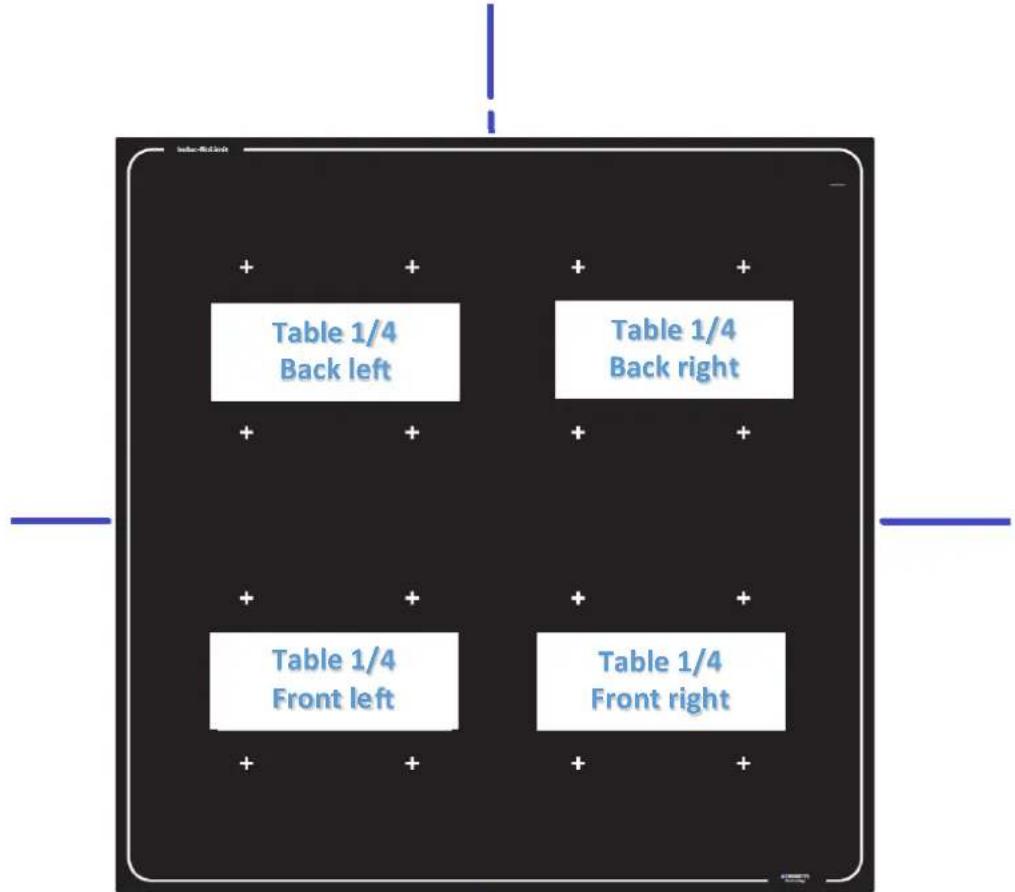

Double panel to control the 2 × 1/4 left zones (front and back)

Double panel to control the 2 × 1/4 right zones (front and back)
Induc-NoLimit
by ADVENTYS
How your device works
1 MEMORY key: memorization or call of 1 program out of 3, for all 4 zones.
3 LEDs to indicate the number-selected program.
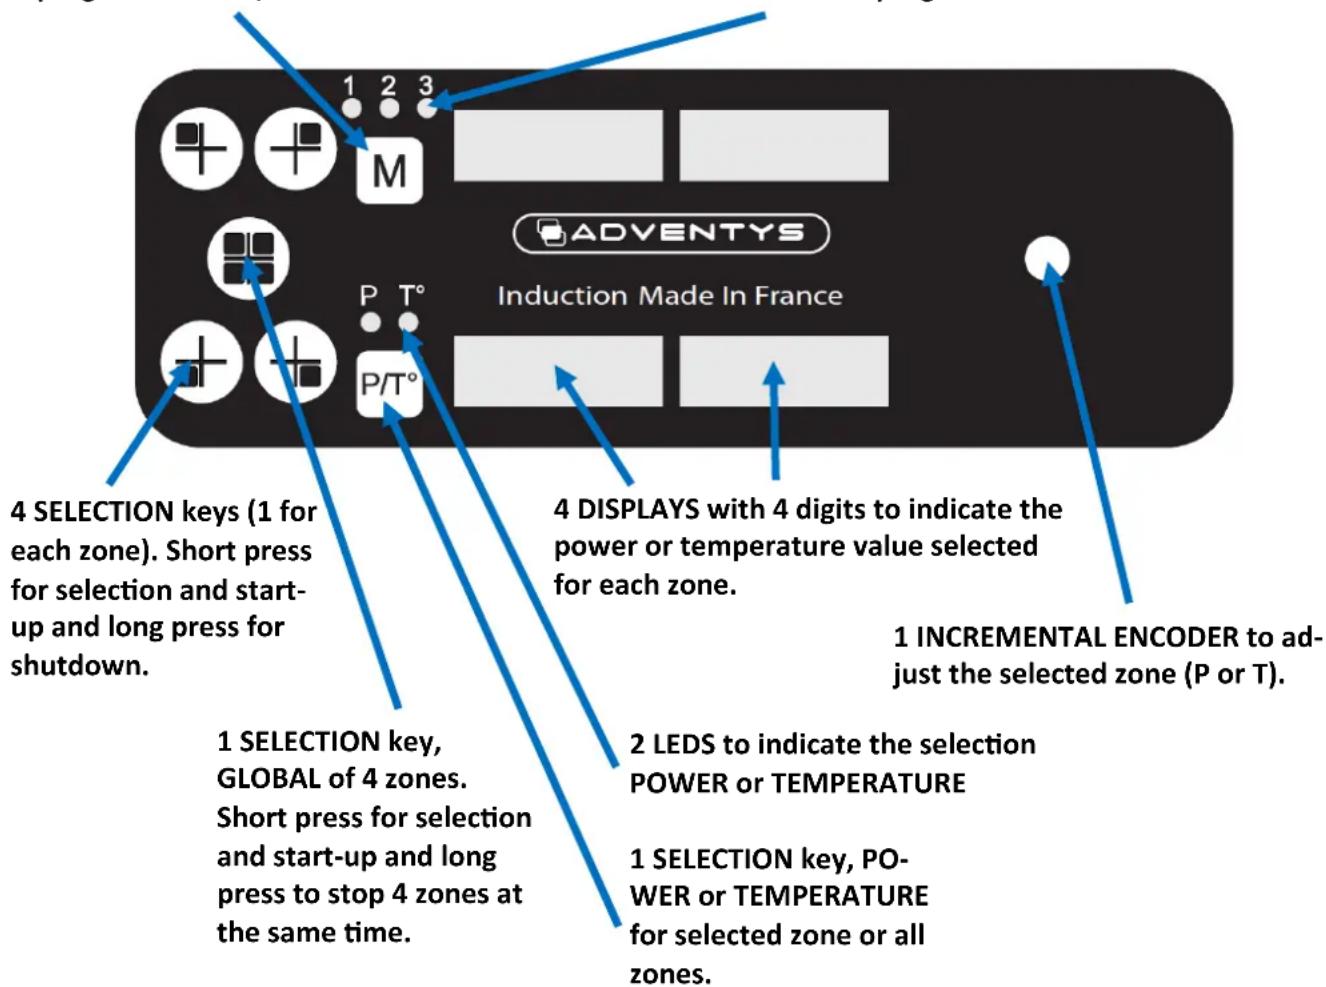
To select a zone:
Short press on the SELECTION key on selected zone(s). A light point at the bottom right of the corresponding display(s) on the zone(s) lights for 5s. This corresponds to the time during which it is possible to turn the incremental encoder to adjust the zone(s) in power or temperature (depending on the selection P / T). After 5s, the zone(s) will automatically deselect itself, the light points will go out to indicate it and the action on the incremental encoder will no longer be taken into account.
To memorize a configuration:
Set the 4 zones in the desired configuration then press the M button for 3 seconds. The 3 leds will flash, use the incremental encoder to select one of the 3 memories (1, 2 or 3). After 3 seconds without any action the led lights up in a fixed way and your configuration is saved.
To call a stored configuration:
Just press the M key and then select the configuration (1,2 or 3) you want.
To turn off a zone:
Just press the button corresponding to the zone for 3 seconds. This also works with the GLOBAL selection key of the 4 zones.
How your device works
1-
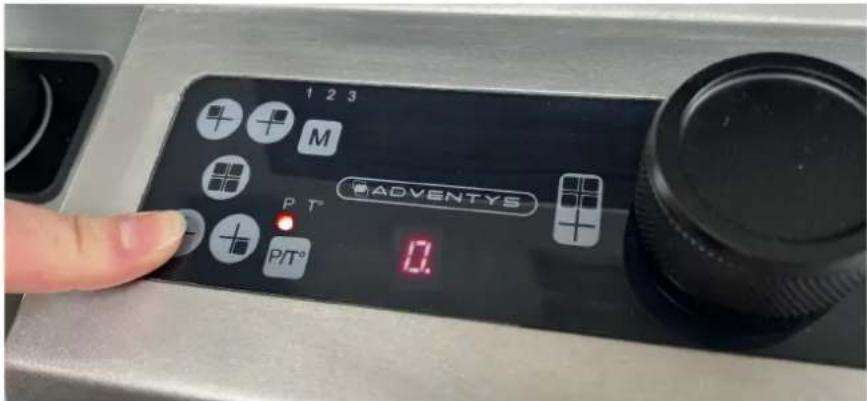
Getting started and setting an area:
Press the SELECTION key of the desired zone then use the incremental encoder to set
the desired power or temperature.
You have a delay of 5 seconds after selecting the zone to start turning the encoder.
2-

Start-up and adjustment of several zones simultaneously:
Press the SELECTION keys of the desired zones and then use the incremental encoder to adjustthe desired
power or temperature.
You have a delay of 3 seconds after selecting zones to begin turning the encoder.
3-
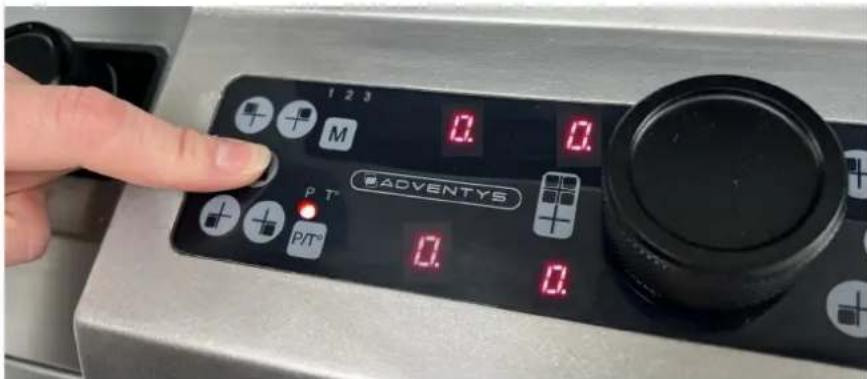
Select and adjust the 4 zones simultaneously:
Press the GLOBAL selection key of the 4 zones and then use the incremental encoder to set the desired
power or temperature which will be identical for the 4 zones.
How your device works
4-
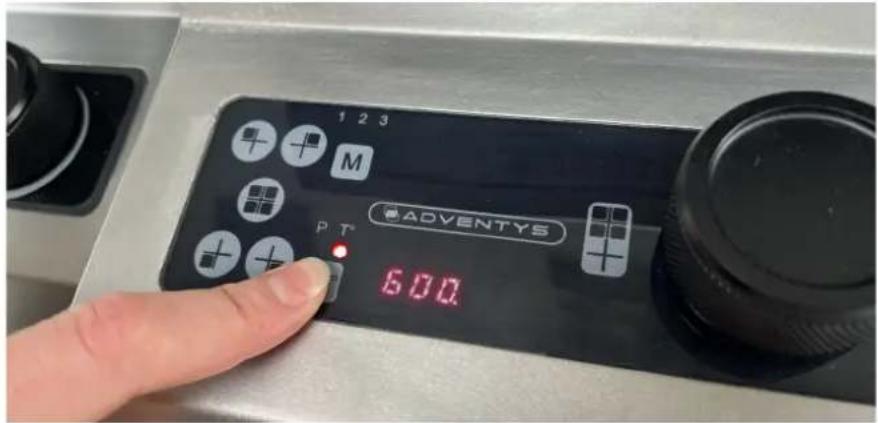
Switch to temperature setting:
Press the SELECTION key for the zone you want to adjust, then press the [P / T] key and then use the encoder to select
the desired temperature. By default the setting of a zone is made in power.
The P or T^ led indicates the current setting mode: P for power and T for temperature.
5-
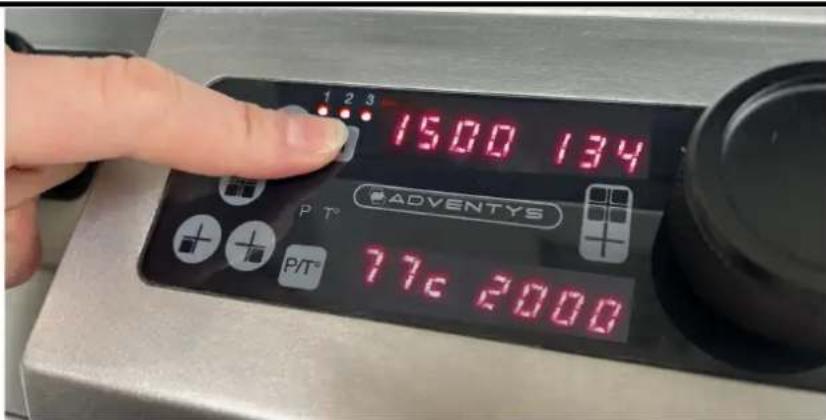
Save a configuration in memory:
Set each zone in a configuration you wish to memorize. Press the [M] key for 3 seconds until the 3 LEDs flash.
Then select with the encoder the desired memory program (1 or 2 or 3). Then, without any action on your part for 3
seconds the new configuration will be memorized.
6-
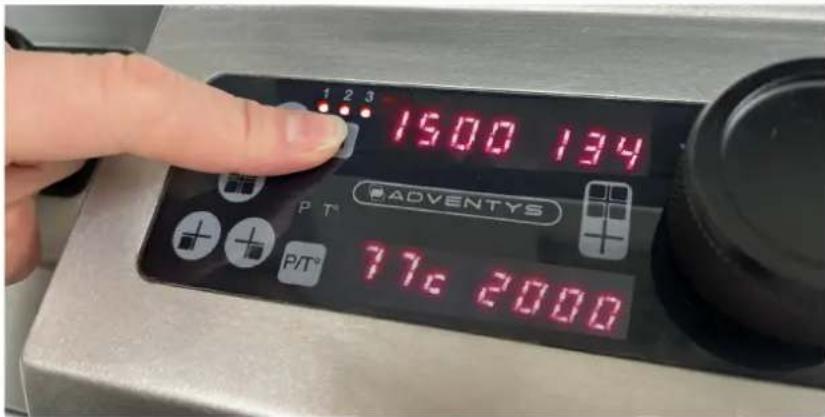
Call a stored configuration:
Press the memory button [M] briefly and select with the incremental encoder one of the 3stored programs (1or2or3).
Then, without any action on your part for 3 seconds, the settings of the stored program will be sent.
How your device works
7-
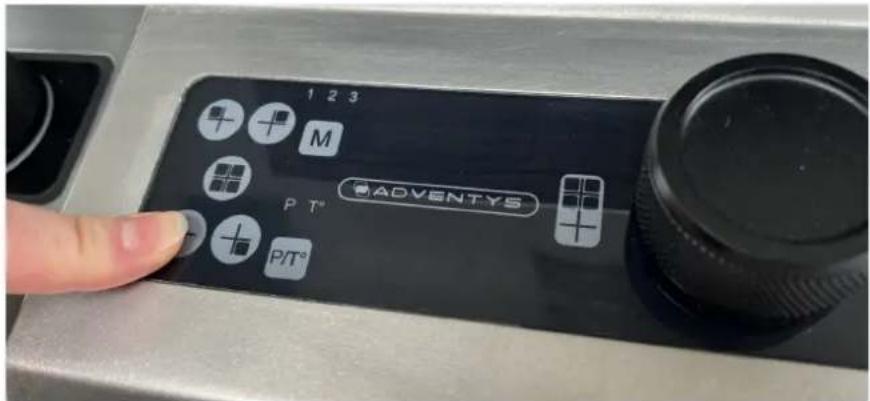
Switch off an cooking zone:
Press the SELECTION key for 3 seconds for the zone you want to turn off.
8-
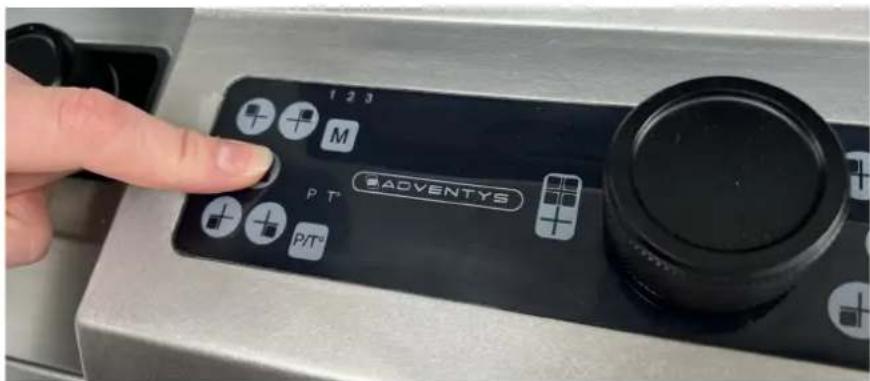
Switch off the 4 zones simultaneously:
Press for 3 seconds the GLOBAL selection key of the 4 zones.

To use your appliance at maximum power on 4 zones simultaneously, the diameter of the bottom of your pan should be at least 35~cm .
Specific message display
The device is perfectly secure. It constantly monitors temperature values and several other electrical parameters to guarantee the user the highest level of performance and safety at all times.
If during use an incorrect operating status is detected, there may be forced shutdown of the device with the indication on the power level display, a flashing error code "Fx" or " hx".
The different codes managed by the device are listed in the table below.
| ERROR DESIGNATION | CODE ON DISPLAY |
| T° vitro sensor missing or short-circuited | F1 |
| Electronic T° sensor missing or short-circuited | F2 |
| Three-phase mains voltage out of tolerance | F3 |
| Low voltage supply voltage out of tolerance | F4 |
| Room temperature sensor (internal to the product) missing or short-circuited | F5 |
| Error on control electronics of power transistors | F6 |
| Problem connecting fans (lack of fan or reverse polarity) | F8 |
| Overheating vitro H1 or H3 | |
| Overheating of electronic power circuits H2 | |
| Problem on temperature sensor under the vitro | H5 |
| Overheating of the ambient temperature H6 |
The flashing error code is displayed as long as the user has not stopped the unit himself and has not restarted a new start, by using the SELECTION / ON key of the relevant fireplace.
If an error code remains permanently displayed despite several successive acknowledgment attempts, contact the service department.
If error code F8 is displayed when the generator block is turned on, it indicates a problem with the fans.
Either there is no connection (absence) of 1 or more fans, or there is reverse polarity, or there is overconsumption. You should contact the after-sales service and report error F8.
Pending the verdict of the manufacturer, the user has the opportunity to inhibit the error F8 and use the product in a degraded mode, until the complete correction of the problem.
Pot types
Your induction cooking appliance is able to recognise most containers.
Container test: place your container on the burner and place a power level: if the indicator remains steady, your container is compatible; if it flashes, your container is not recognised and cannot be used.
You may also use a magnet: if it "catches" onto the bottom of the container, it is compatible with induction technology.
The following containers are induction-compatible:
- Enamel steel containers with or without non-stick coating.
-
Cast iron containers with or without enamel base. An enamel base presents your appliance's glass top from being scratched.
-
Stainless steel containers suitable for induction. Most stainless steel containers are suitable if they pass the container test.
- Special base aluminium containers.
NOTE
Containers made of glass, ceramic or earth-thenware, aluminium (without special base) and copper and certain non-magnetic stainless steel containers are incompatible with induction cooking.
The selected power level indicator will flash to indicate it to you.

Plastic containers must not be placed on hot surfaces.
How to preserve and maintain your appliance?
Prevent containers from rubbing the top of the appliance.
Do not leave empty containers on the burner.
Do not heat up closed tins of food as they may explode.
Do not pre-heat food on a maximum power level when using a container with a non-stick internal coating (such as Teflon) with no or very little oil or fat.
It is not allowed to clean the device by splaying pressurized water. For example, water jet can't be used.

Metal objects such as cutlery, cooking utensils and so on must not be placed on the cooking zones as they may heat up.
All of these faults which do not stop the appliance from operating or prevent it from being used are not covered by the warranty.
Caution, the units must be disconnected from their power supply during cleaning or maintenance and when replacing parts when necessary.
How to preserve and maintain your appliance?
| Your device is easy to clean, here are a few tips | ||
| Type of soiling How to proceed? Use | ||
| Light Soak the area to be cleaned well with warm water, then wipe dry. | Sanitary sponges | |
| Accumulation of annealed dirt Soa | the area to be cleaned well using a special squeezegee, roug- hing glass, finish with the scraping side of a sanitary sponge, then wipe. | Sanitary sponges scraper special glass |
| Aureoles and traces of limestone A | apply warm white spirit vinegar to the dirt, leave to act, wipe with a soft cloth. Use a commercial pro- duct. | Special glass ceramic paste |
| Inlays from sugar, aluminum or melted plastic spills | Apply a special glass-ceramic pro- duct to the surface, preferably with silicone (protective effect). | Special product glass-ceramic glass |
Regular cleaning of air filters
The air filters located on the front of the furniture should be cleaned regularly with soapy water, depending on the level of air pollution inside the kitchen. The cleaning period can range from every 2 weeks to every 2 months.
Once the filters have been cleaned, they must be put back in place completely dry before any new use. The air filters protect all components inside the cabinet from dust and grease. They are essential for filtering the fresh air needed to cool all the components and electronic boards that operate the cabinet.
There are 10 square air filters that are positioned and accessible on a front plate inside the cabinet.
These filters filter the fresh air for the 4 electronic generators.
There are 2 air filters of rectangular shape which are present and accessible on the high front part, just above the control panels. These filter the fresh air for the 16 inductors.
How to preserve and maintain your appliance?
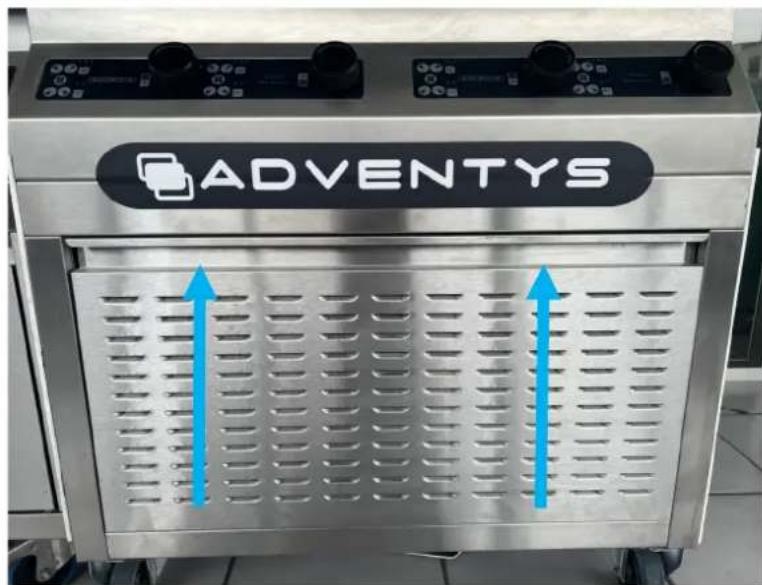
It is necessary to remove the front plate in order to access the first 10 air filters.
When all 4 filters are accessible, they must be removed by successively unscrewing their respective fixing knobs.
The filters can then be cleaned and reassembled once dry.
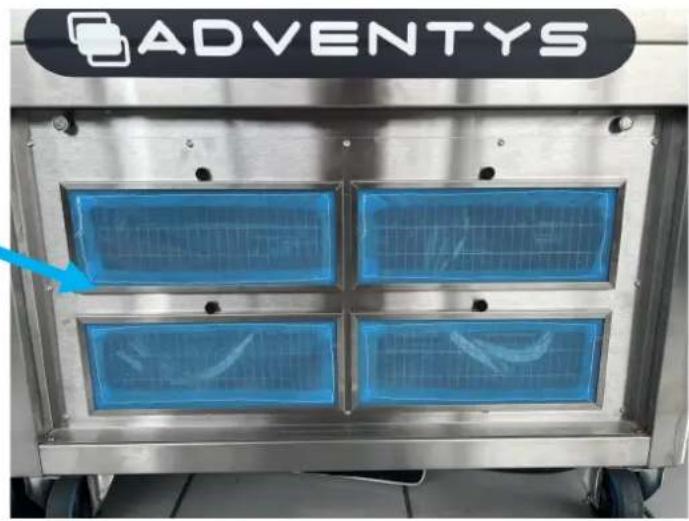
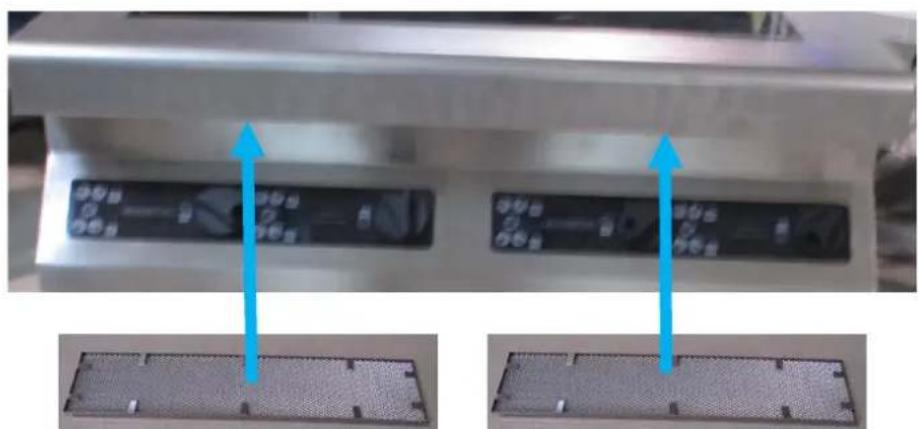
Filter 1
Then, the 2 air filters that filter the air to cool the inductors (upper part of the cabinet) must be manually removed.
It is then possible to clean them before repositioning them once dry.
Induc-NoLimit
by ADVENTYS
Small breakdowns and remedies
You have a doubt about the proper functioning of your device .... this does not necessarily mean that there is a failure. In any case, check the following points:
YOU NOTICE THAT ...
A luminous display appears when the unit is switched on.
During commissioning, your system switches off.
Ventilation continues a few minutes after your unit is turned off.
The device does not work. The indicator lights on the keypad remain off.
An "F-" indication is present on the product display.
The unit does not work, an error message "Fx" or "Hx" is shown on the display and the power is stopped.
The unit emits an odor during the first few firings.
POSSIBLE CAUSES
Normal functioning: Nothing: It is normal.
The connection of your device is faulty.
Cooling of the electronics.
The unit is not powered. The power supply or connection is defective.
There is a permanently activated key on the control keypad
The electronic circuits work badly.
New device.
WHAT TO DO?
Check your connection or the conformity of the connection.
It is normal.
Inspect fuses and circuit breaker of your electrical installation.
If the defect does not disappear, do call the After-Sales Service.
Unplug and then plug the product back in if the problem persists. Call the After-Sales Service Department.
Operate the unit for 1/2 hour without load.
In the event of breakage, cracking or cracks, even slight ones, in the glass-ceramic glass, Unplug the unit immediately and contact Customer Service.
Regular cleaning of air filters
The air filters located on the front of the furniture should be cleaned regularly with soapy water, depending on the level of air pollution inside the kitchen. The cleaning period can range from every 2 weeks to every 2 months.
Once the filters have been cleaned, they must be put back in place completely dry before any new use. The air filters protect all components inside the cabinet from dust and grease. They are essential for filtering the fresh air needed to cool all the components and electronic boards that operate the cabinet.
There are 10 square air filters that are positioned and accessible on a front plate inside the cabinet.
These filters filter the fresh air for the 4 electronic generators.
There are 2 air filters of rectangular shape which are present and accessible on the high front part, just above the control panels. These filter the fresh air for the 16 inductors.
Induc-NoLimit
by ADVENTYS
Warranty
To benefit from your hob's warranty, do not forget to keep a receipt of your date of purchase. Modifications or interventions such as drilling, welding, crimping, clinching and so on are not authorised and will void the manufacturer's warranty.
Any interventions due to installation or use which does not comply with the requirements in this manual will be rejected under the manufacturer's warranty, which will then be voided.
The manufacturer's warranty is depending on the product and its mechanical and electrical characteristics not being modified.
Appearance faults caused by the use of abrasive products or containers rubbing on the vitroceramic top which do not stop the appliance from operating or prevent it from being used are not covered by the warranty.
All repairs must be carried out by a qualified technician.
Only distributors of our brand:
- KNOW YOUR APPLIANCE AND ITS OPERATION PERFECTLY.
- APPLY OUR ADJUSTMENT, SERVICING AND REPAIR METHODS IN FULL.
- USE ORIGINAL PARTS EXCLUSIVELY.
If you have a complaint or want to order spare parts from your distributor, provide them with the full reference of your appliance (type of appliance and serial number). These details appear on the information plate attached under the appliance's metal unit.
The descriptions and characteristics provided in this "booklet" are given for information purposes only and are non-binding. In fact, as we set great store on the quality of our products, we reserve the right to make any modifications or improvements necessary without notice.
Original parts: during a servicing operation, ask your vendor for only certified original parts to be used.
Adventys address:

Meaning of te logo used
Materializes the conformity of a product to the European Community requirements incumbent on the manufacturer of the product.
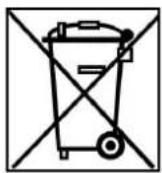
The product cannot be thrown in a traditional dustbin. It must be sent to a specific collection point or collected by an organization that will ensure their subsequent treatment. Case of waste electrical and electronic equipment (WEEE).

Read the operator's manual before starting to install and use the product.

General danger signs to warn of risks of any kind, permanent or temporary.
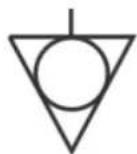
Identifies the connection point for the additional equipotential bonding. Equipotential bonding must be made between all devices with this connection point and earth.

Warns of the presence of dangerous electrical voltage. Caution danger.

Warning of the presence of non-ionizing electromagnetic radiation.