
MOVING 55B - Dryer Lavor - Free user manual and instructions
Find the device manual for free MOVING 55B Lavor in PDF.

| Product type | Auto scrubber (floor scrubber) |
| Brand | Lavor |
| Model | MOVING 55B |
| Power supply | 24 VDC (batteries) or 230 VAC (model E) |
| Compatible battery types | Pb-acid, GEL/AGM, Lithium NCM, Lithium FePO4 |
| Maximum working slope | 2% |
| Maximum transport slope | 10% |
| Brush motor | Yes, with ECO mode |
| Suction motor | Yes, with ECO mode |
| Traction motor | Yes (model BT/T) |
| Forward speed | Adjustable (model BT/T) |
| SMART RUN function | Simultaneous activation of brush + suction + solution |
| Battery charge indicator | Green, yellow, red LED |
| Solution tank capacity | Not specified, larger than recovery tank |
| Recovery tank capacity | Not specified, smaller than solution tank |
| Operating temperature | +4°C to +35°C |
| Storage temperature | +10°C to +50°C |
| Safety devices | Thermal circuit breakers, automatic shutdown, float |
| Warranty | 12 months |
| Intended use | Industrial (hotels, schools, hospitals, factories, etc.) |
Frequently Asked Questions - MOVING 55B Lavor
User questions about MOVING 55B Lavor
0 question about this device. Answer the ones you know or ask your own.
Ask a new question about this device
Download the instructions for your Dryer in PDF format for free! Find your manual MOVING 55B - Lavor and take your electronic device back in hand. On this page are published all the documents necessary for the use of your device. MOVING 55B by Lavor.
USER MANUAL MOVING 55B Lavor
Technical data plate

IT ITALIANO PAGINA 11
EN ENGLISH PAGE 32
FR FRANÇAIS PAGE 53
DE Deutsch SEITE 74
ES ESPANOL PAGINA 95
PT PORTUGUES PAGINA 117
AR 138-145
PL POLSKY STR. 146
RU PYCCKNI CTPAHNlA 165
E - (AC 230V)
B
B - (DC 24V)
D

BT - (DC 24V con trazione - with traction - avec traction - mit Traktion - con tracción)

G
H
I
L
M
N
0
P
Q
R
- INFORMAZIONI GENERALI
1.1. SCOPO DEL MANUALE
1.2. TERMINOLOGIA E LEGENDA SIMBOLI
1.3. IDENTIFICAZIONE DEL PRODOTTO
1.4. UTILIZZO PROPRIO
1.5. MODIFICHE TECNICHE - INFORMAZIONI SULLA SICUREZZA
2.1. RACCOMANDAZIONI FONDAMENTALI
2.2. RUMOROSITA E VIBRAZIONI - INFORMAZIONI SULLA MOVIMENTAZIONE
3.1.SOLLEVAMENTOETRASPORTODELL'IMBALLO
3.2.CONTROLLO ALLA CONSEGNA
3.3. SBALLAGGIO
3.4. SOLLEVAMENTO E TRASPORTO: MACCHINA, BATTERIA E CARICABATTERIA - INFORMAZIONI TECNICHE
4.1. INFORMAZIONI INSTALLAZIONE
4.1.1. BATTERIE
4.1.2. PREPARAZIONE BATTERIA
4.1.3. INSTALLAZIONE BATTERIE
4.1.4. COLLEGAMENTO BATTERIE
4.1.5. CONFIGURAIZIONE INDICATORE DI SCARICA BATTERIE
4.2. CONFIGURAZIONE CARICABATTERIA - INFORMAZIONI UTILIZZO
5.1. PREPARAZIONE MACCHINA
5.2. STRUTTURA E FUNZIONI MACCHINA
5.3. RICARICA DELLE BATTERIE
5.4. MONTAGGIO TERGIPAVIMENTO
5.5. SMONTAGGIO TERGIPAVIMENTO
5.6. SOSTITUZIONE DELLE LAME IN GOMMA DEL TERGIPAVIMENTO
5.7. REGOLAIZIONE TERGIPAVIMENTO
5.8. MONTAGGIO E SMONTAGGIO DEL PARASPRUZZI
5.9. MONTAGGIO E SMONTAGGIO DELLA SPAZZOLA
5.10. RIEMPIMENTO E SCARICO DEL SERBATOIO SOLUZIONE
5.11. SCARICO DEL SERBATOIO DI RECURPO
5.12. NORMESPECIFICHD'USODELMODELLO "E" (AC 230V)
5.13. GUIDA DELLA MACCHINA
5.14. METODO DI LAVORO
5.14.1. PREPARAZIONE ED AVVERTENZE
5.14.2. CONTROLLO STATO DI CARICA DELLA BATTERIA
5.14.3. LAVAGGIO DIRETTO O PER SUPERFICI LEGGERMENTE SPORCHE
5.14.4. LAVAGGIO INDIRETTO O PER SUPERFICI MOLTOSPORCHE
5.14.5. OPERAZIONI POST LAVAGGIO
-
INFORMAZIONI MANUTENZIONE
6.1. SERBATOI
6.2. TUBO DI ASPIRAZIONE
6.3. TERGIPAVIMENTO
6.4. ACCESSORI
6.5. CORPO MACCHINA
6.6. BATTERIE
6.7. MANUTENZIONE PERIODICA
6.8. RICAMBI CONSIGLIATI -
CONTROLLO DI ESERCIZIO
7.1. RISOLUZIONE DEI PROBLEMI
7.1.1. LA MACCHINA NON FUNZIONA
7.1.2. LA MACCHINA NON AVANZA
7.1.3. NON GIRANO LE SPAZZOLE
7.1.4. NON SCENDE O SCENDE TROPPPO POCA SOLUZIONE DETERGENTE
7.1.5. MANCA ASPIRAZIONE
7.1.6. POCA ASPIRAZIONE
7.1.7. IL MOTORE SPAZZOLE O IL MOTORE ASPIRAZIONE NON SI FERMANO
7.1.8. IL TERGIPAVIMENTO NON PULISCE O NON ASCIUGA BENE
7.1.9. IL CARICABATTERIE NON FUNZIONA
7.1.10. LE BATTERIE NON SI CARICANO O NON MANTENGONO LA CARICA -
TABELLA ALLARMI
-
CONDIZIONI DI GARANZIA
9.1. ROTTAMAZIONE DELLA MACCHINA
9.2. SMALTIMENTO
To make it easier to read about and look up various subjects, refer to the table of contents at the beginning of the section in your language.
This manual has been prepared by the manufacturer and is an integral part of the product. As such, it must be kept in a safe place for the machine's entire service life until demolition.
The customer must ensure that machine operators have read or are familiar with the contents of this manual so that they strictly follow the instructions described herein.
Constant compliance with the instructions provided in this manual is the only way to guarantee the best results in terms of safety, performance, efficiency and service life of the product you now own. Non-compliance with these rules may cause injuries to people and damage to the machine, the scrubbed surface and the environment: in no case can such injuries or damage be attributed to the manufacturer.
This manual refers in detail to the machine and provides instructions and descriptions only about our batteries and battery chargers (optional).
The batteries and the battery charger are basic complementary machine parts and will affect its operation in terms of running time and performances. Only the correct combination of the two accessories (batteries and battery charger) will ensure the highest possible performances and avoid wasting lots of money. For more detailed information refer to the special battery and battery charger manuals.
Our recommended battery chargers and batteries (optional) ensure the best combination with the machine and offer outstanding versatility (battery charger) as well as the category's highest quality and performance standards.
1.2. TERMINOLOGY AND SYMBOL LEGEND
For the sake of clarity and to efficiently highlight the various aspects of the instructions provided, terms and symbols were used that are defined and illustrated here below:
- Machine. This definition replaces the commercial name to which this manual refers.
Operator. 'operator' means the person or persons given the task of installing, operating, adjusting, maintaining, cleaning, repairing or transporting machinery.
-
Technician. A technician is considered a person who has the experience, technical education, legislative and regulatory knowledge that allows him to carry out any type of required work, and the ability to recognise and to avoid possible risks during machine installation, and maintenance.
-
INDICATION SYMBOL. Particularly important information to avoid machine malfunctions.
-
ATTENTION SYMBOL. Very important information to avoid serious damage to the machine and to the environment in which it operates.
DANGER SYMBOL. Vital information to avoid serious (or extreme) consequences affecting the health of persons and causing damage to the product and the environment in which it operates.
Total weight (ready to operate)
Max. working range incline 2%
Brush motor
Suction motor
1.3.PRODUCT IDENTIFICATION
The identification plate is located at the front of the recovery tank (Photo P-1) (it must be lifted to see it).
1.4. SPECIFIC USE
This appliance is suited for the commercial use, e.g. in hotels, schools, hospitals, factories, shops, offices, and rental companies.
This machine is a floor scrubber-drier: it must be used to scrub and to vacuum liquids of flat, rigid, horizontal, smooth or moderately rough and uniform floors that are free from obstacles in both civic and industrial environments. Any other use is prohibited.
Please refer very carefully to the safety information reported in this manual.
The scrubber-drier distributes a quantity of a water and detergent solution (adjustable) on the surface to be cleaned, while the brushes remove any dirt on the ground. The machine's suction system, using a ground squeezegee, perfectly dries the liquids and the dirt just removed from the front brushes in a single pass.
By efficiently combining a cleaning detergent with various types of brushes (or abrasive disks), the machine can adapt to all the various combinations of floors and dirt.
1.5. TECHNICAL MODIFICATIONS
The manufacturer reserves the right to make technical modifications to the product, without prior notice, in order to make the necessary technical upgrades or improvements. For this reason, some details of your machine may be different from the information in the sales catalogues or from the illustrations presented in this booklet. However, this will not reduce safety or invalidate the information supplied to this regard.
2. SAFETY INFORMATION
2.1. BASIC RECOMMENDATIONS
Carefully read the "instruction manual" before starting, using, performing unscheduled or routine maintenance or any other work on the machine.
Rigorously comply with all the instructions provided in this manual and in those for the batteries and battery chargers (with particular attention to warnings and danger notices).
The manufacturer will not be held responsible for injuries to persons or damage to property due to non-compliance with the aforementioned instructions.
This machine must be powered only with the safety extra-low voltage indicated on the technical data plate.
Before using the machine, make sure that each part is in the correct position.
The machine may only be used by personnel who have been trained in its use, who have demonstrated their ability and who have been expressly instructed to do so. To prevent unauthorised use, keep the machine at a standstill in a place not accessible to outsiders and remove the key from the control panel.
The appliance is not intended for use by persons (including children) with reduced physical, sensory or mental capabilities, or lack of experience and knowledge, unless they have been given supervision or instruction concerning use of the appliance by a person responsible for their safety.
Children should be supervised to ensure that they do not play with the appliance.
Do not operate this machine for any other purpose except for the use for which it was specifically designed. Evaluate the type of building where it will be utilized and rigorously comply with the current safety regulations and conditions.
Do not use the machine in places without adequate lighting, in explosive environments, when harmful dirt is present (dust, gas, etc.), on roads or public passageways and in outdoor environments in general.
The machine operating temperature range is +4^ to +35^ ; when not being used, store the machine in a dry and non-corrosive environment within a temperature range of between +10^ and +50^ .
When using the machine under any condition the humidity must range between 30% and 95% .
Never use or vacuum liquids, gases, dry dust, acids and solvents (e.g. paint thinners, acetone, etc.), even if diluted, inflammables or explosives (e.g. petrol, fuel oil, etc.); never
vacuum flaming or incandescent objects.
Do not use the machine on slopes or ramps steeper than 2% .
For small slopes, do not use the machine sideways, always handle it with caution and never move backwards. When transporting (10% max) the machine on steeper ramps or slopes, be very careful to avoid tipping and/or uncontrolled accelerations.
The machine can be handled on ramps and/or steps only with the brush head and squeezegee lifted off the ground.
Never park the machine on a slope.
Never leave the machine unattended with the key in and connected; it may be left only after having disconnected it and taken the key out and guaranteeing against accidental movements and, if necessary, disconnecting it from the electrical power supply.
Make sure there are no other persons, and children in particular, in the area where the machine is being used.
Do not use the machine to transport persons/ things or to tow objects. Do not tow the machine.
Do not use the machine as a support surface for any weight for any reason.
Do not block the ventilation and heat dispersion openings.
Do not remove, modify or by-pass the safety devices.
Always use individual safety devices to ensure operator safety: aprons or safety overalls, non-slip and waterproof shoes, rubber gloves, goggles and earphones, and masks to protect the respiratory tract. Before starting to work, remove necklaces, watches, ties and other objects that may cause serious injuries.
Do not insert hands between moving parts.
Do not use detergents that differ from those required and follow the instructions indicated on the relative safety sheets. Detergents should be stored in a place that is inaccessible to children. In case of contact with the eyes, rinse immediately with copious amounts of water and, if swallowed, immediately consult a physician.
Make sure that the battery charger power sockets are connected to an efficient earthing system and that they are protected by magneto thermal and differential circuit breakers.
Follow the battery manufacturer's instructions and comply with legal provisions. The batteries should always be clean and dry to avoid surface leakage currents. Protect the batteries against impurities, such as metallic dust.
If the machine is equipped with gel batteries it is essential to make sure the run-down indicator (located on the panel) is adjusted correctly. Contact your dealer or refer to the specific paragraph.
Do not place tools on top of the batteries: they may cause a short-circuit or an explosion.
When using battery acid, rigorously respect the relative safety instructions.
Never spray water on the machine to clean it.
Recovered fluids contain detergents, disinfectants, water, as well as organic and inorganic material collected during work operations: dispose of them in accordance with current legal provisions.
If the machine malfunctions and/or operates inefficiently, turn it off immediately (disconnecting it from the electric power supply or from the batteries) and do not tamper with it.
Contact one of the manufacturer's technical service centres.
All maintenance or accessory replacement operations must be carried out in environments with adequate lighting and only after having disconnected the machine from the electric power supply by detaching the battery connector.
All work on the electrical system and all maintenance and repair operations (especially those not explicitly described in this manual) should be carried out only by authorized service centers or by specialized technical personnel who are experts in the sector and in the pertinent safety regulations.
The machine owner can only use original accessories and spare parts supplied exclusively by the manufacturer since such parts are the only ones that guarantee that the equipment will operate safely without any problems. Do not use parts disassembled from other machines or other kits as spare parts.
Before each use, check the machine and, in particular, check that the battery charging cable and the connector are in good condition and safe for use. If they are not in perfect condition, do not use the machine for any reason until an authorized specialist repairs the defective parts. If foam or liquid is noted, immediately turn off the suction motor.
Do not use the machine on textile flooring, such as rugs, carpeting, etc.
Wax, foaming detergents or dispersions along the hoses may cause serious problems for the machine or clog the hoses.
2.2.NOISE AND VIBRATIONS
For informations relating to noise and vibration data see page 189.
3. HANDLING INFORMATION
3.1. PACKING LIFTING AND TRANSPORT
During all lifting or transport operations, make sure that the packed machine is securely anchored to prevent it from tipping over or falling accidentally.
Transport vehicle loading and unloading op
rations must be carried out with adequate lighting.
The packed machine must be handled using adequate devices, making sure not to damage/ strike any part of the packing, not to tip it over and to be very careful when placing it on the ground.
All these instructions also apply to the batteries and the battery charger.
3.2. CHECKS UPON DELIVERY
When the goods are delivered (machine, battery or battery charger) by the transporter, carefully check the condition of the packing and its contents. If the contents have been damaged, notify the transporter and reserve the right, in writing (select the word "reserve" on the document), to submit a claim for compensation before accepting the goods.
3.3.UNPACKING
Wear safety clothing and use adequate tools to limit the risks of accidents.
Carry out the following steps if the machine is packed with a cardboard housing:
-
Use scissors or clippers to cut and eliminate the plastic straps.
-
Slip off the cardboard housing from the top of the packed machine.
-
Remove the envelops inside and check their contents (use and maintenance manual, battery charger connector)
-
Remove the metallic brackets or plastic straps that secure the machine to the pallet.
-
Release the brushes and the squeezegee from the packing.
-
Take the machine off the pallet (pushing it backward) by using an inclined surface that is solidly attached to the floor and to the pallet.
If the machine is packed in a wooden crate:
-
Detach all the wooden sides from the pallet, starting from the top one.
-
Remove the protective film wrapped around the machine.
-
Remove the metallic brackets or plastic straps that secure the machine to the pallet.
-
Release the brushes and the squeezegee from the packing.
-
Take the machine off the pallet (pushing it backward) by using an inclined surface that is solidly attached to the floor and to the pallet.
Take the same precautions and follow the same instructions to remove the optional battery charger from the packing (holding the special handles to extract it from the top of the packing) and the optional battery.
After moving the machine away from all the packing, start mounting the accessories and the batteries as per the instructions provided in the specific section.
Keep all the pieces of the packing since they might be useful in the future to protect the machine and the accessories during transport to another location or to authorized service centers. If not, the packing can be disposed in accordance with current disposal laws.
3.4. LIFTING AND TRANSPORT: MACHINE, BATTERY AND BATTERY CHARGER
Never use a forklift truck to lift the machine. There are no places on the frame that can be used to lift the machine directly.
Before preparing the packing and transporting the machine:
- Empty the recovery tank and the detergent solution tank.
- Disassemble the squeegee and the brushes or scrapers.
- Disconnect and remove the batteries.
Place the machine on the original pallet (or an equivalent one that can bear the weight and is big enough for the machine's overall dimensions) using an inclined surface.
Solidly anchor the machine and the squeezegee to the pallet using metallic brackets or other elements that can bear the weight of the parts. Lift the pallet with the machine and load it on the transport vehicle.
Secure the machine and the pallet using ropes connected to the transport vehicle.
As an alternative, when using private transport vehicles, use inclined ramps to push the machine without the pallet, making sure to protect all parts and the machine itself against violent impacts, humidity, vibrations and accidental movements during transport.
The battery boxes have holes where tools can be hooked for handling.
To lift or insert the battery (into the machine compartment), use only suitable personnel and equipment (cables, eyehooks, etc.) for the operation and to bear the weight of the loads involved. When transporting, take the same precautions and follow the same instructions provided for the machine together with those in the special manufacturer's manual.
The battery charger can be transported on its supports, both vertically and horizontally. Take the same precautions and follow the same instructions provided for the machine together with those in the special manufacturer's manual.
4. TECHNICAL INFORMATION
4.1. INSTALLATION INFORMATION
4.1.1. BATTERY
The information provided is of a general nature: always refer to the user manual of the installed battery.
Regardless of the type of construction, battery
performances are indicated with the term capacity, which always refers to a discharge period. Another important value is the number of possible discharges. The capacity is expressed in amps per hour (Ah), while the discharge period is generally indicated as 20 hours (C20 or 20h, or not expressly indicated) or 5 hours (C5 or 5h). The discharge/charge cycles indicate the number of times that the battery can hold a charge under the best conditions, i.e. they indicate the useful battery service life complying with all the necessary measures.
Therefore, the capacity of a battery varies depending on how fast it uses energy (current). That's why there's such a variation in the capacity values expressed as C5 or C20. These factors must be taken into account when comparing products available on the market with our own. The following types of batteries can be assembled on this machine:
- Pb-Acid battery with tubular armored modules: the electrolyte level in each element must be periodically checked!
If one element is no longer covered by the acid solution it will oxidize in 24 hours, thus permanently affecting that element's performance. Refer to the battery manual to avoid physical damage and economic loss.
- GEL/AGM module battery: this type of battery is maintenance free and does not require special environments for recharging (since it does not emit any harmful gases); therefore, it is highly recommended.
Lithium batteries: they do not require maintenance and are more durable in terms of life cycles than the previous ones
It should not be taken for granted that batteries and battery chargers with the same technical features as those we offer will produce the same results. Only perfect compatibility between these elements (Pb-Acid batteries, gel batteries, lithium batteries, and battery chargers) will safeguard the performances, the service life, the safety and the economic value invested.
4.1.2. BATTERY PREPARATION
The technical features of the batteries used must match those indicated in the technical features section. Using different batteries may cause serious damage to the machine or may require them to be charged more frequently.
During installation or when performing any type of battery maintenance, the operator must be equipped with adequate safety accessories to prevent accidents. Work far from open flames, do not short-circuit the battery poles, do not generate sparks and do not smoke.
The batteries are normally supplied full of acid solution (for the Pb-Acid type) and ready for use. In any case, follow the steps indicated in
the manual supplied with the battery and carefully follow the instructions regarding safety and operating procedures.
Refer to the relevant manufacturer's manual provided.
4.1.3. BATTERY INSTALLATION
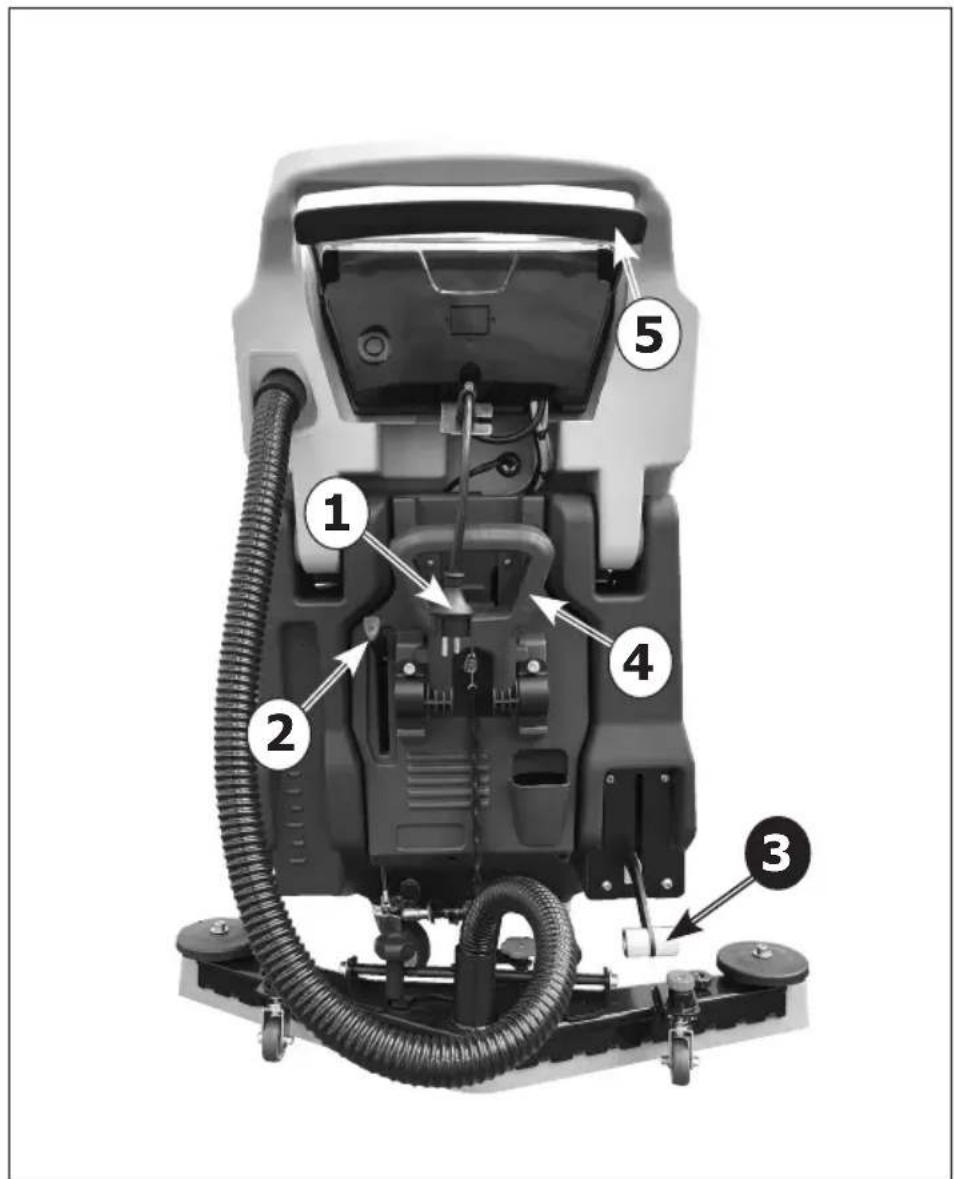
To insert batteries in the battery compartment (Photo I - 2) it is necessary to lower the brush plate to the floor.
To access to the battery compartment, open the hooks (Photo N - 2) and lift the recovery tank (Photo N - 3).
Detach the spring clip (Photo I - 1) placed on the lifting cable of the brush plate.
Place the batteries in the battery compartment (Photo I - 2) checking that they are in perfect conditions.
4.1.4. BATTERY CONNECTION
These operations must be carried out by specialized personnel.
Install and charge the batteries in a dry ventilated place, far from sources of heat and corrosive substances. Make sure that the voltage between the batteries and the battery charger corresponds. Protect the circuit with a delay switch or a fuse with a higher charge than the maximum absorption of the battery charger. Comply with the polarity of the battery plug.
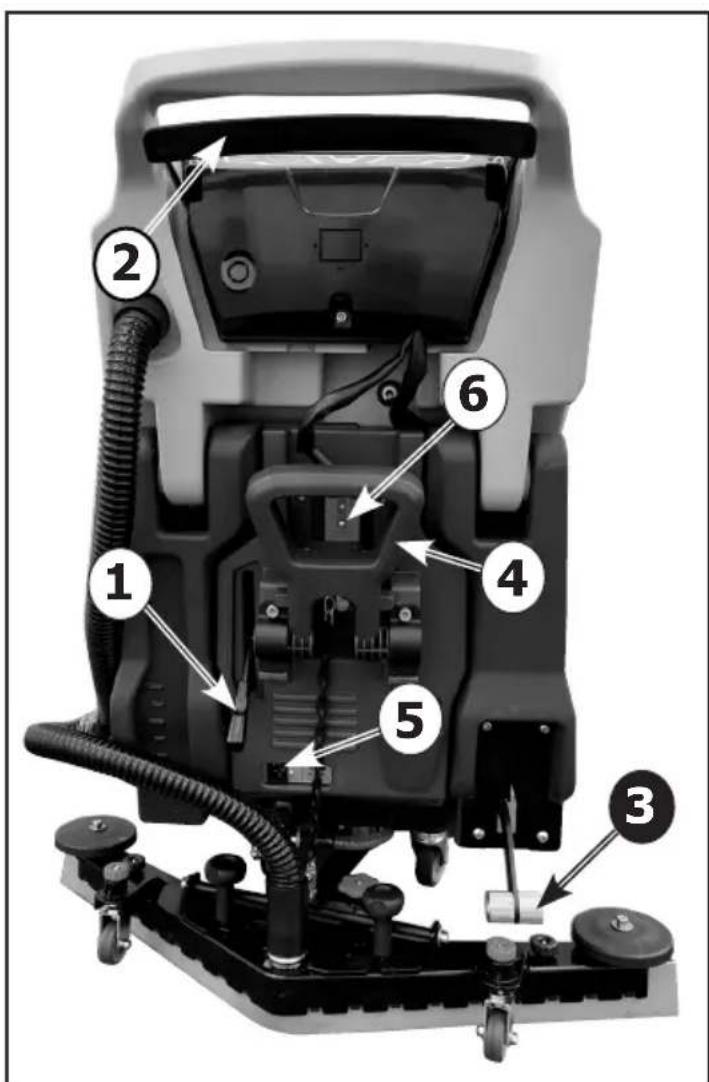
Disconnect the Anderson connector of the battery wiring from the Anderson connector of the machine wiring (Photo D - 6) (Photo F - 8). Always hold the connectors with the hands and never pull on the cables.
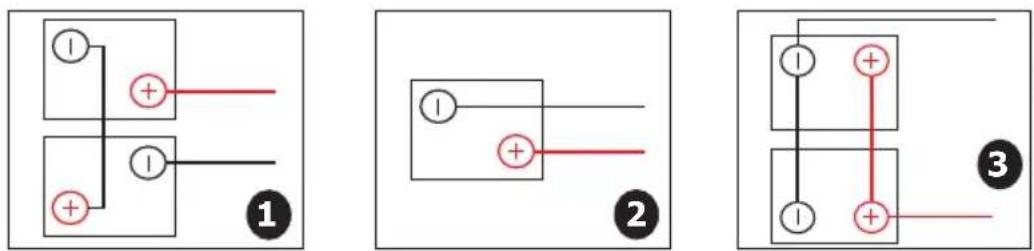
Photo H 1 shows the series connection diagram of the batteries for models B - BT in the case of Lead, Acid or GEL/AGM batteries.
In the event that Lithium batteries are installed, see connection in photos H 2 (single battery) and H 3 (Batteries connected in parallel only for Li-FePO4)
In the case of Lithium batteries connected in parallel, ensure that the connection cables between the battery poles are of the same length and section.
Photo H show connection diagram of the batteries for B-BT machines.
Attach the battery wiring to the battery, connecting the terminals only on the poles marked with the same symbol (red wiring ^ 一 + " black wiring"-")!
A possible short circuit of the battery can cause explosions and short circuits with damage to the electrical system and risk of fire!
After checking that all the controls on the panel are in position "0" or at rest, connect the battery connector to the machine connector.
Close the battery compartment making sure not to crush any wires.
Photo H show the correct connection of the batteries for B-BT machines.
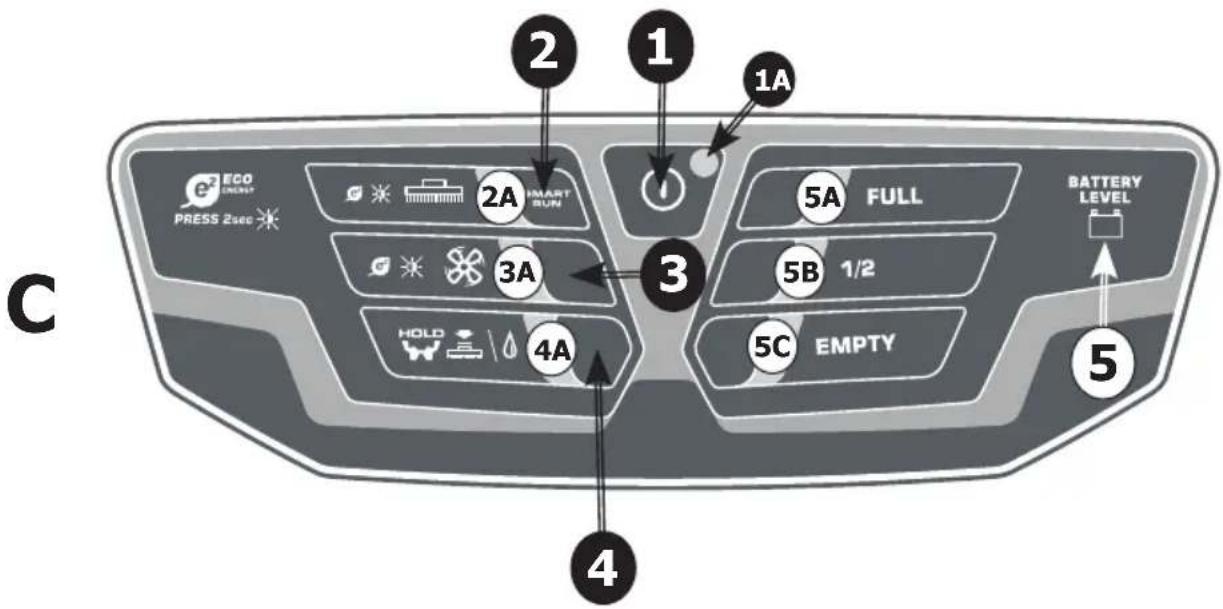
4.1.5. CIRCUIT BOARD SETTINGS CONFIGURATION
The machine is equipped to GEL battery circuit board configured. If the operator whish to use e Pb-Acid battery or Lithium battery, it is necessary to set the electronic circuit board as follows:
Model "B" (DC 24V)
TO ENTER THE BATTERY THRESHOLD CONFIGURATION MODE:
1) Turn off the machine by pressing and holding the machine power button (Photo C-1) for 3 seconds.
2) Press the keys "BRUSH ON" (Photo C-2), "VACUUM CLEANER ON" (Photo C-3) and "BRUSH RELEASE" (Photo C-4) at the same time
3) Holding down the 3 keys "BRUSH ON" (Photo C-2), "VACUUM CLEANER ON" (Photo C-3) and "BRUSH RELEASE" (Photo C-4), press the "ON" key (Photo C-1).
4) When the "POWER" LED (Photo C - 1A) is on, release the power button, holding down the keys "BRUSH ON" (Photo C - 2), "VACUUM CLEANER ON" (Photo C - 3) and "BRUSH RELEASE" (Photo C - 4) until the battery charge status LEDs (Photo C - 5A), (Photo C - 5B) and (Photo C - 5C) remain on and steady.
5) When the LEDs of the keys "BRUSH ON" (Photo C - 2A), "VACUUM CLEANER ON" (Photo C - 3A) and "BRUSH RELEASE" (Photo C - 4A) flash three times and then all three light up simultaneously, release the keys "BRUSH ON" (Photo C - 2), "VACUUM CLEANER ON" (Photo C - 3) and "BRUSH RELEASE" (Photo C - 4).
If the operation has been performed correctly, only the LED corresponding to the type of battery set remains lit (by default the LED "50% CHARGED BATTERY" (Photo C - 5B), yellow, i.e. gel battery)
6) It is now possible to select the battery type by selecting the corresponding LED (see legend on the next page).
Change the selected LED by scrolling up, pressing the "BRUSH ON" key (Photo C - 2) or down by pressing the "BRUSH RELEASE" key (Photo C - 4A).
Confirm the selection by pressing the "VACUUM CLEANER ON" key (Photo C - 3).
THE CONFIGURATION SETTINGS ARE VISIBLE ON THE BATTERY CHARGE STATUS LEDs.
Gel:
50% CHARGED BATTERY LED (Photo C - 5B) lit, yellow.
Lead-Acid:
CHARGED BATTERY LED (Photo C - 5A) lit, green.
Lithium NCM:
LOW BATTERY LED (Photo C - 5C) lit, red.
Lithium FePO4:
LOW BATTERY LED (Photo C - 5C) + 100%
CHARGED BATTERY LED (Photo C - 5A) lit
Once the settings have been set, we have different battery discharge levels with differentiated intervention on the machine functions as specified in the following table:
| Batteries low indicator operation -MODEL "B" (DC 24V) | ||||||
| Battery type V < Trigger voltage | Indication Battery LED | |||||
| WET GEL LI-NCM | Li-FePO4 | Green Yellow Red | ||||
| Vmax Vmax Vmax Vmax On Off | Off | |||||
| 23.30 | 23.70 | 25.30 | Off On | Off | ||
| 22.15 | 22.50 | 22.6 | 25.15 | Off Off On | ||
| 21.70 | 22.00 | 21.65 | 24.70 | Off Off | On flash-ing | |
Model "BT" (DC 24V with traction)
TO ENTER THE BATTERY THRESHOLD CONFIGURATION MODE:
1) Switch off the machine by pressing and holding the machine power button (E - 1) for 3 seconds.
2) Press the keys "BRUSH ON" (Photo E-2), "VACUUM CLEANER ON" (Photo E-3) and "BRUSH RELEASE" (Photo E-4) at the same time
3) Holding down the 3 keys "BRUSH ON" (Photo E-2), "VACUUM CLEANER ON" (Photo E-3) and "BRUSH RELEASE" (Photo E-4) press the "ON" key (Photo E-1).
4) When the "POWER" LED (Photo E-1A) is on, release the power button, holding down the keys "BRUSH ON" (Photo E-2), "VACUUM CLEANER ON" (Photo E-3) and "BRUSH RELEASE" (Photo E-4) until the battery charge status LEDs (Photo E-5A), (Photo E-5B) and (Photo E-5C) remain on and steady.
5) When the LEDs of the keys "BRUSH ON" (Photo E - 2A), "VACUUM CLEANER ON" (Photo E - 3A) and "BRUSH RELEASE" (Photo E - 4A) flash three times and then all three light up simultaneously,
release the keys "BRUSH ON" (Photo E-2), "VACUUM CLEANER ON" (Photo E-3) and "BRUSH RELEASE" (Photo E-4).
If the operation has been performed correctly, only the LED corresponding to the type of battery set remains lit (by default the LED "50% CHARGED BATTERY" (Photo E - 5B), yellow, i.e. gel battery)
6) It is now possible to select the battery type by selecting the corresponding LED (see legend on the next page).
Change the selected LED by scrolling up, pressing the "BRUSH ON" key (Photo E - 2) or down by pressing the "BRUSH RELEASE" key (Photo E - 4). Confirm the selection by pressing the "VACUUM CLEANER ON" key (Photo E - 3).
THE CONFIGURATION SETTINGS ARE VISIBLE ON THE BATTERY CHARGE STATUS LEDs.
Gel:
50% CHARGED BATTERY LED (Photo E - 5B) lit, yellow.
Lead-Acid:
CHARGED BATTERY LED (Photo E - 5A) lit, green.
Lithium NCM:
LOW BATTERY LED (Photo E - 5C) lit, red.
Lithium FePO4:
LOW BATTERY LED (Photo E - 5C)+ 100%
CHARGED BATTERY led (Photo E - 5A) lit
Once the settings have been set, we have different battery discharge levels with differentiated intervention on the machine functions as specified in the following table:
| Batteries low indicator operation -MODEL "BT" (DC 24V) | ||||||
| Battery type V < Trigger voltage | Indication Battery LED | |||||
| WET GEL Li-NC | CM | Li-FePO4 | Green Yellow Red | |||
| Vmax | Vmax Vmax | Vmax Vmax | On Off | Off | ||
| 23.30 | 23.70 | 30 | 25.30 | Off On | ||
| 22.15 | 2.50 | 6 | 25.15 | Off Off On | ||
| 21.70 | 2.00 | 21.65 | 24.70 | Off Off | On flash-ing | |
If you do not complete the configuration procedure, the settings remain as they were originally. We recommend to call the assistance centre or a technician if you have problems with the settings given.
Do not open or tamper the electronic board.
The machine is equipped with a battery charger configured for GEL batteries
To change the battery charger settings read the manual provided by the battery charger manufacturer.
If the machine is supplied with a battery and a charger, the setting of the machine and the charger is carried out by the manufacturer.
In the event of changes to the equipment, i.e. the type of battery and charger, we always recommend that you contact your authorised service centre both for the machine setting and the setting of the charger's charging curve.
As a general rule, the following criteria apply:
For Pb-acid and GEL batteries:
charging current of approx. 10 - 12% of the capacity in Ah-C20
For NCM Lithium batteries:
maximum charge current equal to approximately 30% of the capacity in Ah.
For Lithium FePO4 batteries:
maximum charge current equal to approximately 40% of the capacity in Ah.
Failure to comply may result in serious damage to the battery and warranty invalidation.
Before starting to work, wear non-slip shoes, gloves and any other personal protection device indicated by the supplier of the detergent used or considered necessary based on the operating environment.
Do the following before starting to work. Refer to the relative sections for a detailed de
scription of these steps:
Heck the battery charge level and charge, if necessary.
Mount the brushes or scraper disks (with the abrasive disks) that are suitable for the surface and work involved.
Mount the squeezegee, check that it is solidly attached and connected to the suction hose and that the drying blades are not too worn.
Make sure that the recovery tank is empty. If not, empty it completely.
Check and completely close the detergent solution release control.
Fill the detergent solution tank with a mix of clean water and non-foaming detergent in an adequate concentration through the anterior hole.
The BT MODEL is equipped with a dedicated detergent tank. The detergent used must be suitable for application with particular reference to concentration and viscosity as well as being anti-foaming.
Leave 2cm between the mouth of the plug and the level of the liquid.
To avoid risks, become familiar with the machine movements, carrying out test runs on a large surface without obstacles.
To obtain the best results in terms of cleaning and equipment service life, you should do the following simple but important operations:
-
Identify the work area, moving all possible obstacles out of the way; if the surface is very extensive, work in contiguous and parallel rectangular areas.
-
Choose a straight work trajectory and begin working from the farthest area to avoid passing over areas that have already been cleaned.
5.2. STRUCTURE AND FUNCTIONS
PHOTO A E (AC 230V)
1 Machine power key
1A machine on "LED" light indicator
2 Brush motor start key
2A Brush motor operation "LED" light indicator
3 Suction motor start key
3A Suction motor operation "LED" light indicator
4A "LED" light indicator:
LED lit= the solution comes out
LED off = the solution does not come out and it is possible to release the brush
5 "LED" light indicator for machine operation diagnostics
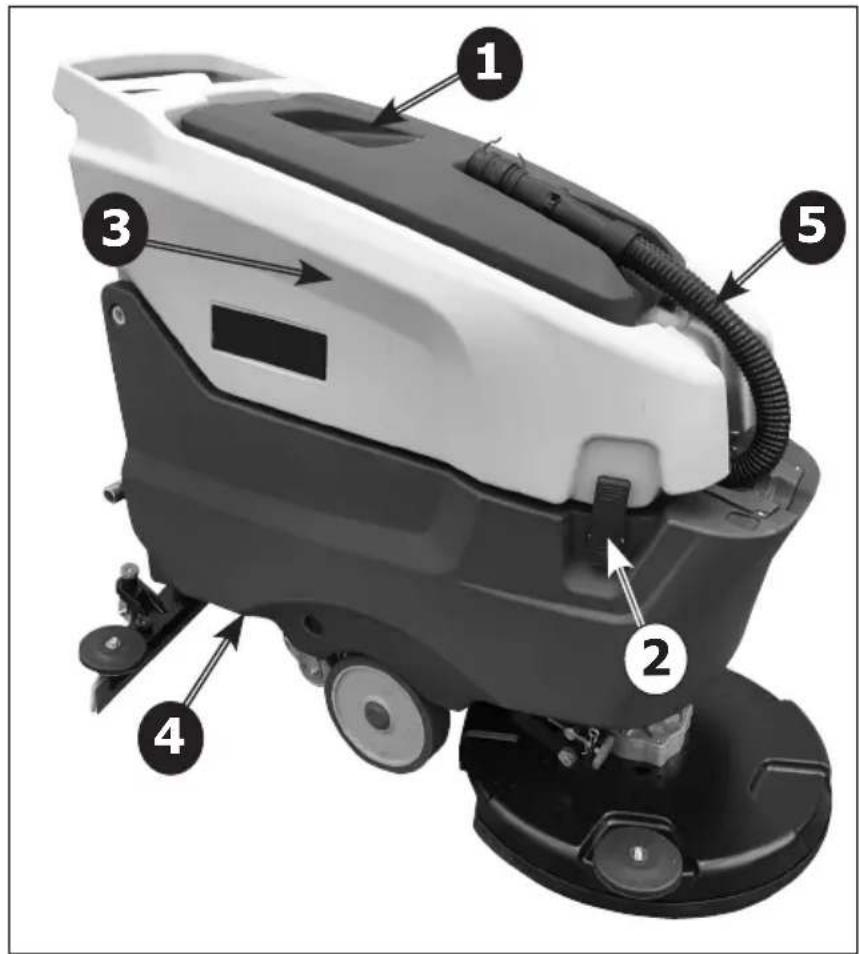
PHOTO B MODELE E (AC 230V)
1 Power supply cable
2 Water outlet adjusting lever
3 Brush plate lift/lower pedal
4 Squeegee lift/lower lever
5 Brush operation lever
6 Recovery tank drain hose
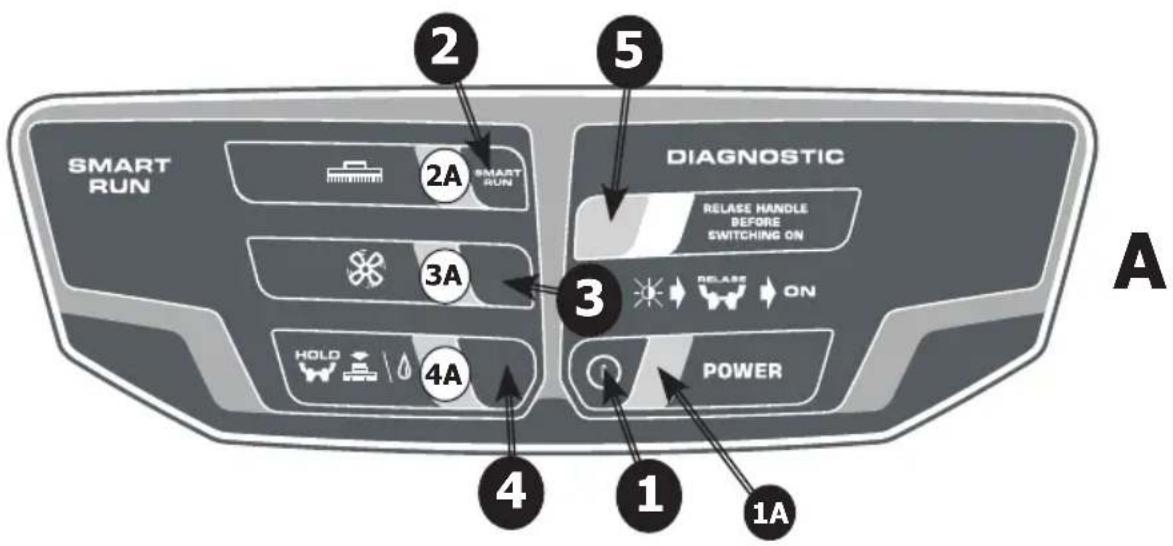
PHOTO C MODEL B - (DC 24V)
1 Machine power key
1A machine on "LED" light indicator
2 SMART RUN program key: activation of brush-suction-solenoid valve solution ON
2A Brush motor operation "LED" light indicator
3 Suction motor start key
3A Suction motor operation "LED" light indicator
4 Brush release and detergent solution key:
4A "LED" light indicator: LED lit = Solenoid valve solution open
LED off = Solenoid valve solution closed and it is possible to release the brush when all the other function LEDs are off and the control lever is activated
5 Battery charge status light indicator
5A Charged battery green "LED" Indicator light
5B 50% charged battery yellow "LED" light indicator
5C Low battery red "LED" light indicator
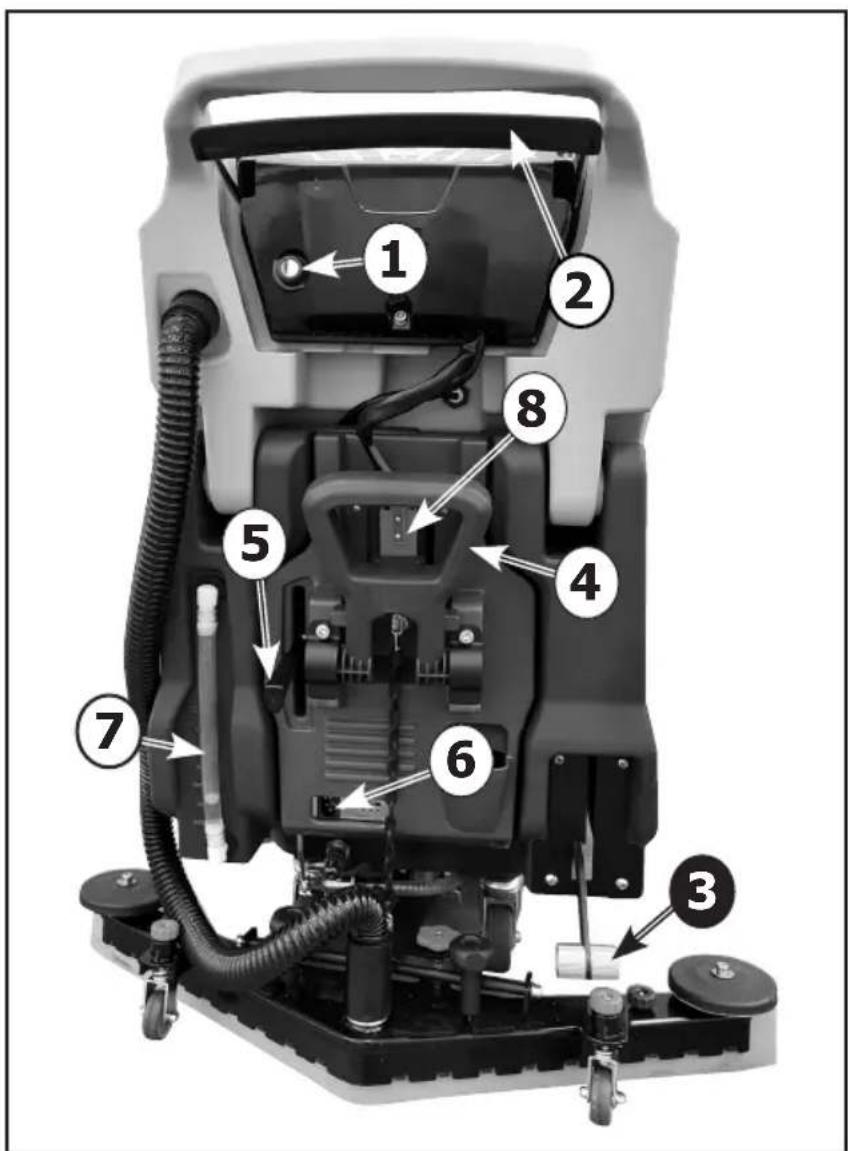
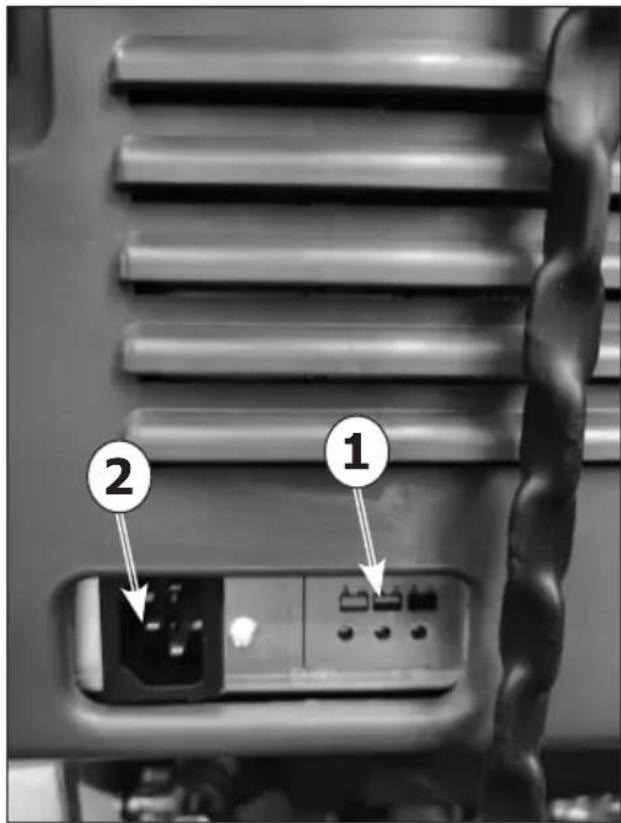
PHOTO D MODEL B-(DC 24V)
1 Detergent solution dosing lever
2 Control lever
3 Brush plate lifting pedal
4 Squeegee lifting lever
5 Power cable socket for battery charging
6 Battery connector
PHOTO E MODEL BT/T - (DC 24V with traction)
1 Machine power key
1A machine on "LED" light indicator
2 SMART RUN program key: activation of brush-suction-solenoid valve solution ON
2A Brush motor operation "LED" light indicator
3 Suction motor start key
3A Suction motor operation "LED" light indicator
4 Brush release and detergent solution key:
4A "LED" light indicator: LED lit = Solenoid valve solution open
LED off = Solenoid valve solution closed and it is possible to release the brush when all the other function LEDs are off and the control lever is activated
5 Battery charge status light indicator
5A Charged battery green "LED" Indicator light
5B 50% charged battery yellow "LED" light indicator
5C Low battery red "LED" light indicator
6 Detergent dosing key (OPTIONAL)
6A detergent dispenser operation "LED" light indicator
6B Detergent dosing level indicators
7 Movement selection key
7A Forward indicator
7B Reverse indicator
8 Selector key for forward speed reduction
9 Selector key to increase the forward speed
10 Forward speed indicators
PHOTO F MODEL BT/T - (DC 24V with traction)
1 General on / off key switch
2 Forward traction operation lever
3 Brush plate lift/lower pedal
4 Squeegee lift/lower lever
5 Detergent solution dosing lever
6 Power cord socket for battery charging
7 Solution tank level indicator
8 Battery connector
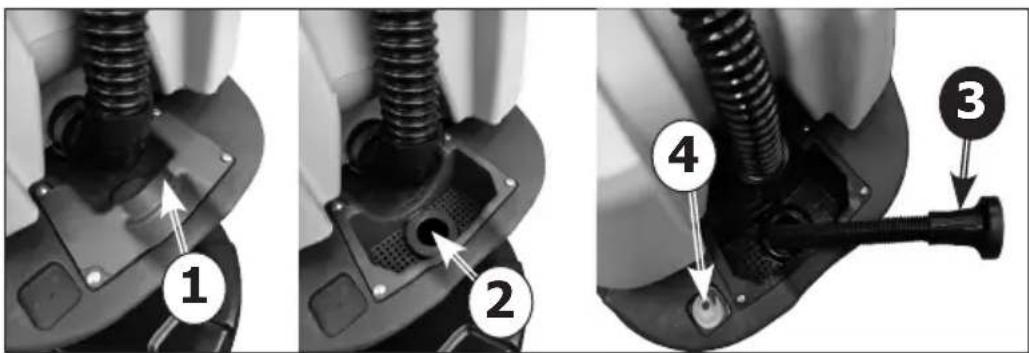
PHOTO G
1 Opening cap for solution tank filling
2 Opening for solution tank filling
3 Filling pipe (OPTIONAL)
4 Automatic filling system (OPTIONAL)
PHOTO H
1 Connection diagram of batteries in series
2 Single lithium battery connection diagram
3 Parallel battery connection diagram for lithium batteries
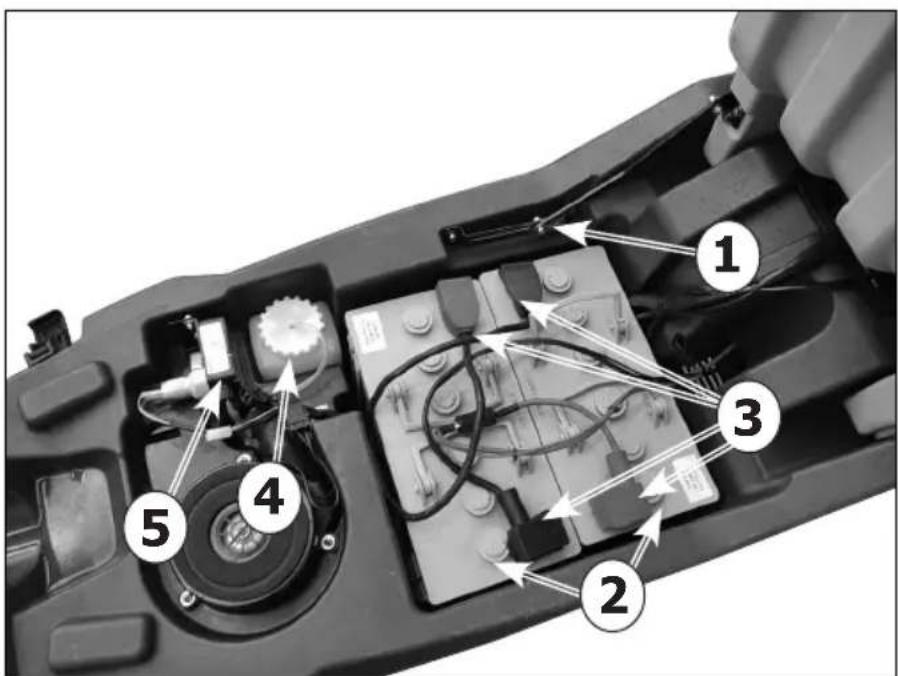
PHOTO I
1 Recovery tank lifting locking mechanism
2 Battery compartment with 12v Batteries (valid for Lead-Acid and GEL/AGM batteries)
3 Battery connection wiring
4 Detergent tank (OPTIONAL on LV MODEL)
5 Detergent pump (OPTIONAL on LV MODEL)
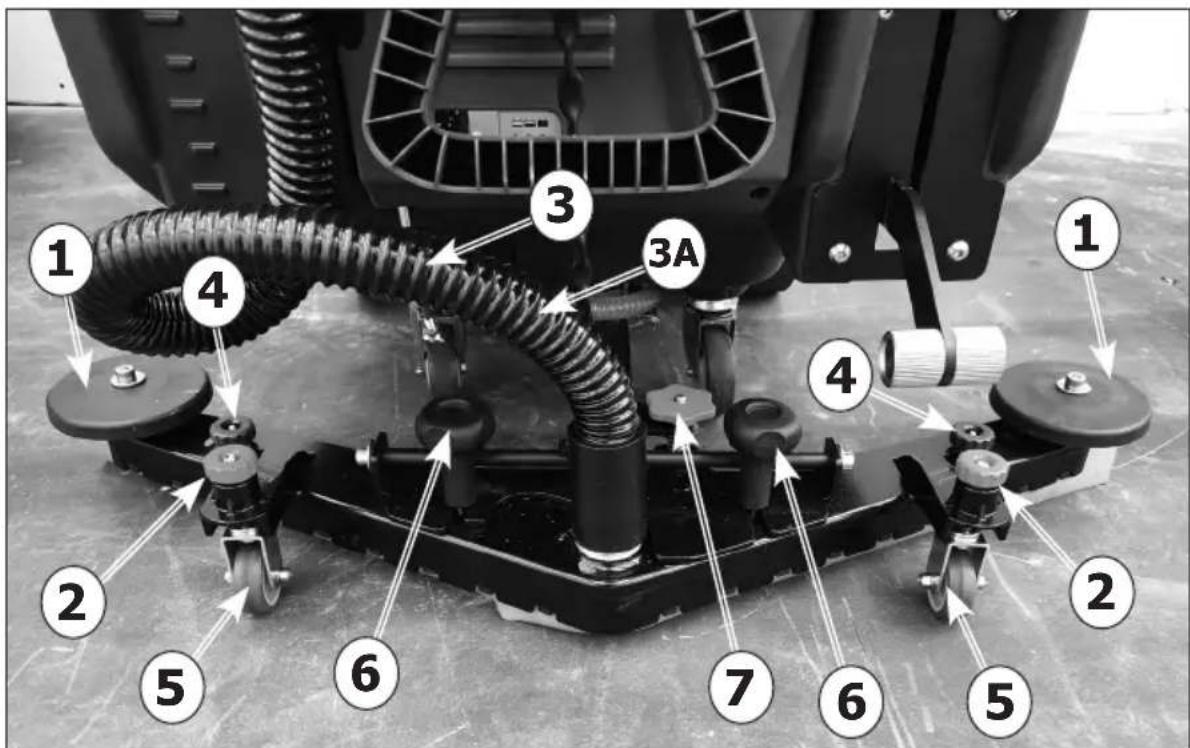
PHOTO L
1 Built-on battery charger
2 Power cord socket for battery charging
PHOTO M
1 Squeegee bumper wheel
2 Squeegee pression adjusting knob
3 Suction hose
3A Correct suction pipe assembly position
4 Squeegee blades replacement knob
5 Squeegee wheel
6 Squeegee fixing knob
7 Squeegee inclination adjusting knob
PHOTO N
1 Recovery tank cover
2 Battery compartment opening hooks
3 Recovery tank
4 Solution tanks
5 Recovery tank emptying pipe
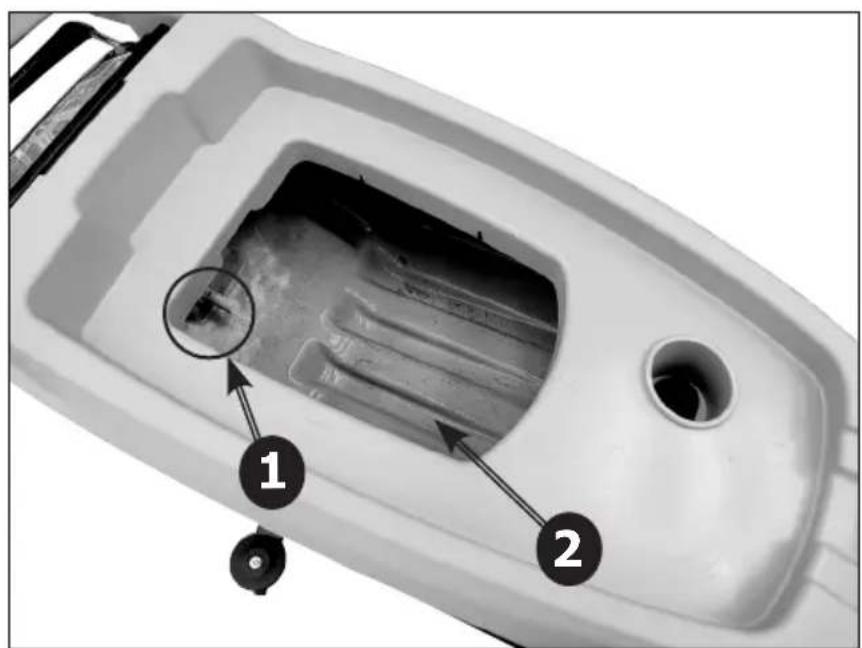
PHOTO O
1 Electronic float
2 Recovery tank inspection opening
PHOTO P
1 Identification plate
PHOTO Q
1 Detergent solution filter
PHOTO R
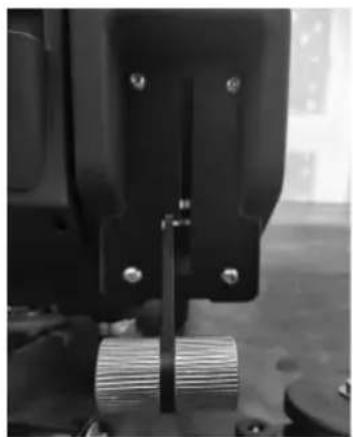
Brush plate lifting pedal position.
5.3. BATTERY CHARGING
Connect the extension cable to the power socket of the battery charger (Photo L-2) and to the mains power.
On switching on the battery charger will check the battery voltage and decide whether to start the charging process. If the battery is not connected to the battery charger, the yellow LED will flash. If the result of the test is positive after 1 second the charging of the battery can start, with the red LED on.
During the charging process, remember to keep the upper tank elevated for proper ventilation.
The progress of the charging process is shown by three LED's: red, yellow and green, as in the whole range of the battery chargers.
The green LED shows the end of the charging. Disconnect the battery charger from the mains.
- For further information refer to the use and safety manual of the battery charger provided by the manufacturer.
If the machine is equipped with Pb-Acid batteries, charge only in a well-ventilated area, lift the superior cover and open the battery plugs. Check that the electrolyte level covers the elements. Top up the level if necessary and at the end of charging. Remember to close the battery caps at the end of charging.
Follow the steps indicated in the battery manufacturer's operating and safety manual (see the battery maintenance section).
INSTRUCTIONS FOR CORRECT BATTERY MANAGEMENT:
If the machine is used regularly:
Always keep the batteries connected to the battery charger when the machine is not being used.
If the machine is not used for extended time periods:
Charge the battery during the night after the last work period, and then disconnect the battery from the battery charger.
Charge the battery during the night before using the machine again.
WARNINGS for Pb-Acid and GEL batteries:
-
They should only be recharged after being discharged by at least 50% to ensure better longevity.
-
Once the charging process has started, it must be completed fully until the green light
on the battery charger turns on. Failure to follow this instruction leads to rapid battery degradation and warranty avoidance.
If the machine is equipped with Pb-Acid batteries, use a hydrometer to check the element liquid density on a regular basis: if one or more elements are discharged and the others fully charged, the battery has been damaged and should be replaced or repaired (refer to the battery service manual).
5.4. SQUEEGEE ASSEMBLY
Slightly screw the two knobs ( Photo M-6 ) into the squeegee body and insert the squeegee into the slots situated on the squeegee support.
Screw the two knobs (Photo M-6) in order to secure the squeezegee to the support.
Firmly insert the suction pipe (Photo M-3) coming from the machine on the connection located on the body of the squeezegee.
5.5. SQUEEGEE DISASSEMBLY
Disconnect the suction hose from the squeezegee body.
Unscrew the two knobs ( Photo M-6 ) that secure the squeezegee to its support and pull the squeezegee to free it.
5.6. SQUEEGEE BLADES DISASSEMBLY / ASSEMBLY
Disassemble the squeezegee from its support (see 5.5)
Unscrew the knobs ( Photo M - 4, Photo M - 6 ) placed on the squeezegee body and apply some pressure on their bolts in order to push out the plastic support of the squeezegee blades from the squeezegee body.
Tear off the rubber blades from the plastic support.
Assemble the new blades on the plastic support by the means of the plastic pins that have to be fixed in the holes placed the blades.
Push the plastic support of the squeegee blades into the squeegee body and screw the knobs (Photo M-4, Photo M-6) to secure it to the squeegee body.
Reassemble the squeegee to its support (see 5.5).
5.7. SQUEEGEE ADJUSTMENT
The knob screw on the squeegee support ( Photo M - 7) adjusts the squeegee's inclination with respect to the floor. The two red knobs on the sides, connected to the rear wheels of the squeegee (Photo M-2) are to adjust the pressure of the squeegee to the floor.
When the squeezegee is perfectly adjusted, the rear squeezegee blade, sliding as it moves, bends in all points forming an angle of 45^ with the floor.
As the machine operates (advances), the knobs (Photo M-2, Photo M-7) can be used to adjust the inclination and pressure of the squeezegee blades on the floor.
Squeezegee drying must be uniform along the entire drying line: damp patches mean that drying is insufficient; turn the adjustment knobs to optimize drying.
5.8.SPLASH GUARD ASSEMBLY/ DISASSEMBLY
The splash guard is attached to the brush plate by interlocking on the brush cover.
To remove the splash guard is sufficient to pull it down until it detaches from the brush cover.
To replace the splash guard, push it into the bottom edge of the brush cover from one end and continue pushing up to the other end.
5.9. BRUSH ASSEMBLY / DISASSEMBLY
Never use the machine if the brush or the pad holder with abrasive pad is not perfectly installed.
Assembly:
Make sure that the brush plate is raised; otherwise lift it by following the instructions provided in the specific section.
Make sure that the ignition key on the control panel is in OFF position.
Place the brush under the plate, taking care that the coupling flange on the brush is under the metal coupling of the machine.
Lower the brush plate and start the brush rotation operating the brush motor switch and the brush operation lever; the brush will couple automatically.
To assemble the pad holder follow the same procedure.
Do not allow the length of the rows of brushes to become lower than 2,5cm
Do not allow the thickness of the abrasive disks to become less than 1 cm.
Working with excessively worn brushes or excessively thin abrasive disks may damage the machine and the floor.
Regularly check the wear on these parts before starting to work.
For disassembly or replacement for all the versions, the operation can be performed automatically or manually.
Manual operation:
Make sure that the brush plate is raised; otherwise lift it by following the instructions provided in the specific section.
Make sure that the ignition key on the control panel is in position OFF position.
While holding the brush with the hands under the plate, turn it in the rotation direction while lowering to release it from the metal coupling on the machine.
To disassemble the pad holder follow the same procedure.
Automatic operation:
ATTENTION: the last brush operation must not be ECO mode, ensure that the machine is switched on and that all the functions are not activated.
Activate the key corresponding to the SV function (depending on the models Photo A-4, Photo C-4, Photo E-4).
Press the control lever and wait for the brush release.
5.10. FILLING AND DRAINING THE SOLUTION TANK
The temperature of the water or the detergent should never exceed 50^
Always empty the recovery tank (Photo N-4) before filling the solution tank (Photo N-3).
To fill the tank:
- Pour into the tank the required quantity of the chemical product, considering the percentage indicated by the supplier, with reference to the full tank capacity listed on the product sheet.
If the machine is equipped with the dedicated detergent tank, open the hooks (Photo N - 2) and lift the recovery tank (Photo N - 3), remove the cap and fill the dedicated tank with detergent (Photo I - 4).
Use only those products suitable for the floor and the dirt to be removed. - Pour water in the filling opening placed in the front of the machine (Photo G - 2).
Leave 2cm between the filling opening and the liquid level. Do not fill beyond this point!
The machine was designed to be used with non-foaming and biodegradable detergents made specifically for scrubber-driers. The use of other chemical products (such as sodium hypochlorite, oxidizers, solvents or hydrocarbons) may damage or destroy the machine. - Follow the safety regulations specified in the relative section and indicated on the detergent container.
- Contact the machine manufacturer to obtain a complete list of available and suitable detergents.
- Do not leave the water hose unattended and insert it completely into the tank: the hose might move and get sensitive parts of the machine wet.
Close the tank with its foam plug.
To drain the tank:
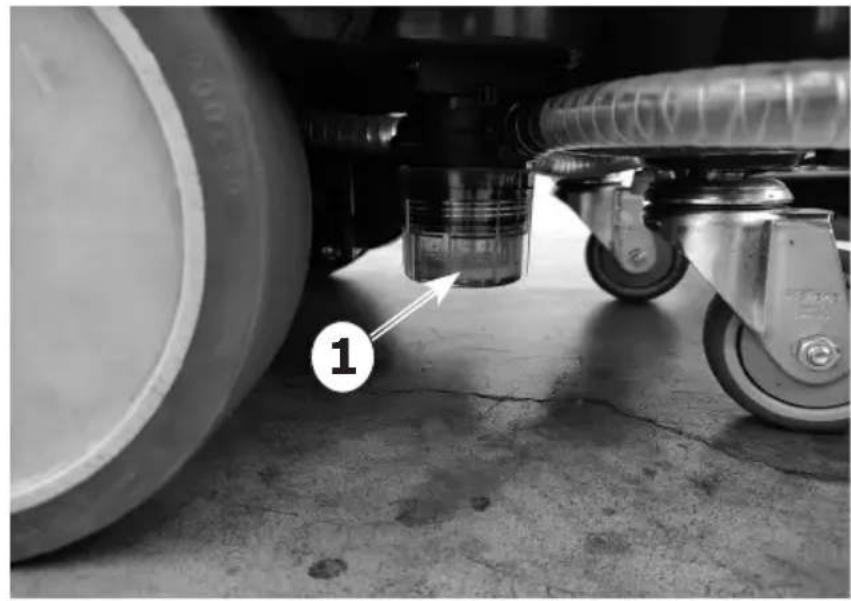
- Unscrew the water filter (Photo Q - 1) to allow the solution tank to be emptied.
- Firmly close the water filter container.
5.11. DRAINING THE RECOVERY TANK
The dirty water must be drained in accordance
with national regulations.
The user is completely responsible for ensuring compliance with such rules.
After the detergent solution is finished, always empty the recovery tank (Photo N-3) before filling it again.
In general, the recovery tank can be emptied whenever required, and even during intermediate phases of the work cycle.
The recovery tank volume is higher than the detergent solution volume, therefore a potentially dangerous situation for the suction motor should never occur. In any case, a safety float (Photo O-1) switches off the suction motor if the level of dirty liquid is excessive.
If water or foam starts leaking from under the tanks for any reason, immediately turn off the suction motor and empty the recovery tank.
To drain the tank:
Drive the machine to a suitable location to drain the dirty water and preferably near a toilet or a sewer drain (comply with the national regulations for waste water disposal).
Turn off the machine and remove the key from the panel.
Detach the drain hose from the holder (Photo N - 5) and, keeping it high, unscrew the plug.
Lower the drain hose toward the selected drainage point.
The emptying operation can be interrupted quickly and whenever required just by raising the drain hose.
Check how much dirt is still in the tank and, if necessary, wash it inside through the inspection hole (Photo O-2).
Once the tank has been emptied, plug the drain pipe and attach it to the hook above the tank.
The plug of the drain pipe must be closed perfectly, without the passage of air, otherwise there will be a loss of depression that will cause imperfect drying.
5.12. SPECIFIC INSTRUCTIONS FOR THE USE OF MODEL AC 230V
The AC 230V model can only be connected to an electrical network with a voltage corresponding to the voltage indicated on the machine's plate data and if the power outlet is provided with earthing.
Do not damage the feed cable; do not crush or pull on it.
ATTENTION: Make sure that the power cable does not come into contact with the rotary brushes.
ATTENTION! - The model AC 230V machine has parts, which are connected to the current; contact with these could cause grave injuries or even death.
- Before executing any type of operation on the machine always disconnect it from the electrical source.
- Never touch electric cables that are defective or worn.
- Before gaining access to the electrical system it is always necessary to disconnect the machine from the electrical source by removing the plug from the socket-outlet.
- In the case of defective, damaged, or cracked electric cables, replace immediately with authentic replacement parts.
- The network of connections must be protected from water spray.
- The patch cord for the connection of the machine to the mains power must conform to current safety rules.
- The electrical system to which the machine is connected must be equipped with a cutout box.
- It is absolutely forbidden to use the machine in proximity to swimming pools or stretches of water.
EMERGENCY SITUATIONS In case of emergency:
- Immediately disconnect the machine from the power mains.
- Immediately apply proper first-aid.
If an accident should occur the machine must not be put into operation until a technician authorized by the manufacturer has examined it.
5.13. DRIVING THE MACHINE
Model "E" (AC 230V)
Connect the power cable (Photo B - 1) to the mains using an extension cord.
Press the machine power button (Photo A - 1). Press the brush motor start button (Photo A - 2). the brush will only start to rotate by operating the control lever (Photo B - 5).
Press the suction motor start button (Photo A - 3).
Open the solution valve by raising the solution dosing lever behind the machine (Photo B - 2), lower the suction unit using the floor squeezegee lifting lever (Photo B - 4), lower the washing head by pressing and moving to the right, and then release the lifting pedal (Photo B - 3).
Wash the floor, proceeding slowly forward, pulling the control lever (Photo B-5) to operate the brush; when the control lever is released, rotation of the brush will stop after a few seconds. Remember to lift the squeegee before reversing to avoid faults with the squeegee.
Model "B" (DC 24V)
Check the connection of the battery connector, located on the back of the machine under the control panel (Photo D-6).
Press the machine power button (Photo C - 1). From the control panel, check the state of charge of the batteries (Photo C - 5);
Press the SMART RUN button to start the brush motor (Photo C-2)
To activate the "Eco" energy
saving mode of the brush, hold down the button for 2 seconds
(Photo C-2). The corresponding light flashes. To return to normal mode, press and hold the button until the corresponding light remains on. To activate the "Eco" energy
saving mode of the suction, hold down the button for 2 seconds
(Photo C-2). The corresponding light flashes. To return to normal mode, press and hold the button until the corresponding light remains on. the brush will only start to rotate after operating the control lever (Photo D - 2).
By pressing the SMART RUN key, the suction motor is automatically activated. To activate/ deactivate the suction, press the suction motor start button (Photo C-3).
Open the solution valve by raising the detergent dosing lever located behind the machine (Photo D - 1), lower the suction unit using the squeezegee lifting lever (Photo D - 4), lower the washing head by pressing and moving to the right and then release the lifting pedal (Photo D - 3).
Wash the floor, proceeding slowly forward, pulling the control lever (Photo D-2) to operate the brush; when the control lever is released, rotation of the brush will stop after a few seconds.
Remember to lift the squeegee before reversing to avoid faults with the squeegee.
Model "BT" (DC 24V with traction)
Check the connection of the battery connector, located on the back of the machine under the control panel (Photo F-8).
Insert and turn the ignition key (Photo F - 1).
Press the machine power button (Photo E - 1).
From the control panel, check the state of charge of the batteries (Photo E-5) and, if sufficient, select the desired operating speed (Photo E-8, E-9).
Press the SMART RUN button to start the brush motor (Photo E-2).
To activate the "Eco" energy
saving mode of the brush, hold down the button for 2 seconds
(Photo E-2). The corresponding light flashes. To return to normal mode, press and hold the button until the corresponding light remains on.
To activate the "Eco" energy
saving mode of the suction, hold down the button for 2 seconds
(Photo E-3). The corresponding light flashes. To return to normal mode, press and hold the button until the corresponding light remains on.
the brush will only start to turn after operating the traction control lever (Photo F - 2).
By pressing the SMART RUN key, the suction motor is automatically activated. To activate/deactivate the suction, press the suction motor start button (Photo E-3).
To perform floor washing, select 'FORWARD' (Photo E-7A) by pressing the selection button (Photo E-7) and pulling the traction control lever (Photo F-2) upwards.
To reverse, select 'REVERSE' (Photo E - 7B) by pressing the selection button (Photo E - 7) again and pulling the traction control lever (Photo F - 2) upwards. In both cases, releasing the control lever will stop the traction, and the brush rotation will stop after a few seconds.
Remember to lift the squeezegee before reversing to avoid faults with the squeezegee.
5.14. WORK METHOD
5.14.1. PREPARATION AND WARNINGS
Remove any loose solid residue from the surface to be treated (using suitable tools, such as vacuum cleaners, sweepers, etc.). It this is not done, the solid dirt might prevent the squeegee from operating correctly, reducing drying efficiency.
Only trained personnel can drive this machine.
5.14.2. BATTERY CHARGE LEVEL CONTROLS
The sequence of lights of the battery charge control (Photo C-5,E-5) progressively turns off until the battery is discharged. When the red light turns on (Photo C-5C, E-5C), turn off the brush motor, close the detergent solution outlet, finish drying the small residual moisture and go to the battery charging area to charge the battery.
The batteries may be irreparably damaged if the residual charge level drops too low (see the battery operating manual). Do not force the battery discharge beyond the safety limits, turning the key off and on or in any other manner.
5.14.3. DIRECT SCRUBBING OR FOR SLIGHTLY DIRTY SURFACES
Scrubbing and drying in a single pass.
Prepare the machine as previously described and use it as described in paragraph 5.13.
Never use the brush without the detergent solution: the floor might be damaged.
5.14.4. INDIRECT SCRUBBING OR FOR VERY DIRTY SURFACES
Scrubbing and drying in various passes.
Prepare the machine as previously described.
First set of operations:
Wash the floor as described in paragraph 5.13, without drying the floor
| When needed | After every use Weekly Monthly | |||
| Remove and wash the squeezegee | X | |||
| Drain the recovery tank | X | |||
| Drain, rinse with clean water or sanificate the recovery tank | X | |||
| Charge the batteries | X | X | ||
| Check the acid level in the battery cells (if batteries are not maintenance-free) | X | |||
| Remove brushes and check for brush wear, foreign bodies and wrapped belts | X | |||
| Verify the machine general conditions. | X | |||
| Verify that suction hose and conduct are free from obstructions | X | |||
| Check the wear of the squeezegee rubber blades | X | |||
| Open and clean the solution water filter | X | |||
| Clean the brush plate, squeezegee support and squeezegee | X | |||
| Check the lifting/lowering of the brush plate. | X | |||
| Check the lifting/lowering of the squeezegee. | X | |||
| Grease the moving parts. | X | |||
| Verify the security devices ( traction operation lever). | X | |||
| Descale water hoses. | X | |||
Allow the detergent solution to work on the dirty floor according to what is indicated in the information relative to the detergent used.
Second set of operations:
Proceed as explained in the previous "DIRECT SCRUBBING OR FOR SLIGHTLY DIRTY SURFACES" paragraph (5.14.3) to also proceed with drying the floor.
Never use the brush without the detergent solution: the floor might be damaged.
5.14.5. POST-SCRUBBING OPERATIONS
Close the detergent solution outlet.
Lift the brush unit and turn off the brush motor.
After having completely dried any traces of water on the surface, wait a few seconds and then lift the squeezegee and turn off the suction motor.
Move to a suitable location to drain the tanks; empty and clean the tanks (as described in 5.11). Turn off the machine using the key and remove it from the control panel.
Switch off the machine by pressing and holding the machine power button (Photo A-1, C - 1, E - 1) for 3 seconds.
If the machine is equipped with a key switch, turn the key anti-clockwise and remove it from the panel.
If necessary, charge the battery (see the relative
section).
6. MAINTENANCE INFORMATION
If the machine is equipped with a key switch, turn the key anti-clockwise and remove it from the panel.
Disconnect the battery connector from the machine wiring.
All work on the electrical system as well as all maintenance and repair operations (especially those not explicitly described in this manual) should be carried out only by authorized service centers or by specialized technical personnel who are experts in the sector and in the pertinent safety regulations.
Performing regular maintenance on the machine, and carefully following the manufacturer's instructions, is the best guarantee for obtaining the best performances and extended machine service life.
6.1.TANKS
Drain the two tanks as described in the relative sections.
Remove any solid dirt by filling and draining the tanks until all dirt has been eliminated: use a washing hose or similar tool to do this.
Water hotter than 50^ a high-pressure cleaner or excessively powerful sprays may damage the
tanks and the machine.
Leave the plugs of the tanks open (only while the machine is not being used) so that they can dry and thus prevent the formation of foul odors.
6.2.SUCTION HOSE
Detach the suction hose from the squeezegee ( Photo M-3).
Now you can wash the hose and remove any obstructions.
Firmly insert the hose on the squeezegee body.
6.3.SQUEEGEE
Do not handle the squeezegee with bare hands: wear gloves and any safety clothing needed to carry out the operation.
Detach the squeezegee from the machine and clean it under running water using a sponge or a brush.
Check the efficiency and the wear on the strips in contact with the floor. They are designed to scrape the film of detergent and water on the floor and to isolate that portion of the surface to enhance the vacuum of the suction motor: this ensures that the machine will dry very efficiently. Working constantly in this manner tends to round or to deteriorate the sharp edge of the strip, thus reducing drying efficiently. This is why the squeegee strips must be replaced.
To replace the worn blades, follow the instructions in the relative section. Turn the blades around to wear down the other sharp corners or to install new ones.
6.4. ACCESSORIES
Remove and clean the brushes or the scraper disks.
A To avoid damaging the floor and the machine, carefully check if foreign matter, such as metallic parts, screws, chips, cords or similar items, has become jammed.
Check that the brushes are flat as they work on the surface (check for any irregular wear on the brushes or on the abrasive disks). If necessary, adjust the slant of the action on the floor.
Use only the accessories recommended by the manufacturer: other products may reduce operating safety.
6.5.MACHINEBODY
Use a sponge or a soft cloth to clean the exterior of the machine and, if necessary, a soft brush to eliminate tough dirt. The machine's shockproof surface is rough to make it harder to see scratches caused during use. However, this does not make it easier to remove tough stains on the surface. It is prohibited to use steam machines, hoses with running water and high-pressure cleaners.
6.6. BATTERIES
PB-Acid batteries
Carry out maintenance operations in accordance with the manufacturer's instructions and with all the other instructions provided in this manual.
Exposing the element plates (not completely immersed in the acid solution) will lead to rapid oxidation and irreparably reduce the element's operating capacities.
An overflowing acid solution may corrode the machine.
Use battery chargers recommended by the manufacturer and, in any case, those that are suitable for the type of battery to be charged.
Always charge batteries in well-ventilated rooms: there is an explosion risk!
Always charge batteries in well-ventilated rooms, there is a risk of explosion!
The use of gel or maintenance-free batteries is highly recommended.
GEL batteries
Carry out maintenance operations in accordance with the manufacturer's instructions and with all the other instructions provided in this manual.
Use only those battery chargers recommended by the manufacturer.
If the batteries are not used, in either case, for an extended period of time, disconnect them and restore the charge within the time limits specified for the type of battery used (generally and as a precaution, no more than 3 months for Pb-acid/GEL/AGM batteries, 6 months for Li-ion batteries).
The manufacturer accepts no liability for damage to batteries caused by failure to follow this procedure.
6.7. THERMAL BREAKERS
The machine is equipped with electric protection devices on the main operating components to avoid costly malfunctions.
Thermal breakers are installed to protect the drive motor wherever foreseen and the brush motor.
When one of these breakers trips automatically, the disabled function can be reactivated by fully depressing the button of the breaker.
When the thermal breakers trip, especially when the machine is used during the first few weeks, it might not be caused by actual machine malfunctions. However, a specialized technician should check the device if the relative breaker continues to trip.
6.8. PERIODIC MAINTENANCE
For all the operations described herein, refer to
the instructions and detailed warnings in the relative sections.
6.9. RECOMMENDED SPARE PARTS
You'll always be able to use your machine as efficiently as possible by maintaining a stock of the most common consumable materials and by scheduling routine and extraordinary maintenance. Contact your dealer for a list of these spare parts.
7. OPERATING CHECKS
7.1. PROBLEM SOLVING GUIDE
These indications make it easier to understand the underlying causes of some problems based on specific type of inconvenience. For the type of corrective action to take please refer to the specific sections described below.
7.1.1. THE MACHINE DOESN'T WORK
The key (if present) isn't inserted or correctly turned.
Insert and turn the key to position ON and press the power key.
The battery connector is disconnected or poorly attached to the main wiring connector.
Firmly connect the two connectors.
The machine is charging.
Complete the charging operation.
The batteries are discharged.
Charge the batteries.
The main fuse has blown
Replace it
The control board has overheated
Check the situations of use that may have caused the fault (high slope, etc.) wait 30 min. and try to avoid the same incorrect uses. If the problem persists, contact the authorised service centre.
7.1.2. THE MACHINE DOESN'T MOVE
The floor slope is too high.
Push manually the machine to the upper floor level.
The thermal protection of the traction motor is tripped.
Stop the machine and rest it for 5 minutes, the push the thermal breaker button.
The batteries are discharged.
Charge the batteries.
The traction motor was not stopped when the machine was switched on.
Place the machine on a flat surface, switch off and on again with the key.
7.1.3. THE BRUSH DON'T ROTATE
The brush motor switch is not selected.
Press the button to activate the brushes.
The brush motor thermal breaker tripped; the motor overheated.
Troubleshoot the cause (cords or similar items that impede movement, surface too rough, etc.) and press the reset breaker (the first from the top).
The control board is faulty or the motor relay or brush motor is faulty
Replace it.
7.1.4. NOT ENOUGH OR TOO MUCH DETERGENT
The detergent solution tank is empty.
Fill the detergent solution tank after having emptied the recovery tank.
The brushes or the machine is stopped.
Activate the brushes and press the control lever.
The flow adjustment lever is closed or almost closed.
Adjust/increase the detergent solution outlet flow as required.
The cleaning solution filter is clogged.
Clean the filter.
The detergent feed conduit is clogged in some point.
Clean out the conduit by removing the dirt.
The flow opening solenoid valve is faulty.
Replace it.
7.1.5. NO SUCTION
The suction hose is not connected to the squeegee.
Connect it correctly.
The suction hose or the squeezegee conduit are clogged.
Clean out and remove any obstructions from the conduits.
The suction motor is turned off.
Activate it.
The recovery tank is full.
Empty it.
The suction motor does not receive the power supply or is faulty.
Check the connections and, for the latter case, replace the motor.
7.1.6. INSUFFICIENT SUCTION
The recovery tank cover has not been fully tightened.
Tighten it firmly.
The recovery tank drain hose plug is not perfectly closed.
Close it correctly.
The suction hose, the squeezegee conduit or the inspection compartment is clogged.
Clean out and remove any obstructions from the conduits.
7.1.7. THE BRUSH MOTOR OR THE SUCTION MOTOR DOESN'T STOP
The control board is defective.
Stop the machine, cutting off the main power supply and disconnecting the main battery
connector, and contact the technical service centre.
7.1.8. THE SQUEEGEE DOESN'T CLEAN OR DRY EFFICIENTLY
The squeezegee blades are worn or are dragging solid dirt.
Replace or clean them.
The squeezegee adjustment is not correct; the advancement must be exactly perpendicular to the running direction.
Adjust the squeegee.
The suction hose or the squeezegee conduit are clogged.
Clean out and remove any obstructions from the conduits.
7.1.9. THE BATTERY CHARGER DOESN'T WORK
The battery charge doesn't start.
Check that the battery charger is connected to the battery. Consult the battery charger manual.
7.1.10. THE BATTERIES DO NOT CHARGE OR DO
NOT HOLD A CHARGE
At the end of the charging process, the battery is not correctly charged (see the battery manufacturer's instruction-maintenance manual)
Check the battery charger error message and check the data indicated on the display (see the battery charger's instruction manual).
The batteries are new and do not generate 100% of the rated performances.
The accumulator reaches the maximum performance after 20-30 complete charge cycles.
The electrolyte has evaporated and does not completely cover the plates.
Check the battery manufacturer's use and maintenance manual.
There are significant differences in density among the various elements.
Replace the damaged battery.
Always consult the battery and battery charger use and maintenance manual. If this does not solve the problem, contact the authorised technical service centre.
The manufacturer CANNOT solve problems caused by using batteries and battery chargers that were not directly supplied.
8. ALARMS TABLE
| STANDARD ERROR CODE (MOTION MANAGER) | DEFAULT FLASHING | FLASH MODE | MEANING DESCRIPT | ON/ACTION |
| 18 LED 1/2 | (yellow BATTERY LED) | 1 flash - pause 2sec - 1 flash 500ms (cyclic) | Suction tank full Floater | |
| 20 LED 1/2 | (yellow BATTERY LED) | 2 flashes - pause 2sec - 2 flashes 500ms (cyclic) | Current Fault The | system has stopped the motor to protect the drive due to excessive peak current. To reset, restart the controller. |
| 19 LED 1/2 | (yellow BATTERY LED) | 3 flashes - pause 2sec - 3 flashes 500ms (cyclic) | Voltage Fault The | system has stopped the motor to protect the drive by short-circuiting. To reset, restart the controller. |
| 54 LED 1/2 | (yellow BATTERY LED) | 4 flashes - pause 2sec - 4 flashes 500ms (cyclic) | Motor disconnected | One of the motors is disconnected. To restore, check the connection and restart the controller. |
| 22 LED 1/2 | (yellow BATTERY LED) | 5 flashes - pause 2sec - 5 flashes 500ms (cyclic) | Start Check When | the board is switched on, the operator presence lever is pressed. |
| 10 LED 1/2 | (yellow BATTERY LED) | 6 flashes - pause 2sec - 6 flashes 500ms (cyclic) | Standby The sys | em goes into standby after 5 minutes (default) to save battery. To reset, restart the controller. |
| 15 LED 1/2 | (yellow BATTERY LED) | 7 flashes - pause 2sec - 7 flashes 500ms (cyclic) | Battery Charging | Battery Charger Inserted. To reset disconnect the battery charger. |
| 14 LED 1/2 | (yellow BATTERY LED) | 8 flashes - pause 2sec - 8 flashes 500ms (cyclic) | Maximum Mosfet temperature | The system has stopped the motor due to excessive temperature of the electronic power stage. To reset, restart the controller being sure to cool the drive. |
| STANDARD ERROR CODE (MOTION MANAGER) | DEFAULT FLASHING | FLASH MODE | MEANING DESCRIPTION | ON/ACTION |
| 24 LED 1/2(yellow BATTERY LED) | 9 flashes- pause 2sec - 9 flashes 500ms (cyclic) | Maximum Micro-processor temperature | The system has stopped the motor due to excessive temperature of the micro-controller. To reset, restart the controller being sure to cool the drive. | |
| 51 LED 1/2(yellow BATTERY LED) | 10 flashes- pause2sec- 10 flashes 500ms (cyclic) | I2T traction motor | The system stopped the motor to protect the motor because the current remained above the defined value beyond the set time. To reset, restart the controller being sure to cool the motor. | |
| 72 LED 1/2(yellow BATTERY LED) | 11 flashes- pause 2sec - 11 flashes 500ms (cyclic) | I2T brush motor The system stopped the motor to protect the motor because the current remained above the defined value beyond the set time. To reset, restart the controller being sure to cool the motor. | ||
| 92 LED 1/2(yellow BATTERY LED) | 12 flashes- pause 2sec - 12 flashes 500ms (cyclic) | I2T suction motor The system stopped the motor to protect the motor because the current remained above the defined value beyond the set time. To reset, restart the controller being sure to cool the motor. | ||
| 53 LED 1/2(yellow BATTERY LED) | 13 flashes- pause 2sec - 13 flashes 500ms (cyclic) | Traction current limitation | The constant current limitation time of the traction motor has been exceeded. To reset, turn the controller off and on again. | |
| 74 LED 1/2(yellow BATTERY LED) | 14 flashes- pause 2sec - 14 flashes 500ms (cyclic) | Brushes current limitation | The constant current limitation time of the brushes motor has been exceeded. To reset, turn the controller off and on again. | |
| 94 LED 1/2(yellow BATTERY LED) | 15 flashes- pause 2sec - 15 flashes 500ms (cyclic) | Suction current limitation | The constant current limitation time of the suction motor has been exceeded. To reset, turn the controller off and on again. | |
| 28 CRC_ERROR Internal error | displayed | only on MotionManager |
ONLY FOR MACHINE EQUIPPED WITH FMS (Fleet Management System)
| STANDARD ERROR CODE (MOTION MANAGER) | DEFAULT FLASHING | FLASH MODE | MEANING DESCRIPTION | ON/ACTION |
| 76 LED Empty (red) Cyclic flashes | Brushes | Threshold | Sh-old Stop | Stops the brush motor due to reaching of the battery threshold. The remaining motors continue to work. |
| 96 LED Empty (red) Cyclic flashes | Suction | Threshold | Sh-old Stop | Stops the suction motor due to reaching of the battery threshold. The remaining motors continue to work. |
| 55 LED Empty (red) Cyclic flashes | Traction | Threshold | Sh-old Stop | THRESHOLD EQUAL TO MINIMUM BATTERY |
| I4.0 - REMOTE CONTROLS | ||||
| 60 SV-LED | Brush release(Green LED) | 2 flashes- pause 2sec - 3 flashes 500ms (cyclic) | Movement limi-tation | The machine is no longer enabled to operate via remote controlContact Assistance |
| 61 SV-LED | Brush release(Green LED) | 5 flashes- pause 2sec - 5 flashes 500ms (cyclic) | Geofencing limi-tation | The machine is operating be-yond the ena-bling area and the brush func-tion lock com-mand has been given remotely.Contact Assis-tance |
9. CONDITIONS OF WARRANTY
All our appliances are subjected to rigorous tests and are covered by warranty against material or manufacturing defects for a period of 12 months. The warranty comes into effect from the date of purchase. The date of purchase is the date indicated on the receipt issued by the Reseller when the appliance is consigned. The manufacturer shall repair or replace any faulty parts free of charge during the period covered by the warranty. Any defects, which cannot be clearly attributed to material or manufacturing defects shall be examined by one of our Technical Service Centres or at our factory and charged in accordance with the outcome. The following are anyhow not covered by the warranty: accidental damage during transportation or handling, accidental damage caused by negligence or unsuitable conduct, damage due to incorrect or improper uses or installations which do not conform with the warnings included in the instruction manual, and anyhow due to unusual events which do not depend on the running or use of the appliance. Appliances requiring repair must be delivered at the Technical Service Centre complete with all their original accessories together with proof of purchase. If the appliance has been repaired or tampered with by unauthorised third parties, the warranty shall be considered null and void. The warranty shall also be considered null and void if the user is not able to produce an original (legible and complete) document proving purchase or if it not possible to read the appliance serial number located on the frame. The appliance shall not be replaced and the warranty shall not be extended once the appliance has been affected by a fault. Repairs shall be carried out at one of our Authorised technical Service Centres or at our factory. Appliances for repair must be sent carriage free, that is, the user shall pay and be responsible for carriage. The warranty does not cover the cleaning of working parts, any scheduled maintenance nor the repair or replacement of parts subject to normal wear and tear. The manufacturer shall not be held liable for damage to persons or things caused by any installation which does not comply with the instructions in the manual or faulty use of the appliance.
9.1. SCRAPPING OF THE MACHINE
If the machine will no longer be used, remove the batteries and dispose of them in accordance with the eco-compatibility regulations as set forth in European standard 2013/56/EU or deposit them in an authorised collection centre.
To dispose of the machine, comply with the current laws where it is used:
-
disconnect the machine from the mains and clean it after emptying any liquids;
-
separate the machine into groups of homogeneous materials (plastics in accordance with the recycling symbol, metals, rubber, packing). For parts containing different materials, contact the competent authorities;
Each homogeneous group must be disposed of in accordance with recycling laws.
In addition, it is recommended to eliminate those parts of the machine that may be dangerous, especially for children.
9.2.DISPOSAL (WEEE)
As the owner of electrical or electronic equipment, the law (in accordance with the EU Directive 2012/19/EU on waste from electrical and electronic equipment
and the national laws of the EU Member States that have implemented this Directive) prohibits you from disposing of this product or its electrical / electronic accessories as municipal solid waste and obliges you to make use of the appropriate waste collection facilities. The product can be disposed of by returning it to the distributor when a new product is purchased. The new product must be equivalent to that being disposed of. Disposing of the product in the environment can cause great harm to the environment itself and human health.
The symbol in the figure indicates the urban waste containers and it is strictly prohibited to dispose of the equipment in these containers. Non-compliance with the regulationis spulated in the Directive 2012/19/EU and the decrees implemented in the various EU Member States is administratively punishable.
FR
SOMMAIRE
- GENERALITES
1.1. BUT DU MANUEL
1.2. TERMINOLOGIE ET LEGENDE DES SYMBOLES REDACTIONNELS
1.3. IDENTIFICATION DE LA MACHINE
1.4.USAGE PREVU
1.5. MODIFICATIONS TECHNIQUES
2. INFORMATIONS SUR LA SECURITE
2.1. REGLES IMPORTANTES
2.2. EMISSION SONORE ET VIBRATIONS
3. INFORMATIONS SUR LA MANUTENTION
3.1. MANUTENTION DE L'EMBALLAGE
3.2. CONTROL A LA RECEPTION
3.3. DEBALLAGE
3.4. MANUTENTION DE LA MACHINE, DES BATTERIES ET DU CHARGEUR DE BATTERIES
4. INFORMATIONS TECHNIQUES
4.1. INFORMATIONS D'INSTALLATION
4.1.1. BATTERIES
4.1.2. PREPARATION DES BATTERIES
4.1.3. INSTALLATION DES BATTERIES
4.1.4. BRANCHEMENT DES BATTERIES
4.1.5. CONFIGURATION DE L'INDICATEUR DE LA DÉCHARGE DES BATTERIES
4.2. CONFIGURATION DU CHARGEUR DE BATTERIE
5. INFORMATIONS SUR L'UTILISATION
5.1. PREPARATION DE LA MACHINE
5.2. STRUCTURE ET FONCTIONS DE LA MACHINE
5.3. RECHARGE DES BATTERIES
5.4. MONTAGE DU SUCEUR
5.5. DEMONTAGE DU SUCEUR
5.6. REMPLACEMENT DES BAVETTES DU SUCEUR
5.7. REGLAGE DU SUCEUR
5.8. MONTAGE ET DEMONTAGE DE LA BAVETTE ANTI-ECLABOSSURES
5.9. MONTAGE ET DEMONTAGE DE LA BROSSE
5.10. REMPLISSAGE ET VIDANGE DU RESERVOIR D'EAU PROPRE
5.11. VIDANGE DU RESERVOIR D'EAU SALE
5.12. NORMES PARTICULIERES D'UTILISATION DU MODELE AC 230V
5.13. CONDUITE DE LA MACHINE
5.14. METHODE DE TRAVAIL
5.14.1. PREPARATION ET CONSEILS
5.14.2. CONTROL DE L'ETAT DE CHARGE DES BATTERIES
5.14.3. LAVAGE DIRECT OU POUR SURFACES LEGEREMENT SALES
5.14.4. LAVAGE INDIRECT OU POUR SURFACES TRES SALES
5.14.5. OPERATIONS APRES-LAVAGE
6. INFORMATIONS SUR L'ENTRETIEN
6.1. RESERVOIRS
6.2. TUYAU D'ASPIRATION
6.3. SUCEUR
6.4. ACCESSORIES
6.5. CORPS DE LA MACHINE
6.6. BATTERIES
6.7. DISJONCTEURS THERMIQUES
6.8. ENTREIENS PÉRIODIQUES
6.9. PIECES DE RECHANGE CONSEILLEES
-
PETIT GUIDE DE DEPANNAGE
7.1. RÉSOLUTION DES PROBLEMES
7.1.1. LA MACHINE NE FONCTIONNE PAS
7.1.2. LA MACHINE N'AVANCE PAS
7.1.3. LA BROSSE NETOURNE PAS
7.1.4. LA DISTRIBUTION DE SOLUTION DETERGENTE EST INSUFFISANTE OU INEXISTANTE
7.1.5. ABSENCE D'ASPIRATION
7.1.6. L'ASPIRATION N'EST PAS EFFICACE
7.1.7. LE MOTEUR DES BROSSES OU LE MOTEUR ASPIRATION NE S'ARRETENT PAS
7.1.8. LE SUCEUR NE NETTOIE PAS OU NE SECHE PAS BIEN
7.1.9. LE CHARGEUR DE BATTERIES NE FONCTIONNE PAS
7.1.10. LES BATTERIES NE SE CHARGENT PAS OU NE MAINTIENNENT PAS LA CHARGE -
TABLEAU ALARMES
-
CONDITIONS DE GARANTIE
9.1. DEMOLITION DE LA MACHINE
9.2. ÉLIMINATION
1. GENERALITES
1.1. BUT DU MANUEL
3. INFORMATIONS SUR LA MANUTENTION
3.1. MANUTENTION DE L'EMBALLAGE
3. HANDLINGS-INFORMATIONEN
J 15 J 15 J 15 J 15 J 15 J 15 J 15 J 15 J 15 J 15 J 15 J 15 J 15 J 15 J 15 J 15 J 15 J 15 J 15 J 15 J 15 J 15 J 15 J 15 J 15 J 15
.
g 1 g 1 1 1 1 1 1 1 1 1 1 1
g j 111 111 111 111 111 111 111 111 111 111 111 111 111 111 111 111 1
jlaalb.3
J 1111111111111111111111111111111111
.
:
p 1 1 1 1 1 1 1 1 1 1 1 1 1 1 1 1 1 1 1 1
L 10000000000000000000000000000000000000000000000000000000000000000
aiee eae 1000000000000000000000000000000000000000000000000000000000
g 20000000000000000000000000000000000000000000000000000000000000000
()1r 100000000000000000000000000000000000000000000000000000000000
y 1
iJ Lac pIg iIgll pcdl gaoe Jxolal aod jIg Jb0 1
jll Aie Ic pii Cilac ay Bg Eal bll d y Jy Gaaia
aogall yic clll sll aol) aillll G y Bg
aleo e o ll k n jlc (uill lgs f t alallddall g
. Cilaoell ojeaiaaiia aaxll gnnn 1 1
baa la gaiyai jie gai yai jaiyai ly bao
JbIyIaAsLgDgDgDgDgDgDgDgDgDgDgDgDgDgDgDgDgDgDgDgDgDgDgDgDgDgDgDgDgDgDgDgDgDgDgDgDgDgDgDgDgDgDgDgDgDgDgDgDgDgDg
aalalalalalalalalalalalalalalalalalal
1 1
a a
aaiiie 1
aalalalalalalalalalalalalalalalalalalal
(…...)
J 1
Aagllg Aaeaae eaiy 1d y (c) ... g
iJLAC g i j 1j"pIaIeI JIaIe I JIaIe I JIaIe I JIaIe I JIaIe I JIaIe I JIaIe I JIaIe I
A
J 100
y
aill 1 JlJL Joc jll no pkiit g aalld
511j 111i 111i
iall 12211111111111111111
a a a a a a a a a a a a a a a a a a a a a
p 1
y
aaii aai i 1
y 1
J 1
1.
1
Jn JnJnJnJnJnJnJnJnJnJnJnJnJnJnJnJnJnJnJnJnJnJnJnJnJnJnJnJnJnJnJnJnJnJnJnJnJnJnJnJnJnJnJn
y10 1
iill
3.1
g g g g g g g g g g g g g g g g g g g g g g g
:
aaii 15
.
CE 1
.
JgDgS
.
gall
.
aJy1 aay1 o gll
.
()
.
i
.
gall y
.
alai
4.1
y j 1
aabaaal 1y jy g yj i jg b a j Jc
g 111111111111111111111111
J
1.1
y 1
.
y j 15 aaii i 4 4 4 4 4 4 4 4 4 4 4 4 4 4 4 4 4 4 4 4 4 4 4 4 4 4 4 4 4 4
j 1
aia jai jie 1
1
a 1
a 1
J 1
-
TABELA ALARMÓW
-
WARUNKI GWARANCJI
9.1. USUWANIE
9.2. POSTEPOWANIE
1. INFORMACJE OGOLNE
1.1. ZAKRES INSTRUKCJI
BnaxKHOCTb DOnkHa 6bITb B ppeJax O T 30% do 95% He3aBNCMO OT kCNyatauMaunHbl.
HnKOrda He nCNoJb3OBA Tb N He BCaCbIbA Tb Ra3bl, cyxyo PbIb, KNCLOTb I paCTBOpTeN (HaPnPmep, pa36abNTeN dJa Kpackn, aueToH n T.D.), DaKe B pa3BeHeHOM BnDe, JERKO BOCnJaMeHIOUneCra NII B3PbIOONaChIbe BeuceCTBa (HaPnPmep, 6eH3nH, Ma3yT nT.D.); HnKOrda He BCaCbIbA Tb ropAunie NnI paKaJIeHNbIpeDMtbl.
He nCNoIb3OBaTb MaunHy Ha HAKIOHax nnCKaTaX cyrnom 6oJee 2 %
Ha He6oBxHnHaKHOHx He CTaBnTb MaunHy 6OKOM, nepeDburatb ee c octopoXHoCTbI, He n3MeHra HnpaBHeHn. MAc. yKIOH TpaHCnOpTHbI 3OHbI 10% . Pn nepeBO3Ke MaunHbI Ha HAKLOHax I cKaTAX C 6OJbUIM yKIOHOM npoBnTb OCTopoXHoCTb BO n36ExaHne OnpoknDIBaHn N/ Nnn HeynpabIeMoro yCKopeHn. IcNoJIb3OBaTb TOJbKO camyIO Hn3KyIO CKOpocTb! MaunHa MoKet NepeMeuTaBCr NO HaKIOHAM /nn CTynEHM TOJbKO C NOHrTaBMN OT 3emNI UeTKaMn N CKpe6Kom.
HnkOrda He napKoBaTb MaunHy Ha HauKIOHHOI NOBepxHOCtN.
HnKOrda He octabTb 6e3 npncmTopa MaunHy, NOkIIOueHHyIO K 3NeKTponNTAHIO N C yCTaHOBJIeHNbIM KIOUOM; MaUNHy CneJyET OCTabTb TOlbKO NOCNE ee OTKIOUeHHRA, BbIHyB KIOU, y6eINBWHCb B OTCYCTBn PNCKA ee CNyauHoro DBNKeHHN r OTCOeINHB MaunHy OT 3NeKTponNTAHra...
Bo Bpemr 3KcNpyatau n Cne dyet 6bTb npedeBHO OCTOPOXHBIMB INPCyTCTBn TpeTBnx LInU, OCO6eHNO DeTei, HaxoJxuxCBA6nn3n 30HbI 3KcNpyatau NMaunHbl.
He nCnoB3OBAbMaunHy dny nepeBO3Kn IIOJeN/ npedMeTOB nn 6yKcnpOBKn. He 6yKcnpOBaTb MaunHy.
Hn npn KaKx 06ctoTbCTBax He nCNoIb3OBAtB MaunHy B KaueCTBe ONOPHO NOBepXHOCTN DnI pEaMetOB IIO6O Beca. He nepeKpbBaTb BEHTUNLAIOHN HbIe NTENIOBbIDJIeIOUIne OTBepCTnI.
He ydaIaTb, He n3MeHraTb n He OTKIOUaTb 3aIITHbIe yCTpOuCTBa.
Ob3aTeJbHO INCIOJIb3OBA Tb CpeCTBa HINBnDy
aIbHO 3aIITbI dIg 6e3oNaChOCTOn OepaTopa: apap
Tyu IIN 3aIITHyIO pa6OuyIO OdeKdy, HeCKoJIb3AUYIO
BOHOHePOHnuaEmyIO OByB, pe3HHOBbie nepaTKn,
3aIITbIE OcKN I HayuHNKn, MaCKI dIg 3aIITbI Dbl
XaTeJbHbIX nyTe. IpeE NaHApOM pa6OtBi CneJeYET
CHrTb UeONQK, Yacbl, raNCTyKN I npOue NpeMeTbl,
KOTOpbIE MOrYT CTaTB pNpUHHOH cepBe3HbIX TpaBM.
He npNKacaTbcrypkamN K MexAHn3MaM B dBNXeHN.
He nCnOJb3OBaTb MOUoIe cpeCTBa, OTNHyIbe OT yKa3aHHbIX, IN CNeIOBAtb IHCTpyKUIM, PpeCTabJIeHHbIM B COOTBeTCTByUOuX NACNOPtax 6e3OnacHOCTn MoUoIe cpeCTBa CneIyET XpaHITb B MeCTax, HeDOCTyINbIX DnI AeTei, B Cnyuae NOnaDaHnB B rJa3a HMeDJIeHNO IpOMbITb 6OJIbUIM KOJIueCTBOM BOIbl, a B CNYaae IporIaTbIBaHnE He3aMeDJInteNbHO ObaTNTbCRA K BpaUy.
A y6eHtbcR, yTO pO3eTK, nCNoIb3yeMbIe IJN NOKIOUeHn 3aprHOrO yCTpOuCTBa aKKyMylrTOPhBIX 6batae, coEINHeHbIC nCnpaBHO CnCTeMOI 3aEMLeHnI 3aunueHbTePOMaHHTbIMN INΦΦepeHcuaJIbHbIMN aBTOMaTneCKmN BbIKNoUaTeJMaM.
A Pn OshaeHn MaunHbI reJeBbIMn 6aTapeMn BaxHo o6ecneuHb npabNlbHyIO peryInnpOBky INdkaTopa pa3pa, pacnoJIOxehHoro Ha np6OpHO n naHenn. 06paTntEcB K CBOemy dInepy.
O6raTeIbHO CO6JIIODaTb INHCTpyKcIMN 3aBOda-N3- roTOBtTeJn AKKymyIaTOPbIX 6batae n N DeIcTByUoJne HopMbI 3aKOHOaTeNbCTBa. AKKymyIaTOpbl OJXHb I BcerDa 6bITb cyxIMN uNCTbIMN, yTO6bl N36ExaTb TOKOB NOBepXHOCTHOYTeuKn. 3aunuATb 6batae n OT 3arpa3HeHn, HApPmEp, OT MetaIINuCeCKOINbIN.
He Klaactb INHCTpyMeHTbI Ha aKKyMyJrTopHbIe 6aTapeN, T.K. OHN MOrYT Bbl3BaTb KOpOTKoe 3aMbIkaHne IINB3pbIB.
Ipn NcnoB3OBAHn KNCNoTbI DnAaKKymyIaTOpOB TsaTeNbHO Co6NIOdaIte COOTBeTCTByIOuNe HnCTpyKcNn NO TexHnke 6e3oNaCHOCTN. HnkOrDa He MbItb MaunHy cTpye BODbl..
Otpa6oTaHHbIe KnKocTn, CoepKaUne MOUuNe CpeCTBa, De3HΦuNpyUoUne BeueCTBa, BOny, OprAHuYeCKne HHeOpraHnueCKne BeueCTBa, Co6paHbIe B TeueHne pa3NJuHbIX 3TaNOB pa60tbl : DOLXHbI yTNIN3NpuOBaTbcB C COOTBeTCTBUN C DeiCTByIOUIM 3aKOHODaTeJIbCTBOM.
A B cnyuae HeNoIaOK n/nnn HeoΦeKTHBHO pa60tbl MaunHb, CneJyET HeMeIeHHO OTKJIIOuHTb ee (OTcoeHNHTb MaunHy OT 3NeKTpONHTaHHN NNIOT aKKymJIaTOPbIX 6aTapei) n He npEapnHMaTb HNKaNX DaNbHeuX DeICTBNI.
O6paNTbcB CHTeHTp TexnoDepKKn 3aBoDa-n3ROTOBNTeJI.
Bce onepaunno texo6nykBaHIO nn 3ameHe KOMnKeTyUOxN DeTaJe NOnKHbI npOBODtbcr B MeCTax C COOTBeTCTByUOzIM OCBeUeHEm N NocLe OTCoEINHeHMaUNHbI OT NCTOCHNka 3NeKTPoNTaHnA, OKJIouHb TaKke aKKyMylTOpHyO batapeio.
LIO60B BnD pa6OT C 3JIeKtpnuecko nCCTEMO MaunHbI N BCE pa60TbI NO pemOnTy IN TexO6cJyXnBaHNIO (B Oco6eHHocTN Te, KOtOpbie NOpO6HO He ONNCAHbIB DaHHOM pyKOBOdCTBe) DOJXHBi BBInONHrTBcR NCKINOHTEJBHO TexHNKaMN-CNEuNAHCTAmN B DaHHo O6NaCTN, 3HaIOUIMN npabnla TexHKn 6eONaCHOCTN.
DonyckaetcNcNoIb3OBAHne KOMnIeKTyUoIux INOpunHaJIbHbIX 3aIyacteIN, NOCTabIeMbIX NCKIIOHTeIbHO I3rOToBHTeJIeMaUNHbI, NCKOJIbKY ToIbKO3TN DeTaNMOrT rapaHTnpOBaTB 6eOJNaChyio paObyO6OpyIOBaHna 6e3 BO3HnKHOBeHNAKnx-ILn60 npO6Iem. He nCnoIb3yIte B KaueCTbe 3aNaChbIX qAteTeDeTaN, DEMOnHTnpOBaHHbIe C dpyrNX MaUnH INN B3aTbIe IN3 dpyrNX KOMnIeKTOB.
Pepd KaKdbim NcNoJb3OBaHnem npOBepaTb MaunHy n, B qactHOCTn, npOBepaTb, HaxoJrTc JN Ka6eJb dJa 3apJdKn aKKymyIaTOPbIX 6aTapeu I CoedHNHTeB XOPOWeM COCTOAHN IN 6e3OanChbl N OH dJa NcNoJb3OBaHn. B IpOTUBHom Cnyae HNKOrda He NcNoJb3OBaTb MaunHy Do TORo, KaK Co CTOpOHbl ABTOpIN3OBaHHOR cNeuaJIncTa He 6yDet BbINONHe COOTBETCTByIOU pEMONT.
SHe3aMeIInTeIbHO BbIKIOuHTb BCaCbIBaIOuNIMBnraTeIb,ecn 3aMeueHb BiJeJIeHnpeHb ININKIOCTN.
He nCNoJIb3OBA Tb MaUHHy Ha TEKCTnIbHbIX HANOJIbHbIX NOKpbITnX, TaKnx KaK KObpbl, KOBPOBble NOKpbITnY I T.D.
IcnoIb3OBAHnE BOCKa, PHeHauXcRA MOUxxCpeCTB IIN DInCnepcNHOHHbIX BeueCTB MoKeT Bbl3BaTb cepbe3HbIE HncPpaBHOCTMaunHbI IIN pINBeCTN K 3acOpEHIO camx Tpy6.
2.2. WYM IN BNUBPAUJRA
Kopo6kn aKKymyIaTOpOB mMeHOT KpenEeKhble OTBepCTn.
- PnBLeKaTe NCKHouHTeNbHO CneUaIIN3uPoBaH Hoe O6OpyOBoAHHe (Ka6eN, KpOKn C npoyuHOn, nT. d.), cNoCo6Hoe BbIepXaTb Harpy3Kn n nepcoHaI DnpepeMeueHn nn yCTaHOBKn aKKymJrTopa (B OTcEK MaunHbl). Pnp TpaHCnOpTupOBKe, cNeDyET PnHtB Te Jke Mepbl IpeoCTOpOXHoCTn n Cneo - BaTb COOTBeTCTByIOUIM IHCTpyKUIM Dnla MaunHbl.
3apAnhoe yctpoIcTBO MoKeT nepeBo3ntbCra Ha erO onopax, KaK BepTKaIbHO, TaK n rOpN3oHTaJIbHO. BocnoJb3yItec b aHaIoruHbIM MepaMn npedoctopoxHOCTn n CneDuYTe INCTpyKUmM, paCNoLOXKeHHbIM B pyKOBoDCTBe MaUNHbl.
4. TEXHnueCKA INHΦOPMALIa
4.1.ИHΦOPMAUЯOBUCTAHOBKE
4.1.1.AKKYMUYIATOP
IpeodocTabHeHHa HOpMaunmMeet OuXapakTeP: Bcerda 06paauTecb K pyKOBODCTBy NOb3OBATEy UCTAHOBHeHHOra AKKymJITOPa.
He3aBncmo OT Tnna KOHCTpyKun pa6oTa aKKymyIaTOp xapaKTepn3yeTc erO eMKoCTbU, KOTopbI Bcerda OTHOCNTc K nepNoy pa3pIKn.
CBNHUCOBO-KNCIOHTbI:
CBETOIOI BATAPER 3APXKEHA NOJHOCTbIO (fTO C-5A) ropnt, 3eJeHoro UBeTa.
Лит NM:
CBETOIOIHN3K0TO 3APRAA BATAPEIN (ΦOTo C-5C) ropnt, kpacHoro zBeta.
Литни FePO4:
CBETOIOH N3K0TO 3APRA DA BATAPEN (OTo C -5C)+CBETOIO1 100% 3APRA DA BATAPEN (OTo C-5A) ropT
Iocne BblonHeHNo HacTpoKn 6dyT pa3HbIe ypOBn pa3PraJa 6aTapen CnDnOpepeHcnpoBaHHbIM BMeTaJIbCTBOM BfYHKmMaaHbI, KaKyKa3aHO B CnedyUoJe Ta6Nue:
CBNHUCOBO-KNCJIOTHbI:
CBETOIOI NOJHOCTbIO 3APXKEHHO BATA PEI (foto E-5A) ropt, 3eHoro uBeta.
Jntn NCM:
CBETOIOHn3KOTo 3APRAbATAPEN (foto E-5C) ropnt, Kpachoro uBeta.
Литун ФЕРО4:
CBETOIOID HN3KOTO 3APRAIABATAPEIN (ΦOTO E-5C)+CBETOIOID 100% 3APRAIABATAPEIN (ΦOTO E-5A) roprt
Iocne BbINOJIHeHHo HAcTPOKn 6ydyT pa3HbIe ypoBn pa3pra6bTapeN CINΦepeHcnpOBaHHbIM BMeJAtelbCTBOM BfYHKUIM MaUNHbI, KaK yKa3aHO B cNeDyUOSei Ta6nue:
| Рабota Иndик�ларopa разрада akкум�ларов -MOДЕЛь «ВТ» (24В ПОСТ.ТOKА) | ||||||
| Тулakкум�ларopaВ <Нарожени сраваты-ваимя | СигналС Beet�юд akкум�ларopa | |||||
| WET GEL Li-NCM | Li-FePO4 | Зелегпь | Желтый Крочьй | |||
| Vmax Vmax Vmax Vmax Vmax Vbkn Bbkn | Vbkn Bbkn | Vbkn Bbkn | Vbkn Bbkn | |||
| 23,30 23,70 25 30 25,30 | 30 25,30 | 30 25,30 | 30 25,30 | |||
| 22,15 2,50 22 6 25,15 | 6 25,15 | 6 25,15 | 6 25,15 | |||
| 21,70 2,00 21 65 24,70 | 65 24,70 | 65 24,70 | 65 24,70 | |||
EcnnuKn KOHpyaun He 3aBepweH, HacTpoKn OCTaOTc HEn3MeHHbIMN B INCXoDHOJ KOHpyaun.
- PekomeHnyeTcI NOMOuB clyx6bl TexnoDepKKn IIN TexHnKa B clyuae npo6Iem C yka3aHHbIMn HaCTpOiKaMn. He OTKpbBaIte N He BbINOJIHnTe pa60tbl Ha 3JIeKTPnuCeKoI ceni.
4.2. KOHФИГУРAZИЗ 3APЯДНΟΥCTPOДСТВА AKКUMЛЯТOPHOББATAPEИ
ДолжнБынONHЯТСТОЛБКОАВTOPИЗOBAHHBIMN TexHuYeCKMn CneцuaJIncTAm. Прп NOkynKe MaшинblдmoМКИ N cyuKIN NOJOB NOCTaBJIeMOe 3apAHDoe yCTpoIcTB OHaCTpoEHO ДЯ pa6Otbl C TELEBbIMN 6aTapeMn.YTO6bl N3MeHnITb HAcTpoIKN 3apAHDoro yCTpoIcTBa O6paNTecb K pyKOBoIDCTBy Ipon3BOODHTeJIa.
CMOTPnTe COOTBeCTBkyUoue pyKOBOdCTBO n3ROTOBnTEJN 13 KOMnJIeKTA NoCTaBKn.
EcnB KOMnIeKtauM MaunHbI npedymotpeh aKKyMylrTOP n 3apraHoe yCTpoiCTBO,HaCTPOINKa MaunHbI n 3apraHoro yCTpoiCTBa OcyueCTBIAETCn Ipon3BOUHTeJEM.
B cnyuae n3MeHeHna o6OpyDoBaHna, nIbO Tnna aKKymyIaTopa N 3apAnHO rCTPOINCTBa, peKOMeHNdyem Bcerda O6paUaTbcra B aBTOpN3OBaHHb CepBnchbl CEHTp KaK dJa HaCTPOIK MaunHbI, TaK I dJa HAcTPOIK KPNBOI 3apAnK 3apAnHO rCTPOINCTBa.
B KaueCTBe npn6n3nteHoro noka3aTeJnNCnoIb3yIOcneDyIOUne KpItePnn:
ДяРб-кnotbixигелевixakkymyIATOPOB: 3apdHbI TOK paBEN np6n3ntelbHO 10-12% emKocTn B Au-C20
Длгпгьх NCM aKKymлтopoB:
3apAHHbI TK paBEN npn6n3ntelbHO 30% EMKOCTN BAU
ДллNTeBbIX FePO4 aKKymIaTOpOB:
3apAHybTOK paBEN npn6n3ntelbHO 40% emKocTN B A
Heco6nOeHne npBBeHbIX yKa3aHm moKet npBecTu K cepbe3Homy NOBpeXdeHIO aKKymyIaTOPa n aHHynipOBaHIO rapaHTn.
5. PABOYAR INHΦOPMAUJRA
5.1. NOIROTOBKA MAUINHbI
-Do hauana pa6oTb y6eAnTeCb B Hauuue 3aunTHo 06yBn C HeckOJIb3raUe N OIOUBoN, nepaTOK INIO6bIX dpyrNX CpeCTB INuHOn 3aunTbI, yKa3aHHbIX B IINCTax DaHHbIX MOUx CpeCTB INI IN Heo6xOIMbIX B TeKyuNX pa6oUHX yCNOBnX.
IpeH naHApO7 CneJyET BbIOJIHNb:
CMOTPNTe COOTBETCTBYUOUIne pa3delenI dIJI NOUYEHIN NOpDpO6HOrO ONNCAHJ DAHHbIX WaROB:
IpoBepbTe ypoBeHb 3apJa aKKyMylTopa n, npN Heo6xoDmOCTn, HaNue 3apJa.
YCTAHOBNTe DNCKn CO ⅢEJKAMN INN CKpe6KaMN (a6pa3NBbIM NDCKaMn), KOTOpbie NOxOJrT DnA OUYIaEMoN IOBepXHOCTn.
YCTAHOBNTeCKpe6OK u y6eINTecb B TOM, UTO OH HADJEXHO 3aKpenIeH N IODKNIOUeyH K BCacBIAIOSeMy UHaHry, a CyuINbHbIe HaKnaDN He CNIUKOM N3HOWeHbl.
Y6eIITecb B TOM, yTO 6aK C CO6paHHOJ KIOCTbO onyctoWeH. B npOTNBOM cnyae onyctoWnte erO. IpoBepbTe n NOnHOCtBu 3a6JOKpUyTe BblNyck paTbopa MOUSeero CpeDCTBa.
3aIolHnTe pe3epByap IJRA pactbopa uepe3 nepeHHe OTBepCTne YNCTOIN BOON IN HeNEHsIMCMoIOUIM CpeDCTBOM B DOCTaTOOH KOHcHTpaUN.
MOJIb BT ochaheHa cneunalhBIM 6akom dIy MoIOJero cpeCTBa. IVcnoIb3yemoe MOIOoee cpeCTBO DOJXHO 6bITb PnIRoHbIM IJI npIMHeHIN IIO KOHcHTpaCmN IN B3KocTn, a TaKKe He DoJXHO NeHHTbcR.
OCTaBbTe pa3HnUy B 2 cm Mexkdy OTBepCTneM npo6Kn ypoBHeM KnIKoCTn.
Bo n36eXaHne pncOB, 03HaKoMbTeCb C dBHXKeHNMaINHbl, npOBOJa npO6Hbe NyCKN B CBO6oJHOM, npocToPHom NOMEueHn 6e3 npenrTCTBNI.
IJIyONyuHnHaHnyuXnxpe3yNbTaTOB C TOUKN 3peHnYnCTKnN
cpoKa cnyk6bI kcnnyatauun CneDyET BblNOHHTb CneNyUoune npocTbe, HO BaXHbI pa60TbI:
- OnpeJeIte 30hbl pa60T, nepemeuaB BCEBO3MOXHbIe npenTCTBnA C nyTu; ecnn
NOBepxHOCTb OueH BeIIka, CneIyET pa6OtaTb B CMexKhbIX N npapJIenbHbIX nprMoYrOJIbHbIX 3OHax.
- Bb6epnte npmyo Tpaektopno pa60tbi npnctynite K eBbINOJIHeHIO, HauHna C cAmO JaIbHeN 3OHbl, CTapaacb He BO3BpaAaTbcra B 3OHbl, rge y6opka yke 6bIa npOBedeHa..
CBeToIIOJNe IopNT pactBOp He BbIXOJNT,MOxHOOTCOeINHHTb 电TKy
5 CBeToDnOuHbI INHdNkAToP DaarHOCTNKn pa - 6OTbIMaunHbI
Mokpbie cneBly yKa3bIbaOT Ha HeIOCTaTOHyO cyuKy. IcnoB3yIte pyKOarTKn peryIINpOBKn, UTo6bl ONTUMN3INPOBaTb 000EKTNBHOCTb.
5.8.CBOPKA IN PA3BOPKA Bpbl3ROBUKA
5pb3rooTpaKaTeNb KpeNtCk Kncky TeKN nyTeM
Kcaun Ha KapTepe TeKN. TTo6bl ChraTb 6pb3-
ROBnK, nPoCTO NotHnTE erO Bn3, noka OH He OTcoeHNHTcR O T KapTepa TeKn. TTo6bl yCTaHOBnTB
6pb3ROBnK Ha MeCTO, BCTaBbTe erO B HxHn Kpa KaPapTepa TeKn, NaHna C OdHOro KOHca, N npoDolJaTe npotaiknbTaB BBepx Do npotuBONoJOKHoro KOHca.
5.9. MONTAGGIO E SMONTAGGIO DELLA SPAZZOLA
Hnkorga He nCnoJb3yIte MaunHy 6e3 uetkn, MArKnx npoklaOk nn a6pa3nBbIX DNCKOB. Heo6xoDIMO npOBeprTb npabNtBHOCTb MOHTaKa.
C6opka:
Y6eHntecb B TOM, yTO pNTa qETKn NODnHaTa; B npOTNBHom Cnyae NOHMnTe ee, CNeDyA INCTpyKcNAM, paCNOLOXKeHHbIM BCOTBETCTBYIOUem pa3DeIe.
PpOBepbTe, yTo6bl rIaNbHbI BBIKNIOuATeJIb Ha naHeIy npaBnEHHa 6bl B BBIKIOUeHHOM nONoXeHN "0".
IpoBeHnTe 电TKn (nnn HnpaBraIOUne a6pa3NBHO DnCKa) B6n3N coeHNHeHn, nOd nnTOIeTKN; NOdHMnTE ux Chepe3 ceHTnpuyouiu NpHaNeuC NOBOPaunBaIte npOTNB HnPaBJIeHnBpaSeHnNoIeJUka.
He no3B0JNe TE dInHe uetnHb CTaTb Mehwe 1 cm. He no3B0JNe TOUHe a6pa3NBHO DnCKa CTaTb Mehwe 1 cm.
Upe3MepHO n3HOweHHbIe 8ETKn nn a6pa3NBbIe DnCKN MOry T NOBpeDNTb MaWHy N NOJ.
Perynphno npOBepaTe n3Hoc 3tHex deTanei neped Hauanom pa60Tbl.
Дя BCex IVcONHeHm MOxHO BbINOHNHTb DeICTBne no pa36OpKe IIN 3aMeHe aBTOMaTnueckN IIN BpyHyIO.
PyHoe JeIcTBne:
Y6eHNTecb B TOM, yTO nIITa 9ETKn NODHrTa;
B npoTnBHOM cnyuae noHmMITE e, cneDy HnCTpyKzma, paCNOJIOXeHHbIM B COOTBETCTBYIOUcEM pa3dene.
Y6eIITecb, yTO KIOU 3aJnraHna Ha NaHeIn ynpabLeHnHaXoNTcB NONOKeHN BbIKIOueHHO MaunHbl.
YdepknBa pykamn ncky noD nckom, nobepHnte INx B HanpaBneHN BpaueHn N onyctnte, yTo6bl OCBO6OHTb OT MeTALNueCKo MyfTbi.
YTO6bI CHaTb DnCK HocuTeJIA, BblOnHInTe Ty Xe npOueDpy.
ABTomatnueckoe JeicTBue:
BHIMAHHE: nocnepnonepauncaetkno He doxha 6bItb ECO, y6eintecbTO Maunna BkIIOyeHa N UTO BCE yHKuHHe aKTHBnPOBaHbl.
BKNIOHky, COOTBeTCTByIOUyIO yHKUN EV (B 3aBNCUMOCTN OT MOJeIeI FOTo A-4, FOTo C-4, FOTo E-4).
Haxmte pbuarg npabHeHn IdoXntecb OToeDInHeHnIeTKN.
5.10. HANOJIHEHNE I ONOPOXHEHNE BAKAMOIOUERO PACTBOPA
Tempepatya BObI INM MOUero PaTbopa He DOJXHa IpeBbIaTb 50^
Pn KaKdom HAnOpHeHn 6aKa MoeHOro pactbopa (Foto N - 4), o6aTeJbHo o6ecneuTb erO Heo6xOIMoe npeBapntbHoe onopoxHeHne (Foto N - 3).
Длгзалнень6aka:
-Добавитб Heo6xOДIMоE KOJNUeCTBO XUMNueCKOrO BeueCTBa C yyeTOM npoUeHTHOrO COOTHOseHnRA (%) , Yka3aHHORO NOCTaBUNKOM, N NOHOn EMKOCTN 6aKa, Yka3aHHOB TEXHONrUeCKoK KapTe N3dJIIn.
EcnMaunHa OchaueHa CneuHbIM 6aKOM nmoUoJero cpeCTBa,OTKpoTe KpOKn (foto N-2) INoHNMTe HAKONTEJBHyBn 6ak (foto N-3),CHMNTe np06ky n 3aJeTMe MOUe e cpeCTBO B BbldeJIeHHbI dJa 3TOr 6ak (foto I -4).
A NcnoB3OBaTb TOnbKO npOdyKTbl, KOTOpble NOxOJrT DnI NIOBOrO NOKpbITnI N 000eKtNBHO ydaHOT 3aqrpa3HeHH.
-Добавиь BODY B OTBepCTne ДЯ 3ANOJIHeHnB NpepeHnЧаTN MaunHbI (ФОТ G - 2).
OCTaBnTb npoctpaHcTB O 2 cm MeKdy rOpNoBnHO npo6Kn n BepxHm ypOBHem KndKoctn. He 3anONHrTb 6ak Bblue 3TOrO ypOBHra!
Maunha 6bila cKOHcTpynpObaHa dJa pa60tblc 6nopa3naraembIMM MOUUMM cpecdTbAMn, He o6pa3yIOUmm NeHbi N BbInyckaembIMN CneuMaJIbHO dJa NOIOMoeUHbIX Maunh. IcNoJIb3OBaHHe dpyrNX XmMuecknx npoDyKTOB (taKnx KaK rInoxlOpNT HaTPna, OKNCInTeN, pactBopntEn n yrNeBODopOdbI)
MOKTe IpnBecTI K IOBpeXdeHIO MII NIOJOMKe MaunHbl.
-Co6IIOdaTb Tpe6OBAHn8 TexHnKn 6e3OnacHOCTn, yKa3aHHbIe B COOTBETCTByUoIeM pa3JeIe pyKOBOcTbA n Ha yNaKOBKe MOIoIero CpeIcTba.
-Дя поуеня понoro почны IMeIoUxCxB HAnuHn NOxOJaux MOUxxCpeCTB,peKOMeHdyetc o6paTntbCЯ K n3rTOBNTeIOMaunHbl.
Bcerda nCnoIb3OBA TbToIbKO MOIOune CpeIcTBA, KOTopbie He 6pa3yIOT neHy
- He octabnTb Tpy6y noaun BoBbl 6e3 npncmotpa N NOHOCbIO BCTabnTb eRO B 6aK, T.K. Tpy6a MOxKET CMECTNTbCn HAMOHTb YyBCTBNTeHbIe MExaHN3MbI MaUNHbl.
- 3akpbItb 6aK COOTBeTCTByUoJeI r6yatoN npo6ko.
Per lo scarico:
-OTBnHTnte fHnbTp dIa BOdbI (fOTo Q - 1), yTO6bl CnITb 6ak dIra pactBopa.
-ПлOTH0 3aKpoIte KOHTeINHeP c ΦиNbTpOM nЯ BOДbl.
5.11. ONYCTOWEHNE BAKA C COBPAHHOJ XNIDKOCTbIO
Tpy3HyIO BDOy Heo6xOJIMO CInTb B COOTBeTCTBUN C HauNoHaJIbHbIMn HOpMaTINBaMn.
Iolb3OBaTeJIb HecET NOnHyIO OTBeTCTBHeHHOCTb 3a o6ecneueHnE Co6JIODeHn DaHHbIX npaBnI.
Iocne toro kak 3aKOHnncra MOUu npactbOp, onopoxhnyTe EMKoCTb 6aka c co6paHHO JIKKOCTbIO 6aka (Foto N - 3).
Bak c co6paHHo XnKocTbIO MOxHO ONyCTOaTaB B IIO6oe Bpem, DaKe Ha npomexkyTOHbIX 3Tanax pa6oero zikna.
Obbem6aka c co6paHno JxNIOKcTBIO 60nbwe yem
Obbem6aka c MOUUM pACTBOPOM I NOTeHuaJIbHO
ONaCHa CNTyaUNI DnI BCaCbBAIOUeRO MOTopa He
DOJXHa PpOIN3oITn (foto O-1) B IIO6om Cnyae
PpeOXPaHnteNbHbI NOnlAbOK BblKluOyAE
BCaCbBaIOUm MOTop npn PpeBbIeHNu yPOBHR
XNIOKcTn B 6ake C CO6paHNo JxNIOKcTbIO.
- Ecnn 36aKOB NaHnHaet Teyb BODa nnneHa HndIeXnT OepaTNBHO BbIKIOuHTb BCaCbIBaIOUIM MOTOp IN ONOPOKHnTB 6aK Cco6paHHo JxNkOCTbIO.
Дя onyctoшен6aka:
Ipebe3Tu MaunHy B MeCTO, NOxOJaee IJI CINBa rpa3HOB Bobl, PpeIOHTuTEbHO OKOIO TyaneTa nn KaHaUN3aUHOHNO Tpy6bl (BCOTBcTbNn C roCyapcTBeHHbIMn HopMaMn IN paBUnAmn NO ydaJeHIO OTXoOB).
BbIKIOUHTe MaunHy n IpOBepbTe, yTO6bl rnaBHbN BbIKIOUaTeNb Ha naHeHn ynpabJeHn 6bl B bIKIOUeHHOM NONOKeHN.
OTcoeINHnTb dpHeNaKhBn IJHaHr OT KpIoka (Foto N -
5) n, depka ero BbICOKO, OTBepHyTB 3aTnykY.
OTcoeHHTb dpeHaXhbln ⅢaHr OT KpIOKa (OTo A-7)(OTo A-8) n, depka ero BbICOKO, OTBepHyTb 3aIyUkY.
Onyctntb dpeHaxHbI IHaHr no HAnpaBneHnIO K Bbl6paHHoI dpeHaXHoi ToUKe.
OnepaunonyctooehnmoKet 6bItb 6bICTpo npepbaHa B JIO60H yXhbl MOMeHT pOcTBIM NOHrTneM dpeHaXHOro IhaHra.
PpOBepuB, cKoJIbKO rpa3N BCE eue octaetcB 6ake n, ecn Heo6xOJIMo, npOMbITb BHyTpEHIOU qactb 6aka uepe3 cmOTPOBoE OTBepCTne (Foto O - 2).
Iocne TOrO, KaK pe3epByap 6yJeT onOpoxHeH, 3a- KpOte CnIBHOJ 7HaHr N 3aKpeNITE erO Ha KpOKe HnAD 6aKom.
Ipo6ka DpeHaxHoro 7nHa rdoJxHa 6bItb repMeTuHOB, B nPoTnBHom Cnyuae NOTepr daBHeHH npNBEdET K CHNXeHNIO 3oEKeTnBHOCTN CyuKn..
5.12.OCOBbIE HOPMbI 3KcPlyATAUIMMODEJIAC230V
MoJeb AC 230V MoXHO NcNoB3OBaTb TOJbKO B cnyuae, ecn HapjKeHne (BOJbTaJ), yKa3aHHoe Ha Ta6NueKe C TexHueCKmM XapaKTePncTKKaMn COOTBeCTByET IMeIOUeMycr N eCIn pO3eTKa IMeET 3a3EmJeHne.
He noBpeKdaTb Ka6eIb NITaHnI, He nepeDaBnBaTb ero n He nepraTb.
BHIMAHHE! CnTe 3a Tem, yTo6bI Ka6enb nTuHnHe cOpnkacancB Bpaauounmncs ueTkamn.
BHUMAHHE! Moelb 230V nMeet deTann C BblcOKIM HnprjKeHneM, NIN NO KOTOpbIM npoxoNT TOK, KOHTaKT C3TMMu YactamM MOxET npNBecTN K TJXKeBIM TpaBMAM N daJa cMeptN.
- IpeepIIO60IonepaueHHaMaUNHe Heo6xOIMO OTOeINHTb ee OTJNEKTPnueckO CETN.
- HnKorda He TporaTb NOBpeXdeHHbIe nnN n3HOweHHbIe 3JIeKTpUcEckne Ka6eJIn.
- Ipeed TaM KaK npoBOnTb KaKne-ln60 pa6OtbI c 3NeKtpoPpOBoKDco, Heo6xoDmO BblIOHTb MaINHy N OTKIOUHTb ee OT pO3eTKn 3NeKtpuYeCKOrTOka.
Bcnyae 6hApxkeHnJeΦeKTOB, TpeunHnn Dpynx NOBpeXdeHn 3JeKTPnueckNXKa6eneH, Heo6xOJIMO HemeJneHH 3aMeHNTb INOpRHaJIbHbIMN 3aNaCHbIMN. - CeTeBbIe coeINHeHn IOnJXHbI 6bITb 3aunueHbI NO MeHbWeMepeOTnonaHaNBOBbl.
-Дя посоединенmaшны K ceTNcnoJb3OBAtToIbKO COOTBETCTBYIOUneHOPMaM TexHnK 6e3OnaCHOCTN ydInHHTeN. -
Po3eTKa, K KOtOpO NODKJIIOueHa MaUNHa, DOJXHa 6bITb CHa6XKeHa yCTPOINCTBOM 3aUHTHOrO OTKIIIOUeyHn.
-
Kateropnueckn 3anpeeHcnoIb3OBaHne Maunhbl B6n3n 6accEHOB nIN BODoEMOB.
4YPE3BbIyAHHbIE CNTYALIN
B cnyuae ue3BbIaHbIX 06ctoTeNbCTB:
-
HemeJenHo OTKIOuHTb MaunHy OT 3neKtpocetn.
-
CpoHNo OKa3aTb NOcTpadaBWMnepByIO NOMOUsb.
Ipn HecuactHom cnyae MaunHa He doJXHa IcNoIb3OBaTbcra Do npoxoKdHnna TPOBepKn, KOtopa MoKeT 6bIT npOBeHa ABTOBaHHbIM 3aBODOM-N3ROTOBtEnem TexHnueckm CneUmaNCTOM.
5.13.YIIPABJIEHNE MAUNHOI
MoeInb "E" (AC 230V)
IopKnIOUHTe K cTeN Ka6eNb PtTaHnY (fOTo B - 1) uepe3 yDnHHTeNb.
Haxmnte KhoNkBy BkIIOueHnmaunhbl (fOTo A - 1).
Haxmte KhoNky BKnIOueHn y DnIraTeIy 1eTKn (foto A-2).
- ΜeTka NaHcHT BpaaTaBcT OIbko npn HaxKaTn Ha pyUar ynpaBHeNHa (fOTo B - 5).
HaXMMTe KHONky BKNIOueHENy DBNrAteTnBcAbaHHN (fOTo A - 3).
OTKpoTe KpaH dIpaCTbopa, NOHb PBiHa rO3nPOBaHnRA pACTbopa C3aIN MaunHbI (fOTO B-2), ONyCTNTe BCacbIBaIOUnn 6NOK C NOMoCbIO pbiHa rA npDbema cKpe6Ka dIra nOla (fOTO B-4), ONyCTNTe npOMbIBOCHNYI ROJOBky, Haxab N nepemeCTNB BnpaBO, a 3aTeM OTNyCTNB neJaNb IOBbema (fOTO B-3).
BbIMoIte non, MeIeHNO Dvuracb BnepeN noTaNyB pbUar ynpabNeHn (foto B-5) dN noKJIuOyeHn uETKn. Korda pbUar ynpabNeHn OTnyueH, BpaSeHne uETKn OCTaHOBNTcYpe3 HeckoJbKO cekyHd.
YTo6bI n36ExKaTb NOBpeKdEnHna CKe6Ka Inna IOna, NOMHInTe O Heo6XoJIMOCn erO NoDbema nepei Ha- aJOM DnBxKeHn 3aDHm XoJOM.
OTcoeHHTb BCacbIBaIOyIO Tpy6y OT cKpe6ka (Foto M-3)
Ha 3TOM 3TaNE MOKHO npomblb N OUnCTNTb Tpy6y OT 3aqrpa3HeHn.
ΠΟΤΗ BCTABUHTpy6y B KOPnyc ckpe6ka.
6.3. CKPE6OK
He 6paTbca 3a ckpe6ok He3aunueneHHbIMn pyKaMn, nCNoIb3OBaTb cpeDCTBa INHINBnDaJbHOJ 3aUNTbl, Heo6xOaNMBle Ira BbINOJIHEnHa pa60T.
OTcoeHnHTbCKpe60K OT MaunHbI OuHCTntb ero NOI npOTOH BDOH,NCONb3yra ry6ky nIN uTeKy. IpOBepNTb 3ΦΦeKTNBHOCTb IN3HOC HacaDOK, HaxOaJxNcB K KOtAKTE C NOLOM. 3TN HacaDNI pEHa3NaueHb DnA CHTNA PLEHKN MOIOeRO CpeCTBa IN BObl C nOJa IN dNIA N3OJauCN ETOJ CaCTN NOBepXHOCTN IN YCUNHeHNA DeiCTBn IBnraTeJI BAcSbIBAHN: TAKIM Obpa3OM ObecneuNbAEcR OueHb 3ΦΦeKTNBHOE BbICyUWBahne. HenpepbIBHOe BbINOJIHeHne pa6OT TaKOro PoDA PPINBOIDNT K 3aKpyrIeHnIO INn Pa3pySeHnIO OCTpbIX KpOMOK
HacaOK, YTO CHNXaET 3ΦΦeKTHBHOCTb cyuKN, NO3TOMy Heo6XoJIMO npou3BOJNTb 3aMeHy HacaOK ckpe6ka.
ДляЗаменинзношених HabадOK,сnéдуп Te HNCTpyKцЯM,прubesdHHbIM B COOTBeTCTByIOUeM pa3деле,песерphут haCakn,Для ИСПОЛБЗOBаHЯ euple He n3HOseHHbIX OCTpbIX yrIIOB,ИИN YcTaHOBHTb HOBble HaKlaIKn.
6.4. KOMNJIeKTIouIe
CHaTb N OUYCTNTB UETKINN YIUCTAUNe DUNCK.
- y6eIHTbcB B OTCyTCTBUN NOCTOPOHNX npedMeTOB,
Taknx KaK MeTaNInueckne DeTaJI, BUNtbl, CTpyXKa, BepeBKN I T.D. BO N36ExKaHne NOBpeXdEHNr NOna N MaunHbl.
Y6eINbCBApa6OyemypOBHe NIOCKOCHTHOCTN 5eTOK (npOBepNTb HAnuHepaBHomepHoro n3Hoca 5eTOKnnn a6pa3NBbIX dNCKOB).
IcnoJb3OBaTb TOJIbKO KOMnKeKTyUoUne, peKOMeHnyeMbIe N3ROTOBnteMe:dpyrNe N3DeNna MOry T npuBeCTn K CHNXeHnIO 6e3OnacHOCTn npi npoBeDeHn pa6OT.
6.5.KOPNUC MAUNHbI
Для чNTКВ-heшнх NOBepxHOCTeMaunHbI Heo6xoJIMO nCnoJIb3OBaTb r6ky, MЯrKyIO TkaHb IIN MЯrKyIO ΜeTKy, ecn Heo6xoJIMO ouNCTNb TpydHOydaJNeMyrpr3b. ydapopnpouHaJ IOBepxHOCtB MaunHbI YBnETCa WepoxOBaToI, QTO6bl CdeNaTb MeHee 3aMeTHbIMN capaNNbI, NOBJIIOUncsBa BO Bpem IAcNoJIb3OBaHn; Tem He MeHee, 3TO He O6IerqaeT ONUCTKy TpydHO ydaJNeMbx IYTeH Ha NOBepxHOCtN.
3anpeeHNOcnoB3ObaHne napOBbIX MaunH, 7nlaHROB c npoToHoi BDOi nn OuchTeJe BBICOKOr DaBHeHn.
6.6.AKKYMUYIATOPHBIEBATAPEN
CBNHUCOBO-KNCLOTbIX AKKymyIATOPOB
BbINOJIHrTb TexO6CnyKuBaHHe B COOTBeTCTBnC nHCTpyKUmaNm N3ROTOBnteY INBcE INHOpMaunne, yKa3aHHoB HAcToAueM DOKyMeHTe
Ecnn octabntb nlaactnhbl 3JemeHTOB OTKpbITbIMn (He nonHOCTbIO NOrpyXeHHbIMN B KNCLOTHbI paCTbOP),3TO npBODNT K6bICTpOMy OKNCLEHNO HeNoPnpABmO HApwae fYHKUHOHaJIbHOCTb 3JemeHTa. IpeenB KNCLOTHoro pACTbopa MoKeT Bbl3BaTb Koppo3NUo MaunHbl.
Icnoj3yute 3apdHoe yctpoiCTBO, pekomeHdoBaHHoe npOn3BODntelem, IN B IIObOM cnyae noXoJouee dTnA 3apxKaemoro aKKymyIaTOPa.
3apKaTb 6aTapen B xopoOIO npoBeTpnaEmbIX NOMeueHnX, NocKoJIbKy npCytCTByET ONpeJeHHaONachOCTb B3pbIbA!
IcnoJb3OBaHne TeJeBbIX aKKymyIaTOPbIX 6aTapei nn 6aTapei 6e3 Texo6cnyKuBaHnHa HactoTeJIbHO peKOMeHNdyETc.
TeneBbIe aKKymIaTOPHbIe 6aTapeu
BbIIOJIHrTb TexO6CnyKuBaHHe B COOTBeCTBUN C HnCTpyKUaMn N3rTOBtTeY IN BcE INHΦOpMaUne, Yka3aHHoB B HaCTOaUeM DOKyMeHTe.
IcnoJb3OBA Tb TOnbKO 3apJHoe yCTPOINCTBO, peKOMeHDoBaHHbIe N3ROTOBUTenEM.
B cnyuae dIInTeNbHOro HeucnObl3OBaHn aKKymyIaTOPOB,OTcoeHNHTe N 3apAINTe Hx B CpOKN, PpeDycmOTpeHHbIe DnY yCTaHOBHeHORo Tnna aKKymyIaTOPa (B KaueCTBe PpeDyPpeNTbHbIX MEP 3TO Heo6XoDnMo DeNaTb, KaK npabNIO, He No3dHee 3 MecaeB DnRA CBNHcOBO-KncNOTbIX, reNeBbIX n AGM aKKymyIaTOPOB IN He No3dHee 6 MecaeB DnIaTN-NoHbIX aKKymyIaTOPOB).
N3rotobntelb Chnmaet c ce6yIO TBETCTBeHHOCTb 3a NOBpeKdEHNe aKKymyIaTOPOB N3-3a Hec06nIOeHnra BblweyKa3aHHoIN pOueDypbl.
6.7.PEYJAPHOE OBCJYKUBAHNE
OTHOCHTeBHO Bcex ONuCAHHbIX DeiCTBn O6paTntecb K INHCTpyKUm N PpeDynpExDeHNM, NOIpo6HO ONuCAHHbIM B COOTBeTCTByIOxN NapaRpaΦax.
6.8. PEKOMEHДyEMbIe 3APACHbIe YACTN
BecnppebHna 3KcnnyataaMaunHb C Han6oIbwe 3ΦΦeKTNBHOCTbIO rapaHTnpyetc Coepxahne B HauNue Ha6opa Han6oJee pacnpoctpaHeHHbx paXoHNbIX MaTePnaOB n peryIpaHbIM TexHnueCKM O6CnyXnBaHne.
Cnncok daHbix 3aNaChbix qacteH haoDntcay y NOCTaBUNKa
7. PABOCHKOHTPOJIb
7.1.YCTPAHEHNEIPOBJIEM
DaHbIe yKa3aHnY npoAOT NOHMaHne npuHn HeKOTOpbIX npo6Iem Ha OCHOBE ONpeJeENbIX TINOB HEnCpabHocTei. TIN Mepbl No NcPabNeHIO NIOJKeHn HaxOHTcB COOTBETCTByUx pa3dEJaX.
7.1.1. MALUNHA HE PABOTAET
Knou (ecnn ectb) He BCTaBneH nn HnnpaBnIbHO NOBepHyT.
BCTaBbTe n nobepHnTe KIOU B NOIOKeHne 1, HaxMMTE KHOKNy BKIOUOeHna.
Pazbem akKymyIaTopa OTKlnoueH nnn npnKpeNJIeK pa3bemy OCHOBHO npoBOdkn HeHaJnxKaUIM 6pa3OM.
CoeHNHte Dba pa3bema.
Haxata abapnHaKhONka.
Ocbo6oNDte KhoNk npekpaueHne pa60Tbl.
MaunHa3apXaetc.
3aBepuTe npouec 3apdKn.
AkkymyIaTopbI pa3pJKeHbI.
3apynteakkymlyTOPbl
⑧ПаТаУпapВileHЯперрелacb.
Поберпе pa6очne cnTyaци, KOTOpbIe MOrnI cTaTb npuHOn HeNcPpABHOCTn (BbICOKN yKIOH, n T.Д).ПоJOxДNTe
30 MInHyT I NOnbItaIteCb He dOnyCKaTb NOpO6HbIX CnTyauu. EcIn npo6JIema He yCTpaHeHa, o6paTntecB B CEHTp OBCnyKUBAHN.
7.1.2. MAUHHA HE DBNKETCBAPEI
PbIyar ynpaBneHn He HaxkAT
Haxmnte Ha pbiyar npabneHn
CnWkoM 6oBwOn HaKIOH nOla
BpyuHyo nepeBeDnte MaunHy Ha HObBi ypoBHeB.
Cpa6oTana Tennobar 3aunTa (o6ua) Dnuratena npBODa (Dnuratenei
OctaHOBnTe MaunHy, daTe en OTdoxHyTb 5 MNHyT, 3aMeHnTe nnabKne npedoxpaHnTeJi.
MnKpOBbIKNIOuATEJIb pbIyara ynpaBneHna HeNCnpaBeH.
BbInOHHeero3aMeHy.
AkkymyIaTOpHbIe 6aTapeu pa3pJxKeHbI.
3apnTe aKKymyTOpbl.
BnraTeIb npBOda He 6bl OCTaHOBJeH BO Bpem BkIOUeHnMaUNHbl.
YcTaHOBnTe MaunHy Ha POBHyIO NOBepXHOCTb, BbIKJIOuHTe IN CHOBa BKJIIOHTe C I NOMOu bIO KJIIOUa.
-OTCOEINHHTb MaUNHy OT CeTN 3JIeKTPoNTaHnA, CINTb BCE XNkOCTn N OCHNTb;
- pa3o6paTb MaunHy Ha rpynnbO ndopOnhix MaTePnaIOB (nlaactMaCCbI B COOTBeCTBUN C CnMBOJOM nepepaoTKn, MeaJIbI, pe3Ha, ynaKOBka). EcIn nDeTaN CoepXaT pa3NnHbIe MaTePnaIbI, o6paTtbcr K KomneTeHTbIM opraHn3aunr; KaJdAn ODHOPoHnA rpynna DoJnxHa 6bITb yTuINn3npoBaHa B COOTBeCTBUN C 3aKOHODaTeJIbCTBOM NO nepepa60fKe MaTePnaIOB.
PekomeHnyetc TaKke ydaNTb Te deTaN MaunHbl, KOTOpBle MOryT PpeCTaBnTb ONaCHOCTb, B Oco6eHHOCTn dIraTei.
9.2. YTNJIIN3AUIN
3aKOH (B COOTBetCTBm C DnpeKTnBOE EC 2012/19/EU no OTxOaM 3neKtpnueckoro n 3neKtpoHHoro 6OpydoBaHnHaunHOHaNbHbIX 3aKOHOB TocydapCTB- yHeOB EC, KOtOpbie pa3pa6oTann 3Ty
IInpeKTHBy) 3anpeaet BlaJeBbUy 3JleKtpueckoro IIN 3JIeKTPoHHORO np60pa yHnTuToXeHne 3TOrO npOdyKTa IIN erO 3JIeKTPpueeCKx/3JIeKTPoHHbIX qacteB KaueCTBe TBepdbIX rOpOcKHX 6bITOBbIX OTXODOB IN O63bIBaet erO cdaBaTb 3TN OTXoDbI B CNeuaIIIN3pObaHHbIe ceHTpbI. MoXHO cDaTb npOdyKT HenocpeDCTBeHHO dNcTpnp6bIoTopy B3aMeH HOBOr 3KBuBaJIeHTHOrnpOdyKTa. Bbl6poc npOdyKTa B OKpykaIOUyIO cpey MoXeT HaHeCTN cepbe3HbI yUeep6 camo cpeE n 3DopOBbIO ueNoBEka.
Ha pncyHke n3o6paXeH KOHTeHep JIa MyHnUInaNbHbIX OTXODOB; CTpOro 3aNpeuaTcB Bbl6pacbIBaTb aIInapaT B 3TN KOHTeHepbl. Heco6JIIODeHne pyKOBOJaIeI NipeKtNBbl 2012/19/E U nCNoJHNTeNbHbIX DeKePToB pa3NJuHbIX CTpaH Coo6JecTBa IOnJeKHT aDMHNCTpaTNBHOMy HaKa3aHIO.
Prolunga elettrica
EN Extension cord
FR Rallongedel alimentationelectrique
DE Verländerungskabels
Prolongación de cable electrico
RU Pnp nCnoJb3ObaHn yDnHHTeBHoro KaBena
PT Extensa de cabo eletrico
NL Verlengsnoer van electrische kabel
PL Przedluzenie kabla elektryczneo
NO Hvis det brukes en skjoteledning ma
DA Forlangerledninger at stromforsyningsledninger
TR Bir uzatmanin kullanilmasi halinde
RO Prelungirea cablului electric
Cs Pokud je pouzita privodni snura
BGKorato n3non3BaTe yIbIInTeIeH Ka6eN
GR KaWδIo npoεKaToaŋc
SL Elektrni podajsek
| 220-240 V < | 500 W (1.5 KW) | 1500 - 2200 W (1.5 - 2.2 KW) | 2200-3000W (2.2 - 3 KW) |
| <20 m 1,5 mm | 2 | \( 2,5{\mathrm{\;{mm}}}^{2} \) | \( 2,5{\mathrm{\;{mm}}}^{2} \) |
| >20 - 50 m 2, \( {}^{a} \) | mm2 | \( 2,5{\mathrm{\;{mm}}}^{2} \) | \( 4,0{\mathrm{\;{mm}}}^{2} \) |
| 120 V < 1500 W(1.5 KW) | 1500 - 2200 W(1.5 - 2.2 KW) | |
| < 20 m 1,5 mm | 2 | 2,5 mm2 |
| > 20 - 50 m 2,5 mm | 2 | 4 mm2 |
LpA 73 dB(A) LwA
86 dB(A) LwA 85dB(A)
(uncertainty) Kpa 3dB (A)
Livello pressione acustica
EN Acoustic pressure
FR Niveau de pression acoustique
DE Schalldruckpegel
ES Nivel deruido
RU ypoBeHb 3ByKOBOrO DaBHeHnA
PT Nível de pressão acústica:
NL Geluidsdrukniveau
PL Poziom ciśnienia akustycznégo
NO Akustisk trykkniva
DA Akustisk trykkniva
RO Nivel presiune acustica
CS Hladina akustického tlaku
BG AkcytnuHo HaJraHe
GR Στάθμηνηχπικήπίεος
SL Stopnja zvočnega hrupa
Acoustic power measured
Acoustic power granted
(DC 24V) +TCU (Traction Control Unit)
P85.0569
2006/42/EC (+2009/127/EC) 2014/30/EU 2014/53/EU
Paolo Bucchi (Legal Representative Lavorwash S.p.A.)
- TERMINOLOGY AND SYMBOL LEGEND
- Total weight (ready to operate)
- 1.3.PRODUCT IDENTIFICATION
- SPECIFIC USE
- TECHNICAL MODIFICATIONS
- SAFETY INFORMATION
- BASIC RECOMMENDATIONS
- vacuum flaming or incandescent objects.
- Never park the machine on a slope.
- 2.2.NOISE AND VIBRATIONS
- HANDLING INFORMATION
- PACKING LIFTING AND TRANSPORT
- CHECKS UPON DELIVERY
- 3.3.UNPACKING
- LIFTING AND TRANSPORT: MACHINE, BATTERY AND BATTERY CHARGER
- TECHNICAL INFORMATION
- INSTALLATION INFORMATION
- BATTERY
- BATTERY PREPARATION
- BATTERY INSTALLATION
- BATTERY CONNECTION
- CIRCUIT BOARD SETTINGS CONFIGURATION
- Model "B" (DC 24V)
- Gel:
- Lead-Acid:
- Lithium NCM:
- Lithium FePO4:
- Model "BT" (DC 24V with traction)
- For Pb-acid and GEL batteries:
- For NCM Lithium batteries:
- For Lithium FePO4 batteries:
- STRUCTURE AND FUNCTIONS
- PHOTO A E (AC 230V)
- PHOTO B MODELE E (AC 230V)
- PHOTO C MODEL B - (DC 24V)
- PHOTO D MODEL B-(DC 24V)
- PHOTO E MODEL BT/T - (DC 24V with traction)
- PHOTO F MODEL BT/T - (DC 24V with traction)
- PHOTO G
- PHOTO H
- PHOTO I
- PHOTO L
- PHOTO M
- PHOTO N
- PHOTO O
- PHOTO P
- PHOTO Q
- PHOTO R
- BATTERY CHARGING
- SQUEEGEE ASSEMBLY
- SQUEEGEE DISASSEMBLY
- SQUEEGEE BLADES DISASSEMBLY / ASSEMBLY
- SQUEEGEE ADJUSTMENT
- 5.8.SPLASH GUARD ASSEMBLY/ DISASSEMBLY
- BRUSH ASSEMBLY / DISASSEMBLY
- Assembly:
- FILLING AND DRAINING THE SOLUTION TANK
- To fill the tank:
- To drain the tank:
- DRAINING THE RECOVERY TANK
- SPECIFIC INSTRUCTIONS FOR THE USE OF MODEL AC 230V
- EMERGENCY SITUATIONS In case of emergency:
- DRIVING THE MACHINE
- Model "E" (AC 230V)
- WORK METHOD
- PREPARATION AND WARNINGS
- BATTERY CHARGE LEVEL CONTROLS
- DIRECT SCRUBBING OR FOR SLIGHTLY DIRTY SURFACES
- INDIRECT SCRUBBING OR FOR VERY DIRTY SURFACES
- First set of operations:
- Second set of operations:
- POST-SCRUBBING OPERATIONS
- MAINTENANCE INFORMATION
- 6.1.TANKS
- 6.2.SUCTION HOSE
- 6.3.SQUEEGEE
- ACCESSORIES
- 6.5.MACHINEBODY
- BATTERIES
- PB-Acid batteries
- GEL batteries
- THERMAL BREAKERS
- PERIODIC MAINTENANCE
- RECOMMENDED SPARE PARTS
- OPERATING CHECKS
- PROBLEM SOLVING GUIDE
- THE MACHINE DOESN'T WORK
- THE MACHINE DOESN'T MOVE
- THE BRUSH DON'T ROTATE
- NOT ENOUGH OR TOO MUCH DETERGENT
- NO SUCTION
- INSUFFICIENT SUCTION
- THE BRUSH MOTOR OR THE SUCTION MOTOR DOESN'T STOP
- THE SQUEEGEE DOESN'T CLEAN OR DRY EFFICIENTLY
- THE BATTERY CHARGER DOESN'T WORK
- THE BATTERIES DO NOT CHARGE OR DO
- NOT HOLD A CHARGE
- ALARMS TABLE
- CONDITIONS OF WARRANTY
- SCRAPPING OF THE MACHINE
- 9.2.DISPOSAL (WEEE)
- FR
- SOMMAIRE
- GENERALITES
- BUT DU MANUEL
- INFORMATIONS SUR LA MANUTENTION
- MANUTENTION DE L'EMBALLAGE
- HANDLINGS-INFORMATIONEN
- INFORMACJE OGOLNE
- ZAKRES INSTRUKCJI
- WYM IN BNUBPAUJRA
- TEXHnueCKA INHΦOPMALIa
- 4.1.ИHΦOPMAUЯOBUCTAHOBKE
- 4.1.1.AKKYMUYIATOP
- CBNHUCOBO-KNCIOHTbI:
- Лит NM:
- Литни FePO4:
- CBNHUCOBO-KNCJIOTHbI:
- Jntn NCM:
- Литун ФЕРО4:
- KOHФИГУРAZИЗ 3APЯДНΟΥCTPOДСТВА AKКUMЛЯТOPHOББATAPEИ
- Длгпгьх NCM aKKymлтopoB:
- ДллNTeBbIX FePO4 aKKymIaTOpOB:
- PABOYAR INHΦOPMAUJRA
- NOIROTOBKA MAUINHbI
- 5.8.CBOPKA IN PA3BOPKA Bpbl3ROBUKA
- MONTAGGIO E SMONTAGGIO DELLA SPAZZOLA
- C6opka:
- ABTomatnueckoe JeicTBue:
- HANOJIHEHNE I ONOPOXHEHNE BAKAMOIOUERO PACTBOPA
- Длгзалнень6aka:
- MOKTe IpnBecTI K IOBpeXdeHIO MII NIOJOMKe MaunHbl.
- Per lo scarico:
- ONYCTOWEHNE BAKA C COBPAHHOJ XNIDKOCTbIO
- Дя onyctoшен6aka:
- 5.12.OCOBbIE HOPMbI 3KcPlyATAUIMMODEJIAC230V
- 4YPE3BbIyAHHbIE CNTYALIN
- B cnyuae ue3BbIaHbIX 06ctoTeNbCTB:
- 5.13.YIIPABJIEHNE MAUNHOI
- MoeInb "E" (AC 230V)
- CKPE6OK
- KOMNJIeKTIouIe
- 6.5.KOPNUC MAUNHbI
- 6.6.AKKYMUYIATOPHBIEBATAPEN
- CBNHUCOBO-KNCLOTbIX AKKymyIATOPOB
- TeneBbIe aKKymIaTOPHbIe 6aTapeu
- 6.7.PEYJAPHOE OBCJYKUBAHNE
- PEKOMEHДyEMbIe 3APACHbIe YACTN
- PABOCHKOHTPOJIb
- 7.1.YCTPAHEHNEIPOBJIEM
- MALUNHA HE PABOTAET
- MAUHHA HE DBNKETCBAPEI
- YTNJIIN3AUIN
- LpA 73 dB(A) LwA
- dB(A) LwA 85dB(A)
Brand : Lavor
Model : MOVING 55B
Category : Dryer