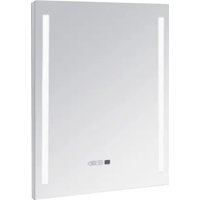
ELEGANCE SPIEGEL 400 L - Electric heater Sonnenkönig - Free user manual and instructions
Find the device manual for free ELEGANCE SPIEGEL 400 L Sonnenkönig in PDF.


| Product type | Electric heater |
| Brand | Sonnenkönig |
| Model | ELEGANCE SPIEGEL 400 L |
| Nominal power | 0.4 kW (400 W) |
| Minimum power | 0.0 kW (off) |
| Nominal consumption | 0.4 kW |
| Standby consumption | 0.001 kW |
| Power supply | 220-240 V ~ 50/60 Hz |
| Mounting type | Wall-mounted (vertical or horizontal) |
| Minimum distance to walls and objects | 20 cm |
| Material | Glass (mirror surface) |
| Functions | Built-in WiFi, touch screen, anti-fog mode, child lock, open window detection, LED lighting with adjustable intensity and color temperature, scheduled programming via app |
| Connectivity | WiFi 2.4 GHz, SMART REMOTE KING app |
| Cleaning | Soft dry cloth, glass cleaner for glass models |
| Safety | Child lock, open window detection, automatic shutdown in case of sudden temperature drop |
| Warranty | 24 months |
| Included accessories | Wall mount, dowels, screws |
| Protection class | IP24 (estimated for bathroom) |
Frequently Asked Questions - ELEGANCE SPIEGEL 400 L Sonnenkönig
User questions about ELEGANCE SPIEGEL 400 L Sonnenkönig
0 question about this device. Answer the ones you know or ask your own.
Ask a new question about this device
Download the instructions for your Electric heater in PDF format for free! Find your manual ELEGANCE SPIEGEL 400 L - Sonnenkönig and take your electronic device back in hand. On this page are published all the documents necessary for the use of your device. ELEGANCE SPIEGEL 400 L by Sonnenkönig.
USER MANUAL ELEGANCE SPIEGEL 400 L Sonnenkönig
natural_image
Exterior view of a modern office building (no signage)Artikel-Nr.:
21222492ELEGANCE SPIEGEL 400L:
INDEX
natural_image
Technical line drawing of a mechanical component with labeled 'WALL' (no other text or symbols)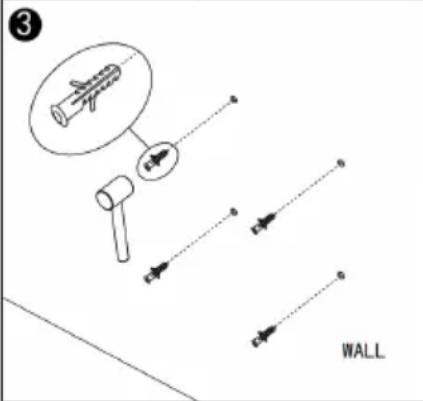
text_image
3 WALL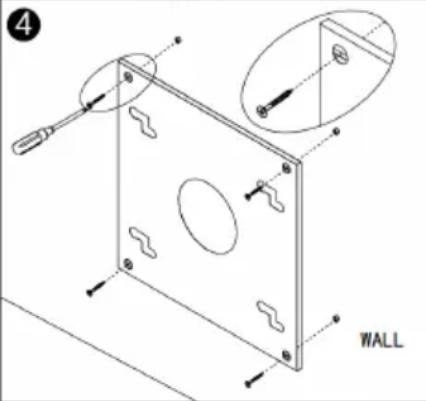
text_image
WALL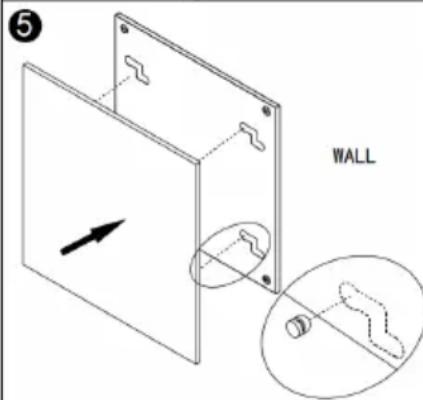
text_image
5 WALL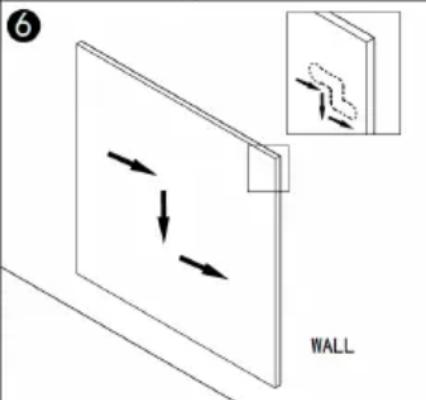
text_image
6 WALLtext_image
QR code image containing encoded data, no visible human-readable text1.2.3.
text_image
SÖNNENKÖNIG OF SWITZERLAND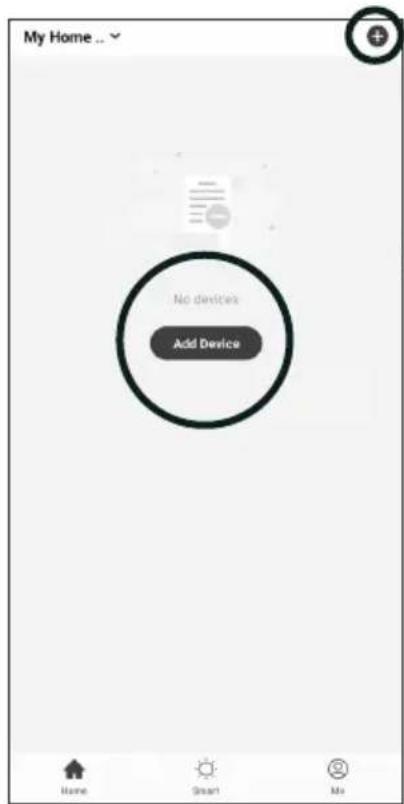
text_image
My Home ... No devices Add Device Home Smart Ms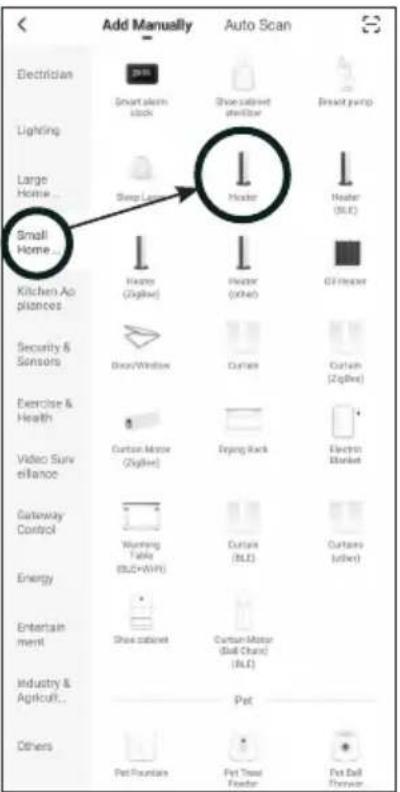
text_image
Add Manually Electrician Lighting Large Home... Small Home... Kitchen Ap pliances Security & Sensors Exercise & Health Video Surve erance Curtaway Control Energy Entertain ment Industry & Agricult... Others Add Manually Auto Scan Smart alarm lock Shoe cabinet defloor Snack Hooker Heater (ULC) Honey (ZigBlue) Heater (Other) Off heater Door/Window Curtain Curtain (ZigBlue) Cartan-Motor (ZigBlue) Eggong Rack Electron Market Running Table (BLC+WPC) Curtain (ULC) Curtain (Liber) Shoe cabinet Cartan-Motor (Dell Chain) (ULC) Pet Pet Fountains Pet Tousal Feeder Pet Ball Thinnertext_image
Cancel Select 2.4 GHz Wi-Fi Network and enter password. If your Wi-Fi is 5GHz, please set it to be 2.4GHz. Common router setting method 2.4GHz 5GHz WiFi Name Password Next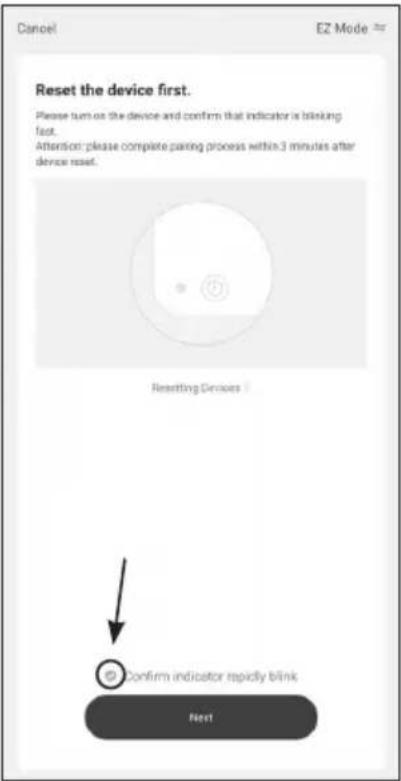
text_image
Cancel EZ Mode * Reset the device first. Please turn on the device and confirm that indicator is blinking fast. Attention: please complete passing process within 3 minutes after device reset. Resetting Devices Confirm indicator rapidly blink Next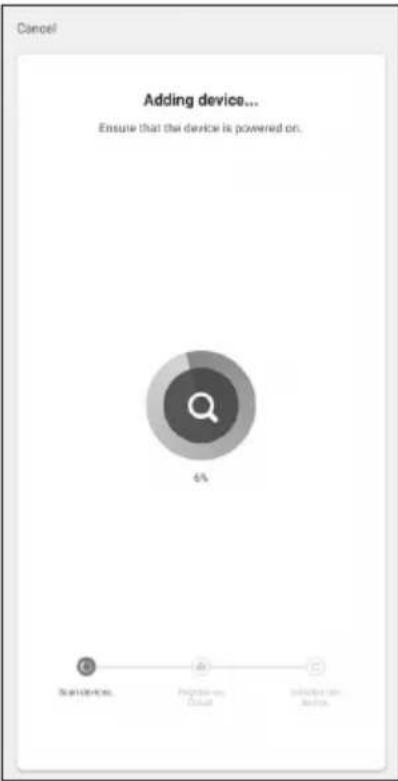
text_image
Cancel Adding device... Ensure that the device is powered on. 6% Start User-Action Progressive Default Sub<<-> User- ActionDE
| Item Unit | |
| Type of heat input, for electric storage local space heaters only (select one) | |
| manual heat charge control, with integrated thermostat [no] | |
| manual heat charge control with room and/or outdoor temperature feedback [no] | |
| electronic heat charge control with room and/or outdoor temperature feedback [no] | |
| fan assisted heat output [no] | |
| Type of heat output/room temperature control (select one) | |
| single stage heat output and no room temperature control | [no] |
| Two or more manual stages, no room temperature control | [no] |
| with mechanic thermostat room temperature control | [no] |
| with electronic room temperature control | [no] |
| electronic room temperature control plus day timer | [no] |
| electronic room temperature control plus week timer | [yes] |
| Other control options (multiple selections possible) | |
| room temperature control, with presence detection | [no] |
| room temperature control, with open window detection | [no] |
| with distance control option | [yes] |
| with adaptive start control | [no] |
| with working time limitation | [no] |
| with black bulb sensor | [no] |
natural_image
Exterior view of a modern office building (no signage)Article-No.:
21222492ELEGANCE SPIEGEL 400L:
FR
INDEX
natural_image
Technical line drawing of a mechanical component with a dotted line and labeled 'WALL' (no other text or symbols)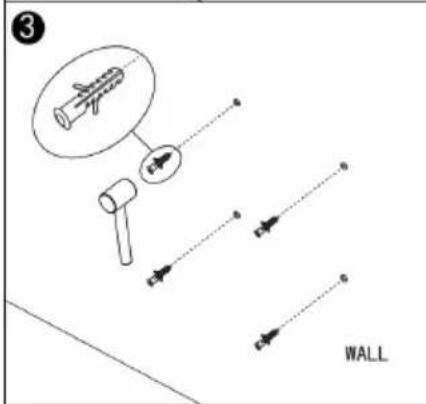
text_image
3 WALL
text_image
WALL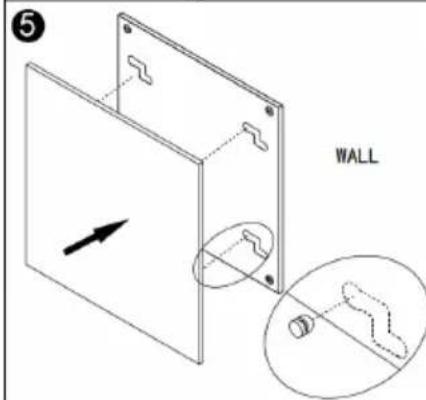
text_image
WALL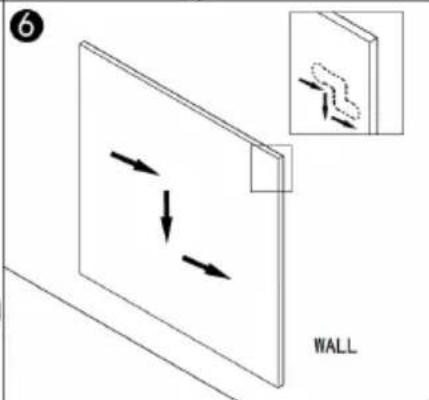
text_image
6 WALLtext_image
QR code image containing encoded data, no visible human-readable text2.1.3.

text_image
SONNENKÖNIG OF SWITZERELAND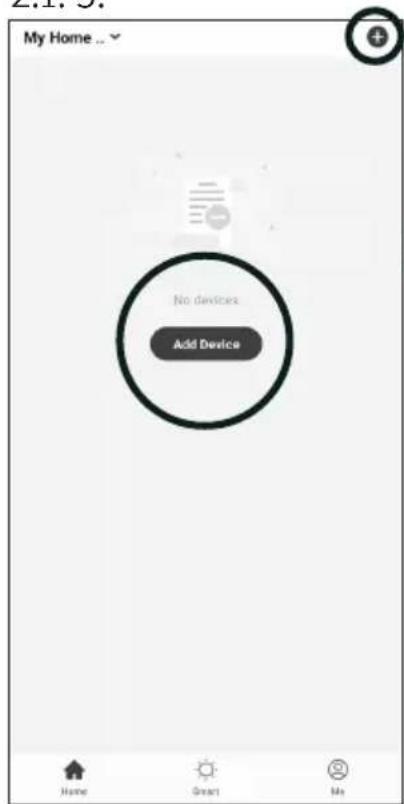
text_image
My Home ... No devices Add Device Home Smart Me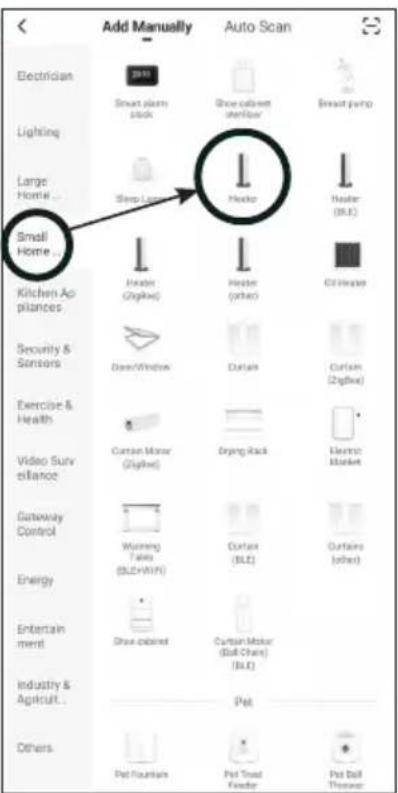
text_image
Add Manually Auto Scan Electrician Smart alarm clock Shoe cabinet timer/boxer Smart pump Lighting Large Home... Sleep Lamp Hooker Hooker (SLT) Small Home... Kitchen Appliances Header (Gigbee) Header (other) Off-Heater Security & Sensors Dawn/Windnet Durban Durban (Gigbee) Exercise & Health Curtan Motor (Gigbee) Drying Rack Electric Blanket Video Surveillance Gateway Control Warming Panel (SLT+HWP) Curban (SLT) Durban (other) Energy Entertainment Draw colorset Curtan Motor (Ball Chest) (SLT) Industry & Agriculture... Pet Others Pet Fountain Pet Towel Funder Pet Ball Throattext_image
Cancel Select 2.4 GHz Wi-Fi Network and enter password. If your Wi-Fi is 5GHz, please set it to be 2.4GHz. Common router setting method 2.4GHz 5GHz WiFi Name Password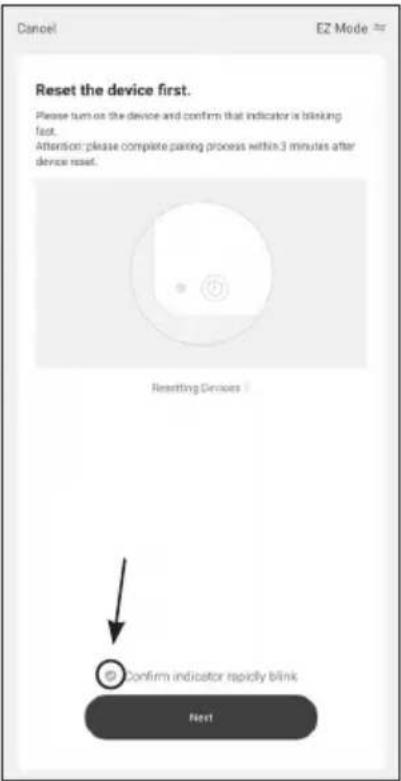
text_image
Cancel EZ Mode * Reset the device first. Please turn on the device and confirm that indicator is blinking fast. Attention: please complete passing process within 3 minutes after device reset. Resetting Devices Confirm indicator rapidly blink Next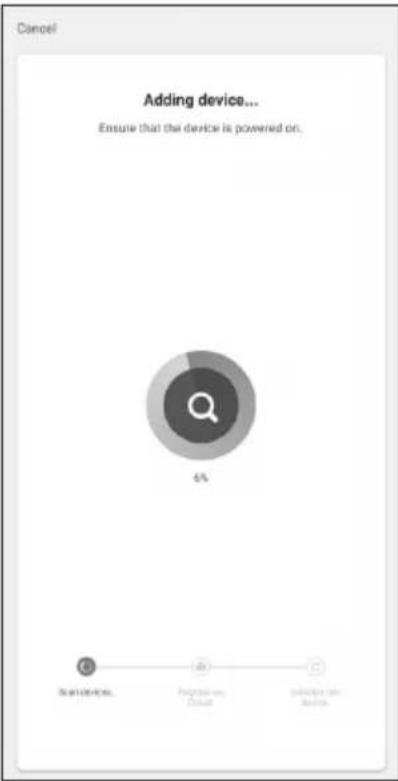
text_image
Cancel Adding device... Ensure that the device is powered on. 6% Start User-Action Progressive Default Sub<<-> User- Action
Modifications techniques
| Item Unit | |
| Type of heat input, for electric storage local space heaters only (select one) | |
| manual heat charge control, with integrated thermostat [no] | |
| manual heat charge control with room and/or outdoor temperature feedback [no] | |
| electronic heat charge control with room and/or outdoor temperature feedback [no] | |
| fan assisted heat output [no] | |
| Type of heat output/room temperature control (select one) | |
| single stage heat output and no room temperature control | [no] |
| Two or more manual stages, no room temperature control | [no] |
| with mechanic thermostat room temperature control | [no] |
| with electronic room temperature control | [no] |
| electronic room temperature control plus day timer | [no] |
| electronic room temperature control plus week timer | [yes] |
| Other control options (multiple selections possible) | |
| room temperature control, with presence detection | [no] |
| room temperature control, with open window detection | [no] |
| with distance control option | [yes] |
| with adaptive start control | [no] |
| with working time limitation | [no] |
| with black bulb sensor | [no] |
natural_image
Exterior view of a modern office building (no signage)N. Articolo:
21222492ELEGANCE SPIEGEL 400L:
IT
INDEX
natural_image
Technical line drawing of a mechanical component with a dotted line and labeled 'WALL' (no other text or symbols)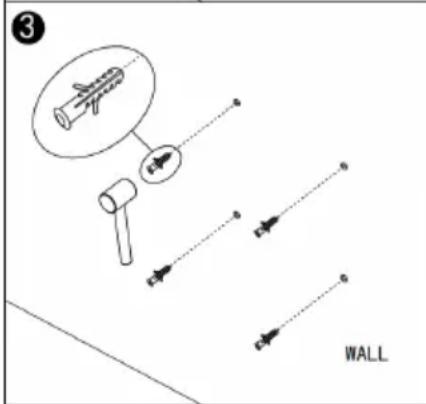
text_image
3 WALL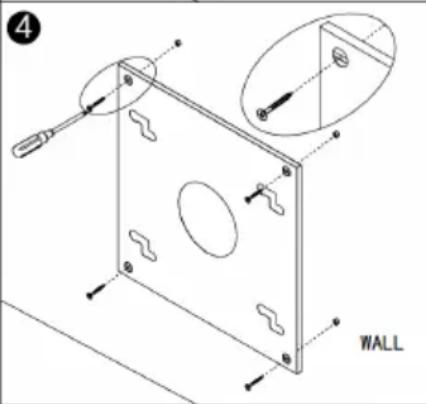
text_image
WALL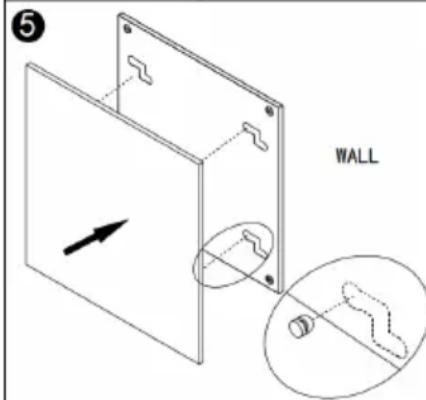
text_image
5 WALL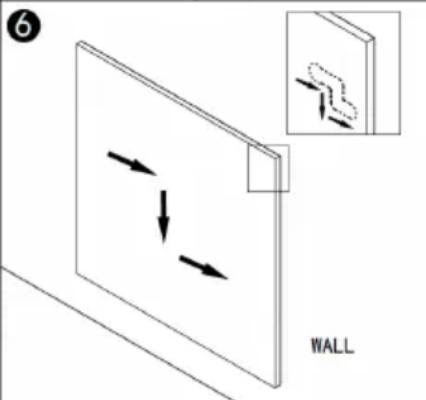
text_image
6 WALLtext_image
QR code image containing encoded data, no visible human-readable text2.1. 3.
text_image
SONNENKÖNIG OF SWITZERLAND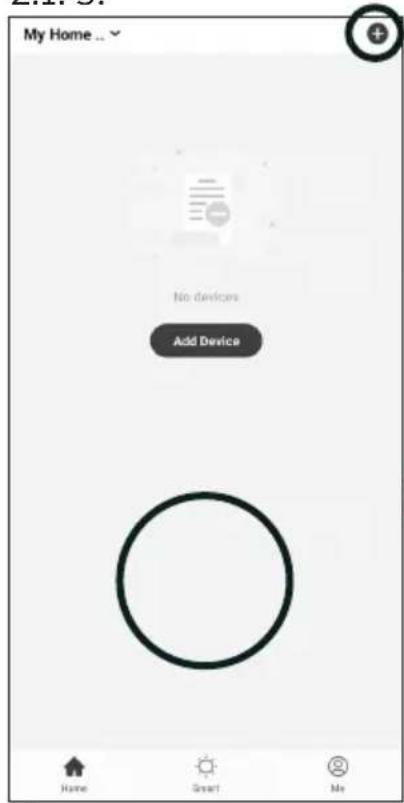
text_image
My Home ... No devices Add Device Home Smart Me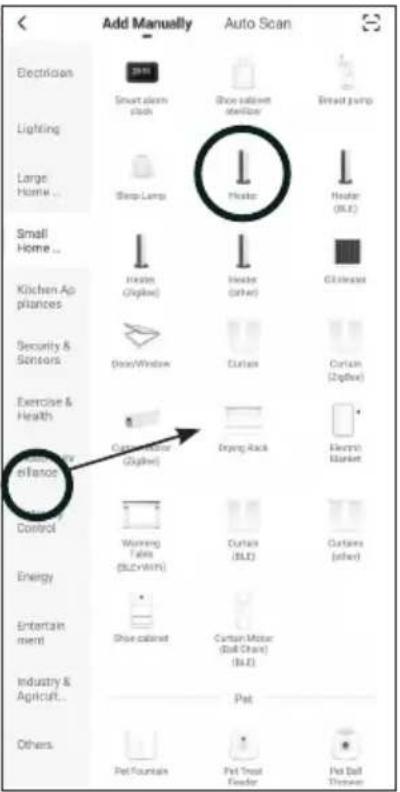
text_image
Add Manually Auto Scan Electrician 2015 Smart alarm clock Show cabinet seatbox Breast pump Lighting Large Home ... Sleep Lamp Heater Heater (BLT) Small Home ... Kitchen Appliances Heater (Zigbee) Heater (other) Clutter Security & Sensors DoorWindow Curtain Curtain (Zigbee) Exercise & Health Curtain Motor (Zigbee) Drying Rack Electrici Market eBalance Control Winning Tables (BLT+WIN) Curtain (BLT) Curtains (other) Energy Entertainment Shoe cabinet Curtain Motor (Ball Chain) (BLT) Industry & Agriculture... Pet Others Pet Fountain Pet Treat Feeder Pet Ball Throattext_image
Cancel Select 2.4 GHz Wi-Fi Network and enter password. If your Wi-Fi is 5GHz, please set it to be 2.4GHz. Common router setting method 2.4GHz 5GHz WiFi Name Password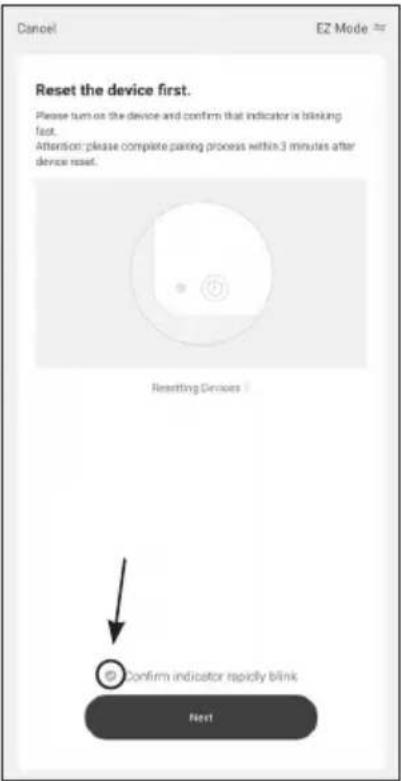
text_image
Cancel EZ Mode * Reset the device first. Please turn on the device and confirm that indicator is blinking fast. Attention: please complete passing process within 3 minutes after device reset. Resetting Devices Confirm indicator rapidly blink Next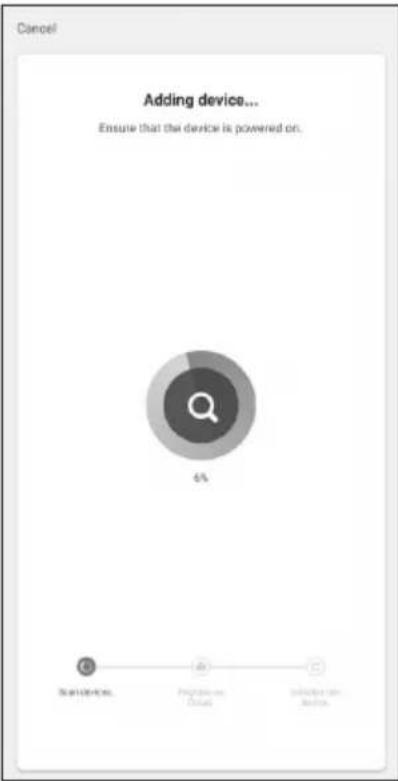
text_image
Cancel Adding device... Ensure that the device is powered on. 6% Start/Offs Programs/Other Subsidy/Other
| Item Unit | |
| Type of heat input, for electric storage local space heaters only (select one) | |
| manual heat charge control, with integrated thermostat [no] | |
| manual heat charge control with room and/or outdoor temperature feedback [no] | |
| electronic heat charge control with room and/or outdoor temperature feedback [no] | |
| fan assisted heat output [no] | |
| Type of heat output/room temperature control (select one) | |
| single stage heat output and no room temperature control | [no] |
| Two or more manual stages, no room temperature control | [no] |
| with mechanic thermostat room temperature control | [no] |
| with electronic room temperature control | [no] |
| electronic room temperature control plus day timer | [no] |
| electronic room temperature control plus week timer | [yes] |
| Other control options (multiple selections possible) | |
| room temperature control, with presence detection | [no] |
| room temperature control, with open window detection | [no] |
| with distance control option | [yes] |
| with adaptive start control | [no] |
| with working time limitation | [no] |
| with black bulb sensor | [no] |
natural_image
Exterior view of a modern office building (no signage)Article-No.:
21222492ELEGANCE SPIEGEL 400L:
EN
INDEX
1 Safety instructions ....39
2 Cleaning and Maintenance ....40
3 Installation.... 41
4 Controlpanel and Display....42
5 Operation 42
6 Technical data....45
7 Warranty / Disposal / Technical change....46
1 Safety instructions
Please read before first commissioning the safety instructions carefully and observe the safety instructions to prevent damage due to misuse, improper operation, and improper environmental conditions to be avoided. Keep these for later reference.
Check the device after removing the packaging for damage. Do not put the unit in case of suspected corruption in operation and consult a specialist. The recyclable packaging material must not be stored or disposed accessible for young children, but must be disposed of properly.
This appliance is only for the purpose for which it was explicitly developed, ie be used for heating rooms. Any other use is regarded as improper and therefore dangerous. The supplier is not liable for damage to persons and / or property damage due to an improper or incorrect use.
Repairs to electrical appliances must only be carried out by trained personnel only. Improperly performed repairs and alterations to the equipment can have dangerous consequences for the user according to what the warranty will be rejected.
The use of all electrical equipment must be observed some fundamentally important rules:
- Do not touch the appliance with wet hands or feet.
- Do not expose the device to the weather.
- The appliance must not be used by children or infirm persons without supervision.
• Pull the plug from the outlet when you no longer need it . not by pulling the power cable or the device to unplug it. - Disconnect before carrying out any cleaning or maintenance operation, unplug the device. The air intake must be cleaned at least once a week.
- Do not use near a bathtub, shower, sink, or swimming pools
- Do not use any accessories or attachments that are not approved by the manufacturer.
- Do not insert objects into the interior of the device.
- Do not cover the appliance with objects.
- Mount the unit with the control at the bottom on a vertical wall.
The device must not be used under the following conditions:
- In areas with potentially explosive atmospheres.
• In rooms with aggressive atmospheres. - In rooms with high solvent concentration.
• In areas with extremely high levels of dust. - Disreputable operating conditions, it is recommended that the technical department of SONNENKÖNIG or dealer to contact. The use of an electric heater under the wrong conditions will invalidate the warranty!
This appliance can be used by children aged from 8 years and above and persons with reduced physical, sensory or mental capabilities or lack of experience and knowledge if they have been given supervision or instruction concerning use of the appliance in a safe way and understand the hazards involved. Children shall not play with the appliance. Cleaning and user maintenance shall not be made by children without supervision.
Children aged from 3 years and less than 8 years shall only switch on/off the appliance provided that it has been placed or installed in its intended normal operating position and they have been given supervision or instruction concerning use of the appliance in a safe way and understand the hazards involved. Children aged from 3 years and less than 8 years shall not plug in, regulate and clean the appliance or perform user maintenance.
2 Cleaning and Maintenance
EN
2.1 Cleaning
Always unplug your heater and let it cool down completely before cleaning. Never dip into water and never splash water on it. Clean the heater with a soft damp cloth. For glass models use a soft cloth and glass cleaner. Never use a wet cloth and make sure to dry the heater when clean with a dry cloth. Do not use any abrasive materials, solvents or harsh cleaning sponges as this could cause scratches or other irreparable damage. Before operating the heater again it must be completely dry.
2.2 Using/Working
Please note that the heater may discolour with use. This is due to airborne pollution and is not a fault. Do not cover your heater with a picture foil and do not paint or print the heater yourself. This might cause damage to the heating element and will void your warranty.
If you notice any noise, smells, visible changes or exceptionally high temperatures please discontinue use and contact an authorized
Sonnenkönig dealer.
text_image
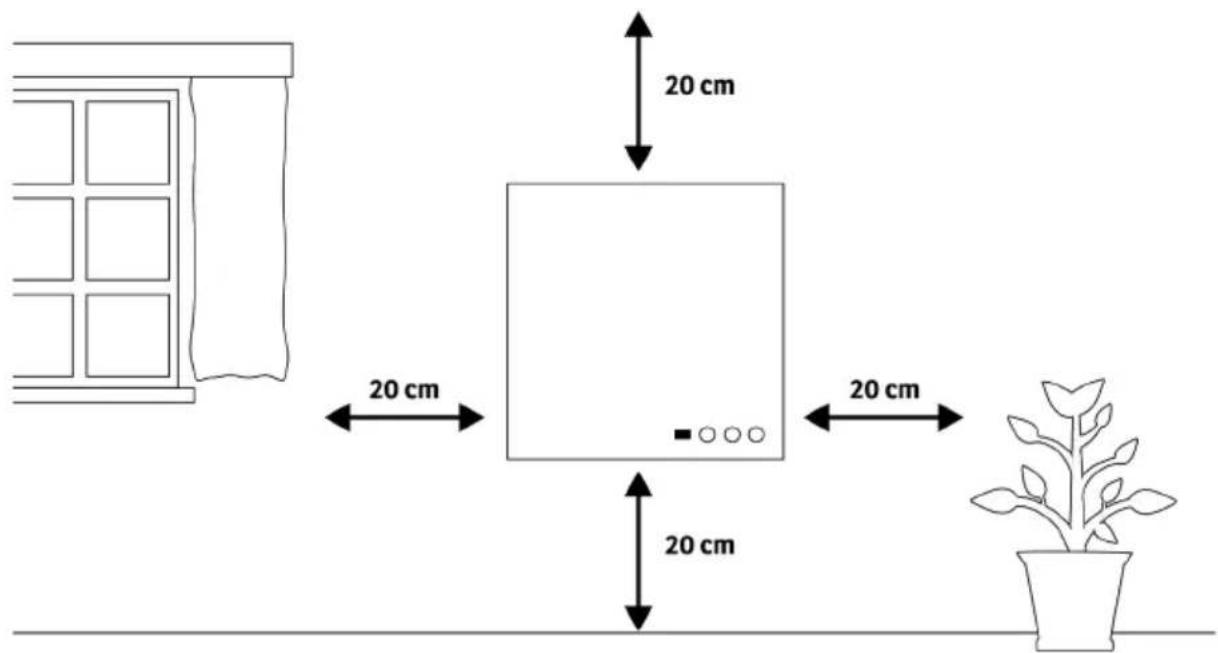
20 cm 20 cm 20 cm 20 cmThe heater must be at least 20 cm away from all objects, walls, the ceiling and the floor.
3 Installation
text_image
1 A WALL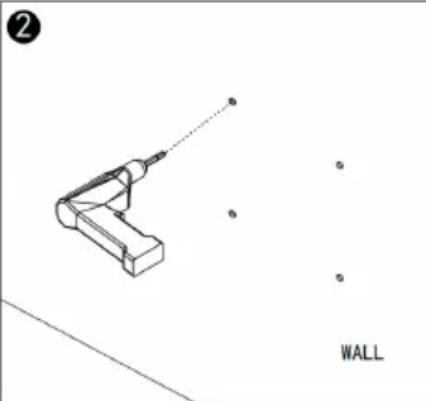
natural_image
Technical line drawing of a mechanical component with a dotted line and labeled 'WALL' (no other text or symbols)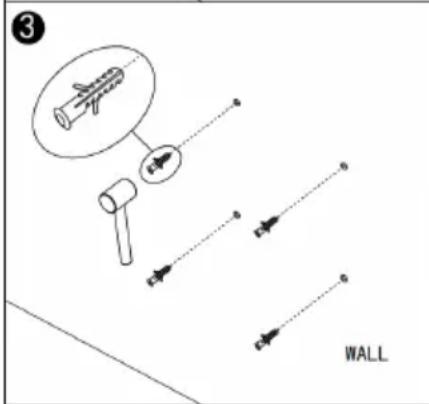
text_image
3 WALL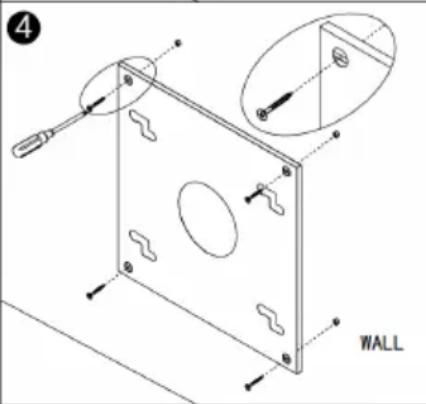
text_image
WALL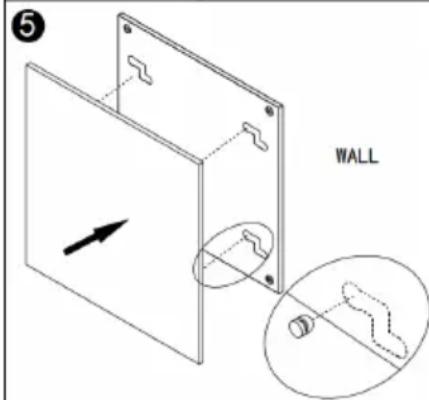
text_image
WALL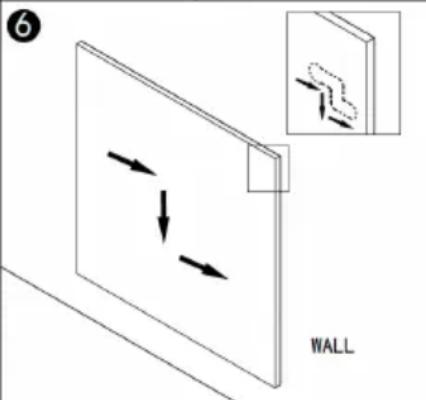
text_image
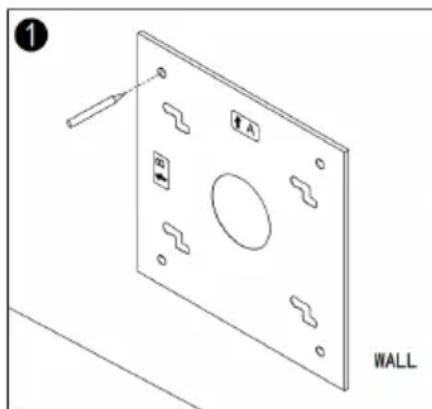
6 WALLStep 1. Use the supplied mounting bracket to mark the position of the holes on the wall. For vertical wall mounting "A" signal will be the top of the mounting bracket. For horizontal wall mounting "B" signal will be the top of the mounting bracket.
Step 2. Drill holes using a 8mm drill.
Step 3. Insert the dowels into the holes.
Step 4. Screw the screws into the dowels through the holes on the mounting bracket.
Step 5. Mount the panel on the mounting bracket.
Step 6. Move the panel into two directions, tight the 4 spacers on the back side of the mirror to make sure the panel is secured.
Note: The kit supplied in the package is designed for mounting vertically on a solid wall. If mounted onto other types of walls, you will need appropriate fixings (not supplied). Please make sure the wall is safe to mount. We highly recommend to have the panel installed by a qualified electrician or installer authorized by Sundirect. The heater must be at least 20 cm removed from all objects, walls, etc.; the distance to the floor must be at least 20 cm.
4 Controlpanel and Display
EN
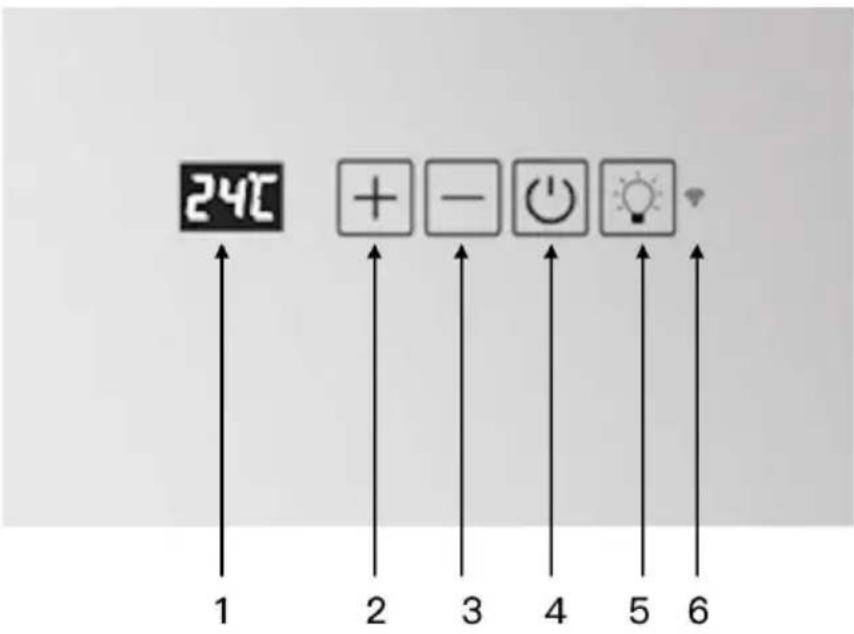
text_image
24°C 1 2 3 4 5 6- Screen
-
- button
-
- button
- Power button
- Light button
- Wifi indicator
* When the screen display shows “— — —”, it means that the heater is under standby mode.
5 Operation
5.1 General Introduction to the Smart Control
The LM-Pro has an integrated WiFi touchscreen control box, which means there is no additional thermostat needed to control the heater. The panel can either be controlled manually using the touch screen on the bottom of the mirror surface or operated via a smartphone. Once the heater has been connected to the APP, the smartphone will take control along with the control box. If your home internet is not working, it is still possible to operate the heater via touchscreen. Just power off the heater and power it on again after a few seconds. Once the heater is reconnected to the WiFi, it will automatically reconnect to the smartphone. Both heating and lighting systems can be easily operated via the touch button and the APP.
Activate/Deactivate the WIFI Function
Power on the heater, press the power button until the screen shows "— — —", press and hold the "-" button for 10 seconds to deactivate this heater's WIFI function; The WIFI sign on screen will disappear. Press and hold the "-" button for 10 seconds again to reactivate it.
Manual Temperature Control
By pressing the ON/OFF button, the current ambient temperature will be displayed on the temperature display. Adjust the desired temperature by pressing the „+“ or „-“ buttons.
5.4 Manual Time Programming
To activate the radiator, press and hold the „-” button for 3 seconds until „00H“ appears on the screen. Modify the countdown number by pressing the „+” or „-” buttons.
5.5 Light Control
Turning On/Off Lights: Press the "Light" button to turn the lights on or off.
Dimmable: Press and hold the „Light“ button; the brightness of the lights can be adjusted from minimum to maximum until an audible signal is heard.
Color Temperature: Use the touch button to switch between different color temperatures. Press and hold both the "Light" and "-" buttons until "C1" appears on the screen. Select between "C1", "C2", and "C3", corresponding to color temperatures of 6000K/4000K or 3000K. After connecting the device to the app, additional color temperature options are available.
5.6 Anti-Fog Mode
This radiator has an anti-fog mode function. Press and hold the power on/off button until "AF" appears on the screen to enter anti-fog mode. It will operate cyclically for 20 minutes to prevent fogging on the mirror surface. Upon completion, the radiator will enter standby mode. If you want to stop it early, press and hold the power on/off button until "---" appears on the screen.
5.7 Child Safety
Press the „+“ and „-“ buttons simultaneously for 3 seconds to activate child safety mode; „KS“ will appear on the screen. Press both buttons again to deactivate child safety mode.
5.8 Window Opening Detection
This radiator has a window opening detection function, which is disabled by default but can be activated after connecting the radiator to the app. When the function is active, the radiator monitors the heating system. If a sudden temperature drop occurs within a short time, "OPE" will flash on the screen. The system will turn off the radiator, and after 30 minutes, it will resume normal operation. Pressing any button during this period will return the radiator to normal operation.
5.9 Temperature Calibration
Activate the radiator; now the screen displays the temperature. Press and hold the „+“ button for 5 seconds to enter temperature calibration mode. Modify the number by pressing the „+“ or „-“ buttons (adjustable between +5 / -5 degrees).
Additional App Functions
After connecting to the app, additional settings can be made, including:
- Setting a heating mode and a time program
- Remote control of the radiator
- Deactivation of the audible signal „beep“
Activation/Deactivation of WLAN Function
Activate the radiator, press the power on/off button until „---“ appears on the screen, then hold the „-” button for 10 seconds to deactivate the WLAN function of this radiator; The WLAN symbol on the screen will disappear. Hold the „-” button again for 10 seconds to reactivate it.
EN
WIFI Operation
Scan the QR code below to download the "Smart Remote King" APP or search "Smart Remote King" APP on APP store or Google play store to start the procedure to download the APP, open the APP and register with your phone number or Email address.
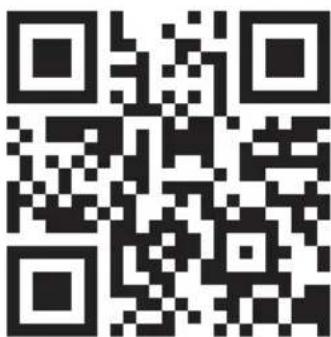
text_image
QR code image containing encoded data, no visible human-readable text- After you connect the device to the power supply and press the main switch, the WIFI symbol on the display will start flashing quickly. The WIFI module is now ready for normal connection mode.
2.3.
natural_image
Black-and-white landscape photo of snow-capped mountains and a lake, with blooming flowers in the foreground (no text or symbols visible on the main scene)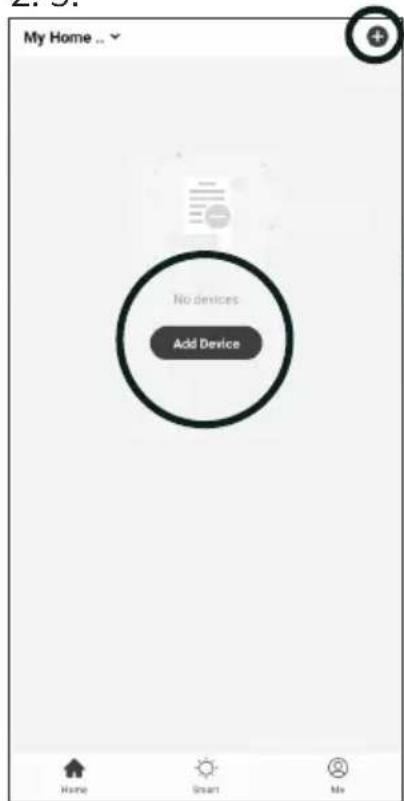
text_image
My Home ... No devices Add Device Home Smart Me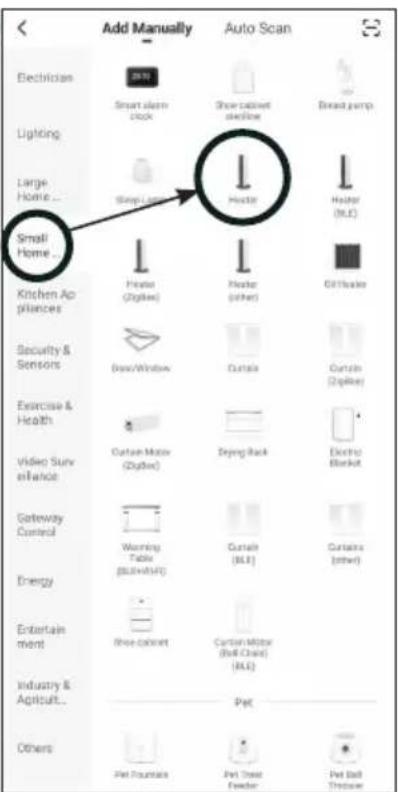
text_image
Add Manually Auto Scan Electrician Smart alarm clock Shoe cabinet grille Bread pump Lighting Large Home... Sleep Lamp Hotel Hotel (MLC) Small Home... Kitchen Ap Appliances Private (Zipbox) Hotel (other) Offshore Security & Sensors Box/Window Curtail Curtail (Zipbox) Exercise & Health Video Survey Curtail Motor (Zipbox) Dyeing Back Electric Basket Gateway Control Warning Panel (pulsification) Curtail (MLC) Curtail (other) Energy Entertainment Shoe cabinet Curtail Motor (Ball Cache) (MLC) Industry & Agriculture... Pet Others Pet Mountains Pet Street Freader Pet Ball Thread- press the + icon or the „Add Device“ button in your app
- Select „Small Home Appliances first and then „Heater“.
4.5.6.
text_image
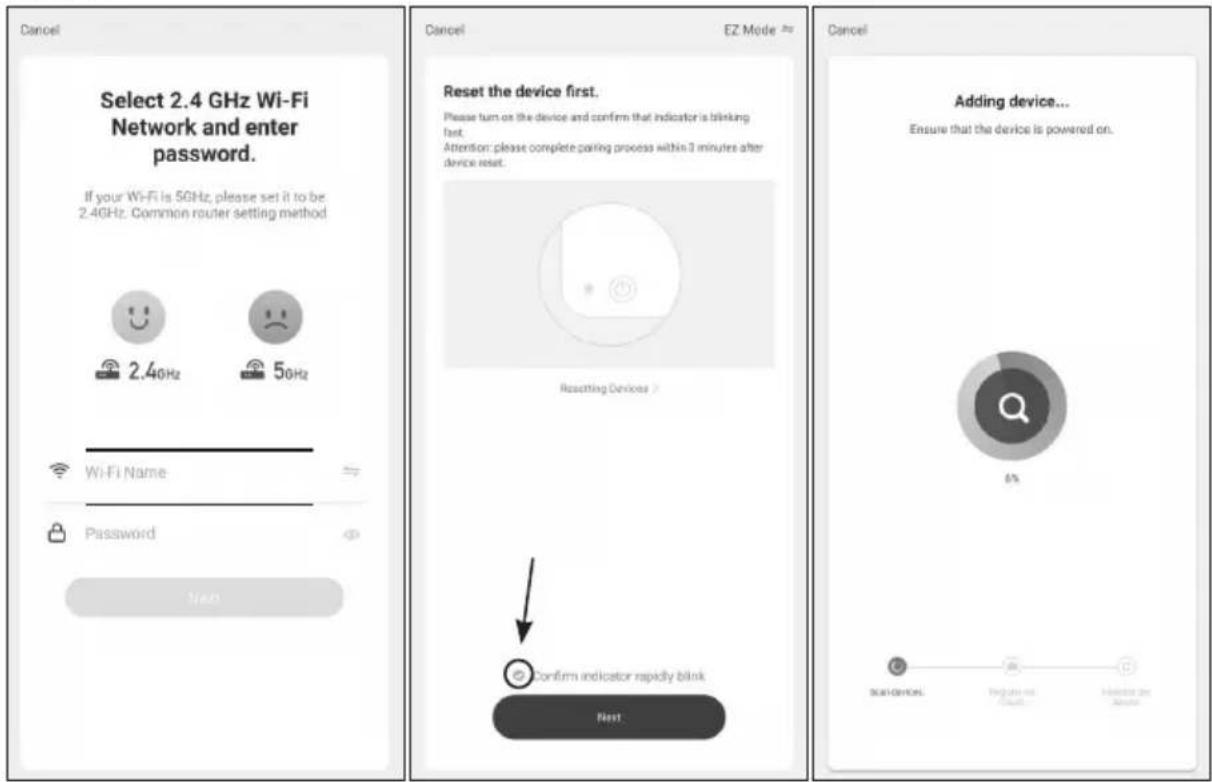
Cancel Select 2.4 GHz Wi-Fi Network and enter password. If your Wi-Fi is 5GHz, please set it to be 2.4GHz. Common router setting method 2.40Hz 50Hz Wi-Fi Name Password Next Cancel EZ Mode * Reset the device first. Please turn on the device and confirm that indicator is blinking fast. Attention: please complete pairing process within 3 minutes after device reset. Resetting Devices > Confirm indicator rapidly blink Next Cancel Adding device... Ensure that the device is powered on. Sub-Device1 Regular unit Control Addict or Adjust
-
Make sure that your smartphone is connected to the WIFI and then enter the security phrase or password of your WIFI router
-
Check again that the WIFI symbol on the display of the infrared tower heater flashes quickly and check the box before pressing again.
-
Wait until the connection status shows 100% . Give the device a name so you can assign it later.
Troubleshooting
If no connection could be established after the time has elapsed, switch off the device, switch it on again after some time, check the points mentioned below and try again.
- Is your device and smartphone near the router?
- Does your WIFI signal have the necessary 2.4 GHz frequency?
- Is your router already overloaded with other WIFI devices?
Set WIFI connection mode
You can select two connection modes during the Wifi setup. To switch between them, press the „+“ button for 5 seconds.
7 Warranty / Disposal / Technical change
EN
Warranty
The Products are controlled just before delivery. If despite a lack of your product, try trustfully your seller. Please bring your receipt, as this is to be submitted for each warranty. The guarantee period is 24 months from date of purchase.
Disposal
The device must be disposed of properly. The device can be distributed free of charge for disposal at each dealer.
Technical changes
Reserving technical changes in technology and design
Caution – Some parts of this product can become very hot and cause burns. Particular attention has to be given where children and vulnerable people are present.
CE Declaration of Conformity
This device complies with the following standards
EMC EN 55014-1:2017
EN 55014-2:2015
EN 61000-3-2:2019
EN 61000-3-3:2013+A1:2019
LVD EN 60335-2-30:2009/A11:2012
EN 60335-1:2012+A11:2014+A13:2017+A1:2019+A14:2019+A2:2019
EN 62233:2008
EMC 2014/30/EU
LVD 2014/35/EU
RoHS 2015/863/EU
RED 2014/53/EU
DISPOSAL INSTRUCTIONS FOR THE ELECTRICAL PART OF THE PRODUCT
In accordance with Article 26 of the Decree-Law of 14 March 2014 implementing Directive 2012/19/EC and the Law of 31 March 2015 implementing Directive 2015/863/EC on the reduction of the use of hazardous substances in electrical and electronic equipment and on waste management.
The crossed-out dustbin symbol on the machine or packaging indicates that the waste generated at the end of its useful life must be collected separately from other waste. The user must therefore take the device to the appropriate collection points at the end of its service life. Sort electronic and electrical waste or send the purchase of new, equivalent devices back to the dealer in a one-to-one process. L'adeguata separate collection for subsequent commissioning of the equipment to be recycled, treatment and environmentally sound disposal, helps to avoid possible adverse effects on the environment and health and promote the reuse and/or recycling of the materials to which they belong. composed the equipment. Misuse of this product by the user will result in the application of the administrative penalties provided for in the applicable legislation. Batteries contained in the device must be disposed of separately in the appropriate containers for the collection of used batteries.
DISPOSAL OF BATTERIES AND ACCUMULATORS
In accordance with Legislative Decree 188 of 20 November 2008 implementing Directive 2006/66/EC on batteries, accumulators and related waste, the symbol of the crossed-out waste bin on the battery indicates that it is prohibited to dispose of used batteries in household waste.
Batteries and batteries contain substances that are highly polluting for the environment. The user is obliged to dispose of used batteries at collection points in the municipality or in appropriate containers. The service is free. In this way, legal requirements will be respected and the environment will be protected. The symbols identifying hazardous materials that may be present in batteries and accumulators are as follows: Hg= Mercury, Cd= Cadmium, Pb= Lead.
Firma/Maison/Ditta/Company
Armin Schmid
Olensbachstrasse 9-15
CH-9631 Ulisbach
Tel. Int. +41 58 611 60 00
Tel. Nat. 0848870850