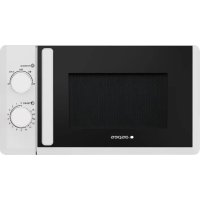
AMWH2510001MD - Microwave Oven ASPES - Free user manual and instructions
Find the device manual for free AMWH2510001MD ASPES in PDF.


User questions about AMWH2510001MD ASPES
0 question about this device. Answer the ones you know or ask your own.
Ask a new question about this device
Download the instructions for your Microwave Oven in PDF format for free! Find your manual AMWH2510001MD - ASPES and take your electronic device back in hand. On this page are published all the documents necessary for the use of your device. AMWH2510001MD by ASPES.
USER MANUAL AMWH2510001MD ASPES
Read these instructions carefully before using your microwave oven, and keep it carefully.
If you follow the instructions, your oven will provide you with many years of good service.
SAVE THESE INSTRUCTIONS CAREFULLY
PRECAUTIONS TO AVOID POSSIBLE EXPOSURE TO EXCESSIVE MICRO WAVE ENERGY
(a) Do not attempt to operate this oven with the door open since this can result in harmful exposure to microwave energy. It is important not to break or tamper with the safety interlocks.
(b) Do not place any object between the oven front face and the door or allow soil or cleaner residue to accumulate on sealing surfaces.
(c) WARNING: If the door or door seals are damaged, the oven must not be operated until it has been repaired by a competent person.
ADDENDUM
If the apparatus is not maintained in a good state of cleanliness, its surface could be degraded and affect the lifespan of the apparatus and lead to a dangerous situation.
SPECIFICATIONS
| Model | AMWH2510001MD |
| Rated Voltage | 230 V~50 Hz |
| Microwave Input | 1550 W |
| Microwave Output | 1000 W |
IMPORTANT SAFETY INSTRUCTIONS WARNING
To reduce the risk of fire, electric shock, injury to persons or exposure to excessive microwave oven energy when using your appliance, follow basic precautions, including the following:
- This appliance is not intended for use by persons (including children) with reduced physical, sensory or mental capabilities, or lack of experience and knowledge, unless they have been given supervision or instruction concerning use of the appliance by a person responsible for their safety. Children should be supervised to ensure that they do not play with the appliance.
- If the supply cord is damaged, it must be replaced by the manufacturer, its service agent or similarly qualified persons in order to avoid a hazard.( For appliance with type Y attachment)
- Warning: Ensure that the appliance is switched off before replacing the lamp to avoid the possibility of electric shock.
- WARNING: It is hazardous for anyone other than a competent person to carry out any service or repair operation that involves the removal of a cover which gives protection against exposure to microwave energy.
- WARNING: Liquids and other foods must not be heated in sealed containers since they are liable to explode.
-
WARNING: Microwave heating of beverages can result in delayed eruptive boiling, therefore care must be taken when handling the container.
-
WARENGtents of feeding bottles and baby
jars shall be stirred or shaken and the temperature food checked before consumption, in order to avoid burns.
-
Only use utensils that are suitable for use in microwave .ovens
-
When heating food in plastic or paper containers, keep an eye on the oven due to the possibility of ignition.
-
If smoke is observed, switch off or unplug the appliance and keep the door closed in order to stifle any flames.
-
Eggs in their shell and whole hard-boiled eggs should not be heated in microwave ovens since they may explode, even after microwave heating has ended.
-
The oven should be cleaned regularly and any food deposits should be removed.
-
The appliance must not be cleaned with a water jet. (for appliances intended to stand on the floor and which are not at least IPX5)
-
Failure to maintain the oven in a clean condition could lead to deterioration of the surface that could adversely affect the life of the appliance and possibly result in a hazardous situation.
-
Only use the temperature probe recommended for this oven. (for ovens provided with a facility to use a temperature-sensing probe.)
-
Read and follow the specific:"PRECAUTIONS TO AVOID POSSIBLE EXPOSURE TO EXCESSIVE MICROWAVE ENERGY".
-
Metallic containers for food and beverages are not allowed during microwave cooking.
READ CAREFULLY AND KEEP FOR FUTURE REFERENCE
To Reduce the Risk of Injury to Persons Grounding Installation
DANGER
Electric Shock Hazard
Touching some of the internal components can cause serious personal injury or death. Do not disassemble this appliance.
WARNING
Electric Shock Hazard
Improper use of the grounding can result in electric shock. Do not plug into an outlet until appliance is properly installed and grounded.
CLEANING
Be sure to unplug the
appliance from the power supply.
- Clean the inside of the oven after using with a slightly damp cloth.
- Clean the accessories in the usual way in soapy water.
- The door frame and seal and neighbouring parts must be cleaned carefully with a damp cloth when they are dirty.
This appliance must be grounded. In the event of an electrical short circuit, grounding reduces the risk of electric shock by providing an escape wire for the electric current. This appliance is equipped with a cord having a grounding wire with a grounding plug. The plug must be plugged into an outlet that is properly installed and grounded.
Consult a qualified electrician or serviceman if the grounding instructions are not completely understood or if doubt exists as to whether the appliance is properly grounded. If it is necessary to use an extension cord, use only a 3-wire extension cord.
- A short power-supply cord is provided to reduce the risks resulting from becoming entangled in or tripping over a longer cord.
- If a long cord set or extension cord is used:
1) The marked electrical rating of the cord set or extension cord should be at least as great as the electrical rating of the appliance.
2) The extension cord must be a grounding-type 3-wire cord.
3) The long cord should be arranged so that it will not drape over the counter top or tabletop where it can be pulled on by children or tripped over unintentionally.
UTENSILS
CAUTION Personal Injury Hazard
It is hazardous for anyone other than a competent person to carry out any service or repair operation that involves the removal of a cover which gives protection against exposure to microwave energy.
See the instructions on "Materials you can use in microwave oven or to be avoided in microwave oven." There may be certain non-metallic utensils that are not safe to use for microwaving. If in doubt, you can test the utensil in question following the procedure below.
Utensil Test:
- Fill a microwave-safe container with 1 cup of cold water (250ml) along with the utensil in question.
- Cook on maximum power for 1 minute.
- Carefully feel the utensil. If the empty utensil is warm, do not use it for microwave cooking.
- Do not exceed 1 minute cooking time.
Materials you can use in microwave oven
Utensils Remarks
| Browning dish | Follow manufacturer's instructions. The bottom of browning dish must be placed smoothly on the ceramic board. Incorrect usage may cause the ceramic board to break. |
| Dinnerware | Microwave-safe only. Follow manufacturer's instructions. Do not use cracked or chipped dishes. |
| Glass jars | Always remove lid. Use only to heat food until just warm. Most glass jars are not heat resistant and may break. |
| Glassware | Heat-resistant oven glassware only. Make sure there is no metallic trim. Do not use cracked or chipped dishes. |
| Oven cooking bags | Follow manufacturer's instructions. Do not close with metal tie. Make slits to allow steam to escape. |
| Paper plates and cups | Use for short-term cooking/warming only. Do not leave oven unattended while cooking. |
| Paper towels | Use to cover food for reheating and absorbing fat. Use with supervision for a short-term cooking only. |
| Parchment paper | Use as a cover to prevent splattering or a wrap for steaming. |
| Plastic | Microwave-safe only. Follow the manufacturer's instructions. Should be labeled "Microwave Safe". Some plastic containers soften, as the food inside gets hot. "Boiling bags" and tightly closed plastic bags should be slit, pierced or vented as directed by package. |
| Plastic wrap | Microwave-safe only. Use to cover food during cooking to retain moisture. Do not allow plastic wrap to touch food. |
| Thermometers | Microwave-safe only (meat and candy thermometers). |
| Wax paper | Use as a cover to prevent splattering and retain moisture. |
Materials to be avoided in microwave oven
Utensils Remarks
| Aluminum tray | May cause arcing. Transfer food into microwave-safe dish. |
| Food carton with metal handle | May cause arcing. Transfer food into microwave-safe dish. |
| Metal or metal-trimmed utensils | Metal shields the food from microwave energy. Metal trim may cause arcing. |
| Metal twist ties | May cause arcing and could cause a fire in the oven. |
| Paper bags | May cause a fire in the oven. |
| Plastic foam | Plastic foam may melt or contaminate the liquid inside when exposed to high temperature. |
| Wood | Wood will dry out when used in the microwave oven and may split or crack. |
SETTING UP YOUR OVEN
Names of Oven Parts and Accessories
Remove the oven and all materials from the carton and oven cavity.
Your oven comes with the following accessories:
Instruction Manual 1
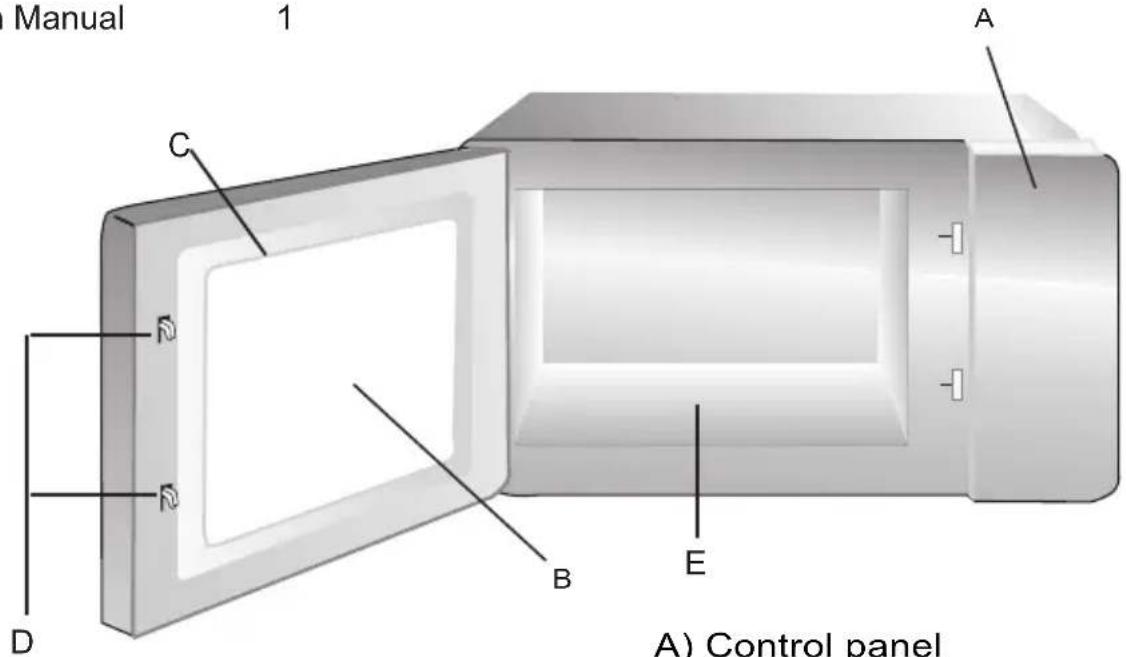
text_image
Manual 1 A C D B E A) Control panelA) Control panel
B) Observation window
C) Door assembly
D) Safety interlock system
E) Ceramic board
Note: 1) Don't press the ceramic board forcibly.
2) Take and put the utensils during the cooperation damage the ceramic board.
to
3) After using, don't touch the ceramic board by hand in order to avoid high temperature .scald
Countertop Installation
Remove all packing material and accessories. Examine the oven for any damage such as dents or broken door. Do not install if oven is damaged.
Cabinet: Remove any protective film found on the microwave oven cabinet surface.
Installation
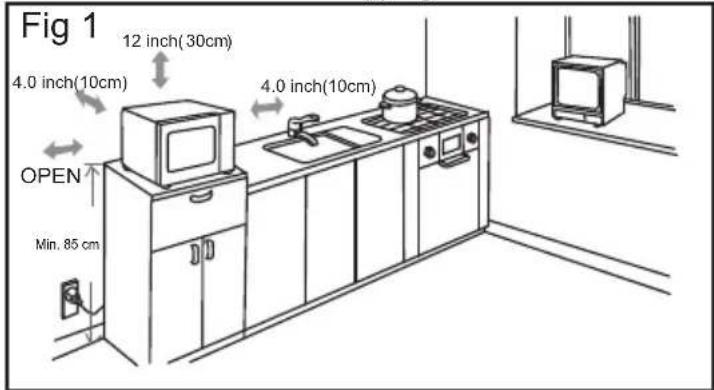
- Select a level surface that provide enough open space for the intake and/or outlet vents(.)Fig 1ure
text_image
Fig 1 12 inch(30cm) 4.0 inch(10cm) 4.0 inch(10cm) OPEN Min. 85 cmA 10-cm spacing should be kept between the appliance and right and back walls, and a 30-cm spacing kept on the top. Never dismantle the appliance's feet, nor block the air intake and exhaust opening. eft Shed must be open.
1) Blocking the intake and/or outlet openings can damage the oven.
2) Place the oven as far away from radios and TV as possible. Operation of microwave oven may cause interference to your radio or TV reception.
3) Plug your oven into a standard household outlet. Be sure the voltage and the frequency is the same as the voltage and the frequency on the rating label.
4) Warning: he plug socket, electric appliances or the appliance which are liable effected by heat and moisture should be kept away from any vents on the oven.
Cleaning Instructions
Always keep the oven clean
- Cleaning the glass viewing window, the inner door panel and oven front face.
For best performance and to maintain the high degree of safety, the inner door panel and oven front face should be free of food or grease build-up. Wipe these parts with a mild detergent, rinse and wipe dry. Never use abrasive powders or pads.
- Cleaning the control panel and plastic parts.
Do not apply a detergent or an alkaline liquid spray to the control panel and plastic parts, as this may cause damage to these parts.
Use a dry cloth (not a soaked cloth) to clean these parts.
- Cleaning the oven interior
After use be sure to clean up spilled liquids, spattered oil and food debris as quickly as possible. If the oven is used when dirty, efficiency drops and the dirt gets stuck on the oven surface and may cause bad odours. Clean the interior with a cloth soaked in luke-warm water with a mild detergent dissolved in it, then rinse the soap off with a damp cloth.
CAUTION: Do Not wipe plastic and painted sections of the oven with bleach, thinners or other cleaning agents, as this may cause these parts to dissolve or change sharp.
OPERATION
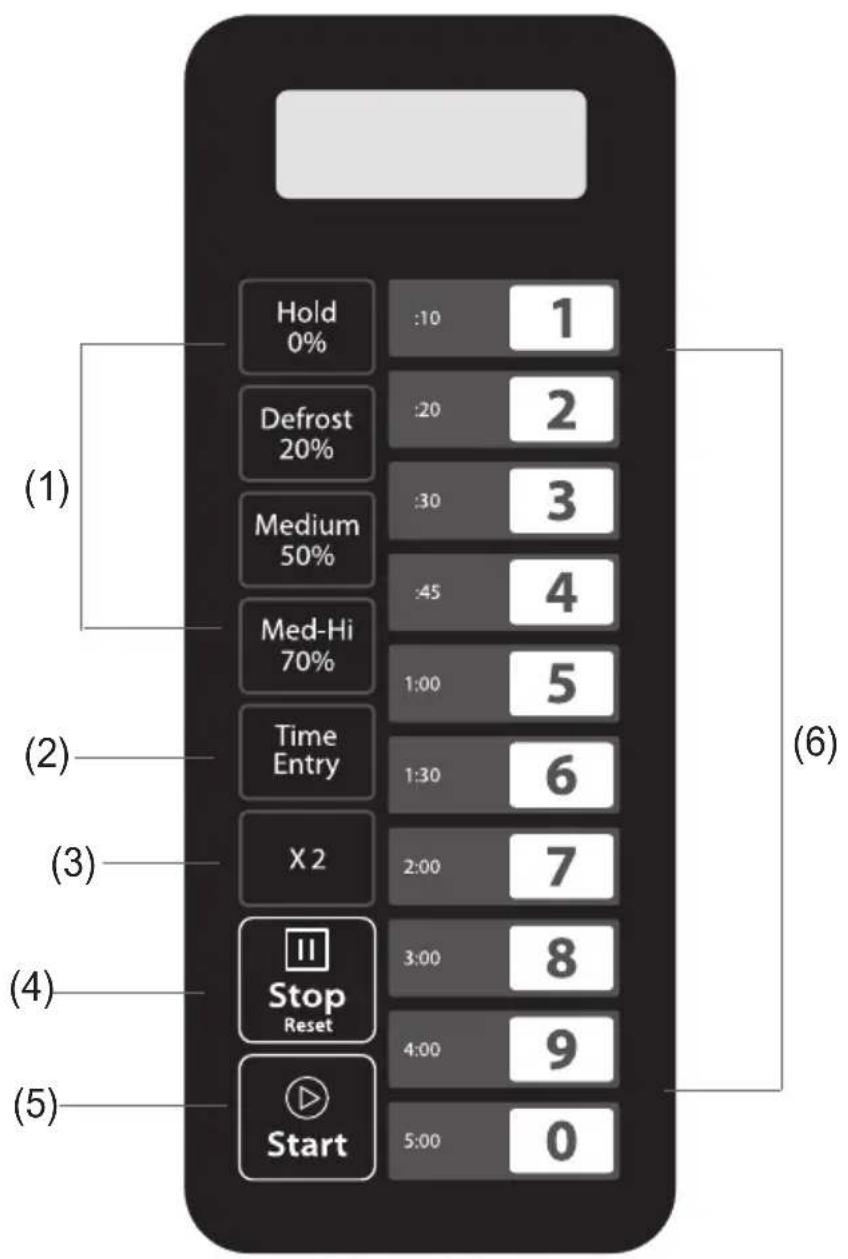
Control Panel and Features
text_image
(1) Hold 0% :10 1 Defrost 20% :20 2 Medium 50% :30 3 Med-Hi 70% :45 4 Time Entry 1:00 5 X 2 1:30 6 2:00 7 (2) (3) (4) Stop Reset 3:00 8 4:00 9 (5) Start 5:00 0 (6)(1) Power Buttons
(2) Time entry Button
(3) X2 Button
(4) Stop/Reset Button
(5) Start Button
(6) Number Buttons
Five power levels are available.
| Level | High | M. High | Med. | Defrost | Hold |
| Power | 100% | 70% | 50% | 20% | 0% |
| Display | PL10 | PL7 | PL5 | PL2 | PL0 |
Appendix. A User Options
Items bolded below are the default values.
| Option | Setting | Discription |
| 1EOC Tone | OP:10 | 3 seconds beep |
| OP:11 | Continuous beep | |
| OP:12 | 5 quick beeps, Repeating | |
| 2BeeperVolume | OP:20 | Beeper Off |
| OP:21 | Low | |
| OP:22 | Medium | |
| OP:23 | High | |
| 3BeeperOn/Off | OP:30 | Keybeep Off |
| OP:31 | Keybeep On | |
| 4KeyboardWindow | OP:40 | 15 seconds |
| OP:41 | 30 seconds | |
| OP:42 | 60 seconds | |
| OP:43 | 120 seconds | |
| 5On the Fly | OP:50 | On-the-Fly Disable |
| OP:51 | On-the-Fly Enable | |
| 6 Door Reset | OP:60 | Door reset Disable |
| OP:61 | Door Reset Enable | |
| 7 Max time | OP:70 | 60 Minute Maximum Cook Time |
| OP:71 | 10 Minute Maximum Cook Time | |
| 8 ManualProgramming | OP:80 | Manual Programming Disable |
| OP:81 | Manual Programming Enable | |
| 9Double Digit | OP:90 | Single Digit Mode-10 programs |
| OP:91 | Doule Digit Mode-100 programs |
Appendix. B Default Cook Times
The oven shall ship with the following Preset Cook Times unless otherwise noted in the product Specification.
| Button | Display (Time) | Power | Cook Factors |
| 1 | 0:10 | 100% | 80% |
| 2 | 0:20 | 100% | 80% |
| 3 | 0:30 | 100% | 80% |
| 4 | 0:45 | 100% | 80% |
| 5 | 1:00 | 100% | 80% |
| 6 | 1:30 | 100% | 80% |
| 7 | 2:00 | 100% | 80% |
| 8 | 3:00 | 100% | 80% |
| 9 | 4:00 | 100% | 80% |
| 0 | 5:00 | 100% | 80% |
1. Power Up
" __ __ " displays when the oven is electrified for the first time. If " Stop " button pressed, the oven will change to idle mode.
Note: Under idle mode, no button can be pressed.
2. Idle Mode
1) Entry. The oven shall enter idle mode after a set of seconds have expired in Ready Mode without a keyboard press or a door open and close. The number of seconds is determined by the keyboard Timeout Window, set by User Option 4.
2) During idle mode, LED is blank. And there shall be no oven activity.
3) Opening and then closing the oven door, the oven will exit the idle mode and into ready mode.
3. Ready Mode
1) Opening and closing the door while the oven is in Idle Mode will put the oven into Ready Mode.
2) During Ready Mode, "0:00" displays.
3) From the Ready Mode, the oven can go to almost all of the other modes.
4) Only the fan and lamp work.
4. Door Open Mode
1) While the door of the oven is open, the oven shall be in Door Open Mode.
2) During this mode, LED is blank. And the fan and oven lamp work.
3) When the door is closed, if User Option OP:60 is selected and the oven was running a manual or preset cook cycle, the oven shall enter Pause Mode.
In all other cases, the oven shall return to Ready Mode with User Option OP:61 set, opening and closing the door will clear out any information about a Manual or Preset Program which was running.
5. Pause Mode
1) While in Manual Cook Mode, or Preset Program Cook Mode, if the door is open or closed, or if the "Stop Reset" pad is pressed, the oven will enter Pause Mode.
2) While paused, LED will display the remaining cooking time.
3) Only the fan and lamp work.
4) Pause Mode will expire back to Idle Mode in the exact fashion as Ready Mode, dependent on User Option 4. Additionally, if the "Stop" button is pressed, the oven shall immediately enter Ready Mode.OR if press "Start" button, the oven will go into working mode.
6. Manual Cook Entry Mode
1) While the oven is in the Ready Mode, pressing the Time Entry pad on the keyboard will put the oven into Manual Cook Entry Mode.
2) During this mode, "00:00" displays
3) If you press "Hold", "Defrost", "Medium" or "Med-Hi" button to select power level, LED will display the related power. If the same button pressed twice, the power will change to PL10. If no power chosen, "PL10" is default.
4) Only the fan and lamp work.
5) During setting process, press "Start" to enter Manual Cook Mode. Press "Stop Reset" to enter Ready Mode.
7. Manual Cook Mode
1) Pressing the "Start" pad will cause to the oven to begin Manual Cook Mode.
2) During this mode, remaining cooking time displays. The fan and oven lamp will work.
3) When cooking program finish, the oven will enter End of Cook Cycle Mode. If you press "Stop" button under this mode, the oven will enter Pause Mode.
8. End of Cook Cycle Mode
1) After the time has expired in a Manual Cook Mode, or a Preset Program Cook Mode, the oven shall go into The End of Cook Cycle Mode.
2) During this mode, "End" displays.
3) If either User Option OP:11 or "OP:12" is selected, the oven shall continue to sound until the user acknowledges this by either opening and closing the door or pressing the "Stop Reset pad. If User Option OP:10 is selected, after the 3 seconds beep, the oven shall go into Ready Mode.
9. Preset Program Cook Mode
1) This mode allows cooking of food items through a one pad touch operation. While in Ready Mode, pressing one of tendigit keys on the keyboard will cause the oven to run the Preset Program associated with that key.
2) LED displays the remaining cooking time. If it is multi-stage cooking, the total remaining cooking time displays not a particular stage cooking time.
3) When cooking program finish, the oven will enter End of Cook Cycle Mode.
If you press "Stop Reset" button under this mode, the oven will enter Pause Mode.
10. On the Fly Cooking
1) While the oven is cooking or under Pause Mode, if User Option OP:51 is selected press number buttons, the preset cooking program will start automatically.
2) LED displays the remaining cooking time.
3) When cooking program finish, the oven will enter End of Cook Cycle Mode.
If you press "Stop Reset" button under this mode, the oven will enter Pause Mode.
11. Programming Mode
This mode allows the user to assign cook times and power levels to the once touche button.
1) Open the door and press "1" for 5 seconds, the buzzer will sound once and enter to Programming Mode.
2) "ProG" displays.
3) Press any number, 0 to 9, and the LED will display the saved time, then you can input the time you need.
4) Press "Hold 0%", "Defrost", "Medium" or "Med-Hi 70%" to input the power level.
LED will display the related power. If the same button pressed twice, the power will change to PL10. If no power chosen, "PL10" is default.
5) To change the cooking fators: If press "X2", LED will display "CF:XX". The default factor is 80%. "CF:80" displays. If you need to change the cooking power, just press one of the number buttons to set.
6) After setting the time and power, press "Start" in 30s, the cooking program will be saved. When the program saved, "ProG" displays.
7) If all the cooking time exceeds the MAX.time User Option 7, when press
"Start " to save the program, the buzzer will sound three times briefly to tell you the time
is no use. And then LED turn back to show "ProG". The time set before will be no change.
8) Close the door, the oven will turn back to Ready Mode.
If press "Stop Reset" button during setting process, the oven turn to Door Open Mode.
The program that not saved will be lost. If there is program saved as memory procedure, press the related number button, the saved program will start. If no saved program, the buzzer will alarm when pressing number button and it will not work.
For example: set the program as memory cooking.
Program; Power level PL7 and cooking time is 1 minute and 25 seconds.
Step 1: In ready state, press number button "1" for 5 seconds, "ProG" displays.
Step 2: Press number button "3", the program will be saved in "3".
Step 3: Press number buttons "1", "2" and "5" to input the cooking time.
Step 4: Press "Med-Hi" "button," PL7" displays. Setting finished.
Step 5: Press "Start" to save. When use the program next time, just press "3", the related program will start.
Note:
-
If the electricity is cut off, the saved program will not lost.
-
If the program need to reset, just repeat the aboved steps.
-
If press "Stop Reset" at the last step, it will turn back to Ready Mode. The setting will be no use.
12. Double Quantity cooking
1) Under ready state, press "X2" button and then press number buttons 0-9 in 5 seconds, the oven will start cooking with the quantity preset cooking time.
2) Press "X2", "doub" displays. When press number buttons, LED will display the quantity preset time.
For example, number button "5" and its preset time is 1 minute. Then press "X2", then time will change to 1:00 × (1 + 0.8) = 1:48
3) When cooking program finish, the oven will enter End of Cook Cycle Mode.
13. Stage Cooking Programming
This allows the user to cook food items at combination of various Power Levels.
1) Three stages can be set at most under cooking mode or memory mode.
After setting the power and time for the first stage, press "Time" to set the second stage.
And the same step to set the third stage.
2) When setting the second or the third stage, press "Time" Entry", "S-2" or "S-3" displays.
3) Press "Start" button to start cooking.
Example: To set three stages as memory mode. The first stage is PL7 and time is 1 minute 25 seconds. The second stage is PL5 and 5 minutes and 40 seconds. The steps are follow.
a. Ready state, press "1" for 5 seconds, LED displays "ProG".
b. Press number buttons "3" to save the program in "3".
c. Press "1", "2", "5" to input the cooking time. "1:25" displays.
d. Press "Med-Hi"70%", "PL7" displays.
The first stage is finished.
e. Press " Time Entry ", LED displays "S-2".
f. Press "5", "4", "0" button, "5:40" displays.
g. Press "Medium" displays.
The second stage is finished.
h. Press "Start" to save the programm.
14. Use Option Mode
1) Open the oven door and press "2" for 5 seconds. The buzzer sounds once and enter this mode.
2) LED displays "OP: - -".
3) Press any number button to enter related mode setting.
For example: to set the voice of the buzzer to medium. Press "2", "OP:22" displays.
If you want to change, keep pressing "2", LED displays "OP:20", "OP:21", "OP:22", "OP:23", "OP:20" .....in cycle.
4) Press " ▶ " to save the current setting. After saved, "OP: - -" display again.
5) During setting process, press "Stop" to enter Door Open Mode. Close the door will enter Ready Mode. Reset
6) If "Start" button not pressed at the last step, the program cannot be saved but stay at previous way.
15. Service Mode
1) Open the oven door and press "3" for 5 seconds to enter service mode.
2) LED displays "SErU".
3) To check the times of closing or opening the door, just press number button "1", LED will display the times.
4) Press "Start" and then press number button "4" in 3 seconds, the message will be cancelled. "4-CL" displays.
5) Press "Stop" to enter Door Open Mode. Close the door will enter Ready Mode.
16. Inquiry Function
During microwave cooking process, press "Time Entry" to check the power level. LED display the power for 3 seconds then turn back to previous state. It is available for multi-stage cooking.
17. Factory-default setting
In power up and ready mode, press" ▶ Start " and " o " to factory--defauct setting.
Trouble shooting
| Normal | |
| Microwave oven interfering TV reception | Radio and TV reception may be interfered when microwave oven operating. It is similar to the interference of small electrical appliances, like mixer, vacuum cleaner, and electric fan.It is normal. |
| Dim oven light | In low power microwave cooking, oven light may become dim. It is normal. |
| Steam accumulating on door, hot air out of vents | In cooking, steam may come out of food. Most will get out from vents. But some may accumulate on cool place like oven door. It is normal. |
| Oven started accidentally with no food in. | It is forbidden to run the unit without any food inside.It is very dangerous. |
| Trouble Possible Cause Remedy | ||
| Oven cannot be started. | (1) Power cord is not plugged in tightly. | Unplug. Then plug again after 10 seconds. |
| (2) Fuse blowing or circuit breaker works. | Replace fuse or reset circuit breaker (repaired by professional personnel of our company) | |
| (3) Trouble with outlet. | Test outlet with other electrical appliances. | |
| Oven does not heat. | (4) Door is not closed well. | Close door well. |
natural_image
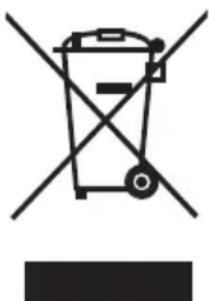
Symbol of a trash bin crossed out by two diagonal lines, with no text or labels present.According to Waste of Electrical and Electronic Equipment (WEEE) directive, WEEE should be separately collected and treated. If at any time in future you need to dispose of this product please do NOT dispose of this product with household waste. Please send this product to WEEE collecting points where available.
Q. aspes
HORNO MICROONDAS INDUSTRIAL
natural_image
Symbol of a trash bin crossed with two crossed lines, no text or numbers presentMANUAL DE INSTRUÇÕES
0 2' (/ 2 □ AMWH2510001MD
* 8\5' (『&8,’ \' 26\0 (17(『(67\6』,16758d®(6