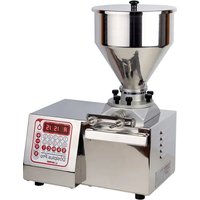
Dosiplus Pro - Other kitchen appliances LA PAVONI - Free user manual and instructions
Find the device manual for free Dosiplus Pro LA PAVONI in PDF.


| Product Type | Professional food dispenser |
| Brand | La Pavoni |
| Model | Dosiplus Pro |
| Construction | Stainless steel, resistant to aggressive substances |
| Machine dimensions assembled (L x W x H) | 420 mm x 320 mm x 590 mm |
| Machine weight assembled | Approx. 22 kg |
| Power supply | 230/240 V ~ 50 Hz (110 V / 60 Hz optional) |
| Power consumption | 330 W |
| Main functions | Automatic, manual and continuous cycles; dosage and pause programming |
| Speed adjustment | 25 speed levels (V01 to V25), from 100 to 220 rpm |
| Anti-drip function (reverse) | 6 levels (R00 to R05), adjustable via keypad |
| Compatible product types | Hard products (speeds V01-V11) and soft/fluid products (V12-V25) |
| Hopper capacity | Not specified (designed for dosing various products) |
| Maintenance and cleaning | Periodic external cleaning; wash hopper components with hot water or in dishwasher |
| Safety | Compliant with EU directives: electrical safety (EN 60204-1), food hygiene (EN 12852), electromagnetic compatibility (2014/30/EU), low voltage (2014/35/EU), machinery (2006/42/EC), food contact (EC REG 1935/2004) |
| Spare parts and repairability | Accessories available: hopper, nozzles (filling units), foot pedal, flexible hose, heating tapes; PAVONI-ITALIA technical support |
| General information | Machine designed for low energy consumption; factory tested before shipment; supplied with time recording table |
| Base body packaging (L x W x H) | 480 mm x 380 mm x 320 mm, weight approx. 19 kg |
| Hopper assembly packaging | 295 mm x 320 mm x 430 mm, weight approx. 6.5 kg |
Frequently Asked Questions - Dosiplus Pro LA PAVONI
User questions about Dosiplus Pro LA PAVONI
0 question about this device. Answer the ones you know or ask your own.
Ask a new question about this device
Download the instructions for your Other kitchen appliances in PDF format for free! Find your manual Dosiplus Pro - LA PAVONI and take your electronic device back in hand. On this page are published all the documents necessary for the use of your device. Dosiplus Pro by LA PAVONI.
USER MANUAL Dosiplus Pro LA PAVONI
natural_image
Exterior view of a stainless steel Dosisplus Pro mixing press machine (no visible text or symbols on the device itself)
natural_image
Baked donuts on a baking tray, dusted with powdered sugar, being handled by hand (no text or symbols visible)
natural_image
Exterior view of a stainless steel Dösiplus Pro feed mixer with control panel (no readable text or symbols)Dosiplus | Pro
ITALIANO pag. 04
ENGLISH pag. 10
FRANÇAIS pag. 16
DEUTSCH pag. 22
ESPAÑOL pag. 28
natural_image
Simple line drawing of a funnel-shaped container with a base and top (no text or symbols)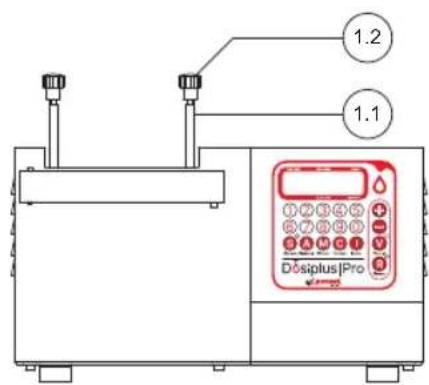
CORPO BASE
Dosiplus PRO has a special feature: it is a machine with very low operating costs. During the design stage, PAVONI-ITALIA technicians have taken into consideration the aspect of energy consumption, equipping the machine with high performance components with low consumption.
Dosipplus PRO is constructed entirely in stainless steel. This makes the machine resistant to aggressive and corrosive substances, especially on the outer surface, which is the most exposed.
PAVONI-ITALIA machines are designed and manufactured in compliance with the standards:
- EN 60204-1 (safety of machinery-electrical safety);
- EN 12852 (safety and hygiene of food processing machinery).
The EC conformity declaration CE PAV/062/17, supplied together with the machine, certifies that CE marking has been applied with reference to:
Directive 2014/30 EU.
Directive 2014/35 UE.
Directive 2006/42/EC of the European Parliament and of the Council dated 17/05/2006.
EC REG. 1935/2004 suitability of material in direct contact with food.
EC REG. 2023/2006 good manufacturing practices (GMP).
Before leaving the factory, all PAVONI-ITALIA products are subjected to rigorous testing in compliance with internal manufacturing quality standards.
To ensure that the machine, during use, gives you maximum satisfaction and maintains the requirements of reliability over time, we ask you to carefully follow the operating and maintenance instructions shown below.
The PAVONI-ITALIA assistance service is available for any information-intervention tel. 035/4934111
Mounting of the machine
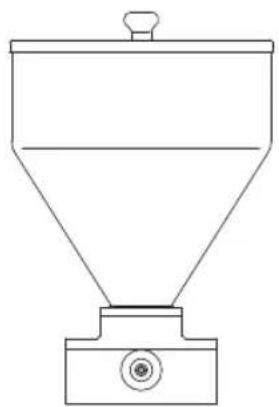
The machine is assembled by inserting the hopper unit in the two threaded rods (1.1) protruding from the base, tightening, but not fully, the two red knobs (1.2).
natural_image
Simple line drawing of a funnel-shaped container with a base and top (no text or symbols)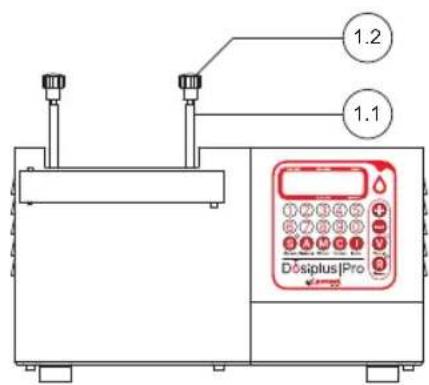
BASE BODY
Switching the system on
Before switching the machine on, make sure that the mains voltage (volt) available is equal to the value of the voltage stated on the machine data plate.
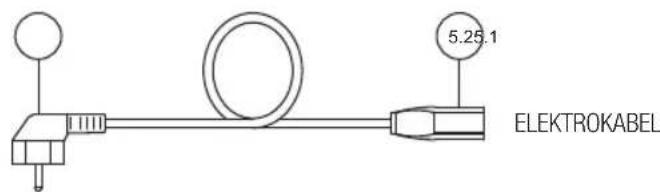
Take the electrical cable, supplied with the machine, and insert the "female" (5.2) connector into the "mains switch-socket" on the rear of the machine.
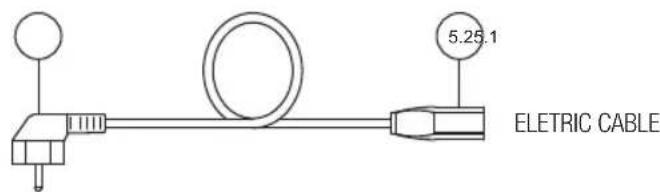
Insert the "male" plug (5.1) of the electrical cable into a voltage power socket. Press the "mains switch" key on the rear of the machine; this switch will light up with the colour red.
Before setting up and programming the machine, press the ENGAGE key (INNESTO) on the keyboard to perform coupling of the machine-hopper unit.
This operation should be carried out each time the hopper unit is removed and installed on the base again. During the coupling stage, a downwards position adjusting of the hopper unit can be carried out.
Once coupled, tighten the two red knobs/handwheels (1.2) fully to secure the hopper unit.
Note: the last programme carried out on the machine will appear on the display.
In the event of a new machine, the last programme will be the one carried out during final testing in PAVONI-ITALIA.
PROGRAMMING
The machine has three operating possibilities, which are

Operation in AUTOMATIC cycle

Operation in MANUAL cycle

Operation in CONTINUOUS cycle
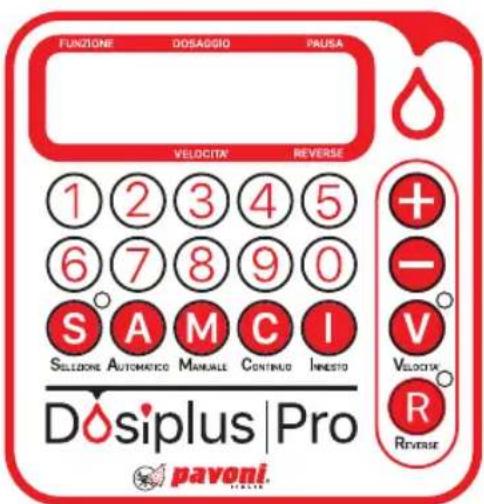
CONTROL KEYPAD

The machine automatically dispenses the quantity of product set, with a pause set between one dose and another.
CYCLE PROGRAMMING
Press the selection key ⚫ (SELEZIONE) on the keyboard and the “LED” incorporated in the key will light up. At the same time, the letter displayed in the function box (FUNZIONE) will begin to flash. Set the automatic cycle by pressing the key ⚪AUTOMATICO) on the keyboard. Once the cycle ⚣has been set, press the key 📄 again to confirm the programme entered. The letter visualised on the display stops flashing and remains steady. The numbers begin to flash in the dose box (DOSAGGIO).
Enter the numbers concerning the dose you wish to set on the keyboard.
Once the numbers have been set, press the key again to confirm.
The numbers set and visualised on the display stop flashing and remain steady.
The numbers begin to flash in the pause box (PAUSA).
Set the numbers for the pause. Once the numbers have been set, press the key 🧑 again to confirm.
The numbers set and visualised on the display stop flashing and remain steady.
Programming is finished and the "LED" incorporated in the key switches off.
CYCLE START
At this point the automatic cycle can be started by pressing the lever (1.5).
To stop (work end), the lever must be pressed again.
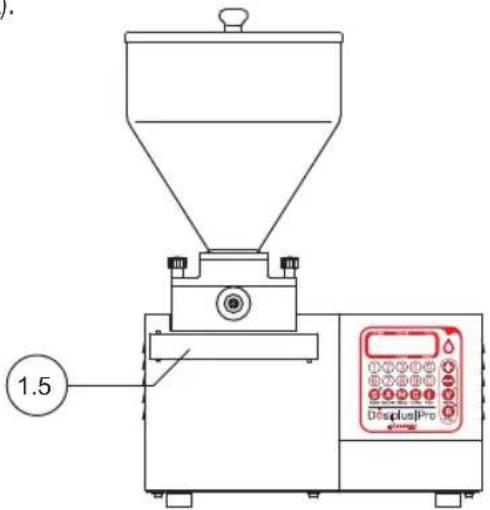

At each command given to the lever, the machine dispenses the quantity of product within the set time/number.
CYCLE PROGRAMMING
Press the selection key S (SELEZIONE) on the keyboard and the "LED" incorporated in the key will light up. The letter, displayed in the function box (FUNZIONE), will begin to flash. Set the manual cycle by pressing the key (MANUALE) on the keyboard. Once the cycle has been set, press the key again to confirm the programme entered. The letter visualised on the display stops flashing and remains steady.
The numbers begin to flash in the dose box (DOSAGGIO).
Using the keyboard, input the numbers for the dose.
Once the numbers have been set, press the key again to confirm.
The numbers set and visualised on the display stop flashing and remain steady.
Programming is finished and the "LED" incorporated in the key switches off.
CYCLE START
At this point the manual cycle can be started.
Each time the lever (1.5) is pressed, the product is dispensed within the set time.

CONTINUOUS OPERATING CYCLE
By pressing the start lever (1.5), the machine dispenses the product in continuous mode. Press the machine lever again to stop dispensing.
CYCLE PROGRAMMING
Press the selection key S (SELEZIONE) on the keyboard and the "LED" incorporated in the key will light up. The letter, displayed in the function box (FUNZIONE), will begin to flash. Set the continuous cycle by pressing the key C (CONTINUO) on the keyboard. Once the cycle C has been set, press the key again to confirm the programme entered. The letter visualised on the display stops flashing and remains steady. Programming is finished and the "LED" incorporated in the key switches off.
CYCLE START
At this point the continuous cycle can be started by pressing the lever (1.5).
To stop (work end), the lever must be pressed again.
Note: A feature of the Dosiplus PRO machine is to have, within the total time of the scale of numbers to input, from 01, 02, 03 to the number 99, constant time intervals between one number and the next. This allows the user to easily search for the time/number comparison to be stored.
A table is provided with the machine to facilitate storage. On this table, the user can record the response numbers compared to operating time of the product to be dosed.
SPEED PROGRAMMING
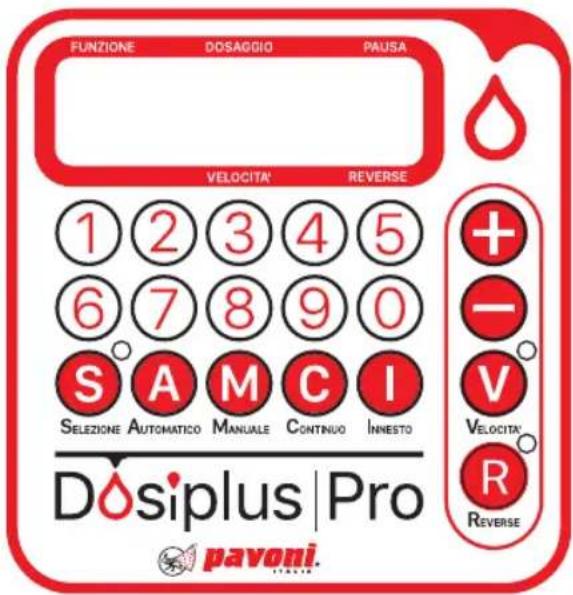
With the machine on and dispensing off, press the speed key VELOCITÀ) on the keyboard and the LED incorporated in the key will light up.
By pressing the + and - keys, the speed of dispensing can be increased or decreased.
V01 100 TURN/1°
V02 105
V03 110
V04 115
V05 120
V06 125
V07 130
V08 135
V09 140 STANDARD SPEED
V10 145
V11 150
V12 155
V13 160
V14 165
V15 170
V16 175
V17 180
V18 185
V19 190
V20 195
V21 200
V22 205
V23 210
V24 215
V25 220
Once the desired speed has been
selected, press the speed key to exit programming.
At this point the operating cycle can be started by pressing the lever (1.5).
Important:
use speeds from v12 to v25 only for soft, fluid products (cream-preserves etc.) and not hard products.
REVERSE PROGRAMMING (NON-DRIP)
With the machine on and dispensing off, press the reverse key (REVERSE) on the keyboard and the LED incorporated in the key will light up.
By pressing the + and - keys, the reverse can be increased or decreased (non-drip reverse rotation).
R00 REVERSE EXCLUDED
R01
R02
R03
R04
R05
Standard reverse is equivalent to R01.
Once the desired reverse has been selected, press the reverse key to exit programming.
At this point the operating cycle can be started by pressing the lever (1.5).
MAINTENANCE (to be carried out frequently)
The base does not require maintenance work except periodically proper cleaning of all outer parts.
We recommend, at each change of the product to be dosed, washing the hopper unit components with hot water or in a dishwasher.
The parts to be washed should be removed from the hopper unit in the following way (the numbers refer to the exploded diagram supplied with the machine):
- unscrew the hopper (pos.28), rotating in an anticlockwise direction;
- unscrew the four knobs (pos.22) that secure the hopper flange;
- remove the flange (pos.17);
• take off the idle gear wheel (pos.42);
• take off the ferrule (pos.34) and relative spout (filling unit); - remove the base plate (pos.16).
ACCESSORIES
The accessories supplied with the machine and/or on request, such as the hopper, spouts (filling unit), start pedal, hose (dispensing extension) and heating bands have been specially designed by PAVONI-ITALIA technicians to increase productivity.
For the types of accessories request the Machines catalogue.
TECHNICAL SPECIFICATIONS
- Electrical supply voltage: 230/240 volt 50 Hz (on request: 110 volt / 60 Hz);
• Power consumption: 330 Watt; - Dimensions of the assembled machine (base + hopper unit): mm 420 x 320 high 590 mm;
- Total weight of the assembled machine: 22 kg ca.
Packaging (sizes and weight):
- dimensions of packaging of base: 480 mm x 380 mm high 320 mm;
- weight of the packaging including the base: 19 kg ca;
- dimensions of the packaging of the hopper unit: 295 mm x 320 high 430 mm;
- weight of the packaging including the hopper unit: 6.50 kg ca.
CE
EAC
natural_image
Simple line drawing of a funnel-shaped container with a top handle and base (no text or symbols)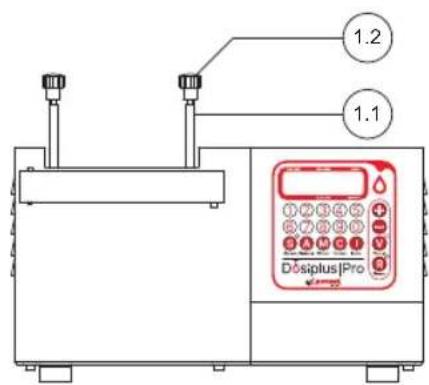
GROUPE TRÉMIE
BLOC MOTEUR
Allumage de la machine
Take the electrical cable, supplied with the machine, and insert the "female" (5.2) connector into the "mains switch-socket" on the rear of the machine.
natural_image
Simple line drawing of a funnel-shaped container with a top handle and base (no text or symbols)
CUERPO BASE


- Dosiplus | Pro
- Mounting of the machine
- Switching the system on
- PROGRAMMING
- CYCLE PROGRAMMING
- CYCLE START
- CONTINUOUS OPERATING CYCLE
- SPEED PROGRAMMING
- Important:
- REVERSE PROGRAMMING (NON-DRIP)
- R00 REVERSE EXCLUDED
- MAINTENANCE (to be carried out frequently)
- ACCESSORIES
- TECHNICAL SPECIFICATIONS
- Allumage de la machine
Brand : LA PAVONI
Model : Dosiplus Pro
Category : Other kitchen appliances