
CeramicCare 8in1 AirGlam Gyro - Hair Straightener CECOTEC - Free user manual and instructions
Find the device manual for free CeramicCare 8in1 AirGlam Gyro CECOTEC in PDF.

User questions about CeramicCare 8in1 AirGlam Gyro CECOTEC
0 question about this device. Answer the ones you know or ask your own.
Ask a new question about this device
Download the instructions for your Hair Straightener in PDF format for free! Find your manual CeramicCare 8in1 AirGlam Gyro - CECOTEC and take your electronic device back in hand. On this page are published all the documents necessary for the use of your device. CeramicCare 8in1 AirGlam Gyro by CECOTEC.
USER MANUAL CeramicCare 8in1 AirGlam Gyro CECOTEC
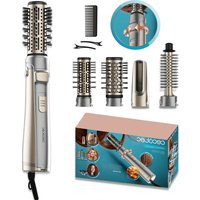
CERAMICCARE 8IN1 AIRGLAM GYRO
CERAMICCARE 8IN1 AIRGLAM GYRO CHAMPAGNE
natural_image
Exterior view of a modern office building (no signage)- Parts and components 10
- Before use 10
- Operation 11
- Cleaning and maintenance 13
- Troubleshooting 13
- Copyright 14
SOMMAIRE
EN • The coding in this manual is generic and applies to all code variants of the appliance.
A. 60 mm brush
B. Dryer head
c. 38 mm brush
D. 50 mm brush
E. Left curling head (32 mm)
F. Right curling head (32 mm)
G. SilkLisse straightening head
H. Straightening brush
I. Brush rotation button
J. Cool shot button
K. Power switch
L. Temperature setting button
M. Speed setting button
NOTE:
The graphics in this manual are schematic representations and may not exactly match the product.
2. BEFORE USE
- This appliance is packaged in a way as to protect it during transport. Take the appliance out of its box and remove all packaging materials. You can keep the original box and other packaging materials in a safe place to prevent damage to the appliance if you need to transport it in the future. If you wish to dispose of the original packaging, make sure all items are recycled properly.
- Check that all parts and components are included and in good condition. If there is any piece missing or in bad conditions, contact the official Cecotec Technical Support Service immediately.
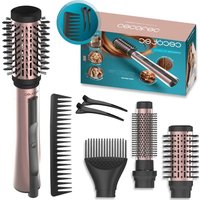
Box content
- Styler
- 8 heads
- Instruction manual
Do not remove the product's serial number in order to keep proper traceability if technical assistance is required.
3. OPERATION
- Insert the desired brush head into the stylist. To change the heads, slide down the head release button and pull it out with the other hand. To insert a new head, place it on the stylist handle and press until you hear a "click". (Fig. 2)
- Slide the power switch upwards to turn on the appliance.
- This appliance has 3 temperature settings: low ±50 ^ (blue indicator light), medium ±70 ^ (yellow indicator light) and high ±90 ^ (red indicator light).
- This appliance has 3 speed levels.
- If you have installed one of the brushes, press the brush rotation button to the right or to the left, depending on the desired movement. Release the button to stop the movement.
- If you press the cool shot button, this mode will be activated. In addition, the indicator light will turn on green. Press this button again to deactivate the cool shot mode, the stylister will return to the previous temperature setting.
Note: the appliance has a memory function, so it will remember the settings selected the last time it was switched off.
- When you have finished using the appliance, turn it off by sliding the power switch downwards and unplug it from the mains socket.
Left/right curling head
The appliance includes 2 curling heads: one for the left side and one for the right side of your head. Curl the hair by placing the strand over the attachment, always following the direction indicated by the arrow.
Fig. 3.
Step 1: Take a strand of hair and place the end over the head. The hair will start to wrap around.
Step 2: Move the appliance towards you. No need to turn it. Hold this position for 10-15 seconds.
Step 3: Press and hold the cool shot button for 10 seconds to set the curl. To change the curl direction, use the other head.
Straightening head
Start with a strand of hair 2.5 cm wide and no more than 0.5 cm thick. Place the strand in the attachment and slide the styler slowly downwards.
ENGLISH
Brushes
To rotate the head, press the brush rotation button according to the direction in which you want it to rotate. This will make the head rotate clockwise or counterclockwise.
- Start by sectioning your hair and detangling each section.
- To further lift the root, hold the stylist under the hair section, close to the roots, for a few seconds.
- Move the stylist through the hair, towards the ends while styling it.
Note:
- If, with the button pressed, the head stops rotating, you may need to detangle that section of hair better.
- You may take several attempts to perfect this technique.
WARNING: Do not wrap your hair around the styler, as it could get tangled. If your hair wraps accidentally, stop rotating the head and carefully pull the styler downwards, the head will rotate in the opposite direction and release your hair. Do not attempt to untangle it with the automatic rotation.
- Press the cool shot button for a few seconds to cool the hair and create longer-lasting volume.
- Switch off and clean the appliance after every use.
Straightening brush
- Detangle your hair beforehand.
- Select a section of hair.
- With the appliance turned on at the desired setting, place the straightening brush close to the roots.
- Slide the stylist along the section, from the roots to the ends.
- Repeat on different sections of hair as needed.
60 mm brush
- Detangle your hair beforehand.
- Divide your hair into 3-4 sections.
- Place the stylist at the root of the selected hair section and slowly slide it through the hair applying tension. Repeat until the desired result is achieved.
Dryer head
Before curling or straightening your hair, use this head to pre-dry it until it is almost dry.
4. CLEANING AND MAINTENANCE
- It is recommended to clean the styler after every use.
- Switch off and unplug the appliance from the mains before cleaning it.
- Allow the appliance to cool down completely before cleaning or handling.
- Clean the housing of the appliance with a soft, damp cloth.
- Make sure the appliance is completely dry before storing or using it again.
- Do not immerse the appliance in water or any other liquid.
- Do not use harsh detergents, abrasives, solvents or similar cleaning products.
- Always make sure that the plug is dry.
- Regularly clean the air inlets and outlets with a fine brush to remove hair and dust. This is necessary to maintain optimal performance and prevent the appliance from overheating. You can remove the air inlet filter for cleaning as shown in figure 4.
- Store the appliance in a dry and safe place, out of the reach of children.
- Do not store the appliance near hair oils and lotions, as these may deform the housing, comb or brush.
- Never wind the power cord around the appliance. This could cause premature wear and cord breakage.
5. TROUBLESHOOTING
| PROBLEM POSSIBLE CAUSES POSSIBLE SOLUTIONS | ||
| The appliance does not switch on. | It is not properly connected to the mains socket. | Check that the socket is live and connect the plug correctly. |
| The power switch is in the off position. | Slide the power switch upwards to turn on the appliance. | |
ENGLISH
| Hot air does not come out. | The cool shot mode is activated. | Press the cool shot button until the indicator light turns off, one of the indicator lights on the temperature setting button will turn on. |
| The appliance has overheated. | Slide the power switch to the off position, unplug the appliance from the mains and allow it to cool down properly. Before turning it back on, make sure that nothing is clogging the air inlet. | |
| The does not rotate. | You have installed a head that does not have a swivel option. | Attach the 38 mm brush or the 50 mm brush if you want the head to rotate. |
WARNING:
Do not try to repair the appliance by yourself. If the problem persists after performing the checks described above, please contact authorised personnel, the shop where you purchased the product or the official Cecotec Customer Service.
6. COPYRIGHT
The intellectual property rights over the texts in this manual belong to CECOTEC INNOVACIONES, S.L. All rights reserved. The contents of this publication may not, in whole or in part, be reproduced, stored in a retrieval system, transmitted, or distributed by any means (electronic, mechanical, photocopying, recording or similar) without the prior authorization of CECOTEC INNOVACIONES, S.L.
1. PIÈCES ET COMPOSANTS
Img. 1
5. PROBLEEMOPLOSSING
natural_image
Diagram of a mechanical device with a downward arrow indicating force or movement (no text or symbols present)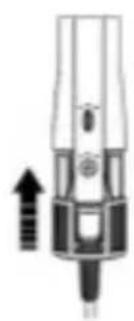
natural_image
Pure mechanical component diagram without any text, numbers, or symbolsFig./Img./Abb./Afb./Rys. 4
www.cecotec.es
Brand : CECOTEC
Model : CeramicCare 8in1 AirGlam Gyro
Category : Hair Straightener