MFS400R0APW - Fan MIDEA - Free user manual and instructions
Find the device manual for free MFS400R0APW MIDEA in PDF.

| Product Type | Pedestal fan with remote control |
| Brand | Midea |
| Model | MFS400R0APW |
| Power supply voltage | 220-240 V ~ 50 Hz |
| Rated power | 50 W |
| Blade diameter | 40 cm |
| Maximum air flow | 61.77 m³/min |
| Fan power | 40.30 W |
| Service value | 1.53 (m³/min)/W |
| Sound level | 56.55 dB(A) |
| Standby consumption | 0.31 W |
| Seasonal consumption | 13.24 kWh/year |
| Number of speeds | 3 + natural breeze |
| Timer | 1h, 2h, 4h, 7h (combinable) |
| Oscillation function | Yes |
| Remote control | Yes (range 5 m, AAA batteries not included) |
| Adjustable height | Yes |
| Estimated weight | 5 kg |
| Estimated dimensions (H x W x D) | 130 x 40 x 40 cm |
| Usage | Indoor, household only |
| Cleaning | Soft cloth and mild detergent, do not immerse |
| Warranty | 24 months (conventional warranty) |
Frequently Asked Questions - MFS400R0APW MIDEA
User questions about MFS400R0APW MIDEA
0 question about this device. Answer the ones you know or ask your own.
Ask a new question about this device
Download the instructions for your Fan in PDF format for free! Find your manual MFS400R0APW - MIDEA and take your electronic device back in hand. On this page are published all the documents necessary for the use of your device. MFS400R0APW by MIDEA.
USER MANUAL MFS400R0APW MIDEA
natural_image
Line drawing of a standard 16-inch outdoor fan with visible blades and control panel (no text or symbols)STAND FAN
USER MANUAL
MFS400ROAPH MFS400ROAPW
Warning notices: Before using this product, please read this manual carefully and keep it for future reference. The design and specifications are subject to change without prior notice for product improvement. Consult with your dealer or manufacturer for details. The diagram above is just for reference. Please take the appearance of the actual product as the standard.
LANGUAGES
EN English
DE German
IT Italian
FR France
THANK YOU LETTER
Thank you for choosing Midea! Before using your new Midea product, please read this manual thoroughly to ensure that you know how to operate the features and functions that your new appliance offers in a safe way.
CONTENTS
THANK YOU LETTER 01
SAFETY INSTRUCTIONS 02
SPECIFICATIONS 05
PRODUCT OVERVIEW 06
PRODUCT INSTALLATION 07
OPERATION INSTRUCTIONS 10
CLEANING AND MAINTENANCE 13
TROUBLESHOOTING 14
TRADEMARKS, COPYRIGHTS AND LEGAL STATEMENT 15
DISPOSAL AND RECYCLING 16
DATA PROTECTION NOTICE 17
WARRANTY / SERVICE 18
SAFETY INSTRUCTIONS
Intended Use
The following safety guidelines are intended to prevent unforeseen risks or damage from unsafe or incorrect operation of the appliance. Please check the packaging and appliance on arrival to make sure everything is intact to ensure safe operation. If you find any damage, please contact the retailer or dealer. Please note modifications or alterations to the appliance are not allowed for your safety concern. Unintended use may cause hazards and loss of warranty claims.
Explanation of Symbols

Danger
This symbol indicates that there are dangers to the life and health of persons due to extremely flammable gas.

Warning of electrical voltage
This symbol indicates that there is a danger to life and health of persons due to voltage.

Warning
The signal word indicates a hazard with a medium level of risk which, if not avoided, may result in death or serious injury.

Caution
The signal word indicates a hazard with a low degree of risk which, if not avoided, may result in minor or moderate injury.

Attention
The signal word indicates important information (e.g. damage to property), but not danger.

Observe instructions
This symbol indicates that a service technician should only operate and maintain this appliance in accordance with the operating instructions.
Read these operating instructions carefully and attentively before using/commissioning the unit and keep them in the immediate vicinity of the installation site or unit for later use!

Caution
- Read rules for safe operation and instructions carefully.
-
This appliance can be used by children aged from 8 years and above and persons with reduced physical, sensory or mental capabilities or lack of experience and knowledge if they have been given supervision or instruction concerning use of the appliance in a safe way and understand the hazards involved. Children shall not play with the appliance. Cleaning and user maintenance shall not be made by children without supervision.
-
Keep electrical appliances out of reach from Children or infirm persons. Do not let them use the appliances without supervision.
- When the appliance is not in use and before cleaning, unplug the appliance from the outlet.
-
When the fan was assembled, the rotor blade guard shall not be taken off anymore.
-
Prior to cleaning, unplug the fan.
- The rotor guard shall not be dissembled/opened to clean the rotor blades.
-
Wipe the fan enclosure and rotor blade guard with a slightly damp cloth.
-
Never insert fingers, pencils, or any other object through the grille when fan is running.
- Disconnect fan when moving from one location to another.
- Indoor and household use only.
Warning
- If the supply cord is damaged, it must be replaced by manufacturer or its service agent or a similarly qualified person in order to avoid a hazard.
• To protect against the risk of electrical shock, do not immerse the unit, cord or plug in water or other liquid. - When the appliance is not in use and before cleaning, unplug the appliance from the outlet.
- Ensure that the fan is switched off from the supply mains before removing the guard.
- DISPOSAL: Do not dispose of electrical appliances as unsorted municipal waste, use separate collection facilities. Contact your local government for information regarding the collection systems available. If electrical appliances are disposed of in landfills or dumps, hazardous substances can leak into the groundwater and get into the food chain, damaging your health and well-being.
SPECIFICATIONS
| Product Model | MFS400R0APHMFS400R0APW |
| Voltage | 220-240V~ |
| Frequency | 50Hz |
| Power | 50W |
| Item/DescriptionSymbolValue | Unit | ||
| Maximum fan flow rate | F | 61,77 | m^3/min |
| Fan power input | P | 40,30 | W |
| Service value | Sv | 1,53 | (m^3/min)W |
| Standby power consumption | P_SB | 0,31 | W |
| Off power consumption | P_OFF | - | W |
| Fan sound power level | LWA | 56,55 | dB(A) |
| Maximum air velocity | C | 2,94 | meters/sec |
| Seasonal electricity consumption | Q | 13,24 | kWh/a |
| Measurement standard for service value | EN IEC 60879:2019 | ||
| Contact details for obtaining more information | Midea Italia S.rl. a socio unico Viale Luigi Bodio 29/37 20158 Milano Italia midea.com/it | ||
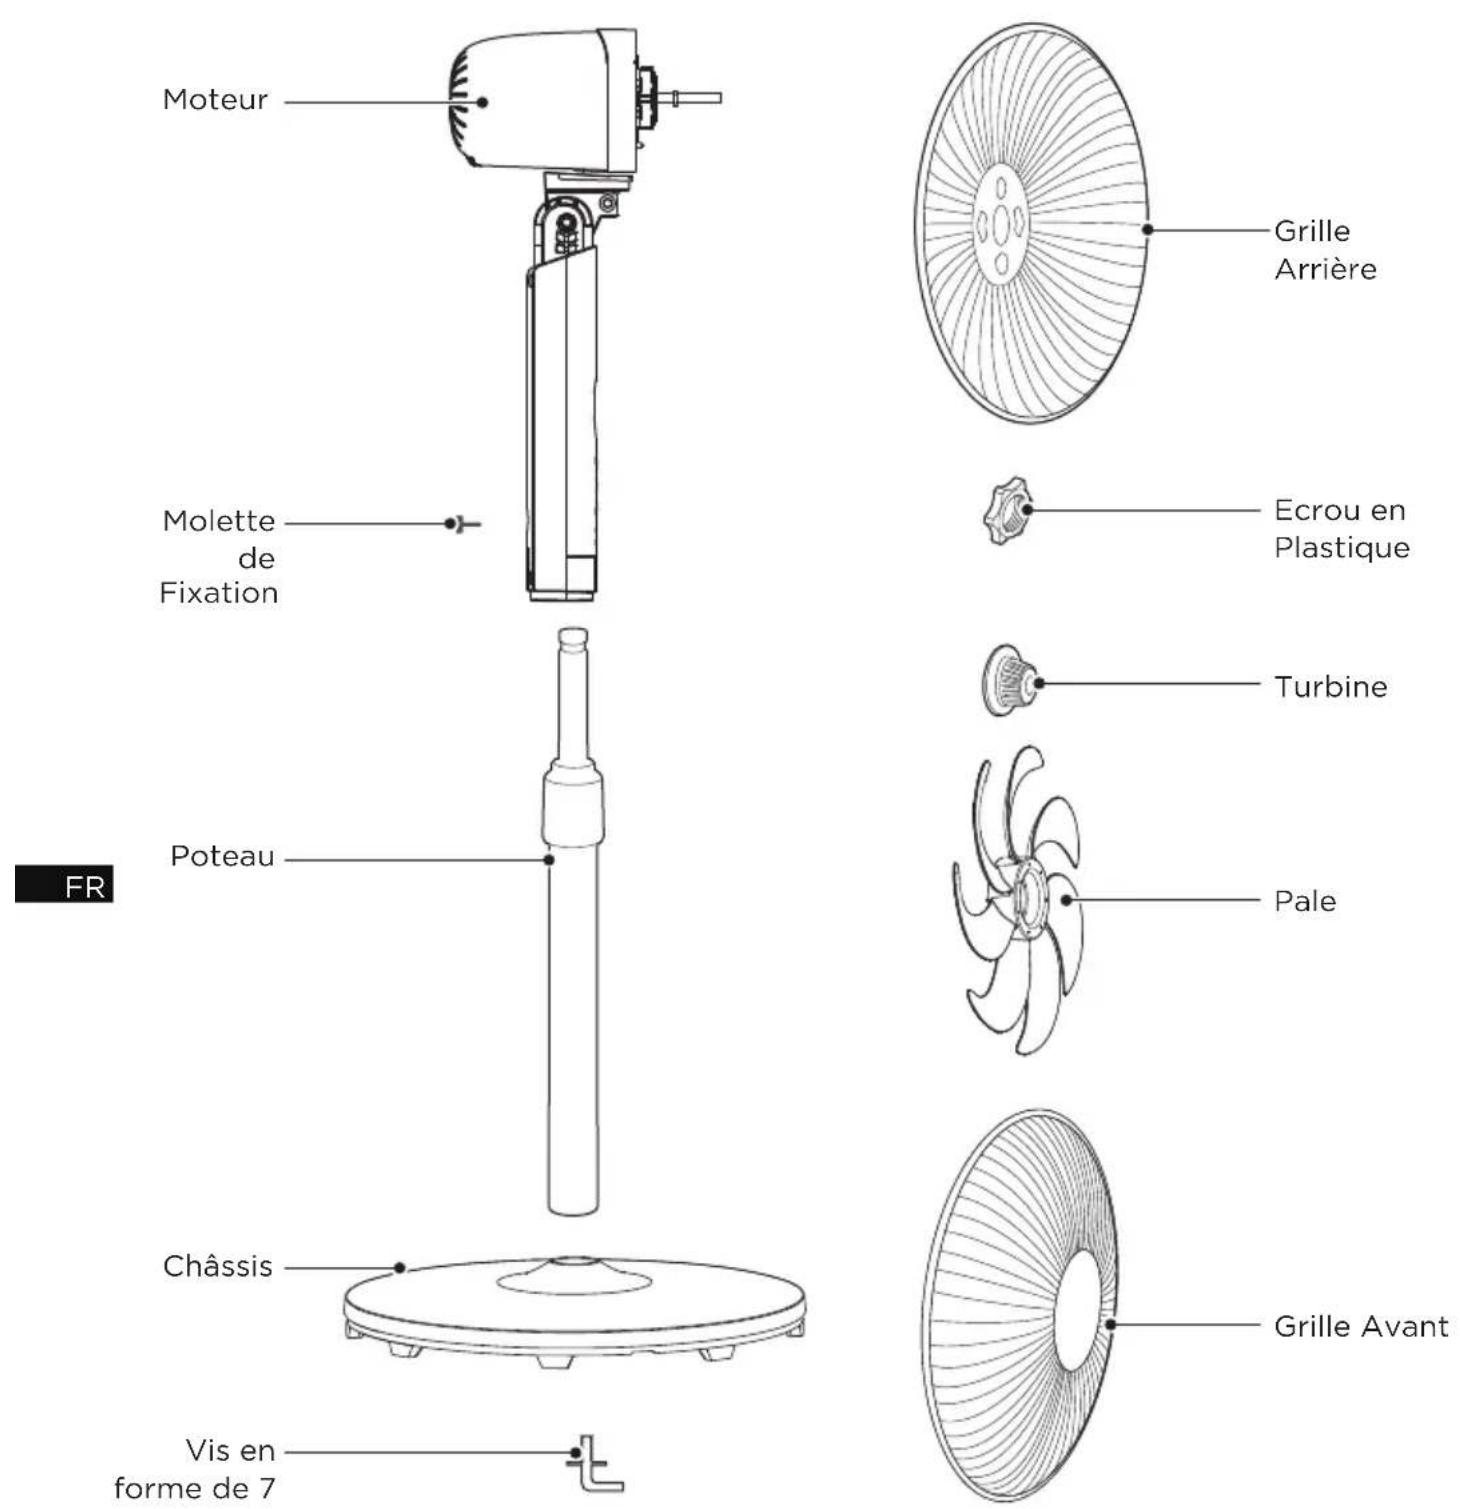
PRODUCT OVERVIEW
Component Name
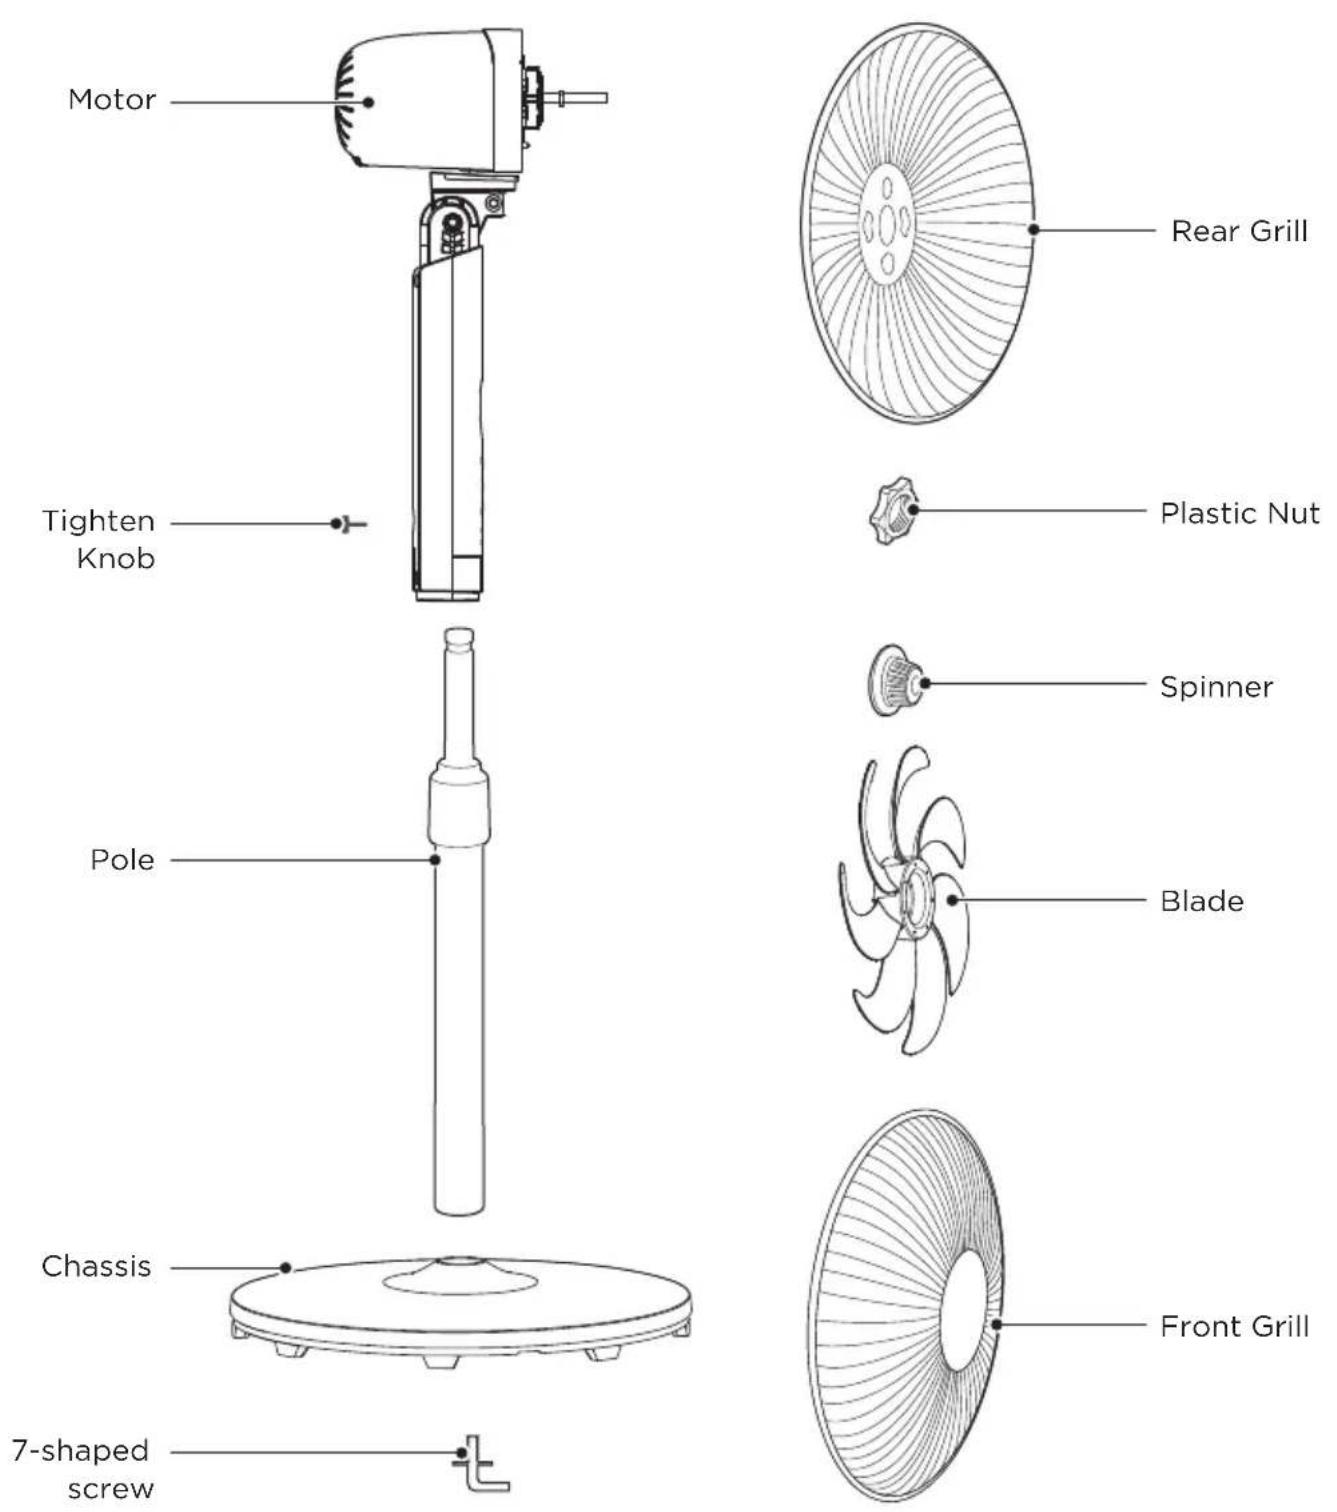

NOTE
All the pictures in this manual are for explanation purpose only. Any discrepancy between the real object and the illustration in the drawing shall be subject to the real subject. Remove parts from the component before performing installation.
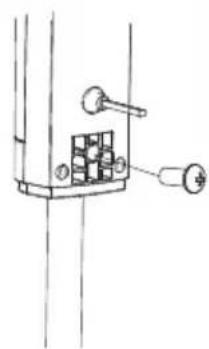
PRODUCT INSTALLATION
Installation Procedures

NOTE
Before installation, first remove 7-shape screws from the pole, remove the Spinner and Plastic nut from the motor shaft, and then install.
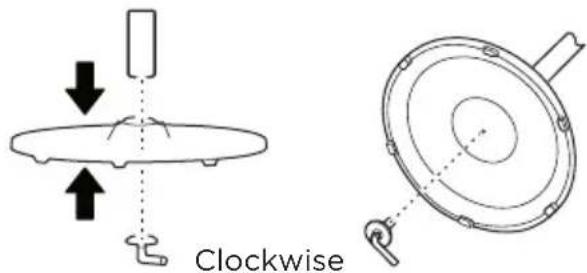
1 Chassis installation
Align the lower pole and the chassis, and then fasten securely with chassis screws.
2 Pole installation
EN
2.1 Pull out and fix the internal pole (column) after adjusting the height by way of tightening or loosening the knob.
2.2 Install and fix the machine body by way of tightening or loosening tighten knob.

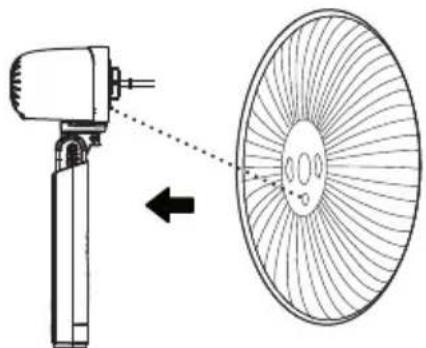
3 Installation of Rear Grill
Align the holes of rear grill with the protruded points on the motor housing.
natural_image
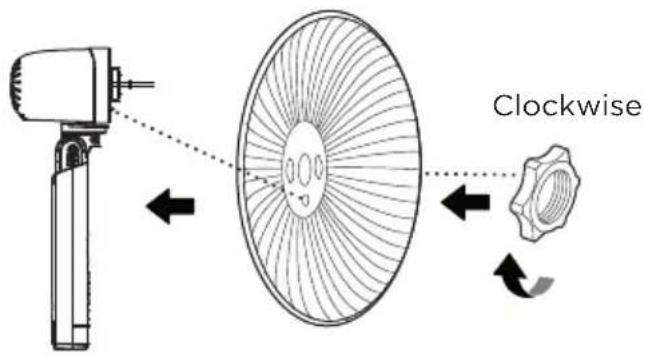
Diagram showing a device emitting a fan blade, with an arrow indicating direction (no text or symbols present)4 Installation of Plastic Nut
Screw clockwise the plastic nut tightly to fasten the rear grill.
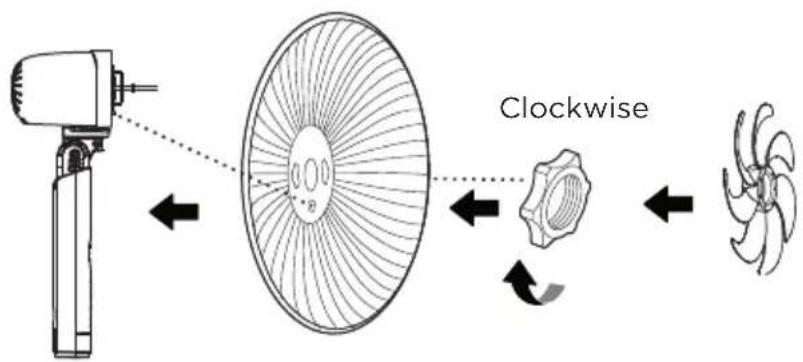
5 Blade installation
After the installation of blade, rotate the blade with your finger to make sure the blade works normally.
EN
6 Spinner installation
Screw counterclockwise the spinner tightly, and then install the front grill.
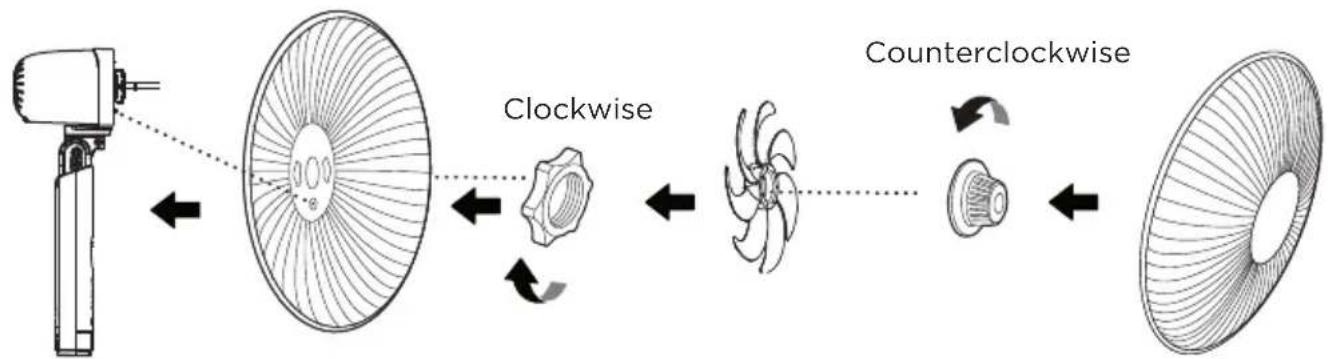
flowchart
graph LR
    A["Left side: Top blade"] --> B["Clockwise"]
    B --> C["Clockwise"]
    C --> D["Counterclockwise"]
    D --> E["Right side: Top blade with clockwise arrow"]
    style A fill:#f9f,stroke:#333
    style E fill:#bbf,stroke:#333
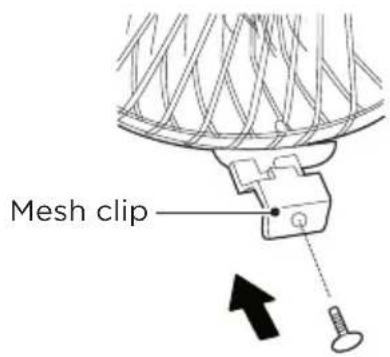
7 Installation of Front Grill
7.1 From top to bottom align the clips of the front grill with the uppermost mesh of the rear grill. After the alignment is correct, look from back to front according to the diagram.
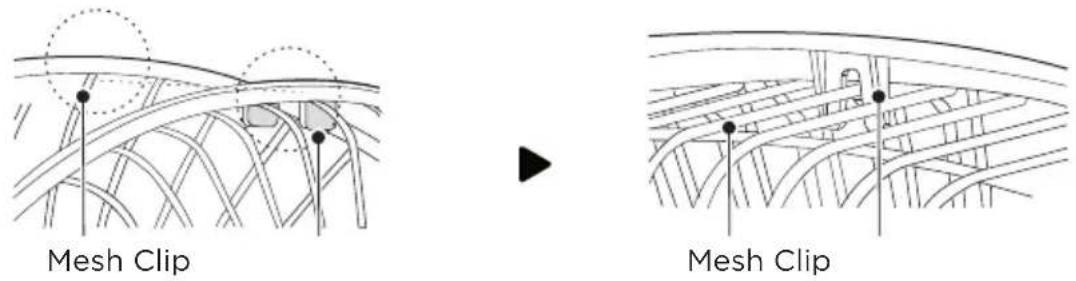
7.2 Press the grills in order with both hands. A sound of "click" will be heard when installed right.
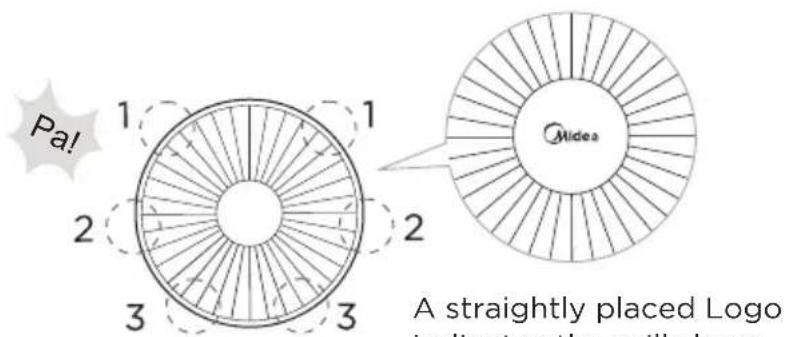
A straightly placed Logo indicates the grills have been correctly aligned.
7.3 Self-clipped installation.
OPERATION INSTRUCTIONS
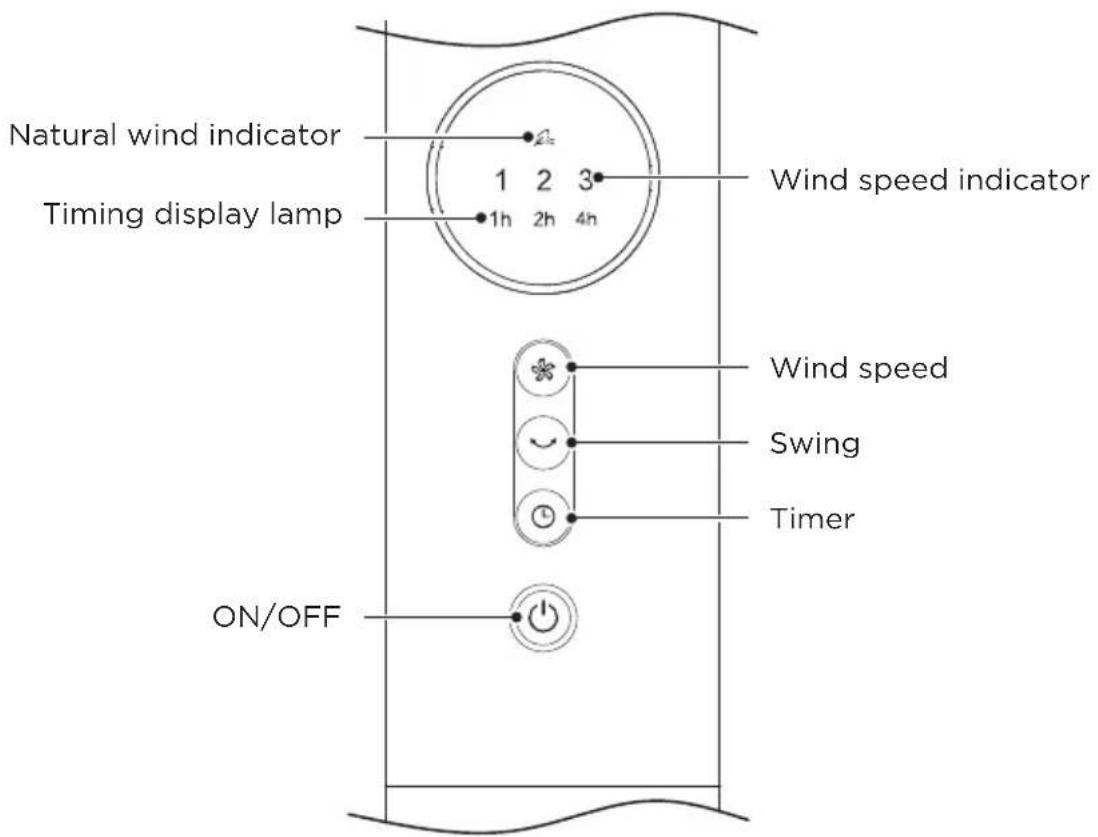
Operating Instructions Of The Machine Body
EN
| Function descriptionButton | ||
 | ON/OFF KEY | The key is for switching on the fan. The fan will be started at low speed. Press the key again, it will be switched off. |
 | TIMER KEY | When the TIMER key is touched repeatedly , the time to be set for air delivery increased step by step. For instance, if the fan operation is required to be set for 7hours, this key must be touched repeatedly so that the pilot lamps for 1, 2 and 4 hours lighten together.It means that the set time is 1+2+4=7hours. The time setting indicated by the pilot lamp will increase gradually by a unit of 1hour. Don't press the TIMER key when the fan is required to operate continuously. At the moment all pilot lamps don't light. |
 | SWING KEY | In power-on state, press this Swing key to turn on/off swing. |
| [67xH] | WIND SPEED KEY | Press the wind speed key to select set the wind speed in the following sequence:level 1→ level 2→ level 3→ Nature Wind. |
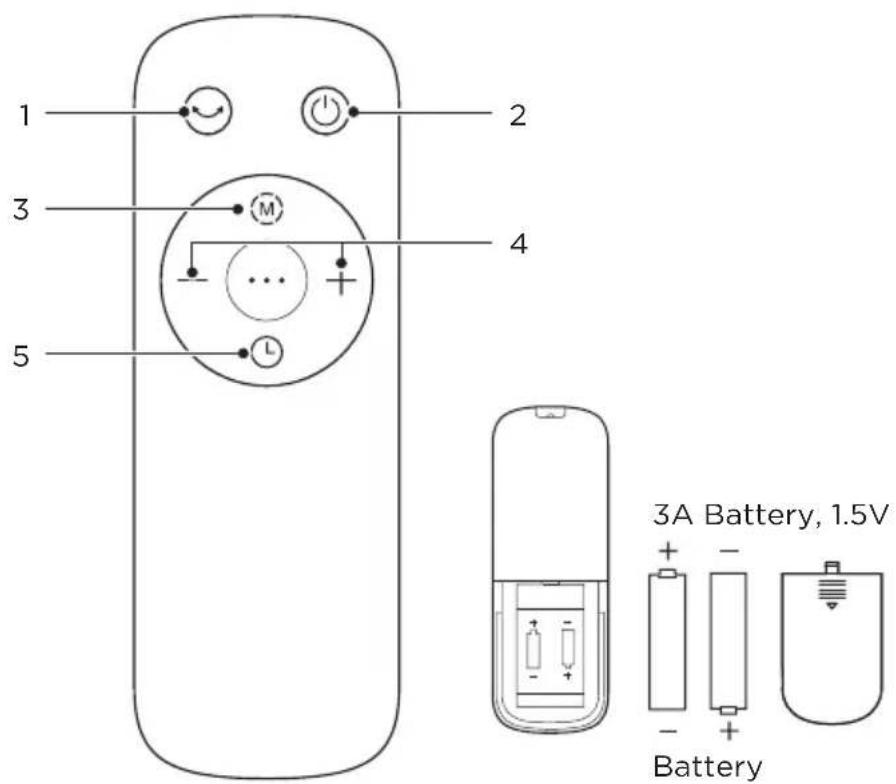
Remote Controller
- The remote control should be normally used within 5 meters of the front of the product and 30 degrees of the deviation angle.
- The battery contains many heavy metals, acids and bases, etc., which may threaten human's health; Waste batteries should be recycled separately.
EN
| Function descriptionButtonNO | ||
| 1 |  | • Start up or shut down oscillating. |
| 2 |  | • Startup/Standby. |
| 3 |  | • Switch the wind mode between normal wind and nature wind. |
| 4 |  | • Press “+, -” to set the wind speed. |
| 5 |  | • Set the timed shutdown/ reserved startup. |
Batteries Installation
Battery not included in the packaging
1 Slide the battery compartment cover.
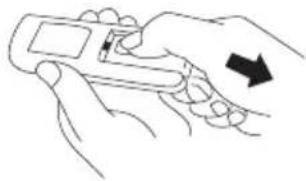
natural_image
Illustration of two hands holding a handheld device with an arrow indicating rotation (no text or symbols)Fig 1
2 Insert the batteries, and make sure that the batteries are placed as shown in the Fig 2.
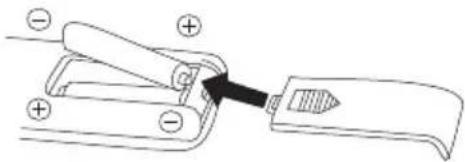
Fig 2
3 Slide back the battery cover.
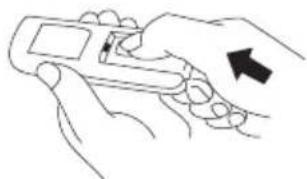
natural_image
Line drawing of two hands holding a handheld device with an arrow indicating motion (no text or symbols)Fig 3

NOTE
- Use manganese or alkaline batteries of type "AAA".
Batteries Warning As Below
- Do not dispose of batteries in fire, batteries may explode or leak.
- Do not mix old and new batteries.
- Do not mix alkaline, standard (carbon-zinc) or rechargeable (nickel-cadmium) batteries.
• Non-rechargeable batteries are not to be recharged. - Batteries are to be inserted with the correct polarity.
- Exhausted batteries are to be removed from the product.
- The batteries must be removed from the remote controller before it is scrapped and that they are disposed of safely.
CLEANING AND MAINTENANCE
The fan requires minimal maintenance. Do not try to fix it by yourself. Refer it to qualified service personnel if service is needed.
- Before cleaning and assembling, unplug the fan power.
- To ensure adequate air circulation to the motor, keep vents at the rear of the motor free of dust. Do not disassemble the fan to remove dust.
Please wipe the exterior parts with a soft cloth soaking and a mild detergent. - Do not use any abrasive detergent or solvents to avoid scratching the surface.
- Do not use any of the following as a cleaner: gasoline, thinner.
- Do not allow water or any other liquid entering into the motor housing or interior parts.
- Be sure to unplug from the electrical supply source before cleaning.
- Plastic parts should be cleaned with a soft cloth moisten with mild soap.
EN
TROUBLESHOOTING
Operation of your appliance can lead to errors and malfunctions. The following tables contain possible causes and notes for resolving an error message or malfunction. It is recommended to read the table below carefully in order to save your time and money that may cost for calling to the service center.
| Cause Solu | ||
| The machine does not work properly after installed | ·The power cable is not plugged in or has poor contact. | Make sure the plug is properly inserted into the socket. |
| ·The switch on the body is not turned on. | Turn on the switch on the body. | |
| The remote does not work | ·The battery needs replacing. Replace the battery. | |
| ·The remote is being used more than 5m away from the fan. | Use the remote closer to the fan and make sure it is pointing directly at the display panel. | |
EN
TRADEMARKS, COPYRIGHTS AND LEGAL STATEMENT
Midea logo, word marks, trade name, trade dress and all versions there of are valuable assets of Midea Group and/or its affiliates (“Midea”), to which Midea owns trademarks, copyrights and other intellectual property rights, and all goodwill derived from using any part of an Midea trademark. Use of Midea trademark for commercial purposes without the prior written consent of Midea may constitute trademark infringement or unfair competition in violation of relevant laws.
This manual is created by Midea and Midea reserves all copyrights thereof. No entity or individual may use, duplicate, modify, distribute in whole or in part this manual, or bundle or sell with other products without the prior written consent of Midea.
All the described functions and instructions were up to date at the time of printing this manual. However, the actual product may vary due to improved functions and designs.
DISPOSAL AND RECYCLING
Important instructions for environment
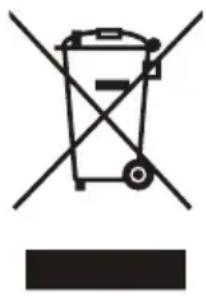
Compliance with the WEEE Directive and Disposing of the Waster Product: This product complies with EU WEEE Directive (2012/19/EU). This product bears a classification symbol for waster electrical and electronic equipment (WEEE).
This symbol indicates that this product shall not be disposed with other household wastes at the end of its service life. Used device must be returned to official collection point for recycling of electrical electronic devices. To find these collection systems please contact to your local authorities or retailer where the product was purchased. Each household performs important role in recovering and recycling of old appliance. Appropriate disposal of used appliance helps prevent potential negative consequences for the environment and human health.
natural_image
Symbol of a trash bin crossed with no text or numbers, representing waste sorting or restriction (no text present)Compliance with RoHS Directive
The product you have purchased complies with EU RoHS Directive (2011/65/EU). It does not contain harmful and prohibited materials specified in the Directive.
Package information
Packaging materials of the product are manufactured from recyclable materials in accordance with our National Environment Regulations. Do not dispose of the packaging materials together with the domestic or other wastes. Take them to the packaging material collection points designated by the local authorities.

natural_image
Recycling symbol with three chasing arrows forming a triangle (no text or labels)DATA PROTECTION NOTICE
For the provision of the services agreed with the customer,
we agree to comply without restriction with all stipulations of applicable data protection law, in line with agreed countries within which services to the customer will be delivered, as well as, where applicable, the EU General Data Protection Regulation (GDPR).
Generally, our data processing is to fulfil our obligation under contract with you and for product safety reasons, to safeguard your rights in connection with warranty and product registration questions. In some cases, but only if appropriate data protection is ensured, personal data might be transferred to recipients located outside of the European Economic Area.
Further information are provided on request. You can contact our Data Protection Officer via MideaDPO@midea.com. To exercise your rights such as right to object your personal date being processed for direct marketing purposes, please contact us via MideaDPO@midea.com. To find further information, please follow the QR Code.
EN
Additional Conventional Warranty Conditions
- The products imported by Midea Italia s.r.l. (hereinafter "Midea") and marked with the trademark. "Midea" are covered by the legal warranty for lack of conformity, which is provided for in Articles 28-135 of the Consumer Code and for which the seller is liable in respect of goods sold in its sales outlets. For the period of two years from the time of purchase, the consumer may at any time benefit from the legal guarantee covering conformity defects existing at the time of delivery, and provided that the conformity defect is reported to the seller within two months from the date of discovery of the defect. On the basis of agreements with its vendors, Midea provides technical support services for products covered by the legal warranty through its network of Authorised Service Centres (hereinafter referred to as the "ASC");
- Furthermore, Midea Italia s,r.l. a sole shareholder with registered office in Milan, 20121, largo Guido Donegani 2 (hereinafter referred to as "Midea") offers an additional conventional warranty for a period of two years from the date of purchase on all Midea branded products (hereinafter referred to as the "Products") marketed by Midea itself in the territory of the Italian Republic (with the exclusion of the territory of the city of Venice and the smaller islands), in the territory of the Republic of San Marino and in the territory of the Vatican City, when installed and used in the same states and territories (hereinafter referred to as the "Territory") and when accompanied by the present Conventional Warranty Certificate (hereinafter referred to as the "CWC").
Additional conventional warranty conditions
- This document contains the warranty conditions recognized by Midea Italia, s.r.l. (hereinafter "Midea") with reference to the Products marketed and installed in the Territory and accompanied by the CWC. These conventional warranty conditions respect the rights recognized to the consumer of D.Lgs.n.206/2005 and the following amendments and additions (hereinafter, the "Consumer Code") and by Articles 1519 bis et seq. of the Italian Civil Code and, in any case, do not limit, exclude or prejudice the consumer's right to benefit from the guarantee of conformity for which the seller is responsible.
- The Conventional Warranty offered by Midea (hereinafter the "Conventional Warranty") is effective and applicable only in respect of and in favour of the purchasers of the Products having the characteristics and quality of consumers, as defined and established by the Consumer Code (hereinafter the "Consumers"). The Conventional Warranty is therefore not effective, is excluded and cannot be invoked by the purchasers of the Products who are not Consumers and/or who use the Products within the scope of their professional and/or entrepreneurial and/or commercial activity.
- The Conventional Warranty is valid for 24 months from the date of purchase of the Product. In any event and irrespective of the date of purchase of the Product, the Conventional Warranty loses all effectiveness and is no longer valid 72 months after the date of manufacture of the Product, as determined by the serial numbers affixed to the Product.
• The Conventional Warranty shall only be considered effective and valid if the following conditions are simultaneously and comprehensively fulfilled: -
- The Product is accompanied by an original CWC, delivered to the buyer at the time of delivery of the Product. The CWC must be presented at the time of the service request and to the service centre personnel at the time of the servicing.
-
- A suitable tax document is available certifying; (i) the date of purchase of the Product, (ii) the company name and correct identification of the seller and, (iii) the type and model of Product purchased, (iv) the quality of Consumer. The tax document of purchase must be shown at the time of the request for intervention and to the personnel of the service center at the time of the repair intervention,
• 3. The labels affixed to the Product and indicating the model and characteristics of the equipment, as well as the serial numbers of the Product itself must be intact, not altered or made illegible.
- A suitable tax document is available certifying; (i) the date of purchase of the Product, (ii) the company name and correct identification of the seller and, (iii) the type and model of Product purchased, (iv) the quality of Consumer. The tax document of purchase must be shown at the time of the request for intervention and to the personnel of the service center at the time of the repair intervention,
-
- the Product shall be installed by a professional installer having all licenses and certifications required by law, and shall be installed and used in compliance with all regulations in force in the Territory of installation and in accordance with the provisions of the installation and use manuals enclosed with the Product itself
- Midea is not responsible for any loss of this certificate and is not required to issue duplicates.
• The Conventional Warranty, when effective, consists of the repair or replacement free of charge of Product components with defects or manufacturing faults. - Midea may arrange for the replacement of the Product with a new one, or in the event of the unavailability of such Product, with another equivalent.
- The replacement of the Product does not modify or extend the validity of the Conventional Warranty, which always starts from the date of purchase of the original Product.
- Warranty services are provided by Midea through a network of Technical Assistance Centres (hereinafter referred to as the "TAC") authorised by Midea.
- The validity of the warranty is subject to the verification of the existence of defects or defects of the components constituting the Product, carried out by an authorised TAC.
• After the warranty period, the customer is responsible for all costs related to spare parts and labor necessary for the repair of the Product.
Exclusions
• By way of example but not limited to, some cases of ineffectiveness and exclusion of the coverage of the Conventional Warranty are listed:
a. The Conventional Warranty is ineffective and does not cover routine maintenance and periodic inspections such as; filter cleaning, filter replacement, heat exchanger cleaning and other activities to check and set the Product or to adjust or modify plugs or cables.
b. The Conventional Warranty is ineffective and does not provide cover in the event that it is established that periodic maintenance has not been carried out or has been carried out in an irregular manner, in accordance with the prescriptions and indications set out in the Product's instruction booklet and user manual.
c. The contractual warranty is ineffective and does not provide cover if the Product is used for non-domestic purposes, in any event, if it is used in the course of a commercial and/or entrepreneurial and/or professional activity.
d. The Conventional Warranty is ineffective and does not offer coverage in the event of loss of parts, accessories and components of the Product.
e. The conventional warranty does not cover direct damage and faults resulting from the use of the Product in a manner not specified in the instruction manual and the Product's user manual and in any case outside the Product's intended ratings, or from sudden changes in the mains voltage to which the Product is connected, as well as faults caused by liquid infiltration, fire, inductive/electrostatic discharges or discharges caused by lightning, surges or other phenomena external to the Product.
f The Conventional Warranty is ineffective and does not offer coverage for direct or indirect damage caused by improper or negligent use of the Product or in the event of installation or storage of the Product outside the environmental conditions provided for its correct functioning, as indicated in the user manual that accompanies the Product.
g. The Conventional Warranty is ineffective and does not offer coverage for defects arising from the imperfect installation of the Product or, in any case, when the Product has not been installed by a professional installer equipped with all the licenses and legal certifications.
h. The Conventional Warranty is ineffective and does not offer coverage in case of use of the Product that does not comply with what is indicated in the user manual that accompanies the Product.
i. The Conventional Warranty is ineffective and does not offer coverage for damage resulting from leaks and spills of water or other liquids attributable to defects in the constituent components of the product.
j. The Conventional Warranty is ineffective and does not offer coverage for direct or indirect damage caused by negligence, weather events, falling materials, accumulation of ice in the units of the Product, accumulation of impurities or residues in the connecting pipes and connection of the Product, contact of the Product with liquids or moisture.
k. The Conventional Warranty is ineffective and does not offer coverage for direct or indirect damage caused by tampering by unauthorized personnel and by the use of components, spare parts or consumables not approved by Midea as suitable.
I. The Conventional Warranty is ineffective and does not provide coverage for damage resulting from the transport and handling of the Product, even if such damage is reported to the carrier at the time of delivery.
m. The Conventional Warranty is ineffective and does not cover all parts subject to wear and tear as a result of use, such as batteries, filters, seals, buttons, doors and doors, knobs, lamps, handles, plastic parts, accessories and similar components that are not affected by faults or manufacturing defects found in the first 7 months from the date of purchase or delivery of the Product.
n. The Conventional Warranty is ineffective and does not offer coverage for damage or compensation to food, clothing and the like inserted in the product, following its malfunction or failure.
o. The Conventional Warranty is ineffective and does not offer coverage for costs for tools or services necessary to access the Product, or for the transport of parts or components of the Product to the installation position in the event of not easy access guaranteed to the same.
p. The Conventional Warranty is ineffective and does not offer coverage for defects attributable to technological obsolescence or other software/hardware components provided by third parties with respect to Midea.
- The clauses contained herein may be modified exclusively by Midea; no variation or modification may be made to this document except as expressly stated by Midea.

Warranty certificate
Midea would like to thank you for purchasing one of its products.
Please keep this document with your proof of purchase.
The warranty has a duration of 24 months from the date shown on the purchase document.
Our Customer Service is at your disposal for product reports and requests for information. To contact customer service and possible:
- Connect to the website www.midea.com/it
- Send an E-Mail to assistenza@midea.com
To request product assistance in the event of a fault, please contact the customer service number:
02 962 46 65
EN
The service is from Monday to Friday from 09:00 - 13:00 and 14:00 - 18:00, excluding public holidays. The service is subject to the normal tariff in force depending on the tariff plan used. The costs for the call may vary depending on the telephone operator and the tariff plan used.
Keep this document together with the document proving the date of purchase of the product.
Space to apply the purchase document
Space to apply the barcode with the serial number present on the product packaging.
midea.com
VIELEN DANK
natural_image
Technical line drawings of a mechanical component with arrows indicating direction (no text or symbols)Im Uhrzeigersinn
2 Stange installieren
natural_image
Diagram showing a device emitting a fan blade with an arrow indicating direction (no text or symbols present)natural_image
Line drawing of two hands holding a handheld device with an arrow indicating direction (no text or symbols)Abb. 1
Abb. 2
natural_image
Line drawing of two hands holding a handheld device with an arrow pointing to the right (no text or symbols)Abb. 3.
DE
HINWEIS
natural_image
Symbol of a trash bin crossed with no text or labels, accompanied by a blank rectangular block below (no text or symbols present)natural_image
Recycling symbol with three chasing arrows forming a triangle (no text or labels)DATENSCHUTZHINWEISE
65760 Eschborn Germany
DE
natural_image
Technical line drawing of a mechanical component with no visible text or symbolsIn senso orario
natural_image
Diagram showing a device emitting a fan blade, with an arrow indicating direction (no text or symbols present)natural_image
Line drawing of two hands holding a handheld device with an arrow indicating direction (no text or symbols)Fig 1
Fig 2
natural_image
Line drawing of two hands holding a handheld device with an arrow pointing to the right (no text or symbols)Fig 3

NOTA
natural_image
Symbol of a trash bin with crossed lines indicating no waste, and a solid black rectangle below (no text or labels)natural_image
Recycling symbol with three chasing arrows forming a triangle (no text or labels)VUE D'ENSEMBLE DU PRODUIT 06
INSTALLATION DU PRODUIT 07
INSTRUCTIONS SUR LE FONCTIONNEMENT 10
NETTOYAGE ET ENTRETIEN 13
DÉPANNAGE 14
MARQUES, DROITS D'AUTEUR ET MENTIONS LEGALES 15
ELIMINATION ET RECYCLAGE 16
AVIS SUR LA PROTECTION DES DONNEES 17
GARANTIE/SERVICE 18
CONSIGNES DE SECURITE
Usage prévu
VUE D'ENSEMBLE DU PRODUIT
Noms des Composants
INSTALLATION DU PRODUIT
natural_image
Simple line drawing of a vertical pole with an arrow indicating rotation, no text or symbols presentInstaller le Bouton
natural_image
Pure mechanical assembly diagram without any text, numbers, or symbols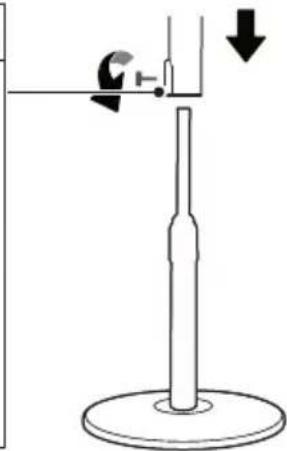
FR
natural_image
Diagram showing a device emitting a fan blade, with an arrow indicating direction (no text or symbols present)natural_image
Line drawing of two hands holding a handheld device with an arrow indicating direction (no text or symbols)III 1
III 2
natural_image
Line drawing of a hand holding a handheld device with an arrow pointing to the right side (no text or symbols present)III 3

REMARQUE
natural_image
Symbol of a trash bin crossed out by two crossed lines, with no text or labels present.natural_image
Recycling symbol with three chasing arrows forming a triangle (no text or labels)AVIS SUR LA PROTECTION DES DONNEES
make yourself at home