
MSFT42RW6BL - Fan MIDEA - Free user manual and instructions
Find the device manual for free MSFT42RW6BL MIDEA in PDF.


| Product Type | Tower Fan |
| Model | MSFT42RW6BL |
| Brand | Midea |
| Voltage | 120V~ |
| Frequency | 60Hz |
| Power Consumption | 40W |
| Fuse Rating | 2.5A, 125V |
| Speed Levels | 5 (1-5) |
| Wind Modes | Normal, Natural, Sleep, ECO |
| Timer | 1-9 hours (on/off) |
| Oscillation | Yes (on/off) |
| Remote Control | Yes (30° angle, up to 16ft) |
| Display Panel | LED with mode indicators |
| Polarized Plug | Yes (safety feature) |
| Overload Protection | Fuse (replaceable) |
| Cleaning Method | Detachable body, rinse with water, wipe with damp cloth |
| Safety Certifications | Indoor use only, keep away from children |
| Installation | Align body with base, secure with latch |
| Battery Type (Remote) | AAA (2x, manganese or alkaline) |
| Warranty | Refer to manual or contact Midea |
Frequently Asked Questions - MSFT42RW6BL MIDEA
User questions about MSFT42RW6BL MIDEA
0 question about this device. Answer the ones you know or ask your own.
Ask a new question about this device
Download the instructions for your Fan in PDF format for free! Find your manual MSFT42RW6BL - MIDEA and take your electronic device back in hand. On this page are published all the documents necessary for the use of your device. MSFT42RW6BL by MIDEA.
USER MANUAL MSFT42RW6BL MIDEA
natural_image
Line drawing of a tall vertical air conditioner unit with cooling fins and ventilation slots (no text or symbols)Thank you for choosing Midea! Before using your new Midea product, please read this manual thoroughly to ensure that you know how to operate the features and functions that your new appliance offers in a safe way.
EN
CONTENTS
THANK YOU LETTER 01
SAFETY INSTRUCTIONS 02
SPECIFICATIONS 06
PRODUCT OVERVIEW 07
PRODUCT INSTALLATION 08
OPERATION INSTRUCTIONS 10
CLEANING AND MAINTENANCE 12
TROUBLESHOOTING 15
TRADEMARKS, COPYRIGHTS AND LEGAL STATEMENT 16
DATA PROTECTION NOTICE 17
SAFETY INSTRUCTIONS
Intended Use
The following safety guidelines are intended to prevent unforeseen risks or damage from unsafe or incorrect operation of the appliance. Please check the packaging and appliance on arrival to make sure everything is intact to ensure safe operation. If you find any damage, please contact the retailer or dealer. Please note modifications or alterations to the appliance are not allowed for your safety concern. Unintended use may cause hazards and loss of warranty claims.
EN
Explanation of Symbols

Danger
This symbol indicates that there are dangers to the life and health of persons due to extremely flammable gas.

Warning of electrical voltage
This symbol indicates that there is a danger to life and health of persons due to voltage.

Warning
The signal word indicates a hazard with a medium level of risk which, if not avoided, may result in death or serious injury.

Caution
The signal word indicates a hazard with a low degree of risk which, if not avoided, may result in minor or moderate injury.

Attention
The signal word indicates important information (e.g. damage to property), but not danger.

Observe instructions
This symbol indicates that a service technician should only operate and maintain this appliance in accordance with the operating instructions.
Read these operating instructions carefully and attentively before using/commissioning the unit and keep them in the immediate vicinity of the installation site or unit for later use!
IMPORTANT SAFETY INSTRUCTIONS READ AND SAVE THESE INSTRUCTIONS
EN

CAUTION
- Read rules for safe operation and instructions carefully.
- This appliance is not intended for use by persons (including children) with reduced physical, sensory or mental capabilities, or lack of experience and knowledge, unless they have been given supervision or instruction concerning use of the appliance by a person responsible for their safety. Children should be supervised to ensure that they do not play with the appliance.
- Keep electrical appliances out of reach from Children or infirm persons. Do not let them use the appliances without supervision.
- Never insert fingers, pencils, or any other object through the grille when fan is running.
- Disconnect fan when moving from one location to another.
- Be sure fan is on a stable surface when operating to avoid overturning.
- Indoor and household use only.
WARNING
- If the supply cord is damaged, it must be replaced by manufacturer or its service agent or a similarly qualified person in order to avoid a hazard.
• To protect against the risk of electrical shock, do not immerse the unit, cord or plug in water or other liquid. - Unplug or disconnect the appliance from the power supply before servicing.
- WARNING: To Reduce The Risk Of Fire Or Electric Shock, Do Not Use This Fan With Any Solid-State Speed Control Device.
• To Reduce The Risk Of Fire, Electric Shock Or Injury To Persons, Do Not Use Replacement Parts That Have Not Been Recommended By The Manufacturer (e.g. Parts Made At Home Using A 3D Printer). - When the appliance is not in use and before cleaning, unplug the appliance from the outlet.
- When the fan was assembled, the rotor blade guard shall not be taken off anymore.
- Prior to cleaning, unplug the fan.
- The rotor guard shall not be dissembled/opened to clean the rotor blades.
- Wipe the fan enclosure and rotor blade guard with a slightly damp cloth.
- This appliance has a polarized plug (one blade is wider than the other). To reduce the risk of electric shock, this plug is intended to fit into a polarized outlet only one way. If the plug does not fit fully into the outlet, reverse the plug. If it still does not fit, contact a qualified electrician. Do not attempt to defeat this safety feature.
- Ensure that the fan is switched off from the supply mains before removing the guard.
WARNING
- This product employs overload protection (fuse). A blown fuse indicates an overload or short-circuit situation. If the fuse blows, unplug the product from the outlet. Replace the fuse as per the user servicing instructions (follow product marking for proper fuse rating) and check the product. If the replacement fuse blows, a short-circuit may be present and the product should be discarded or returned to an authorized service facility for examination and/or repair.
a) Do not operate any fan with a damaged cord or plug. Discard fan or return to an authorized service facility for examination and/or repair.
b) Do not run cord under carpeting. Do not cover cord with throw rugs, runners, or similar coverings. Do not route cord under furniture or appliances. Arrange cord away from traffic area and where it will not be tripped over.
SPECIFICATIONS
| MSFT42RW6BLProduct Model | |
| Voltage | 120V~ |
| Frequency 60Hz | |
| Power | 40W |
EN
PRODUCT OVERVIEW
Part Name
EN


NOTE
All the pictures in this manual are for explanation purpose only. Any discrepancy between the real object and the illustration in the drawing shall be subject to the real subject.
PRODUCT INSTALLATION
Installation Procedures
1 To install, please hold the molded handle on the back of the machine body and install it in alignment with the back of the base.


NOTE
Make sure that both the body and the base are aligned on the back to avoid a front-to-back situation.
2 When aligning the body with the base, please keep the vertical direction the same. In case of alignment failure, rotate the body slightly from side to side until the alignment is successful.
To test for successful alignment:
Check if there's no gap between the body and the base.
EN
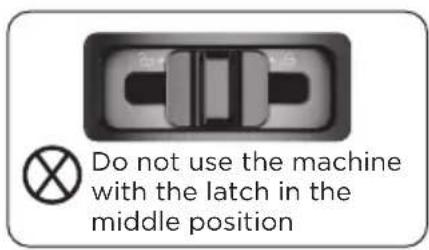
The latch must be in the leftmost position when installed in alignment.

natural_image
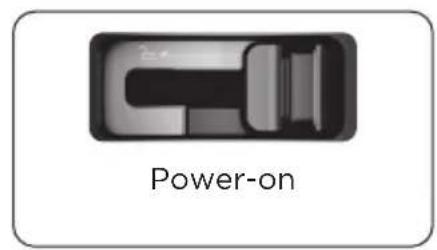
Mechanical assembly diagram showing a piston-cylinder joint with internal components and alignment arrows (no text or symbols)3 Once the body is successfully aligned, turn the latch from the leftmost to the rightmost side. The machine is ready for use when a beep is heard after 1 sec of power-on.

OPERATION INSTRUCTIONS
Preparation Before Use
- Remove the blue non-transferable tape from the body before use.
EN
Instructions for Operation of Body


flowchart
graph TD
    A["Timer"] --> B["Reset"]
    B --> C["Power"]
    C --> D["Fan"]
    D --> E["Curve with Arrow"]
Display panel Operation panel
| DescriptionButton | |
 | In the power-on state, you can set the schedule off time in 1-9 hours; In standby mode (powered on but not switched on), you can set the schedule on time in 1-9 hours. |
 | Click this key to switch the wind type (natural wind,sleep wind, ECO mode,normal wind). |
 | Click on the “ ⏻ ” key (ON/Standby) to switch on or standby. |
 | Click this key to switch the wind speed (cycle according to the sequence of 1-5 ). |
 | Click this key to switch on/off the Oscillation mode. |
 | This icon lights up in natural mode.The fan automatically adjusts the wind speed according to a set program, three levels(1, 2 and 3) are available. |
 | This icon lights up in Sleep mode. |
| h | This Icon lights up when the Timer function is switched on. |
Remote Control
- The remote control should typically be used in front of the product with a deviation angle of 30 degrees.
- The battery contains many heavy metals, acids and bases, etc., which may threaten human health; Waste batteries should be recycled separately.
- The schematic diagram of the remote control is for illustration only, please refer to the actual product.
EN

BATTERY WARNING AS BELOW
- Use manganese or alkaline batteries of type "AAA".
• DO NOT use rechargeable batteries. - DO NOT dispose of batteries in fire, batteries may explode or leak.
• DO NOT mix old and new batteries.
• DO NOT mix alkaline, standard (carbon-zinc) or rechargeable (nickel-cadmium) batteries. - Pay attention to poles (+ and -) of the batteries.
CLEANING AND MAINTENANCE
The fan requires minimal maintenance. Do not try to fix it by yourself. Refer it to qualified service personnel if service is needed.
- Before cleaning and assembling, unplug the fan power.
- To ensure adequate air circulation to the motor, keep vents at the rear of the motor free of dust.
Do not disassemble the fan to remove dust. Please wipe the exterior parts with a soft cloth soaking a mild detergent.
-
Do not use any abrasive detergent or solvents to avoid scratching the surface.
-
Do not use any of the following as a cleaner: gasoline, thinner.
-
Do not allow water or any other liquid entering into the motor housing or interior parts.
-
Be sure to unplug from the electrical supply source before cleaning.
-
Plastic parts should be cleaned with a soft cloth moisten with mild soap. Thoroughly remove soapsuds with dry cloth.
Cleaning Instructions
- How to disassemble the fan body from the motor base
Before detaching the body from base, turn off the power switch and unplug it, then turn the latch on the back to the far left, hold the back of the body by the molded handle and lift vertically upwards to detach the body from the base.

2. Cleaning
Rinsing:
Position the fan body securely and rinse it throughly under a water tap or shower head. After rinsing, gently shake the excess water out of the fan body and leave it to drain until it is dry before re-installing the fan body on to the tower motor base and plugging-in the fan.


natural_image
Illustration of hands holding a cylindrical device with a faucet above it, no text or symbols present
NOTE
When cleaning the fan body it must be detached from the motor base.
USER SERVICING INSTRUCTIONS
a) Grasp plug and remove from the receptacle or other outlet device. Do not unplug by pulling on cord.
b) Open fuse cover. Slide open fuse access cover on top of attachment plug towards blades.(Fig. ①)
c) Remove fuse carefully. Insert the tip of your tool into fuse slot (close with the terminal), then remove the fuse gradually and slowly, but do not overexert. If you encounter resistance, gently work on loosening the fuse. When one side of the fuse has been released, then you can get the fuse out entirely. (Fig. ②)
d) Risk of fire (fix spacing). Replace fuse only with 2.5 Amp, 125 Volt fuse.(Fig. ③)
e) Close fuse cover. Slide closed the fuse access cover on top of attachment plug.(Fig. ④)
f) Risk of fire (fix spacing). Do not replace attachment plug. Contains a safety device (fuse) that should not be removed. Discard product if the attachment plug is damaged.
g) If the fan suddenly does not work during normal operation, please check whether it is a problem with the fuse.

flowchart
graph LR
    A["Step ①: Component ①"] --> B["Step ②: Tool and Component"]
    B --> C["Step ③: Component ③"]
    C --> D["Step ④: Final assembled"]

NOTE
- When you replace the fuse, please do not operate suddenly or overexert, or else the product may become damaged.
TROUBLESHOOTING
If the appliance encounters any errors or malfunctions, the following table contains possible causes and solutions for resolving an error or malfunction.
| Cause SolutionProblem | ||
| ENThe machine plugged in but NOT powering ON. | Plug improperly inserted into power outlet. | Check that the power plug is fully and properly inserted into the power outlet, and re-insert if needed. |
| The machine suddenly shuts-off during working. | The temperature exceeds the threshold of the motor thermal cut-off. | Please send to after-sales maintenance. |
| The machine does not work properly | The power cable is not plugged in or has poor contact. | Make sure the plug is properly inserted into the socket. |
| The switch on the body is not turned on. | Turn on the switch on the body. | |
| The remote does not work | The battery needs replacing. Replace the battery. | |
| The remote is being used more than 16ft away from the fan. | Use the remote closer to the fan and make sure it is pointing directly at the display panel. | |
| The panel shows EU | Abnormal communication fault. | Please send to after-sales maintenance. |
TRADEMARKS, COPYRIGHTS AND LEGAL STATEMENT
Midea logo, word marks, trade name, trade dress and all versions there of are valuable assets of Midea Group and/or its affiliates (“Midea”), to which Midea owns trademarks, copyrights and other intellectual property rights, and all goodwill derived from using any part of an Midea trademark. Use of Midea trademark for commercial purposes without the prior written consent of Midea may constitute trademark infringement or unfair competition in violation of relevant laws.
This manual is created by Midea and Midea reserves all copyrights thereof. No entity or individual may use, duplicate, modify, distribute in whole or in part this manual, or bundle or sell with other products without the prior written consent of Midea.
All the described functions and instructions were up to date at the time of printing this manual. However, the actual product may vary due to improved functions and designs.
DATA PROTECTION NOTICE
For the provision of the services agreed with the customer,
we agree to comply without restriction with all stipulations of applicable data protection law, in line with agreed countries within which services to the customer will be delivered, as well as, where applicable, the EU General Data Protection Regulation (GDPR).
EN
Generally, our data processing is to fulfill our obligation under contract with you and for product safety reasons, to safeguard your rights in connection with warranty and product registration questions. In some cases, but only if appropriate data protection is ensured, personal data might be transferred to recipients located outside of the European Economic Area.
Further information are provided on request. You can contact our Data Protection Officer via MideaDPO@midea.com. To exercise your rights such as right to object your personal data being processed for direct marketing purposes, please contact us via MideaDPO@midea.com. To find further information, please follow the QR Code.
AGRADECIMIENTOS
natural_image
Illustration of hands holding a cylindrical device with a faucet above it, no text or symbols presentES

NOTA
make yourself at home



- CONTENTS
- SAFETY INSTRUCTIONS
- Intended Use
- Explanation of Symbols
- Danger
- Warning of electrical voltage
- Warning
- Caution
- Attention
- Observe instructions
- IMPORTANT SAFETY INSTRUCTIONS READ AND SAVE THESE INSTRUCTIONS
- EN
- SPECIFICATIONS
- PRODUCT OVERVIEW
- Part Name
- NOTE
- PRODUCT INSTALLATION
- Installation Procedures
- OPERATION INSTRUCTIONS
- Preparation Before Use
- Instructions for Operation of Body
- Remote Control
- BATTERY WARNING AS BELOW
- CLEANING AND MAINTENANCE
- Cleaning Instructions
- Cleaning
- USER SERVICING INSTRUCTIONS
- TROUBLESHOOTING
- TRADEMARKS, COPYRIGHTS AND LEGAL STATEMENT
- DATA PROTECTION NOTICE
- AGRADECIMIENTOS
- NOTA
Brand : MIDEA
Model : MSFT42RW6BL
Category : Fan