CM1103 - Coffee grinder GRAEF - Free user manual and instructions
Find the device manual for free CM1103 GRAEF in PDF.

User questions about CM1103 GRAEF
0 question about this device. Answer the ones you know or ask your own.
Ask a new question about this device
Download the instructions for your Coffee grinder in PDF format for free! Find your manual CM1103 - GRAEF and take your electronic device back in hand. On this page are published all the documents necessary for the use of your device. CM1103 by GRAEF.
USER MANUAL CM1103 GRAEF
natural_image
Illustration of a coffee maker with digital display and control buttons (no text or symbols)EN Operating Instructions Coffee grinder
natural_image
Diagram of a mechanical device with a conical top and directional arrow (no text or symbols)
natural_image
Diagram of a coffee maker with a funnel and base, showing mechanical components (no text or symbols)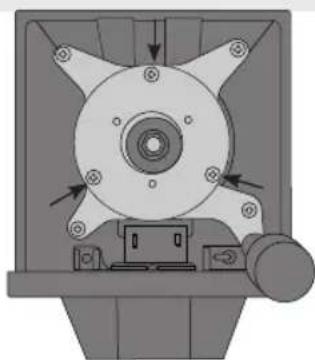
natural_image
Mechanical component diagram showing a central hub with multiple blades and mounting holes (no text or symbols)Product description....17
Preface....18
Information on these operating instructions.... 18
Warning messages....18
General safety instructions 19
Danger caused by electric current 21
Intended use....21
Limitation of liability 21
After-sales service 22
Unpacking 22
Disposal of the packaging....22
Disposal of the unit....22
Requirements on the installation location 22
Electrical connection 23
Prior to first use 23
Attaching the bean container 23
Group handle holder 23
Setting the grinding grade....24
Display....24
Start-up 24
Lock setting 25
Continuous grinding....25
Display of cups dispensed 25
Cleaning outside 26
Cleaning 26
Cleaning and maintenance of the grinding gear....27
Two-year warranty 27
PRODUCT DESCRIPTION
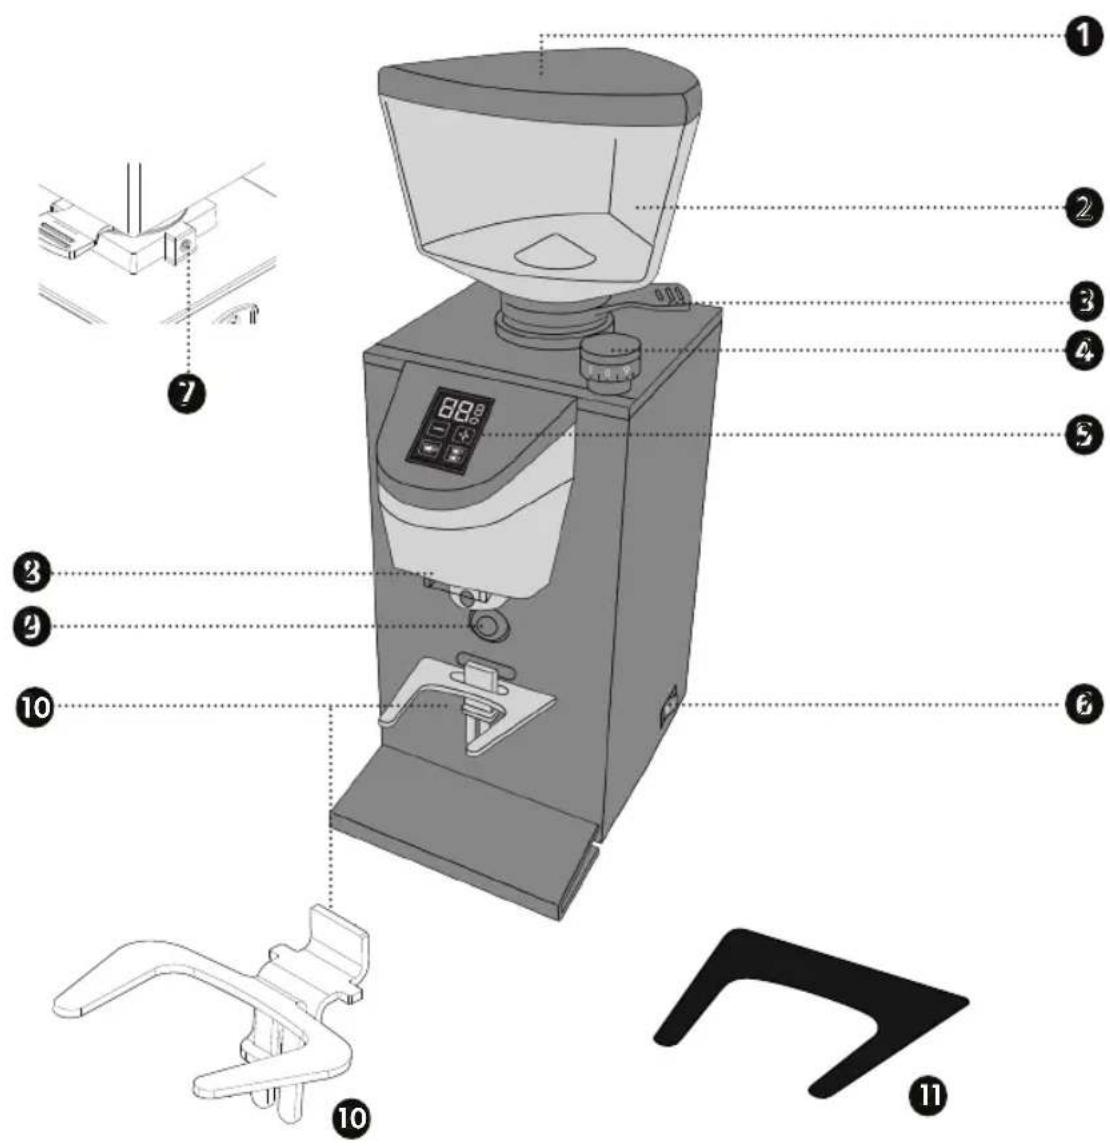
① Bean container cap
2. Bean container
3 Slide lock
4 Rotary adjuster for setting the grinding grade
5 Display
ON / OFF switch
7 Mounting screw for the container
8 Outlet
9 Contact switch
10 Group handle holder
11 Protection pad*
PREFACE
Dear Customer,
You have made a good choice by buying this coffee grinder. You have purchased a recognized quality product.
Thank you very much for buying our product. We wish you a lot of pleasure with your new Graef coffee grinder.
INFORMATION ON THESE OPERATING INSTRUCTIONS
These operating instructions are part of the coffee grinder (hereinafter referred to as unit) and provide important information on start-up, safety, intended use and the service of the unit.
The operating instructions have to be available at the unit at all times. The instructions have to be read and applied by every person who in view of:
- Initial operation
- Start-up
- Operation
- Fault remedy and/or
Cleaning
Keep these operating instructions and pass them on to the next owner along with the unit.
These operating instructions cannot take into consideration every conceivable use. For further information or in the event of problems that are not covered or not covered in sufficient detail in these instructions, please contact Graef customer service or your specialist dealer.
WARNING MESSAGES
In these operating instructions, the following warning messages and signal words are used:
WARNING
This refers to a potentially dangerous situation. Failure to observe this warning may result in serious injury or even death.
CAUTION
This refers to a potentially dangerous situation. In case of non-observation of this warning message, material damage may occur.
IMPORTANT!
This refers to application hints and other especially important information!
GENERAL SAFETY INSTRUCTIONS
This unit is in conformity with the safety instructions mentioned hereinbefore. However, incorrect handling may lead to personal injury and material damage.
For safe handling of this unit, please observe the following safety instructions:
- Before using the unit check for any external visible damage of the housing, the connecting cable and plug. Do not operate a damaged unit.
- Repairs may be carried out only by an expert or by Graef after-sales service. Incorrect repairs may cause considerable hazards for the user. In addition, any claim under guarantee is forfeited.
- Defective parts must be replaced by original spare parts only. Only these parts are guaranteed to meet the safety requirements.
- This unit must not be used by children. Keep the unit and its connection cable away from children.
- Children should be supervised in order to make sure that they do not play with this unit.
- This unit can also be used by persons with reduced physical, sensory or mental capabilities or lack of experience and/or knowledge if they have been given supervision or instruction concerning use of the unit in a safe way and understand the hazards involved.
- The unit is not intended to be used with an external timer or a separate remote control.
- Always disconnect the connecting cable by using plug; do not pull the connecting cable.
- Do not use the unit if the connecting cable or plug is damaged.
• Prevent that liquids get on the plug.
- If the connecting cable is damaged, it shall be replaced by the manufacturer, the manufacturer's customer service or a similarly qualified person only, in order to avoid potential dangers.
- Do not open the housing under any circumstances. When touching live connections and if the electric and mechanical structure is changed, there is danger of electric shock.
- Never touch live parts. They may cause an electric shock or even may lead to death.
- Before connecting the unit, compare the connecting data (voltage and frequency) on the type plate with those of your energy network. These details must correspond so that no damage occurs to the unit.
- Check to be sure that the connecting cable has been safely laid. Due to getting caught on the cable, the unit might fall down from the work surface.
- Packaging materials must not be used for playing. There is danger of suffocation.
- Never use the unit in the vicinity of a heat source.
- Never use the unit outdoors, and always keep it in a dry place.
- To ensure normal operation, the unit must be installed in locations where the temperature ranges from +5°C to +32°C and the humidity does not exceed 70%.
- Do not attempt to grind ground coffee again.
- To avoid overheating the unit, we recommend not keeping on grinding for more than 1 minute.
- Do not block any ventilation or heat sink openings or slots and do not introduce water or liquids of any kind into the unit.
- Never insert spoons, forks or other utensils into the outlet or coffee bean container while the unit is in operation.
- To remove coffee to be ground from the outlet, always switch off the machine first.
- If a foreign object blocks the motor, switch off the unit immediately and contact Graef customer service.
DANGER CAUSED BY ELECTRIC CURRENT
WARNING
Mortal danger is caused by contact with live cables or components!
Please observe the following safety instructions in order to prevent exposure to electric current:
- Do not use the unit if the connecting cable or plug is damaged.
- In this case, you should let the Graef Customer Service or an authorized specialist install a new connecting cable before re-using the unit.
- Do not open the housing under any circumstances. When touching live connections and if the electric and mechanical structure is changed, there is danger of electric shock.
- Never touch live parts. They may cause an electric shock or even may lead to death.
INTENDED USE
This unit is not intended for commercial use. Use the
unit for grinding coffee beans only. Another or any exceeding use shall not be considered intended. This unit is intended for use in a household.
• Staff kitchens in shops and office
• In agricultural estates
- By guests in hotels, motels and other living quarters
• In bed and breakfast boarding houses
IMPORTANT!
Use only in household-like areas!
Another or any exceeding use shall not be considered intended.
CAUTION
The unit can cause dangers, if is not used as intended.
• Use the unit exclusively as intended.
- Observe the procedures described in these operating instructions.
Claims of any kind caused by damage by unintended use shall be excluded.
The risk shall be borne sole by the user.
LIMITATION OF LIABILITY
All technical information, data and notes on the installation, the operation and the care contained in these operating instructions correspond to the last status before printing, and are rendered under consideration of our previous experience and to the best of knowledge.
No claims may be derived from the specifications, illustrations and descriptions in these instructions.
The manufacturer does not assume any liability for damage caused by:
• Non-observation of the instructions
- Unintended use
- Improper repairs
• Technical modifications
• Use of unapproved spare parts
Translations are carried out to the best of knowledge. We do not assume any liability for translation mistakes. The original German text shall be binding only.
AFTER-SALES SERVICE
If your Graef unit is damaged, please contact your dealer or the Graef Customer Service at +49 (2932) 9703677 or write an e-mail to service@graef.de.
IMPORTANT!
If possible, keep the original packaging during the guarantee period of the unit in order to be able to pack the unit properly in case of guarantee.
UNPACKING
When unpacking the unit, proceed as follows:
- Remove the unit from the box.
- Remove the packaging parts.
- Remove any stickers on the unit. Do not remove the type plate!

DISPOSAL OF THE PACKAGING
The packaging protects the unit against transport damage. The packaging materials are selected according to the environmental compatibility and disposal-related aspects and can therefore be recycled. The return of packaging into the material cycle saves raw material and reduces the waste volume. Dispose of the packaging material no longer needed at collection points for the "Green Dot" recycling system (in Germany).

DISPOSAL OF THE UNIT
At the end of its service life, this product cannot be disposed of in normal domestic waste. The symbol on the product and in the operating instructions point out to this fact. Reuse the materials according to their marking. With the reuse, recycling or other forms of recycling of old equipment, you make an important contribution to the protection of our environment. Please ask your municipal administration for the disposal point.
REQUIREMENTS ON THE INSTALLATION LOCATION
For safe and faultless operation of the unit, the following requirements of the installation location have to be met:
-
The unit has to be placed on a solid, flat, horizontal, and non-slipping surface with a sufficient weight-carrying capacity.
• Make sure that the unit cannot topple over. -
Choose the location in such a way that children cannot reach the connecting cable of the unit.
- Do not place the unit on hot surfaces, such as hotplates, or near them.
- Never use the unit outdoor and store in a dry location.
- The unit is not designed for installation in a wall or a built-in cupboard.
- Do not set up the unit in a hot, wet or moist environment.
- The socket has to be easily accessible so that the connecting cable can be removed easily in case of emergency.
ELECTRICAL CONNECTION
For safe and fault-free operation of the unit, the following requirements have to be met during the electrical connection:
- Before connecting the unit, compare the connecting data (voltage and frequency) on the type plate with those of your energy network. These details must correspond so that no damage occurs to the unit. In case of uncertainty, contact a qualified electrician.
- The socket has to be protected at least by a 10 amps circuit breaker.
- Make sure that the connecting cable is not damaged and not laid across hot surfaces or sharp edges.
- Before connecting the unit, compare the connecting data (voltage and frequency) on the type plate with those of your energy network. These details must correspond so that no damage occurs to the unit. In case of uncertainty, contact a qualified electrician. - The socket has to be protected at least by a 10 amps circuit breaker. - Make sure that the connecting cable is not damaged and not laid across hot surfaces or sharp edges.
- The connecting cable must not be stretched tightly.
- The electric safety of the unit is ensured only when it is connected to a socket with protective conductor installed correctly. Operation on a socket without protective conductor is forbidden. If in doubt, let the house installation be checked by a skilled electrician. The manufacturer does not assume responsibility for damage which has been caused by missing or interrupted protective conductor.
PRIOR TO FIRST USE
Clean all parts as described under "Cleaning".
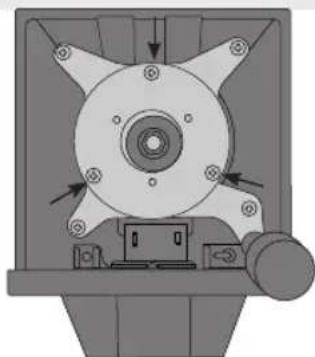
ATTACHING THE BEAN CONTAINER
• Fit the coffee bean container on the unit.
- If necessary, use a flat-blade screwdriver to tighten the lock screw of the container.
- Open the outlet of the coffee bean container by pulling out the sliding lock.
- Remove the cap of the bean container and fill it with coffee beans.
- Fit the cap.
GROUP HANDLE HOLDER
Place the group handle holder. The group handle holder is height adjustable. To find the right position for the group handle, loosen the screw and adjust the height. Do not loosen completely the screws. The group handle holder can be moved up or down depending on the size of the group handle. When you have found the right size, tighten the screw. The group handle holder fixes the group handle directly under the outlet and allows you to automatically grind into the group handle without holding it.
SETTING THE GRINDING GRADE
IMPORTANT!
The grain size of the coffee grounds can be varied by means of the different settings of the grinding grade.
Precise data on the grinding grade cannot be given as many different factors play a role, such as type of coffee / bean, room temperature, personal taste, etcetera.
In general, a finer grinding grade is set for Espresso; for filter coffee a medium grinding grade and for French Press a coarser grinding grade.
The unit is equipped with a variable grinding grade adjustment
to be set with the rotary knob. Turn it clockwise for a finer grind and turn it anticlockwise for a coarser grind.
Note:
• The finer the grinding grade, the longer the grinding process.
- If you use a very fine grinding grade, it may happen that the coffee agglutinates.
- Adjust the grinding grade by one or two stages at a time while the coffee grinder is running, otherwise the unit may jam.
DISPLAY
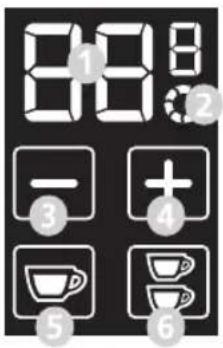
① Seconds display
2 Continuous grinding
3 Minus display
4 Plus display
⑤ Cup portion for 1 cup
6 Cup portion for 2 cups
START-UP
- Plug the connecting cable into the socket.
- Switch on the unit.
- Place the group handle holder.
IMPORTANT!
Prior to first commissioning, the unit is set to factory settings. You can set the device according to your wishes.
The next time you use it, your pre-setting remains saved.
- Select whether you want to carry out the setting for
- Press the corresponding button.
- Then select the desired processing time by pressing the +/- button.


• The time is shown in seconds.
- After setting the time, place the group handle in the group handle holder and press it against the contact switch.
• The grinding process starts.
• After expiration of the time, the unit will stop.
IMPORTANT!
To interrupt the process, press the contact switch. The selected cup flashes. To continue the process, press against the contact switch again.
IMPORTANT!
To ensure correct operation of the unit, do not grind more than 160 g coffee beans per grind.
LOCK SETTING
To prevent unwanted adjustment of the previously set times (child safety lock), proceed as follows:
- Press the + and - buttons at the same time.
- When the buttons are released, they disappear from the display and the previously set time can no longer be adjusted.
- To release the time setting, press the + and - buttons again simultaneously.
- The buttons reappear on the display and time setting is possible again.
CONTINUOUS GRINDING
If you want to grind continuously without setting the time beforehand, you can set this as follows:


- Press the buttons for and cut on the same time.

• The symbol appears in the display.
- Place the group handle in the group handle holder and press it against the contact switch. The grinding process starts.
- Or remove the group handle holder and press a container against the contact switch. The grinding process starts.
- Once you have reached the desired quantity, press against the contact switch again and then remove the group handle or the container.
IMPORTANT!
The maximum grinding time is 60 seconds.
DISPLAY OF CUPS DISPENSED
If you want to see how many grindings you have already made with your coffee grinder, proceed as follows:
- Press the contact switch simultaneously when switching on the unit. Press and hold the contact
switch for 5 seconds.
• Now select the desired counter:
- Single portion button mounts the single portions dispensed.
- Double portion button mounts the double portions dispensed.
- Single portion 📁 button and double portion 📁 button at the same time: counts the portion dispensed with continuous grinding.
- The selected buttons light up on the display and the number of portions is shown in pairs one after the other.
- When calling up the number of cups for continuous grinding, no button lights up.
- For example, if you have ground a total of 536 portions, the digits 00, 05, 36 will appear on the display one after the other for two seconds.
- After the last pair of digits, there is an interruption of 4 seconds, then the sequence starts again.
• To exit the counter, press against the contact switch again.
CLEANING OUTSIDE
Disconnect the mains plug from the socket and let the unit cool. Use a soft and moist cloth to clean the outer surfaces of the unit. Use a mild detergent in case of heavy contamination.
Never clean the unit under running water or immerse it into water.
CLEANING
IMPORTANT!
Old coffee remaining in the unit may lead to oxidation. This condition affects the result of the preparation; unpleasant and inedible taste may develop. Keep the unit always in a well-serviced condition in order to ensure perfect Espresso at all times.
Depending on use, clean the unit at least once a week.
- Remove the plug from the socket.
- Close the bean container by pushing the slider in.
- Grind the beans left in the grinder.
- Loosen the lock screw of the bean container.
- Remove the bean container by lifting it upwards.
- Place the unused beans in an airtight container so keep the flavour.
- Clean the coffee bean container in warm water using a little washing-up liquid.
• After that, dry the container well.
CLEANING AND MAINTENANCE OF THE GRINDING GEAR
CAUTION
- Follow the instructions in this chapter carefully and contact Graef customer service if you have any questions.
- Do not perform any unauthorized maintenance work and always use original spare parts.
134

natural_image
Diagram of a mechanical device with a funnel and base, showing internal components and an arrow indicating direction (no text or symbols)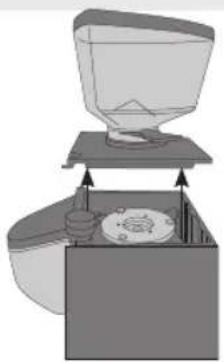
natural_image
Diagram of a coffee maker with a funnel and base, showing mechanical components (no text or symbols)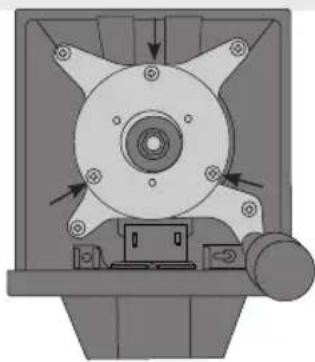
natural_image
Mechanical component diagram showing a central hub with multiple blades and mounting holes, no text or symbols present.- Remove the cap on the back of the housing.
- Use a screwdriver to remove the screw.
- Remove upper housing cover.
- After removing the upper housing cover, loosen the three screws fixing the upper grinding gear with a screwdriver and then remove the upper grinding gear.
- Clean this grinding gear and the other internal parts with a brush or dry cloth. If necessary, use a hoover to remove any remaining coffee powder.
- After cleaning, replace the upper grinding gear, retighten the three screws from the upper grinding gear with a screwdriver and then close the housing with the upper housing cover.
- Tighten the screw on the housing with a screwdriver and put on the cap.
Note:
You can grind suitable cleaning tablets to clean the lower grinder.
IMPORTANT!
If you notice a change in the grinding results during the service life of the unit, this may be an indication of wear on the grinding discs.
Therefore check the grinding discs for wear every 250 kg of coffee and, if necessary, have them replaced with original spare parts by a specialist or by Graef customer service.
TWO-YEAR WARRANTY
As from the date of purchase we assume manufacturer warranty of twenty four months for defects which can be traced back to manufacturing and material defect. Your legal warranty claim in conformity with Section 437 et seq. of the German Civil Code (BGB) shall remain unaffected by this regulation. The warranty does not cover any damage which is caused by incorrect handling or use as well as defects which only slightly influence the function or the value of the unit. Moreover, transport damage insofar we are not responsible shall be excluded from
the claims under guarantee. Warranty shall be ruled out for damage, the repair of which has not been carried out by us or one of our representations. In case of justified complaints, we shall repair the defective product or replace it by a product without defects at our discretion.
TABLE DES MATIÈRES
natural_image
Diagram of a mechanical device with a conical top and internal components (no text or symbols)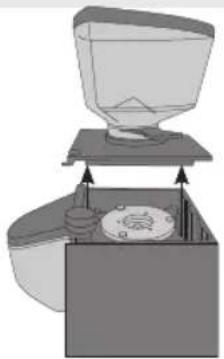
natural_image
Diagram of a mechanical device with a funnel and base, showing internal components (no text or symbols)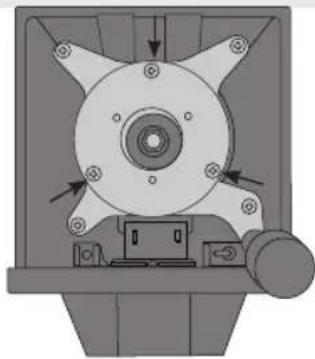
natural_image
Mechanical component diagram showing a central hub with multiple arms and mounting holes, no visible text or symbolsnatural_image
Diagram of a mechanical device with a funnel and lever mechanism (no text or symbols)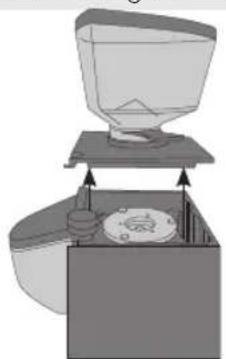
natural_image
Diagram of a funnel pouring liquid into a container with a lid, showing internal components (no text or symbols)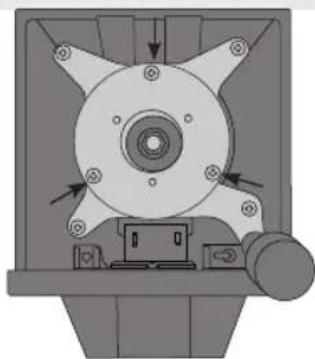
natural_image
Mechanical component diagram showing a central hub with multiple blades and mounting holes, no visible text or symbolsnatural_image
Diagram of a mechanical device with a conical top and side supports, showing no text or symbols.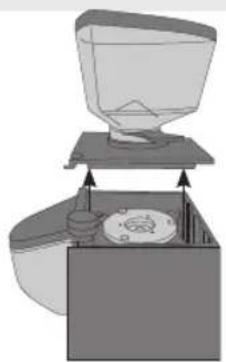
natural_image
Diagram of a coffee maker with a funnel and base, showing mechanical components (no text or symbols)
natural_image
Mechanical component diagram showing a rotating fan or impeller assembly with mounting holes and directional arrows (no text or symbols)natural_image
Diagram of a mechanical device with a funnel and base, showing internal components and directional arrows (no text or symbols)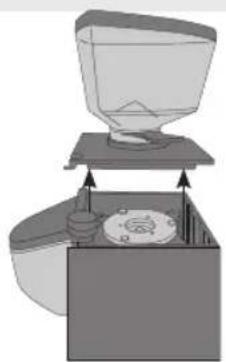
natural_image
Diagram of a coffee maker with a funnel and base, showing mechanical components (no text or symbols)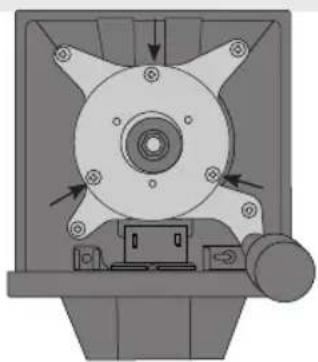
natural_image
Mechanical component diagram showing a central hub with mounting holes and directional arrows (no text or symbols)① Bønnebeholderlåg
② Bønneheholder
3 Skydelås
4 Drejeknap til indstilling af malingsgrad
Display
Taend-/slukknap
7 Monteringsskrue til beholder
③ Udlob
2 Kontaktskifter
10 Filtersystem
11 Beskyttelsespude*
natural_image
Simple line drawing of a mechanical device with a funnel and lever (no text or symbols)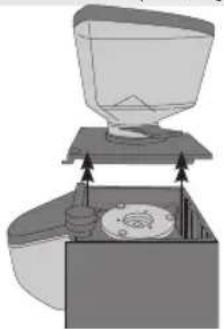
natural_image
Diagram of a mechanical device with a funnel and base, showing internal components and directional arrows (no text or symbols)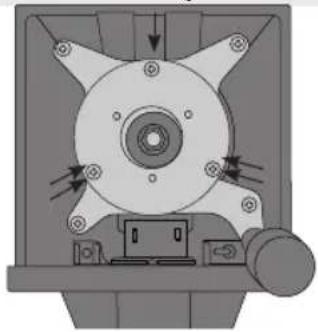
natural_image
Mechanical component diagram showing a central hub with mounting holes and directional arrows (no text or symbols)natural_image
Diagram of a mechanical device with a funnel and lever mechanism (no text or symbols)
natural_image
Diagram of a coffee maker with a funnel and base, showing internal components (no text or symbols)
natural_image
Mechanical component diagram showing a central hub with multiple blades and mounting holes (no text or symbols)Malegradinnstilling....113
Display....113
Igangsetting....113
Sperre innstilling....114
Varig maling 114
SETTE PÅ B∅NNEBEHOLDEREN
natural_image
Simple line drawing of a mechanical device with a funnel and base (no text or symbols)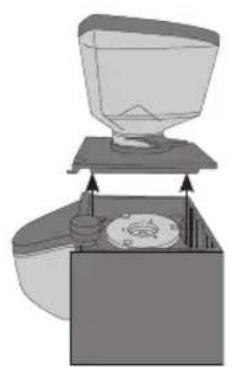
natural_image
Diagram of a coffee maker with a lid and base, showing internal components (no text or symbols)
natural_image
Mechanical component diagram showing a central hub with multiple blades and mounting holes (no text or symbols)natural_image
Simple line drawing of a mechanical device with a funnel and base, no text or symbols present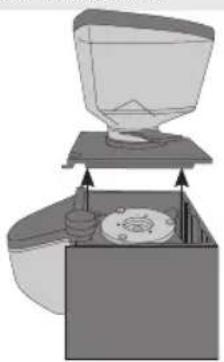
natural_image
Diagram of a kitchen sink with a funnel and lid, showing internal components (no text or symbols)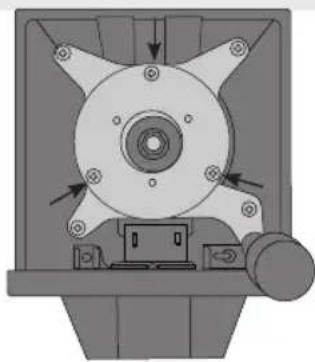
natural_image
Mechanical component diagram showing a rotating fan or impeller assembly with mounting holes and directional arrows (no text or symbols)natural_image
Diagram of a laboratory apparatus with a funnel and side panel, no visible text or symbols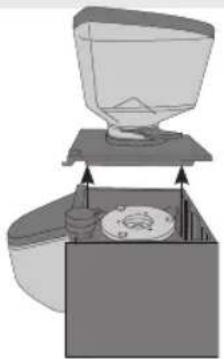
natural_image
Diagram of a coffee maker's open lid and side panel, showing mechanical components without any text or symbols.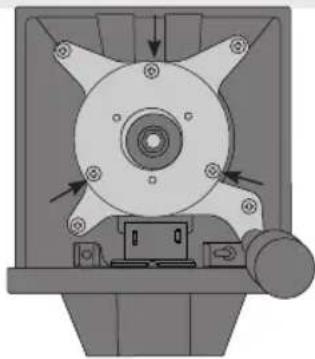
natural_image
Mechanical component diagram showing a rotating fan or impeller assembly with mounting holes and directional arrows (no text or symbols)natural_image
Diagram of a mechanical device with a funnel and lever mechanism (no text or symbols)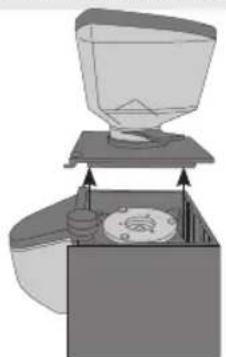
natural_image
Diagram of a funnel pouring liquid into a container with a lid, showing mechanical components (no text or symbols)