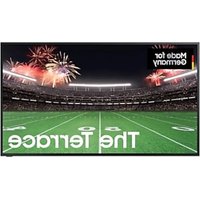
GQ75LST7DAT - TV SAMSUNG - Free user manual and instructions
Find the device manual for free GQ75LST7DAT SAMSUNG in PDF.


User questions about GQ75LST7DAT SAMSUNG
0 question about this device. Answer the ones you know or ask your own.
Ask a new question about this device
Download the instructions for your TV in PDF format for free! Find your manual GQ75LST7DAT - SAMSUNG and take your electronic device back in hand. On this page are published all the documents necessary for the use of your device. GQ75LST7DAT by SAMSUNG.
USER MANUAL GQ75LST7DAT SAMSUNG
Before Reading This Simple User Guide
This TV comes with this Simple User Guide and an embedded User guide (☑ > ≡ (left directional button) > ⚙️ Settings > Support > Open User guide).
To activate the Samsung Smart Remote, press ⏻ on it. (This is required only when using it for the first time.)
Warning! Important Safety Instructions
Please read the Safety Instructions before using your TV. Refer to the table below for an explanation of symbols which may be on your Samsung product.
| CAUTION | |
| RISK OF ELECTRIC SHOCK. DO NOT OPEN. | |
| CAUTION: TO REDUCE THE RISK OF ELECTRIC SHOCK, DO NOT REMOVE COVER (OR BACK). THERE ARE NO USER SERVICEABLE PARTS INSIDE. REFER ALL SERVICING TO QUALIFIED PERSONNEL. | |
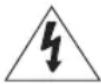 | This symbol indicates that high voltage is present inside. It is dangerous to make any kind of contact with any internal part of this product. |
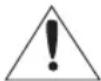 | This symbol indicates that this product has included important literature concerning operation and maintenance. |
 | Class II product: This symbol indicates that a safety connection to electrical earth (ground) is not required. If this symbol is not present on a product with a mains lead, the product MUST have a reliable connection to protective earth (ground). |
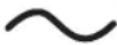 | AC voltage: Rated voltage marked with this symbol is AC voltage. |
 | DC voltage: Rated voltage marked with this symbol is DC voltage. |
 | Caution. Consult instructions for use: This symbol instructs the user to consult the Simple User Guide for further safety related information. |
Power
- Do not overload wall outlets, extension cords, or adapters beyond their voltage and capacity. It may cause fire or electric shock.
Refer to the power specifications section of the manual or the power supply label on the product for voltage and amperage information.
- Power-supply cords should be placed so that they are not likely to be walked on or pinched by items placed upon or against them. Pay particular attention to cords at the plug end, at wall outlets, and at the point where they exit from the appliance.
- Never insert anything metallic into the open parts of this apparatus. This may cause electric shock.
- To avoid electric shock, never touch the inside of this apparatus. Only a qualified technician should open this apparatus.
- Be sure to plug in the power cord until it is firmly seated. When unplugging the power cord from a wall outlet, always pull on the power cord's plug. Never unplug it by pulling on the power cord. Do not touch the power cord with wet hands.
- If this apparatus does not operate normally - in particular, if there are any unusual sounds or smells coming from it - unplug it immediately and contact an authorised dealer or Samsung service centre.
- To protect this apparatus from a lightning storm, or to leave it unattended and unused for a long time, be sure to unplug it from the wall outlet and disconnect the antenna or cable system.
– Accumulated dust can cause an electric shock, an electric leakage, or a fire by causing the power cord to generate sparks and heat or by causing the insulation to deteriorate.
- Use only a properly grounded plug and wall outlet.
- An improper ground may cause electric shock or equipment damage. (Class I Equipment only.)
- To turn off this apparatus completely, disconnect it from the wall outlet. To ensure you can unplug this apparatus quickly if necessary, make sure that the wall outlet and power plug are readily accessible.
Installation
- Do not place this apparatus near or over a radiator or heat register, or where it is exposed to direct sunlight.
- Do not place any objects (vases etc.) containing water on this apparatus, as this can result in a fire or electric shock.
- Do not expose this apparatus to rain or moisture.
- Be sure to contact an authorised Samsung service centre for information if you intend to install your TV in a location with heavy dust, high or low temperatures, high humidity, chemical substances, or where it will operate 24 hours a day such as in an airport, a train station, etc. Failure to do so may lead to serious damage to your TV.
- Do not expose this apparatus to dripping or splashing.
Mounting the TV on a wall
Because access to Media Bay of the TV may be limited due to the design of the wall-mount that you use, connecting all cables and devices that you need prior to hanging the TV on the wall is recommended. When connecting additional cables and devices to the TV after hanging on the wall, you may need to separate the TV from wall-mount.
If you mount this TV on a wall, follow the instructions exactly as set out by the manufacturer. If it is not correctly mounted, the TV may slide or fall and cause serious injury to a child or adult and serious damage to the TV.
• To order the Samsung wall mount kit, contact Samsung service centre.
- Samsung is not responsible for any damage to the product or injury to yourself or others if you choose to install the wall mount on your own.
- You can install your wall mount on a solid wall perpendicular to the floor. Before attaching the wall mount to surfaces other than plaster board, contact your nearest dealer for additional information. If you install the TV on a ceiling or slanted wall, it may fall and result in severe personal injury.
- When installing a wall mount kit, we recommend you fasten all four VESA screws.
- If you want to install a wall mount kit that attaches to the wall using two top screws only, be sure to use a Samsung wall mount kit that supports this type of installation. (You may not be able to purchase this type of wall mount kit, depending on the geographical area.)
- Do not mount the TV at more than a 15 degree tilt.
- Standard dimensions for wall mount kits are shown in the table.
Do not install your wall mount kit while your TV is turned on. This may result in personal injury from electric shock.
- Do not use screws that are longer than the standard dimension or do not comply with the VESA standard screw specifications. Screws that are too long may cause damage to the inside of the TV set.
- For wall mounts that do not comply with the VESA standard screw specifications, the length of the screws may differ depending on the wall mount specifications.
- Do not fasten the screws too firmly. This may damage the product or cause the product to fall, leading to personal injury. Samsung is not liable for these kinds of accidents.
- Samsung is not liable for product damage or personal injury when a non-VESA or non-specified wall mount is used or when the consumer fails to follow the product installation instructions.
• Always have two people mount the TV onto a wall.
- WARNING: This apparatus must be securely attached to the wall.
"Tipping, shaking, or rocking the machine may cause injury/death". (CSA60065)
Wall Mount Specifications (VESA)
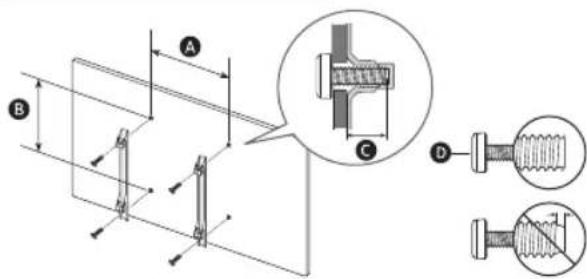
text_image
Technical diagram showing mechanical assembly with labeled components A, B, C, D and detail views of a bolted joint detail.| TV size in inches 55 65 75 | |||
| VESA screw hole specs (A x B(mm)) | 200 x 200 | 400 x 400 | |
| C (mm) | 9-11 | ||
| D x 4 | M8 | ||
Providing proper ventilation for your TV
When you install your TV, maintain a distance of at least 38 mm between the TV and other objects (walls, cabinet sides, etc.) to ensure proper ventilation. Failing to maintain proper ventilation may result in a fire or a problem with the product caused by an increase in its internal temperature.
- When you install your TV with a wall mount, we strongly recommend you use parts provided by Samsung only. Using parts provided by another manufacturer may cause difficulties with the product or result in injury caused by the product falling.
- The Terrace can be installed in a tilted position on a wall or a cabinet side, up to 15°.
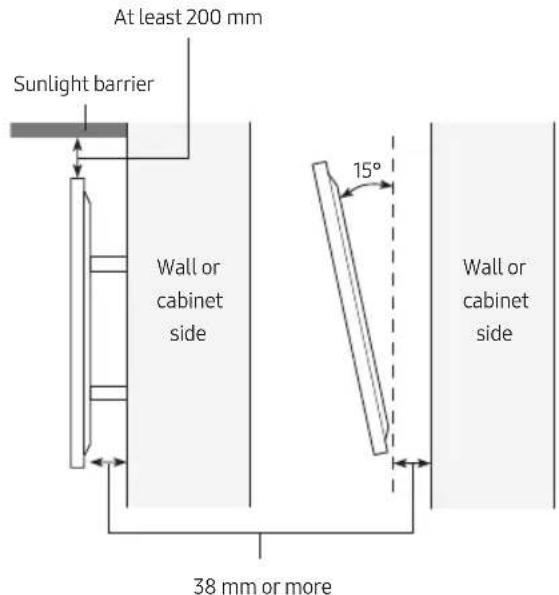
text_image
At least 200 mm Sunlight barrier Wall or cabinet side 15° Wall or cabinet side 38 mm or moreSafety Precaution
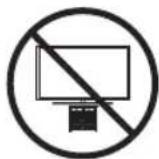
Caution: Pulling, pushing, or climbing on the TV may cause the TV to fall. In particular, do not hang on or destabilise the TV. This action may cause the TV to tip over, causing serious injuries or death. Follow all safety precautions provided in the Safety Flyer included with your TV.
WARNING: Never place a television set in an unstable location. The television set may fall, causing serious personal injury or death. Many injuries can be avoided by taking simple precautions such as:
• Always use cabinets or mounting methods recommended by Samsung.
• Always use furniture that can safely support the television set.
• Always ensure the television set is not overhanging the edge of the supporting furniture.
• Always educate about the dangers of climbing on furniture to reach the television set or its controls.
• Always route cords and cables connected to your television so they cannot be tripped over, pulled or grabbed.
- Never place a television set in an unstable location.
- Never place the television set on tall furniture (for example, cupboards or bookcases) without anchoring both the furniture and the television set to a suitable support.
- Never place the television set on cloth or other materials that may be located between the television set and supporting furniture.
- Never place items that might tempt to climb, such as toys and remote controls, on the top of the television or furniture on which the television is placed.
If the existing television set is going to be retained and relocated, the same considerations as above should be applied.
Operation
- This apparatus uses batteries. In your community, there might be environmental regulations that require you to dispose of these batteries properly. Please contact your local authorities for disposal or recycling information.
- Store the accessories (remote control, or etc.) in a location safely out of the reach.
- Do not drop or strike the product. If the product is damaged, disconnect the power cord and contact a Samsung service centre.
- Do not dispose of remote control or batteries in a fire.
- Do not short-circuit, disassemble, or overheat the batteries.
- CAUTION: There is danger of an explosion if you replace the batteries used in the remote with the wrong type of battery. Replace only with the same or equivalent type.
- WARNING - Do not use liquid fumigators containing chemicals, such as mosquito repellent or aerial freshener, around the product.
- If steam comes in contact with the product surface or enters the product, it may cause stains or malfunction.
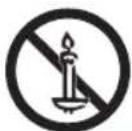
- WARNING - TO PREVENT THE SPREAD OF FIRE, KEEP CANDLES AND OTHER ITEMS WITH OPEN FLAMES AWAY FROM THIS PRODUCT AT ALL TIMES.
Caring for the TV
• To clean this apparatus, unplug the power cord from the wall outlet and wipe the product with a soft, dry cloth. Do not use any chemicals such as wax, benzene, alcohol, thinners, insecticide, aerial fresheners, lubricants, or detergents. These chemicals can damage the appearance of the TV or erase the printing on the product.
- The exterior and screen of the TV can get scratched during cleaning. Be sure to wipe the exterior and screen carefully using a soft cloth to prevent scratches.
- Do not spray water or any liquid directly onto the TV. Any liquid that goes into the product may cause a failure, fire, or electric shock.
01 What's in the Box?
Make sure the following items are included with your TV. If any items are missing, contact your dealer.
- Simple User Guide
- Warranty Card / Regulatory Guide (Not available in some locations)
• Samsung Smart Remote
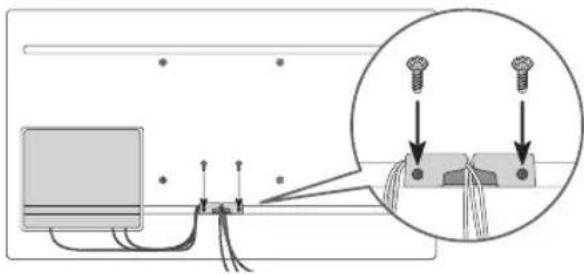
• TV Power Cord - Holder-Cable
- Screw x 2 (M4 x L7)
-
CI Card Adapter
-
The items' colours and shapes may vary depending on the models.
- Cables not included can be purchased separately.
- Check for any accessories hidden behind or in the packing materials when opening the box.
Using the Holder-Cable
text_image
Diagram showing a computer connected to a cable with two screws, and a magnified inset illustrating screw positioning.
The screen can be damaged from direct pressure when handled incorrectly. As shown in the figure, make sure to grip the edges of the screen when you lift the TV.
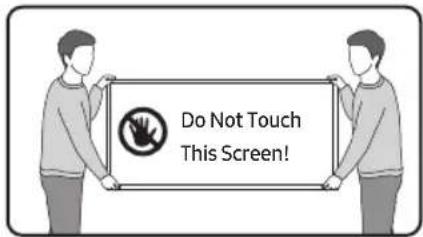
text_image
Do Not Touch This Screen!02 TV Installation

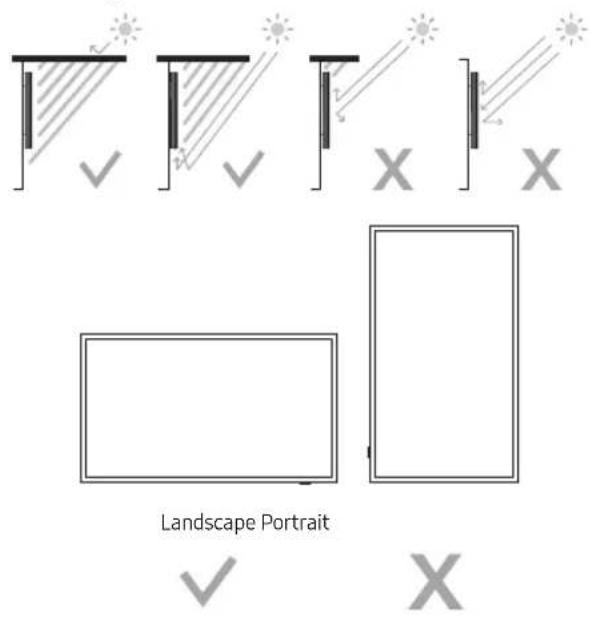
• TV screen must not be exposed to direct sunlight.
- If the TV screen is exposed to direct sunlight, it can develop dark areas. This is a common symptom of LCD Panel and dark areas will disappear when the screen is taken out of direct sunlight.
- Continuous exposure to direct sunlight may cause damage to the TV screen.
- The brightness sensor, which is located at the bottom right side of the product, should not be covered by any object and totally exposed to outside.
- The TV will activate "Sunlight Protection" if it senses too much brightness in the surrounding area. The luminance may be lowered to protect the TV screen.
- For the stable use of the product, it should be installed in a place where there is no risk of freezing due to snow accumulation or exposure to rain for a long time.
- It cannot be installed in a recessed space.
- The Terrace must be installed only in Landscape orientation, not in Portrait orientation.
• We recommend that you ask a professional installation service company to install it. For more information on installation, contact the dealer where you purchased the product.
Planning the location
text_image
Landscape Portrait
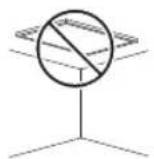
Do not install The Terrace on a ceiling, floor, or table.
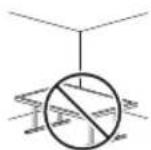
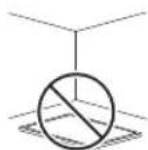
Media Bay
- The Terrace provides space (Media Bay) to install Media Players where Weather-Resistant is guaranteed on the rear of the product.
- The media player listed below can be installed on the rear space (Media Bay) of the product.
– Media player: Amazon Fire Stick, Google Chromecast, Roku Ultra Streaming M Player
- Make sure to close the cover and fasten the screws to ensure it is water tight. (Use the provided screws. Otherwise, it may cause problems such as improper Weather-Resistant.)
- We are not responsible for any personal injury or damage to the product that occurs when users install the product.
| Media BayDimensions (W x H x D) 210.0 x 270.0 x 25.0 mm | |
| Media playerInstallation space (W x H x D) 140.0 x 200.0 x 25.0 mm |
Before connecting cables
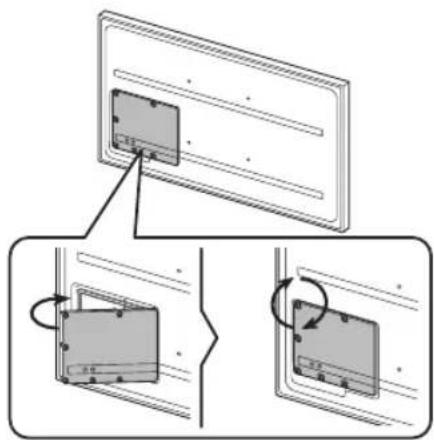
- Unfasten the screws, then open the cover.
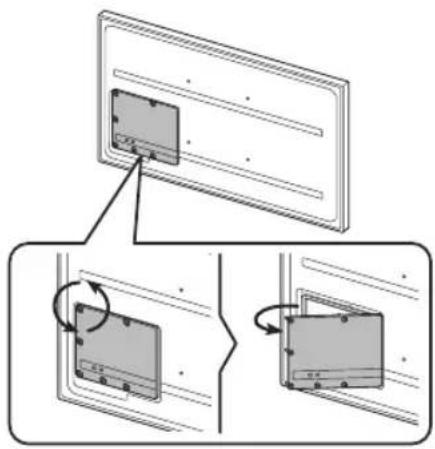
text_image
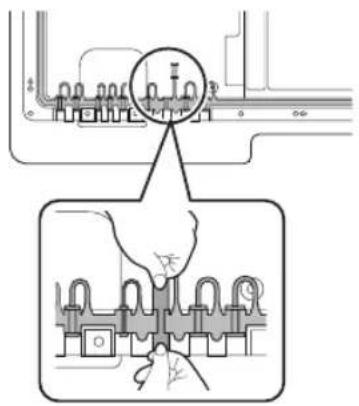
Diagram showing a device panel with an open lid and its rotation arrows, likely illustrating a mechanical or electrical assembly.- Remove the appropriate silicone bar for the thickness of the cable to connect.
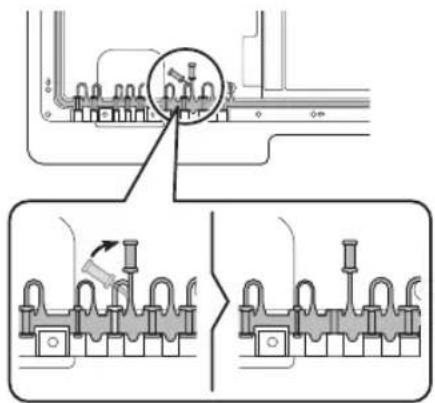
text_image
Technical diagram showing mechanical assembly with magnified detail and component disassembly steps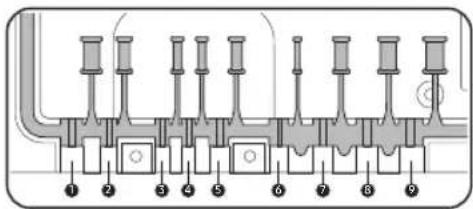
text_image
Diagram of a mechanical or electrical component with numbered parts labeled 1 through 9, likely for assembly or labeling.Different hole sizes and corresponding cable thickness for each:
| Position | 1 | 2 | 3 | 4 | 5 |
| Cable diameter (Φ mm) | Φ 7.0 | Φ 4.0 | Φ 3.0 | Φ 3.0 | Φ 5.5 |
| Position | 6 | 7 | 8 | 9 | |
| Cable diameter (Φ mm) | Φ 1.6 | Φ 5.5 | Φ 7.0 | Φ 8.0 |
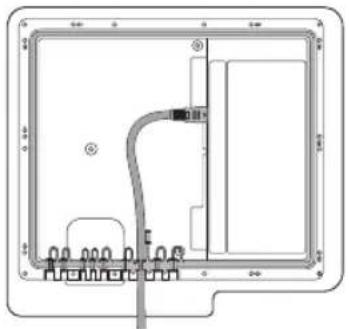
- Insert the appropriate cable into the hole from which the silicone bar was removed.
text_image
Technical diagram showing mechanical assembly with labeled components and a magnified view of a component being inserted into a housing.- The cable should be connected as shown.
natural_image
Pure electrical circuit lines without any symbols- Close the cover, then fasten the screws.
- After all the cables are connected, make sure to close the cover and fasten the screws to ensure it is water tight. (Use the provided screws. Otherwise, it may cause problems such as improper Weather-Resistant.) Recommended torque: 2.5 - 3.5 kgf.cm
text_image
Diagram showing a device panel with an open lid and its internal components, illustrating the process of assembly or mounting.Durability
- The TV provides the robust durability by IP56 so that it can be used in outdoor environment (when installed and used as per the instructions in this Simple User Guide). - The remote control of this product provides durability by IP56.
| Protection against solids | IP | Protection against water | |
| 5 | 6 | ||
| No protection 0 | 0 | No protection | |
| Solids >50 mm | 1 | 1 | Vertically falling water |
| Solids >12 mm 2 | 2 | Vertically water - enclosure tilted 15° | |
| Solids >2.5 mm | 3 | 3 | Sprayed water 60° from vertical |
| Solids >1.0 mm 4 | 4 | Splashed water from all directions | |
| Dust Protected 5 | 5 | Hosing jets from all directions | |
| Dust tight 6 | 6 | Strong hosing jets from all directions | |
| - | 7 | Temporary Immersion: 1 m for 30 minutes | |
| - | 8 | Immersion: manufacturer defined depth and time | |
Despite the IP56 ratings, your TV and remote control are not impervious to water damage in any situation. To help prevent damage to your products, avoid the products being subjected to:
- Water projected by a source greater than 12.5 mm against enclosure from any direction or submersion in water.
- Water projected at greater than 100 KPa (14.5 PSI) with a water volume greater than 100 litres/minute for more than 3 minutes and extreme weather conditions.
If you have purchased or been provided a Dust Cover, be sure to put the Dust Cover on the TV whenever the TV is not in use for an extended period of time.
The Dust Cover will help prevent dust, dirt, and more from accumulating on the TV. Please refer to the guide provided with the Dust Cover for installation/usage guidelines.
03 About the Buttons on the Samsung SolarCell Remote (Samsung Smart Remote)
- To activate the Samsung Smart Remote, press on it. (This is required only when using it for the first time.)
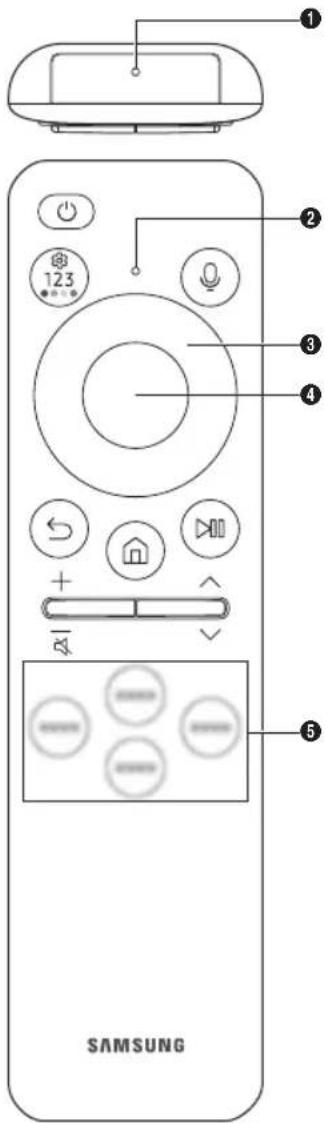
text_image
1 2 3 4 5 SAMSUNG(Power)
Press to turn the TV on or off. Press and hold to turn off the TV completely.
① MIC
Used as MIC when using voice recognition with the remote control.
- Do not impact the MIC hole or use a sharp object to poke into the hole.
② LED
When charging the remote control via the USB port, the LED is lit if charging is in progress. When charging is complete, the LED is turned off.
(Voice Assistant)
Runs Voice Assistant. Press and hold the button, say a command, and then release the button to run Voice Assistant.
- The supported Voice Assistant's languages and features may differ by geographical area.
Settings - Number - Colour button)
You can access Setting menu / virtual numeric pad / Colour buttons / Option pad / SmartThings directly.
- Accessing the SmartThings app using this button may not be supported, depending on the model.
- Use this button to access additional options that are specific to the feature in use.
- Press to bring up the virtual numeric pad on the screen. Use the numeric keypad to enter numeric values. Select numbers and then select Done or Enter Number to enter a numeric value. Use to change the channel, enter a PIN, enter a ZIP code, etc.
- When pressed for 1 second or more, the Shortcuts menu screen appears.
③ Directional button (up, down, left, right)
Moves the focus and changes the values seen on the TV's menu.
4 Select
Selects or runs a focused item. When pressed while you are watching a broadcast programme, detailed programme information appears.
(Return)
Press to return to the previous menu. When pressed for 1 second or more, the running function is terminated. When pressed while you are watching a programme, the previous channel appears.
(Smart Hub)
Press to switch to the Home Screen.
Play/pause
When pressed, the playback controls appear. Using these controls, you can control the media content that is playing. To use Game Bar, press and hold the button in Game Mode.
- Game Bar may not be supported depending on the model or geographical area.
+/- (Volume)
Move the button up or down to adjust the volume. To mute the sound, press the button. When pressed for 2 seconds or more, the Accessibility Shortcuts appears.
• may not be present, depending on the model.
^/∨(Channel)
Move the button up or down to change the channel. To see the Guide screen, press the button. When pressed for 1 second or more, the Channel List screen appears.
⑤ Launch app button
Press each button to run its function.
• Available apps may differ depending on the geographical area or contents provider.
+ (Pairing)
If the Samsung Smart Remote does not pair to the TV automatically, point it at the front of the TV, and then press and hold the 📁 and buttons simultaneously for 3 seconds or more.
- Use the Samsung Smart Remote less than 6 m from the TV. The usable distance may vary with the wireless environmental conditions.
- The images, buttons, and functions of the Samsung Smart Remote may differ with the model or geographical area.
- The Universal Remote function operates normally only when you use the Samsung Smart Remote that comes with the TV.
Charging the battery
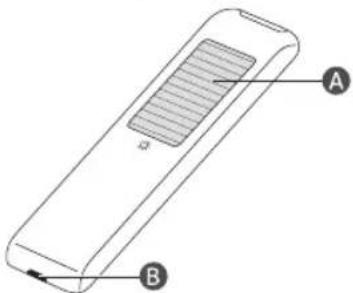
natural_image
Diagram of a rectangular device with labeled parts A and B, showing internal structure (no text or symbols beyond labels)A Solar Cell
Expose to light when the remote is not in use. This will extend the remote's operating time.
B USB port (C-type) for charging
Used for quick charging. The LED on the front will light when charging. When the battery is fully charged, the LED will turn off.
• The USB Cable is not provided.
- It is recommended to use an original Samsung charger. Otherwise, it may cause performance degradation or failure of the product. In this case, the warranty service is not applicable.
- When the remote control does not work due to low battery, charge it by using the USB-C type port.
Fire or explosion may occur, resulting in damage to the remote control or personal injury.
- Do not apply shock to the remote control.
- Be careful not to let foreign substances such as metal, liquid, or dust come in contact with the charging terminal of the remote control.
- When the remote control is damaged or you smell smoke or burning fumes, immediately stop operation and then repair it at the Samsung service centre.
- Do not arbitrarily disassemble the remote control.
- Be careful not to let infants or pets suck or bite the remote control. Fire or explosion may occur, resulting in damage to the remote control or personal injury.
04 Initial Setup
When you turn on your TV for the first time, it immediately starts the Initial Setup. Follow the instructions displayed on the screen and configure the TV's basic settings to suit your viewing environment.
- You will need a Samsung Account to access our network-based smart services. If you choose not to log in, you will only get a connection to terrestrial TV (applicable to devices with tuners only) and external devices, e.g. via HDMI.
Using the TV Controller
You can turn on the TV with the TV Controller button at the bottom of the TV, and then use the Control menu. The Control menu appears when the TV Controller button is pressed while the TV is On.
- The screen may dim if the protective film on the Samsung logo or the bottom of the TV is not removed. If protective film is attached, remove the film.
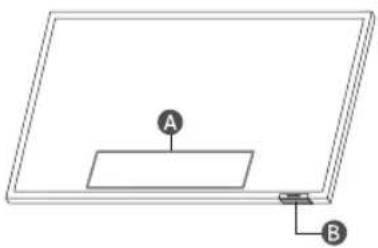
natural_image
Simple line drawing of a rectangular frame with two labeled points A and B, no text or symbols present.A Control menu
B TV Controller button / Remote control sensor
05 Connecting the HDBase-T
HDBase-T connection of The Terrace is built-in for transmission of audio and video data. It does not support transmission of power, Ethernet and control signals including IR and RS232.
- Up to HDMI 1.4 is supported.
- CEC does not operate when the TV is Off.
General
• The appearance may differ depending on the product.
- Connecting parts may differ in different products.
- Data transmission is not available if HDBase-T (Rx) is connected to HDBase-T (Tx) through a hub.
- While installing the product, be sure to use the cables and TX devices certified by the HDBase-T Alliance.
- When connecting an external device via HDBase-T, for the maximum resolution, use a certified TX device that supports 4K 30 Hz.
• This port (HDBT port on the TV) does not support ARC (eARC).
Guidelines for connection
- HDBase-T (Tx) transmits data from an external device to HDBase-T (Rx). Only 1:1 connection is available between devices. Make sure to connect them via a LAN (CAT6 or higher quality) cable.
- HDBase-T works with unshielded twisted pair (UTP) or shielded twisted pair (STP) cables; but, to ensure CE compliance, STP cables and STP Connectors are required. STP cable and connectors are recommended to safeguard against unpredictable environmental electrical noise which may impact performance. It is recommended to use an STP cable to maximize performance. Using a UTP cable or patch may decrease performance.
- Before replacing the external device, first remove the HDBT LAN (CAT6 or higher quality) cable.
- For HDBT signal stability, please use CAT6 or higher quality cables are Certified by HDbaseT.
- Do not use CAT5E cables even though the cables are Certified by HDbaseT.
Constraints
- When connecting an external device via HDBase-T, there may be restrictions during communication between devices.
- When connection a gaming device via HDBase-T, the related functions and screen resolution may not be supported smoothly.
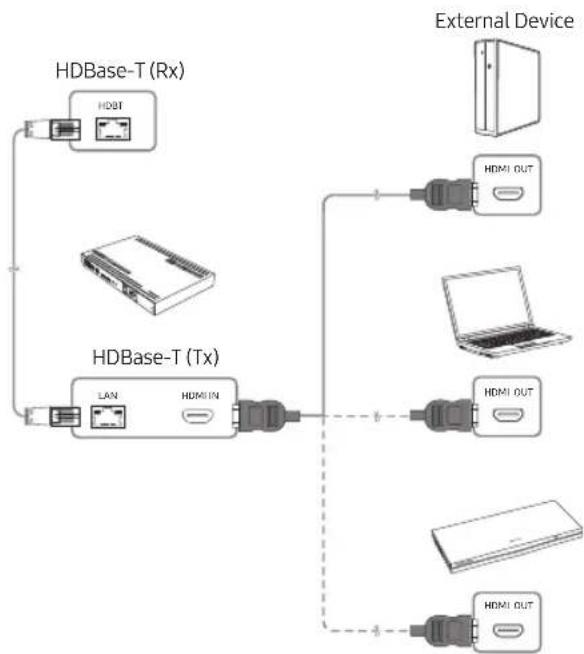
flowchart
graph TD
    A["HDBase-T (Rx)"] --> B["HWBT"]
    C["HDBase-T (Tx)"] --> D["LAN"]
    C --> E["HDMI IN"]
    F["External Device"] --> G["HDMI OUT"]
    G --> H["Laptop"]
    I["External Device"] --> J["HDMI OUT"]
    J --> K["Computer"]
06 Using the Cold Weather Mode
≡ (left directional button) > ⚙️ Settings > All Settings >
General & Privacy > System Manager > Cold Weather Mode
Outdoor TV provides an optimal viewing experience under 0 °C (32 °F) to 50 °C (122 °F).
- In low temperature below 10^ (50 °F), motion blur may occur due to liquid crystal characteristics.
- To view the TV under low temperature below 10^ (50°F), you can use the Cold Weather Mode for stable startup.
- Cold Weather Mode keeps the startup stable by operating the TV backlight when the weather is very cold.
- When Cold Weather Mode is active, be sure to keep the power supply connected.
- Even in standby mode for Cold Weather Mode, power may be consumed as follows:
- 55": MAX 210 W, 65": MAX 280 W, 75": MAX 350 W
- Cold Weather Mode operates in standby and the screen may appear grey.
High-Temperature protection
- At the temperature above 45^ (113 °F), the TV brightness may be lowered to protect the product. This option works regardless of Cold Weather Mode activation.
Sunlight Protection
- When surrounding brightness level is over 20,000 lux for 5 minutes in a row, the luminance may be lowered to protect the TV screen.
07 Using the Adaptive Picture
(← (left directional button) > Settings > All Settings > General & Privacy > Intelligent Mode Settings > Adaptive Picture Optimises brightness and provides the best picture quality in real time, based on the lighting condition and the content you're viewing.
- The Adaptive Picture in The Terrace automatically optimises Brightness and Contrast in real time, making the content you are currently watching the best quality even in bright or dark conditions.
08 Troubleshooting and Maintenance
Troubleshooting
For more information, refer to "Troubleshooting" in the User guide.
≡ (left directional button) > Settings > Support > Open User guide > Troubleshooting
If none of the troubleshooting tips apply, please visit "www.samsung.com" and click Support or contact the Samsung service centre.
- This panel is made up of sub pixels which require sophisticated technology to produce. There may be, however, a few bright or dark pixels on the screen. These pixels will have no impact on the performance of the product.
- To keep your TV in optimum condition, upgrade to the latest software. Use the Update Now or Auto update functions on the TV's menu (▲) > ≡ (left directional button) > ⚙️ Settings > Support > Software Update > Update Now or Auto update).
The TV won't turn on.
- Make sure that the power cord is securely plugged into the product and the wall outlet.
- Make sure that the wall outlet is working and the remote control sensor at the bottom of the TV is lit and glowing a solid red.
- Try pressing the TV Controller button at the bottom of the TV to make sure that the problem is not with the remote control. If the TV turns on, refer to "The remote control does not work".
The remote control does not work.
- Check if the remote control sensor at the bottom of the TV blinks when you press the ⏻ button on the remote control.
- When the remote's battery is discharged, charge the battery using the USB charging port (C-type), or turn over the remote to expose the solar cell to light.
- Try pointing the remote directly at the TV from 1.5-1.8 m away.
- If your TV came with a Samsung Smart Remote (Bluetooth Remote), make sure to pair the remote to the TV. To pair a Samsung Smart Remote, press the 📋 and 🔍 buttons together for 3 seconds.
Changing the TV's password
≡ (left directional button) > ⚙️ Settings > All Settings > General & Privacy > System Manager > Change PIN
Run Change PIN and then enter the current password in the password field.
Enter a new password and then enter it again to confirm it. The password change is complete.
If you forgot your PIN code, press the buttons in the following sequence to reset the PIN to "0000" (France: "1111"):
- Press + / — (Volume) button. > Volume Up > Volume Down > Volume Up >
Eco Sensor and screen brightness
Eco Sensor adjusts the brightness of the TV automatically. This feature measures the light in your room and optimises the brightness of the TV automatically to reduce power consumption. If you want to turn this off, go to 📄 > (left directional button) >
Settings > All Settings > General & Privacy > Power and Energy Saving > Brightness Optimisation.
- The eco sensor is located at the bottom of the TV. Do not block the sensor with any object. This can decrease picture brightness.
09 Specifications and Other Information
Specifications
| Model Name GQ55LST7D** / QE55LST7D** GQ65LST7D** / QE65LST7D** | |
| Display Resolution 3840 x 2160 3840 x 2160 | |
| Screen Size | |
| Diagonal | 54.6 inches |
| Measured Diagonally | 138 cm |
| Sound (Output) | 40 W |
| Dimensions (W x H x D) | |
| Body | 1247.4 x 720.9 x 69.8 mm |
| Weight | |
| Body | 27.9 kg |
| Model Name GQ75LST7D** / QE75LST7D** | |
| Display Resolution 3840 x 2160 | |
| Screen Size | |
| Diagonal | 74.5 inches |
| Measured Diagonally | 189 cm |
| Sound (Output) | 40 W |
| Dimensions (W x H x D) | |
| Body | 1692.0 x 974.5 x 69.8 mm |
| Weight | |
| Body | 48.1 kg |
*:0\~9,A\~Z
| Operating Temperature | -31 °C to 50 °C (-24 °F to 122 °F) |
| Operating Humidity | 10 % to 80 %, non-condensing |
| *Storage Temperature | -31 °C to 50 °C (-24 °F to 122 °F) |
| Storage Humidity | 5 % to 95 %, non-condensing |
*: When the temperature is -20^ to -31^ (-4°F to -24°F), it is mandatory to store the TV inside with complete packaging or apply power and activate the Cold Weather Mode.
Notes
• This device is a Class B digital apparatus.
- For information about the power supply, and more information about power consumption, refer to the information on the label attached to the product.
- On most models, the label is attached to the back of the TV. (On some models, the label is inside the cover terminal.)
• Typical power consumption is measured according to IEC 62087.
• To connect a LAN cable, use a CAT7 (*STP type) cable for the connection. (100/10 Mbps)
* Shielded Twisted Pair
- When the temperature is out of Operating Temperature / Storage Temperature range, please store the TV inside with complete packaging to protect the product.
* Figures and illustrations are provided for reference only and may differ from the actual product appearance.
Product design and specifications may change without notice.
Decreasing power consumption
When you shut the TV off, it enters Standby mode. In Standby mode, it continues to draw a small amount of power. To decrease power consumption, unplug the power cord when you don't intend to use the TV for a long time.
An administration fee may be charged in the following situations:
(a) An engineer is called out at your request, but it is found that the product has no defect (i.e., where the user manual has not been read).
(b) You bring the unit to the Samsung service centre, but it is found that the product has no defect (i.e., where the user manual has not been read).
You will be informed of the administration fee amount before a technician visits.
Following the repair by a non-authorised service provider, self-repair or non-professional repair of the product, Samsung is not liable for any damage to the product, any injury or any other product safety issue caused by any attempt to repair the product which does not carefully follow these repair and maintenance instructions. Any damage to the product caused by an attempt to repair the product by any person other than a Samsung certified service provider will not be covered by the warranty.
Please visit samsung.com/support to find further information about external power adapter and remote control associated with EU Ecodesign directive - ErP regulation
Hereby, Samsung declares that this radio equipment is in compliance with Directive 2014/53/EU and the relevant UK statutory requirements.
The full text of the declaration of conformity is available at the following internet address:
http://www.samsung.com go to Support and enter the model name. This equipment may be operated in all EU countries and in the UK. The 5 GHz WLAN(Wi-Fi) function of this equipment may only be operated indoors.
RF max transmitter power : 100 mW at 2.4 GHz - 2.4835 GHz Wi-Fi max transmitter power :
100 mW at 2.4 GHz - 2.4835 GHz,
200 mW at 5.15 GHz - 5.25 GHz,
100 mW at 5.25 GHz - 5.35 GHz & 5.47 GHz - 5.725 GHz.
The frequency range (5.15 - 5.35 GHz) for Wi-Fi is restricted to indoor use only.

Correct Disposal of This Product (Waste Electrical & Electronic Equipment) (Applicable in countries with separate collection systems)
This marking on the product, accessories or literature indicates that the product and its electronic accessories (e.g. charger, headset, USB cable) should not be disposed of with other household waste at the end of their working life. To prevent possible harm to the environment or human health from uncontrolled waste disposal, please separate these items from other types of waste and recycle them responsibly to promote the sustainable reuse of material resources.
Household users should contact either the retailer where they purchased this product, or their local government office, for details of where and how they can take these items for environmentally safe recycling.
Business users should contact their supplier and check the terms and conditions of the purchase contract. This product and its electronic accessories should not be mixed with other commercial wastes for disposal.
Removing the battery
• To remove the battery, contact an authorised service centre. To obtain battery removal instructions, please visit www.samsung.com/global/ecodesign_energy.
- For your safety, you must not attempt to remove the battery. If the battery is not properly removed, it may lead to damage to the battery and device, cause personal injury, and/or result in the device being unsafe.
Correct disposal of batteries in this product (Applicable in countries with separate collection systems)
The marking on the battery, manual or packaging indicates that the battery in this product should not be disposed of with other household waste. Where marked, the chemical symbols Hg, Cd or Pb indicate that the battery contains mercury, cadmium or lead above the reference levels in EC Directive 2006/66.
The battery incorporated in this product is not user replaceable. For information on its replacement, please contact your service provider. Do not attempt to remove the battery or dispose it in a fire. Do not disassemble, crush, or puncture the battery. If you intend to discard the product, the waste collection site will take the appropriate measures for the recycling and treatment of the product, including the battery.
Declaration of Conformity
Manufacturer
Name: Samsung
Registered Trade Name: Samsung Electronics Co., Ltd
Address: 129 Samsung-ro, Yeongtong-gu, Suwon-si, Gyeonggi-do, Korea
Product Details
Product: Smart Control
Model(s): VG-TM2365E
Declaration and applicable standards
We hereby declare under our sole responsibility that the product above is in compliance with the essential requirements of the Radio Equipment Directive(2014/53/EU) by application of:
EMC
Safety
EN 301 489-1 V2.2.3
EN IEC 62368-1:2020+A11:2020
EN 301 489-17 V3.2.4
EN IEC 62368-3:2020
EN 62479:2010
Radio
EN 300 328 V2.2.2
and the Directive (2011/65/EU) on the restriction of the use of certain hazardous substances in electrical and electronic equipment by application of EN IEC 63000:2018.
Signed for and on behalf of : Samsung
Samsung Euro QA Lab, Saxony Way, Yateley, GU46 6GG, UK ^® 2024-05-20 (Place and date of signature)
Stephen Colclough – Director Regulatory Affairs (Name and signature of authorized person)
※ This is not the address of Samsung Service Centre. Please see the address or the phone number of Samsung Service Centre in the warranty card or contact the retailer where you purchased your product.
This page is intentionally left blank.
text_image
Technical diagram showing mechanical assembly with labeled components A, B, C, D and magnified views of a bolted joint detail.text_image
Diagram showing a computer connected to a device with screw holes, and a magnified view of the device's internal structure.
text_image
Diagram showing a device panel with rotation arrows indicating clockwise rotation and back rotation.text_image
Technical diagram showing mechanical assembly with magnified detail and component disassembly steps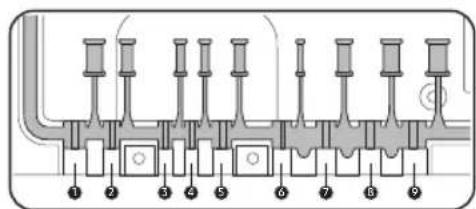
text_image
Technical diagram of a mechanical assembly with numbered components, likely a valve or actuator assembly.text_image
Technical diagram showing mechanical assembly with labeled parts and a magnified view of a component being inserted into a housing.natural_image
Pure electrical circuit lines without any symbolstext_image
Diagram showing a device panel installation with two views and directional arrows indicating rotation or adjustment.Kapazität
natural_image
Diagram of a rectangular device with labeled parts A and B, showing internal structure (no text or symbols beyond labels)A Solarzelle
natural_image
Simple line drawing of a rectangular frame with two labeled points A and B, no text or symbols present.A Steuerungsmenü
EN IEC 62368-1:2020+A11:2020
EN IEC 62368-3:2020
EN 62479:2010
Funk
EN 300 328 V2.2.2
text_image
Technical diagram showing mechanical assembly with labeled components A, B, C, D and magnified detail viewtext_image
Diagram showing a computer connected to a cable with two screws, and a magnified inset illustrating screw positioning.
text_image
Paysage Portrait
text_image
Diagram showing a device panel with an open lid and its rotation arrows, likely illustrating a mechanical or electrical assembly.text_image
Technical diagram showing mechanical assembly with magnified detail and component disassembly steps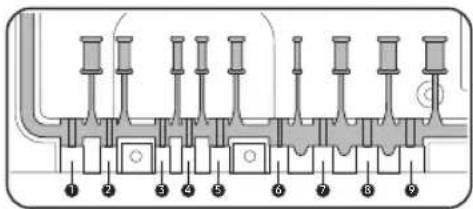
text_image
Diagram of a mechanical or electrical component with numbered parts labeled 1 through 9, likely for assembly or labeling.text_image
Technical diagram showing mechanical assembly with labeled components and a magnified view of a hand holding a component.natural_image
Pure technical diagram of a rectangular enclosure with internal components and no visible text or symbolstext_image
Diagram showing a device panel with an open lid and its rotation arrows, likely illustrating a mechanical or electrical assembly.Durabilité
natural_image
Diagram of a rectangular device with labeled parts A and B, showing internal structure (no text or symbols beyond labels)A Cellule solaire
natural_image
Simple line drawing of a rectangular frame with two labeled points A and B, no text or symbols present.A Menu de contrôle
Instructions de raccordement
* Shielded Twisted Pair
Nom commercial depose: Samsung Electronics Co., Ltd
Adresse: 129 Samsung-ro, Yeongtong-gu, Suwon-si, Gyeonggi-do,
Korea
Détails du produit
EN IEC 62368-1:2020+A11:2020
EN 301 489-17 V3.2.4
EN IEC 62368-3:2020
EN 62479:2010
Radio
EN 300 328 V2.2.2
text_image
Technical diagram showing mechanical assembly with labeled components A, B, C and inset views of threaded fasteners D| Dimensione del televisore in pollici | 55 65 75 | ||
| Specifiche foro vite VESA (A x B(mm)) | 200 x 200 | 400 x 400 | |
| C (mm) | 9-11 | ||
| D x 4 | M8 | ||
Italiano - 3
text_image
Diagram showing a computer connected to a device with screw holes, and a magnified view of the device's internal structure.
– Media Play Amazon Fire Stick, Google Chromecast, Roku Ultra Streaming M Player
| Media BayDimensioni (L x A x P) 210,0 x 270,0 x 25,0 mm | |
| Media PlayDimensioni di installazione(L x A x P) 140,0 x 200,0 x 25,0 mm |
Italiano - 6
text_image
Diagram showing a device panel with an open lid and its rotation arrows, likely illustrating a mechanical or electrical assembly.text_image
Technical diagram showing mechanical assembly with magnified detail and component disassembly steps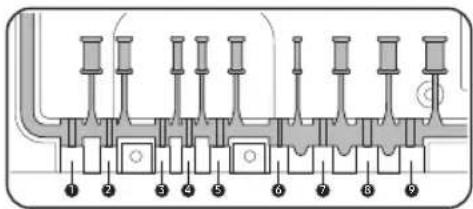
text_image
Diagram of a mechanical or electrical component with numbered parts labeled 1 through 9, likely for assembly or labeling.text_image
Technical diagram showing mechanical assembly with labeled components and a magnified view of a component being inserted into a housing.natural_image
Pure technical diagram of a mechanical or electrical component without any text, numbers, or symbolstext_image
Diagram showing a device panel with an open lid and its internal components, illustrating the assembly or disassembly process.Durata
natural_image
Diagram of a rectangular device with labeled parts A and B, showing internal structure (no text or symbols beyond labels)A Cella solare
natural_image
Simple line drawing of a rectangular frame with two labeled points A and B, no text or symbols present.A Menu di controllo
EN IEC 62368-1:2020+A11:2020
EN IEC 62368-3:2020
EN 62479:2010
Radio
EN 300 328 V2.2.2
text_image
Technical diagram showing mechanical assembly with labeled components A, B, C and inset views D and C of threaded fasteners| Afmeting van de tv in inches | 55 65 75 | ||
| Specificatie van de VESA-schroefgaten (A x B(mm)) | 200 x 200 | 400 x 400 | |
| C (mm) | 9-11 | ||
| D x 4 | M8 | ||
Nederlands - 3
text_image
Diagram showing cable connections to a computer and a magnified view of screw assembly with labeled parts
text_image
Diagram showing a device panel with an open lid and its rotation arrows, likely illustrating a mechanical or electrical assembly.text_image
Technical diagram showing mechanical assembly with magnified detail and component disassembly steps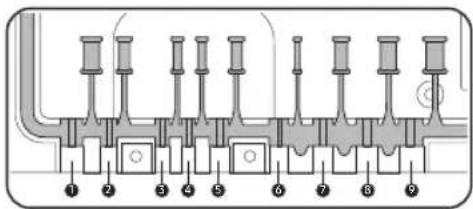
text_image
Diagram of a mechanical or electrical component with numbered parts labeled 1 through 9, likely for assembly or labeling.text_image
Technical diagram showing mechanical assembly with labeled components and a hand gesture indicating motion or force.natural_image
Pure technical diagram of a rectangular device with internal components and no visible text or symbolstext_image
Diagram showing a device panel with an open lid and its internal components, illustrating the assembly or mounting process.Duurzaamheid
natural_image
Diagram of a rectangular device with labeled parts A and B, showing internal structure (no text or symbols beyond labels)A Zonnecel
natural_image
Simple line drawing of a rectangular frame with two labeled points A and B, no text or symbols present.A Menu Beheer
B Toets TV-bediening/Afstandsbedieningssensor
* Shielded Twisted Pair
EN IEC 62368-1:2020+A11:2020
EN 301 489-17 V3.2.4
EN IEC 62368-3:2020
EN 62479:2010
Radio
EN 300 328 V2.2.2
Contact Samsung world wide
If you have any questions or comments relating to Samsung products, please contact the Samsung service centre.
| Country/Region | Samsung Service Centre | Website |
| AUSTRIA 0800 72 67 | 864 (0800-SAMSUNG) www.samsung.com/at/support | |
| BELGIUM 02-201-24 | -18 | www.samsung.com/be/support (Dutch)www.samsung.com/be_fr/support (French) |
| BOSNIA 055 233 999 | www.samsung.com/ba/support | |
| DENMARK 707 019 70 | www.samsung.com/dk/support | |
| FINLAND 030-6227 | 515 www.samsung.com/fi/support | |
| FRANCE 01 48 63 00 | 00 www.samsung.com/fr/support | |
| GERMANY 06196 77 | 555 77 www.samsung.com/de/support | |
| ITALIA 800-SAMSUNG (800.7267864) www.samsung.com/it/support | ||
| LUXEMBURG | 261 03 710 | www.samsung.com/be_fr/support |
| MONTENEGRO | 020 405 888 | www.samsung.com/support |
| NETHERLANDS | 088 90 90 100 | www.samsung.com/nl/support |
| NORWAY | 21629099 | www.samsung.com/no/support |
| PORTUGAL | 210 608 098 | www.samsung.com/pt/support |
| KOSOVO | 038 40 30 90 | www.samsung.com/support |
| SPAIN | 91175 00 15 | www.samsung.com/es/support |
| SWEDEN 0771-400 300 | www.samsung.com/se/support | |
| SWITZERLAND | 0800 726 786 | www.samsung.com/ch/support (German)www.samsung.com/ch_fr/support (French) |