Kreate K3 - Monitor KRK - Free user manual and instructions
Find the device manual for free Kreate K3 KRK in PDF.

User questions about Kreate K3 KRK
0 question about this device. Answer the ones you know or ask your own.
Ask a new question about this device
Download the instructions for your Monitor in PDF format for free! Find your manual Kreate K3 - KRK and take your electronic device back in hand. On this page are published all the documents necessary for the use of your device. Kreate K3 by KRK.
USER MANUAL Kreate K3 KRK
KRK Systems has been the unwavering cornerstone of professional audio monitoring for over three decades, earning its reputation as an industry leader through a rich history of innovation and execution. Founded in 1986, KRK Systems set out to revolutionize the way music professionals and enthusiasts experience audio.
Since its inception, KRK Systems has prioritized precision and accuracy in studio monitor design. From using woven fiber composite transducers and employing finite element analysis tools to scientifically tune and optimize cabinet and bass reflex port systems to working with the latest advanced electronic and acoustic analysis tools and equipment to ensure our designs maintain the highest levels of performance, KRK's commitment to delivering pristine sound has led to numerous industry-defining breakthroughs in speaker technology.
Through the years, KRK has continued to refine its studio monitors, blending modern technologies with time-tested principles of audio engineering. With a legacy built on trust and performance, KRK Systems monitors remain the choice for those who demand the very best in sound quality and reliability.
You are about to experience this difference for yourself and elevate your audio production to new heights with the KRK Systems KREATE SERIES product line, which caters to the diverse needs of creators, producers, and musicians worldwide. Whether you're working on a chart-topping hit, a film score, or content creation, KRK Systems KREATE SERIES monitors provide the tools you need to capture every nuance of your sound with astonishing clarity.
WELCOME TO OUR FAMILY.
IMPORTANT SAFETY INFORMATION
SAFETY INSTRUCTIONS
-
Read instructions - All the safety and operating instructions should be read before the product is operated.
-
Retain instructions - The safety and operating instructions should be retained for future reference.
-
Heed Warnings - All warnings on the product and in the operating instructions should be adhered to.
-
Follow Instructions - All operating and use instructions should be followed.
-
Cleaning - Unplug this product from the wall outlet before cleaning. Do not use liquid cleaners or aerosol cleaners. Use a damp cloth for cleaning.
-
Attachments - Do not use attachments not recommended by the product manufacturer as they may cause hazards.
-
Water and Moisture - Do not use this product near water - for example, near a bathtub, wash bowl, kitchen sink, or laundry tub, in a wet basement, or near a swimming pool, and the like.
-
Accessories - Do not place this product on an unstable cart, stand, tripod, bracket, or table. The product may fall, causing serious injury to a child or adult and serious damage to the product. Use only with a cart, stand, tripod, bracket, or table recommended by the manufacturer or sold with the product. Any mounting of the product should follow the manufacturer's instructions and should use a mounting accessory recommended by the manufacturer.
-
Cart - A product and cart combination should be moved with care. Quick stops, excessive force, and uneven surfaces may cause the product and cart combination to overturn.

-
Ventilation - Slots and openings in the cabinet are provided for ventilation to ensure reliable operation of the product and to protect it from overheating. These openings must not be blocked or covered. The openings should never be blocked by placing the product on a bed, sofa, rug, or other similar surface. This product should not be placed in a built-in installation such as a bookcase or rack unless proper ventilation is provided, or the manufacturer's instructions have been adhered to.
-
Power Sources - This product should be operated only from the type of power source indicated on the marking label and connected to a MAINS socket outlet with a protective earthing connection. If you are not sure of the type of power supply to your home, consult your product dealer or local power company.
-
Power Cord Protection – Power supply cords should be routed so that they are not likely to be walked on or pinched by items placed upon or against them, paying particular attention to cords at plugs, convenience receptacles, and the point where they exit from the product.
-
Mains Plug - Where the mains plug or an appliance coupler is used as the disconnect device, the disconnect device shall remain readily operable.
-
Lightning - For added protection for this product during a lightning storm or when it is left unattended and unused for long periods of time, unplug it from the wall outlet and disconnect the antenna or cable system. This will prevent damage to the product due to lightning and power-line surges.
-
Overloading - Do not overload wall outlets, extension cords, or integral convenience receptacles, as this can result in a risk of fire or electric shock.
-
Flame Sources - No naked flame sources, such as lighted candles, should be placed on the product.
-
Object and Liquid Entry - Never push objects of any kind into this product through openings, as they may touch dangerous voltage points or short-out parts that could result in a fire or electric shock. Never spill liquid of any kind on the product.
-
Loudspeakers - Excessive sound pressure from loudspeakers can cause hearing loss.
-
Damage Requiring Service - Unplug this product from the wall outlet and refer servicing to qualified service personnel under the following conditions:
a. When the power supply cord or plug is damaged.
b. If liquid has been spilled or objects have fallen into the product.
c. If the product has been exposed to rain or water.
d. If the product does not operate normally by following the operating instructions. Adjust only those controls that are covered by the operating instructions, as an improper adjustment of other controls may result in damage and will often require extensive work by a qualified technician to restore the product to its normal operation.
e. If the product has been dropped or damaged in any way.
f. When the product exhibits a distinct change in performance - this indicates a need for service.
-
Replacement Parts - When replacement parts are required, be sure the service technician has used replacement parts specified by the manufacturer or have the same characteristics as the original part. Unauthorized substitutions may result in fire, electric shock, or other hazards.
-
Safety Check - Upon completion of any service or repairs to this product, ask the service technician to perform safety checks to determine that the product is in proper operating condition.
WARNING
The lightning flash with the arrowhead symbol, within an equilateral triangle, is intended to alert the user to the presence of uninsulated “dangerous voltage” within the product’s enclosure that may be of sufficient magnitude to constitute a risk of electric shock to persons.
The exclamation point within an equilateral triangle is intended to alert the user to the presence of important operating and maintenance (servicing) instructions in the literature accompanying the appliance.
CAUTION REGARDING PLACEMENT
To maintain proper ventilation, be sure to leave a space around the unit (from the largest outer dimensions, including projections) that is equal to or greater than shown below.
Top, Front, Rear, Left, and Right Sides: 10 cm.=
CAUTION
Changes or modifications to this equipment not expressly approved by KRK SYSTEMS for compliance could void the user's authority to operate this equipment.
CAUTION
To prevent electric shock, match the wide blade of the plug to the wide slot and fully insert.
CAUTION
The marking and rating plate can be found on the rear panel of the apparatus.
WARNING
To reduce the risk of fire or electric shock, do not expose this apparatus to rain or moisture.
The apparatus shall not be exposed to dripping or splashing, and no objects filled with liquids, such as vases, shall be placed on the apparatus.
The mains plug is used as a disconnect device, and it should remain readily operable during intended use. In order to disconnect the apparatus from the mains completely, the mains plug should be disconnected from the mains socket outlet completely.
Battery shall not be exposed to excessive heat such as sunshine, fire, or the like.
CAUTION
An appliance with a protective earth terminal should be connected to a mains outlet with a protective earth connection.
IF IN DOUBT, CONSULT A COMPETENT ELECTRICIAN.
NOTES ON ENVIRONMENTAL PROTECTION
At the end of its useful life, this product must not be disposed of with regular household waste but must be returned to a collection point for the recycling of electrical and electronic equipment. The symbol on the product, user's manual, and packaging point this out.
The materials can be reused in accordance with their markings. Through re-use, recycling of raw materials, or other forms of recycling of old products, you are making an important contribution to the protection of our environment.
Your local administrative office can advise you of the responsible waste disposal point.
FCC STATEMENT This device complies with Part 15 of the FCC Rules. Its operation is subject to the following two conditions:
(1) This device may not cause harmful interference, and
(2) This device must accept any interference received, including interference that may cause undesired operation.
NOTE: This equipment has been tested and found to comply with the limits for a Class B digital device, pursuant to part 15 of the FCC Rules. These limits are designed to provide reasonable protection against harmful interference in a residential installation.
This equipment generates, uses, and can radiate radio frequency energy and, if not installed and used in accordance with the instructions, may cause harmful interference to radio communications. However, there is no guarantee that interference will not occur in a particular installation. If this equipment does cause harmful interference to radio or television reception, which can be determined by turning the equipment off and on, the user is encouraged to try to correct the interference by one or more of the following measures:
- Reorient or relocate the receiving antenna.
- Increase the separation between the equipment and receiver.
-Connect the equipment to an outlet on a circuit different from that to which the receiver is connected.
-Consult the dealer or an experienced radio/TV technician for help
NOTE: The manufacturer is not responsible for any radio or TV interference caused by unauthorized modifications to this equipment. Such modifications could void the user's authority to operate the equipment.
RF Exposure: This equipment complies with FCC radiation exposure limits set forth for an uncontrolled environment. This equipment should be installed and operated with a minimum distance of 20 cm between the radiator and your body. This transmitter must not be co-located or operating in conjunction with any other antenna or transmitter.
This device complies with CAN ICES-003 (B)/NMB-003(B). Science and Economic Development Canada's licence-exempt RSS(s). Operation is subject to the following two conditions:
(1) This device may not cause interference.
(2) This device must accept any interference, including interference that may cause undesired operation of the device.
Hereby, Gibson, Inc. declares that the radio equipment type KREATE 3, KREATE 5, AND KREATE 8 are in compliance with Directive 2014/53/EU. The full text of the EU Declaration of Conformity is available at the following internet address: www.krkmusic.com
Manufacturer information:
Gibson, Inc.
209 10th Avenue South, Suite 460
Nashville, TN 37203 USA
service@gibson.com
European Importer and Responsible Party for Product Safety
For regulatory and import information in the EU:
Importer: Gibson Europe B.V. Address: Smallepad 15
3811 MG Amersfoort
The Netherlands
Contact: 00800-4GIBSON1 (00800-44427661)
Service.europe@gibson.com
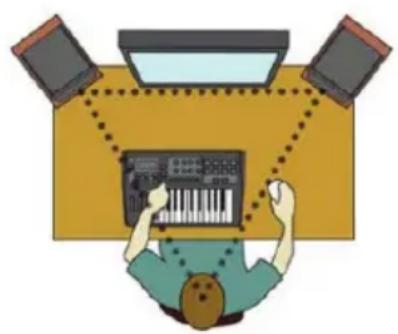
SYSTEM SETUP
Overall system setup is crucial to avoid unnecessary room acoustic interaction. A room's natural acoustics may alter the sound level at various frequencies due to abnormal damping or reflections. Follow the checklist below for more details.
- The system setup (studio monitors and work desk) should be placed within the front 1/3 of the room. Doing so will minimize room modes and reduce buildup of peak frequencies.
- The left and right sides of the system setup should be centered at an equal distance from the left and right walls. Treat side walls with acoustic absorption at the first reflection point. This will ensure a more even frequency response and preserve stereo imaging.
- Avoid a listening position (your ears) that is closer than 3 feet (1 meter) from any wall. Also, avoid large objects (such as lamps or decorations) near the studio monitor and listening position.
- Diffusers and absorption material on the walls, in the corners, and back of a room will further help remove destructive room modes. (There are many articles and videos online to help with proper acoustic treatments).
- Carpeting will help prevent reflections from hard floor surfaces.
- Studio monitor isolators (foam or rubber pads) will help remove low-frequency coupling between the stands and desk. Low-frequency coupling will cause the stand or desk to vibrate, causing unwanted sounds.
- A low noise floor in your room (no outside interference from appliances, machinery, or fans) is important to prevent the masking of low-frequency detail. Rattles due to studio monitor playback should be fixed as well.
natural_image
Top-down illustration of a person working at a keyboard with three monitors in the background (no text or symbols)
natural_image
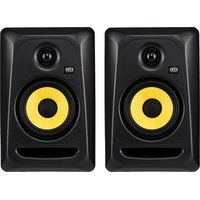
Illustration of a person using a desktop computer (no text or symbols present)Within the system setup, the studio monitors and listening placement should be positioned in a near-field configuration as follows: The left and right studio monitors should be approximately 3 to 5 feet (1 to 1.5 meters) apart and directed at a 60-degree angle towards the listening location. Measure the distance between the left and right studio monitors and sit in the listening position that is equal distance to both sides. This will form an equilateral triangle. It is important that both left and right studio monitors are level-matched (set to the same volume).
The KREATE SERIES monitors are two-way studio monitor systems with a tweeter (producing high frequencies) and a woofer (producing mid and low frequencies) in one enclosure. The tweeter is the acoustic axis point. The acoustic axis point should be directly pointed to ear level in the listening position. It is acceptable to angle the studio monitors to ensure the acoustic axis is pointed in the correct direction.
IMPORTANT: Before powering up the KREATE SERIES monitors, be sure all connections have been made. All faders and controls should be set to their minimum levels, and all other equipment should be turned on prior to powering up your KRK monitors.
NOTE: Your KREATE SERIES monitors have friction lock Neutrik® combo input connectors (K5 and K8 models). Use an XLR cable or TRS (tip, ring, sleeve) 1/4" balanced cable to connect to your interface, mixing board, or monitor controller. Alternatively, use an 1/8" stereo to dual 1/4" unbalanced adapter cable to hook up directly to a phone, computer, or music player. If you purchased a K3 model, alternatively use the 1/8" stereo aux in to hook up directly to a phone, computer, or music player. All KREATE SERIES also include Bluetooth wireless audio streaming capability. To use the Bluetooth function, please see the Bluetooth Operation section below. (CAUTION: Be sure the volume on your device is set to minimum and then adjust to your ideal listening level.)
POWER UP
When you first power up the KREATE SERIES, the logo on the front of the unit illuminates. The monitor will perform an internal boot sequence for approximately 5 seconds, and then the monitor is ready to use.
STANDBY
Your monitors have the ability to automatically enter standby mode when they are not used for more than 30 minutes. Automatic standby mode can be disabled by tapping the Bluetooth button three times (see below). If you prefer to use automatic standby to save energy, or if the power switches are hard to reach, leave the automatic standby on. You will know the monitors are on standby when the power switch is "ON" and the KRK logo is off.
To reactivate the monitors from standby mode, just add a minimum of -50 dB of signal to the input. This will automatically reactivate the monitors. We recommend slowly increasing your source level to avoid a full volume "jolt" of sound when the monitors suddenly reactivate.
MONITOR BREAK IN
Now that you have set up your system, you should take the time to break in your new monitors before performing any critical work or critical listening. The transducers (also known as speakers or drivers) in your monitors are complex electromechanical devices that need to "settle in" a bit to bring them to their optimal operating condition. During the design and development process, KRK Systems' final tuning and voicing are performed after the transducers are properly broken in, so after your monitors are broken in, they will be in optimum operating condition.
We recommend either listening to or playing a broad range of dynamic music for about 30 hours at a slightly higher volume than you would normally listen to or playing full-bandwidth pink noise at approximately +85dB SPL for 20 hours. The break-in time does not need to be done continuously, so take your time and enjoy listening to some music while you condition your monitors.
FACEPLATE AND TWEETER GRILLE
The KREATE SERIES monitors come with a protective grille over the tweeter to protect it from debris or pokey fingers. The systems were voiced with this grille installed, so you can have confidence that they will not affect the sound of your KREATE SERIES monitors.
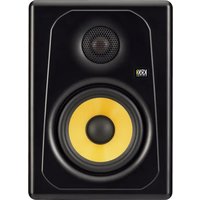
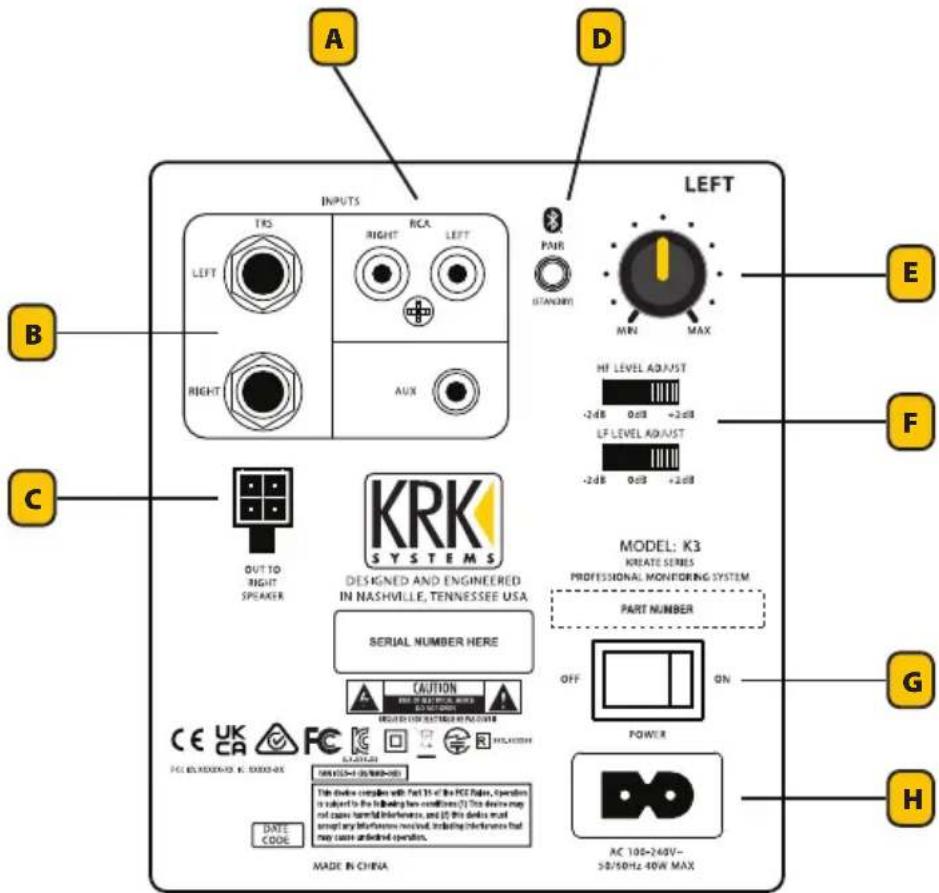
KREATE 3 SYSTEM CONNECTORS AND CONTROLS
The KREATE 3 system operates in a Main-Secondary configuration with the Left speaker being the Main. All Controls are located on the Main Left speaker.
text_image
A D INPUTS TRA RIGHT RCA LEFT PAR STANDARD LEFT MIN MAX B C OUT TO RIGHT SPEAKER KRK SYSTEMS DESIGNED AND ENGINEERED IN NASHVILLE, TENNESSEE USA SERIAL NUMBER HERE CAUTION PROFESSIONAL MONITORING SYSTEM PART NUMBER OFF ON POWER G H DATE CODE Made IN CHINA AC 100-240V- 50/50Hz 40W MAXCREATE 3 LEFT REAR PANEL
A - RCA INPUTS – Unbalanced RCA inputs. Connection to audio interfaces, DJ mixers, or consumer audio gear.
A - AUX INPUT – Stereo 1/8" analog input. Connect to computer, media player, or cell phone outputs.
B - TRS INPUTS – Balanced 14 " inputs. Connection to audio interfaces, mixing consoles, or other professional audio equipment.
C - OUT TO RIGHT SPEAKER CONNECTOR – Speaker-level connection to the right speaker via supplied 4-pin locking connector.
D - BLUETOOTH / STANDBY – Bluetooth input for wireless audio streaming. Connect to Bluetooth-capable audio device, i.e., computer, iPhone, Android, media player, etc. Push to pair; the blue LED will blink, and the pairing mode sound will play when in pairing mode. Blue LED will become a solid color and connected sound will play when paired. Long pressing (3 seconds) the button will disconnect from any connected device. Press the button three times consecutively to bypass automatic standby mode. Press the button two times consecutively to enter back into automatic standby mode.
E - SYSTEM LEVEL – The level knob adjusts the system gain. Turn clockwise to raise the volume and counterclockwise to reduce volume.
F - HF LEVEL ADJUST – The High Frequency adjustment switch is used to increase or decrease high frequency levels from the monitor system by +2dB or -2dB. This is useful for lowering the HF level in a bright room or increasing for an acoustically dead room. It is also useful for tailoring to a listening style preference; set these to room condition and taste.
F - LF LEVEL ADJUST – The Low Frequency adjustment settings are boundary condition filters. The -2dB setting rolls off the additional low-end that becomes present when the monitors are set close to walls or other large hard surface boundaries. The +2dB setting will add additional low-end if you need more low frequency content; set these to room condition and taste.
G – POWER SWITCH – Main power switch for the system. Ensure the switch is in the "ON" position to supply power to the system.
H - AC INLET SOCKET – A standard IEC320 Polarized C8 socket is used to provide power to the studio monitor. Only use the provided AC power cord provided with your monitor.
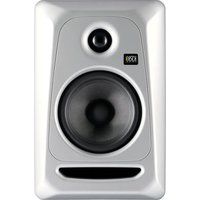
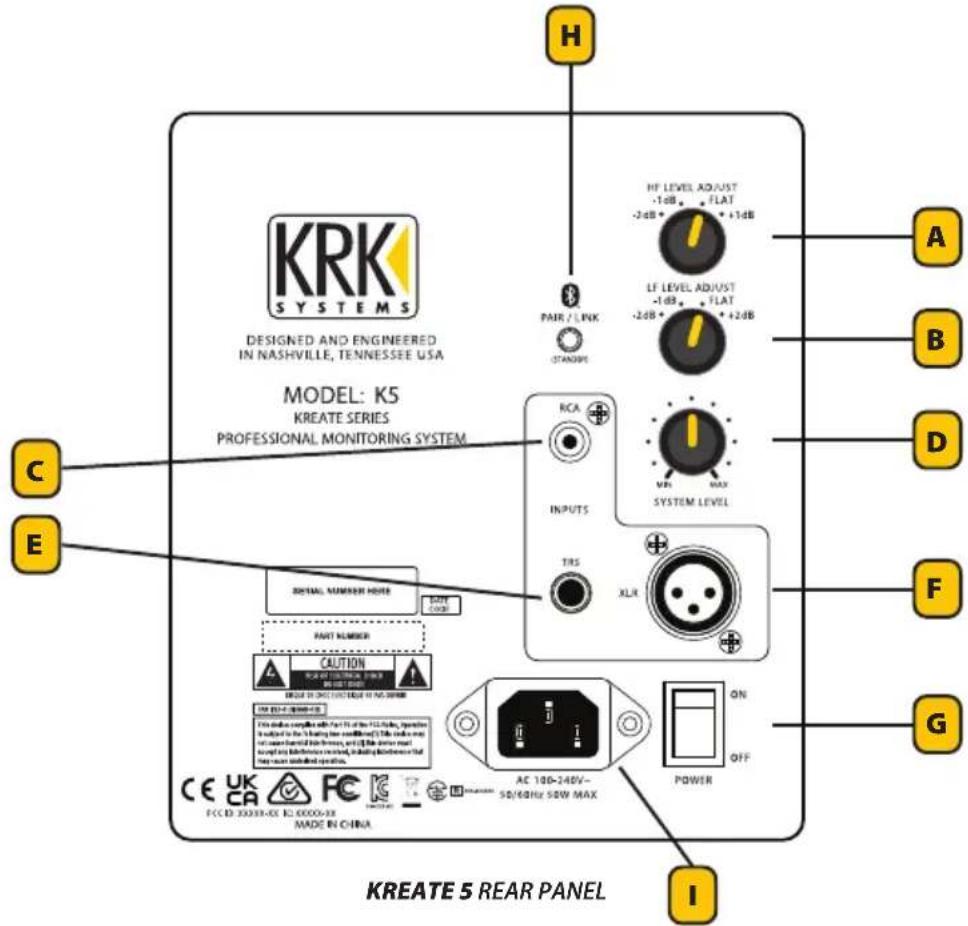
KREATE 5 AND KREATE 8 SYSTEM CONNECTORS AND CONTROLS
Connectors and Controls are the same for the KREATE 5 and KREATE 8.
text_image
KRK SYSTEMS DESIGNED AND ENGINEERED IN NASHVILLE, TENNESSEE USA MODEL: K5 KREATE SERIES PROFESSIONAL MONITORING SYSTEM C E H PAIR / LINK STANDARD RF LEVEL ADJUST -1dB - FLAT -2dB + 1dB LF LEVEL ADJUST -1dB - FLAT -2dB + 2dB RCA INPUTS MIN MAX SYSTEM LEVEL TRS XLR DIGITAL NUMBER MODE GATE CODE PART NUMBER CAUTION ORDER IN ORDER OF NO ORDER THE EDITION OF PROCESSED ITEMS THIS SHOWN COMPLIES WITH PART OF THE FILLER, OPERATION INTUIT TO THE LATING (FOR COMMULATED) THIS ORDER NOT FOR USED FOR YOUR INFORMATION, OR IT THE ORDER NOT WITH ANY INFORMATION USED, INCLUDING WITHOUT THE POWER CHECK OR WRITTEN. FOR ANY INFORMATION USED. AC 100-240V~ 50/60Hz 50W MAX POWER ON OFF I KREATE 5 REAR PANELA - HF LEVEL ADJUST – The High Frequency adjustment switch is used to increase or decrease high frequency levels from the monitor system by -2dB to +1dB. This is useful for lowering the HF level in a bright room or increasing for an acoustically dead room. It is also useful for tailoring to a listening style preference; set these to room condition and taste.
B - LF LEVEL ADJUST – The Low Frequency adjustment settings are boundary condition filters. The -1dB and -2dB settings roll off the additional low-end that becomes present when the monitors are set close to walls or other large hard surface boundaries. The +2dB setting will add additional low-end if you need more low frequency content; set these to room condition and taste.
C - RCA INPUT – Unbalanced RCA input. Connection to audio interfaces, DJ mixers, or consumer audio gear.
D - SYSTEM LEVEL – The level knob adjusts the system gain. Turn clockwise to raise the volume and counterclockwise to reduce volume.
E - TRS INPUT – Balanced 14 " input. Connection to audio interfaces, mixing consoles, or other professional audio equipment.
F - XLR INPUT – Balanced XLR input. Connection to audio interfaces, mixing consoles, or other professional audio equipment.
G – POWER SWITCH – Main power switch for the system. Ensure the switch is in the "ON" position to supply power to the system.
H - BLUETOOTH / STANDBY
PAIRING AND UNPAIRING: Bluetooth input for wireless audio streaming. Connect to a Bluetooth-capable audio device, i.e., computer, iPhone, Android, media player, etc. Push to pair: the blue LED will slow blink, and the pairing mode sound will play when in pairing mode. The Blue LED will become a solid color and connection sound will play when successfully paired. Extra-long pressing (10 seconds): the button will disconnect the speaker from any connected device. Press the button three times consecutively to bypass the automatic standby mode. Press the button two times consecutively to enter automatic standby mode.
DEVICE LINK: Before attempting device link, make sure both speakers are not connected to any other devices. Long press (3 seconds) on both speakers to enter device link mode; blue LED will fast-blink. This mode can be initiated from either speaker. Note that the speakers will not enter device link if they are already connected to a device. The device link sound will play when successfully linked. Once linked, the pairing mode sound will play, and the device will immediately enter pairing mode. One of the speakers will have a slow-blinking LED and the other will have a solid LED. The speaker with the blinking LED is designated as the Left speaker and the speaker with the solid LED is designated as the Right speaker. This designation will remain constant until the speakers are unlinked and relinked, in which case the process will be repeated. Once paired to a device, both speakers will have a solid blue LED. If the speakers are linked but disconnected from a device, then the Left speaker LED will be off and the Right speaker LED will be solid. Extra-long pressing (10 seconds) of the button on either speaker will unlink the speakers and disconnect them from the device.
I - AC INLET SOCKET – A standard IEC320 C14 AC Inlet socket is used to provide power to the studio monitor. Only use the provided AC power cord provided with your monitor.
TROUBLESHOOTING
If there is no power...
- Check to see if the power cord is plugged into both the IEC socket on the rear panel of the active speaker and into the AC mains. Verify that the AC mains are active by using an approved AC tester or simply connect a lamp with a working light bulb. In some cases, the AC mains may be controlled by a light switch or power strip with a suppressor that may not be in the "on" position.
- Verify that the power switch on the active speaker is in the "on" position.
- Check to see if the power light is illuminated. The power light is the KRK logo on the monitor's front panel. If the power light is not illuminating, please contact the dealer you purchased the monitor from for customer support or servicing.
If you can't hear certain sounds...
- Repeat the steps in the previous troubleshooting section above before continuing to the next steps.
- Check whether all other audio devices using the same AC outlet are still operating.
- Check to see if the audio source cable is plugged into both the source output and the monitor input.
- Check to see if the signal source (E.g., mixing console, workstation, CD player, etc.) is turned up to a level that can properly send a signal to the monitors.
- Check to see if the audio source is in mono or stereo. Information in the mix may also be panned differently, which can result in differing cancellation. Audio heard in stereo and not heard in mono may be a result of phase cancellation due to long delays between left and right channels or polarity inversion. Avoid polarity inversion by using matching cables.
- Check to see if one of the monitors is working. Exchange the audio input cable from the non-working monitor to the working unit. This will determine whether it's really the monitor, a faulty cable, or some other glitch in the audio chain.
- If the monitor is still not responding, it should be returned to the dealer where you purchased it or to KRK for servicing.
If the monitor suddenly stops working...
- Turn the monitor level down or off.
- Repeat the steps in the troubleshooting sections above before continuing to the next steps.
- Carefully check to see if the amplifier's back plate is hot! If the monitor has been running at its highest power output for an extended period of time, it
could be that the unit has become overheated, and the protection circuitry has shut the system down momentarily. The monitor provides maximum circuitry protection against AC power surges, amplifier overdrive, and overheating of the amplifiers. Turn the monitor off, then wait 30 minutes to allow the back plate to cool down. Turn the power switch back on.
- Increase the volume to check for normal operation.
- If the monitor is still not responding, it should be returned to the dealer where you purchased it or to KRK for servicing.
The sound quality changes...
- Repeat the steps in the previous troubleshooting section above before continuing to the next steps.
- It is possible that the change in sound quality is due to changes in the room or listening position. Low frequencies (bass response) can be increased or reduced by changes such as furniture and/or large equipment placement. Try moving the speakers or listening area to a different position or return the room back to where the sound quality was acceptable.
- A reduction in bass frequencies may result from polarity inversion between the left and right channels or long delays between the left and right channels. Information in the mix may also be panned differently, which will result in differing cancellation. Check the audio source and verify if one channel is polarity-flipped or if long delays are being used. Avoid polarity inversion by using matching cables.
- Disconnect the signal cable at the monitor's input and adjust the volume control to the minimum setting. With power on, place your ear close to each driver (tweeter/woofer) and listen for noise (i.e., a slight hiss or hum) while slowly increasing the volume from the minimum setting. It is important that the volume is slowly adjusted from the minimum setting to avoid any spike in sound levels while the ear is close to the drivers (tweeter & woofer). If there's absolutely no sound whatsoever, it could be that the driver is at fault. It's also possible that the problem lies somewhere in the electronics.
- Play some non-distorted source material at a low volume. Carefully cover the woofer (to block the sound) without touching the diaphragm. Is the woofer producing a clean sound? If there is not a clear tonal quality or any sound at all, then the woofer probably needs to be replaced.
- Verify the source signal level has not changed, or the source has changed. This can be tested by connecting the source headphone outputs to a set of headphones and verifying the sound is not loud or distorted. If the sound is poor at the source (preamp stage), then it is not the active speakers that are causing the issue.
The monitor hums or makes other loud noises...
- Make sure that the power cord is plugged snugly into the IEC socket on the rear of the monitor.
- Check the connections between the signal source and the monitor. Make sure all connections are secure and that the cable is not damaged or wired incorrectly.
- If you are using an unbalanced output to balanced cable conversion, make sure it is correct. The shield is connected to the unbalanced ground of the source and pins 1 and 3 of the XLR (or the sleeve and ring on the 14 " TRS jack).
- All audio equipment should use the same ground point. Check all other devices using the same AC output in the building, like light dimmers, neon signs, TV screens, and computer monitors. These devices should not be using the same circuit.
- Verify that the signal cables are not routed near AC power lines or other EMI sources (including wall power adapters and computers).
- Excessive hiss may be a result of an incorrect gain setting before the speaker connection. Verify the source signal is not noisy before connecting the monitors. This can be tested by connecting the signal source's headphone output to a set of headphones.
- Once you have a better idea of what may be at fault, then contact our service department. They will help you determine the best solution to correct your issue.
TROUBLESHOOTING BLUETOOTH ISSUES
The speakers aren't connecting to my device...
- Check that Bluetooth is enabled on your device.
- Check that the speaker is not connected to another device (the blue LED should be off). If it is, disconnect from that device first and click "Forget this device" in the Bluetooth menu before trying to pair it to a new device.
- If you have previously connected to this device, click "Forget this device" in your device's Bluetooth menu, then try to pair it again.
The speakers aren't device-linking (Kreate 5 and 8 only)...
- Check that both speakers are powered on.
- Check that you are entering device link mode on both speakers (both speakers have a blinking LED).
- Check that neither speaker is connected to any other devices.
- Verify that when you put the speakers into device link mode you see a fast-blinking LED on both speakers. If they don't link, power cycle (turn on/off) the speakers and try again.
My speakers are linked but I only hear audio through one side (Kreate 5 and 8 only)...
- Check that both speakers are powered on. If connected to a device, both speakers should have a solid LED.
- Check that the volume is turned up on both speakers.
My speakers are linked but I don't hear audio at all (Kreate 5 and 8 only)...
- Check that both speakers are powered on.
- Check that both speakers are connected to a device (they will show up as a single entry in the device Bluetooth menu).
- Check that the volume is turned up on both speakers.
- Check that both speakers are connected (have a blue LED). If the Left speaker LED is off and the Right speaker is solid, then the device is not currently connected to a device. Reenter pairing mode by single pressing the button once on either device.
I turned off one of my speakers when linked, and audio stopped playing (Kreate 5 and 8 only)...
- While linked, if the Right speaker is powered off, audio will continue playing through the Left speaker. If the Left speaker is powered off, the speakers will disconnect, and the Right speaker will immediately enter pairing mode (no sound will play while this is occurring). It will reconnect automatically within 2-15 seconds to the device, at which point the connection sound will play and you can continue playback through the Right speaker.
I turned off Bluetooth and now my speaker is disconnected...
- Select the speaker in your device's Bluetooth menu and click "Connect" to reconnect to the speaker.
The speaker disconnected from my device when I walked away...
- Check that you are within range of the speaker. If the device is within range, it should automatically reconnect.
www.krkmusic.com/warranty
If used in strict accordance with KRK instructions and only for products operated in the United States, Gibson, Inc. warrants parts and labor on all monitors and grille accessories for a period of three (3) years from the original date of purchase for all products purchased from a US Authorized Dealer. For goods purchased outside of the United States, please contact your local dealer or distributor for specific information on warranty terms and conditions. Gibson, Inc. warrants parts and labor on all headphones and computer audio devices, including room correction devices, for a period of one (1) year from the original date of purchase. Defective parts will be repaired under this warranty when a defect occurs under normal installation and use.
This warranty is limited to the repair of parts and replacements necessitated by defective workmanship or materials. Gibson, Inc. accepts no responsibility for damage or malfunction which, in the sole opinion of Gibson, Inc., is the result of misuse, abuse, neglect, accident, shipping damage, or unauthorized repair. Any such misuse, abuse, neglect, accident, shipping damage, or unauthorized repair will result in the voiding of this warranty.
Except as set forth herein, Gibson, Inc. makes no representations or warranties, whether expressed or implied, including any implied warranties of merchantability or suitability for a particular purpose, all of which are expressly waived and disclaimed hereby, as to any Gibson, Inc. products.
In no event shall Gibson, Inc. be liable for special, incidental, consequential, punitive, or indirect damages, including, without limitation, loss of profits or loss of data. For any action brought against Gibson, Inc., whether in tort, contract, or any other theory of law, in no event shall Gibson, Inc.'s liability exceed the total amount paid by the purchaser to an authorized dealer or representative for the product giving rise to the underlying claim.
Some states and countries do not allow the exclusion or limitation of incidental or consequential damages, so the above limitation or exclusion may not apply to you. This warranty gives you specific legal rights, and you may also have other rights, which vary from state to state. This warranty only applies to Gibson, Inc. products purchased by the consumer from an authorized Gibson, Inc. dealer.
In the United States:
Gibson, Inc.
ATTN: Consumer Service
209 10th Ave South
Suite 460
Nashville, TN 37203
1-800-4GIBSON (1-800-4442766)
service@gibson.com
In Europe:
Gibson, Inc.
ATTN: Consumer Service
Smallepad 15
3811 MG Amersfoort
The Netherlands
00800-4Gibson1 (00800-44427661)
service.europe@gibson.com

KRK Product Warranty Registration
www.gibson.com/en-US/Support/Customer-Service

KRK Product Downloads & Manuals
www.krkmusic.com/pages/downloads-and-manuals
KREATEKREATES
209 10th Avenue South, Suite 460
Nashville, TN 37203 USA
service@gibson.com
natural_image
Top-down illustration of a person working at a desk with a keyboard, three monitors, and a monitor above (no text or symbols)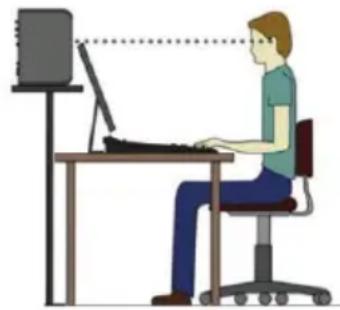
natural_image
Illustration of a person sitting at a desk using a computer, with no visible text or symbolstext_image
A D INPUTS LEFT B C OUT TO RIGHT SPEAKER KRK SYSTEMS DESIGNED AND ENGINEERED IN NASHVILLE, TENNESSEE USA SERIAL NUMBER HERE MODEL: K3 KRIATE SERIES PROFESSIONAL MONITORING SYSTEM PART NUMBER OFF ON CAUT ON 100x 150Hz (2.1MHz, 40Hz/Hz) PWRTR CE UK CA FC PCT & RESISTE R/S/GELS DATE CODE CAN 815-70/90HZ-125 This device complies with Part 15 of the PCC lines, Operation is adjusted to the following line contains: (2) This device may not cause natural performance, and (3) this device must switch any hardware or service, including hardware that may cause undelined operation. AC 100-245V~ 50/40Hz 40W MAX E F G HPANEL POSTERIOR IZQUIERDO DE KREATE 3
text_image
KRK SYSTEMS DESIGNED AND ENGINEERED IN NASHVILLE, TENNESSEE USA MODEL: K5 KREATE SERIES PROFESSIONAL MONITORING SYSTEM PAIR / LINK STANDARD RCA INPUTS TRS XLR HF LEVEL ADJUST -1.4B - FLAT -2.6B + 1.4B LF LEVEL ADJUST -1.4B - FLAT -2.6B + 2.6B SYSTEM LEVEL MIN MAX A B D F G E C I DETAIL NUMBER MORE SOTY CODE PART NUMBER CAUTION FOR PART NUMBER OF THE FUTCHER FOR PART NUMBER OF THE FUTCHER (FOR PART NUMBER OF THE FUTCHER) FOR PART NUMBER OF THE FUTCHER (FOR PART NUMBER OF THE FUTCHER) FOR PART NUMBER OF THE FUTCHER (FOR PART NUMBER OF THE FUTCHER) FOR PART NUMBER OF THE FUTCHER (FOR PART NUMBER OF THE FUTCHER) FOR PART NUMBER OF THE FUTCHER (FOR PART NUMBER OF THE FUTCHER) FOR PART NUMBER OF THE FUTCHER (FOR PART NUMBER OF THE FUTCHER) OF THE FUTCHER FOR PART NUMBER OF THE FUTCHER (FOR PART NUMBER OF THE FUTCHER) FOR PART NUMBER OF THE FUTCHER (FOR PART NUMBER OF THE FUTCHER) FOR PART NUMBER OF THE FUTCHER (FOR PART NUMBER OF THE FUTCHER) FOR PART NUMBER OF THE FUTCHER (FOR PART NUMBER OF THE FUTCHER) FOR PART NUMBER OF THE FUTCHER (FOR PART NUMES OF THE FUTCHER) FOR PART NUMBER OF THE FUTCHER (FOR PART NUMES OF THE FUTCHER) FOR PART NUMBER OF THE FUTCHER (FOR PART NUMES OF THE FUTCHER) FOR PART NUMBER OF THE FUTCHER (FOR PART NUMES OF THE FUTCHER) FOR PART NUMBER OF THE FUTCHER (FOR PART NUMES OF THE FUTCHER) FOR PART NUMBER OF THE FUTCHUMBER (FOR PART NUMES OF THE FUTCHUMBER) FOR PART NUMBER OF THE FUTCHUMBER (FOR PART NUMES OF THE FUTCHUMBER) FOR PART NUMBER OF THE FUTCHUMBER (FOR PART NUMES OF THE FUTCHUMBER) FOR PART NUMBER OF THE FUTCHUMBER (FOR PART NUMES OF THE FUTCHUMBER) FOR PART NUMBER OF THE FUTCHUMBER (FOR PART NUMES OF THE FUTCHUMBER) FOR PART NUMBER OF THE FUTURE YEAR (FOR PART NUMES OF THE FUTURE YEAR) FOR PART NUMBER OF THE FUTURE YEAR (FOR PART NUMES OF THE FUTURE YEAR) FOR PART NUMBER OF THE FUTURE YEAR (FOR PART NUMES OF THE FUTURE YEAR) FOR PART NUMBER OF THE FUTURE YEAR (FOR PART NUMES OF THE FUTURE YEAR) FOR PART NUMBER OF THE FUTURE YEAR (FOR PART NUMES OF THE FUTURE YEAR) FOR PART NUMBER OF THE FUTURE YEAR (FOR PART NUMES OF THE FUTURE YEAR) FOR PART NUMBEROF THE FUTURE YEAR (FOR PART NUMES OF THE FUTURE YEAR) FOR PART NUMBEROF THE FUTURE YEAR (FOR PART NUMES OF THE FUTURE YEAR) FOR PART NUMBEROF THE FUTURE YEAR (FOR PART NUMES OF THE FUTURE YEAR) FOR PART NUMBEROF THE FUTURE YEAR (FOR PART NUMES OF THE FUTURE YEAR) FOR PART NUMBEROF THE FUTURE YEAR (FOR PART NUMES OF THE FUTURE YEAR) FOR PART NUMBEROF THE FUTURE YEAR( FOR PART NUMES OF THE FUTURE YEAR) FOR PART NUMBEROF THE FUTURE YEAR( FOR PART NUMES OF THE FUTURE YEAR) FOR PART NUMBEROF THE FUTURE YEAR( FOR PART NUMES OF THE FUTURE YEAR) FOR PART NUMBEROF THE FUTURE YEAR( FOR PART NUMES OF THE FUTURE YEAR) FOR PART NUMBEROF THE FUTURE YEAR( FOR PART NUMES OF THE FUTURE YEAR) FOR PART NUMBEROF THE FUTURE YEAR( FOR PART NUMES OF THEY ARE NOT USED IN THIS Panel) FOR PART NUMBEROF THE FUTURE YEAR( FOR PART NUMES OF THEY ARE NOT USED IN THIS Panel) FOR PART NUMBEROF THE FUTURE YEAR( FOR PART NUMES OF THEY ARE NOT USED IN THIS Panel) FOR PART NUMBEROF THE FUTURE YEAR( FOR PART NUMES OF THEY ARE NOT USED IN THIS Panel) FOR PART NUMBEROF THE FUTURE YEAR( FOR PART NUMES OF THEY ARE NOT USED IN THIS Panel) FOR PART NUMBEROF THE FUTURE YEAR( FOR MAIN CHINA) FOR PART NUMBEROF THE FUTURE YEAR( FOR MAIN CHINA) FOR PART NUMBEROF THE FUTURE YEAR( FOR MAIN CHINA) FOR PART NUMBEROF THE FUTURE YEAR( FOR MAIN CHINA) For part number of the main part number of the main part number of the main part number of the main part number of the main part number of the main part number of the main part number of the main part number of the main part number of the main part number of the main part number of the main part number of the main part number of the main part number of the main part number of the main part number of the main part number of the main part number of the main part number of the main part number of the major part number of the main part number of the main part number of the main part number of the main part number of the main part number of the main part number of the main part number of the main part number of the main part number of the main part number of the main part number of the main part number of the main part number of the main part number of the main part number of the main part number of the main part number of the main part number of the main part number of the primary part number of the main part number of the main part number of the main part number of the main part number of the main part number of the main part number of the main part number of the main part number of the main part number of the main part number of the main part number of the main part number of the main part number of the main part number of the main part number of the main part number of the main part number of the main part number of the main part number of the Main Part Number AC 100-240V- 50/40Hz 50W MAX POWER ON OFF CE UK CA FC EC CCDCDCDC DC DCDCDCDC DC DCDCDCDC DC DCDCDCDC DC DCDCDCDC DC DCDCDCDC DC DCDCDCDC DC DCDCDCDC DC DCDCDCDC DC DCDCDCDC DC DCDCDCDC DC DCDCDCDC DC DCDCDCDC DC DCDCDCDC DC DCDCDCDC DC DCDCDCDC DC DCDCDCDC DC DCDCDCDC DC DCDCDCDC DC DCDCDCDC DC DCDCDCDC DC AC 100-240V- 50/40Hz 50W MAX PANEL POSTERIOR DE KREATE 5www.krkmusic.com/warranty
ATTN: Consumer Service
209 10th Ave South
Suite 460
Nashville, TN 37203
1-800-4GIBSON (1-800-4442766)
service@gibson.com
En Europa:
Gibson, Inc.
ATTN: Consumer Service
Smallepad 15
3811 MG Amersfoort
Países Bajos
00800-4Gibson1 (00800-44427661)
service.europe@gibson.com

www.gibson.com/en-US/Support/Customer-Service

www.krkmusic.com/pages/downloads-and-manuals
CREATEKREATES
STUDIOLAUTSPRECHER-SYSTEME
BEDIENUNGSANLEITUNG
209 10th Avenue South, Suite 460
Nashville, TN 37203 USA
service@gibson.com
natural_image
Top-down illustration of a person working at a desk with three monitors and a keyboard (no text or symbols)
natural_image
Illustration of a person working at a desk with a computer, no text or symbols presenttext_image
A D INPUTS LEFT TRS RIGHT LEFT STRAWN MIN MAX E B F C OUT TO RIGHT SPEAKER KRK SYSTEMS DESIGNED AND ENGINEERED IN NASHVILLE, TENNESSEE USA SERIAL NUMBER HERE MODEL: K3 KREATE SERIES PROFESSIONAL MONITORING SYSTEM PART NUMBER CAUTION OFF ON G H CE UK CA FOR BE SHOULAD, ELECTRICAL POWER 100W MAX This device uses for Part II of the PCC Tube, Operation is assigned to the following been considered. This device is not used to have any additional features and it does not be used as appropriate. The device should not use any interference or noise, so using time when that may use underlined operation. DA'S CODE Made IN CHKA AC 148-260V~ 54/80Hz 40W MAXKREATE 3 RÜCKSEITE DES LINKEN LAUTSPRECHERS
www.krkmusic.com/warranty
ATTN: Consumer Service
209 10th Ave South
Suite 460
Nashville, TN 37203
1-800-4GIBSON (1-800-4442766)
service@gibson.com
In Europa:
Gibson, Inc.
ATTN: Consumer Service
Smallepad 15
3811 MG Amersfoort
The Netherlands
00800-4Gibson1 (00800-44427661)
service.europe@gibson.com

www.gibson.com/en-US/Support/Customer-Service

www.krkmusic.com/pages/downloads-and-manuals
GAMME KREATEK
SYSTÈMES DE SURVEILLANCE
MANUEL DE L'UTILISATEUR
209 10th Avenue South, Suite 460
natural_image
Top-down illustration of a person working at a keyboard with three monitors, no text or symbols present
natural_image
Illustration of a person using a computer at a desk (no text or symbols present)www.krkmusic.com/warranty
www.gibson.com/en-US/Support/Customer-Service

www.krkmusic.com/pages/downloads-and-manuals
SERIE KREATEKR
SISTEMI DI MONITORAGGIO
MANUALE D'USO
209 10th Avenue South, Suite 460
Nashville, TN 37203 USA
service@gibson.com
natural_image
Top-down illustration of a person using a keyboard with three monitors in the background (no text or symbols)
natural_image
Illustration of a person sitting at a desk using a computer, with no visible text or symbolstext_image
H KRK SYSTEMS DESIGNED AND ENGINEERED IN NASHVILLE, TENNESSEE USA MODEL: K5 KREATE SERIES PROFESSIONAL MONITORING SYSTEM PART / LINK HP LEVEL ADJUST -2dB FLAT LF LEVEL ADJUST -1dB FLAT -2dB FLAT +2dB C E A B D F G I NORMAL NUMBER MORE DATA LIME PART NUMBER CAUT ON AC TOUVE FOR THE WORK OF THE WORK. The working and the following are: the work is to be completed by the following: the work is completed by the following: the work is completed by the following: the work is completed by the following: the work is completed by the following: the work is completed by the following: the work is completed by the following: the work is completed by the following: the work is completed by the following: the work is completed by the following: the work is completed by the following: the work is completed by the following: the work is completed by the following: the work is completed by the leading. The work is completed by the leading. The work is completed by the leading. The work is completed by the leading. The work is completed by the leading. The work is completed by the leading. The work is completed by the leading. The work is completed by the leading. The work is completed by the leading. The work is completed by the leading. The work is completed by the leading. The work is completed by the leading. The work is completed by the leading. The work is completed the leading. The work is completed by the leading. The work is completed by the leading. The work is completed by the leading. The work is completed by the leading. The work is completed by the leading. The work is completed by the leading. The work is completed by the leading. The work is completed by the leading. The work is completed by the leading. The work is completed by the leading. The work is completed by the leading. The work is completed by the leading. The workload is not available for any other worker. The workload is not available for any other worker. The workload is not available for any other worker. The workload is not available for any other worker. The workload is not available for any other worker. The workload is not available for any other worker. The workload is not available for any other worker. The workload is not available for any other worker. The workload is not available for any other worker. The workload is not available for any other worker. The workload is not available for any other work in China. AC TOUVE FOR THE SELECTIVE SWR MAX POWER ON OFF PANNELLO POSTERIORE KREATE 5www.krkmusic.com/warranty
www.gibson.com/en-US/Support/Customer-Service

www.krkmusic.com/pages/downloads-and-manuals
KREATEKREATES
MONITORINGSSYSTEMEN
GEBRUIKSAANWIJZING
WAARSCHUWING I.V.M. PLAATSING
209 10th Avenue South, Suite 460
Nashville, TN 37203 USA
service@gibson.com
natural_image
Top-down illustration of a person using a keyboard and two monitors (no text or symbols)
natural_image
Illustration of a person working at a desk with a computer, no text or symbols presenttext_image
KRK SYSTEMS DESIGNED AND ENGINEERED IN NASHVILLE, TENNESSEE USA MODEL: K5 KREATE SERIES PROFESSIONAL MONITORING SYSTEM C E H PAIR / LINK STANDARD RCA INPUTS TRS XLR HF LEVEL ADJUST -1dB + FLAT -2dB + LF LEVEL ADJUST -1dB + FLAT -2dB + +2dB A B D F G I SEVER. NUMBER MORE WRITE CODE PART NUMBER CAUTION SELECT OR CHECK OR CHECK OR CHECK OR CHECK OR CHECK OR CHECK OR CHECK OR CHECK OR CHECK OR CHECK OR CHECK OR CHECK OR CHECK OR CHECK OR CHECK OR CHECK OR CHECK OR CHECK OR CHECK OR CHECK OR CHECK OR CHECK OR CHECK OR CHECK OR CHECK OR CHECK OR CHECK OR CHECK OR CHECK OR CHECK OR CHECK OR CHECK OR CHECK OR CHECK OR CHECK OR CHECK OR CHECK OR CHECK OR CHECK OR CHECK OR CHECK OR CHECK OR CHECK OR CHECK OR CHECK OR CHECK OR CHECK OR CHECK OR CHECK OR CHECK OR ACCESS OR ACCESS OR ACCESS OR ACCESS OR ACCESS OR ACCESS OR ACCESS OR ACCESS OR ACCESS OR ACCESS OR ACCESS OR ACCESS OR ACCESS OR ACCESS OR ACCESS OR ACCESS OR ACCESS OR ACCESS OR ACCESS OR ACCESS OR ACCESS OR ACCESS OR ACCESS OR ACCESS OR ACCESS OR ACCESS OR ACCESS OR ACCESS OR ACCESS OR ACCESS OR ACCESS OR ACCESS OR ACCESS OR ACCESS OR ACCESS OR ACCESS OR ACCESS OR ACCESS OR ACCESS OR ACCESS OR ACCESS OR ACCESS OR ACCESS OR ACCESS OR ACCESS OR ACCESS OR ACCESS OR ACCESS OR ACCESS OR ACCESS OR AC 100-240V~ AC 100-240V~ 50/10Hz 50W MAX POWER ON OFF CE UK CA FC FCC ED 20233-XX EC 00000-88 MADE IN CHINA KREATE 5 ACHTERPANEELKREATE5enKREATE8SYSTEEMCONNECTORSENBDIENINGSELEMENTEN
www.krkmusic.com/warranty
www.gibson.com/en-US/Support/Customer-Service

KRK Productdownloads & Handleidingen
www.krkmusic.com/pages/downloads-and-manuals
KREATE KREATI
监听系统
用户手册
209 10th Avenue South, Suite 460
Nashville, TN 37203 USA
service@gibson.com
natural_image
Top-down illustration of a person working at a desk with three monitors and a keyboard (no text or symbols visible)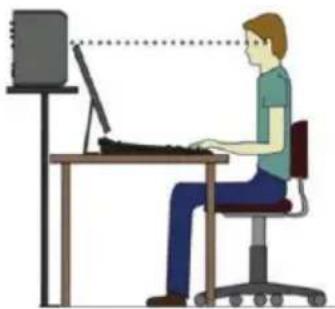
natural_image
Illustration of a person working at a desk with a computer monitor, no text or symbols presentwww.krkmusic.com/warranty
www.gibson.com/en-US/Support/Customer-Service

KRK 产品下载项目和手册
www.krkmusic.com/pages/downloads-and-manuals
CREATE シリーズ
モニタリングシステム
取扱説明書
209 10th Avenue South, Suite 460
Nashville, TN 37203 USA
service@gibson.com
欧州の輸入業者・製品安全責任者
natural_image
Illustration of a person using a keyboard in front of three monitors (no text or symbols)
natural_image
Illustration of a person working at a desk with a computer monitor, no text or symbols presentwww.krkmusic.com/warranty
www.gibson.com/en-US/Support/Customer-Service

KRK製品のダウンロードとマニュアル
www.krkmusic.com/pages/downloads-and-manuals