KKPro2D49SS - Freezer KENMORE - Free user manual and instructions
Find the device manual for free KKPro2D49SS KENMORE in PDF.

User questions about KKPro2D49SS KENMORE
0 question about this device. Answer the ones you know or ask your own.
Ask a new question about this device
Download the instructions for your Freezer in PDF format for free! Find your manual KKPro2D49SS - KENMORE and take your electronic device back in hand. On this page are published all the documents necessary for the use of your device. KKPro2D49SS by KENMORE.
USER MANUAL KKPro2D49SS KENMORE
FOR TWO YEARS FROM the date of sale this product is warranted against defects in material or workmanship.
WITH PROOF OF SALE a defective product will be repaired or replaced free of charge.
The Kenmore brand is used under license. Direct all claims for warranty service to Koolatron Customer Assistance, call 1-800-265-8456 or email service@koolatron.com
This warranty covers manufacturer's defects including electrical and mechanical defects provided the appliance is correctly assembled, operated and maintained according to the supplied instructions. It does not cover damage caused by accident, misuse or abuse including overheating, unauthorized repairs or alterations, or use with a voltage converter or aftermarket accessories, and it does not apply to scratches, stains, discoloration or other surface damage that does not impair the product function.

Ans
Garantie limitée
4320 Federal Drive, Batavia, NY 14020 U.S.A.
139 Copernicus Blvd., Brantford, ON N3P1N4 Canada
Kenmore and the Kenmore logo are registered trademarks to Transform SR Brands Management LLC and are used under license by Koelatron Corporation
Stainless Steel Reach-In
Convertible
Freezer/Refrigerator
READ AND FOLLOW ALL SAFETY INSTRUCTIONS
ELECTRICAL SAFETY PRECAUTIONS
- Always use a dedicated outlet that is properly grounded. DO NOT attempt to alter the plug in any way to make it fit into an ungrounded outlet.
- Ensure that the plug is tightly connected to the outlet before using the unit.
- Do not attempt to operate the appliance if there is damage to the cord or plug. Have it immediately replaced by a qualified technician.
- Do not insert or remove the power plug if there is any indication of flammable gasses present.
- Do not repeatedly cycle the power button as this could lead to electric shock or short-circuiting of the unit.
- Always unplug the power cord before cleaning or during a power interruption. Wait at least 5 minutes before plugging the power cord back in to avoid damage to the compressor.
OTHER SAFETY PRECAUTIONS
- Never store flammable, explosive or corrosive items in the unit.
- Do not store items on the top of the unit.
- Never expose the unit to water or place the unit in a wet location.
- Be careful not to touch hot surfaces when cleaning the condenser.
PLACEMENT PRECAUTIONS
- STABLE SURFACE: Unit should be installed on a flat surface capable of supporting the full weight combined weight of the unit and its contents. If any material is used to support the unit, ensure that the material is not flammable.
- HEAT SOURCES: For optimal refrigeration performance, unit should be kept away from all heat sources and not placed in direct sunshine.
- VENTILATION: Unit should be installed in a well-ventilated area with a minimum of 1.5 inches (3.8cm) clearance on the sides and back.
- EXTERNAL ELEMENTS: Unit should not be installed anywhere with an ambient temperature below 41^ (5^) . The unit must always be protected from dust, rain, and direct sunlight and is not recommended for outdoor use.
SAVE THESE INSTRUCTIONS
KNOW YOUR FREEZER
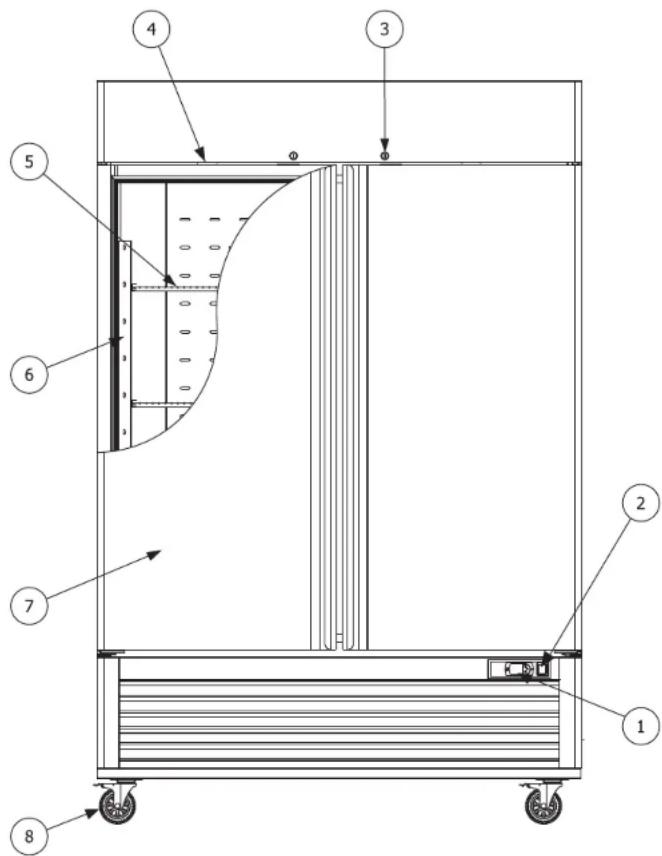
- Thermostat
5.Shelf - Power switch
- Shelf support rail
- Lock
- Door
- Light and fan switch
- Caster
KNOW YOUR FREEZER
Technical Specification Wiring Diagrams
| Model | Rated Voltage (V) | Frequency (Hz) | Temperature (°F) | Working power (W) |
| KKPro1D23SS | 115 | 60 | 33~41 / -13~5 | 500 |
| KKPro2D49SS | 115 | 60 | 33~41 / -13~5 | 800 |
| KKPro3D66SS | 115 | 60 | 33~41 / -13~5 | 1050 |
| Model | Dimension (L×D×H) | Net Volume (cu. ft.) | Net weight (lb) | |
| KKPro1D23SS | 27"x31.5"x83.25" | 19.32 | 252.4 | |
| KKPro2D49SS | 54.5"x31.5"x83.25" | 43.50 | 390.2 | |
| KKPro3D66SS | 81.5"x31.5"x83.25" | 68.30 | 563.3 |
The above specifications are tested in an ambient temperature of 90^ (32^)
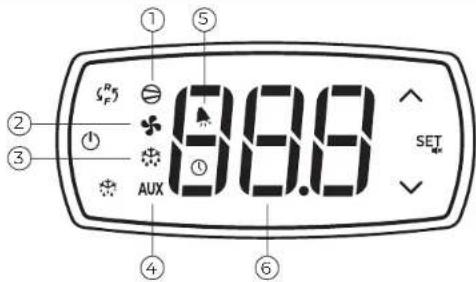
KNOW YOUR CONTROL PANEL
| No. | Function | Indicator Lights State | Remark | ||
| ON | OFF | FLASH | |||
| 1 | compressor | on | off | call | |
| 2 | fan | on | off | call | |
| 3 | defrost | on | off | call | |
| 4 | auxiliary | on | off | - | |
| 5 | alarm | alarm | no alarm | - | EO/EI/dr/Lo/HI alarm |
| 6 | digits | display value and code | |||
4
CONTROL PANEL TECHNICAL SPECS
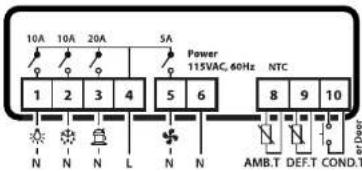
Technical Datasheet
Connector: Fixed terminal
Power supply: 15VAC±10%, 50/60Hz
Power consume: 7.0VA max
Display: Three-digit digital tube and symbol light
Input: 2 NTC probes and 1 single input
Outputs: Refer to the wiring
Working temp.: -10°C ~ 55°C
Storage temp.: -25°C ~ 75°C
Relative humidity: 20% ~ 85% (no fro
BEFORE FIRST USE
- Carefully remove the unit from the pallet. Remove all cardboard packaging, plastic bags and tape from the outside of the unit.
- Remove any packaging material, keys and any other accessories from the inside of the unit.
- Check the unit for any broken or missing parts. Contact the seller with any questions.
- Place the unit in a suitable location per the safety instructions on the previous pages.
- Clean the inside and outside of the unit and check the operation of the door(s) before plugging the unit in.
- Let the unit cool down to proper operating temperature before storing products inside.
CLEANING PROCEDURES
INSIDE AND OUTSIDE SURFACES
- Clean the interior and exterior surfaces of the unit with a soft cloth and gentle, non-abrasive cleaning agent. Do not use any corrosive cleaning agents.
- Clean the door gasket on a regular basis to help maintain an airtight seal between the door and the cabinet.
- Dry all surfaces with a clean, soft cloth.
CONDENSER COIL
- Check the condenser coil once a month for visible dirt and dust as a dirty condenser coil will affect refrigeration performance.
- Turn off power to the unit before cleaning the condenser coil.
- Using a soft brush, gently brush vertically along the fins to remove any built up dust. Do not horizontally against the fins as this could damage them and negatively impact refrigeration performance.
NOTE - After cleaning, check to ensure that all parts that were removed have been properly reinstalled and the unit is safe to use.
5
TIPS FOR BEST USE
- Do not store more than 100 lbs (45 kg) of product on each shelf.
- To ensure there is enough for cold air to circulate to maintain the correct operat
ing temperature, do not exceed 70% of the load limit of the unit. - Always allow hot food to cool before placing it in the unit.
- Store food products in airtight packaging.
Press and hold for 3 s to switch parameter groups from freezer to chiller and vice versa.
SET DESIRED TEMPERATURE
- Press and hold SET for 1 s until the temperature value starts to flash.
- Use and to increase or decrease the value until you reach your desired temperature.
- Press SET again to confirm the new temperature.
VIEW/MODIFY TYPE F PARAMETERS
- To access the Type F (frequently used) parameters, press and hold SET for at least 3 s until the display shows P5 (password).
2.Use and to scroll through the list of Type F parameters. - Press SET to display the value associated with each parameter and use and to increase or decrease the value as desired.
- Press SET again to temporarily save the new value and return to the parameter list. 5. Repeat steps 3-4 for any other parameters that need to be modified.
- When you are finished modifying all parameters, press and hold SE for more than 3 s to save all changes, exit the parameter menu and return to the main display.
VIEW/MODIFY TYPE C PARAMETERS
- To access the Type C (configurable) parameters, press and hold for at least 3 s until the display shows PS (password).
- Press again to enter the password setting and use and to scroll the numerical menu until it displays "22" (the preset password).
- Press SE again to confirm the password and access the Type C parameters
- Use and to scroll through the list of Type C parameters and follow steps 3-6 in the previous section to modify any parameters as needed.
IMPORTANT - Your changes are not permanently saved until you press and hold SET for 3s to confirm and return to the main display. If 60 s elapses without a button being pressed while you are in the parameter menu, all changes will be canceled and all previous settings restored.
MANUAL DEFROST
Press and hold for at least 3s to start the manual defrost cycle.
DISPLAY EVAPORATOR SENSOR TEMPERATURE
Press to display the current evaporator sensor temperature.
POWER ON/OFF
Press and hold for at least 3s to power the control panel on or off.
TROUBLESHOOTING
NOTE- If the problem cannot be solved using the troubleshooting guide below, contact your seller. All service or repairs must be performed by qualified and authorized service technicians. Failure to comply will void the warranty.
| PROBLEM | POSSIBLE REASONS | POSSIBLE SOLUTIONS |
| No refrigeration | - Power plug is loose | - Ensure power plug is securely connected to outlet |
| Slow cooling | - Non-dedicated outlet used- Power switch is turned off- Unit is defrosting- Unit is overfilled- Air circulation blocked by stored products- Unis in direct sunlight or near a heat source- Condenser is dirty- Doors being opened frequently- Temperature is not set correctly- Hot food in the unit | - Use a dedicated power outlet- Turn power switch to on position- Wait for defrost cycle to finish- Remove some contents- Reposition contents to allow cold air to circulate- Relocate to a more suitable area- Power the unit off and clean the condenser (see pg. 5)- Open the doors less frequently- Check the set temperature and adjust if needed (see pg. 67)- Remove the hot food and allow it to cool |
| Noisy operation | - Unit is not level- Surface is uneven or unstable | - Adjust casters/legs to level the unit- Relocate to more suitable surface |
Error Codes
| Error code | Description | Related parameters |
| E0 | probe 1 error=control | - |
| E1(*) | probe 2 error=defrost | [d0=0/1] |
| dr(*) | door open alarm | |
| Lo | low temperature alarm | [AL][Ad][A0] |
| HI | high temperature alarm | [AH][Ad][A0] |
(*)only valid for series C/Y
PARAMETER TABLE PARAMETER TABLE
| Par. | Disp. | Description Description | Type | Min | Max Unit | Def. | |
| PS | PS | password | F | 0 | 200 | 22 | |
| /2 | r2 | probe measurement stability | H | 1 | 15 | 4 | |
| /3 | r3 | probe display rate | C | 0 | 15 | 1 | |
| /4 | r4 | select probe displayed | H | 1 | 3 | 1 | |
| /5 | r5 | select °C/F (0:centi degree 1fahrenheit) | C | 0 | 1 | 1 | |
| /6 | r6 | disable decimal point (0: disable dp.) | C | 0 | 1 | 1 | |
| /7 | r7 | enable probe 2 alarm(1:alarm) (reserved) | H | 0 | 1 | 0 | |
| /C1 | r[1] | probe 1 offset | F -50 | 50 | 0.0°F | ||
| /C2 | r[2] | probe 2 offset | F -50 | 50 | 0.0°F | ||
| /C3 | r[3] | probe 3 offset | H -50 | 50 | 0.0°F | ||
| /P | rP | select type of probe (reserved) | H | 0 | 1 | 0 | |
| /St | St | set point | H | r1 | r2 | 33.0°F | |
| rd | rd | differential | F | 0 | 19 | 8.0°F | |
| r1 | r1 | minimum set point value | C -50 | r2 | 33°F | ||
| r2 | r2 | maximum set point value | C | r1 | 200 | 41°F | |
| r3 | r3 | select direct/reverse operation (0: direct with defrost (1: direct without defrost (2: reverse without defrost) | HO | 2 | 0 | ||
| r4 | r4 | night-time set point delta | H | -50 | 50 | 3.0°F | |
| c0 | c0 | compressor and fan start delay on | C 0 | 100 | min | ||
| c1 | c1 | minimum time between consecutive compressor starts | H 0 | 100 | 0 | ||
| c2 | c2 | minimum compressor off time | C 0 | 100 | 5 | ||
| c3 | c3 | minimum compressor on time | H 0 | 100 | 0 | ||
| c4 | c4 | compressor on time with duty setting (0:off,100:always on) | H 0 | 100 | 0 | ||
| cc | cc | continuous cycle duration (reserved) | H 0 | 15 | 0 h | ||
| c6 | c6 | temperature alarm bypass after continuous cycle (reserved) | H 0 | 15 | 2 h | ||
| c11 | c11 | second compressor delay(reserved) | H 0 | 250 | 4 s |
8
| Par. | Disp. | Type | Min | Max Unit | |||
| d0 | d0 | type of defrost(0=heater, end by temperature(1=hot gas, end by temperature(2=heater, end by time(3=hot gas, end by time(4=heater with temperature control,end by time) | C | 0 | 4 | 0 | - |
| d1 | d1 | interval between defrosts | C 0 | 199 | 8 | h/min | |
| dt | dt | end defrost temperature set point | C | -50 | 130 | 55.0°F | °C/F |
| dP | dP | maximum defrost duration | C | 1 | 199 | 30 | min/s |
| d4 | d4 | defrost when switching the instrument on (0: disable tenable) | H 0 | 1 | 0 | - | |
| d5 | d5 | defrost delay on power-up or when enabled by digital input | H 0 | 199 | 0 min | ||
| d6 | d6 | freeze control temperature display during defrost(0: display the message“dF”alternating with the temperature measured by the control probe;(1: freeze the display on the last temperature measured before the defrost) | H 0 | 1 | 1 | - | |
| dd | dd | dripping time | C 0 | 15 | 2 | min | |
| d8 | dB | alarm bypass time after defrost | H 0 | 15 | 1 | h | |
| d9 | dB | defrost priority over compressor protectors (0: protection times observed (1: protection times ignored) | H 0 | 1 | 0 | - | |
| d/ | dr/ | defrost probe reading | F | - | - | °C/F | |
| dC | dC | time base(0:dll uint=hour, dP unit=min(Idl uint=min, dP unit=second) | H 0 | 1 | 0 | - | |
| A0 | A0 | alarm and fan temperature differential(A0≤0, AL and AH expressed as absolute (A0>0, AL and AH expressed relative to the set point) | C | -20 | 20 | 2.0 | °C/F |
| AL | AL | absolute/relative temperature for low temperature alarm | C | -50 | 250 0 | °C/F | |
| AH | AH | absolute/relative temperature for high temperature alarm | C | -50 | 250 0 | °C/F | |
| Ad | Ad | temperature alarm delay | C 0 | 199 | 0 | min | |
9
PARAMETER TABLE
| A4 | R4 | 3rd input configuration0:Input not active1:External alarm (Input open=alarm)2:reserved3:Start defrost when input change from open to closed4:Curtain switch or night-time operation (Input closed=night-time set point, Input open=normal set point)5:Remote ON-OFF (Input closed=ON, Input open=OFF)6:reserved7:Door switch with evaporator fans off (Input closed=door closed, Input open= door open)8:Door switch with evaporator fans and compressor off (Input closed=door closed, Input open= door open)9:Direct / reverse operating mode (input closed=reverse, (input open=direct + defrost)10:Probe for dirty condenser alarm 11:Product probe12:Door switch with evaporator fans off and light on (Input closed=door closed, Input open= door open) | C 0 | 12 12 - | ||||
| A7 | R7 | digital alarm input delay(only A4=1,7,8,12 available) | C 0 | 199 1 | min | |||
| A8 | R8 | enable alarm "Ed"(end defrost by timeout) | H 0 | 10 - | ||||
| Ac | Rc | dirty condenser alarm set point | H | -50 | 250 | 0 | - | |
| AE | RE | dirty condenser alarm differential | H 0 | 1 | 20.0 | 0 - | ||
| Acd | Acd | dirty condenser alarm delay | H 0 | 250 | 0 - | |||
| Ad0 | Ad0 | door management algorithm (reserved) | H - | - | - | |||
| FO | FO | enable evaporator fan control(0:the fan is on;1:The fan is controlled based on a set point (see parameter FI).If the evaporator probe is faulty, the fan operates) | C | 0 1 | 1 | - | ||
| FI | FI | evaporator fan control set point(When FO=1, evaporator temp. < FI-AO, the fan is ON; evaporator temp. >FI, the fan is off) | F | -50 | 130 | 99.0°F | °C/°F |
PARAMETER TABLE
| F2 | F2 | stop evaporator fans if compressor stops 0:the fan operates according to F0 even when the compressor is off; 1:the fan is off when the compressor is off; 2:the fan is managed in cyclical on/off mode. The on and off times can be configured by parameters F4 and F5 respectively. The on and off sequence after control is deactivated starts with the ON phase, so as to exploit the fact that the evaporator is still cold. | C | 0 2 | 2 | ||
| F3 | F3 | evaporator fan status during defrost (0:the fan is on during the defrost (1:the fan is off during the defrost.) | C | 0 1 | 1 | ||
| Fd | Fd | post-dripping time | C | 0 | 15 | 0 | min |
| F4 | F4 | fan ON time (when F2=2) | C | 0 | 100 | 1 | min |
| F5 | F5 | fan OFF time (when F2=2) | C | 0 | 100 | 5 | min |
| H0 | H0 | serial address(reserved) | H | 0 | 207 | 0 | - |
| H1 | H1 | AUX output configuration (reserved) | H | 0 | 3 | 0 | - |
| H2 | H2 | enable keypad(reserved) (0:keypad disabled: (1:keypad enabled (2:keypad enabled except for ON/OFF)) | H | 0 2 | 1 | ||
| H4 | H4 | disable buzzer | C | 0 | 1 | 0 | - |
| H5 | H5 | ID code (read-only) (reserved) | H | 0 | 199 | 0 | - |
| H6 | H6 | select control associated with UP + DOWN buttons (reserved) (0:start/stop continuous cycle; (1:start/stop defrost.) | H | 0 1 | 0 | ||
| H7 | H7 | management of fourth relay/serial communication (reserved) (0:fourth relay disabled and serial communication enabled; (1:fourth relay enabled and serial communication disabled)) | H | 0 1 | 0 | ||
| EZY | E:Y | rapid parameter set selection (reserved) | H | 0 | 4 | 0 | - |
| tEn | t:En | enable RTC (reserved) | H | 0 | 1 | 0 | - |
*F: frequently parameters, no need password
*C: configurable parameters, need password
*H: hidden parameters, unadjustable

WARNING! This product can expose you to chemicals including lead, which is known to the State of California.
to cause cancer, and bisphenol A (BPA) and lead which are known to the state of California to cause birth
dects or other reproductive harm. For more information go to www.P65Warnings.ca.gov.
CONSIGNES DE SECURITE IMPORTANTES
LISEZ ET RESPECTEZ TOUTES LES CONSIGNES DE SECURITE
PRECAUTIONS DE SECURITE ELECTRIQUE
PRECAUTIONS D'EMPLACEMENT
Specifications techniques
| Modèle | Tension nominale (V) | Fréquence (Hz) | Température (°F) | Puisance de fonctionnement (W) |
| KKProD23SS | 115 | 60 | 33~41 / -13~5 | 500 |
| KKPro2D49SS | 115 | 60 | 33~41 / -13~5 | 800 |
| KKPro3D66SS3 | 115 | 60 | 33~41 / -13~5 | 1050 |
| Modèle | Dimensions (L×D×H) | Volume net (cu. ft.) | Poids net (lb) | |
| KKProD23SS | 27"x31.5"x83.25" | 19.32 | 252.4 | |
| KKPro2D49SS | 54.5"x31.5"x83.25" | 43.50 | 390.2 | |
| KKPro3D66SS | 81.5"x31.5"x83.25" | 68.30 | 563.3 |