
KW1049 - Vacuum Cleaner KENMORE - Free user manual and instructions
Find the device manual for free KW1049 KENMORE in PDF.

| Brand | Kenmore |
| Model | KW1049 |
| Product Type | Portable Spot Cleaner (Wet/Dry Vacuum) |
| Intended Use | Household: carpet cleaning, upholstery, pet stains |
| Power Supply | 120 V~, 60 Hz (polarized power cord) |
| Double Insulation | Yes – grounding not required |
| Clean Water Tank Capacity | max. 1.6 L (large surface) / 0.8 L (small surface) |
| Dirty Water Tank Capacity | Indicated by a "Max Fill" line – approx. 0.5 L (estimate) |
| Reversible Nozzle | Bristle brush side (scrubbing) and rubber side (hair removal) |
| Spray and Suction Function | Yes |
| Mesh Filter | Cleanable by hand (soft brush or cloth) |
| Included Accessories | Reversible nozzle, hose cleaning tool, hose and tool storage clip, stain cloth, 236 ml cleaning formula |
| Cord Length | Approx. 6 m (estimate) |
| Weight | Approx. 4.5 kg (estimate) |
| Dimensions (L × W × H) | Approx. 30 × 25 × 45 cm (estimate) |
| Warranty | 1 year (parts and labor) |
| Phone Support | 1-877-531-7321 (US) / 1-844-608-3081 (Canada) |
| Recommended Cleaning Solution | Kenmore KS1010 (use exclusively) |
| Routine Maintenance | Drain and rinse tanks after each use, clean nozzle and mesh filter |
| Safety | Do not immerse; do not use outdoors; unplug before maintenance |
| Replacement Parts Available | Tanks, nozzle, clips, cleaning tool (references in manual) |
Frequently Asked Questions - KW1049 KENMORE
User questions about KW1049 KENMORE
0 question about this device. Answer the ones you know or ask your own.
Ask a new question about this device
Download the instructions for your Vacuum Cleaner in PDF format for free! Find your manual KW1049 - KENMORE and take your electronic device back in hand. On this page are published all the documents necessary for the use of your device. KW1049 by KENMORE.
USER MANUAL KW1049 KENMORE
Portable Carpet Spot and Pet Stain Cleaner
Vacuum Cleaner Help Line
8:00am-5:00pm EST, M-F
De 8 AM a 5 PM, de lunes a Viernes
TABLE OF CONTENTS
Before Using Your New Spot Cleaner ....2
Packing List....2
Important Safety Instructions....3-4
Double Insulation Instructions ....5
Spot Cleaner Warranty....6
Parts and Features....7
Assembly Instructions.... 8-9
Operating Instructions....10-15
Maintenance and Care....16-18
Troubleshooting....19-20
Requesting Assistance or Service...... Back Cover
Read this Use & Care Guide. It will help you assemble and operate your new Kenmore spot cleaner in the safest and most effective way.
For more information about spot cleaner care and operation, call the Vacuum Cleaner Help Line at 1-877-531-7321 (US) / 1-844-608-3081 (CA). You will need the complete model and serial numbers when requesting information.
Your spot cleaner's model and serial numbers are located on the Model and Serial Number Plate. Use the space below to record the model number and serial number of your new Kenmore spot cleaner.
Model No.
Serial No. ____
Date of Purchase ____
Keep this book and your sales check (receipt) in a safe place for future reference.
PACKING LIST
Your KENMORE SPOT CLEANER is packaged with the following parts and components included separately in the carton:
1 Spot Vacuum Cleaner 1 Hose Storage Clip
1 8 oz. Carpet Cleaning Formula 1 Hose Cleaning Tool
1 Reversible Tough Stain Nozzle 1 Use & Care Guide
1 Tool Storage Clip
IMPORTANT SAFETY INSTRUCTIONS
Read all instructions in this guide before assembling or using your spot cleaner.

WARNING!
Your safety is important to us. To reduce the risk of fire, electrical shock, injury to persons or damage when using your spot cleaner, follow basic safety precautions including the following:
- Use your spot cleaner only as described in this Use & Care Guide. Use only manufacturer's recommended attachments.
- Fully assemble before operating.
- Operate cleaner only at voltage specified on rating plate.
- Do not leave spot cleaner when plugged in. Unplug from outlet when not in use and before performing maintenance.
- Do not expose to rain. Store indoors.
- Do not immerse. Use only on carpet moistened by cleaning process.
- Do not allow to be used as a toy. Close attention is necessary when used by or near children.
- Do not use with a damaged cord or plug. If spot cleaner is not working as it should, has been dropped, damaged, left outdoors, or dropped in water, immediately discontinue use and call 1-877-531-7321 (US) / 1-844-608-3081 (CA) for assistance.
-
Do not pull or carry by cord, use cord as a handle, close a door on cord, or pull cord around sharp edges or corners. Do not run spot cleaner over cord. Keep cord away from heated surfaces.
-
Do not unplug by pulling on cord. To unplug, grasp the plug, not the cord.
- Do not handle plug or spot cleaner with wet hands.
- Do not put any objects into openings.
- Do not use with any opening blocked; keep free of dust, lint, hair, and anything that may reduce air flow.
- Keep hair, loose clothing, fingers, and all parts of body away from openings and moving parts.
- Turn off all controls before unplugging.
- Use extra care when cleaning stairs. To avoid personal injury or damage, and to prevent the spot cleaner from falling, always place spot cleaner at bottom of stairs or on floor. Do not place spot cleaner on stairs or furniture, as it may result in injury or damage.
- Do not put spot cleaner on chairs, tables, etc. Keep unit on the floor.
IMPORTANT SAFETY INSTRUCTIONS
- Do not use spot cleaner to pick up flammable or combustible liquids (gasoline, cleaning fluid, perfumes, etc.), or use in areas where they may be present. The fumes from these substances can create a fire hazard or explosion.
• To reduce the risk of health hazards from vapors or dusts, do not vacuum toxic materials. - Do not use or store near hazardous materials.
- Do not pick up anything that is burning or smoking, such as cigarettes, matches, or hot ashes.
- Do not use spot cleaner without tanks in place.
- Do not clean over floor electrical outlets.
- Do not use the spot cleaner to pick up sharp hard objects, small toys, pins, paper clips, etc. They may damage the spot cleaner or tanks.
-
Do not use sharp objects to clean out hose as they can cause damage.
-
To help prevent matting and resoiling, avoid contact with carpets until they are dry. Keep children and pets away from carpets until they are completely dry.
- Do not store the spot cleaner with solution in tanks.
- Use only Kenmore cleaning formulas intended for use with this appliance to prevent internal component damage.
- This spot cleaner is provided with double insulation. Use only identical replacement parts. See DOUBLE INSULATION INSTRUCTIONS.
- You are responsible for making sure that your spot cleaner is not used by anyone unable to operate it properly.

CAUTION
To reduce the risk of injury from moving parts - Unplug before servicing.

WARNING
To reduce the risk of electric shock - Unplug before cleaning or servicing.
SAVE THESE INSTRUCTIONS
Proper assembly and safe use of your spot cleaner are your responsibilities. Your spot cleaner is intended for Household use. Read this Use & Care Guide carefully for important use and safety information. This guide contains safety statements under warning and caution symbols.
DOUBLE INSULATION INSTRUCTIONS
This spot cleaner is double insulated, eliminating the need for a separate grounding system. Use only identical replacements parts. Read the instructions for Servicing Double-Insulated Spot Cleaners before servicing. Use this spot cleaner as described in this manual.
Observe the following warnings that appear on the motor housing of your spot cleaner.

Double Insulated -
Grounding not required - When servicing use only identical replacement parts.

WARNING
To reduce the risk of electric shock - Do not expose to rain. Store indoors.

WARNING
For your own safety, read and understand the Use & Care Guide. Do not run unattended. Do not pick up hot ashes, coals, toxic, flammable or other hazardous materials. Do not use around explosive liquids or vapors.

WARNING
Servicing of Double-Insulated Spot Cleaners
With a double-insulated spot cleaner, two systems of insulation are provided instead of grounding. No grounding means is provided on a double-insulated appliance, nor should a means for grounding be added. Servicing a double insulated spot cleaner requires extreme care and knowledge of the system and should be done only by qualified service personnel. Replacement parts for a double-insulated spot cleaner must be identical to the parts they replace. Your double-insulated spot cleaner is marked with the words 'Double Insulated' and the symbol (square within a square) may also be marked on the appliance.
SPOT CLEANER WARRANTY
LIMITED WARRANTY
FOR ONE YEAR from the date of sale (or, for deliveries in the State of California, one year from the date of delivery) this product is warranted against defects in material or workmanship.
WITH PROOF OF SALE a defective product will be replaced free of charge.
The Kenmore brand is used under license. Direct all claims for warranty service to: 1-877-531-7321 (US) / 1-844-608-3081 (CA).
This warranty is void if this product is ever used for anything other than private household purposes. This warranty gives you specific legal rights, and you may also have other rights which vary from state to state.
Cleva North America, Inc., Greenville SC 29607
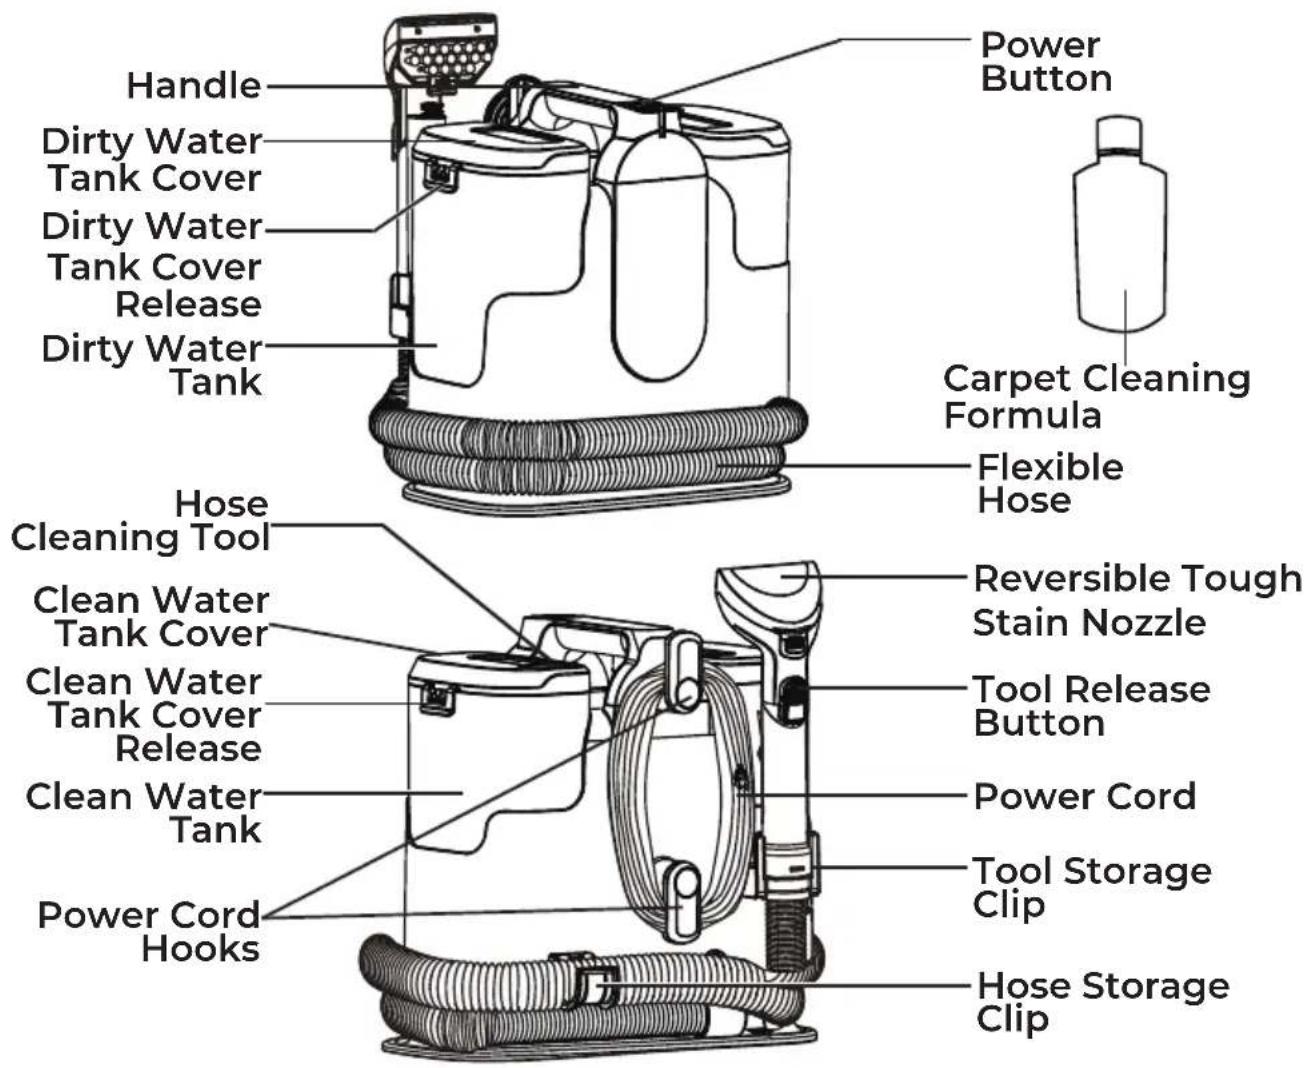
PARTS AND FEATURES
It is important to know your spot cleaner's parts and features to assure its proper and safe use. Review these before using your spot cleaner.
REPLACEMENT PARTS
| Item | PartNo.(US) | PartNo.(CA) |
| Tool Storage Clip 671 | 008101 67100 | 08101 |
| Dirty Water Tank 671 | 039101 67103 | 39101 |
| Clean Water Tank 671 | 1039102 67103 | 39102 |
| Reversible ToughStain Nozzle | 671039103 | 671039103 |
| Hose Cleaning Tool 671 | 011109 671 | 011109 |
| Hose Storage Clip 671 | 1008104 671008 | 1008104 |
To order a replacement part, call 1-877-531-7321 (US) / 1-844-608-3081 (CA).

Please pay special attention to these hazard alert boxes, and follow any instructions given. WARNING statements alert you to such hazards as fire, electric shock, burns and personal injury. CAUTION statements alert you to such hazards as personal injury and/or property damage.
ASSEMBLY INSTRUCTIONS
Before assembling the spot cleaner, check the PACKING LIST (page 2). Use this list to verify that you have received all the components of your new Kenmore Spot Cleaner.
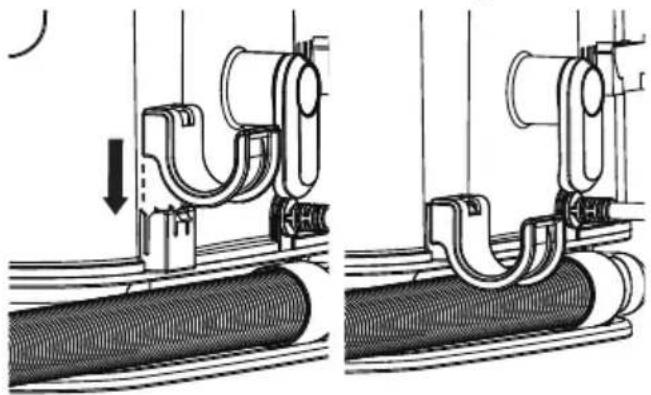
- Align the hose storage clip with the slot as shown. Slide down the hose storage clip until it is secured into place.
natural_image
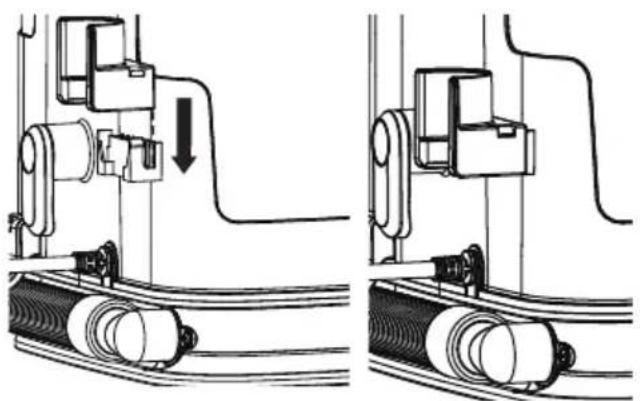
Technical illustration of mechanical assembly with no visible text or symbols- Align the tool storage clip with the slot as shown. Slide down the tool storage clip until it is secured into place.
natural_image
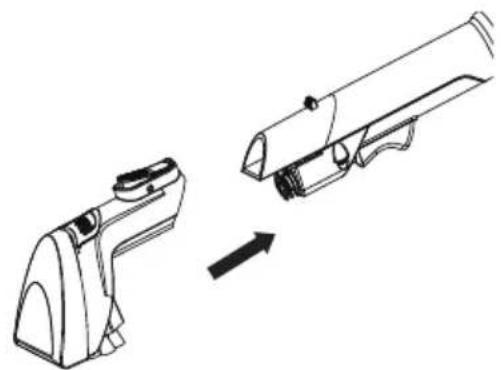
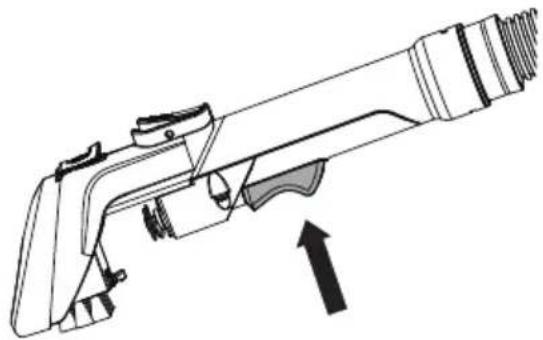
Technical diagram showing two mechanical assembly steps with no visible text or symbols- Slide the tough stain nozzle onto the end of the suction hose until it clicks into place.
To remove: Press the tool release button and pull away the tough stain nozzle.
natural_image
Line drawing of a firearm being processed from a cylindrical component (no text or symbols)Reversible Tough Stain Nozzle
This tool is designed with two sides, a bristle brush and a rubber brush.
Use the bristle side to scrub and lift stains, dirt, or pet messes from carpets, upholstery, and fabric surfaces.
Use the rubber side to remove embedded pet hair and debris from upholstery, pet beds, and more.
Flip the tool as needed to switch for more effective cleaning results. Insert the two tabs in the slots first and secure brush in place.
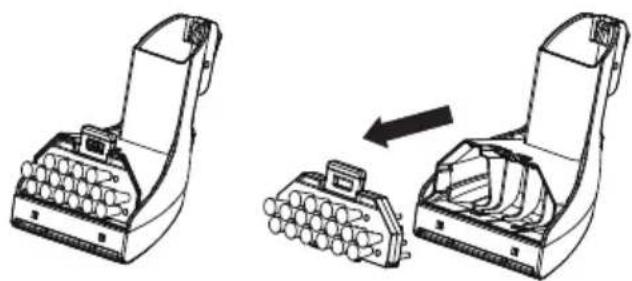
natural_image
Diagram showing two views of a mechanical device with internal components, one being folded and the other assembled (no text or symbols present)ASSEMBLY INSTRUCTIONS
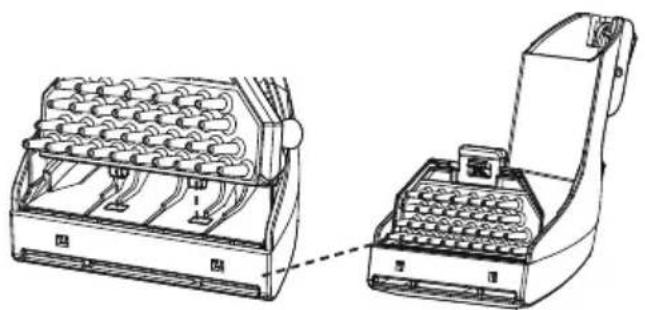
natural_image
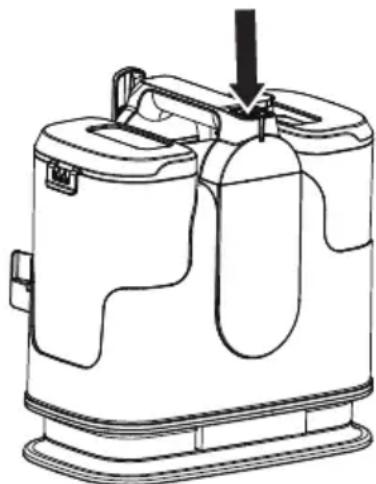
Technical line drawing of a mechanical device with internal components and a separate open top view (no text or symbols)NOTE: Put the flexible hose onto the hose storage clip. Snap the end of the hose with the tool installed into the tool storage clip when not in use.
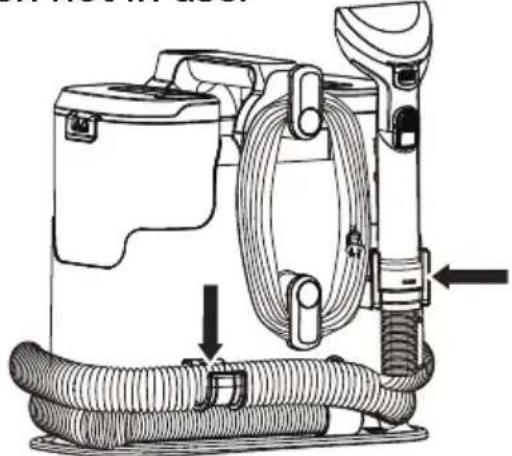
natural_image
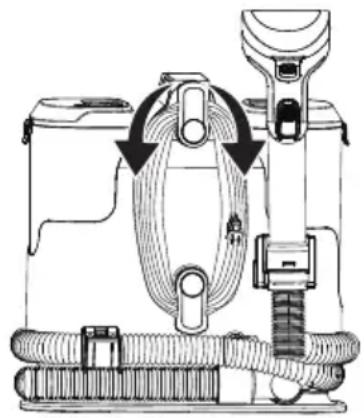
Technical line drawing of a portable vacuum cleaner with coiled hoses and attached device (no text or symbols)- Make sure both power cord hooks are in the proper position as shown. Wrap the power cord loosely around the cord hooks.
NOTE: Make sure to wrap the power cord around the lower cord hook first, and then around the upper cord hook to avoid damaging the power cord.
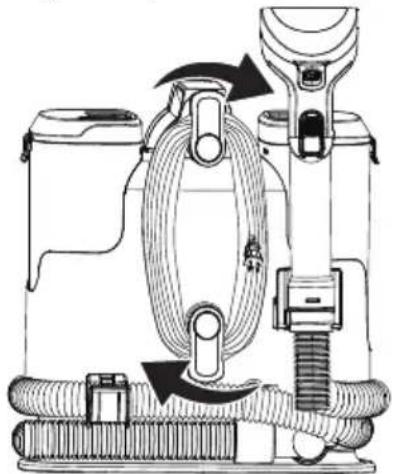
natural_image
Technical line drawing of a mechanical device with hoses and components, no visible text or symbols- Lock power cord plug onto the power cord.
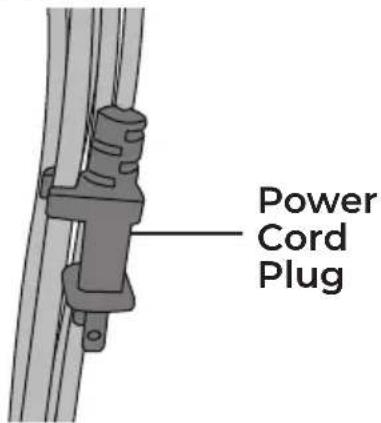
WARNING
Electrical Shock and Personal Injury Hazard
Wrapping the cord too tightly with excessive stress on the cord may cause cord damage. A damaged cord is an electrical shock hazard and could cause personal injury or damage.
POLARIZED PLUG
To reduce the risk of electrical shock, this appliance has a polarized plug (one blade wider than the other). This plug will fit in a polarized outlet only one way. If the plug does not fit fully in the outlet, reverse the plug. If it still does not fit, contact a qualified electrician to install the proper outlet. Do not change the plug in any way. Double insulation ☐ eliminates the need for the three-wire grounded power cord and grounded power supply system.
OPERATING INSTRUCTIONS
FILLING THE CLEAN WATER TANK
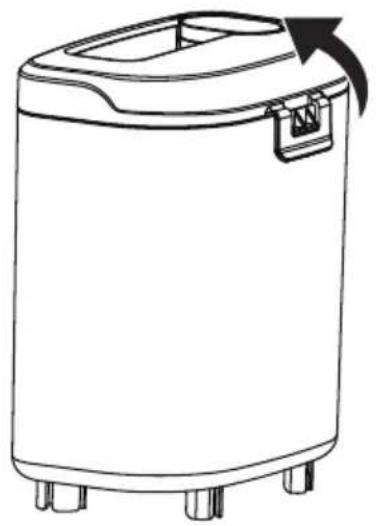
- Lift up the clean water tank from the side of the unit. A security latch is positioned to keep the clean water tank in position to avoid unintentional release. The latch will automatically release when the tank is pulled upwards.

- Remove the clean water tank cover by undoing the clean water tank cover release.
natural_image
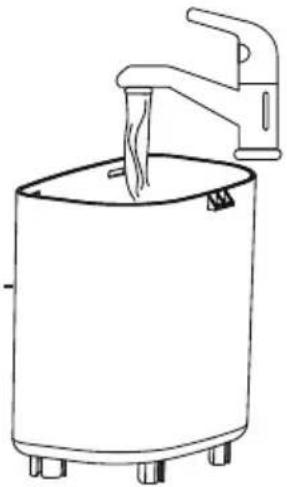
Line drawing of a four-legged washing machine with a handle and arrow indicating rotation (no text or symbols)- Fill the tank with clean water and cleaning formula. Ensure the correct proportion of water and cleaning solution is used by referring to the solution label.
SMALL CLEANING AREA - 0.8L/0.2G Liquid LARGE CLEANING AREA - 1.6L/0.4G Liquid
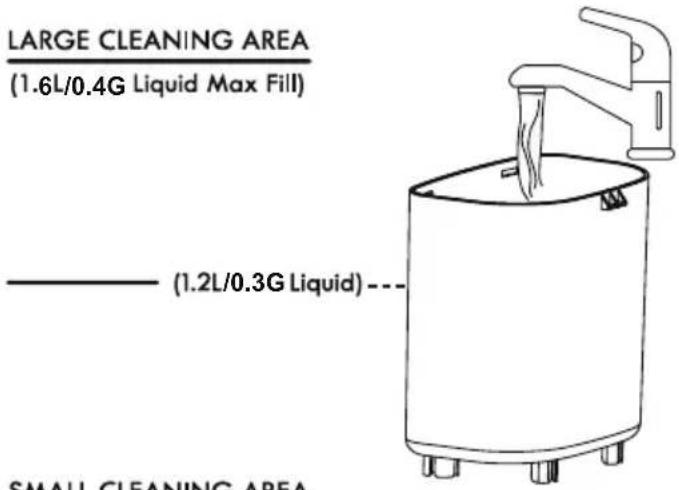
(0.8L/0.2G Liquid)
Do not exceed filling the clean water tank over the maximum fill line indicated on the clean water tank.
CAUTION
Do not fill with water above 104°F (40°C).
FILLING THE CLEAN WATER TANK
NOTE: An 8 oz. (236ml) bottle of cleaning formula is provided with this spot cleaner. Ensure the cleaning formula and water are mixed correctly. Water must be at room temperature. Once the initial sample is depleted, only use Kenmore cleaning solution KS1010 (available at kenmorefloorcare.com). Using other solutions may cause excessive foaming and will void your warranty.
NOTE: Using more than the recommended amount of cleaning formula may cause excessive foaming. KEEP OUT OF REACH OF CHILDREN. In case of eye contact, thoroughly flush with cold water. If irritation persists, consult a physician.
- Insert the locking tabs into the slots of the clean water tank first and then secure the clean water tank cover back into place until a click is heard.

natural_image
Line drawing of a kitchen appliance with an open lid and side-mounted base, shown in two views: top is close-up; bottom is detailed view (no text or symbols)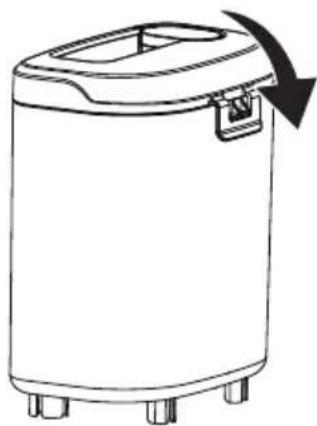
natural_image
Line drawing of a four-legged kitchenpan with a lid and arrow indicating rotation (no text or symbols)- Slide the clean water tank back onto the unit. The security latch will automatically secure once the clean water tank is in position. A click will be heard when correctly installed.
USING THE SPOT CLEANER
NOTE: Before using the spot cleaner, thoroughly vacuum the area to be cleaned. Always test a small hidden area for colorfastness and pile distortion. Test Colorfastness - Gently rub surface with a dampened white cloth containing cleaning solution. Wait 10 minutes and check for color removal with a white paper towel. If color changes, do not use.
NOTE: To prevent staining, please use plastic, wax paper or aluminum foil to protect wood or metal surfaces from possible water spray.
To protect the wooden oors underneath rugs, place protective material (e.g. plastic) underneath them before cleaning.
NOTE: Always refer to and follow the manufactures care guidelines before using cleaning solution and spot cleaner.
- Unwrap the hose from the unit. Make sure the tough stain nozzle is attached securely.
NOTE: The tough stain nozzle can be used for cleaning carpet stains, furniture and other hard-to-reach surfaces.
- Turn the power cord hooks inward from either side to release the power cord.
natural_image
Technical line drawing of a mechanical device with hoses and components (no text or symbols)- Detach the power cord plug from the power cord. Plug the power cord plug into an outlet located near the oor.

WARNING
Personal Injury and Product Damage Hazard
- When any abnormality/failure occurs, stop using the product immediately and disconnect the power plug.
• DO NOT clean over floor electrical outlets. Water will drip from the tool after use and may puddle.
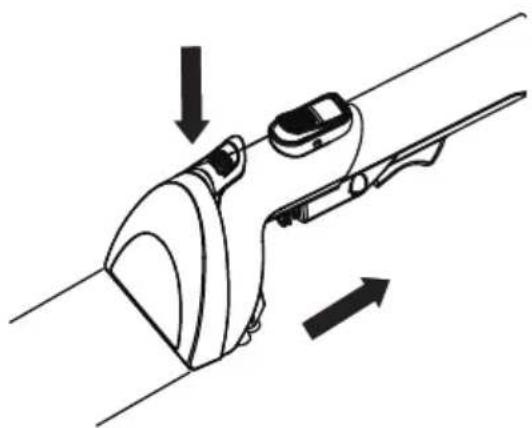
- Press the power button to turn the spot cleaner on.
natural_image
Line drawing of a mechanical device with a downward arrow indicating a component (no text or symbols present)USING THE SPOT CLEANER
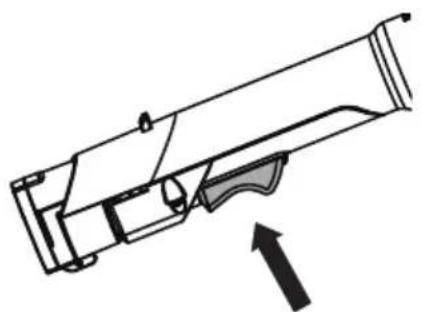
- Hold the tool about 1 inch over the stain to be cleaned. Squeeze the spray trigger to spray a generous amount of cleaning solution over the soiled area. Use the brush on the tool to agitate stains by scrubbing in a back and forth motion.
natural_image
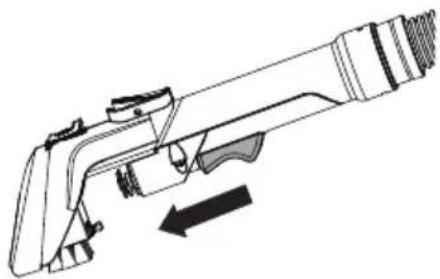
Line drawing of a firearm with an arrow indicating motion (no text or symbols)- To lift away the stain, apply downward pressure on the front of the cleaning tool and pull the tool backward slowly to vacuum up excess dirty liquids. Repeat as necessary.
natural_image
Diagram of a mechanical device with directional arrows indicating movement or force (no text or symbols)-
Empty the dirty water tank when the dirty liquid reaches the "Max Fill" line and there is a loss in suction. See instructions in the EMPTYING THE DIRTY WATER TANK (page 14-15).
-
Once you have completed cleaning, press the power button; and unplug the power cord plug from the outlet.
-
Turn the power cord hooks to the proper position and wrap the cord loosely around the power cord hooks.
EMPTYING THE DIRTY WATER TANK

WARNING
Always unplug power cord from electrical outlet before performing any service on spot cleaner.
Empty the dirty water tank when the dirty liquid reaches the "Max Fill" line and there is a loss in suction. During normal use, debris may accumulate in the dirty water tank. In order to keep the spot cleaner functioning properly, rinse out the dirty water tank with clean water after each use.
- Lift up the dirty water tank from the side of the unit. A security latch is positioned to keep the dirty water tank in position to avoid unintentional release. The latch will automatically release when the tank is pulled upwards.
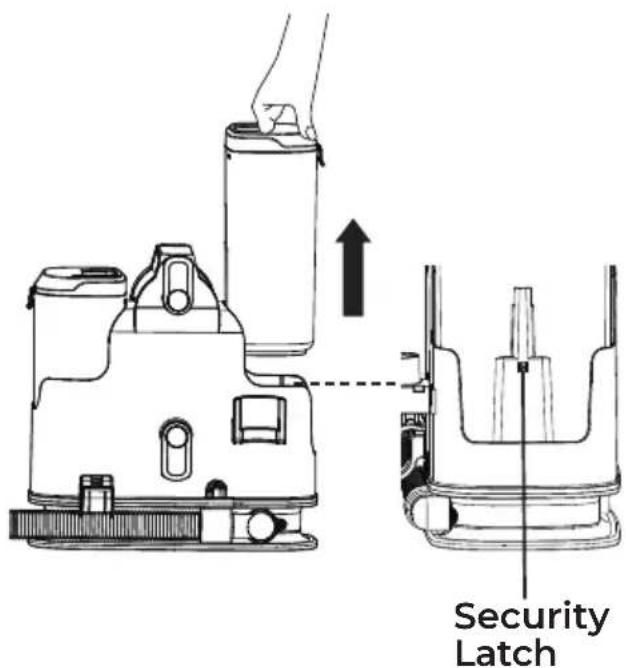
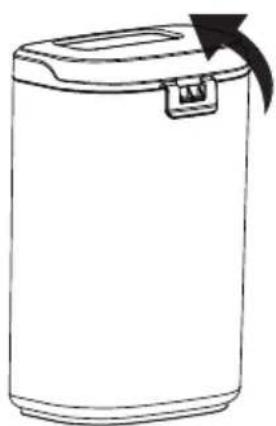
- Remove the dirty water tank cover by undoing the dirty water tank cover release.
natural_image
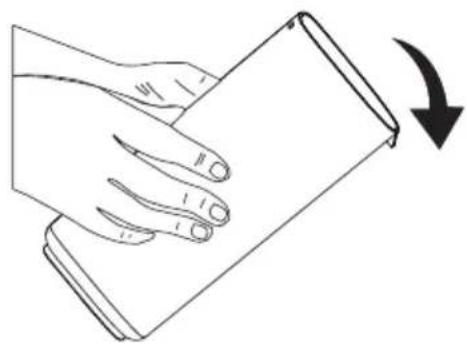
Line drawing of a cylindrical water dispenser with a lid and arrow indicating rotation (no text or symbols)- Empty the tank into a sink or toilet. Rinse the tank thoroughly with clean water. If continuing to use after emptying the dirty water tank, be sure to dry the outside of the tank before reinstalling.
natural_image
Line drawing of a hand holding a smartphone with a curved arrow indicating rotation (no text or symbols)EMPTYING THE DIRTY WATER TANK
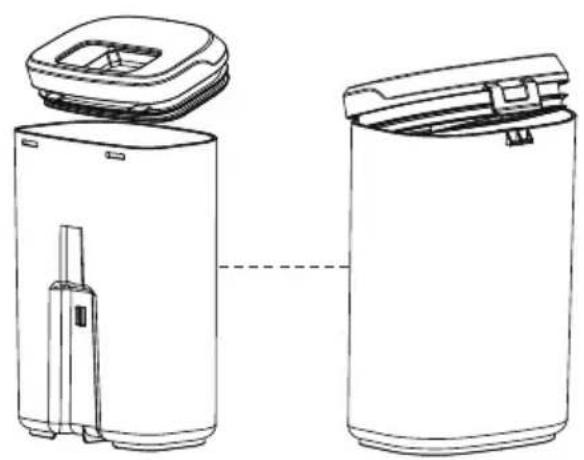
- Insert the locking tabs into the slots of the dirty water tank first and then secure the dirty water tank cover back into place until a click is heard.
natural_image
Line drawing of two identical industrial water purifiers with different internal structures, connected by a dashed line indicating connection (no text or symbols present)
natural_image
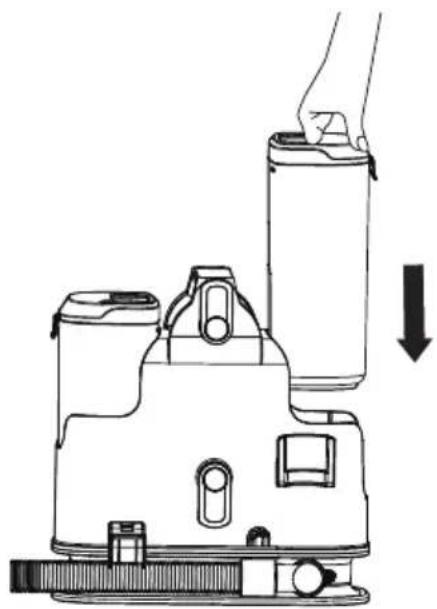
Line drawing of a cylindrical container with a lid and arrow indicating downward motion (no text or symbols)- Reinstall the dirty water tank back onto the unit. The security latch will automatically secure the dirty water tank in position. A click will be heard when correctly installed.
natural_image
Diagram of a hand operating a cylindrical device with a downward arrow indicating motion (no text or symbols present)WARNING
The motor noise changes to a higher pitch when the dirty water tank is full or blocked. Stop the spot cleaner immediately and empty the dirty water tank.
MAINTENANCE AND CARE
Always follow all safety precautions when performing maintenance to the spot cleaner.

WARNING
Electrical Shock and Personal Injury Hazard
Disconnect electrical supply before servicing or cleaning the spot cleaner. Failure to do so could result in electrical shock or personal injury from spot cleaner suddenly starting.
CLEANING EXTERIOR AND ATTACHMENTS
- Turn off and unplug spot cleaner. DO NOT drip water on spot cleaner.
- To clean exterior, or to reduce static electricity and dust build-up, wipe outer surface
with a clean, soft cloth that has been dipped in a solution of mild liquid detergent and water, then wrung dry. Wipe dry after cleaning.
SPOT CLEANER STORAGE

WARNING
Electrical Shock and Personal Injury Hazard
Wrapping the cord too tightly puts stress on the cord and can cause cord damage. A damaged cord is an electrical shock hazard and could cause personal injury or damage.
-
Replace suction hose and attachments in storage position.
-
Wrap the power cord loosely around the cord hooks. Attach plug retainer clip onto the power cord.
-
Empty the clean water tank (if necessary). Rinse it out before replacing on the unit. Open the clean water tank cap to allow it to air dry.
- Empty the dirty water tank then rinse, clean and dry before placing back on the unit.
- Store the spot cleaner in a dry and cool indoor area.
CLEANING THE TOUGH STAIN NOZZLE
It is recommended to clean the tough stain nozzle with water after each use.
- Press the tool release button to remove the attachment from the hose.
natural_image
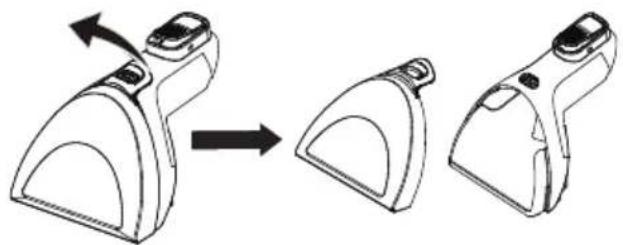
Line drawing of a firearm with an arrow indicating motion (no text or symbols)- Pull up the cover release tab on the nozzle to remove the cover.
natural_image
Diagram showing a device being processed from a left-side tool, with no visible text or symbols.-
Rinse thoroughly with clean water. Allow the parts to dry before reinstalling.
-
Reinstall the nozzle cover and then insert back into place until a click is heard.
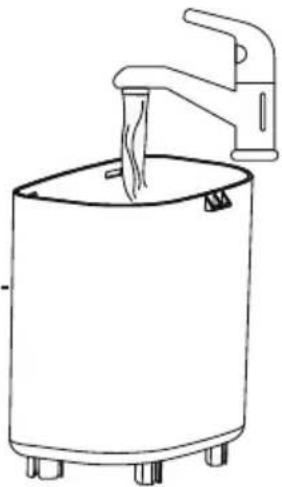
HOSE CLEANING TOOL
- Remove the clean water tank and fill with clean water.
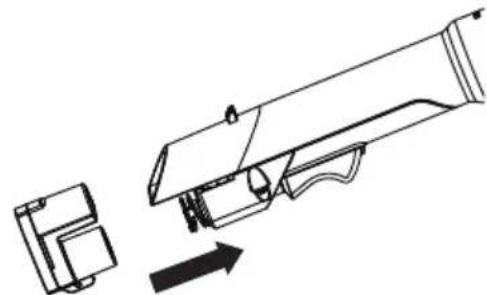
- Attach the hose cleaning tool to the suction hose. Ensure the tough stain nozzle is removed.
natural_image
Technical line drawing of a firearm component with an arrow indicating motion (no text or symbols)-
Make sure both the clean water and dirty water tanks are secured on the unit.
-
Press the power button to turn the spot cleaner on and hold the spray trigger for 30 seconds. The clean water will rush through the suction hose, effectively cleaning and removing any trapped dirt and debris in the hose which may build up over time. Repeat as needed. Let the machine run for 5-10 seconds before turning off.
natural_image
Technical line drawing of a mechanical component with an arrow indicating direction (no text or symbols)- Turn off and unplug the spot cleaner.
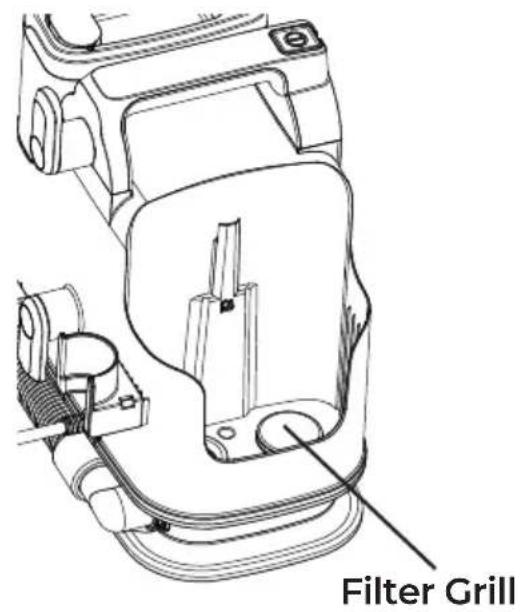
CLEANING THE FILTER GRILL
- Firmly grip the dirty water tank handle and carefully pull the tank away from the main body.
- Once the tank is removed, you will see the filter grill.
- Use a soft brush or cloth (or a small vacuum attachment) to gently remove any accumulated dirt, hair, or large debris from the filter grill.
- Ensure the grill is clean before reattaching the dirty water tank until it clicks securely back into place.
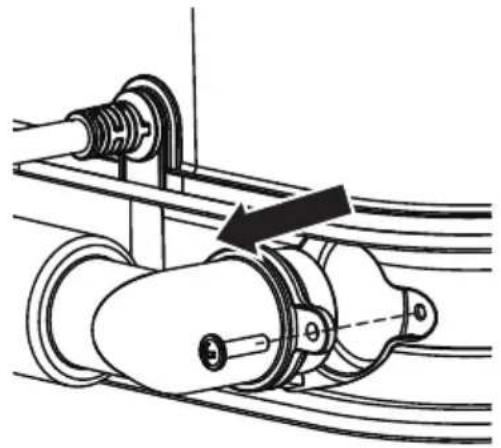
REMOVING THE HOSE BLOCKAGE
- Use a Phillips screw driver to unscrew the hose and remove it from the spot cleaner. Do not pull the hose excessively.
natural_image
Mechanical assembly diagram showing a shaft and housing with a directional arrow indicating motion (no text or symbols present)- Check and remove any clogs.
- Ensure the sealing ring is positioned on the hose properly. Reattach the hose onto the spot cleaner and tighten the screw.
NOTE: Do not use scissors or other sharp objects to remove blockages from the hose as these may damage the hose.
TROUBLESHOOTING
Review this table to find do-it-yourself solutions for minor performance problems. Any service needed, other than maintenance described in this Use & Care Guide, should be performed by a qualified service agent.

WARNING
Disconnect electrical supply before performing maintenance to the spot cleaner. Failure to do so could result in electrical shock or personal injury.
| PROBLEM | POSSIBLE CAUSE SOLUTION | |
| The cleaner will not run. | Unplugged at wall outlet. | Plug in firmly. |
| Defective wall outlet. | Check with a good appliance or lamp. Be sure the power cord plug is fully plugged into a good wall outlet. | |
| The motor is damaged. | Call 1-877-531-7321 (US) / 1-844-608-3081 (CA) for assistance. | |
| Poor job of dirt pick-up. | Dirty water tank is not installed correctly. | Check the dirty water tank for correct installation. Ensure it is installed in place. |
| Dirty water tank is full. Empty the dirty water tank. | ||
| The suction hose is clogged. | Clean the hose. Refer to page 18. | |
| Float valve is activated. Empty the dirty water tank. | ||
| Water escapes from the spot cleaner. | Dirty water tank is full. Empty the dirty water tank. | |
| Dirty water tank is not installed correctly. | Check the dirty water tank for correct installation. Ensure it is installed in place. | |
| Clean water tank is not installed correctly. | Check the clean water tank for correct installation. Ensure it is installed in place. | |
| Reduced or no spray through nozzle of the cleaner. | Clean water tank is empty. | Fill the clean water tank. |
| Clean water tank is not installed correctly. | Check the clean water tank for correct installation. Ensure it is installed in place. | |
| Hose nozzle will not spray after filling the clean water tank. | Air is trapped in the pump and hose. | Turn on the spot cleaner. If hose does not spray, prime the pump by lowering the hose down to the floor and hold the trigger for up to 1 minute. |
TROUBLESHOOTING
| Motor noise becomes high-pitched. | Dirty water tank is full. Empty the dirty water tank. | |
| The suction hose is clogged. | Clean the hose. Refer to page 18. | |
| The float in the dirty water tank has been activated. | Empty and clean the dirty water tank. | |
TABLA DE CONTENIDO
Cleva North America, Inc., Greenville SC 29607
PIEZAS Y CARACTERÍSTICAS
natural_image
Technical illustration of mechanical assembly with two views showing a U-shaped component being inserted into a coiled cable (no text or symbols present)natural_image
Technical line drawing showing two mechanical assembly steps with no visible text or symbolsnatural_image
Line drawing of a mechanical device with an arrow indicating transformation (no text or symbols)Boquilla reversible para manchas difíciles
natural_image
Technical line drawing of a portable air purifier with hoses and control panel (no text or symbols)natural_image
Technical diagram of a mechanical device with hoses and components, no visible text or symbolsINSTRUCCIONES DE ENSAMBLAJE

ADVERTENCIA
natural_image
Line drawing of a four-legged washing machine with a lid and arrow indicating rotation (no text or symbols)(1.6L/0.4G Liquid Max Fill)
(1.2L/0.3G Liquid) ---
natural_image
Line drawing of a cylindrical container with a faucet inserted into it, showing liquid being poured into it (no text or symbols)SMALL CLEANING AREA
(0.8L/0.2G Liquid)
natural_image
Line drawing of a cylindrical device with an open lid and internal compartments, shown from an inset view (no text or symbols)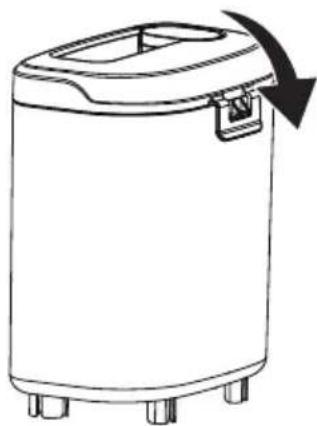
natural_image
Line drawing of a four-legged kitchenpan with a lid and arrow indicating rotation (no text or symbols)natural_image
Technical line drawing of a mechanical device with hoses and a lever (no text or symbols)ADVERTENCIA
natural_image
Line drawing of a mechanical device with a valve and housing (no text or symbols)natural_image
Line drawing of a firearm with an arrow indicating motion or force direction (no text or symbols present)natural_image
Technical line drawing of a mechanical device with directional arrows indicating motion (no text or symbols)natural_image
Line drawing of a cylindrical water dispenser with a handle and arrow indicating rotation (no text or symbols)natural_image
Line drawing of a hand holding a rectangular object with a curved arrow indicating rotation (no text or symbols)natural_image
Line drawing of two different household appliances, one open and one closed, with no visible text or symbols.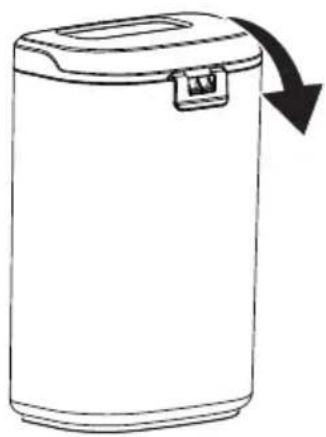
natural_image
Line drawing of a cylindrical container with a lid and arrow indicating downward motion (no text or symbols)natural_image
Line drawing of a hand operating a vacuum cleaner with a downward arrow indicating motion (no text or symbols)ADVERTENCIA
natural_image
Line drawing of a firearm with an arrow indicating motion (no text or symbols)natural_image
Diagram showing a device being processed from a left-side tool to a right-side tool, with no visible text or symbols.natural_image
Technical line drawing of a firearm with an inset showing internal components (no text or symbols)natural_image
Mechanical assembly diagram showing a shaft and housing with a directional arrow indicating motion (no text or symbols present)Cleva North America, Inc., Greenville SC 29607
PIÈCES ET FONCTIONNALITÉS
natural_image
Technical illustration of mechanical assembly with no visible text or symbolsnatural_image
Technical diagram showing two mechanical assembly steps with no visible text or symbolsnatural_image
Technical line drawing showing a mechanical device being processed into a cylindrical component (no text or symbols present)natural_image
Technical line drawing of a portable air purifier with hoses and control panel (no text or symbols)natural_image
Technical diagram of a mechanical device with rope and lever mechanism (no text or symbols)natural_image
Line drawing of a portable kitchen appliance with a handle and wheels (no text or symbols)LARGE CLEANING AREA (1.6L/0.4G Liquid Max Fill)
natural_image
Line drawing of a cylindrical water dispenser with a faucet, showing liquid being poured into it (no text or symbols)SMALL CLEANING AREA (0.8L/0.2G Liquid)
ATTENTION
natural_image
Line drawing of a two-step kitchen appliance with a close-up inset showing internal components (no text or symbols)natural_image
Technical diagram of a mechanical device with hoses and a valve, no visible text or symbolsnatural_image
Line drawing of a portable gas stove with a valve and lid (no text or symbols)UTILISATION DU NETTOYEUR DE TACHES
natural_image
Line drawing of a firearm with an arrow indicating motion or force direction (no text or symbols present)natural_image
Diagram of a mechanical device with directional arrows indicating motion or force (no text or symbols)natural_image
Line drawing of a cylindrical water dispenser with a handle and arrow indicating rotation (no text or symbols)natural_image
Line drawing of a hand holding a smartphone with a curved arrow indicating rotation (no text or symbols)VIDANGE DU RÉSERVOIR D'EAU SALE
natural_image
Line drawing of two different household appliances, one open and one closed, with no text or symbols present.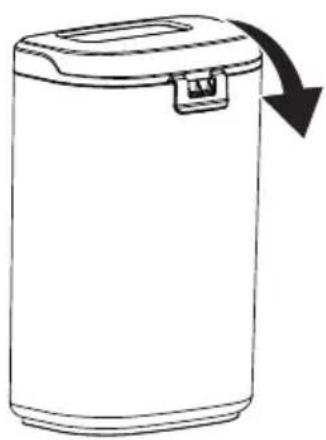
natural_image
Line drawing of a cylindrical container with a lid and arrow indicating downward motion (no text or symbols)natural_image
Line drawing of a hand operating a cylindrical device with a downward arrow indicating motion (no text or symbols)AVERTISSEMENT
natural_image
Line drawing of a firearm with an arrow indicating motion (no text or symbols)natural_image
Diagram showing a device being processed from a curved tool, with no visible text or symbols.natural_image
Technical line drawing of a firearm component with an arrow indicating motion (no text or symbols)natural_image
Technical line drawing of a firearm component with an arrow indicating upward motion (no text or symbols)natural_image
Mechanical assembly diagram showing a shaft connected to a housing with a directional arrow indicating motion (no text or symbols present)Kenmore and the Kenmore logo are registered trademarks of Transform SR Brands LLC and are used under license by Cleva North America, Inc., Greenville, SC 29607
- Portable Carpet Spot and Pet Stain Cleaner
- TABLE OF CONTENTS
- PACKING LIST
- IMPORTANT SAFETY INSTRUCTIONS
- WARNING!
- CAUTION
- WARNING
- SAVE THESE INSTRUCTIONS
- DOUBLE INSULATION INSTRUCTIONS
- SPOT CLEANER WARRANTY
- LIMITED WARRANTY
- PARTS AND FEATURES
- ASSEMBLY INSTRUCTIONS
- Reversible Tough Stain Nozzle
- POLARIZED PLUG
- OPERATING INSTRUCTIONS
- FILLING THE CLEAN WATER TANK
- USING THE SPOT CLEANER
- EMPTYING THE DIRTY WATER TANK
- MAINTENANCE AND CARE
- CLEANING EXTERIOR AND ATTACHMENTS
- SPOT CLEANER STORAGE
- CLEANING THE TOUGH STAIN NOZZLE
- HOSE CLEANING TOOL
- CLEANING THE FILTER GRILL
- REMOVING THE HOSE BLOCKAGE
- TROUBLESHOOTING
- TABLA DE CONTENIDO
- PIEZAS Y CARACTERÍSTICAS
- Boquilla reversible para manchas difíciles
- INSTRUCCIONES DE ENSAMBLAJE
- ADVERTENCIA
- PIÈCES ET FONCTIONNALITÉS
- ATTENTION
- UTILISATION DU NETTOYEUR DE TACHES
- VIDANGE DU RÉSERVOIR D'EAU SALE
- AVERTISSEMENT
Brand : KENMORE
Model : KW1049
Category : Vacuum Cleaner