
WOI4S8HM0SXA - Oven WHIRLPOOL - Free user manual and instructions
Find the device manual for free WOI4S8HM0SXA WHIRLPOOL in PDF.

| Brand | Whirlpool |
| Model | WOI4S8HM0SXA |
| Product type | Built-in oven |
| Power supply | 230 V ~ 50/60 Hz, 16 A (adjustable to 13 A) |
| Capacity | 70 L (estimated) |
| Main functions | Natural convection, Forced air, Rotisserie, Grill, Turbo grill, Air Fry, Pizza (up to 310°C), Steam+, Dough proofing, Smart Clean, Fast Preheat, ECO, 6th Sense (Stew, Meat, Bread, Cakes) |
| Cleaning type | Smart Clean (low temperature steam); catalytic panels (depending on model) |
| Lighting | Halogen bulb 40 W/230 V, type G9, T300°C |
| Supplied accessories | Metal grid, drip tray, baking tray, Air Fry tray (depending on model), telescopic rails (depending on model) |
| Removable door | Yes, for easy cleaning |
| Key lock | Yes, activate by long press on BACK button |
| Settings | Temperature unit (°C/°F), nominal current (16A/13A) |
| Energy consumption | ECO program for optimization |
| Repairability | Replaceable bulb, parts available via after-sales service |
| Manufacturer | Whirlpool, licensed product |
Frequently Asked Questions - WOI4S8HM0SXA WHIRLPOOL
User questions about WOI4S8HM0SXA WHIRLPOOL
0 question about this device. Answer the ones you know or ask your own.
Ask a new question about this device
Download the instructions for your Oven in PDF format for free! Find your manual WOI4S8HM0SXA - WHIRLPOOL and take your electronic device back in hand. On this page are published all the documents necessary for the use of your device. WOI4S8HM0SXA by WHIRLPOOL.
USER MANUAL WOI4S8HM0SXA WHIRLPOOL
THANK YOU FOR BUYING A WHIRLPOOL PRODUCT
In order to receive a more complete assistance, please register your product on www.register10.eu

Before using the appliance carefully read the Safety Instruction.
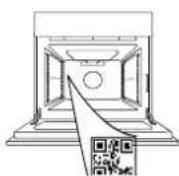
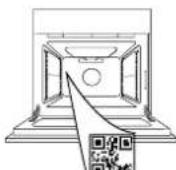
PLEASE SCAN THE QR CODE ON YOUR APPLIANCE IN ORDER TO REACH MORE INFORMATION
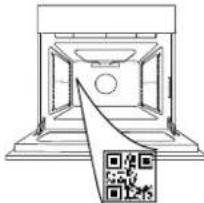
natural_image
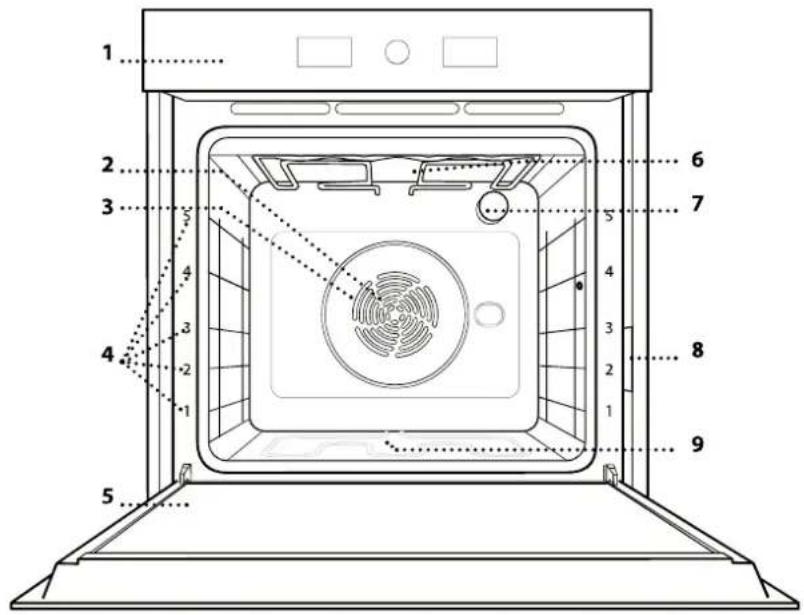
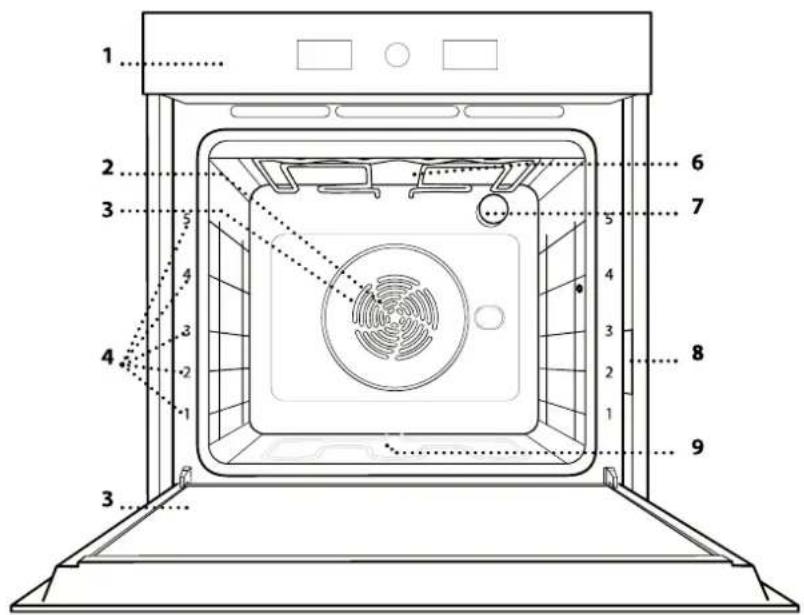
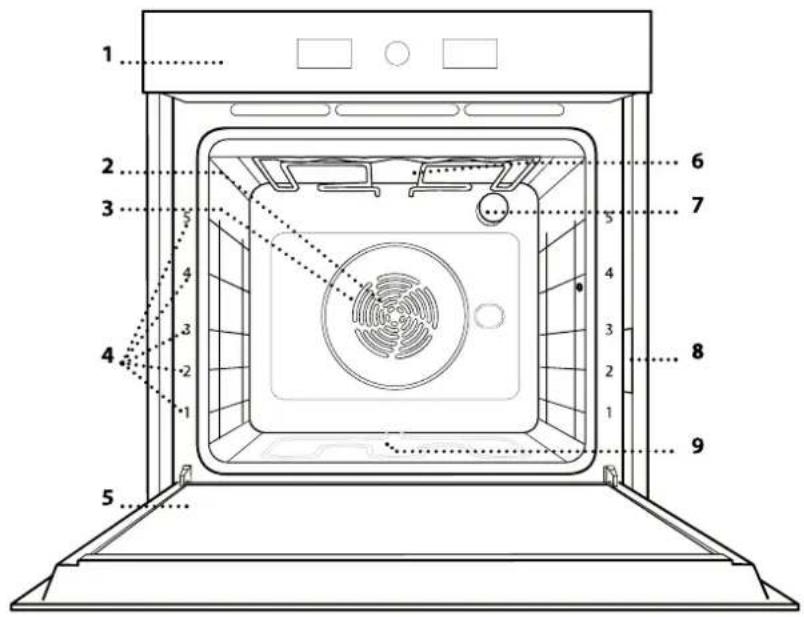
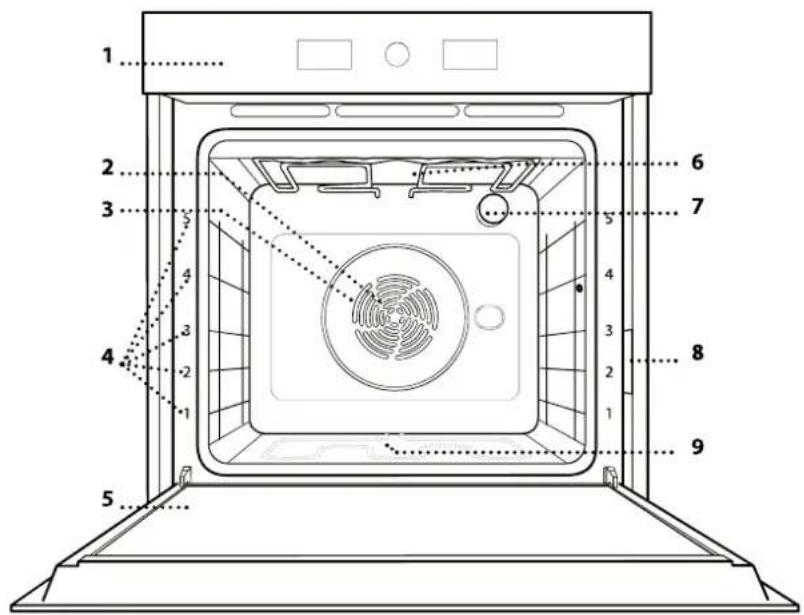
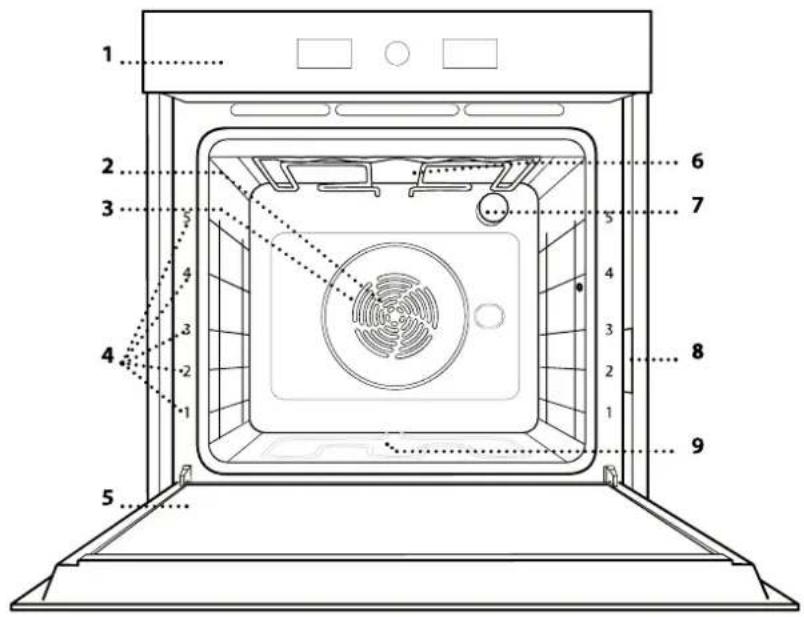
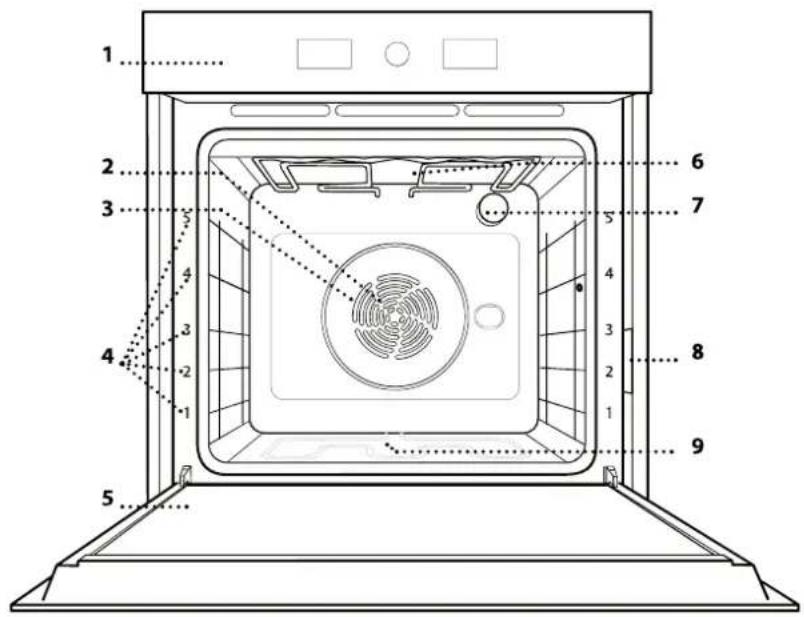
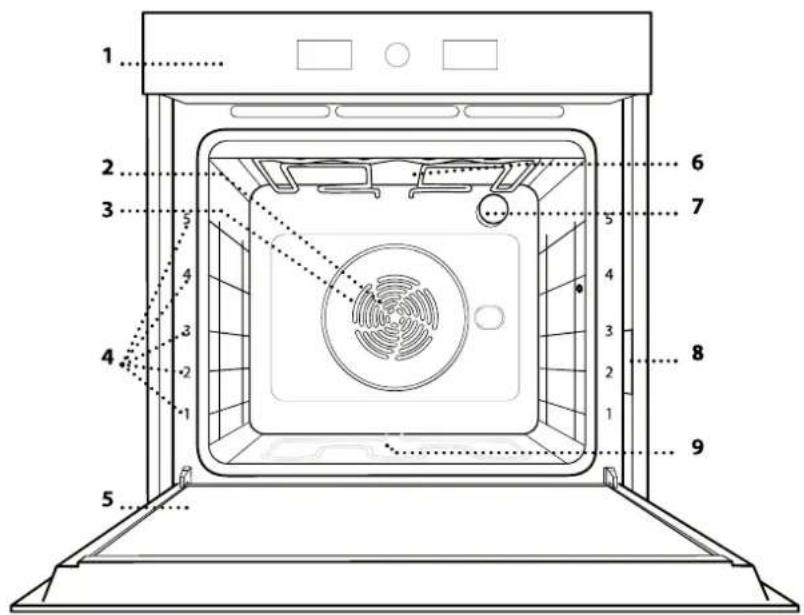
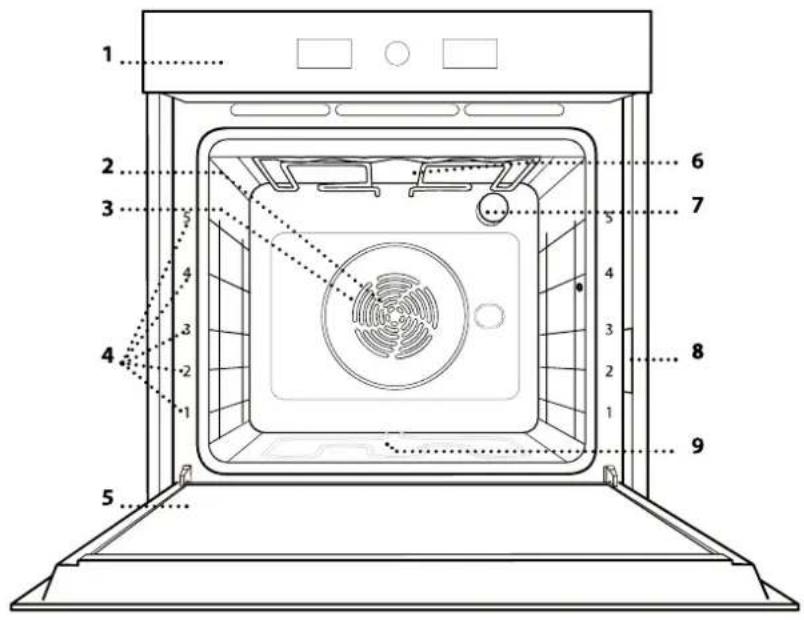
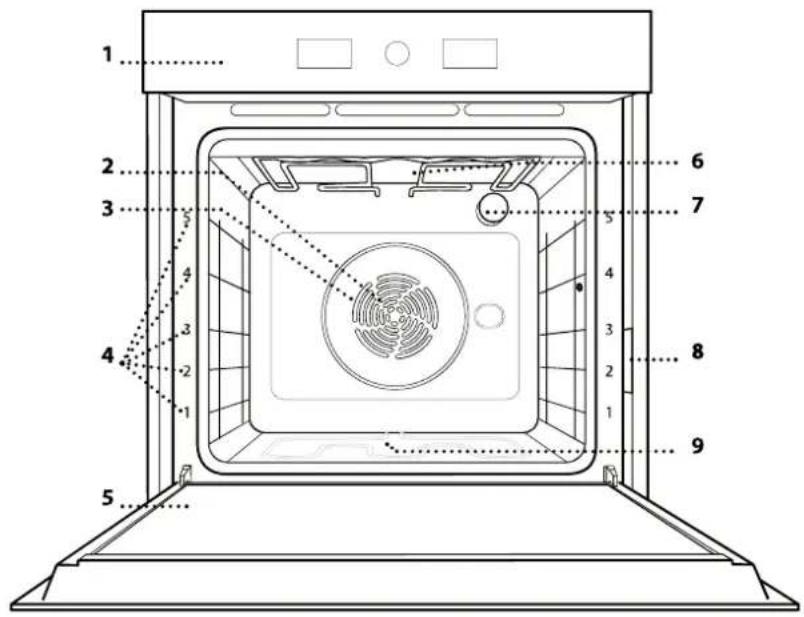
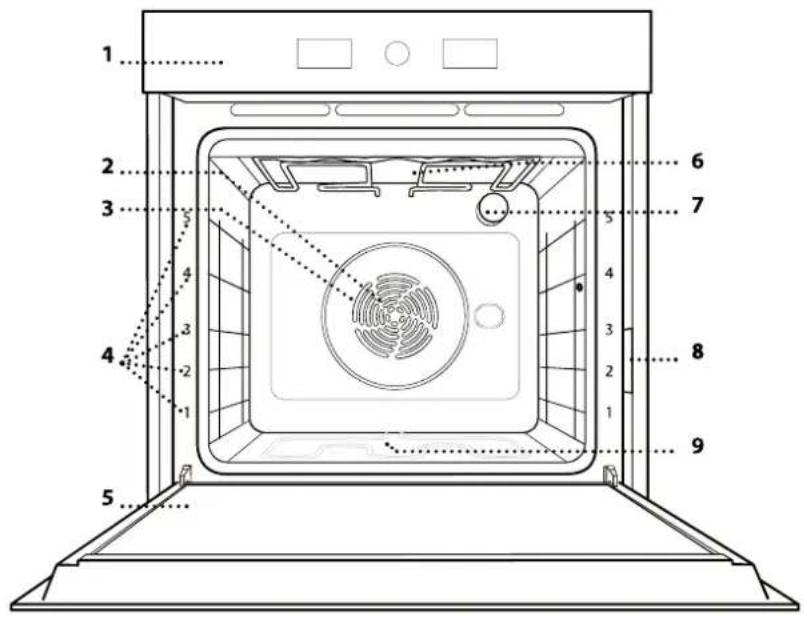
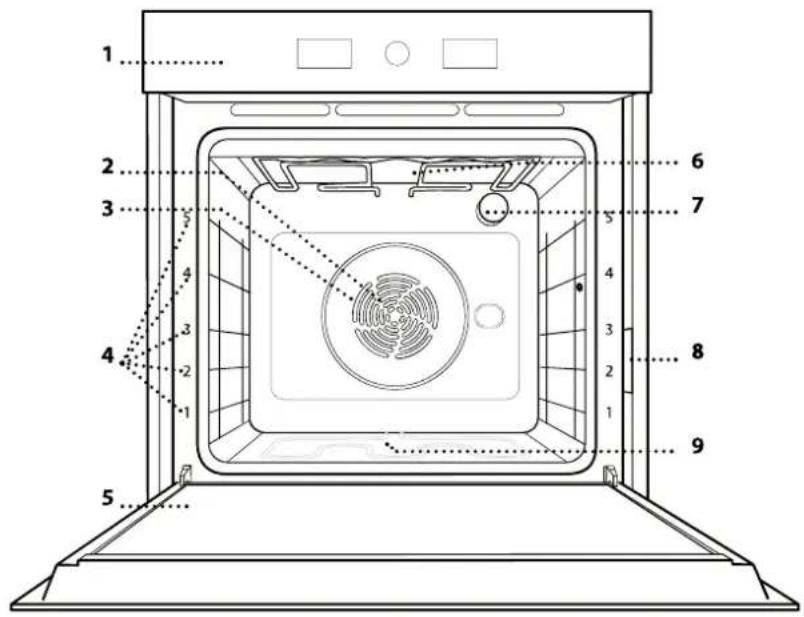
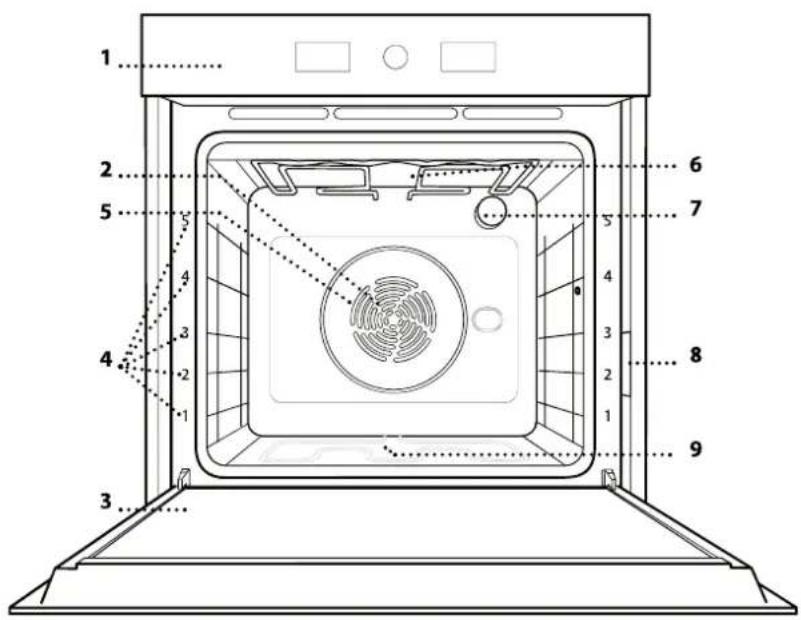
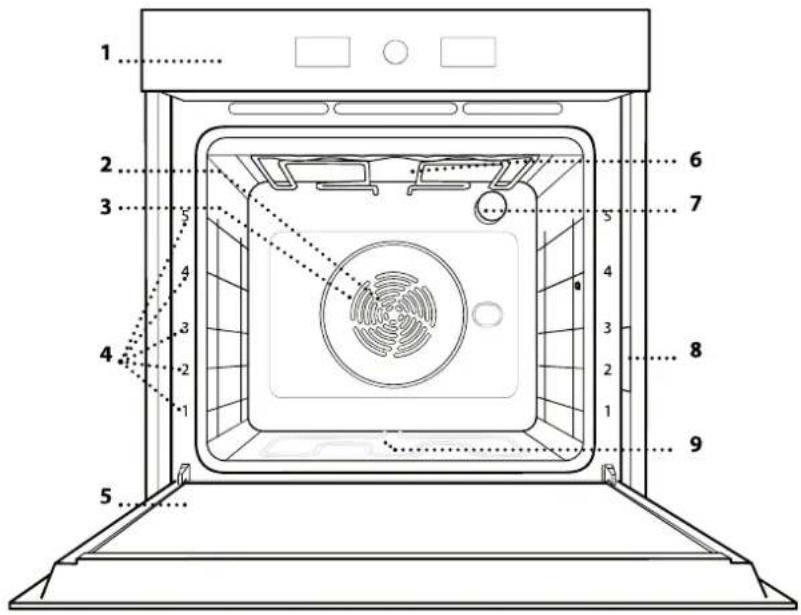
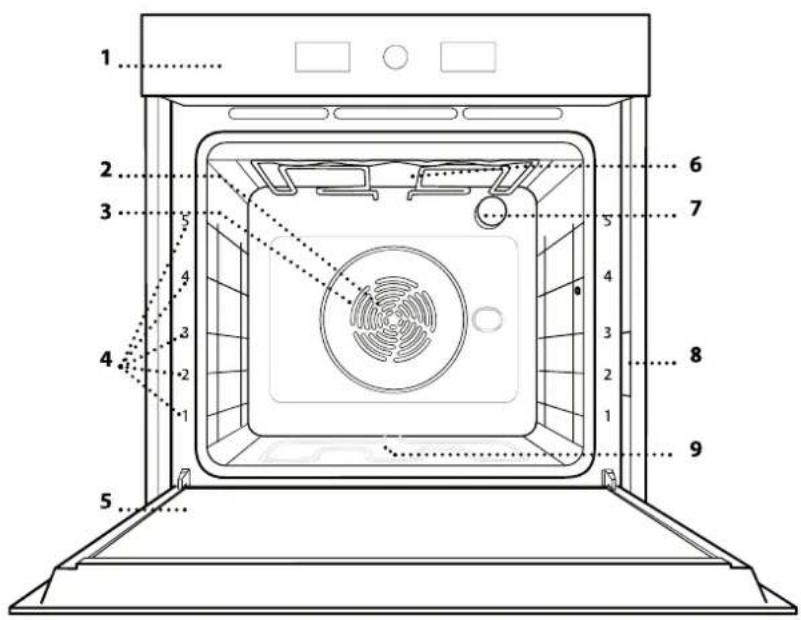
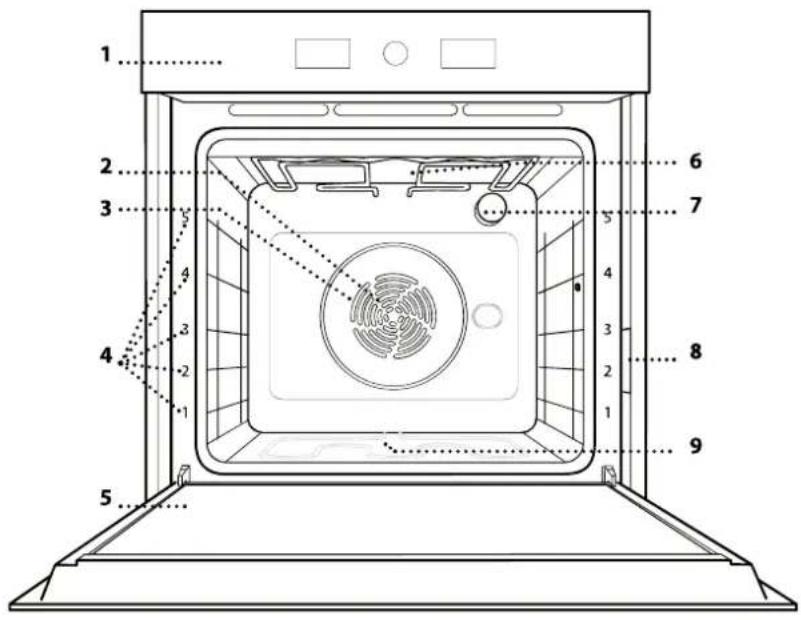
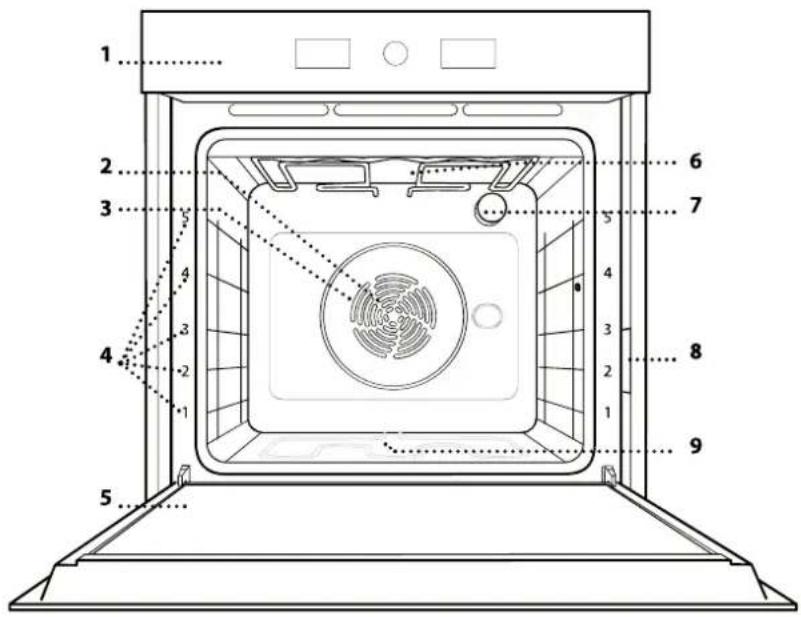
Line drawing of a 3D printer with a QR code overlay (no text or symbols on the diagram itself)PRODUCT DESCRIPTION
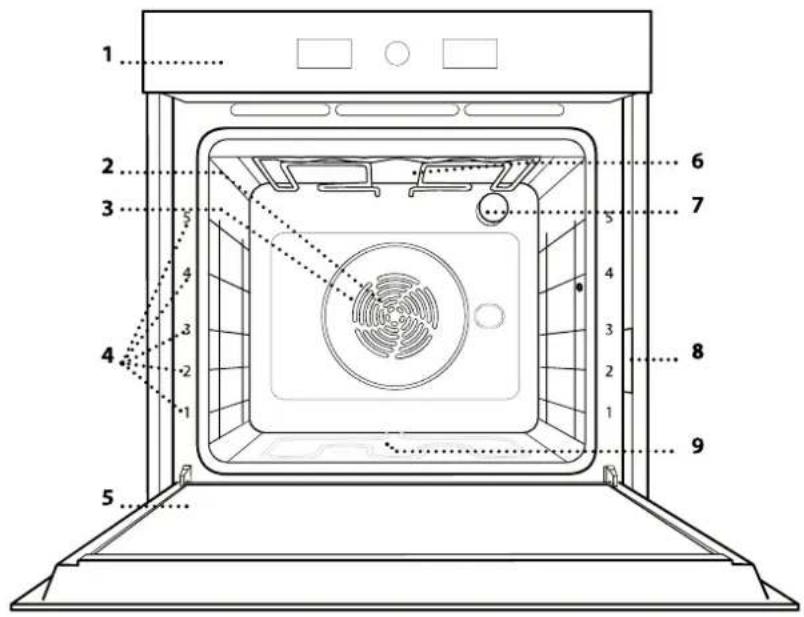
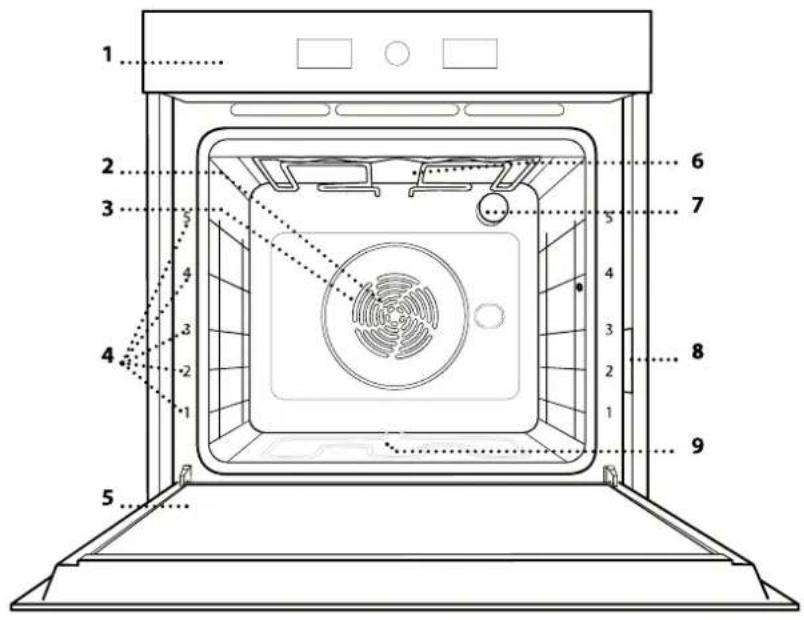
- Control panel
- Fan
- Circular heating element (non-visible)
- Shelf guides (the level is indicated on the front of the oven)
- Door
- Upper heating element/grill
- Lamp
- Identification plate (do not remove)
- Lower heating element (non-visible)
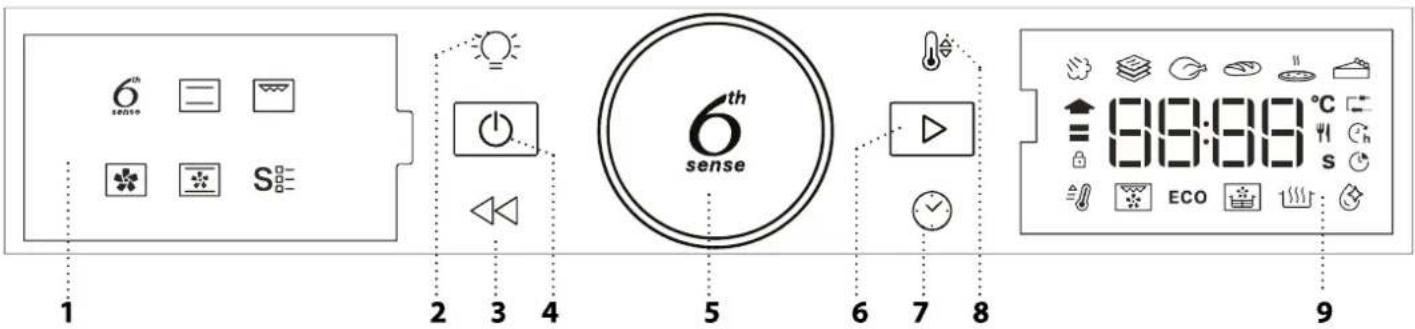
CONTROL PANEL
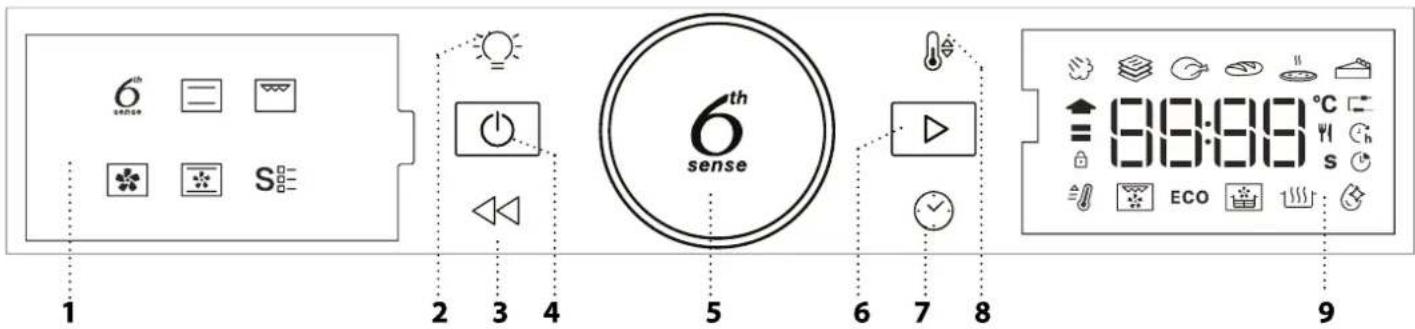
1. LEFT HAND DISPLAY
2. LIGHT
For switching the lamp on/off.
3. BACK
For returning to the previous screen. During cooking, allows settings to be changed.
4. ON/OFF
For switching the oven on and off and for stopping an active function at any time.
5. ROTARY KNOB
Turn this to navigate through the functions and adjust all of the cooking parameters. Press to select, set, access or confirm functions or parameters and eventually start the cooking program.
6. START
For starting functions and confirming settings.or a set value.
7. TIME
For setting the time as well as setting or adjusting the cooking time.
8. TEMPERATURE
For setting the temperature.
- RIGHT-HAND DISPLAY
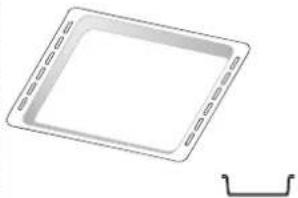
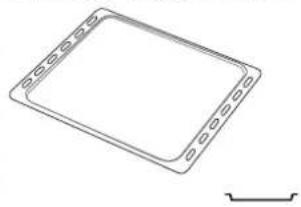
ACCESSORIES
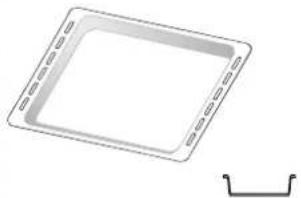
WIRE SHELF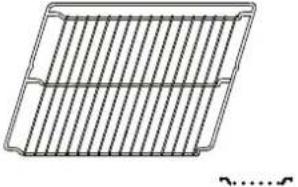 | DRIP TRAY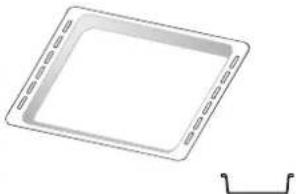 | BAKING TRAY *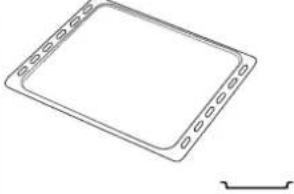 | SLIDING RUNNERS *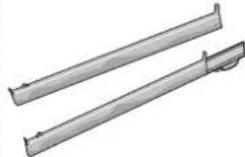 |
| Use to cook food or as a support for pans, cake tins and other ovenproof items of cookware. | Use as an oven tray for cooking meat, fish, vegetables, focaccia, etc. or position underneath the wire shelf to collect cooking juices. | Use for cooking all bread and pastry products, but also for roasts, fish en papillotte, etc. | To facilitate inserting or removing accessories. |
AIR FRY TRAY * 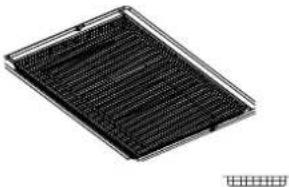 | The number and the type of accessories may vary depending on which model is purchased.Other accessories can be purchased separately; for orders and information contact the after sales service.* Available only in certain models | ||
| To be used when cooking foods with Air Fry function, with a baking tray positioned at a lower level to collect possible crumbs and drip. It can be cleaned in the dishwasher. | |||
INSERTING THE WIRE SHELF AND OTHER ACCESSORIES
Insert the wire shelf horizontally by sliding it across the shelf guides, making sure that the side with the raised edge is facing upwards.
Other accessories, such as the drip tray and the baking tray, are inserted horizontally in the same way as the wire shelf.
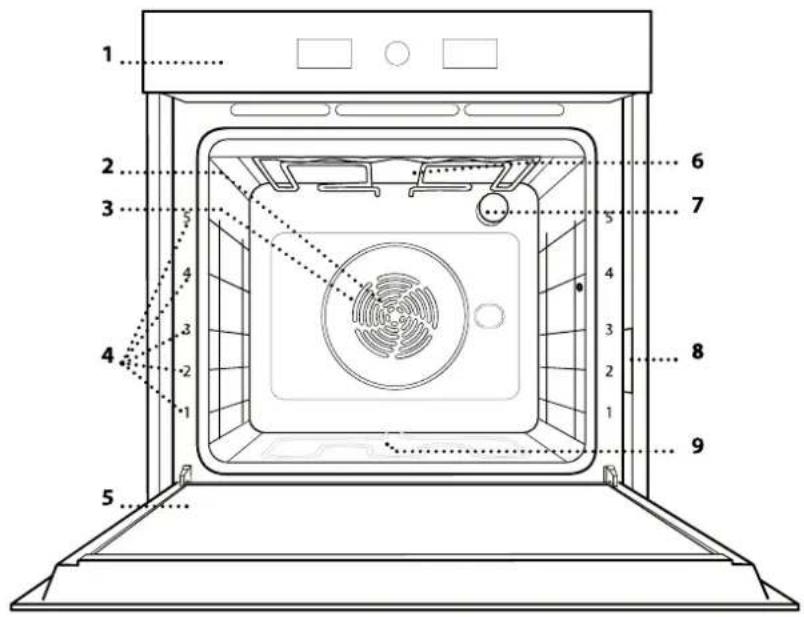
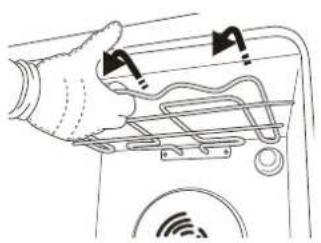
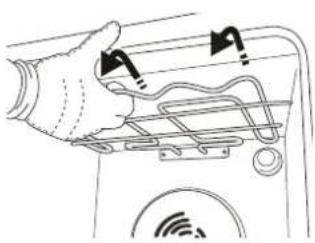
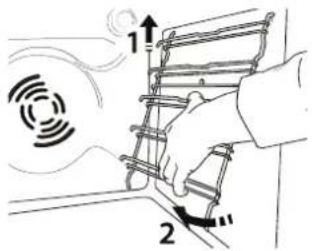
REMOVING AND REFITTING THE SHELF GUIDES
- To remove the shelf guides, lift them up and pull the lower parts out of their lodgings: The shelf guides can now be removed.
- To refit the shelf guides, first fit them back into their upper seating. Keeping them held up, slide them into the cooking compartment, then lower them into position in the lower seating.
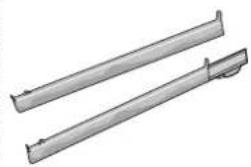
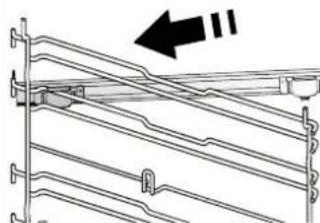
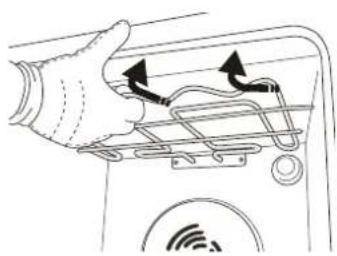
FITTING THE SLIDING RUNNERS (IF PRESENT)
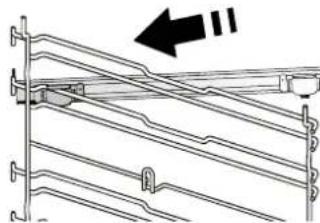
natural_image
Diagram of a mechanical or structural assembly with diagonal braces and a black arrow indicating direction (no text or symbols)Remove the shelf guides from the oven and remove the protective plastic from the sliding runners.
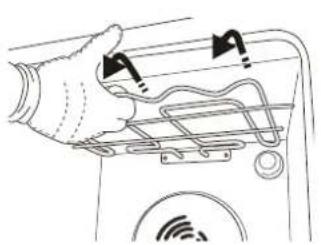
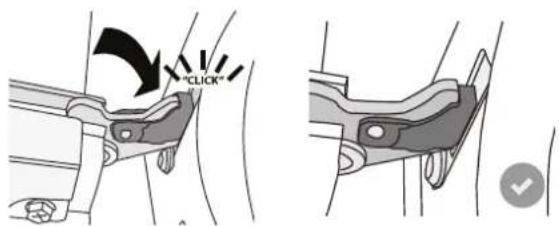
Fasten the upper clip of the runner to the shelf guide and slide it along as far as it will go. Lower the other clip into position.
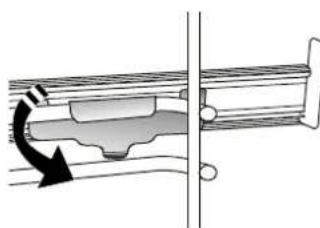
natural_image
Mechanical assembly diagram showing a rotating component with an arrow indicating rotation direction (no text or symbols)To secure the guide, press the lower portion of the clip firmly against the shelf guide. Make sure that the runners can move freely. Repeat these steps on the other shelf guide on the same level.
Please note: The sliding runners can be fitted on any level.
FUNCTIONS

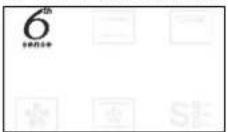
6TH SENSE
These allow automatic selection of the cooking method and the best temperature range for all types of food (Lasagna, Meat, Fish, Vegetables, Cakes & Pastries, Salt cakes, Bread, Pizza). To get the best from this function, follow the indications on the cooking table.
• STEAM+
The Steam+ function allows to obtain excellent performances thanks to the presence of steam in the cooking cycle. This function suggests the ideal temperature for cooking a wide range of recipes; The cooking times and the water quantity (100 / 200 ml) of the main dishes are shown in the relative cooking table that you can find online. Always activate the steam function when the oven is cold, and after pouring drinking water into the bottom of the cavity.
Note: The advised water quantity exceeds the cavity embossment capacity, but the bottom of the oven is designed to manage the advised excess water efficiently.
- CASSEROLE
This function suggests the best temperature and cooking method for pasta dishes.
• MEAT
This function suggests the best temperature and cooking method for meat.
• BREAD
This function automatically suggests the best temperature and cooking method for all types of bread.
- PIZZA
This function allows you to cook great homemade pizza, in less than 10 minutes like in a restaurant. The dedicated cooking cycle works at temperature level above 300 degree Celsius, delivering pizza soft inside, crunchy on the edges and with a perfectly even browning.
Combining this function with the Pizza Stone WPro accessory and preheating for 30 minutes can bake a pizza in 5-8 min. (For orders and information contact the after sales service or www.whirlpool.eu.)
- PASTRY
This function suggests the best temperature and cooking method for all types of cake.

CONVENTIONAL
For cooking any kind of dish on one shelf only.

GRILL
For grilling steaks, kebabs and sausages, cooking vegetables au gratin or toasting bread. When grilling meat, we recommend using a drip tray to collect the cooking juices: Position the tray on any of the levels below the wire shelf and add 500 ml of drinking water.

FORCED AIR
For cooking different foods that require the same cooking temperature on several shelves at the same time. This function can be used to cook different foods without odours being transferred from one food to another. Consult the cooking table for correct level combination selection.

CONVECTION BAKE
For cooking meat, baking cakes with fillings on one shelf only.

SPECIAL FUNCTIONS
- FASTPREHEAT
For preheating the oven quickly.
• TURBO GRILL
For roasting large joints of meat (legs, roast beef, chicken). We recommend using a drip tray to collect the cooking juices: Position the pan on any of the levels below the wire shelf and add 500 ml of drinking water.
• ECO CYCLE \*
For cooking stuffed roasting joints and fillets of meat on a single shelf. When this Eco Cycle is in use, the light will remain switched off during cooking. To use the Eco Cycle and therefore optimise power consumption, the oven door should not be opened until the food is completely cooked.
• AIR ERY/CONVECT ROAST
Using dedicated air fry tray (provided with some models) allows you to cook French fries, chicken nuggets and more using less oil, resulting pleasantly crispy. Heating elements cycle to properly heat the cavity, while the fan circulates hot air. Position the food on the Air Fry tray in a single layer and follow Air Fry Cooking Table instructions for best performances. Alternatively, this function can be used to get great roasting results on meat and poultry, potatoes and vegetables, according to the cooking table recommendation. These recipes can be prepared using standard baking tray.
• RISING
For optimal proving of sweet or savoury dough. To maintain the quality of proving, do not activate the function if the oven is still hot following a cooking cycle.
- SMART CLEAN
The action of the steam released during this
special low-temperature cleaning cycle allows dirt and food residues to be removed with ease. Pour 200 ml of drinking water on the bottom of the oven and only activate the function when the oven is cold.
* Function used as reference for the energy efficiency declaration in accordance with Regulation (EU) No. 65/2014
FIRST TIME USE
1. SET THE TIME
You will need to set the time when you switch on the oven for the first time.
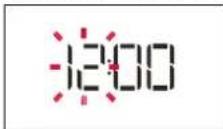
The two digits for the hour will start flashing: Turn the knob to set the hour and press to confirm.
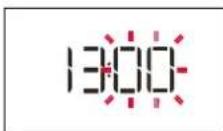
The two digits for the minutes will start flashing. Turn the knob to set the minutes and press to confirm.
Please note: To change the time at a later point, press and hold for at least one second while the oven is off and repeat the steps above.
You may need to set the time again following lengthy power outages.
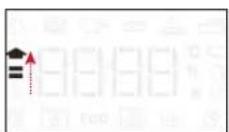
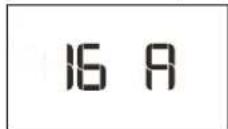
2. SETTINGS
If required, you can change the default unit of measurement, temperature (°C) and rated current (16 A). With the oven off, press and hold for at least 5 seconds.
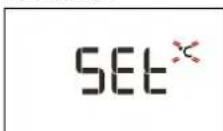
Turn the selection knob to select the unit of measurement, then press to confirm.
16 9
Turn the selection knob to select the rated current, then press to confirm.
Please note: The oven is programmed to consume a level of electrical power that is compatible with a domestic network that has a rating of more than 3 kW (16 A): If your household uses a lower power, you will need to decrease this value (13 A).
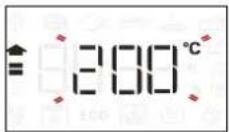
3. HEAT THE OVEN
A new oven may release odours that have been left behind during manufacturing: This is completely normal.
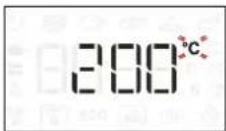
Before starting to cook food, we therefore recommend heating the oven with it empty in order to remove any possible odours. Remove any protective cardboard or transparent film from the oven and remove any accessories from inside it. Heat the oven to 200 °C for around one hour, ideally using a function with air circulation (e.g. "Forced Air" or "Convection Bake").
Follow the instructions for setting the function correctly.
Please note: It is advisable to air the room after using the appliance for the first time.
DAILY USE
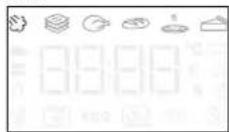
1. SELECT A FUNCTION
When the oven is off, only the time is shown on the display. Press and hold to switch the oven on. Turn the rotary knob to view the main functions available on the left-hand display. Select one and press.
To select a sub-function (where available), select the main function and then press to confirm and go to the function menu.
Turn the rotary knob to select from amongst the subfunctions available on the right-hand display and then press to confirm.
2. SET THE FUNCTION
After having selected the function you require, you can change its settings. The display will show the settings that can be changed in sequence.
When the °C/°F icon flashes on the display, turn the knob to change the value, then press to confirm and continue to alter the settings that follow (if possible).
You can also set the grill level (3 = high, 2 = medium, 1 = low) at the same time.
Please note: Once the function has started, you can change the temperature or the grill level by pressing 🎨 or by turning the knob directly.
DURATION
When the icon flashes on the display, use the adjustment knob to set the cooking time you require and then press to confirm.
You do not have to set the cooking time if you want to manage cooking manually: Press to confirm and start the function. In this case, you cannot set the end cooking time by programming a delayed start.
Please note: You can adjust the cooking time that has been set during cooking by pressing Turn the knob to change the hour and press to confirm.
SETTING THE END COOKING TIME/DELAYED START
In many functions, once you have set a cooking time you can delay starting the function by programming its end time. Where you can change the end time, the display will show the time the function is expected to finish while the icon flashes.
If necessary, turn the knob to set the time you want cooking to end, then press to confirm and start the function.
Place the food in the oven and close the door: The function will start automatically after the period of time that has been calculated in order for cooking to finish at the time you have set.
Please note: Programming a delayed cooking start time will disable the oven preheating phase: The oven will reach the temperature your require gradually, meaning that cooking times will be slightly longer than those listed in the cooking table.
During the waiting time, you can use the knob to change the programmed end time.
Press 🏠 or ⬤ to change the temperature and cooking time settings. Press to confirm when finished.
3. ACTIVATE THE FUNCTION
Once you have applied the settings you require, press ▶ to activate the function.
You can press and hold at any time to pause the function that is currently active.
4. PREHEATING
Some functions have an oven preheating phase: Once the function has started, the display indicates that the preheating phase has been activated.
Once this phase has finished, an audible signal will sound and the display will indicate that the oven has reached the set temperature.
At this point, open the door, place the food in the oven, close the door and start cooking by pressing.
Please note: Placing the food in the oven before
preheating has finished may have an adverse effect on the final cooking result.
Opening the door during the preheating phase will stop pause it.
The cooking time does not include a preheating phase.
You can always change the temperature you want the oven to reach using the knob.
5. END OF COOKING
An audible signal will sound and the display will indicate that cooking is complete.
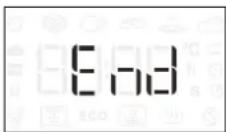
To extend the cooking time without changing the settings, turn the knob to set a new cooking time and press ▶
6. 6 ^TH SENSE FUNCTIONS
SMART CLEAN
To activate the "Smart Clean" function, with the oven cold, distribute 200 ml of water on the bottom of the oven cavity, then close the oven door.
Access special functions and turn the knob to select from menu. then press to confirm.
Press to start immediately the cleaning cycle, or press to set the end time/start delayed.
At the end of the cycle, let the oven colling down
and remove any residual water in the oven and start cleaning using a sponge moistened with hot water (cleaning could be compromised if delayed by more than 15 minutes).
Please note: The duration and temperature of cleaning cycle cannot be set.
7. KEYLOCK
To lock the keypad, press and hold for at least five seconds.
Do this again to unlock the keypad.
Please note: This function can also be activated during cooking. For safety reasons, the oven can be switched off at any time by pressing .
.NOTES
- Do not cover the inside of the oven with aluminium foil.
- Never drag pots or pans across the bottom of the oven as this could damage the enamel coating.
- Do not place heavy weights on the door and do not hold on to the door.
- Due to the higher temperature of the Pizza cycle it is expected to experience slightly higher cooling fan noise.
USEFUL TIPS
HOW TO READ THE COOKING TABLE
The table lists the best function, accessories and level to use to cook different types of food. Cooking times start from the moment food is placed in the oven, excluding preheating (where required). Cooking temperatures and times are approximate and depend on the amount of food and the type of accessory used. Use the lowest recommended settings to begin with and, if the food is not cooked enough, then switch to higher settings. Use the accessories supplied and preferably dark-coloured metal cake tins and baking trays. You can also use Pyrex or stoneware pans and accessories, but bear in mind that cooking times will be slightly longer.
COOKING DIFFERENT FOODS AT THE SAME TIME
Using the “Forced Air” function, you can cook different foods which require the same cooking temperature at the same time (for example: fish and vegetables), using different shelves. Remove the food which requires a shorter cooking time and leave the food which requires a longer cooking time in the oven.
MEAT
Use any kind of oven tray or pyrex dish suited to the size of the piece of meat being cooked. For roast joints, it is best to add some stock to the bottom of the dish, basting the meat during cooking for added flavour. Please note that steam will be generated during this operation. When the roast is ready, let it rest in the oven for another 10-15 minutes, or wrap it in aluminium foil.
When you want to grill meat, choose cuts with an even thickness all over in order to achieve uniform cooking results. Very thick pieces of meat require longer cooking times. To prevent the meat from burning on the outside, lower the position of the wire shelf, keeping the food farther away from the grill. Turn the meat two thirds of the way through cooking. Take care when opening the door as steam will escape.
To collect the cooking juices, we recommend placing a dripping pan filled with half a litre of drinking water directly underneath the wire shelf on which the food is placed. Top-up when necessary.
DESSERTS
Cook delicate desserts with the conventional function on one shelf only.
Use dark-coloured metal baking pans and always place them on the wire shelf supplied. To cook on more than one shelf, select the forced air function and stagger the position of the cake tins on the shelves, aiding optimum circulation of the hot air.
To check whether a leavened cake is cooked, insert a wooden toothpick into the centre of the cake. If the toothpick comes out clean, the cake is ready.
If using non-stick baking pans, do not butter the edges as the cake may not rise evenly around the edges.
If the item "swells" during baking, use a lower temperature next time and consider reducing the amount of liquid you add or stirring the mixture more gently.
For desserts with moist fillings or toppings (such as cheesecake or fruit tarts), use the “Convection bake” function. If the base of the cake is soggy, lower the shelf and sprinkle the bottom of the cake with breadcrumbs or biscuit crumbs before adding the filling.
RISING
It is always best to cover the dough with a damp cloth before placing it in the oven. Dough proving time with this function is reduced by approximately one third compared to proving at room temperature (20-25°C). The rising time for pizza starts at around one hour for 1 kg of dough.

AIR FRY COOKING TABLE
| RECIPE FUNCTION | SUGGESTED QUANTITY | PREHEAT | TEMPERATURE (°C) | DURATION (MIN.) | SHELF AND ACCESSORIES | |||||
| FROZEN FOOD | Frozen French Fries 650 - 850g | Yes 20 | [YBHH] | 30 | 4 | 2 | ||||
| Frozen Chicken Nugget 500g | Yes 200 |  | 20 | 4 | 2 | |||||
| Fish Sticks 500g | Yes 220 |  | 4 | 2 | ||||||
| Onion Rings |  | 500g Yes 200 | 15 - 20 | 4 | 2 | |||||
| VEGETABLES | Fresh Breaded Zucchini 400g |  | Yes | 200 15 - 20 | 4 | 2 | ||||
| Homemade Fries |  | 300 - 800 g | Yes | 200 | 20 - 40 | 4 | 2 | |||
| Mixed Vegetables |  | 300 - 800 g | Yes | 200 | 20 - 30 | 4 | 2 | |||
| MEAT AND FISH | Chicken Breasts |  | 1 - 4 cm | Yes 200 20 - 40 | 4 | 2 | ||||
| Chicken Wings |  | 200 - 1500 g | Yes | 220 | 30 - 50 | 4 | 2 | |||
| Breaded Cutlet |  | 1 - 4 cm | Yes 220 20 - 50 | 4 | 2 | |||||
| Fish Fillet |  | 1 - 4 cm | Yes 220 15 - 25 | 4 | 2 | |||||
For cooking fresh or homemade foods, spread a thin layer of oil across the food surface.
In order to guarantee uniform cooking results, mix food halfway through the recommended cooking time.
| FUNCTIONS | Air Fry | |
| ACCESSORIES | Air Fry tray Oven tray or cake tray on wire shelf | Drip tray / Baking tray or oven tray on wire shelf |
COOKING TABLE
| RECIPE | FUNCTION | PREHEAT | TEMPERATURE (°C) | COOK TIME (Min.) | LEVEL AND ACCESSORIES |
| Leavened cakes / Sponge cakes | - 170 30 - 50 | 2 | |||
| Yes 160 30 - 50 | 2 | ||||
| Yes 160 30 - 50 | 4 1 | ||||
| Filled cakes(cheesecake, strudel, apple pie) | - 160 - 200 30 - 85 | 3 | |||
| Yes 160 - 200 35 - 90 | 4 1 | ||||
| Cookies / Small cakes | - 160 - 170 20 - 40 | 3 | |||
| Yes 150 - 160 20 - 40 | 4 | ||||
| Yes 150 - 160 20 -40 | 4 1 | ||||
| Choux buns | - 180 - 200 30 - 40 | 3 | |||
| Yes 180 - 190 35 - 45 | 4 1 | ||||
| Yes 180 - 190 35 - 45* | 5 3 1 | ||||
| Meringues | Yes | 90 | 110 - 150 | 3 | |
| Yes | 90 | 130 - 150 | 4 1 | ||
| Yes | 90 140 - 160* | 5 3 1 | |||
| Pizza (Thin, thick, focaccia) | Yes 310 | 7-12 | 2 | ||
| Yes 220 - 240 20 - 40 | 4 1 | ||||
| Yes 220 - 240 25 - 50* | 5 3 1 | ||||
| Bread loaf 0,5 kg | - 180 - 220 50 - 70 | 2 | |||
| Small bread | - 180 - 220 30 - 50 | 3 | |||
| Bread | Yes 180 - 220 30 - 60 | 4 1 | |||
| Frozen pizza | Yes | 250 10 - 15 | 2 | ||
| Yes | 250 10 - 20 | 4 1 | |||
| Savoury pies(vegetable pie, quiche) | Yes 180 - 190 45 - 60 | 2 | |||
| Yes 180 - 190 45 - 60 | 4 1 | ||||
| Yes 180 - 190 45 - 70* | 5 3 1 | ||||
| Vols-au-vent / Puff pastry crackers | Yes 190 - 200 20 - 30 | 3 | |||
| Yes 180 - 190 20 - 40 | 4 1 | ||||
| Yes 180 - 190 20 - 40* | 5 3 1 | ||||
| FUNCTIONS | Conventional Grill Turbo Grill | Forced Air | Convect Bake ECO | ECO |
| AUTOMATIC FUNCTIONS | Casserole | Meat | Bread | Pizza function |
| ACCESSORIES | Wire shelf | Oven tray or cake tray on wire shelf | Drip tray / Baking tray or oven tray on wire shelf | Drip tray / Baking tray |
| RECIPE | FUNCTION | PREHEAT | TEMPERATURE (°C) | COOK TIME (Min.) | LEVEL AND ACCESSORIES |
| Lasagne / Flans - 190 - 200 40 - 80 | 3 | ||||
| Baked pasta / Cannelloni - 190 - 200 25 - 60 | 3 | ||||
| Lamb / Veal / Beef / Pork 1 kg - 190 - 200 | 60 - 90 | 3 | |||
| Chicken / Rabbit / Duck 1 kg - 200 - 230 | 50 - 80** | 3 | |||
| Turkey / Goose 3 kg - 190 - 200 90 - 150 | 2 | ||||
| Baked fi sh / en papillote (fi llets, whole) | Yes 180-200 | 40 - 60 | 3 | ||
| Stuff ed vegetables(tomatoes, courgettes, aubergines) | Yes 180 - 200 | 50 - 60 | 2 | ||
| Toast | - | 3 (High) | 3 - 6 | 5 | |
| Fish fi llets / Steaks | - | 2 (Mid) 20 - 30*** | 43 | ||
| Sausages / Kebabs / Spare ribs /Hamburgers | - | 2 - 3(Mid - High) | 15 - 30*** | 54 | |
| Roast chicken 1-1.3 kg | - | 2 (Mid) | 55 - 70** | 21 | |
| Roast beef rare 1 kg | - | 2 (Mid) 35 - 50** | 3 | ||
| Leg of lamb / Shanks | - | 2 (Mid) 60 - 90** | 3 | ||
| Roast potatoes | - | 2 (Mid) | 35 - 55** | 3 | |
| Vegetable gratin | - | 3 (High) | 10 - 25 | 3 | |
| Complete meal: Fruit tart (level 5) /lasagna (level 3) / meat (level 1) | Yes | 190 40 - 120* | 531 | ||
| Lasagna & Meat | Yes | 200 50 - 120* | 41 | ||
| Meat & Potatoes | Yes | 200 45 - 120* | 41 | ||
| Fish & Vegetables | Yes | 180 | 30 - 50 | 41 | |
| Stuff ed roasting joints | - | 200 | 80 - 120* | 3 | |
| Cuts of meat(rabbit, chicken, lamb) | - | 200 | 50 - 120* | 3 |
* Estimated length of time: dishes can be removed from the oven at different times depending on personal preference.
** Turn food two thirds of the way through cooking (if necessary).
*** Turn food halfway through cooking.
Please note: Dynamic Menu "Pastry Cakes" function uses upper and lower heating elements only, without forced air circulation. It doesn't require preheating.
| FUNCTIONS |  Conventional Conventional |  Grill Grill |  Turbo Grill Turbo Grill |  Forced Air Forced Air |  Convect Bake Convect Bake | ECOECO |
| AUTOMATIC FUNCTIONS |  Casserole Casserole |  Meat Meat |  Bread Bread |  Pizza function Pizza function | [HWKS]Pastry | |
| ACCESSORIES |  Wire shelf Wire shelf |  Oven tray or cake tray on wire shelf Oven tray or cake tray on wire shelf |  Drip tray / Baking tray or oven tray on wire shelf Drip tray / Baking tray or oven tray on wire shelf |  Drip tray / Baking tray Drip tray / Baking tray |  Drip tray with 500 ml of water Drip tray with 500 ml of water |
STEAM+ COOKING TABLE
| FOOD RECIPE | QUANTITY | TIME(MIN.) | ACCESSORIES WATER | ||
| BREAD | Small breads 80-100 g 30 - 45 | 3 | 100 ml | ||
| Sandwich loaf in tin 300-500 g 40 - 60 | 3 | ||||
| Bread 500g-2 kg 50 - 100 | 3 | ||||
| Baguettes 200-300 g 30 - 45 | 3 | ||||
| PASTRIES | Cookies one tray 25 - 35 | 3 | |||
| Muffin 30-60 g 25 - 45 | 3 | ||||
| Sponge Cake 500-700 g 30 - 50 | 2 | ||||
| Tart | one tray 35 - 55 | 2 | |||
| MEAT | Roast | 1 kg | 60 - 110 | 3 | 200 ml |
| Ribs | 500g-1,5 kg | 50 - 75 | 3 | ||
| Chicken | 1-1,5 kg | 55 - 80 | 3 | ||
| Chicken/Turkey | 3 kg | 100 - 140 | 3 | ||
| FISH | Fillet Steak 0.5-2 cm 15 - 25 | 3 | |||
| Fillet Steak | 2-4 cm | 20 - 35 | 3 | ||
| Whole Fish | 300- 600 g | 20 - 30 | 3 | ||
| Whole Fish | 600 -1200 g | 25 - 45 | 3 | ||
| VEGETABLES | Roasted Potatoes | 0.5-1.5 kg | 45 - 60 | 3 | |
| Stuffed Peppers | 1-2 kg | 35 - 55 | 3 | ||
| Roasted Broccoli | 0.3-1 kg 30 - 50 | 3 | |||
| Roasted Zucchini | 0.5-1.5 kg | 30 - 50 | 3 |
Start the STEAM+ function only when the oven is cold. Opening the door and topping up the water during cooking may have an adverse effect on the final cooking result.
| ACCESSORIES | |||
| Air Fry tray | Oven tray or cake tray on wire shelf | Drip tray / Baking tray or oven tray on wire shelf |
MAINTENANCE AND CLEANING
Make sure that the oven has cooled down before carrying out any maintenance or cleaning.
Do not use steam cleaners.
Do not use wire wool, abrasive scourers or abrasive/corrosive cleaning agents, as these could damage the surfaces of the appliance.
Wear protective gloves.
The oven must be disconnected from the mains before carrying out any kind of maintenance work.
EXTERIOR SURFACES
- Clean the surfaces with a damp microfibre cloth. If they are very dirty, add a few drops of pH-neutral detergent. Finish off with a dry cloth.
- Do not use corrosive or abrasive detergents. If any of these products inadvertently comes into contact with the surfaces of the appliance, clean immediately with a damp microfibre cloth.
INTERIOR SURFACES
• After every use, leave the oven to cool and then clean it, preferably while it is still warm, to remove any deposits or stains caused by food residues. To dry any condensation that has formed as a result of cooking foods with a high water content, leave the oven to cool completely and then wipe it with a cloth or sponge.
- Activate the "Smart Clean" function for optimum
cleaning of the internal surfaces. (Only in some models).
- Clean the glass in the door with a suitable liquid detergent.
• The oven door can be removed to facilitate cleaning. - Dry out the bottom profile below the door of the oven if water residues are present after a cooking cycle.
ACCESSORIES
Soak the accessories in a washing-up liquid solution after use, handling them with oven gloves if they are still hot. Food residues can be removed using a washing-up brush or a sponge.
Do not clean Food Probe and Meat Probe (if present) in the dishwasher. Air Fry tray (if present) can be cleaned in the dishwasher.
CLEANING THE CATALYTIC PANELS
(ONLY IN SOME MODELS)
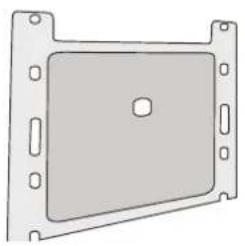
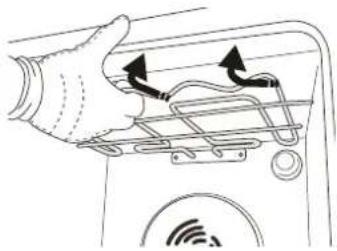
This oven is equipped with special catalytic panels that facilitate cleaning of the cooking compartment thanks to their special self-cleaning coating, which is highly porous and able to absorb grease and grime. These panels are fitted to the shelf guides: When repositioning and then refitting the shelf guides, make sure that the hooks at the top are slotted into the appropriate holes in the panels.
natural_image
Simple line drawing of a rectangular metal plate with mounting flanges (no text or symbols)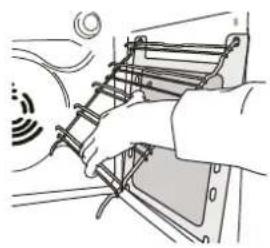
natural_image
Illustration of hands assembling a mechanical component with a sensor icon (no text or symbols)To make best use of the catalytic panels' self-cleaning properties, we recommend heating the oven to 200 °C for around one hour using the "Convection Bake" function. The oven must be empty during this time. Then leave the appliance to cool down before removing any remaining food residues using a nonabrasive sponge.
Please note: Using corrosive or abrasive cleaning agents, stiff brushes, pan scourers or oven sprays could damage the catalytic surface and compromise its self-cleaning properties.
Please contact our After-sales Service if you require replacement panels.
REPLACING THE LAMP
- Disconnect the oven from the power supply.
- Unscrew the cover from the light, replace the bulb and screw the cover back on the light.
- Reconnect the oven to the power supply.
Please note: 40 W/230 \~ V type G9, T300°C halogen bulbs.
The bulb used in the product is specifically designed for domestic appliances and is not suitable for general room lighting within the home. (EC Regulation 244/2009) Light bulbs are available from our After-sales Service.
If using halogen bulbs, do not handle them with your bare hands as your fingerprints could cause damage. Do not use the oven until the light cover has been refitted.
REMOVING AND REFITTING THE DOOR
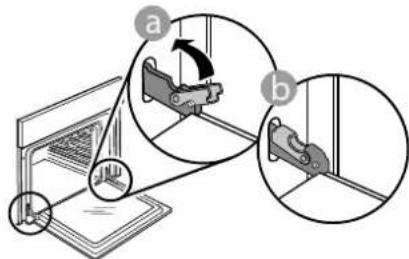
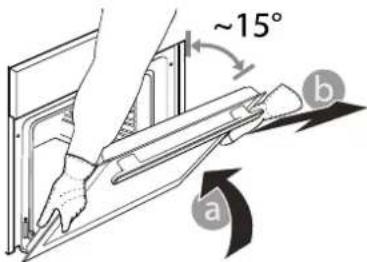
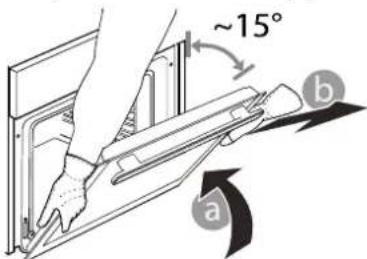
- To remove the door, open it fully and lower the catches until they are in the unlock position.
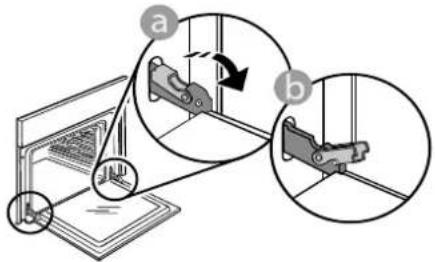
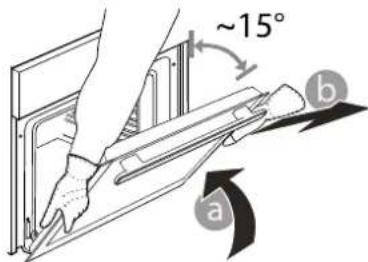
- Close the door as much as you can. Take a firm hold of the door with both hands – do not hold it by the handle. Simply remove the door by continuing to close it while pulling it upwards at the same time until it is released from its seating. Put the door to one side, resting it on a soft surface.
-
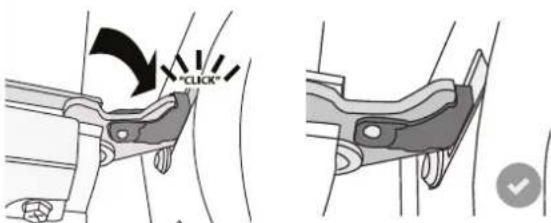
Refit the door by moving it towards the oven, aligning the hooks of the hinges with their seating and securing the upper part onto its seating.
-
Lower the door and then open it fully. Lower the catches into their original position: Make sure that you lower them down completely.
Apply gentle pressure to check that the catches are in the correct position.
- Try closing the door and check to make sure that it lines up with the control panel. If it does not, repeat the steps above: The door could become damaged if it does not work properly.
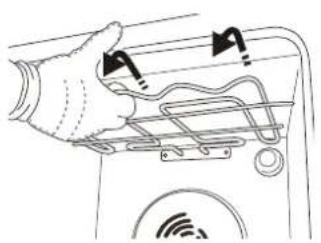
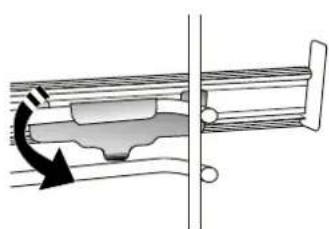
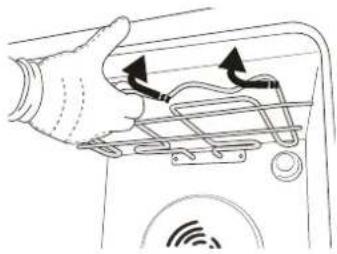
LOWER THE TOP HEATING ELEMENT (ONLY IN SOME MODELS)
- Remove the lateral shelf guides.
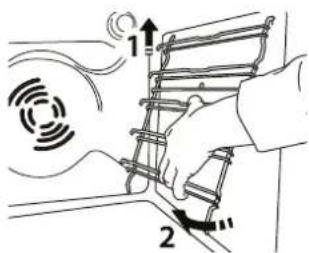
- Pull the heating element out a little and lower it.
natural_image
Line drawing of a hand holding a device with cables and a sensor icon (no text or symbols)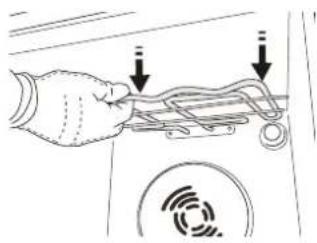
natural_image
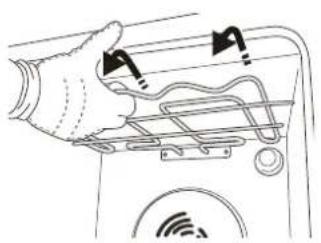
Hand holding a device with arrows pointing to a component, no visible text or symbols- To reposition the heating element, lift it up, pulling it slightly towards you, making sure it comes to rest on the lateral supports.

natural_image
Diagram of a hand holding a device with arrows indicating motion or signal flow (no text or symbols)TROUBLESHOOTING
| Problem | Possible cause | Solution |
| The oven is not working. | Power cut.Disconnection from the mains. | Check for the presence of mains electrical power and whether the oven is connected to the electricity supply.Turn off the oven and restart it to see if the fault persists. |
| The display shows the letter “F” followed by a number. | Software problem. | Contact the Call Center and state the number following the letter “F”. |
| The display shows unclear text and appears to be broken. | Another language set. Contact the Call Center.. | |
| Cooking cycle with probe ended without evident cause or error F3E3 is printed on the screen. | Food Probe is not properly connected. | Check connection of the food probe. |
Policies, standard documentation and additional product information can be found by:
• Using the QR code in your appliance
- Visiting our website docs.whirlpool.eu/docs
• Alternatively, (Seoplant our Afteris the Service booklet). When contacting our After-sales Service, please state the codes provided on your product's identification plate.
®/TM/© 2025 Whirlpool. Produced under license.

БЛАГОДАРИМ ВИ, ЧЕ ЗАКУПИХТЕ ПРОДУКТ НА WHIRLPOOL
natural_image
Line drawing of a 3D printer with a QR code overlay (no text or symbols on the diagram itself)ОПИСАНИЕ НА УРЕДА
1. ЛЯВ ДИСПЛЕЙ
2. ОСВЕТЛЕНИЕ
natural_image
Simple line drawing of a rectangular metal tray with horizontal slats (no text or symbols)ТАВА ЗА ОТЦЕЖДАНЕ
natural_image
Simple line drawing of a rectangular tray with a small bracket on the right side (no text or symbols)ТАВА ЗА ПЕЧЕНЕ *

natural_image
Simple line drawing of a rectangular plate with rounded edges and a small bracket at the bottom right (no text or symbols)ПЛЪЗГАЧИ*
natural_image
Two metallic cylindrical metal bars with flanges, shown from different angles (no text or symbols)natural_image
Exterior view of a rectangular metal grate with a grid pattern on the side (no text or symbols)natural_image
Pure mechanical assembly diagram showing diagonal metal rods and a bracket with an arrow indicating direction (no text or symbols)natural_image
Technical diagram of a mechanical assembly with directional arrow indicating rotation (no text or symbols)natural_image
Simple line drawing of a rectangular panel with mounting flanges and a central square hole (no text or symbols)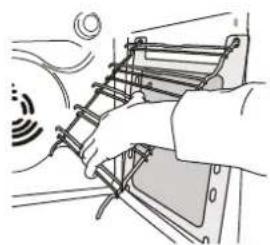
natural_image
Illustration of a hand installing or adjusting a ladder-like structure with signal waves (no text or symbols)natural_image
Diagram of a hand holding a device with attached cables and a circular sensor icon (no text or symbols)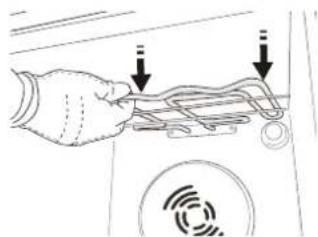
natural_image
Hand holding a device with arrows pointing to a circular component (no text or symbols visible)natural_image
Diagram of a hand holding a device with arrows indicating motion or signal flow (no text or symbols present)ОТСТРАНЯВАНЕ НА НЕИЗПРАВНОСТИ
POPIS PRODUKTU
1. LEVÝ DISPLEJ
2. SVĚTLO
natural_image
Diagram of a mechanical or structural assembly with diagonal braces and a directional arrow (no text or symbols)natural_image
Mechanical assembly diagram showing a rotating component with an arrow indicating rotational motion (no text or symbols)natural_image
Simple line drawing of a rectangular metal plate with mounting holes (no text or symbols)
natural_image
Illustration of a hand holding a ladder inside a vehicle (no text or symbols visible)natural_image
Hand holding a microphone with attached wires and a circular sensor icon (no text or symbols)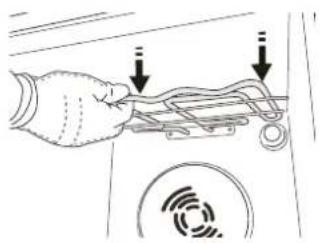
natural_image
Hand holding a device with two arrows pointing to a cable or connector (no text or symbols visible)natural_image
Hand holding a device with arrows indicating motion or signal flow (no text or symbols)ODSTRAŇOVÁNÍ ZÁVAD
TAK FORDI DU HAR K∅BT ET WHIRLPOOL PRODUKT
PRODUKTBESKRIVELSE
1. VENSTRE DISPLAY
2. LYS
INDSÆT RIST OG ANDET TILBEH∅R
natural_image
Technical diagram of a mechanical assembly with diagonal braces and a directional arrow (no text or symbols)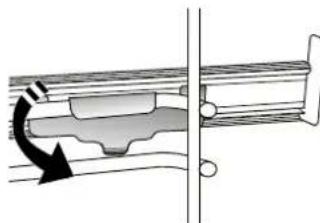
natural_image
Mechanical assembly diagram showing a rotating component with directional arrow (no text or labels)natural_image
Simple line drawing of a rectangular metal plate with mounting flanges (no text or symbols)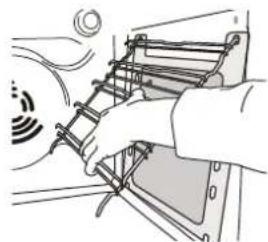
natural_image
Illustration of hands operating a mechanical device with a sensor symbol and signal waves (no text or labels)natural_image
Line drawing of a hand holding a device with cables and a circular sensor icon (no text or symbols)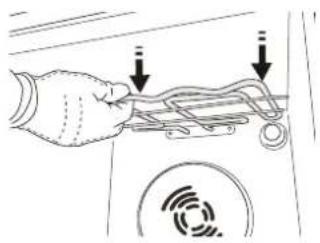
natural_image
Hand holding a device with two arrows pointing to a component, no text or symbols presentnatural_image
Hand holding a device with arrows indicating cable or connection (no text or symbols)FEJLFINDING
DANKE, DASS SIE SICH FÜR EIN WHIRLPOOL PRODUKT ENTSCHIEDEN HABEN
PRODUKTBESCHREIBUNG
1. LINKES DISPLAY
2. LICHT
natural_image
Technical line drawing of a mechanical assembly with no visible text or symbolsnatural_image
Mechanical assembly diagram showing a rotating component with a curved arrow indicating motion (no text or symbols)natural_image
Simple line drawing of a rectangular metal plate with mounting flanges (no text or symbols)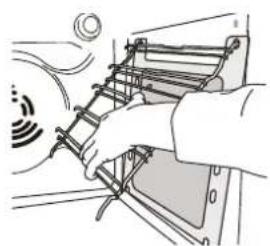
natural_image
Illustration of a hand installing or adjusting a ladder-like structure with a sensor icon (no text or symbols)natural_image
Diagram of a hand holding a cable or wire device with signal waves, no text or symbols present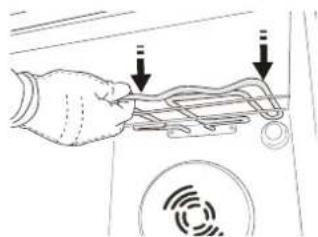
natural_image
Hand holding a device with wires and a circular sensor, no visible text or symbolsnatural_image
Diagram of a hand holding a device with arrows indicating motion or connection, no text or symbols presentLÖSEN VON PROBLEMEN
natural_image
Line drawing of a 3D printer with a QR code overlay (no text or symbols on the diagram itself)ΠΕΡΙΓΡΑΦΗ ΠΡΟΪΟΝΤΟΣ
1. ΑΡΙΣΤΕΡΗ ΟΘΟΝΗ
2. ΦΩΣ
natural_image
Pure technical line drawing of a mechanical assembly with no text or symbols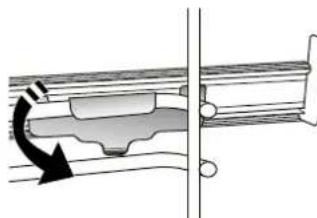
natural_image
Mechanical assembly diagram showing a rotating component with directional arrow (no text or labels)natural_image
Simple line drawing of a rectangular metal plate with mounting flanges (no text or symbols)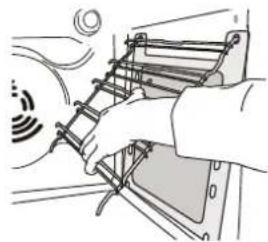
natural_image
Illustration of hands operating a mechanical device with a sensor emitting signals (no text or symbols)natural_image
Diagram of a hand holding a device with attached cables and a circular sensor icon (no text or symbols)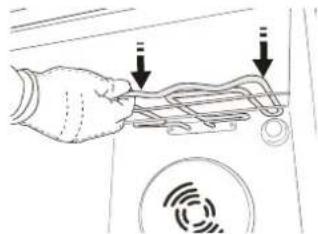
natural_image
Hand holding a device with arrows pointing to a circular component (no text or symbols visible)natural_image
Diagram of a hand holding a device with arrows indicating motion or connection (no text or symbols present)1. PANTALLA DE LA IZQUIERDA
2. LUZ
natural_image
Technical line drawing of a mechanical assembly with no visible text or symbolsnatural_image
Mechanical assembly diagram showing a rotating component with an arrow indicating rotation direction (no text or labels)natural_image
Simple line drawing of a rectangular metal plate with mounting flanges (no text or symbols)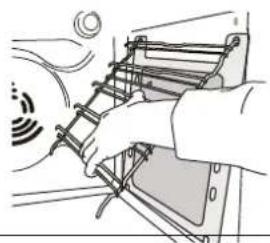
natural_image
Illustration of a hand installing or adjusting a ladder-like structure with a sensor symbol (no text or labels)- Extraiga ligeramente la resistencia y bájela.
natural_image
Hand inserting a device into a device panel with arrows indicating direction (no text or symbols)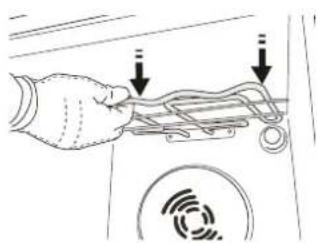
natural_image
Hand holding a device with two arrows pointing to a component, no visible text or symbolsnatural_image
Diagram of a hand holding a device with arrows indicating motion or signal flow (no text or symbols)TOOTE KIRJELDUS

1. VASAKPOOLNE NÄIDIK
2. VALGUSTUS
natural_image
Technical line drawing of a mechanical assembly with no visible text or symbolsnatural_image
Mechanical assembly diagram showing a rotating component with an arrow indicating rotation (no text or symbols present)natural_image
Simple line drawing of a rectangular panel with mounting flanges and a central square hole (no text or symbols)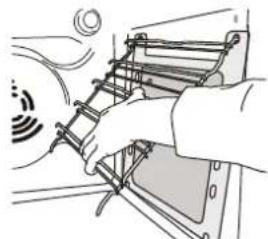
natural_image
Illustration of a hand using a ladder to lift a vehicle, with motion lines indicating speed (no text or symbols)natural_image
Line drawing of a hand holding a microphone with attached wires and a circular sensor icon (no text or symbols)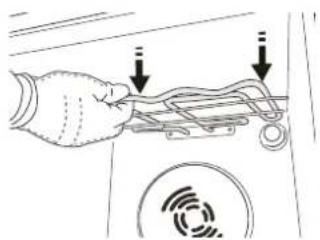
natural_image
Hand holding a device with two arrows pointing to a cable or connector (no text or symbols visible)natural_image
Diagram of a hand holding a device with arrows indicating connection or movement (no text or symbols present)RIKKEOTSING
TUOTTEEN KUVAUS
1. VASEN NÄYTTÖ
2. VALO
natural_image
Technical line drawing of a mechanical assembly with no visible text or symbolsnatural_image
Mechanical assembly diagram showing a rotating component with an arrow indicating rotation (no text or symbols present)6. 6 ^TH SENSE -TOIMINNOT
SMART CLEAN
KYPSENNYSTAULUKON LUKEMINEN
ERI RUOKIEN KYPSENNYS SAMANAIKAISESTI
AIR FRY -KYPSENNYSTAULUKKO
natural_image
Simple line drawing of a rectangular panel with mounting flanges and a central square hole (no text or symbols)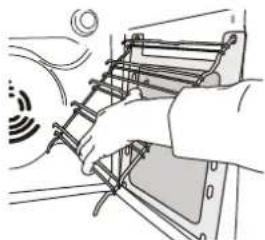
natural_image
Illustration of hands installing or adjusting a ladder on a vehicle chassis (no text or symbols visible)natural_image
Line drawing of a hand holding a device with cables and sensors, no text or symbols present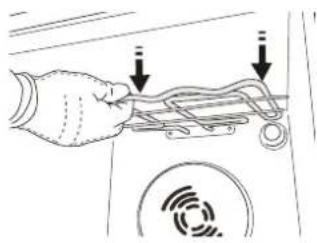
natural_image
Hand holding a device with arrows pointing to a cable or connector (no text or symbols visible)natural_image
Diagram of a hand holding a device with arrows indicating motion or signal flow (no text or symbols)VIANETSINTÄ
MERCI D'AVOIR CHOISI UN PRODUIT WHIRLPOOL
DESCRIPTION DU PRODUIT

1. ÉCRAN DE GAUCHE
2. LAMPE
natural_image
Technical line drawing of a mechanical assembly with no visible text or symbolsnatural_image
Mechanical assembly diagram showing a curved arrow indicating rotation or force direction (no text or symbols)natural_image
Simple line drawing of a rectangular panel with mounting flanges and a central square hole (no text or symbols)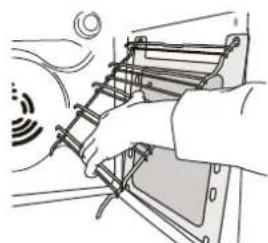
natural_image
Illustration of a hand using a ladder to lift a vehicle (no text or symbols visible)natural_image
Line drawing of a hand holding a device with attached cables and a circular sensor (no text or symbols)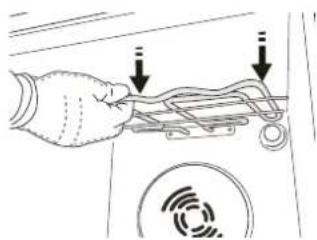
natural_image
Line drawing of a hand holding a device with two arrows pointing to a component (no text or symbols present)natural_image
Diagram of a hand holding a device with two curved arrows indicating motion or connection (no text or symbols present)DÉPANNAGE
ZAHVALJUJEMO VAM NA KUPOVINI PROIZVODA WHIRLPOOL
Kako bismo vam mogli pružiti potpuniju pomoć, registrirajte svoj proizvod na adresi www.register10.eu

Pažljivo pročitajte sigurnosne upute prije upotrebe uređaja.
SKENIRAJTE QR KOD NA SVOM UREĐAJU DA BISTE DOBILI VIŠE INFORMACIJA

natural_image
Line drawing of a 3D printer with a QR code overlay (no text or symbols on the device itself)OPIS PROIZVODA
1. LIJEVI ZASLON
2. SVJETLO
natural_image
Technical line drawing of a mechanical assembly with no visible text or symbolsVodilicu učvrstite tako da čvrsto pritisnete donji dio kopče na vodilicu rešetke. Provjerite mogu li se vodilice slobodno pomicati. Ove korake ponovite na drugoj vodilici rešetke na istoj razini.
natural_image
Mechanical assembly diagram showing a rotating component with directional arrow (no text or symbols)FUNKCIJE

6TH SENSE
Omogućuje odabir načina kuhanja i najbolji raspon temperature za sve vrste namirnica (lasagne, meso, riba, povrće, kolači i torte, slani kolači, kruh, pizza). Za najbolji način upotrebe funkcije pratite upute u odgovarajućoj tablici kuhanja.
• STEAM+ (KUHANJE NA PARI)
Steam+ (kuhanje na pari) omogućuje postizanje odličnih rezultata zahvaljujući pari u ciklusu pripremanje hrane. Ova funkcija predlaže idealnu temperaturu za pripremu hrane po velikom broju recepata; Trajanja kuhanja i količina vode (100 / 200 ml) glavnih jela prikazana je u odgovarajućoj tablici kuhanja koju možete pronaći na mreži. Funkciju pare uvijek aktivirajte kad je pećnica hladna i nakon što ste ulili pitku vodu na dno unutrašnjosti.
Napomena: Preporučena količina vode veća je od zapremnine na dnu unutrašnjosti, ali dno unutrašnjosti pećnice posebno je dizajnirano da učinkovito podnosi preporučene veće količine vode.
• CASSEROLE (SLOŽENAC)
Ta funkcija predlaže najbolju temperaturu i način kuhanja za jela s tjesteninom.
• MESO
Ta funkcija predlaže najbolju temperaturu i način kuhanja za meso.
• BREAD (KRUH)
Ta funkcija automatski predlaže najbolju temperaturu i način kuhanja za sve vrste kruha.
- PIZZA
Ova vam funkcija omogućuje izradu izvrsne domaće pizze za manje od 10 minuta, kao u restoranu. Namjenski ciklus kuhanja radi na temperaturi iznad 300 stupnjeva Celzijusa, čineći pizzu mekanom iznutra, hrskavom na rubovima i savršeno ravnomjerno zapečenom.
Kombinirajući ovu funkciju s dodatkom Pizza Stone WPro (kamen za pizzu WPro) i zagrijavanjem od 30 minuta pizza se može ispeći za 5 – 8 min. (Obratite se postprodajnoj službi ili na www.whirlpool.eu. za narudžbe ili informacije)
• KOLAČI
Ta funkcija predlaže najbolju temperaturu i način kuhanja za sve vrste kolača.

KONVENCIONALNO
natural_image
Simple line drawing of a rectangular metal plate with mounting flanges (no text or symbols)
natural_image
Illustration of a hand holding a ladder inside a vehicle (no text or symbols visible)Kako biste na najbolji način iskoristili svojstva samočišćenja katalitičkih ploča preporučujemo da pećnicu oko jedan sat zagrijavate na 200 °C pomoću funkcije „Konvekcijsko pečenje“. Za to vrijeme pećnica mora biti prazna. Zatim pustite da se uređaj ohladi prije no što uklonite ostatke jela neabrazivnom spužvom.
Napomena: Upotreba nagrizajućih ili abrazivnih sredstava za čišćenje, hrapavih četki, sredstva za ribanje ili raspršivača za čišćenje pećnice mogla bi oštetiti katalitičku površinu i uništiti njena svojstva samočišćenja.
Obratite se našem postprodajnom servisu ako trebate zamjenske ploče.
ZAMJENA ŽARULJE
- Zatvorite vrata koliko god to možete. Čvrsto uhvatite vrata s obje ruke; ne držite ih za ručku. Vrata jednostavno skinite tako da ih nastavljate zatvarati dok ih istovremeno vučete prema gore dok se ne otpuste iz ležišta. Stavite vrata sa strane, oslanjajući ih na meku površinu.

-
Ponovno postavite vrata pomičući ih prema pećnici, poravnavajući kuke šarki s ležištima i učvršćujući gornji dio na njegovo ležište.
-
Spustite vrata pa ih otvorite do kraja. Šarke spustite u njihov početni položaj: provjerite jeste li ih do kraja spustili.

- Izvucite grijač i malo ga spustite.
natural_image
Diagram of a hand holding a device with cables and sensors, no text or symbols present
natural_image
Hand holding a device with arrows pointing to a component, no visible text or symbols- Za ponovno namještanje grijača, podignite lagano ga povlačeći prema sebi i provjerite je li sjeo na bočne nosače.
natural_image
Diagram of a hand holding a device with arrows indicating motion or signal flow (no text or symbols)RJEŠAVANJE PROBLEMA
| Problem | Mogući uzrok | Rješenje |
| Pećnica ne radi. | Nestalo je struje.Došlo je do isključenja iz mreže. | Provjerite ima li struje u mreži i je li pećnica ukopčana u struju.Isključite i ponovno uključite pećnicu kako biste provjerili javlja li se kvar i dalje. |
| Ako zaslon pokazuje slovo „F“ iza kojeg slijedi broj. | Softverski problem. | Obratite se dežurnom pozivnom centru i navedite broj iza slova „F”. |
| Tekst na zaslonu nije jasan i čini se da je u kvaru. | Postavljen je neki drugi jezik. | Obratite se pozivnom centru. |
| Ciklus kuhanja sa sondom završio je bez jasnog uzroka ili se na zaslonu prikazuje pogreška F3E3. | Sonda za hranu nije ispravno priključena. | Provjerite priključak sonde za hranu. |
Pravila, standardne dokumente i dodatne informacije o proizvodu možete pronaći tako da:
- Koristeći QR kod na Vašem uređaju
- Posjetite naše web-mjesto docs.whirlpool.eu/docs
- Možete i (bkojntekftinađa potrači postprojedajnja serwis). Kada se obraćate našem postprodajnom servisu navedite kodove navedene na identifi kacijskoj pločici proizvoda.
®/TM/© 2025 Whirlpool. Proizvedeno prema licenci.


KÖSZÖNJÜK, HOGY A WHIRLPOOL TERMÉKÉT VÁLASZTOTTA
natural_image
Diagram of a 3D printer with a QR code overlay, no text or symbols presentTERMÉKLEÍRÁS
natural_image
Technical line drawing of a mechanical assembly with no visible text or symbols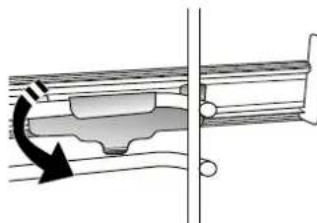
natural_image
Mechanical assembly diagram showing a curved arrow indicating rotation or force direction (no text or symbols)natural_image
Simple line drawing of a rectangular metal plate with mounting flanges (no text or symbols)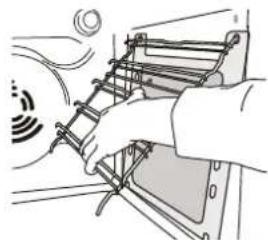
natural_image
Illustration of hands operating a mechanical device with a sensor symbol and wiring (no text or labels)natural_image
Line drawing of a hand holding a device with cables and sensors, no text or symbols present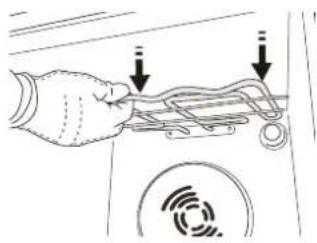
natural_image
Hand holding a device with two arrows pointing to a cable or connector (no text or symbols visible)natural_image
Hand holding a device with arrows indicating cable or connection (no text or symbols)A PROBLÉMÁK MEGOLDÁSA
1. PARTE SINISTRA DEL DISPLAY
2. LAMPADA
natural_image
Technical diagram of a mechanical assembly with diagonal braces and a directional arrow (no text or symbols)natural_image
Mechanical assembly diagram showing a rotating component with an arrow indicating rotation direction (no text or labels)(SOLO IN ALCUNI MODELLI)
natural_image
Simple line drawing of a rectangular electronic component with mounting flanges (no text or symbols)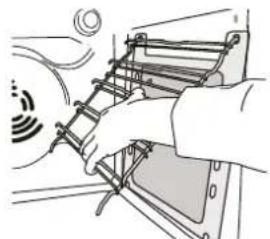
natural_image
Illustration of a hand installing or adjusting a ladder-like structure with a sensor icon (no text or symbols)(SOLO IN ALCUNI MODELLI)
natural_image
Hand holding a device with attached cables and a circular sensor icon (no text or symbols)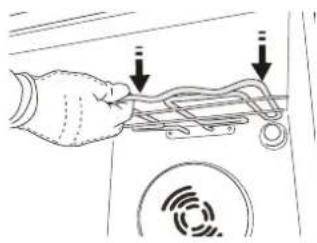
natural_image
Hand holding a device with arrows pointing to a component, no visible text or symbolsnatural_image
Hand holding a device with arrows indicating motion or signal flow (no text or symbols)GAMINIO APRAŠYMAS
1. KAIRYSIS EKRANAS
2. LEMPUTÉ
natural_image
Technical line drawing of a mechanical assembly with no visible text or symbolsnatural_image
Mechanical assembly diagram showing a rotating component with directional arrow (no text or labels)• KEPIMAS ORE/KONVEKCINIS KEPSNYS
natural_image
Simple line drawing of a rectangular metal plate with mounting holes (no text or symbols)
natural_image
Illustration of a hand holding a ladder inside a vehicle chassis, with no visible text or symbols- Uždarykite dureles.
natural_image
Line drawing of a hand holding a device with attached cables and a circular sensor (no text or symbols)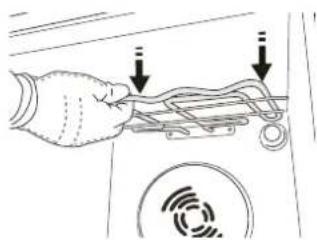
natural_image
Line drawing of a hand holding a device with two downward arrows indicating motion or force, next to a circular component with a sensor icon (no text or symbols)natural_image
Hand holding a device panel with arrows indicating motion or connection (no text or symbols)TRIKČIŲ ŠALINIMAS
IZSTRĀDĀJUMA APRAKSTS
1. DISPLEJS KREISAJÄ PUSË
2. APGAISMOJUMS
4. IESLÊGTS/IZSLÊGTS
natural_image
Technical line drawing of a mechanical assembly with spring-loaded components and an arrow indicating direction (no text or symbols)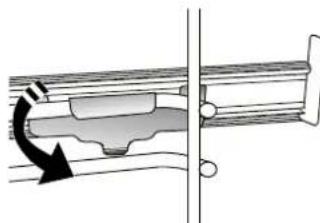
natural_image
Mechanical assembly diagram showing a rotating component with an arrow indicating rotational motion (no text or symbols)SLÍDOŠO SLIEČU IEVIETOŠANA (JA IR KOMPLEKTÁ)
natural_image
Simple line drawing of a rectangular metal plate with mounting flanges (no text or symbols)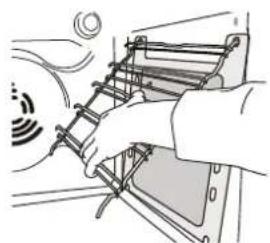
natural_image
Illustration of a hand installing or adjusting a mechanical component with visible wiring (no text or symbols)- Nedaudz izvelciet uz āru sildelementu un nolaidiet to.
natural_image
Line drawing of a hand holding a device with attached cables and a circular sensor icon (no text or symbols)
natural_image
Hand holding a device with two arrows pointing to a cable or connector (no text or symbols visible)natural_image
Hand holding a device panel with arrows indicating motion or signal flow (no text or symbols)PROBLÉMU RISINĀŠANA
PRODUCTBESCHRIJVING
1. LINKER DISPLAY
2. LAMP
natural_image
Technical line drawing of a mechanical assembly with no visible text or symbols
natural_image
Mechanical assembly diagram showing a rotating component with a curved arrow indicating motion (no text or symbols)Remove the shelf guides from the oven and remove the protective plastic from the sliding runners.
Turn the selection knob to select the rated current, then press to confirm.
To select a sub-function (where available), select the main function and then press to confirm and go to the function menu.
When the °C/°F icon flashes on the display, turn the knob to change the value, then press to confirm and continue to alter the settings that follow (if possible).
If necessary, turn the knob to set the time you want cooking to end, then press to confirm and start the function.
natural_image
Simple line drawing of a rectangular electronic component with mounting flanges (no text or symbols)
natural_image
Illustration of a hand installing or adjusting a ladder inside a vehicle (no text or symbols visible)natural_image
Diagram of a hand holding a device with a sensor icon and directional arrows indicating motion (no text or symbols)
natural_image
Hand holding a device with arrows pointing to a circular component (no text or symbols visible)natural_image
Diagram of a hand holding a device with two arrows indicating motion or connection, no text or symbols presentPROBLEEMOPLOSSING
TAKK FOR AT DU KJ∅PTE ET WHIRLPOOL-PRODUKT
PRODUKTBESKRIVELSE
1. VENSTRE DISPLAY
2. LYS
SETTE INN GLIDESKINNENE (HVIS TIL STEDE)
natural_image
Technical line drawing of a mechanical assembly with no visible text or symbolsTRADISJONELL STEKING
VEDLIKEHOLD OG RENHOLD
natural_image
Simple line drawing of a rectangular metal plate with mounting flanges (no text or symbols)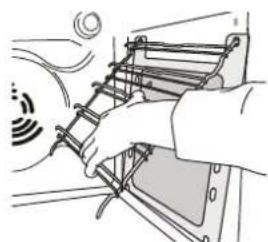
natural_image
Illustration of a hand using a ladder to lift a vehicle (no text or symbols visible)- Trekk varmeelementet litt ut og senk det.

natural_image
Line drawing of a hand holding a device with cables and a sensor icon (no text or symbols)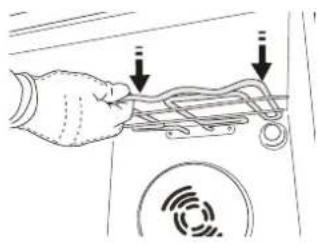
natural_image
Hand holding a cable with two arrows pointing to it, next to a circular device with a sensor icon (no text or symbols)natural_image
Diagram of a hand holding a device with arrows indicating motion or signal flow (no text or symbols)PROBLEML∅SNING
OPIS PRODUKTU
1. WYŚWIETLACZ Z LEWEJ STRONY
2. ŚWIATŁO
natural_image
Pure mechanical assembly diagram showing diagonal metal rods and a double-headed arrow indicating direction (no text or symbols)miejscu.
natural_image
Mechanical assembly diagram showing a rotating component with directional arrow (no text or labels)At this point, open the door, place the food in the oven, close the door and start cooking by pressing ▶
To extend the cooking time without changing the settings, turn the knob to set a new cooking time and press ▶
6. FUNKCJE 6 ^TH SENSE
FUNKCJA SMART CLEAN
natural_image
Simple line drawing of a rectangular panel with mounting holes and a central square hole (no text or symbols)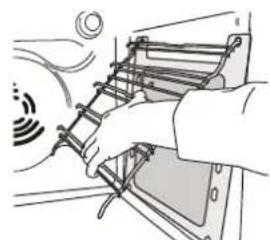
natural_image
Illustration of a hand operating a mechanical device with visible wiring and motion indicators (no text or symbols)natural_image
Diagram of a hand holding a device with cables and sensors, no text or symbols present
natural_image
Hand holding a device with two arrows pointing to a cable or connector (no text or symbols visible)natural_image
Diagram of a hand holding a cable or wire inside a device, with no visible text or symbolsROZWIĄZYWANIE PROBLEMÓW
natural_image
Pure mechanical assembly diagram showing diagonal braces and spring supports without any text or symbolsnatural_image
Mechanical assembly diagram showing a rotating component with an arrow indicating rotation direction (no text or labels)FUNCTIONS (FUNÇÕES)

6TH SENSE
natural_image
Simple line drawing of a rectangular panel with mounting flanges and a central square hole (no text or symbols)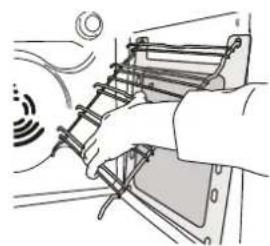
natural_image
Illustration of a hand using a ladder to lift a vehicle (no text or symbols visible)REMOVER E REPOR A PORTA
natural_image
Line drawing of a hand holding a device with a curved panel and sensor icon (no text or symbols)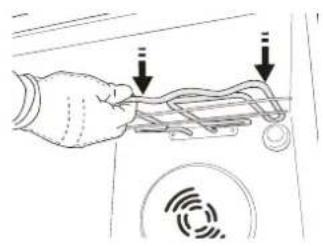
natural_image
Hand holding a device with two arrows pointing to a cable or connector (no text or symbols visible)natural_image
Hand inserting a cable into a device panel with signal waves (no text or symbols)VĂ MULȚUMIM CĂ AȚI ACHIZIȚIONAT UN PRODUS WHIRLPOOL
DESCRIEREA PRODUSULUI
1. AFIŞAJUL DIN STÂNGA
2. LUMINĂ
natural_image
Pure mechanical assembly diagram showing diagonal braces and a double-headed arrow (no text or symbols)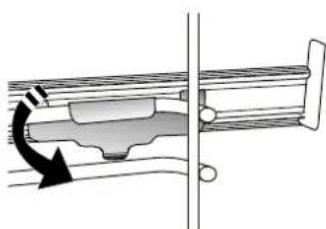
natural_image
Technical diagram of a mechanical assembly with directional arrows indicating motion (no text or symbols)natural_image
Technical line drawing of a rectangular plate with mounting holes and a central square hole (no text or symbols)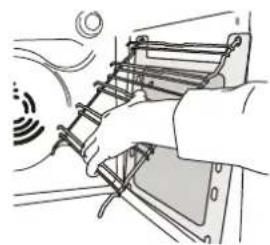
natural_image
Illustration of a hand using a ladder to lift a vehicle (no text or symbols visible)natural_image
Line drawing of a hand holding a device with cables and a sensor icon (no text or symbols)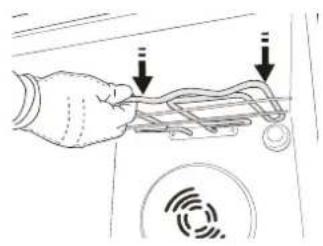
natural_image
Hand holding a device with two arrows pointing to a cable or connector (no text or symbols visible)natural_image
Illustration of a hand holding a device with arrows indicating motion or signal flow (no text or symbols)REMEDIEREA DEFECTIUNILOR
OPIS SPOTREBIČA
natural_image
Pure mechanical assembly diagram showing diagonal braces and a double-headed arrow (no text or symbols)natural_image
Mechanical assembly diagram showing a rotating component with an arrow indicating rotation (no text or symbols present)Upozornenie: Posuvné bežce možno nasadit na hociktorej úrovni.
FUNCTIONS (FUNKCIE)

6TH SENSE
TEPLOTA / ÚROVEŇ PARY
natural_image
Simple line drawing of a rectangular panel with mounting flanges and a central square hole (no text or symbols)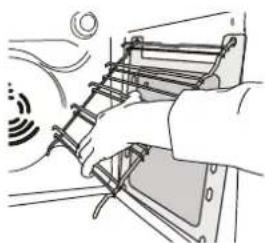
natural_image
Illustration of a hand using a ladder to lift a device (no text or symbols visible)- Zatvorte dvierka, čo najviac ako to ide. Pevne dvierka chytte oboma rukami – nedržte ich za rukovát. Dvierka jednoducho vyberiete tak, že ich budete d'alej zatvárat a pritom t'ahat nahor, až kým sa neuvolnia. Dvierka odložte nabok na mäkký povrch.
natural_image
Diagram of a hand holding a device with a curved panel and sensor icon (no text or symbols)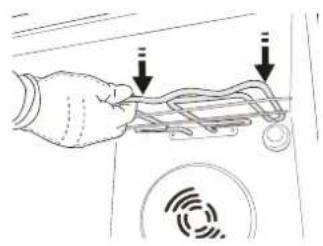
natural_image
Hand holding a device with two arrows pointing to a cable or connector (no text or symbols visible)natural_image
Hand inserting a cable into a device panel with signal icon (no text or symbols)RIEŠENIE PROBLÉMOV

Pred uporabo aparata pozorno preberite varnostna navodila.
OPIS IZDELKA
1. LEVI PRIKAZOVALNIK
2. LUČ
natural_image
Simple line drawing of a rectangular plate with vertical lines, no text or symbols present.PRESTREZNI PEKAČ
natural_image
Simple line drawing of a rectangular tray with side grooves and a separate curved bracket (no text or symbols)UNIVERZALNI PEKAČ*
natural_image
Simple line drawing of a rectangular plate with scalloped edges and a small arrow below (no text or symbols)DRSNA VODILA.*

natural_image
Two metallic cylindrical metal bars with flanged ends, no text or symbols visiblenatural_image
3D rendering of a rectangular metal frame with a mesh grille and a small grid pattern at the bottom (no text or symbols)natural_image
Pure mechanical assembly diagram showing diagonal metal rods and a bracket with an arrow indicating direction (no text or symbols)natural_image
Mechanical assembly diagram showing a rotating component with directional arrow (no text or labels)Da vodila zavarujete, spodnji del sponke čvrsto pritisnite na vodila za pekače. Prepričajte se, da je mogoče drsna vodila nemoteno premakniti. Postopek ponovite na drugem vodilu za pekače, ki je na enaki višini.
natural_image
Simple line drawing of a rectangular panel with mounting holes and a central square hole (no text or symbols)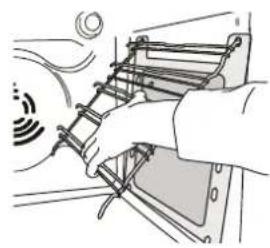
natural_image
Illustration of a hand using a ladder to lift a vehicle, with motion lines indicating speed (no text or symbols)- Vrata zaprite, kolikor je mogoče.
Z nežnim pritiskom preverite, ali sta zaporna vzvoda v pravilnem položaju.
- Grelnik nekoliko izvlecite in ga postavite nižje.
natural_image
Hand holding a device panel with attached cables and a circular sensor icon (no text or symbols)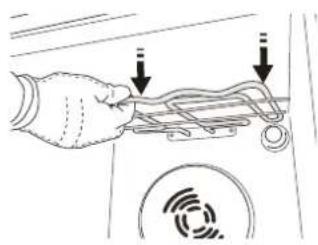
natural_image
Hand holding a device with two arrows pointing to a cable or connector (no text or symbols visible)- Grelnik nazaj v položaj namestite tako, da ga dvignete, rahlo povlečete k sebi in preverite, da je naslonjen na stranske nosilce.
natural_image
Diagram of a hand holding a device with arrows indicating motion or signal flow (no text or symbols)ODPRAVLJANJE TEŽAV
OPIS PROIZVODA
- Kontrolna tabla
- Ventilator
- Kružni grejač (nije vidljiv)
- Vođice (nivo je prikazan na prednjem delu pećnice)
- Vrata
- Gornji grejač / roštilj
- Sijalica
- Pločica za identifikaciju (ne uklanjajte je)
- Donji grejni element (nije vidljiv)
KONTROLNA TABLA
1. LEVI DISPLEJ
2. SVETLO
- DISPLEJ SA DESNE STRANE
DODACI
ŽIČANA REŠETKA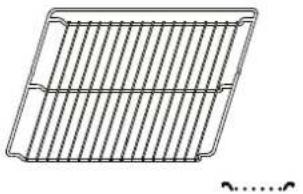 | PLEH ZA SAKUPLJANJE MASNOĆE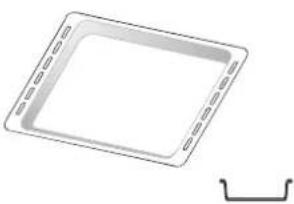 | PLEH ZA PEČENJE*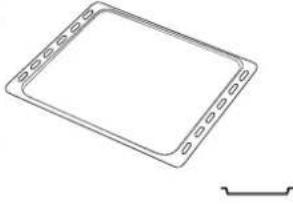 | KLIZNE VOĐICE*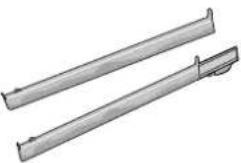 |
| Koristi se za pripremu hrane ili kao držać za šerpe, kalupe za kolače i drugo posuđe za pripremu hrane u pećnici. | Koristi se kao pleh za pečenje mesa, ribe, povrća, fokače itd. ili je možete postaviti ispod žičane rešetke ako želite da prikupite saft od pečenja. | Koristi se za pečenje svih vrsta hleba i peciva, kao i pečenja, ribe u sopstvenom soku itd. | Da bi olakšale postavljanje ili uklanjanje dodataka. |
PLEH ZA PRŽENJE VAZDUHOM*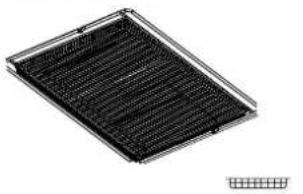 | |||
| Koristi se za pripremu hrane pomoću funkcije prženja vazduhom, tako što je pleh za pečenje postavljen na niži nivo radi prikupljanja mogućih mrvica ili masnoće. Može se prati u mašini za pranje sudova. | Količina i vrsta dodataka može se razlikovati u zavisnosti od kupljenog modela. Ostali pribor se može kupiti zasebno; za porudžbine i informacije, obratite se postprodajnom servisu.* Dostupno samo na određenim modelima | ||
STAVLJANJE REŠETKI I DRUGIH DODATAKA
natural_image
Pure mechanical assembly diagram showing diagonal braces and a black arrow indicating direction (no text or symbols)biste pričvrstili vodicu, donji deo žabice pričvrstite za nju. Vodite računa da se klizači slobodno kreću. Ponovite ove korake na drugoj vodici na istom nivou.
Uklonite vodice iz pećnice i zaštitnu plastiku sa kliznih vodica.
Pričvrstite gornju žabicu klizača za vođicu i pomerite klizanjem do kraja. Donju žabicu spustite na željeni položaj.
natural_image
Mechanical assembly diagram showing a rotating component with a curved arrow indicating motion (no text or symbols)natural_image
Simple line drawing of a rectangular panel with mounting flanges and a central square hole (no text or symbols)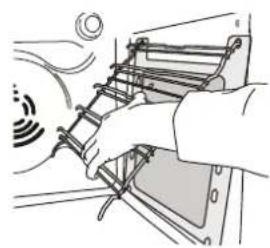
natural_image
Illustration of a hand using a ladder to lift a vehicle (no text or symbols visible)Za najbolje korišćenje funkcije samočišćenja katalitičkih ploča, preporučujemo grejanje rerne na 200 °C oko sat vremena pomoću funkcije „Konvekciono Pečenje“. Tokom ovog procesa, pećnica mora biti prazna. Zatim ostavite uređaj da se ohladi pre nego što neabrazivnim sunderom skinete sve ostatke hrane.
Obratite pažnju na sledeće: Korišćenje korozivnih ili abrazivnih deterdženata, čvrstih četki, živce za sudove ili spreja za čišćenje pećnice može da oštei katalitičku površinu i ugrozi njene karakteristike samočišćenja. Kontaktirajte postprodajni centar ako je potrebna zamena ploča.
ZAMENA LAMPICE
- Isključite pećnicu iz struje.
- Odvrnite poklopac lampe, zamenite sijalicu i vratite poklopac.
- Ponovo priključite rernu na električnu mrežu.
Obratite pažnju na sledeće: halogene sijalice od 40 W / 230 V, tip G9, T300.
Sijalica koja se koristi u ovom uređaju je posebno dizajnirana za kućne aparate i nije pogodna za sobno osvetljenje u domaćinstvu. (EC regulativa 244/2009) Sijalice su dostupne u našem postprodajnom servisu.
- Zatvorite vrata koliko god je moguće. Čvrsto držite vrata sa obe ruke – ne držite ih za dršku. Jednostavno skinite vrata tako što ćete nastaviti da ih zatvarate dok ih istovremeno povlačite nagore i oslobađate iz njihovog ležišta. Položite vrata da leže na jednoj strani, na mekanoj površini.
-
Ponovo postavite vrata tako što ćete ih podići ka pećnici, poravnajte kuke šarki sa ležištem i postavite gornji deo vrata u njihovo ležište.
-
Spustite vrata, a potom ih potpuno otvorite. Spustite kvačice na njihovu prvobitnu poziciju: Proverite da li ste ih spustili potpuno.

Nežno ih pritisnite kako biste se uverili da su kvačice u dobrom položaju.

- Pokušajte da zatvorite vrata i proverite da li su u istoj ravni sa kontrolnom tablom. Ukoliko nisu, ponovite gore opisane korake: Vrata se mogu oštetiti ukoliko nisu nameštena kako treba.
SPUŠTANJE GORNJEG GREJAČA
(SAMO KOD NEKIH MODELA)
- Uklonite bočne vodice.
natural_image
Diagram of a hand holding a device with cables and sensors, no text or symbols present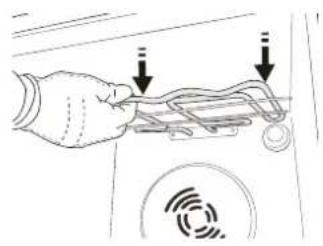
natural_image
Hand holding a device with two arrows pointing to a cable or connector (no text or symbols visible)- Ukoliko želite da promenite položaj grejnog elementa, povucite ga malo prema sebi, vodeči računa pri tome da leži na bočnim osloncima.
natural_image
Hand inserting a cable into a device panel with signal waves (no text or symbols)OTKLANJANJE PROBLEMA
TACK FÖR ATT DU HAR KÖPT EN PRODUKT FRÅN WHIRLPOOL
BESKRIVNING AV PRODUKTEN

1. VÄNSTER DISPLAY
2. BELYSNING
natural_image
Simple line drawing of a rectangular grid with horizontal lines, no text or symbols present.natural_image
Simple line drawing of a square plate with a small curved bracket beside it (no text or symbols)natural_image
Simple line drawing of a rectangular frame with notches and a small curved line at the bottom (no text or symbols)natural_image
Two metallic cylindrical metal rods with flanged ends, shown from different angles (no text or symbols)natural_image
Exterior view of a rectangular metal grate or filter component (no text or symbols visible)natural_image
Technical line drawing of a mechanical assembly with no visible text or symbolsnatural_image
Mechanical assembly diagram showing a rotating component with directional arrow (no text or labels)natural_image
Technical line drawing of a rectangular component with mounting flanges and a central square hole (no text or symbols)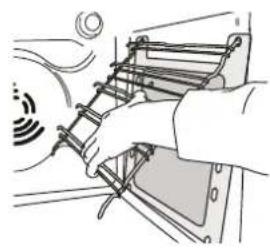
natural_image
Illustration of a hand using a ladder to lift a vehicle (no text or symbols visible)natural_image
Diagram of a hand holding a device with attached cables and a circular sensor icon (no text or symbols)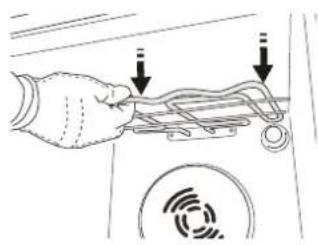
natural_image
Hand holding a device with two arrows pointing to a cable or connector (no text or symbols visible)natural_image
Diagram of a hand holding a device with two curved arrows indicating motion or connection (no text or symbols present)FELSÖKNING
®/TM/© 2025 Whirlpool. Producerad under licens.
ОПИС ВИРОБУ
natural_image
Exterior view of a rectangular metal frame with a grid pattern on the side (no text or symbols)natural_image
Technical line drawing of a mechanical assembly with no visible text or symbolsnatural_image
Mechanical assembly diagram showing a rotating component with directional arrow (no text or labels)Turn the selection knob to select the unit of measurement, then press to confirm.
At this point, open the door, place the food in the oven, close the door and start cooking by pressing ▶
natural_image
Technical line drawing of a rectangular mechanical component with mounting flanges (no text or symbols)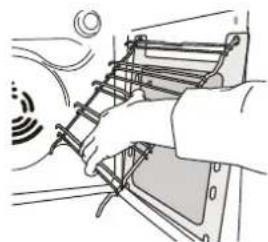
natural_image
Illustration of a hand operating a ladder with a sensor icon and cable (no text or symbols)natural_image
Hand holding a device panel with a circular sensor icon and signal waves (no text or symbols)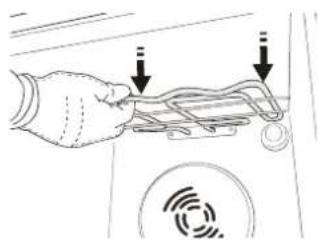
natural_image
Illustration of a hand holding a cable with two arrows indicating direction, next to a device panel (no text or symbols)- PRODUCT DESCRIPTION
- CONTROL PANEL
- LEFT HAND DISPLAY
- LIGHT
- BACK
- ON/OFF
- ROTARY KNOB
- START
- TIME
- TEMPERATURE
- INSERTING THE WIRE SHELF AND OTHER ACCESSORIES
- REMOVING AND REFITTING THE SHELF GUIDES
- FITTING THE SLIDING RUNNERS (IF PRESENT)
- FUNCTIONS
- 6TH SENSE
- • STEAM+
- - CASSEROLE
- • MEAT
- • BREAD
- - PIZZA
- - PASTRY
- CONVENTIONAL
- GRILL
- FORCED AIR
- CONVECTION BAKE
- SPECIAL FUNCTIONS
- - FASTPREHEAT
- • TURBO GRILL
- • ECO CYCLE \*
- • AIR ERY/CONVECT ROAST
- • RISING
- - SMART CLEAN
- FIRST TIME USE
- SET THE TIME
- SETTINGS
- HEAT THE OVEN
- DAILY USE
- SELECT A FUNCTION
- SET THE FUNCTION
- DURATION
- SETTING THE END COOKING TIME/DELAYED START
- ACTIVATE THE FUNCTION
- PREHEATING
- END OF COOKING
- 6 TH SENSE FUNCTIONS
- SMART CLEAN
- KEYLOCK
- .NOTES
- USEFUL TIPS
- HOW TO READ THE COOKING TABLE
- COOKING DIFFERENT FOODS AT THE SAME TIME
- MEAT
- DESSERTS
- RISING
- MAINTENANCE AND CLEANING
- EXTERIOR SURFACES
- INTERIOR SURFACES
- ACCESSORIES
- CLEANING THE CATALYTIC PANELS
- REPLACING THE LAMP
- REMOVING AND REFITTING THE DOOR
- LOWER THE TOP HEATING ELEMENT (ONLY IN SOME MODELS)
- БЛАГОДАРИМ ВИ, ЧЕ ЗАКУПИХТЕ ПРОДУКТ НА WHIRLPOOL
- ОПИСАНИЕ НА УРЕДА
- ЛЯВ ДИСПЛЕЙ
- ОСВЕТЛЕНИЕ
- ОТСТРАНЯВАНЕ НА НЕИЗПРАВНОСТИ
- POPIS PRODUKTU
- LEVÝ DISPLEJ
- SVĚTLO
- ODSTRAŇOVÁNÍ ZÁVAD
- TAK FORDI DU HAR K∅BT ET WHIRLPOOL PRODUKT
- PRODUKTBESKRIVELSE
- VENSTRE DISPLAY
- LYS
- INDSÆT RIST OG ANDET TILBEH∅R
- DANKE, DASS SIE SICH FÜR EIN WHIRLPOOL PRODUKT ENTSCHIEDEN HABEN
- PRODUKTBESCHREIBUNG
- LINKES DISPLAY
- LICHT
- LÖSEN VON PROBLEMEN
- ΠΕΡΙΓΡΑΦΗ ΠΡΟΪΟΝΤΟΣ
- ΑΡΙΣΤΕΡΗ ΟΘΟΝΗ
- ΦΩΣ
- PANTALLA DE LA IZQUIERDA
- LUZ
- TOOTE KIRJELDUS
- VASAKPOOLNE NÄIDIK
- VALGUSTUS
- TUOTTEEN KUVAUS
- VASEN NÄYTTÖ
- VALO
- 6 TH SENSE -TOIMINNOT
- KYPSENNYSTAULUKON LUKEMINEN
- ERI RUOKIEN KYPSENNYS SAMANAIKAISESTI
- VIANETSINTÄ
- MERCI D'AVOIR CHOISI UN PRODUIT WHIRLPOOL
- DESCRIPTION DU PRODUIT
- ÉCRAN DE GAUCHE
- LAMPE
- DÉPANNAGE
- ZAHVALJUJEMO VAM NA KUPOVINI PROIZVODA WHIRLPOOL
- SKENIRAJTE QR KOD NA SVOM UREĐAJU DA BISTE DOBILI VIŠE INFORMACIJA
- OPIS PROIZVODA
- LIJEVI ZASLON
- SVJETLO
- FUNKCIJE
- • STEAM+ (KUHANJE NA PARI)
- • CASSEROLE (SLOŽENAC)
- • MESO
- • BREAD (KRUH)
- • KOLAČI
- KONVENCIONALNO
- ZAMJENA ŽARULJE
- RJEŠAVANJE PROBLEMA
- KÖSZÖNJÜK, HOGY A WHIRLPOOL TERMÉKÉT VÁLASZTOTTA
- TERMÉKLEÍRÁS
- PARTE SINISTRA DEL DISPLAY
- LAMPADA
- GAMINIO APRAŠYMAS
- KAIRYSIS EKRANAS
- LEMPUTÉ
- • KEPIMAS ORE/KONVEKCINIS KEPSNYS
- IZSTRĀDĀJUMA APRAKSTS
- DISPLEJS KREISAJÄ PUSË
- APGAISMOJUMS
- IESLÊGTS/IZSLÊGTS
- SLÍDOŠO SLIEČU IEVIETOŠANA (JA IR KOMPLEKTÁ)
- PROBLÉMU RISINĀŠANA
- PRODUCTBESCHRIJVING
- LINKER DISPLAY
- LAMP
- TAKK FOR AT DU KJ∅PTE ET WHIRLPOOL-PRODUKT
- SETTE INN GLIDESKINNENE (HVIS TIL STEDE)
- TRADISJONELL STEKING
- VEDLIKEHOLD OG RENHOLD
- PROBLEML∅SNING
- OPIS PRODUKTU
- WYŚWIETLACZ Z LEWEJ STRONY
- ŚWIATŁO
- FUNKCJE 6 TH SENSE
- ROZWIĄZYWANIE PROBLEMÓW
- FUNCTIONS (FUNÇÕES)
- REMOVER E REPOR A PORTA
- VĂ MULȚUMIM CĂ AȚI ACHIZIȚIONAT UN PRODUS WHIRLPOOL
- DESCRIEREA PRODUSULUI
- AFIŞAJUL DIN STÂNGA
- LUMINĂ
- OPIS SPOTREBIČA
- FUNCTIONS (FUNKCIE)
- TEPLOTA / ÚROVEŇ PARY
- RIEŠENIE PROBLÉMOV
- OPIS IZDELKA
- LEVI PRIKAZOVALNIK
- LUČ
- ODPRAVLJANJE TEŽAV
- KONTROLNA TABLA
- LEVI DISPLEJ
- SVETLO
- STAVLJANJE REŠETKI I DRUGIH DODATAKA
- ZAMENA LAMPICE
- SPUŠTANJE GORNJEG GREJAČA
- TACK FÖR ATT DU HAR KÖPT EN PRODUKT FRÅN WHIRLPOOL
- BESKRIVNING AV PRODUKTEN
- VÄNSTER DISPLAY
- BELYSNING
- FELSÖKNING
- ОПИС ВИРОБУ
Brand : WHIRLPOOL
Model : WOI4S8HM0SXA
Category : Oven