USER MANUAL OCEAVB100W2 OCEANIC
natural_image
Modern outdoor fan with a mounted digital display stand (no visible text or symbols)
REF: OCEAVB100W2
oceanic
CONSIGNES IMPORTANTES DE SÉCURITÉ
Attention
natural_image
Diagram showing a device's internal components before and after assembly, with no visible text or symbols.
natural_image
Technical line drawing of a mechanical device with exploded view and side-view assembly (no text or symbols)
natural_image
Technical line drawing of a fan assembly with three stages: vertical, fan blade, and fan base (no text or symbols)
natural_image
Technical line drawing of a mechanical component with exploded and assembled views (no text or symbols)
natural_image
Technical line drawing of a two-tiered outdoor fan with front and side views (no text or symbols)
natural_image
Line drawing of a vertical industrial machine with a rotating arm (no text or symbols)
natural_image
Modern outdoor air conditioner with a circular fan and control panel (no visible text or symbols)
REF: OCEAVB100W2
oceanic
IMPORTANT SAFEGUARDS
Caution
Read Rules for Safe Operation and Instructions Carefully.
WARNING
- If the supply cord is damaged, it must be replaced by manufacturer or its service agent or a similarly qualified person in order to avoid a hazard.
- To protect against the risk of electrical shock, do not immerse the unit, cord or plug in water or other liquid.
- This appliance can be used by children aged from 8 years and above and persons with reduced physical, sensory or mental capabilities or lack of experience and knowledge if they have been given supervision or instruction concerning use of the appliance in a safe way and understand the hazards involved. Children shall not play with the appliance. Cleaning and user maintenance shall not be made by children without supervision.
- When the appliance is not in use and before cleaning, unplug the appliance from the outlet.
- Keep electrical appliances out of reach from Children or infirm persons. Do not let them use the appliances without supervision.
- When the fan was assembled, the rotor blade guard shall not be taken off anymore
- Prior cleaning unplug the fan.
- Wipe the fan enclosure and rotor blade guard with a slightly damp cloth.
- Unplug the appliance during filling and cleaning.
- Ensure that the fan is switched off from the supply mains before removing the guard.
- For details filling, cleaning and descaling, please refer to the section "CLEANING AND MAINTENANCE".
WARNING
10. Clean the water tank every 3 days
- Be aware that high humidity levels may encourage the growth of biological organisms in the environment.
- Do not permit the area around the humidifier to become damp or wet. If dampness occurs, turn the output of the humidifier down. If the humidifier output volume cannot be turned down, use the humidifier intermittently Do not allow absorbent materials, such as carpeting, curtains, drapes, or tablecloths, to become damp.
- Unplug the appliance during filling and cleaning.
- Never leave water in the reservoir when the appliance is not in use.
- Empty and clean the humidifier before storage. Clean the humidifier before next use.
- Warning: Micro-organisms that may be present in the water or in the environment where the appliance is used or stored, can grow in the water reservoir and be blow in the air causing very serious health risks when the water is not renewed and the tank is not cleaned properly every 3 days.
- Never insert fingers, pencils, or any other object through the grille when fan is running.
- Disconnect fan when moving from one location to another.
- Be sure fan is on a stable surface when operating to avoid overturning.
- DO NOT use fan in window, rain may create electrical hazard.
PART FIGURE
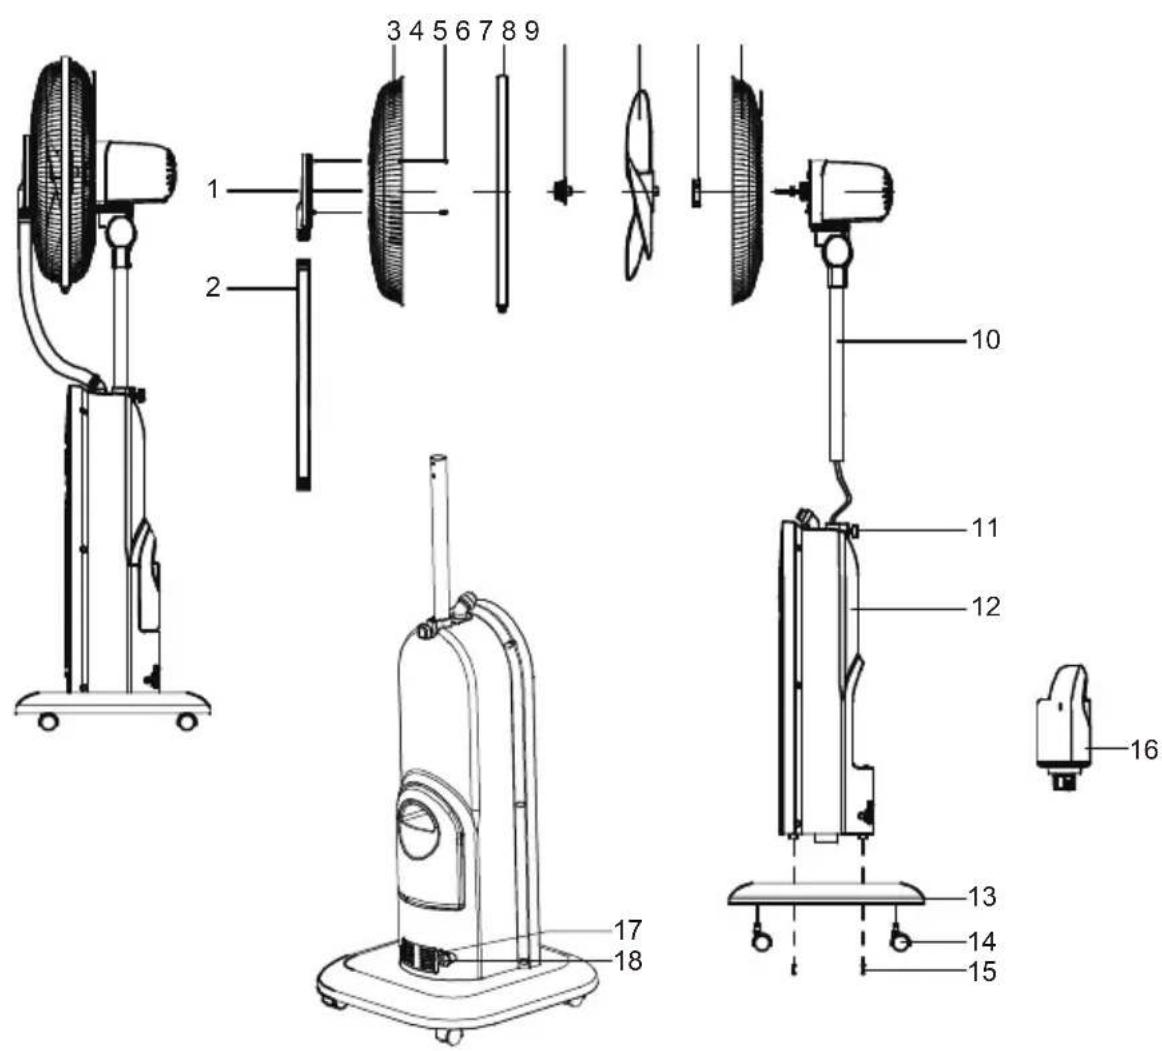
| NO. | Description NO. Description | | |
| 1 | Spray cap | 10 | Motor assy |
| 2 | Corrugated hose | 11 | Tightening knob |
| 3 | Front guard | 12 | Host assy |
| 4 | Screw (ST3*7.5) | 13 | Base assy |
| 5 | Net clamp | 14 | Caster (Universal wheel) |
| 6 | Blade nut | 15 | Screw (M5*20) |
| 7 | Blade | 16 | Water tank assy |
| 8 | Guard nut | 17 | Spring clamp |
| 9 | Rear guard | 18 | Drain plug |

Note:
All the pictures in this manual are for explanation purpose only. Any discrepancy between the real object and the illustration in the drawing shall be subject to the real subject.
INSTALLATION METHOD
Fig.1
1. Assembly of host
Take out the motor assy and host assy from the package, as is shown in Figure 1, insert the connecting wire and the column into the host, then tighten the fastening knob and ensure to drive the screw into the positioning hole.
Fig.2
natural_image
Diagram showing a device interior with sensor lights and components, before and after assembly (no text or symbols)
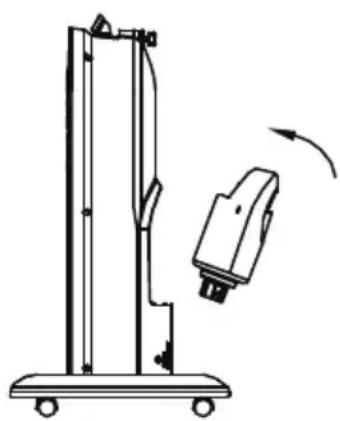
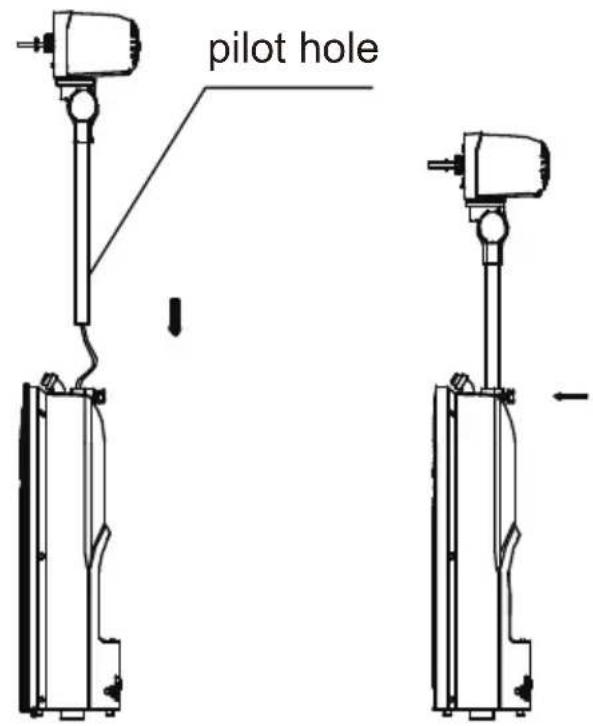
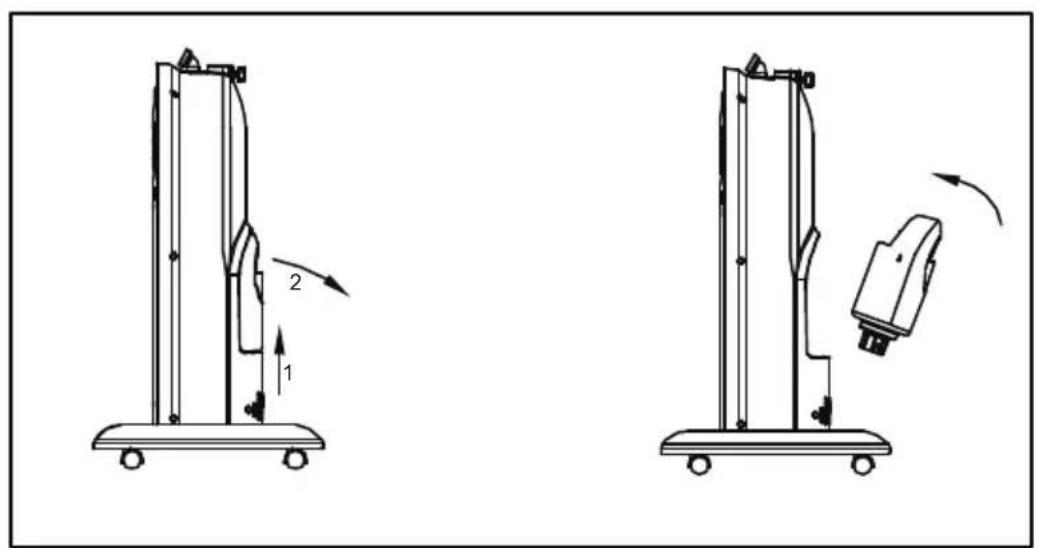
2. Mounting the casters
Take out the base and casters from the package, as is shown in Figure 2, and press the casters into the base mounting hole.
INSTALLATION METHOD
Fig.3
natural_image
Technical line drawing of a mechanical device with exploded view and side-view assembly (no text or symbols)
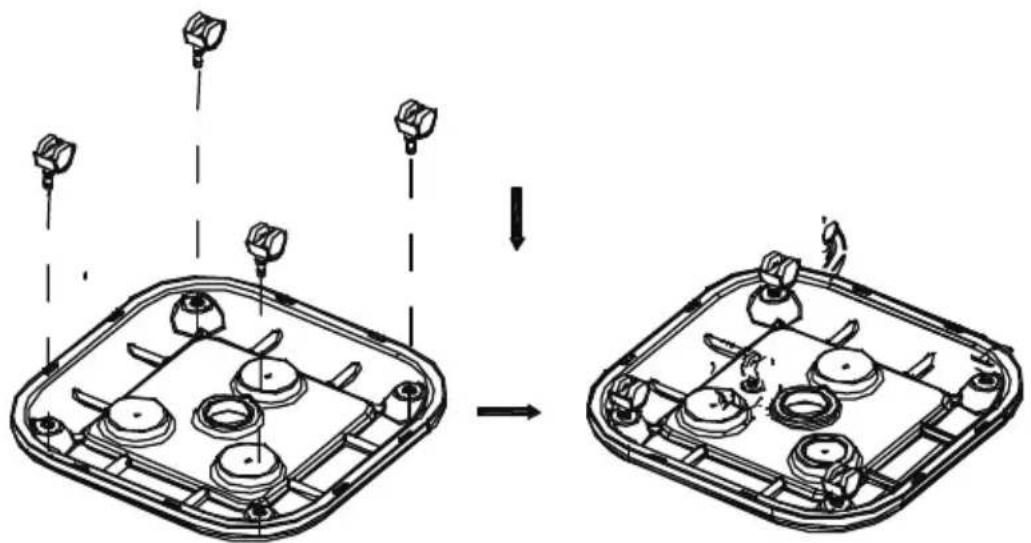
3. Mounting the base in the host
As is shown in Figure 3, put 3 screws (M5 * 20) through the base, and fix the base host in the nuts embedded in the host bottom.
Fig.4
natural_image
Technical line drawings of a wind turbine assembly with three different configurations (no text or symbols)
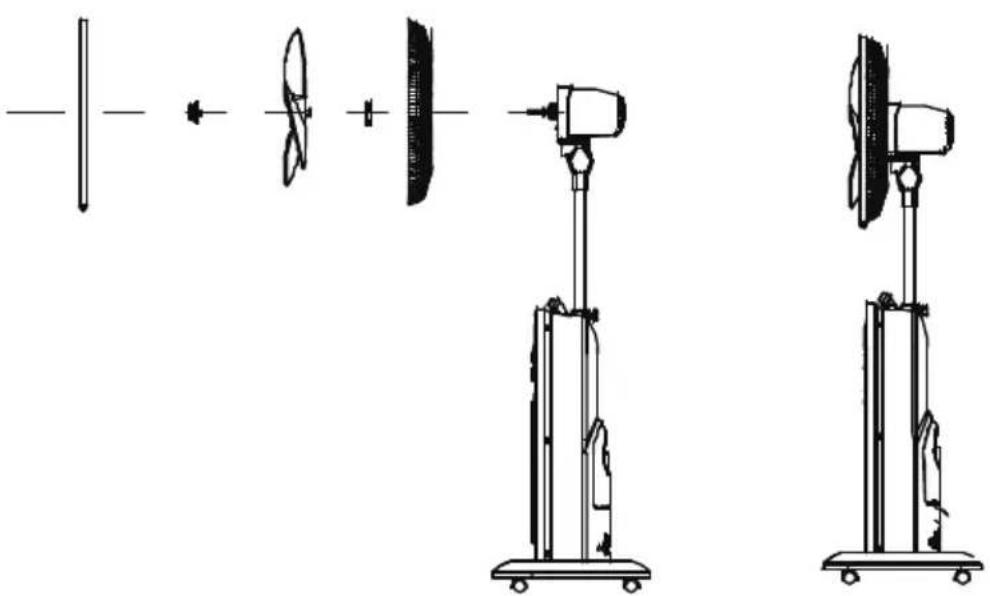
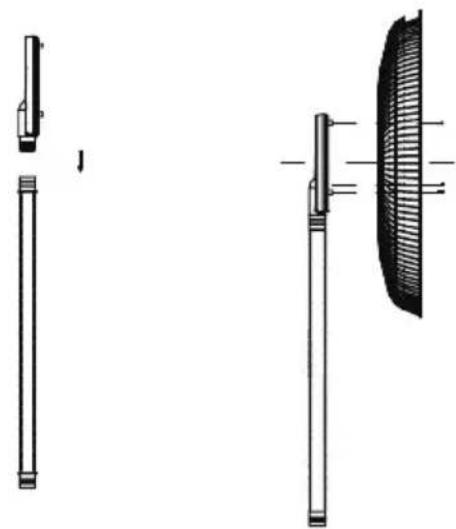
4. Mounting the rear guard and blade
As is shown in Figure 4, in sequence, mount the rear guard, guard nut, blade, blade nut and net clamp.
INSTALLATION METHOD
Fig.5
natural_image
Technical line drawing of a mechanical component with exploded and assembled views (no text or symbols)
5. Assembling the chassis
As is shown in Figure 5, press the spray cap into a corrugated hose, during assembly, perform pressing while rotating, and then with screws, fix the spray cap on the front guard.
Fig.6
natural_image
Technical line drawing of a two-tiered outdoor fan with front and side views (no text or symbols)
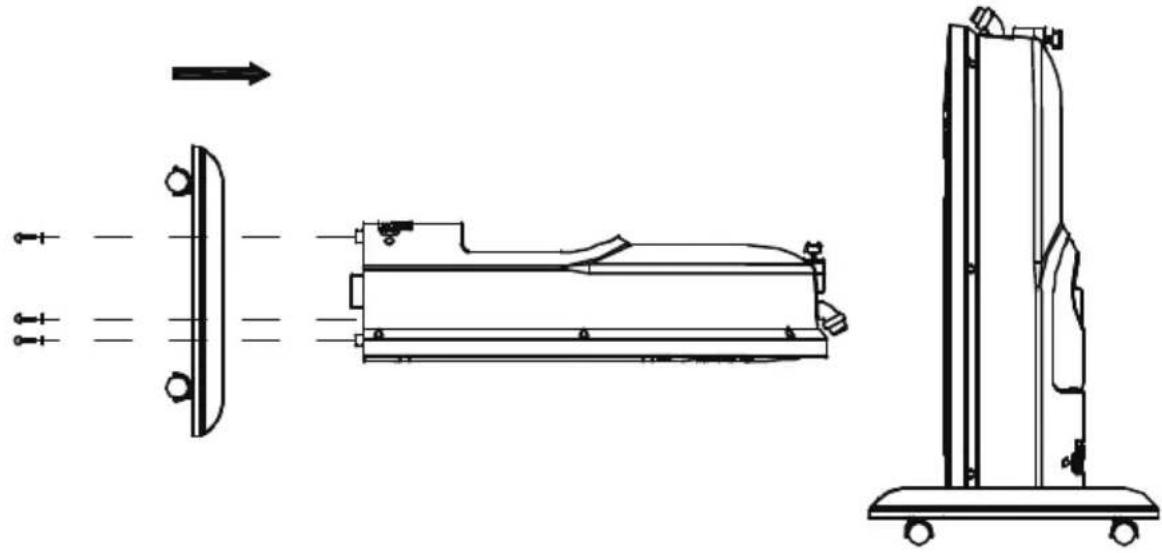
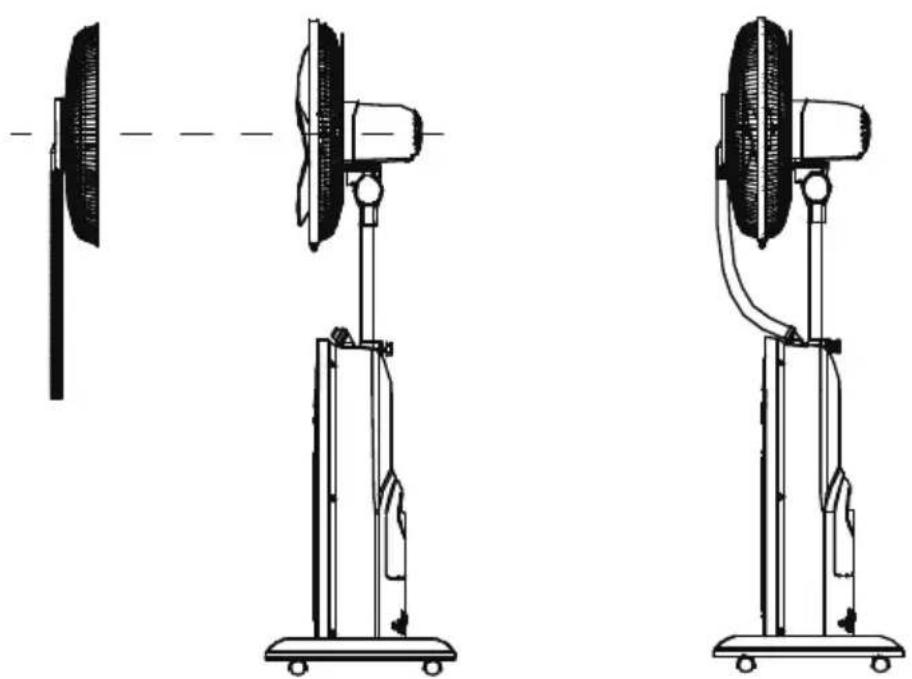
6. Mount the components of front guard into the net clamp
As is shown in Figure 6, mount the front guard into the net clamp, screw in the net clamp and then tighten the screws; then mount the corrugated hose on the top of host.
INSTRUCTIONS FOR USE
Instructions on Key Functions
After power-on, the buzzer will "beep", and the power indicator lights up.
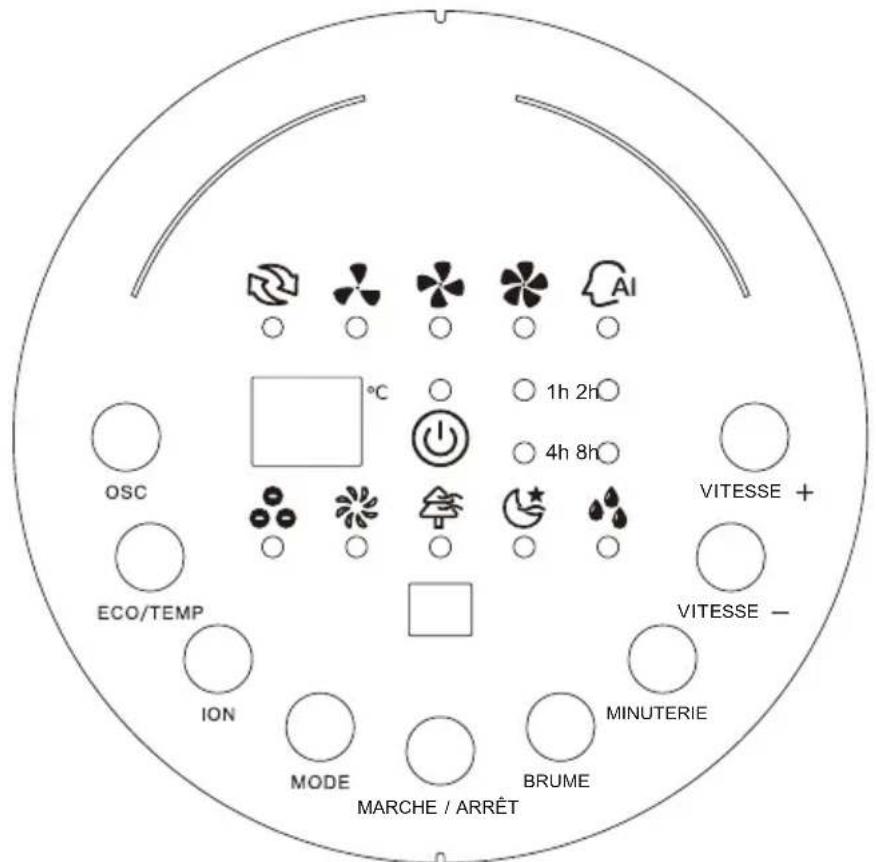
Control Panel
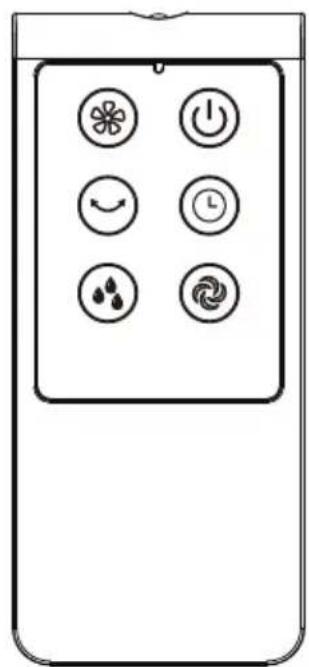
Remote Control Panel
INSTRUCTIONS FOR USE

ON/OFF
Fan power switch: When the key is pressed, the wind type is in normal mode, low-level running is performed and room temperature is shown, and after the button is pressed again, the fan power supply is disconnected.


SPEED
Fan level selection control by speed+ and speed-
1h 2h 4h 8h
TIMER
Fan timer switch: it cycles in the sequence of 1H-2H-4H-8H-0-1H-.

MIST
Humidification switch: For use, see the User's Manual of Humidifier.

MODE
Wind class selector switch: it cycles in the sequence of Normal wind - Natural wind - Sleep wind - Normal wind.

ION
Anion switch: It works after the fan and humidifier are performed.

ECO/TEMP
Smart wind switch: It automatically selects an appropriate level according to the temperature change.

OSC
Oscillation switch: It controls the left and right swinging.
INSTRUCTIONS FOR USE
natural_image
Two technical diagrams of a vacuum cleaner with labeled parts, showing motion directions (no text or symbols)
Instructions on humidification function
- Remove the water tank from the host, and unscrew the water tank cap count-er-clockwise.
- Fill the water tank with cold water, tighten the water tank cap and check for leakage.
- As is shown, put the water tank into the host according to the angle, and wait a few minutes until the host sink is filled with water.
- After the humidification button is pressed, the indicator lights up to start humidification.
Batteries
- Slide the battery compartment cover on the back of the controller Insert the batteries and make sure they are installed properly.
- Replace the cover.
NOTE: Use only AAA manganese or alkaline batteries (NOT INCLUDED).
Do not use rechargeable batteries.
- Do not dispose batteries by throwing them into fire.
No mix old and new batteries.
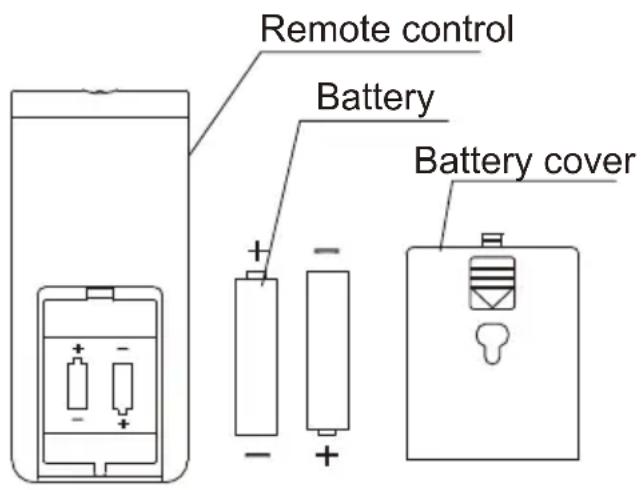
Battery compartment

Note:
If the indicator flashes (off after 10 seconds), it indicates insufficient water or low water level, please check whether the float in the sink of the host has floated or the water tank is properly placed.
| Table 3: Information requirements for comfort fans. | P |
| Information to identify the model(s) to which the information relates to [fill in as necessary]: |
| Description | Symbol | Value | Unit |
| Maximum fan flow rate | F | 67,4 | m^3/min |
| Fan power input | P | 43,7 | W |
| Service value | S_v | 1,5 | (m^3/min)/W |
| Standby power consumption | P_SB | 0,2 | W |
| Off power consumption | P_OFF | — | W |
| Fan sound power level | L_WA | 62,8 | dB(A) |
| Maximum air velocity | C | 3,4 | meters/sec |
| Seasonal electricity consumption | Q | 14,2 | kWh/a |
| Norme de mesure de la valeur de service | IEC 60897: 1986 (corr.1992)EN 60704-2-7:1998.EN 60704-1: 2010+A11: 2012.EN 50564: 2011 |
| Coordonnées pour obtenir plus d'informations | OCEANIC120/126 quai de BacalanCS 1158433000 Bordeaux |
PRECAUTIONS
- Before use, please check that the machine has been assembled completely and fixed motor components have been mounted and fastened; before this, do not connect the power supply.
- Before turning on the power, check whether the used voltage is the same as the voltage indicated on the machine.
- When the appliance works, do not insert your fingers and sharp objects into the guard or the machine body.
- Children shall use this electric appliance under adult supervision to prevent accidents. When using an electric mosquito repellant, please ensure that it is out of reach by children, and if it is accidentally swallowed, seek medical attention immediately.
- Prior to use, check the power cord and plug for any damage, and if the power cord is damaged, in order to avoid danger, be sure to have it replaced by the manufacturer, maintenance department or professionals with the similar qualification.
- If the appliance is left unattended or is no longer in use, turn off the power and unplug the power cord to avoid failure problems and accidents.
- When the humidifier is used, the water tank shall use clean water below 40^ , and it is recommended to use demineralized water, pure water or distilled water containing less impurities.
- Do not place this appliance on sloping ground to avoid tipping over, and do not move the water tank when the humidifier is working; if the humidifier or host accidentally tips over when it contains water, please unplug the power cord and remove the water tank in the machine body, and reuse it after there is no hidden security risk in the machine and especially no water accumulates in the machine body.
- When using a humidifier, you can not add sanitizers, vinegar, perfume or essential oils.
- When using a humidifier, never have the mist to face the furniture, appliances or walls to avoid damage due to excessive damp.
- Water is inside the water tank or sink shall not be placed for a too long time, as this may easily breed bacteria; change the water every 2 days, and clean the sink once every 2-3 weeks.
HUMIDIFIER CLEANING METHOD
- Before cleaning the humidifier, turn off the power, remove the spring clamp and drain plug, and clear the machine of remaining water.
- After removal of the scale and use for some time, scale is prone to accumulation inside the water tank, sink, and transducer; if scale occurs in the sink or on the oscillating blade, a small amount of detergent is put into the water in the sink, and cleaned with clear water after soaking for about 30 minutes.
- Mount the drain plug and spring clamp.
- Accept it carefully after continuous use or drying the machine in shade.
The fan requires little maintenance. Do not try to fix it by yourself. Refer it to qualified service personnel if service is needed.
- Before cleaning and assembling, fan must be unplugged.
- To ensure adequate air circulation to the motor, keep vents at the rear of the motor free of dust. Do not disassemble the fan to remove dust.
- Please wipe the exterior parts with a soft cloth soaking a mild detergent.
- Do not use any abrasive detergent or solvents to avoid scratching the surface. Do not use any of the following as a cleaner: gasoline, thinner.
- Do not allow water or any other liquid into the motor housing or interior parts.
CLEANING
- Be sure to unplug from the electrical supply source before cleaning.
- Plastic parts should be cleaned with a soft cloth moisten with mild soap. Thoroughly remove soap film with dry cloth.
DISPOSAL: Do not dispose of electrical appliances as unsorted municipal waste, use separate collection facilities. Contact you local government for information regarding the collection systems available. If electrical appliances are disposed of in landfills or dumps, hazardous substances can leak into the groundwater and get into the food chain, damaging your health and well-being.
OCEANIC
120-126 Quai de Bacalan
CS 11584
33000 Bordeaux
IMPORTÉ PAR :
A.M.C.
123, QUAI JULES GUESDE
94400 VITRY SUR SEINE
France
oceanic
www.oceanic.eu