
OCEAVP40TW - Fan OCEANIC - Free user manual and instructions
Find the device manual for free OCEAVP40TW OCEANIC in PDF.

| Product type | Floor fan |
| Model | OCEAVP40TW |
| Brand | Oceanic |
| Rated voltage | 220-240 V~ |
| Frequency | 50/60 Hz |
| Power consumption | 39 W |
| Maximum air flow | 54.30 m³/min |
| Service value | 1.39 (m³/min)/W |
| Standby consumption | 0.42 W |
| Sound power level | 53.29 dB(A) |
| Maximum air speed | 3.24 m/s |
| Seasonal consumption | 12.95 kWh/year |
| Number of speeds | 3 (Low, Medium, High) |
| Operating modes | Normal, Breeze, Sleep |
| Timer | 0.5 to 7.5 hours |
| Oscillation | Yes, with clutch button |
| Remote control | Yes, AAA 1.5 V batteries (not included) |
| Adjustable height | Yes |
| Blade material | Plastic |
| Protection | Front and rear grille |
| Cleaning | Damp sponge and mild soap |
| Insulation class | Class II |
| Warranty | See conditions in manual |
Frequently Asked Questions - OCEAVP40TW OCEANIC
User questions about OCEAVP40TW OCEANIC
0 question about this device. Answer the ones you know or ask your own.
Ask a new question about this device
Download the instructions for your Fan in PDF format for free! Find your manual OCEAVP40TW - OCEANIC and take your electronic device back in hand. On this page are published all the documents necessary for the use of your device. OCEAVP40TW by OCEANIC.
USER MANUAL OCEAVP40TW OCEANIC
IMPORTANT WARNINGS AND SAFETY ADVICE
We encourage you to read this user guide carefully and completely before installing and using your device.
It is important that this user guide is kept with the device for any new consultation. If this unit is to be transferred to another person, make sure that the user guide follows the unit so that the new user can be informed of the operation of the unit.
In this user guide, the following symbols are used:
| A | Important information about your personal safety and how to avoid damage to the device |
| B | General information and advice |
| C | Environmental information |
| D | Fire hazard |
| E | Risk of electric shock |
| F | Hot surfaces |
| G | Do not cover the device |
SAFETY RULES
The product must be installed in accordance with the national installation rules.
This device is only intended for domestic and indoor use.
- Mount it completely before turning it on.
-
Before connecting the device, check whether:
-
the connection voltage is the same as that of the nameplate,
- the plug and the power supply are adapted to the device,
-
the cable plug is suitable for the socket
The unit is only intended for a power outlet with a connection voltage of 230 Volts (50 Hz). -
Never insert your fingers, pencils or any other object through the grill while the fan is running.
- Make sure that the fan is placed on a stable surface while it is running.
- Do not use your fan near a window. Rain may cause a risk of electric shock.
- Never let the fan run unattended.
-
For safety reasons, it is ESSENTIAL to always remove the plug from the socket when the appliance is not in use, before cleaning it or before any maintenance.
-
Do not use chemicals or detergents for cleaning that could easily damage or deform your device.
- Do not pull on the power cord to disconnect the appliance from the power outlet.
- Do not use the appliance with a damaged cord or plug.
- Never attempt to disassemble or repair the unit yourself. In the case of a repair by a non competent person, the warranty is canceled.
- Unplug the fan when moving it.
- Never leave this device in the presence of or within the reach of children without supervision.
- The appliance and grill must not be disassembled for maintenance or cleaning.
- The devices are not intended to be operated by means of an external timer or by a separate remote control system.
-
This device may be used by children at least 8 years of age and by persons with reduced physical, sensory or mental capacity or lack of experience or knowledge, if they are properly supervised if instructions for the safe use of the apparatus have been given to them and the risks involved have been apprehended. Children should not play with the device. Cleaning and maintenance by the user should not be done by unattended children.
-
This product complies with the requirements of Directives 2014/35 / EU (repealing Directive 73/23 / EEC as amended by Directive 93/68 / EEC) and 2014/30 / EU (repealing Directive 89/336 / EEC).
- WARNING !!! If the power cable is damaged, it must be replaced by the manufacturer, its after-sales service or similarly qualified persons in order to avoid a hazard.
- The power cord plug must be removed from the electrical outlet before cleaning or servicing.
- Once the unit is assembled, it is forbidden to disassemble the grilles.
- This device is intended for use in domestic and indoor applications.
- For instructions on how to install the unit, refer to the following "Assembly Instructions" section of the manual.
- For cleaning and maintenance of the appliance, refer to the section "Cleaning and maintenance".
UNPACKING THE APPLIANCE AND DISPOSING OF THE EMBALLAGIC ELEMENTS

- Remove all packing material around the appliance and the protective elements inside the appliance compartments.
-
Cartonboard and sheets of paper are recyclable. They must be thrown in the collection bins provided for this purpose.
-
Materials bearing the symbol are recyclable:
PE <= polyethylene; > PS <= polystyrene; > PP <= polypropylene
This means that they can be recycled by depositing them into appropriate collection containers.
- Other packaging elements (adhesive, fasteners, etc.) must be disposed of with household waste.
To know more: www.quefairodemesdechets.fr
SUMMARY
IMPORTANTWARNINGS AND SAFETY ADVICE 13
SAFETY RULES 14
SUMMARY 17
I. ASSEMBLY INSTRUCTIONS 18
II. OPERATING INSTRUCTIONS 19
III. CLEANING AND MAINTENANCE 20
IV. TECHNICAL SPECIFICATIONS 20
V. EXCLUSIONS OF WARRANTY 21
VI. DISPOSAL 21
I. ASSEMBLY INSTRUCTIONS
ASSEMBLY OF THE BASE
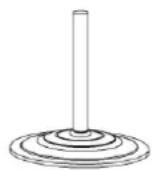
Position the counterweight (12) under the plastic base (11), place the base trim (10) and insert the lower tube (9) into the center hole. Secure it by adding the washer (13) and tighten with the elbow screw (14).
FAN ASSEMBLY
The height of the fan can be adjusted by loosening the height adjustment screw (8). Raise or lower the main extension tube (7) carefully and firmly tighten the set screw.
Position the blower housing (6A) on the top of the main extension tube (7) and push it down. Lock the connection with the clamping screw (6B)
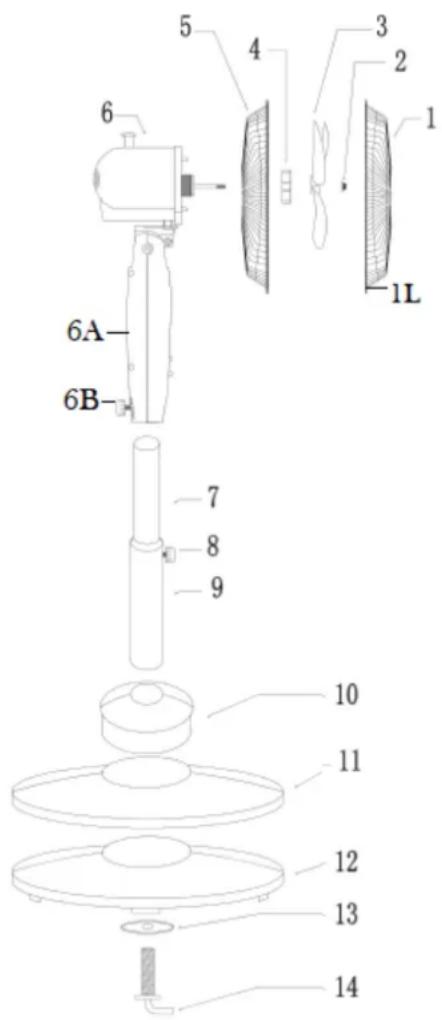
Loosen the nut (4) of the motor (6). Position the rear grille (5) on the motor, making the 3 mounting studs coincide and hold it firmly (Make sure the grill handle is at the top) Tighten the nut (4) on the grill so that it block the grill on the engine.
Fit the fan blades (3) on the shaft. Make sure that the locking pin (across the axle) fits into the notches on the back of the blade. Secure it firmly with the reverse step nut (2). (Screw in the opposite direction of the clockwise)
At this time, the blades should be able to turn freely without touching the clamping nut of the rear grille.
Unscrew the screw on the rear grille (5). Place the front grille on the back grille, matching the hole in the front grille (1) with the hole in the back grille. Secure the grids with the clips and use a screwdriver to tighten the locking screw (1L).
II. OPERATING INSTRUCTIONS
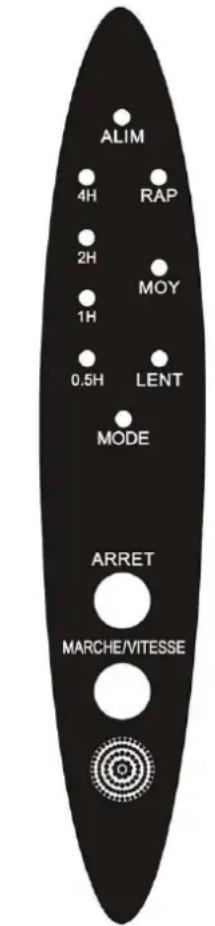
When the fan is plugged into a power outlet, the ALIM (Power) light will illuminate indicating that the fan is ready for operation.
Press the "ON / SPEED" button to turn on the power and select the fan speed, the corresponding indicator light will come on.
- "LENT" slow speed
- "MOY" average speed
RAP" fast speed
Press the "OFF" button to turn off the unit.
Remote control
It works with 2 1.5V AAA batteries, not supplied, respect the polarities by inserting the batteries.
Used batteries must be disposed of safely.
Deposit them in the collection bins provided (ask your dealer) to protect the environment.
Replace the battery only with a battery of the same type.
On the remote control:
Press the "MODE" button to select one of 3 available modes: Normal / Breeze / Sleep.
The MODE indicator on the fan with the corresponding color will illuminate to indicate the mode.
- Normal Mode: Classic continuous operation with the selected speed. In this mode the MODE indicator will be lit with the green color.
- Breeze Mode: The unit changes pace to give you the feel of a natural breeze.
If fast speed is selected: speed switches between fast / medium / slow / stop.
If the average speed is selected: the speed switches between medium / slow / stop.
If the slow speed is selected: the speed switches between slow / stop.
In this mode the MODE indicator will be red.
- Sleep mode: intermittent operation, ideal for use during the night. In this mode the MODE indicator will be off.
If the fast speed is selected: the fan runs in fast speed breeze mode for 30 minutes, then in medium speed mode breeze, the remaining time in slow speed

breeze mode.
If the average speed is selected: the fan runs at medium speed breeze mode for 30 minutes, the remaining time in slow speed breeze mode.
If slow speed is selected: the fan runs in slow speed breeze mode.
Press the "TIMER" button several times to set the automatic shutdown time between 0.5h and 7.5h.
- The selected delay is indicated by the corresponding LED (s).
Each press of the "TIMER" button increases the half-hour delay.
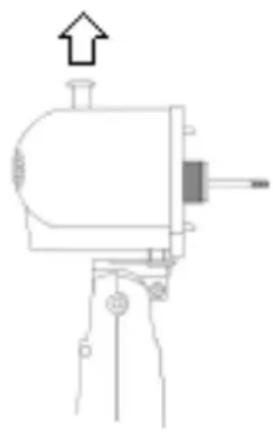
- To stop the oscillation of the unit, pull the clutch knob up.
- To adjust the air direction up or down, tilt the ventilation grille up or down.
III. CLEANING AND MAINTENANCE
Warning: the appliance must be unplugged before cleaning.
- Be sure to turn off and unplug the appliance before cleaning.
- Clean the plastic parts with a damp sponge impregnated with a mild soap.
Remove the soap with clear water and wipe with a soft cloth.
- Make sure the water can not come in contact with the engine.
- Do not reconnect the appliance until it is completely dry.
IV. TECHNICAL SPECIFICATIONS
| Reference | OCEAVP408B OCEAVP40TW |
| Model No. | TX-1608BR |
| Voltage | 220-240V~ |
| Frequency | 50/60Hz |
| Power | 45W |
| Class II | |
| Description | Symbol | Value | Unit |
| Maximum airflow | F | 54.3 | m³/min |
| Absorbed power | P | 39.0 | W |
| Service value | SV | 1.39 | (m³/min)/W |
| Electricity consumption in "standby" | PSB | 0.42 | W |
| Power consumption device off | POFF | - | W |
| Sound power level | LWA | 53.29 | dB(A) |
| Maximum speed of air | C | 3.24 | metres/sec |
| Seasonal electricity consumption | Q | 12.95 | kWh/a |
| Service Value Measurement Standard | IEC 60879:1986 (corr.1992) | ||
V. EXCLUSIONS OF WARRANTY
Contact details for any further information
The warranty does not cover the wear parts of the product, nor the problems or damage resulting from:
(1) surface deterioration due to normal wear and tear of the product;
(2) defects or deterioration due to contact with liquids and corrosion caused by rust or the presence of insects;
(3) any incident, abuse, misuse, alteration, disassembly or unauthorized repair
(4) improper maintenance, improper use concerning the product or connection to an incorrect voltage;
(5) any use of accessories not supplied or not approved by the Oceanic.
VI. DISPOSAL
The guarantee will be cancelled if the nameplate and / or serial number of the product are removed.
-
This logo affixed to the product means that it is a device whose treatment as waste falls within the scope of Directive 2012/19 / EU, on waste electrical and electronic equipment (WEEE).
-
The presence of hazardous substances in electrical and electronic equipment can have potential effects on the environment and human health in the reprocessing cycle of this product.
- Thus, at the end of the life of this appliance, it must not be disposed of with unsorted municipal waste.
- As a final consumer, your role is paramount in the cycle of reuse, recycling and other forms of recovery of this electrical and electronic equipment. Recovery and collection systems are made available to you by local authorities (waste disposal centers) and distributors.
- You have the obligation to use the selective collection systems available to you.
Information on the meaning of the conformity marking

The CE marking indicates that the product meets the main requirements of European Directives 2014/35 / EC (Low Voltage), 2014/30 / EC (Electromagnetic Accounting), 2011/65 / EU (Reduction of the use of certain hazardous substances in EEE).
Oceanic - 120-126 Quai de Bacalan - CS 11584 - 33000 Bordeaux Imported by ADMEA, 12 rue Jules Ferry, 93110 Rosny sous-Bois, France
oceanic
CE 2
www.oceanic.eu

- IMPORTANT WARNINGS AND SAFETY ADVICE
- We encourage you to read this user guide carefully and completely before installing and using your device.
- SAFETY RULES
- UNPACKING THE APPLIANCE AND DISPOSING OF THE EMBALLAGIC ELEMENTS
- SUMMARY
- IMPORTANTWARNINGS AND SAFETY ADVICE 13
- SAFETY RULES 14
- SUMMARY 17
- ASSEMBLY INSTRUCTIONS
- ASSEMBLY OF THE BASE
- FAN ASSEMBLY
- OPERATING INSTRUCTIONS
- Remote control
- On the remote control:
- CLEANING AND MAINTENANCE
- Warning: the appliance must be unplugged before cleaning.
- TECHNICAL SPECIFICATIONS
- EXCLUSIONS OF WARRANTY
- DISPOSAL
- Information on the meaning of the conformity marking
- oceanic
- www.oceanic.eu
Brand : OCEANIC
Model : OCEAVP40TW
Category : Fan