
LMX - Pressure washer Lavor - Free user manual and instructions
Find the device manual for free LMX Lavor in PDF.

| Product type | Professional high pressure cleaner |
| Brand | Lavor |
| Model | LMX |
| Usage | Professional |
| Power supply | 230-240 V ~ 50 Hz (single-phase) or 400-415 V ~ 50 Hz (three-phase) |
| Automatic stop system | A.S.S. (Automatic Stop System) |
| Pressure regulator | Yes, with pressure gauge |
| Detergent tank | Integrated |
| Gun | With safety catch |
| High pressure hose | Included |
| Lance and nozzle | Included |
| Max inlet water temperature | 40 °C |
| Max inlet water pressure | 1 MPa (10 bar) |
| Minimum water flow | 16 l/min |
| Minimum feed hose diameter | 13 mm (1/2") |
| Water inlet filter | Yes, clean periodically |
| Pump oil | SAE 20/30, change after 50 h then every 500 h |
| Motor protection | Thermal protection device |
| Max electrical extension cord | 20 m (230 V) / 30 m (400 V) |
| Accessories supplied | HP hose, gun, lance, nozzle, electrical cable |
| Warranty | Manufacturing defects (excluding normal wear) |
Frequently Asked Questions - LMX Lavor
User questions about LMX Lavor
0 question about this device. Answer the ones you know or ask your own.
Ask a new question about this device
Download the instructions for your Pressure washer in PDF format for free! Find your manual LMX - Lavor and take your electronic device back in hand. On this page are published all the documents necessary for the use of your device. LMX by Lavor.
USER MANUAL LMX Lavor
natural_image
Line drawing of a compact water heater with coiled hose and wheels (no text or symbols)LMX
Artic
-
P86.0005
Technical data plate. - Plaque données techniques. - Placa dato técnicos.


CE
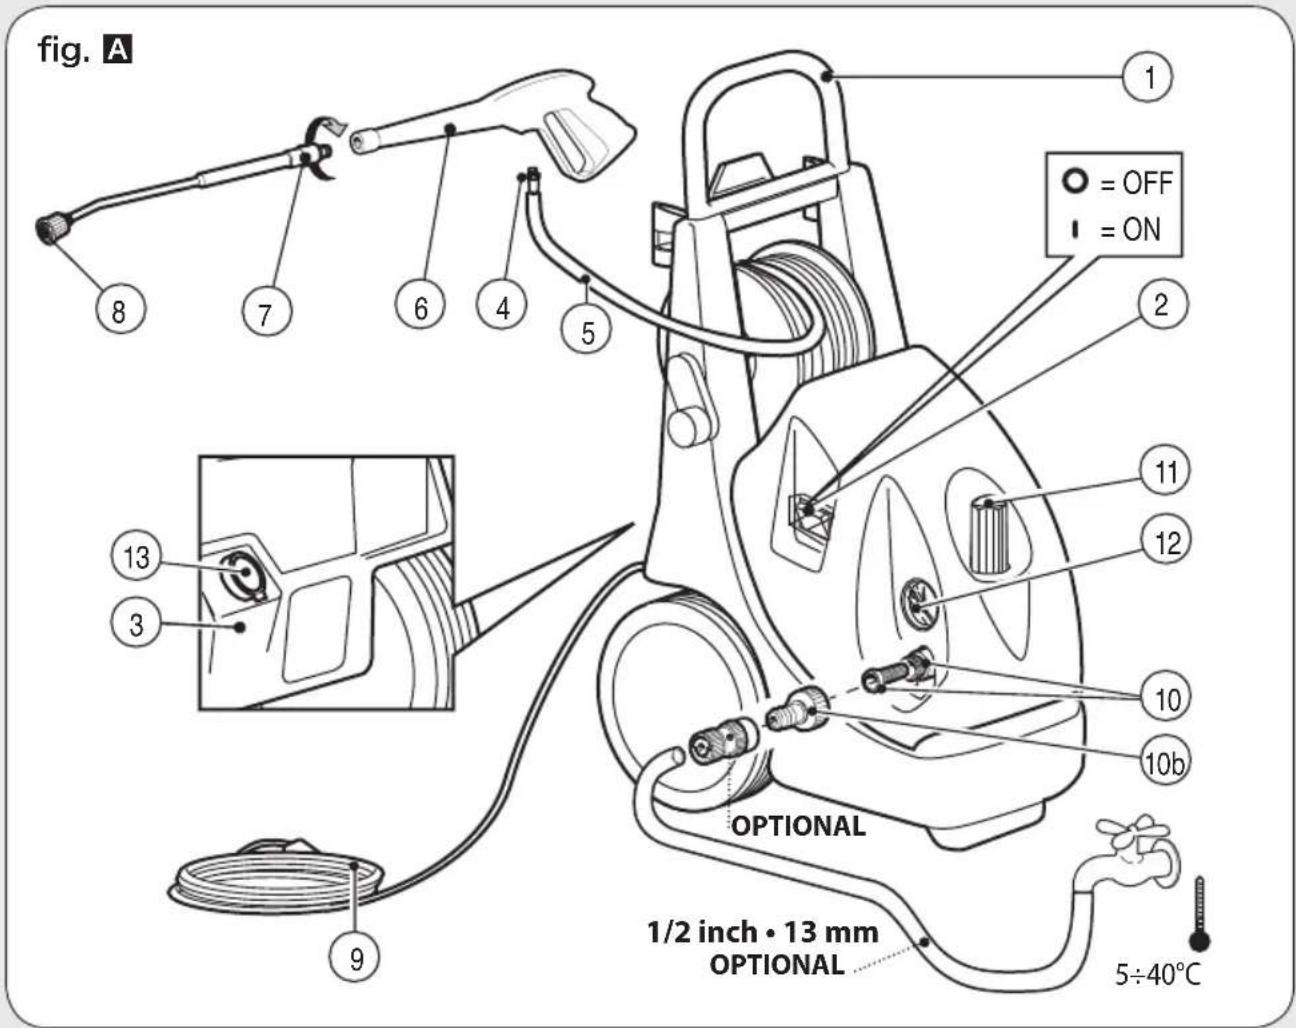
IT • DESCRIZIONE DELL'APPARECCHIO
EN • DESCRIPTION OF THE MACHINE
FR • DESCRIPTION DU L'APPAREIL
DE • BESCHREIBUNG DES GERÄTS
ES • DESCRIPCIÓN DEL APARATO
NL • TOESTEL UITZICHT
EL • ΣΤΑΝΤΑΡ ΕΞΟΠΛΙΣΜΟΣ
PT • COMPONENTES DO APARELHO
FIVAKIOVARUSTEET
RU • БАЗОВАЯ КОМПЛЕКТАЦИЯ
HR • SERIJSKA OPREMA
SL·OBSEG DOBAVE
IT In base al modello si possono verificare delle differenze nella fornitura. EN Depending on the model, there are differences in the scopes of delivery. Suivant le modèle, la fourniture peut varier.
DE Je nach Modell gibt es Unterschiede im Lieferumfang. Según el modelos, hay diferencias en el contenido suministrado. PT Consoante o modelo, existem diferenças no volume de fornecimento. FI Mallien varustetaso vaihtelee, katso kuvaus laatikon kyljestä.
IT
5 High pressure hose
6 Gun
7 Lance
8 Nozzle
9 Electric cable
10 Water inlet + filter
10b Rubber hose fitting
11 Regulator of pressure
12 Pressure gauge
13 Detergent tank
FR
1 Manche
2 Interrupteur
natural_image
Technical line drawing of a mechanical assembly with a downward arrow indicating force or motion (no text or symbols)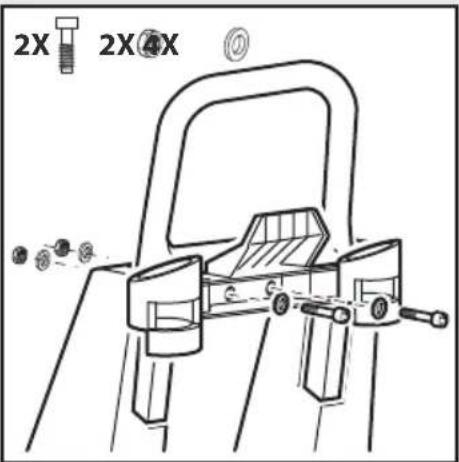
natural_image
Line drawing of a mechanical device with a coiled cable and directional arrow indicating rotation (no text or symbols)fig. C
1b.
Optional
1c.
1d.
Optional
OPTIONAL
IT SE PRESENTE
EN IF PRESENT
FR SI INCLUSE
DE WENN VORHANDEN
ES SI ESTUVIERA PRESENTE
NL INDIEN AANWEZIG
PT SE PRESENTE
MIKÄLI VARUSTEENA
EL E'AN YΠΑΡΧΕΙ
RV ЕСЛИ ЕСТЬ
HR NEKI MODELI
SL ČE JE V KOMPLETU
fig. D
flowchart
graph TD
    A["Step 1: Lock Icon"] --> B["Step 2: Lock Icon"]
    B --> C["Step 3: Hand gestures with arrows indicating motion"]
    C --> D["Step 4: Hand gestures with arrows indicating motion"]
    D --> E["Step 5: Hand gestures with arrows indicating motion"]
AVVIAMENTO • STARTING UP • DEMARRAGE • INBETRIEBNAHME • PUESTA EN MARCHA • INGEBRU-IKNAME • ΘΕΣΗ ΣΕ ΛΕΙΤΟΥΡΓΙΑ • COLOCAÇÃO EM FUNCIONAMENTO • KÄYTTÖÖNOTTO • ΠΥСК • POKRETANJE • ZAGON
fig. E

OPTIONAL
IT SE PRESENTE
EN IF PRESENT
FR SI INCLUSE
DE WENN VORHANDEN
ES SI ESTUVIERA PRESENTE
NL INDIEN AANWEZIG
PT SE PRESENTE
MIKÄLI VARUSTEENA
EAN YNAPXEI
RU ЕСЛИ ЕСТЬ
HR NEKI MODELI
SL ČE JE V KOMPLETU
fig. F
π alta/bassa pressione high/low pressure haute/basse pression
OPTIONAL
getto ventaglio spread pattern jet d'eau en eventail großen
Wasserstrahl ES chorro grandes NL waaiervormige straal PT jato grande
EL підакас евталіа FI viuhkamainen suihku RU веерообразная струя
SL pahljačasti curek vode HR mlaznica raspršivač
OPTIONAL
natural_image
Illustration of two coaxial cable connectors with internal components and connector arrows (no text or symbols)OPTIONAL
getto spillo/ventaglio spread pattern/pencil jet jek variable
natural_image
Diagram of a mechanical device emitting smoke with an arrow indicating direction (no text or symbols)3 Ph.
SCHEMA IDRICO
• WATER DIAGRAM
• SCHEMA HYDRAULIQUE
• WASSERUMLAUFSCHEMA
• ESQUEMA HÍDRICO
• WATERCHEMA
• ΣΧΕΔΙΟ ΥΔΡΕΥΣΗΣ
• ESQUEMA HIDRÁULICO
• VEDENKYTKENTÄKAAVIO
• ГИДРАВЛИЧЕСКАЯ СХЕМА
• SHEMA VODENOG KRUGA
• VODOVODNA SHEMA
fig. G
INTRODUZIONE
> UTILIZZO PREVISTO
- This appliance's performance and userfriendliness make it suitable for PROFESSIONAL use.
- The appliance can be used for washing surfaces outdoors, whenever pressurised water is required to remove dirt.
- With special optional accessories, it can be used for foaming and sandingblasting, and for washing with a rotary brush for application to the gun.
> THECNICAL DATA
(see thecnical data plate)
SYMBOLS
WARNING: It is important to be careful of the following items.

IMPORTANT

LOCKED

OPEN

IF PRESENT

Double insulated (IF PRESENT): supplementary insulation is applied to the basic insulation to protect against electric shock in the event of failure of the basic insulation.
SAFETY PRECAUTIONS
>WARNINGS
- 01WARNING: This appliance is for outdoor use only.
·02WARNING: Always disconnect the electricity and water supplies on completion of every job.
·03WARNING: Do not use the machine
if a supply cord or important parts of the machine are damaged, e.g. safety devices, high pressure hoses, trigger gun.
- 04WARNING: This appliance has been designed for use with the detergent provided or the detergent specified by the manufacturer, such as a neutral shampoo based on biodegradable anionic surface active detergents. The use of other detergents or chemicals may put the appliance's safety at risk.
- 05a WARNING: Do not use the machine within range of persons unless they wear protective clothing.
05b - Do not allow other people or animals within a range of 5m when operating the machine.
05c - Always wear suitable protective clothing in order to protect yourself against ricocheting parts.
05d - Do not touch the plug and the appliance with wet hands or when barefoot.
05e - Wear safety goggles and non-slip rubber footwear.
- 06WARNING: Do not direct the nozzle toward mechanical parts containing lubricant grease, as the grease will dissolve and spread over the surrounding ground. Vehicle tyres/tyre valves may only be cleaned from a minimum distance of 30 cm, otherwise the vehicle tyre/tyre valve could be damaged by the high-pressure jet. The first indication of this is a discoloration of the tyre. Damaged vehicle tyres/tyre valves can be deadly dangerous.
07WARNING: High pressure jets can be dangerous if subject to misuse. The jet must not be directed at persons, animal, live electrical equipment or the machine itself.
·08WARNING: High pressure hoses, fittings and couplings are important for the safety of the machine. Use only hoses, fittings and couplings recommended by the manufacturer. (it is extremely important to protect these components against damage by avoiding their improper use and protecting them against bending, knocks and scratches).
- 09WARNING: Appliances not equipped with A.S.S. – Automatic Stop System: must not be left in operation for more than 2 minutes
with the gun released. The recycled water heats up considerably, seriously damaging the pump.
A.S.S. AUTOMATIC STOP SYSTEM 10 WARNING: Appliances equipped with A.S.S – Automatic Stop System: these appliances should not be left in standby for more than 5 minutes.
· 11WARNING: Switch the appliance off completely (master switch on (0)OFF) whenever it is left unattended.
· 12WARNING: Every machine is tested in its operating conditions, so it is normal for a few drops of water to be left inside it.
· 13WARNING: Take care not damage the electric cable. If the supply cord is damaged, it must be replaced by the manufacturer, its service agent or similarly qualified persons in order to avoid a hazard
· 14WARNING: Appliance with fluid under pressure. Keep a firm hold on the gun and be prepared to take the kickback pressure. Only use the high pressure nozzle provided with the appliance.
· 16WARNING: This appliance is not intended for use by persons (including children) with reduced physical, sensory or mental capabilities, or lack of experience and knowledge, unless they have been given supervision or instruction concerning use of the appliance by a person responsible for their safety.
· 17WARNING: Children should be supervised to ensure that they do not play with the appliance.
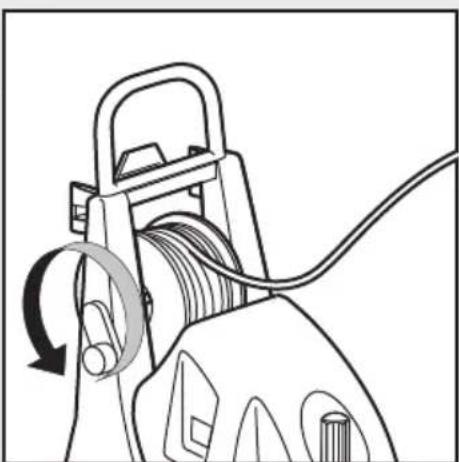
- 18WARNING: Never start the high-pressure cleaner without first completely unwinding the high-pressure hose.
· 19WARNING: When winding and unwinding the pipe take care not to cause the high-pressure cleaner to overturn.
· 20WARNING: Before unwinding or winding the hose, switch the machine off and release the pressure in the hose itself (switching off).
· 21WARNING: Risk of explosion — Do not spray flammable liquids.
·22WARNING: To ensure machine safety, use only original spare parts from the manufacturer or approved by the manufacturer.
· 23WARNING: Do not direct the jet against
yourself or others in order to clean clothes or foot-wear.
·24WARNING: High pressure cleaners shall not be used by children or untrained personnel.
- WARNING: Water that has flown through backflow preventers is considered to be non-potable.
- XX WARNING: the machine shall be disconnected from its power source, by removing the plug from the socket-outlet, during cleaning or maintenance and when replacing spare parts
- XJ WARNING: If an extension cord is used, the plug and socket must be of watertight construction.
- XY WARNING: Inadequate extension cords can be dangerous.
- WARNING: It is absolutely forbidden to use the machine in potentially explosive environments or areas.
- WARNING:
- NEVER EVER TOUCH THE MACHINE WITH WET HANDS OR BARE FEET.
- NEVER PULL THE POWER SUPPLY CABLE OR MACHINE IN ORDER TO DISCONNECT THE PLUG FROM THE SOCKET.
- IF DURING FUNCTIONING THE POWER SUPPLY RUNS OUT, FOR SAFETY REASONS, TURN THE MACHINE OFF.
> SAFETY DEVICE
- WARNING: the gun is fitted with a safety catch. Whenever use of the machine is interrupted it is important to operate the safety catch to prevent accidental activation of the jet.
- Safety features: gun equipped with safety locking device, appliance equipped with (Class I) overload cutout, pump equipped with by-pass valve or shutdown device.
- The safety button on the gun is not there to lock the lever during operation, but to prevent its accidental operation.
- WARNING: The appliance is equipped with a motor protection device: in case of device intervention, wait some minutes or, in alternative, disconnect and re-connect the product to the electric system. In case this problem repeats again or if the product
EN
does not start again, take the product to the nearest After Sales Service Point
> STABILITY
- WARNING: The machine must be always kept on horizontal bases, in a safe and stable way.
> WATER SUPPLY
Water supply collection
Water supply from the water main
- Connect a supply hose (not included) to the water inlet of the unit and to the water supply.
- Open the water supply.

WARNING: (symbol) machine not suitable connection to the potable water mains.
The cleaner can only be connected to the water mains if the water mains is separated by a backflow preventer. Make sure that the hose is at least ∅ 13mm-1/2 inch and that it is reinforced.
- WARNING: Water that has flown through backflow preventers is considered to be nonpotable.
IMPORTANT: Only clean or filtered water should be used for intake. The delivery of the water intake tap should be equal to the double of the maximum pump range.
- Minimum delivery rate: 16 l/min.
- Maximum intake water temperature: 40°C
- Max inlet water pressure: 1Mpa
Place the cleaner as close to the water supply system as possible.
Water supply from an open container
- Unscrew the coupling part for the water inlet.
- Screw the suction hose with filter (not included) onto the water connection of the unit.
- Hang the filter in the container.
- Vent the unit before operation.
- Unscrew the high-pressure line at the high-pressure outlet of the unit.
- Switch on the unit and let it run until water free of bubbles emerges at the high-pressure outlet.
- Switch off the unit and screw on the high-pressure hose again.
Failure to comply with the above conditions causes serious mechanical damage to the pump and the
loss of warranty cover.
> ELECTRICITY SUPPLY
- The appliance's electrical connection must comply with the IEC 60364-1 standard.
IMPORTANT: Before connecting the appliance, make sure that the nameplate data are the same as those of the electrical mains and that the socket is protected by a differential security breaker with tripping sensitivity below 0.03 A - 30 ms. - If the appliance's plug is not compatible with the socket, have the socket replaced with another of suitable type by professionally qualified staff.
- Never use the appliance in ambient temperatures below 0^ C if it is equipped with a PVC (HVV-F) cable.
- XY WARNING: Inadequate extension cords can be dangerous.
- XJ WARNING: If an extension cord is used, the plug and socket must be of watertight construction.
Information for supply may also be obtained from the plug manufacturer.
| 230-240V | 400-415V |
| 3G 2,5 mm2 | 4G 2,5 mm2 |
| max 20 m | max 30 m |
USAGE
> UNPACKING
>ASSEMBLY INSTRUCTIONS
(see fig. B)
>DESCRIPTION OF THE MACHINE
(see fig. A)
A.S.S. AUTOMATIC STOP SYSTEM
(if fitted)
IMPORTANT: This water cleaner is equipped with the A.S.S. (Automatic Stop System), which stops the machine during the bypass phase.
To start the water cleaner, it is therefore necessary to set the switch on position "ON"; after that press the pistol trigger: the Automatic Stop System will start the machine and will stop it automatically when the trigger is released. It is advisable to put on the safety of the pistol trigger whenever the machine is stopped, in order to avoid unintentional starting.
- Any automatic start of the machine without pressing the gun trigger is attributable to air bubbles in the water or other similar phenomena which do not imply the existence of any defects in the machine.
- Do not leave the appliance unattended during the standby for more than 5 minutes. Contrarily, for the safety of the appliance it is necessary to re-turn the switch into the OFF position.
- Please check that the coupling of the high pressure hose with the appliance and the gun supplied as standard equipments made correctly, that is to say without any water leak.
If the appliance is equipped with a pressure regulator:
- when the pressure is set to minimum the A.S.S. may not trigger. Therefore, do not allow the appliance to function in by-pass for more than 1 minute.
- do not act on the gun lever too frequently (this may cause a malfunction).
> INSTALLATION AND START-UP
(fig. A)
FILLING UP WITH DETERGENT
the detergent tank with the suggested products, suitable for the kind of washing to be carried out.
- WARNING: Make use only of liquid detergent, do not absolutely use acid or too much alkaline products. We suggest you to make use of our products, which have been studied for the use with washer machines.
>INSTALLATION
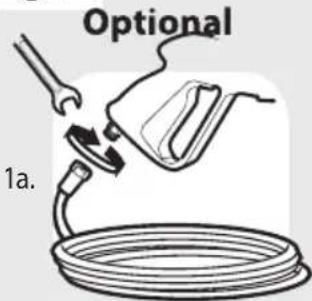
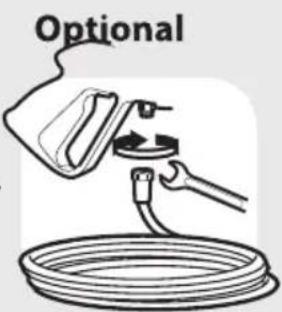
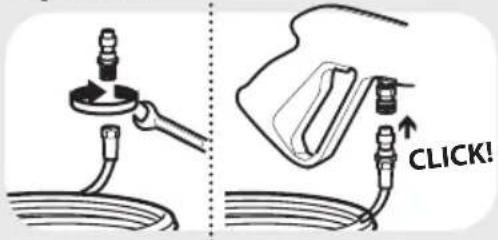
(fig. CD)
- Check that the master switch is turned to "OFF" and that the water filter is fitted into the pump's inlet pipe.
- Screw the snap connection into place by hand, without the aid of tools.
- Connect the water supply hose to the snap connection. The hose must have an inside diameter of at least 13 mm (1/2").
- Connect the high pressure hose to the pump's outlet pipe. Press the high pressure hose coupling fully down and then screw into place by hand without the aid of tools.
- Connect the high pressure hose to the gun.
- Turn the water tap fully on. The water temperature absolutely must be below 40°C.
IMPORTANT: The washer machine has to operate with clean water in order to avoid any damages to the washer machine itself.
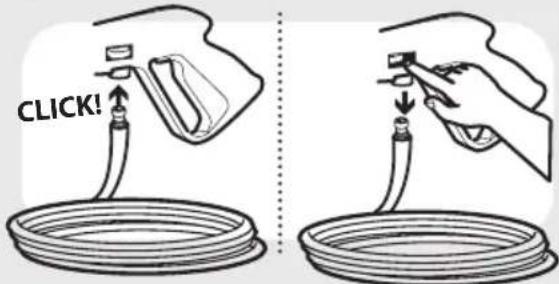
(fig. D) Release the gun safety catch and keep the trigger pressed, allowing the water to flow until all the air has been expelled.
• Fit the lance into the gun.
• Fit the nozzle into the lanxce.
- Connect the plug to the power socket.
>1ST START-UP
When starting up for the first time or after a long period out of use, connect the intake line only for a few minutes so that any dirt is vented from the delivery outlet
> START-UP
(fig. E)
- Whenever using the high-pressure cleaner, users are urged to hold the gun in the correct position, with one hand on the grip and the other on the spray rod.
- To start the machine, press the gun trigger and at the same time turn the master switch to "ON"
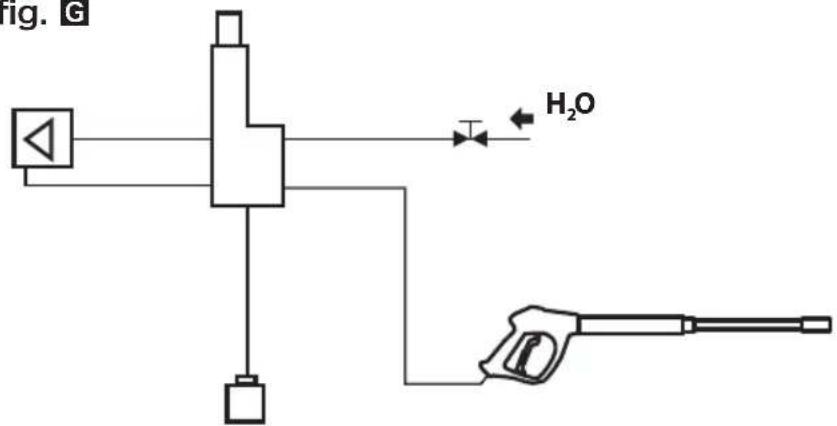
>DETERGENT SUCTION
NOZZLE at low pressure (if included)
(see fig. F)
The adjusting head allow you to select water jet at
EN
low and high pressure. The pressure selection is carried out by rotating the adjusting head. To increase the pressure, rotate the adjusting head clockwise, to reduce the pressure rotate it anti-clockwise. The detergent suction is automatic when the adjusting head of the lance is rotate for low pressure operation (anti-clockwise).
- CAUTION: Make use only of liquid detergent, do not absolutely use acid or too much alkaline products. We suggest you to make use of our products, which have been studied for the use with washer machines.
CARE AND MAINTENANCE
IMPORTANT: Before doing any work on the cleaner, discharge the pressure and disconnect the electricity and water supplies.
Check the oil level periodically. The oil must be changed for the first time after 50 working hours, with subsequent changes every 500 hours. SAE 20/30 oil is recommended . 0,5 Kg.
CHECKING THE WATER INTAKE FILTER
Inspect and clean the water intake filter on the intake union periodically. This is important to prevent fouling which may impair operation of the pump.
CHECKING THE SPRAY ROD NOZZLE
Replace the nozzle when the pressure drops below the normal values.
DESCALING
The descaling procedure must be carried out periodically with specific products. The interval depends on the hardness of the water. Pour one litre of product for every 15 litres of water into a drum containing at least 30 litres of water. Disconnect the gun from the high pressure line and place its free end in the drum, in order to form a closed circuit, and draw the solution into the machine for at least 10 minutes. The delivery end of the line should discharge into a canvas or mesh bag so that the scale removed is not returned to the circuit. Then restore the normal connection and rinse with plenty of cold water. This operation should be carried out by our after-sales service, since the descaling product may cause wear of components. Comply with the regulations in for-
ce when disposing of the descaling agent.
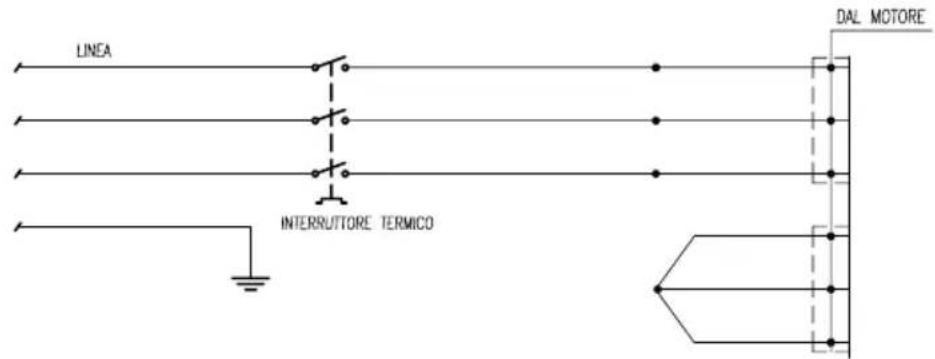
ELECTRIC DIAGRAM
See illustrations, page G.
WATER DIAGRAM
See illustrations, page H.
TROUBLESHOOTING
Before doing any work on the machine, disconnect the electricity and water supplies and discharge the pressure. Proceed systematically to identify Faults following the chart below; if you are still unable to eliminate the problem, call in the Authorized After-Sales Service.
| Fault | When switch “ON” the machine will not start working |
| Cause | Plug not properly inserted in socket.Electric socket is faulty.The main voltage is insufficient.The pump is stuck.Gauge of extension lead not sufficient. |
| Repair | Fit plug in power socket correctly.Have electrical socket checked.Have a check made on the suitability of the mains system.Turn switch to ON while keeping nozzle trigger pressed; if problem persists, contact an authorised service centre. |
| Fault | The motor stops suddenly |
| Cause | Thermic safety switch has tripped due to the overheating.Cable extension seems to be inadequate. |
| Repair | Leave motor to cool for a few minutes. If the problem persists, contact an authorised service centre.. |
| Fault | The pump doesn’t reach the necessary pressure |
| Cause | Insufficient flow.Water inlet filter is clogged.Suction/delivery valves are clogged or worn out.Pressure regulator valve set on minimum.The nozzle is worn out. |
| Repair | Check that the delivery rate is 30% higher than the value stated on the appliance's technical data plate.Remove and clean the filter.Contact an authorised service centre.Increase the pressure by screwing in the pressure regulator knob.Replace the nozzle. |
| Fault | Fluctuating pressure |
| Cause | The nozzle is either clogged or deformed.Suction/delivery valves are clogged or worn out.Worn gaskets.Pressure regulator valve gaskets worn.The filter is dirty. |
| Repair | Dismantle the lance and clean the nozzle with the pin provided.Contact an authorised service centre.Contact an authorised service centre.Contact an authorised service centre.Remove and clean the filter. |
| Fault | Water leak from appliance |
| Cause | Water leaking from the pump.Leaks from hose reel (if present).Leaks from pressure regulator valve.Leaks from water unions. |
| Repair | Contact an authorised service centre.Tighten the unions; if the problem persists, contact an authorised service centre.Contact an authorised service centre.Tighten the unions; if the problem persists, contact an authorised service centre. |
| Fault | Abnormal noise |
| Cause | • Suction/delivery valves are clogged or worn out.• Worn bearings.• The filter is dirty.• Extreme water temperature. |
| Repair | • Contact an authorised service centre.• Contact an authorised service centre.• Remove and clean the filter.• Bring the temperature under 50°. |
| Fault | Water is in the oil |
| Cause | • O-rings (water and oil) are worn out. |
| Repair | • Contact an authorised service centre. |
| Fault | The machine does not suck wax or detergent |
| Cause | Tanks empty.Rod knob on high pressure position.Disconnected pipe in detergent suction system. |
| Repair | Replace oil with double frequency that is suggested.Fill the tanks.Turn it to the low pressure position.Return it into position. |
> REPAIRS - SPARE PARTS
For any problems not mentioned in this manual, or if the machine breaks down, you are urged to contact an Authorized After-Sales Service for the relative repair or for any replacement of components with original spare parts. Use exclusively original replacement parts.
> WARRANTY CONDITIONS
All our machines are subjected to strict tests and are covered against manufacturing defects in accordance with applicable regulations. The warranty is effective from the date of purchase.
The following are not included in the warranty: - Parts subject to normal wear. - Rubber parts, charcoal, filters and the accessories and optional accessories. - Accidental damage,
EN
caused by transport, neglect or inadequate treatment, incorrect or improper use and installation failing - The warranty shall not cover any cleaning operations to which the operative components may be subjected, such as clogged nozzles and filter blocked due to limestones.
> DISPOSAL
As the owner of electrical or electronic equipment, the law (in accordance with the EU Directive 2002/96/EC of 27 January 2003 on waste from electrical and electronic equipment and the national laws of the EU Member States that have implemented this Directive) prohibits you from disposing of this product or its electrical / electronic accessories as municipal solid waste and obliges you to make use of the appropriate waste collection facilities.
The product can be disposed of by returning it to the distributor when a new product is purchased. The new product must be equivalent to that being disposed of.
Disposing of the product in the environment can cause great harm to the environment itself and human health.
The symbol in the figure indicates the urban waste containers and it is strictly prohibited to dispose of the equipment in these containers. Non-compliance with the regulations stipulated in the Directive 2002/96/EC and the decrees implemented in the various EU Member States is administratively punishable.
INDICATIONS GÉNÉRALES
> UTILISATION PRÉVUES
> CONDITIONS DE GARANTIE
EN CE DECLARATION OF CONFORMITY
FR DECLARATION DE CONFORMITÉ CE
EN Declares under its responsibility that the machine:
EN complies with directives EC, and subsequent modifications, and the standards EN:
EN 2000/14/EC: The appliance is defined by no. 27 of the enclosure I. Conformity evaluation procedure in accordance with enclosure V.
LwA 96dB(A) K (uncertainty) 2dB (A)
EN Acoustic power measured
EN Acoustic power granted
EN Technical booklet at
- IT
- FR
- OPTIONAL
- fig. F
- INTRODUZIONE
- > UTILIZZO PREVISTO
- > THECNICAL DATA
- SYMBOLS
- SAFETY PRECAUTIONS
- >WARNINGS
- > SAFETY DEVICE
- EN
- > STABILITY
- > WATER SUPPLY
- > ELECTRICITY SUPPLY
- USAGE
- > UNPACKING
- >ASSEMBLY INSTRUCTIONS
- >DESCRIPTION OF THE MACHINE
- A.S.S. AUTOMATIC STOP SYSTEM
- (if fitted)
- > INSTALLATION AND START-UP
- (fig. A)
- FILLING UP WITH DETERGENT
- >INSTALLATION
- (fig. CD)
- >1ST START-UP
- > START-UP
- (fig. E)
- >DETERGENT SUCTION
- NOZZLE at low pressure (if included)
- (see fig. F)
- CARE AND MAINTENANCE
- CHECKING THE WATER INTAKE FILTER
- CHECKING THE SPRAY ROD NOZZLE
- DESCALING
- ELECTRIC DIAGRAM
- WATER DIAGRAM
- TROUBLESHOOTING
- > REPAIRS - SPARE PARTS
- > WARRANTY CONDITIONS
- > DISPOSAL
- INDICATIONS GÉNÉRALES
- > UTILISATION PRÉVUES
- > CONDITIONS DE GARANTIE
- LwA 96dB(A) K (uncertainty) 2dB (A)
Brand : Lavor
Model : LMX
Category : Pressure washer