
SBBK 700 A1 - Vacuum Cleaner SILVERCREST - Free user manual and instructions
Find the device manual for free SBBK 700 A1 SILVERCREST in PDF.

| Product type | Floor vacuum cleaner |
| Brand | SilverCrest |
| Model | SBBK 700 A1 |
| Mains voltage | 220-240 V ~, 50/60 Hz |
| Power | 700 W |
| Protection class | II |
| Filter type | EPA exhaust air filter (EPA 12) + motor protection filter |
| Dust bag capacity | Washable reusable bag, compatible with Swirl Y298/Y98, Handy Bag Y98 |
| Included accessories | Suction hose, telescopic tube, floor nozzle, crevice tool/brush, upholstery nozzle |
| Main functions | Bag fill indicator, auxiliary air valve, automatic cord rewind, floor/carpet selection pedal |
| Intended use | For dry household dust and dirt, private indoor use |
| Maintenance | Washable dust bag, replaceable motor filter, replaceable EPA filter |
| Safety | Switch off and unplug before maintenance, protection against moisture |
| Warranty | 3 years |
| Optional accessories | Compatible bags Swirl Y298, Y98 or Handy Bag Y98 |
Frequently Asked Questions - SBBK 700 A1 SILVERCREST
User questions about SBBK 700 A1 SILVERCREST
0 question about this device. Answer the ones you know or ask your own.
Ask a new question about this device
Download the instructions for your Vacuum Cleaner in PDF format for free! Find your manual SBBK 700 A1 - SILVERCREST and take your electronic device back in hand. On this page are published all the documents necessary for the use of your device. SBBK 700 A1 by SILVERCREST.
USER MANUAL SBBK 700 A1 SILVERCREST
natural_image
White and black vacuum cleaner with handle and clasp (no visible text or symbols)BODENSTAUBSAUGER SBBK 700 A1 VACUUM CLEANER SBBK 700 A1 ASPIRATEUR SBBK 700 A1
GB Operating instructions
VACUUM CLEANER
For EU market: Imported for GB market by:
HOYER Handel GmbH Lidl Great Britain Ltd
Tasköprüstraße 3 Lidl House · 14 Kingston Road
22761 Hamburg Surbiton - KTS 9NU
GERMANY
Stand der Informationen · Status of information · Version des informations · Stand van de informatie Stan informacji · Stay informaci · Stay informáci · Estado de las informaciones · Informationernes stand:
07/2021 ID: SBBK 700 A1_21_V1.2
IAN 374192_2104 IAN 374182_2104
BE NL
PLCZ SK
Deutsch...... 2
English.... 20
Français 38
Nederlands.... 60
Polski 78
Česky 98
Slovenčina 116
Español.... 134
Dansk 152
Übersicht / Overview / Aperçu de l'appareil / Overzicht / Przegląd / Přehled / Prehlad / Vista general / Oversigt
Inhalt
natural_image
3D diagram of a mechanical device with labeled parts, showing internal components and part outline (no text or symbols)6. Montage

natural_image
Diagram of a vacuum cleaner with threaded tube and valve, showing mechanical components without any text or symbolsnatural_image
Line drawing of a hand holding a tool, no text or symbols presentnatural_image
3D diagram of a mechanical device with a cylindrical component being inserted into it, showing no text or symbols.natural_image
Pure electrical circuit lines without any symbolsnatural_image
3D mechanical component diagram showing a base with a handle and a labeled part '11' (no text or symbols beyond labels)
natural_image
Simple black horizontal line with a small square at the end, on white background (no text or symbols)natural_image
3D mechanical component diagram with labeled part '11' (no text or symbols on the object itself)Polsterdüse 3

natural_image
3D rendered image of a gray ergonomic tool or component (no text or symbols)natural_image
Illustration of a hairbrush with bristles and a handle (no text or symbols)natural_image
Illustration of a hairbrush tool with a brush and blade, showing a rotation arrow (no text or symbols)8. Saugen
natural_image
Cross-sectional diagram of a mechanical device showing internal components and a housing (no text or labels)natural_image
3D mechanical component diagram showing a square housing with a central circular hole and mounting brackets, with an upward arrow indicating direction (no text or symbols)Staubbeutel leeren
natural_image
Illustration of hands holding a tool with an arrow indicating direction (no text or symbols)natural_image
Illustration of a mechanical component with a square base and granular material inside (no text or symbols)natural_image
Technical line drawing of a mechanical component with mounting brackets and a circular feature (no text or symbols)natural_image
Cross-sectional diagram of a vehicle's internal components, showing structural layout and airflow direction (no text or labels)natural_image
Diagram of a robotic vacuum cleaner with a grid panel and power cord, showing internal components and airflow direction (no text or symbols)natural_image
Diagram of a car interior showing airflow or ventilation system with no visible text or symbolsnatural_image
Illustration of a vacuum cleaner next to a mounted device with a hand tool (no text or symbols visible)natural_image
Illustration of a vacuum cleaner with attached device and cable (no text or symbols)- Overview 21
- Intended purpose 22
- Safety information 23
- Items supplied 24
- Before using for the first time 24
- Assembly 25
- Using the nozzle 26
- Vacuum cleaning 27
- Dust bag and filter 28
9.1 Dust bag.... 28
9.2 Motor protection filter.... 30
9.3 Exhaust air filter / Paper filter (EPA) 30
-
Cleaning and care 31
-
Storage 32
- Disposal 33
- Trouble-shooting 33
- Technical specifications 34
- Warranty of the HOYER Handel GmbH 35
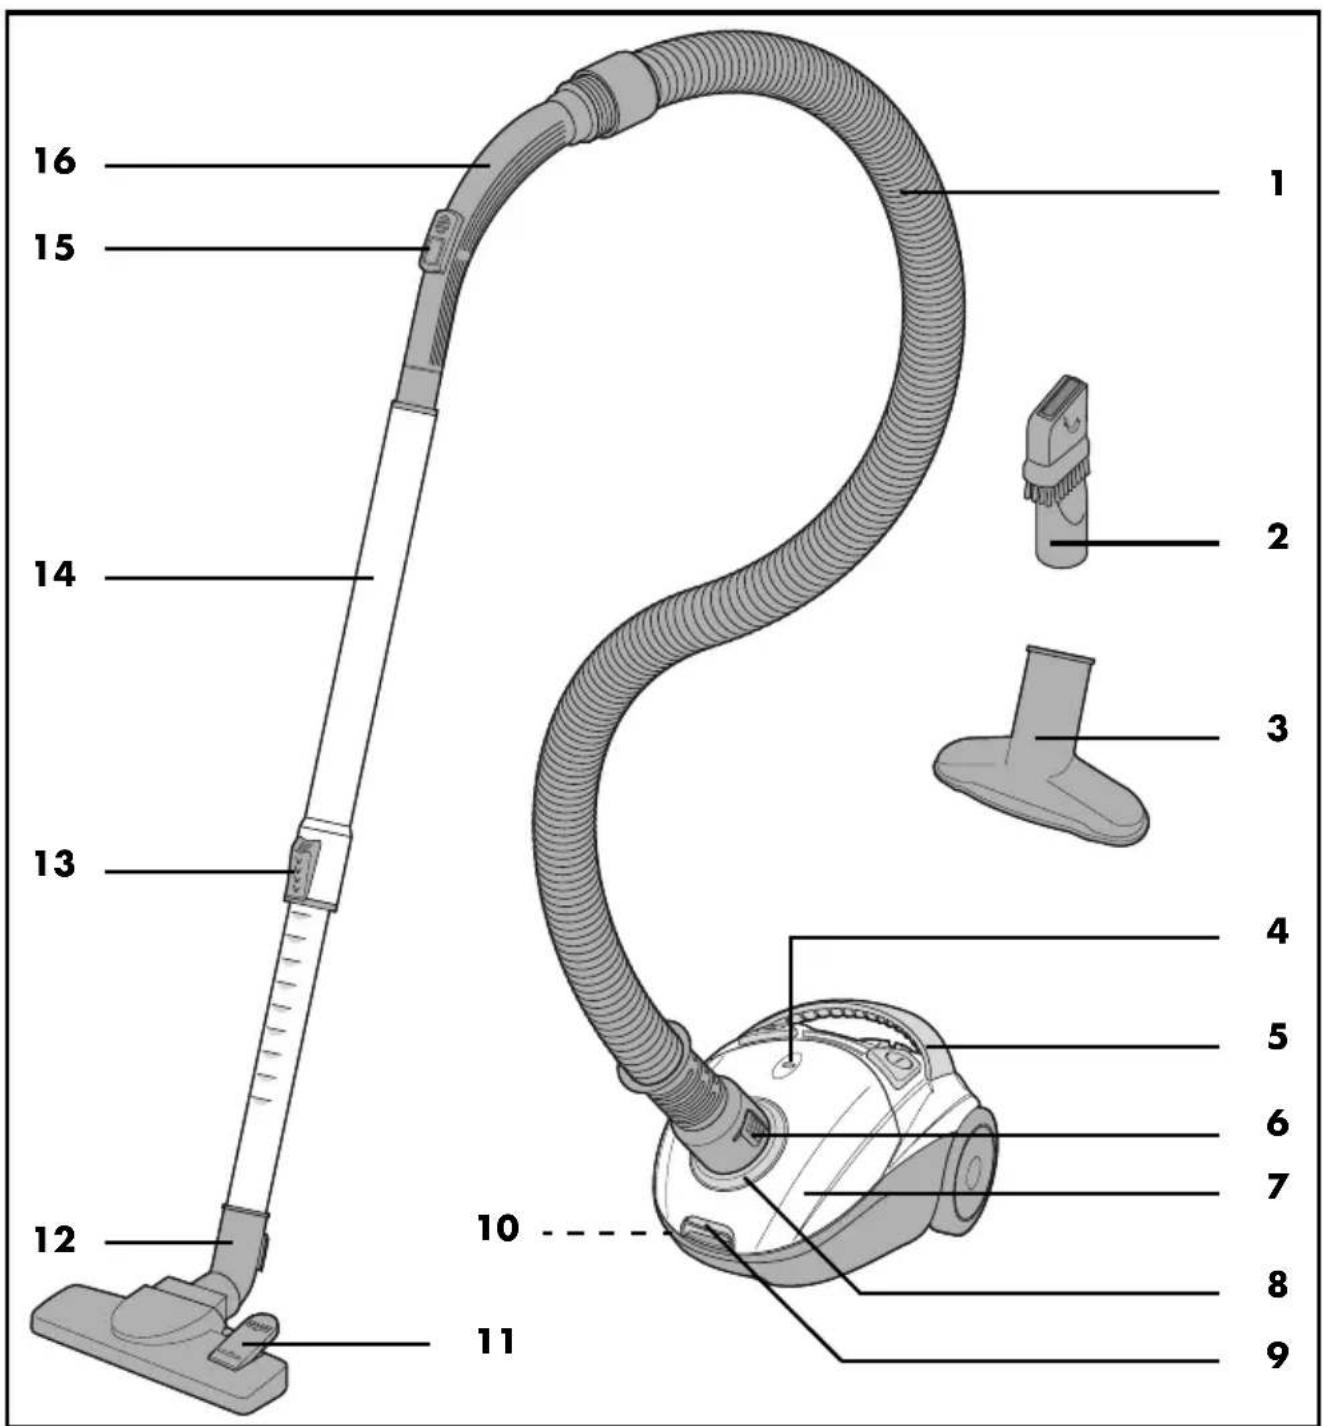
1. Overview
1 Hose
2 Crevice/brush nozzle
3 Upholstery nozzle
4 Dust bag indicator
5 Handle
6 Release buttons (on both sides of the hose)
7 Lid
8 Connection opening (for the hose)
9 Release button (for the lid)
10 Holder for the floorhead (on the underside of the floor vacuum cleaner)
11 Foot button
(on the floorhead - for extending / retracting the brush)
12 Floorhead
13 Slider (for unlocking the telescopic tube)
14 Telescopic tube
15 Auxiliary air valve
16 Handle (on the hose)
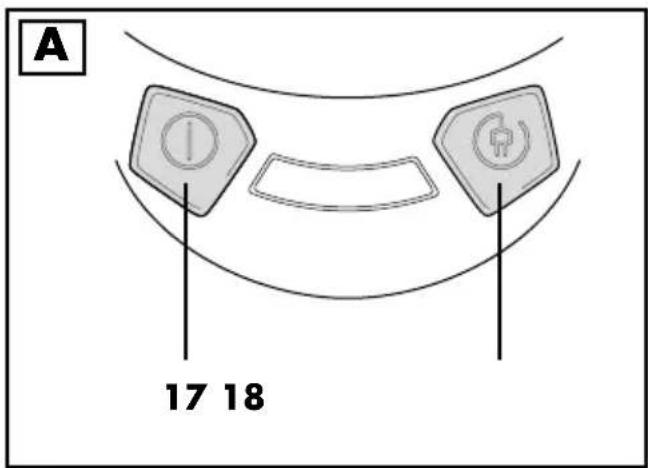
Figure A: control elements
17 On/off switch
18 Button for rolling up the power cable
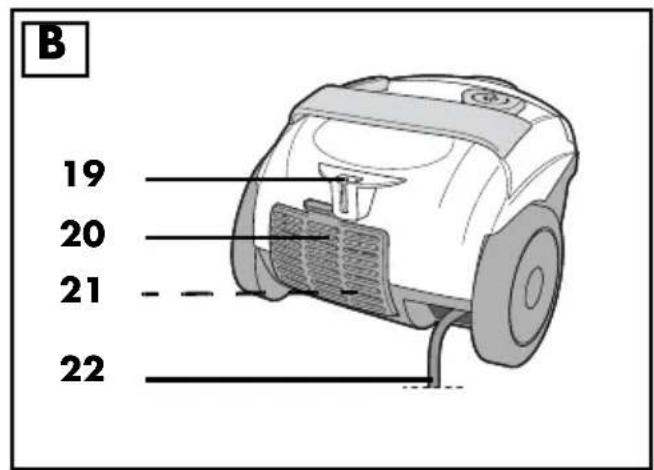
Figure B: rear side
19 Holder (for the floorhead)
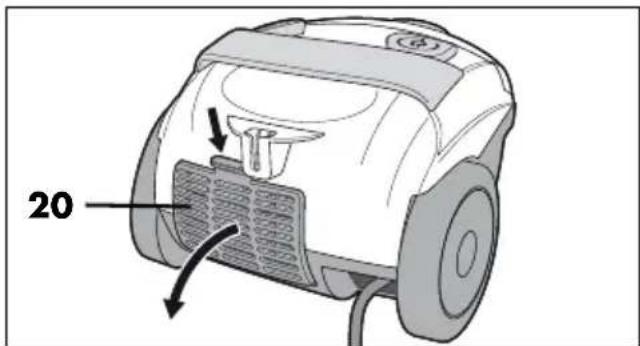
20 Cover over the exhaust air filter
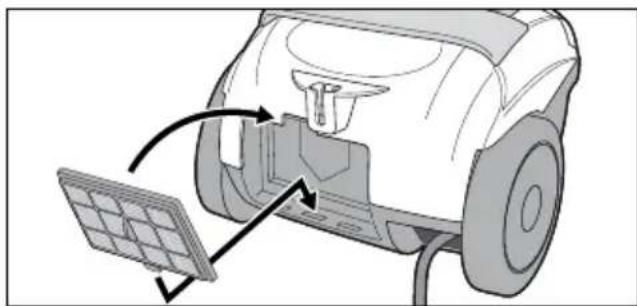
21 Exhaust air filter
22 Power cable with mains plug
Thank you for your trust!
Congratulations on your new floor vacuum cleaner.
For safe handling of the product and in order to get to know the entire range of features:
- Read these user instructions thoroughly prior to initial use.
- Above all, observe the safety information!
- The device should only be used as described in this copy of the user instructions.
- Keep this copy of the user instructions for reference.
- If you pass the device on to someone else, please include this copy of the user instructions. The user instructions are a part of the product.
We hope you enjoy your new floor vacuum cleaner!
2. Intended purpose
The floor vacuum cleaner is suitable for vacuuming normal, dry house dust and slightly coarse dirt.
The device is designed for private home use and must not be used for commercial purposes.
The device must only be used indoors.
Foreseeable misuse

VARIOUS DANGERS!
- The following materials must not be sucked in:
- Liquids and moist dirt
- Explosive or flammable materials such as flour or coal dust
- Harmful substances such as asbestos dust
- Ember, burning matches or other hot materials
- particularly fine dusts such as toner for copying machines. The filter inside the device is not suited for such materials.
- Children should not sit on the device or use it as a toy.
Notes on trademarks
Swirl ^® , Y 298 ^® and Y 98 ^® are registered trademarks of a Melitta Group company and are not associated with LIDL.
3. Safety information
Warnings
If necessary, the following warnings are used in this copy of the user instructions:

DANGER! High risk: failure to observe this warning may result in injury to life and limb.
WARNING! Moderate risk: failure to observe this warning may result in injury or serious material damage.
CAUTION: low risk: failure to observe this warning may result in minor injury or material damage.
NOTE: circumstances and specifics that must be observed when handling the device.
Instructions for safe operation
- This device can be used by children from the age of 8 and people with restricted physical, sensory or intellectual abilities or people without adequate experience and/or understanding, if they are supervised or instructed on how to use this device safely and if they are aware of the resulting dangers. Children must not play with the device. Cleaning and user maintenance must not be carried out by children without supervision.
- Switch the device off and pull out the mains plug, ... ... before you assemble or disassemble the device, ... before you change filters or dust bags, ... before you eliminate blockages and ... before you clean the device.
- If the power cable of this device should become damaged, it must be replaced by the manufacturer, the manufacturer's customer service department or a similarly qualified specialist in order to avoid any hazards.

DANGER for children
- Packing materials are not children's toys. Children should not be allowed to play with the plastic bags. There is a risk of suffocation.

DANGER to and from pets and livestock
Electrical devices can represent a danger to pets and livestock. In addition, animals can also cause damage to the device. For this reason you should keep animals away from electrical devices at all times.
- Never vacuum animals.

DANGER! Risk of electric shock due to moisture
- Protect the device from moisture, water drops and water splashes.
- The device, the cable and the mains plug must not be immersed in water or any other liquids.
- If liquid gets into the device, disconnect the mains plug immediately. Have the device checked before reusing.
- Allow the reusable dust bag to dry completely before reinserting it.
- Never touch the device with wet hands.

DANGER! Risk of electric shock
- Lay the power cable such that no one can step on it, get caught on it, or trip over it.
- Only connect the device to a properly installed, easily accessible wall socket, the voltage of which corresponds to the specifications on the rating plate. The wall socket must still be easily accessible after connection.
- Ensure that the power cable cannot be damaged by sharp edges or hot spots.
- Ensure that the power cable cannot be trapped or crushed.
- To pull the mains plug out of the wall socket, always pull on the mains plug, and never on the power cable.
- Disconnect the mains plug from the wall socket ...
... before you clean the device, ... if there is a fault and ... during thunderstorms.

DANGER! Risk of injury
- Never vacuum your skin, hair or clothing.
- Hold the power cable tight when you press the button to wind up the power cable. Otherwise, the mains plug may strike you on the legs, for example, when winding up quickly.
WARNING! Risk of material damage
- Use the vacuum cleaner only if a dust bag and all of the filters are installed. Vacuuming without a dust bag or without a filter destroys the motor.
- Use only the original accessories and the dust bags specified in these user instructions.
- Do not clean using sharp objects or abrasive cleaning agents.
4. Items supplied
1 Vacuum cleaner (base unit) with inserted filters and inserted dust bag
1 Hose 1
1 Telescopic tube 14
1 Floorhead 12
1 Crevice/brush nozzle 2
1 Upholstery nozzle 3
1 copy of the user instructions
5. Before using for the first time
- Unpack the device and all accessories.
- Check, if all parts are available and undamaged.
NOTES:
- All filters and a dust bag are already inserted upon delivery.
- Please note that there may be an odour development when first used. This is harmless and disappears after a short time. Please ensure that the room is well ventilated.
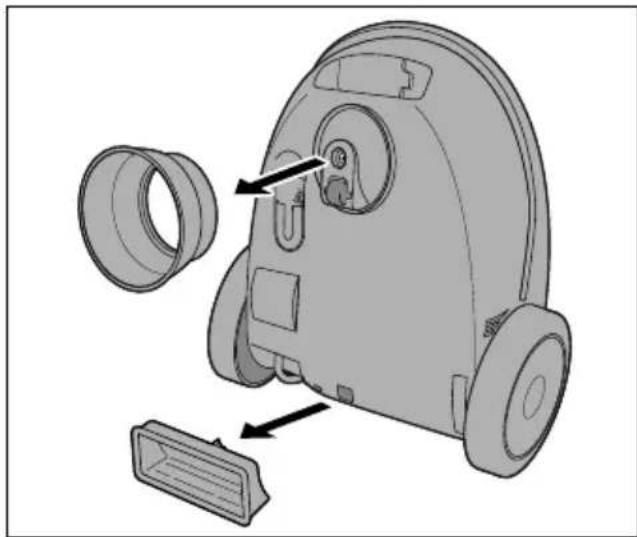
Remove transport protection
The device is delivered with two transport protection elements located on the underside.
- Remove these transport protection elements by pulling them off the underside.
natural_image
Diagram of a mechanical device with labeled parts, showing internal components and part outline (no text or symbols)6. Assembly

DANGER! Risk of injury!
- Unplug the mains plug 22 before assembling or disassembling the vacuum cleaner.
Inserting/removing the hose
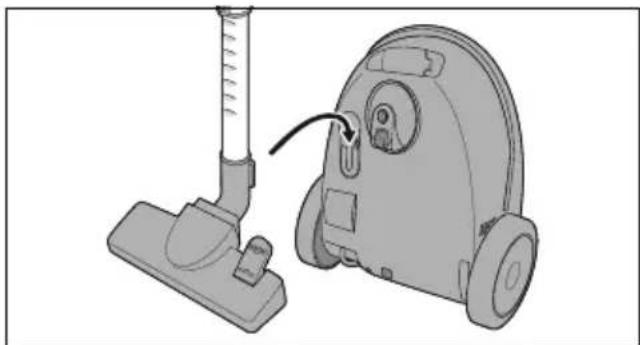
- Insert the hose 1 into the connection opening 8 on the top of the device. The hose must audibly click into place.
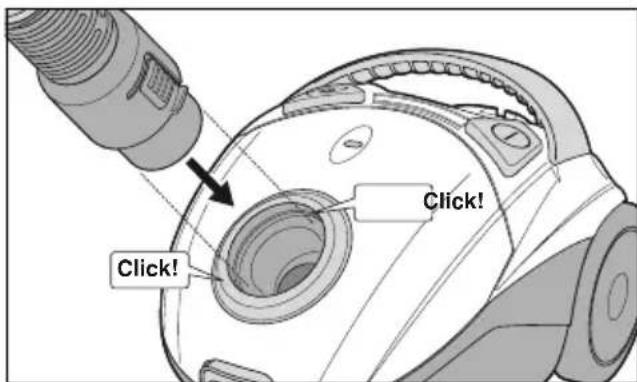
- To remove the hose 1 press the two release buttons 6 and pull out.

natural_image
Diagram of a vacuum cleaner with threaded tube and valve, showing mechanical components (no text or labels)Attaching the telescopic tube
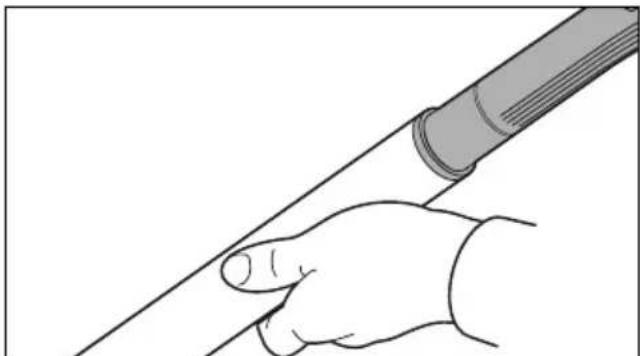
- Insert the hose 1 with the handle 16 into the upper end of the telescopic tube 14. For a better grip, turn the handle slightly back and forth.
natural_image
Line drawing of a hand holding a tool against a plain background (no text or symbols)- It is best to turn the telescopic tube 14 so that the slider 13 points upwards. This will make it easier for you to operate later.
Attaching/removing the nozzle
- All nozzles can be attached directly to the handle 16 of the hose 1 as well as to the lower end of the telescopic tube 14.
- Plug in the desired nozzle. Turn the nozzle slightly back and forth for a better grip.

natural_image
Mechanical assembly diagram showing a pipe being inserted into a component (no text or symbols)• To remove, gently turn the nozzle back and forth and pull it.
Adjusting the length of the telescopic tube
- Push down the slider 13 on the telescopic tube 14 and set the desired length.
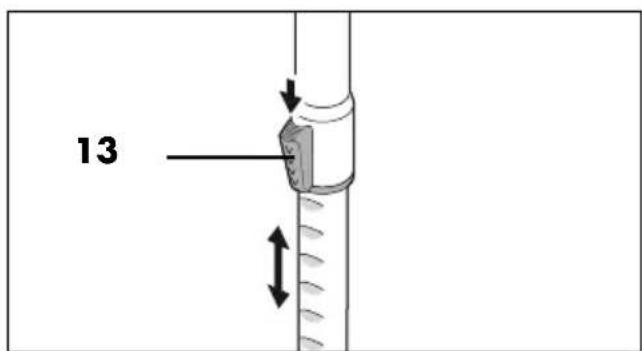
- Release the slider 13 and continue to move the telescopic tube 14 until it clicks into place.
7. Using the nozzle
Here, you will find an overview of the cleaning tasks for which the various nozzles are particularly suitable.
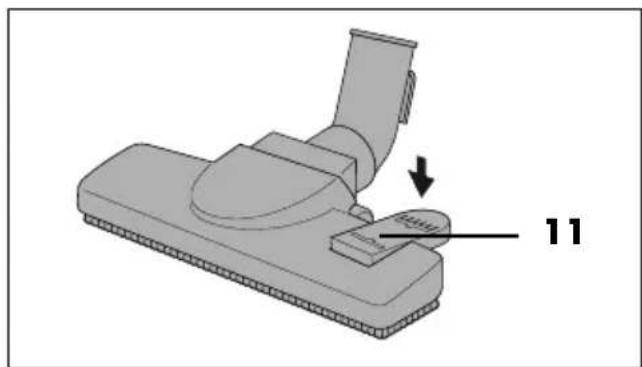
Floorhead 12
Suitable for carpets and smooth floors. Switch between the two functions using the foot button 11.
natural_image
Pure electrical circuit lines without any symbols- For smooth floors such as tiles, tilt the foot button 11 to the „brush extended" symbol. The brush on the underside is extended.
natural_image
3D mechanical component diagram showing a base with a handle and a small component labeled '11' (no text or symbols beyond labels)
natural_image
Simple black horizontal line with a small notch, no text or symbols present- For carpets, tilt the foot button 11 to the "brush retracted" symbol. The brush is retracted.

natural_image
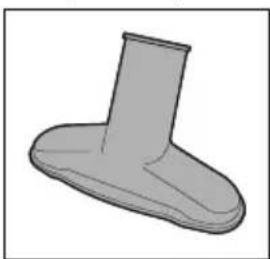
3D mechanical component diagram with labeled part '11' (no text or symbols on the object itself)Upholstery nozzle 3

natural_image
3D rendered image of a gray ergonomic tool or component (no text or symbols)The upholstery nozzle 3 is suitable for upholstered furniture, mattresses and car seats, etc.
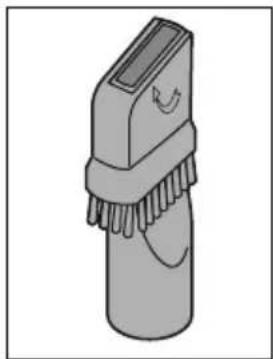
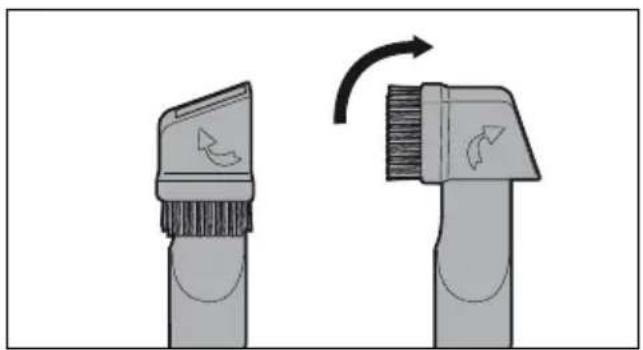
Crevice/brush nozzle 2
natural_image
Illustration of a hairbrush with bristles and a handle (no text or symbols)The crevice nozzle 2 is suitable for skirting boards, corners, columns and upholstery etc.
- Fold the brush out in the direction of the arrow to turn the crevice nozzle 2 into a brush nozzle. This is suitable e.g. for uneven objects, lamps, profile strips.
natural_image
Illustration of a hairbrush tool with a brush and blade, showing a rotation arrow (no text or symbols)8. Vacuum cleaning
WARNING! Risk of material damage!
- All of the filters and a dust bag must always be assembled when vacuuming.
Switching the vacuum cleaner on and off
- Assemble the accessories needed.
- Pull out the power cable 22 at least to the yellow mark. Stop at the red mark. The power cable must not be pulled out by force until it stops.
- Plug the mains plug 22 into a suitable wall socket. The wall socket must still be easily accessible after connection.
- Press the on/off switch ① 17, to switch the device on.
Auxiliary air valve
- When vacuuming light, delicate objects (such as curtains) you can regulate the suction power flexibly when necessary. The further the auxiliary air valve 15 is opened, the weaker the suction power becomes.

- During normal vacuuming, the auxiliary air valve 15 should remain completely closed, so that the suction power is not reduced.
- Fully open the auxiliary air valve 15 to quickly release textiles which have been sucked in.
Stop vacuuming
- To switch off the device, push the on/off switch ①7.
- Pull the mains plug 22 out of the wall socket.
- To roll up the power cable, hold the power cable 22 firmly and press the button ①8.
NOTE: pull out the power cable 22 slightly if it stops rolling up.
- Put away the vacuum cleaner (see "Storage" on page 32).
9. Dust bag and filter

DANGER! Risk of injury!
Turn off the vacuum cleaner and unplug the mains plug 22 before replacing or cleaning dust bags or filters.
WARNING! Risk of material damage!
- When vacuuming, use all of the filters and a dust bag at all times.
9.1 Dust bag
NOTE: the supplied dust bag can be emptied, washed and reused, or alternatively you can use a Swirl® Y 298® or Swirl® Y 98® dust bag for this device.
Dust bag indicator 4
The latest that the dust bag can be emptied or replaced is when the dust bag indicator 4 is completely coloured.
Please note the following:
- The dust bag indicator 4 can be coloured temporarily if the vacuum cleaner gets stuck to textiles while vacuuming.
- If the dust bag indicator 4 is permanently coloured but the dust bag is not full:
- Switch off the vacuum cleaner.
- Pull out the mains plug 22.
- Check whether there is a blockage in the hose 1 or in the nozzle. Remove them if necessary.
- The dust bag indicator 4 is set up for common household dust made up of carpet fluff, hair and sand. Fluff from carpet or wool may cause the dust bag to be full even though the indicator does not show this. Empty or change the dust bag in any case.
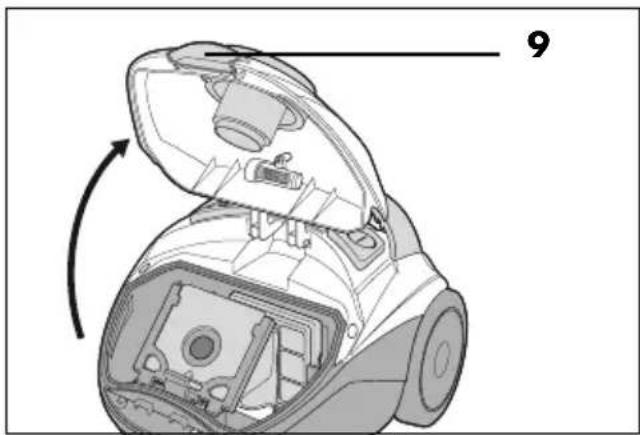
Removing the dust bag
- Pull the release button 9 upwards towards the lid and fold the lid 7 up until it clicks into place.
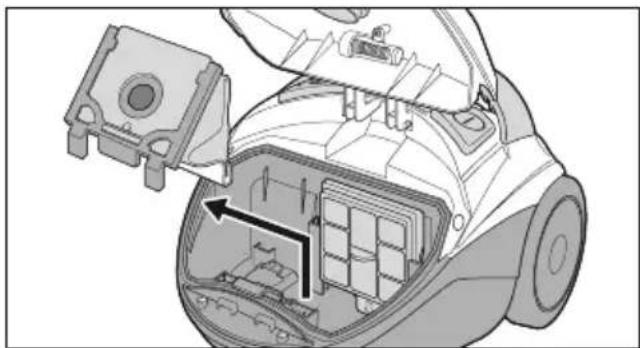
- Pull the dust bag with the dust bag holder upwards out of the vacuum cleaner.
natural_image
Technical diagram of a vacuum cleaner internal structure, showing housing, casing, and internal components (no text or labels)- Pull the dust bag out of the dust bag holder.
natural_image
3D mechanical component diagram showing a mounting bracket with a circular hole and an upward arrow indicator (no text or symbols)Emptying the dust bag
NOTE: to avoid dust from spilling out, you can put the dust bag into an empty bin bag and close it before emptying.
- Carefully pull off the plastic rail at the bottom of the reusable dust bag.
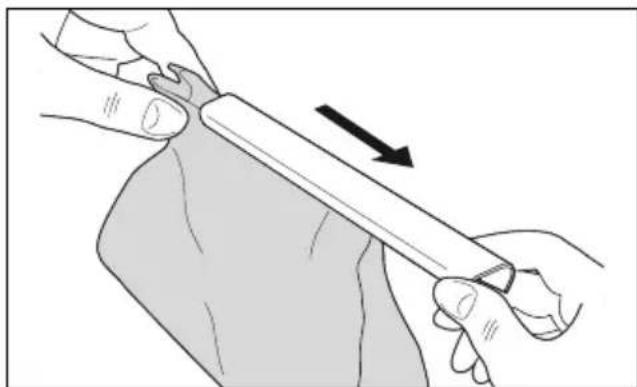
natural_image
Illustration of hands holding a tool with an arrow indicating direction (no text or symbols)- Empty the contents of the dust bag.
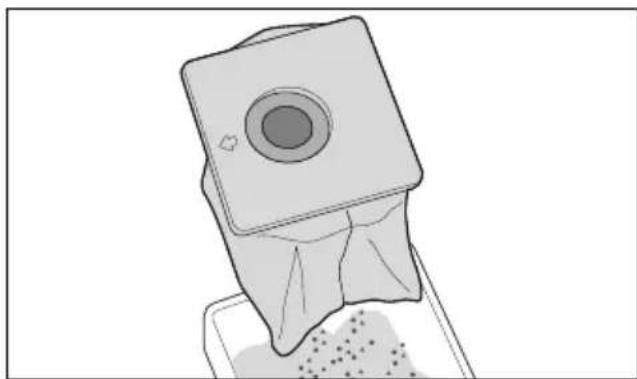
natural_image
Illustration of a mechanical component with a square base and granular material inside (no text or symbols)NOTE: wash the reusable dust bag regularly under running water (see "Wash out the reusable dust bag" on page 32).
- Fold the bottom end back together so that you can slide the plastic rail on.
- Slide the plastic rail on so that the lower end of the dust bag is completely enclosed by the plastic rail.
Inserting the dust bag

DANGER! Risk of electric shock due to moisture!
- Allow the reusable dust bag to dry completely before reinserting it.
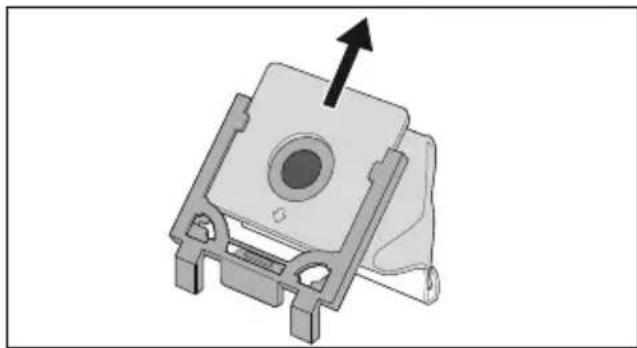
- Push the emptied reusable dust bag or a new dust bag all the way into the dust bag holder. Note the small arrow on the dust bag's plate.
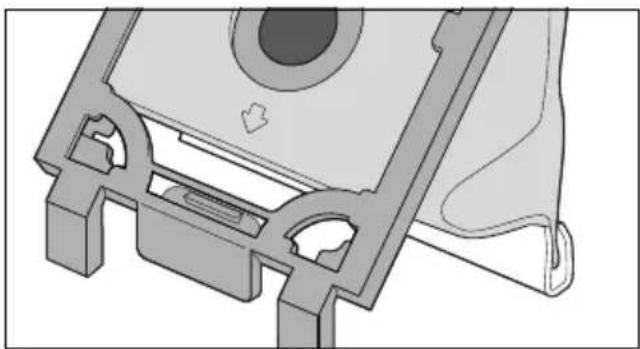
natural_image
Technical illustration of a mechanical component with mounting brackets and a circular feature (no text or symbols)- Slide the dust bag holder with the dust bag from above into the two rails in the vacuum cleaner. Make sure that the dust bag is not caught anywhere.
- Close the lid 7, until it clicks into place.
9.2 Motor protection filter
The motor protection filter is a hygiene filter. It is located on the back wall of the dust bag compartment and cleans the air before entering the motor. Change it when necessary (for example, when the suction power is reduced) or after 5 dust bags have been used.
NOTE: to replace the motor protection filter, use commercially available universal motor filters that are cut to the appropriate size.
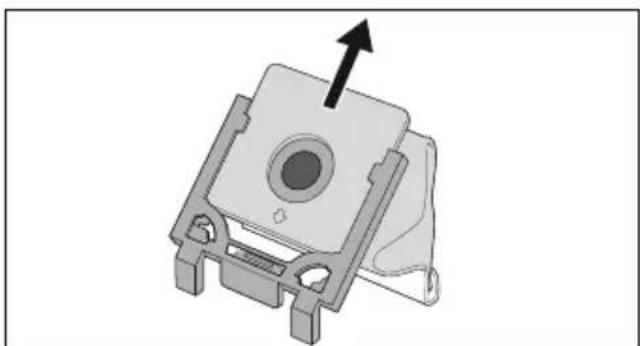
- Open the lid 7 and remove the dust bag holder along with the dust bag (see "Removing the dust bag" on page 28). The motor protection filter is behind the grid on the rear wall of the dust bag compartment.
- Pull out the grid with the motor protection filter upwards.
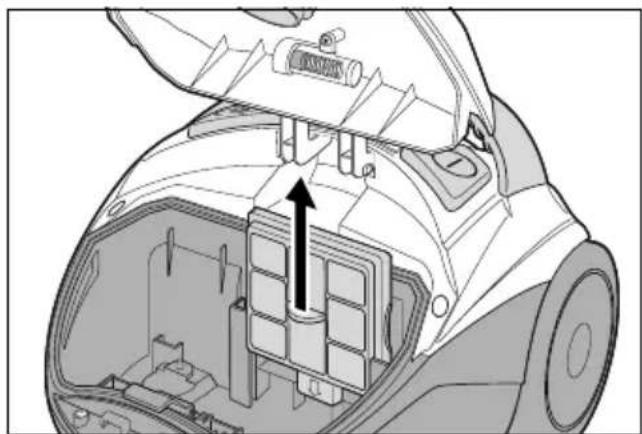
natural_image
Technical diagram of a robotic vacuum cleaner internal structure, showing internal components and assembly (no text or labels)- Remove the used motor protection filter.
- Cut the new motor protection filter to the dimensions of the used motor protection filter.
- Place the new motor protection filter in the grid.
- Put the grill back into the rails on the back panel and push it down as far as it will go.
- Reinsert the dust bag holder with the dust bag. Make sure that the dust bag is not caught anywhere.
- Close the lid 7, until it clicks into place.
9.3 Exhaust air filter / Paper filter (EPA)
The exhaust air filter is a micro hygiene filter. It is located at the back of the suction device. It removes the smallest particles which remain in the air being blown out.
Check it regularly for dirt and damage.
- Press the release button down and remove the cover 20 over the exhaust air filter 21.
- Pull out the EPA filter 21.
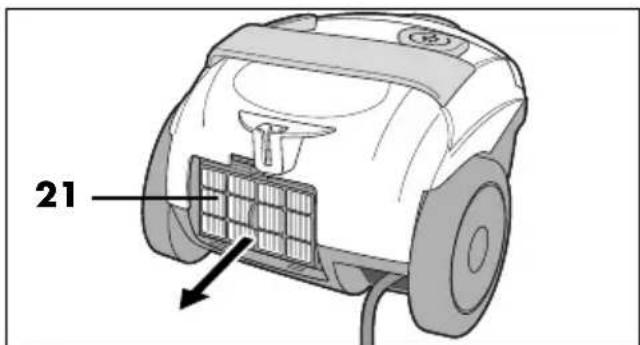
- Check the EPA filter for damage. If damaged, replace the EPA filter.
- Put the EPA filter 21 in a plastic bag and tap it. Wait for the small particles to settle before removing the EPA filter from the plastic bag.
NOTE: Use a EPA 12 EPA filter for this device.
- Place the EPA filter 21 at a slight angle at the bottom of the holder and then press the upper part against the device. It must be firmly seated.
natural_image
Diagram of a robotic vacuum cleaner with a panel attached, showing internal components and airflow direction (no text or symbols)- Insert the cover 20 over the exhaust air filter 21 at the bottom and close it. Press the release button down slightly and make sure that the cover clicks into place firmly.

natural_image
Diagram of a vacuum cleaner with airflow path and component labels (no text or symbols)10. Cleaning and care

DANGER! Risk of injury!
Turn off the vacuum cleaner and unplug the mains plug 22 before cleaning the device.
WARNING! Risk of material damage!
- Do not clean using sharp objects or abrasive cleaning agents.
Checking regularly
To maintain the full performance of your vacuum cleaner and to prevent damage to the device:
- Check the dust bag indicator 4 regularly (see "Dust bag indicator 4" on page 28).
Empty/change the dust bag or eliminate blockages if necessary. - Check the nozzles for dirt such as lint or hair regularly.
- Check all filters regularly for damage or deformations. Damaged or deformed filters that can no longer be cleaned must be replaced.
- Regularly check the reusable dust bag for damage. A damaged dust bag may no longer be used.
- Check the cable and the device for damage regularly.
Wiping down with a damp cloth
• Using a slightly damp cloth, wipe the following parts:
- the device
- the hose 1
- the telescopic tube 14
- the plastic surfaces of the nozzles
- Let all parts dry completely before you put them away or use the device again.
Brush cleaning
- Tap the brushes on the brush nozzle 2 and the floorhead 12. If e.g. hair has become tangled, pull it off with your fingers.
- You can also vacuum the brushes using the handle 16 on the hose 1.
Wash out the reusable dust bag

DANGER! Risk of electric shock due to moisture!
- Allow the reusable dust bag to dry completely before reinserting it.
Wash out the reusable dust bag regularly (depending on how dirty it is) under running water.
- Empty the dust bag (see "Emptying the dust bag" on page 29).
- Rinse the dust bag under cold running water.
- Allow the dust bag to dry completely before closing it with the plastic rail and reinserting it back into the vacuum cleaner.
11. Storage
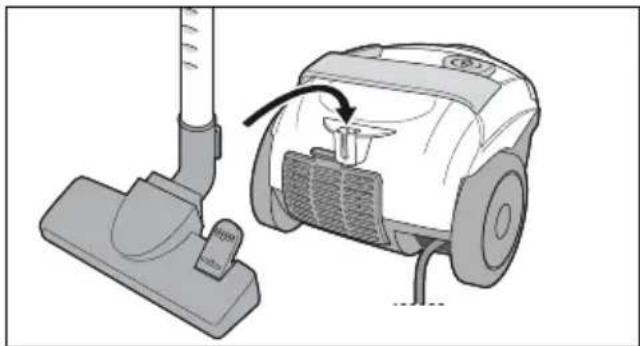
Parking the vacuum cleaner
The device is equipped with a double parking system. The floorhead 12 must be in place for this function.
- When the vacuum cleaner is in the normal suction position, hook the floorhead 12 into the holder 19 on the back.
natural_image
Diagram of a vacuum cleaner next to a mounted device with a handle, showing no text or symbols.- Or you can place the vacuum cleaner upright and hook the floorhead 12 into the holder 10 on the underside.
natural_image
Illustration of a vacuum cleaner with attached device and cable (no text or symbols)- For space-saving storage and to ensure the vacuum is standing in a stable position, push the telescopic tube 14 together as far as possible.
12. Disposal
This product is subject to the provisions of European Directive 2012/19/EC. The symbol showing a wheelie bin crossed through indicates that the product requires separate refuse collection in the European Union. This applies to the product and all accessories marked with this symbol. Products identified with this symbol may not be discarded with normal household waste, but must be taken to a collection point for recycling electric and electronic appliances.
This recycling symbol marks e.g. an object or parts of the material as valuable for recycling. Recycling helps to reduce the consumption of raw materials and protect the envi

Packaging
When disposing of the packaging, make sure you comply with the environmental regulations applicable in your country.
13. Trouble-shooting
If your device fails to function as required, please try this checklist first. Perhaps there is only a minor problem, and you can solve it yourself.

DANGER! Risk of electric shock!
- Do not attempt to repair the device yourself under any circumstances.
| Fault Possible causes /Actions | |
| No function | Check the power supply. |
| Suction power insufficient | Have all parts been properly connected?Is the dust bag indicator 4 filled?- Is one of the nozzles 2/3/12, the hose 1 or the telescopic tube 14 clogged?- Is the dust bag full?- Is one or several filters heavily contaminated?Is the auxiliary air valve 15 open? |
| Odour development | It is normal for new devices to have some odour development, this is not harmful to health.If a musty smell occurs later, check the dust bag and filters. Change them if necessary. |
| Lid cannot be closed | Is the dust bag correctly inserted? |
14. Technical specifications
| Model: SBBK 700 | A1 |
| Mains voltage: 22 | 0 – 240 V ~50/60 Hz |
| Protection class: II | |
| Power rating: 700 W | |
| Ambient conditions: | Use up to a height of4000 m above sea level |
NOTE: no action by the user is required to switch the product between 50 and 60 Hz. The product adjusts itself for both 50 and 60 Hz.
Symbols used
 | Double insulation |
 | Geprüfte Sicherheit (certified safety): devices must comply with the generally acknowledged rules of technology and the German Product Safety Act (Produkt-sicherheitsgesetz - ProdSG). (Not for UK.) |
 | With the CE marking, HOYER Handel GmbH declares the conformity with EU guidelines. |
 | This symbol reminds you to dispose of the packaging in an environmentally friendly manner. |
 | Recyclable materials: cardboard (except corrugated cardboard) |
| ~ | AC voltage |
 | It is a recyclable product which is subject to an extended producer responsibility and for which the rules of waste separation apply. |
Subject to technical modifications.
15. Warranty of the HOYER Handel GmbH
Dear Customer,
your device is provided with a 3 year warranty starting with the purchase date. In the event of product defects, you are entitled to statutory rights against the vendor. These statutory rights are not restricted by our warranty presented in the following.
Warranty conditions
The warranty period starts with the purchase date. Please keep the original purchase receipt in a safe place. This document is required to verify the purchase.
If within three years from the purchase date of this product a material or factory defect occurs, the product will be repaired or replaced by us – at our discretion – free of charge to you, or the purchase price will be refunded. This warranty implies that within the period of three years the defective device and the purchase receipt are presented, including a brief written description of the defect and the time it occurred.
If the defect is covered by our warranty, the repaired or a new product will be returned to you. No new warranty period starts with a repair or replacement of the product.
Warranty period and statutory claims for defects
The warranty period is not extended when the warranty has been claimed. This also applies to replaced and repaired parts. Any damages and defects already existing at the time of purchase must be reported immediately upon unpacking. Repairs arising after the expiration of the warranty period are subject to a charge.
Warranty coverage
The device was produced carefully according to strict quality guidelines and tested diligently prior to delivery. The warranty applies to material or factory defects.
Excluded from the warranty are wear parts subject to normal wear and damages to fragile parts, e.g. switches, batteries, lamps or other parts manufactured from glass.
This warranty expires if the product is damaged, not used as intended or not serviced. For the proper operation of the product, all instructions listed in the operating instructions must be observed carefully. Any form of use and handling that is advised against in the operating instructions or warned against must always be avoided.
The product is only intended for private and not for commercial use. In the case of incorrect and improper treatment, use of force and interventions not performed by our authorised Service Centre, the warranty shall cease.
Handling in case of a warranty claim
In order to ensure prompt processing of your matter, please observe the following notes:
- Please keep the article number IAN: 374192_2104 and the purchase receipt as a purchase verification for all inquiries.
- The article number can be found on the rating plate, an engraving, the title page of your instructions (in the bottom left), or as a label on the rear or underside of the device.
- If faulty operation or other defects occur, first contact the Service Centre listed in the following by telephone or email.
- Then, you are able to send a product reported as defective free of charge to the service address specified to you, including the purchase receipt and the information on the defect and when it occurred.
At www.lidl-service.com you can download this and many other manuals, product videos and installation software.

This QR code takes you directly to the Lidl Service website (www.lidl-service.com), where you can enter the article number (IAN)
374192_2104 to open your user instructions.

Service Centre
GB Service Great Britain
Tel.: 0800 404 7657
E-Mail: hoyer@lidl.co.uk
IE Service Ireland
Tel.: 1890 930 034
(0,08 EUR/Min., (peak))
(0,06 EUR/Min., (off peak))
E-Mail: hoyer@lidl.ie
MT Service Malta
Tel.: 80062230
E-Mail: hoyer@lidl.com.mt
CY Service Cyprus
Tel.: 8009 4409
E-Mail: hoyer@lidl.com.cy
IAN: 374192_2104
Supplier
Please note that the following address is no service address. First contact the aforementioned Service Centre.
HOYER Handel GmbH
Tasköprüstraße 3
22761 Hamburg
GERMANY
Sommaire
natural_image
Diagram of a mechanical device with labeled parts, showing internal components and directional arrows (no text or symbols)6. Montage

DANGER ! Risque de blessures !
natural_image
Diagram of a vacuum cleaner with threaded pipe and valve, showing mechanical components without any text or symbolsnatural_image
Illustration of a hand holding a tool with a pen inserted, no text or symbols presentnatural_image
3D diagram of a mechanical component being inserted into a cylindrical part, showing a downward arrow (no text or symbols)natural_image
Pure electrical circuit lines without any symbolsnatural_image
3D mechanical component diagram showing a lever and base with labeled part 11 (no text or symbols beyond labels)
natural_image
Simple black horizontal line with a small square at the bottom (no text or symbols)natural_image
3D mechanical component diagram with labeled part '11' (no text or symbols on the object itself)Suceur à coussins 3

natural_image
3D rendered image of a T-shaped object with rounded ends, resembling a mechanical or electronic component (no text or symbols)natural_image
Illustration of a handheld device with textured grip and scroll wheel (no text or symbols)natural_image
Diagram showing two hairbrushes with brush and texture, one being cut with rotation arrow (no text or symbols)8. Aspiration
natural_image
Technical illustration of a mechanical device with internal components and a directional arrow indicating flow or movement (no text or symbols present)natural_image
Mechanical component with a circular hole and mounting bracket, shown in 3D rendering (no text or symbols)natural_image
Illustration of a hand holding a tool with an arrow indicating direction (no text or symbols)natural_image
Illustration of a mechanical device with a square component and granular material inside (no text or symbols)natural_image
Technical illustration of a mechanical component with mounting brackets and a circular feature (no text or symbols)natural_image
Technical diagram of a vacuum cleaner internal structure with no visible text or symbolsnatural_image
Diagram of a robotic vacuum cleaner with a grid panel inserted, showing internal components and airflow direction (no text or symbols)natural_image
Diagram of a robotic vacuum cleaner with internal components and airflow arrows (no text or symbols)natural_image
Diagram of a vacuum cleaner next to a mounted vacuum cleaner (no text or symbols present)natural_image
Illustration of a vacuum cleaner with attached device and cable (no text or symbols)natural_image
Diagram of a mechanical device with labeled parts, showing internal components and directional arrows (no text or symbols)6. Montage

natural_image
Diagram of a vacuum cleaner with attached pipe and valve (no text or labels)Telescopische buis opsteken
natural_image
Illustration of a hand holding a tool, no text or symbols presentnatural_image
Mechanical assembly diagram showing a valve inserted into a base component (no text or symbols)natural_image
Pure electrical circuit lines without any symbolsnatural_image
3D mechanical component diagram showing a base with a handle and a labeled part '11' (no text or symbols beyond label)
natural_image
Simple black horizontal line with a small square at the bottom (no text or symbols)natural_image
3D mechanical component diagram with labeled part '11' (no text or symbols on the object itself)Bekledingmondstuk 3

natural_image
3D rendered image of a T-shaped object with rounded ends, resembling a mechanical or electronic component (no text or symbols)natural_image
Illustration of a mechanical device with a curved handle and flanged base (no text or symbols)natural_image
Illustration of two hairbrushes with brush and curl, showing a curved arrow indicating rotation (no text or symbols)8. Stofzuigen
natural_image
Technical illustration of a mechanical device with internal components and a directional arrow indicating flow or movement (no text or symbols present)natural_image
Mechanical component with a circular hole and mounting bracket, showing an upward arrow (no text or symbols)Stofzak legen
natural_image
Illustration of hands holding a tool with an arrow indicating direction (no text or symbols)natural_image
Illustration of a mechanical component with a square base and textured surface (no text or symbols)natural_image
Technical illustration of a mechanical component with mounting brackets and a central circular feature (no text or symbols)natural_image
Technical diagram of a mechanical device with internal components and a directional arrow indicating assembly (no text or symbols present)natural_image
Diagram of a robotic device with a grid-patterned panel inserted into the base, showing mechanical components and wiring (no text or symbols)natural_image
Diagram of a robotic vacuum cleaner with internal components and airflow arrows (no text or symbols)natural_image
Illustration of a vacuum cleaner next to a mounted device with a handle and control panel (no text or symbols)natural_image
Illustration of a vacuum cleaner with attached device and cable (no text or symbols)natural_image
Mechanical component diagram showing a device with labeled parts, including a cylindrical housing and a rectangular housing (no text or symbols present)6. Montaz

natural_image
Technical illustration of a vacuum cleaner with threaded pipe and valve (no text or symbols)natural_image
Line drawing of a hand holding a tool, no text or symbols presentnatural_image
Mechanical assembly diagram showing a pipe being inserted into a base component (no text or symbols)natural_image
Simple black-and-white diagram of a symmetrical abstract shape resembling a stylized letter or symbol (no text or labels)natural_image
3D mechanical component diagram showing a base with a handle and a labeled part '11' (no text or symbols beyond label)
natural_image
Simple black horizontal line with a small square at the bottom (no text or symbols)natural_image
3D mechanical component diagram with labeled part '11' (no text or symbols on the object itself)Dysza do tapicerki 3

natural_image
3D rendered image of a T-shaped object with rounded ends, resembling a mechanical or electronic component (no text or symbols)natural_image
Illustration of a mechanical component with fins and a curved arrow (no text or symbols)natural_image
Diagram showing two hairbrushes with brush and texture, one being rotated by a curved arrow (no text or symbols)8. Odkurzanie
natural_image
Technical diagram of a vacuum cleaner internal structure, showing housing, casing, and internal components (no text or labels)natural_image
Mechanical component with a circular hole and mounting bracket, showing an upward arrow (no text or symbols)natural_image
Illustration of hands holding a tool with an arrow indicating direction (no text or symbols)natural_image
Illustration of a mechanical component with a square base and textured surface (no text or symbols)natural_image
Technical line drawing of a mechanical component with mounting brackets and a central circular feature (no text or symbols)natural_image
Technical diagram of a mechanical device showing internal components and a directional arrow (no text or symbols)natural_image
Diagram of a robotic vacuum cleaner with a panel array and control panel, showing internal components and wiring (no text or symbols)natural_image
Diagram of a robotic vacuum cleaner with airflow arrows indicating internal components (no text or symbols)natural_image
Illustration of a vacuum cleaner next to a mounted device with a handle and fan (no text or symbols)natural_image
Illustration of a vacuum cleaner next to a mounted device with a cable inserted (no text or symbols)natural_image
Diagram of a mechanical device with labeled parts, showing internal components and part outline (no text or symbols)6. Montáž

NEBEZPEČÍ zranění!
natural_image
Diagram of a vacuum cleaner with threaded tube and handle, showing mechanical components (no text or labels)natural_image
Illustration of a hand holding a tool with a cylindrical object inserted (no text or symbols)natural_image
Mechanical assembly diagram showing a pipe being inserted into a component (no text or symbols)natural_image
Pure electrical circuit lines without any symbolsnatural_image
3D mechanical component diagram showing a base with a handle and a labeled part '11' (no text or symbols beyond label)
natural_image
Simple black horizontal line with a small rectangular notch at the end (no text or symbols)natural_image
3D mechanical component diagram with labeled part '11' (no text or symbols on the object itself)natural_image
3D rendered image of a T-shaped object with a flared top and rounded base (no text or symbols)natural_image
Illustration of a handheld device with f-bruts and a scroll wheel (no text or symbols)natural_image
Diagram showing two hair clip manipulator designs with rotation arrows indicating movement (no text or symbols)8. Vysávání
natural_image
Technical illustration of a vacuum cleaner internal structure with no visible text or symbolsnatural_image
3D mechanical component diagram showing a square housing with a central circular hole and mounting brackets, with an upward arrow indicating direction (no text or symbols)natural_image
Illustration of two hands holding a tool with an arrow indicating direction (no text or symbols)natural_image
Illustration of a mechanical device with a square component and textured base (no text or symbols)natural_image
Technical line drawing of a mechanical component with mounting brackets and a circular feature (no text or symbols)natural_image
Technical diagram of a mechanical device showing internal components and a directional arrow (no text or symbols)natural_image
Diagram of a robotic vacuum cleaner with airflow arrows indicating mechanical components (no text or symbols)natural_image
Diagram of a robotic vacuum cleaner with airflow path and component layout (no text or symbols)natural_image
Illustration of a vacuum cleaner next to a mounted device with a handle and control panel (no text or symbols)natural_image
Illustration of a vacuum cleaner with attached device and cable (no text or symbols)natural_image
Diagram of a mechanical device with labeled parts, showing internal components and part outline (no text or symbols)
- Na vybratie sacej hadice 1 stlačte obidve odblokovacie tlačidlá 6 a vytiahnite ich.

natural_image
Diagram of a vacuum cleaner with threaded tube and handle, showing mechanical components (no text or labels)Nasunutie teleskopickej trubice
natural_image
Illustration of a hand holding a tool with a pen inserted, no text or symbols presentnatural_image
Mechanical assembly diagram showing a pipe being inserted into a component (no text or symbols visible)- Na vybratie hubicou zlahka otáčajte sem a tam a stiahnite ju.
7. Používanie hubíc
natural_image
Pure electrical circuit lines without any symbolsnatural_image
3D mechanical component diagram showing a base with a handle and a labeled part '11' (no text or symbols beyond labels)- Pre koberce sklopte nožné tlačidlo 11 na symbol „kefa zasunutá“. Kefa sa zasunie.
natural_image
Simple black horizontal line with a small square at the bottom (no text or symbols)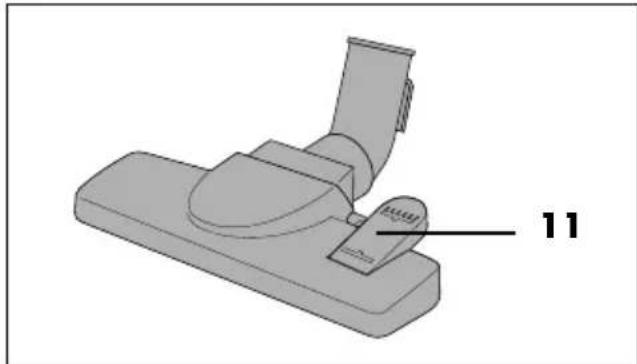
natural_image
3D mechanical component diagram with labeled part '11' (no text or symbols on the object itself)natural_image
3D rendered image of a T-shaped object with rounded ends, resembling a mechanical or electronic component (no text or symbols)natural_image
Illustration of a hairbrush with bristles and a handle (no text or symbols)natural_image
Diagram showing two hairbrushes with brush and texture, one with a curved arrow indicating rotation (no text or symbols)8. Vysávanie
natural_image
Technical diagram of a vacuum cleaner internal structure, showing housing, casing, and mounting components (no text or labels)- Vytiahnite vrecko na prach z držiaka vrecka na prach.
natural_image
Mechanical component with a circular hole and mounting bracket, showing an upward arrow (no text or symbols)natural_image
Illustration of hands holding a tool with an arrow indicating direction (no text or symbols)natural_image
Illustration of a mechanical component with a square base and granular material inside, no text or symbols present.natural_image
Technical line drawing of a mechanical component with mounting brackets and a circular feature (no text or symbols)natural_image
Technical diagram of a mechanical device showing internal components and a directional arrow (no text or symbols)natural_image
Diagram of a robotic vacuum cleaner with internal components and airflow arrows (no text or symbols)- Nasad'te dole kryt 20 nad filter vychá-dzajúceho vzduchu 21 a zaklapnite ho. Zl'ahka pritom zatlačte nadol odblo-kovacie tlačidlo a dbajte o to, aby kryt pevne zapadol.

natural_image
Diagram of a robotic vacuum cleaner with internal components and airflow arrows (no text or symbols)10. Čistenie a ošetrovanie

natural_image
Illustration of a vacuum cleaner next to an electric vacuum cleaner (no text or symbols present)natural_image
Illustration of a vacuum cleaner with attached device and cable (no text or symbols)natural_image
Diagram of a mechanical device with labeled parts, showing internal components and assembly (no text or symbols)6. Montaje

natural_image
Diagram of a vacuum cleaner with attached tubing and valve mechanism (no text or labels)natural_image
Illustration of a hand holding a tool with a pen inserted, no text or symbols presentnatural_image
Mechanical assembly diagram showing a pipe being inserted into a component (no text or symbols)natural_image
Pure electrical circuit lines without any symbolsnatural_image
3D mechanical component diagram showing a lever and base with labeled part 11 (no text or symbols beyond labels)
natural_image
Simple black horizontal line with a small square at the bottom (no text or symbols)natural_image
3D mechanical component diagram with labeled part 'MAXI' and number '11' (no readable text or symbols beyond labels)Boquilla para tapizados 3
natural_image
3D rendered image of a T-shaped object with rounded ends, resembling a mechanical or electronic component (no text or symbols)natural_image
Illustration of a hairbrush with bristles and a handle (no text or symbols)natural_image
Diagram showing two hairbrushes with brush and texture, one with a curved arrow indicating rotation (no text or symbols)8. Aspirar
natural_image
Technical diagram of a vacuum cleaner internal structure, showing housing, casing, and component layout (no text or labels)natural_image
Mechanical component with a circular hole and mounting bracket, showing an upward arrow (no text or symbols)natural_image
Illustration of hands holding a tool with an arrow indicating direction (no text or symbols)natural_image
Illustration of a mechanical component with a square base and granular material inside, no text or symbols present.natural_image
Technical line drawing of a mechanical component with mounting brackets and a circular feature (no text or symbols)natural_image
Technical diagram of a vehicle interior showing internal components and a directional arrow (no text or symbols)natural_image
Diagram of a robotic vacuum cleaner with a panel array and control panel, showing mechanical components without any text or symbols.natural_image
Diagram of a car interior showing airflow or exhaust flow from a fan to a vehicle (no text or symbols present)natural_image
Illustration of a vacuum cleaner next to a mounted device with a handle and ventilation system (no text or symbols)natural_image
Illustration of a vacuum cleaner with attached device and cable (no text or symbols)natural_image
Diagram of a mechanical device with labeled parts, showing internal components and part outline (no text or symbols)6. Montering

natural_image
Diagram of a vacuum cleaner with attached pipe and valve mechanism (no text or labels)natural_image
Illustration of a hand holding a tool with a tool handle (no text or symbols)- Teleskoprøret 14 drejes helst således, at skyderen 13 vender opad. Det letter betjeningen senere.
natural_image
Mechanical assembly diagram showing a pipe being inserted into a component (no text or symbols)natural_image
Simple black-and-white diagram of a symmetrical abstract shape resembling a stylized letter or symbol (no text or labels)natural_image
3D mechanical component diagram showing a base with a handle and a labeled part '11' (no text or symbols beyond label)
natural_image
Simple black horizontal line with a small square at the end, enclosed in a rectangular border (no text or symbols)natural_image
3D mechanical component diagram with labeled part '11' (no text or symbols on the object itself)Møbelmundstykke 3

