
Sekko 12 ARDEHU12 - Dehumidifier ARDES - Free user manual and instructions
Find the device manual for free Sekko 12 ARDEHU12 ARDES in PDF.

User questions about Sekko 12 ARDEHU12 ARDES
0 question about this device. Answer the ones you know or ask your own.
Ask a new question about this device
Download the instructions for your Dehumidifier in PDF format for free! Find your manual Sekko 12 ARDEHU12 - ARDES and take your electronic device back in hand. On this page are published all the documents necessary for the use of your device. Sekko 12 ARDEHU12 by ARDES.
USER MANUAL Sekko 12 ARDEHU12 ARDES
(IT) MANUALE PER L'INSTALLAZIONE, LA MANUTENZIONE E L'USO
(EN) INSTALLATION, SERVICE AND OPERATION MANUAL
(FR) MANUEL D'INSTALLATION, D'ENTRETIEN ET D'UTILISATION
(DE) INSTALLATIONS-, SERVICE- UND BEDIENUNGSANLEITUNG
(ES) MANUAL DE INSTALACIÓN, SERVICIO Y OPERACIÓN
(PT) MANUAL DE INSTALAÇÃO, ASSISTÊNCIA E FUNCIONAMENTO
| ARDEHU12 | (IT) DEUMIDIFICATORE(EN) DEHUMIDIFIER(FR) DÉSHUMIDIFICATEUR(DE) ENTFEUCHTER(ES) DESHUMIDIFICADOR(PT) DESUMIDIFICADOR |
natural_image
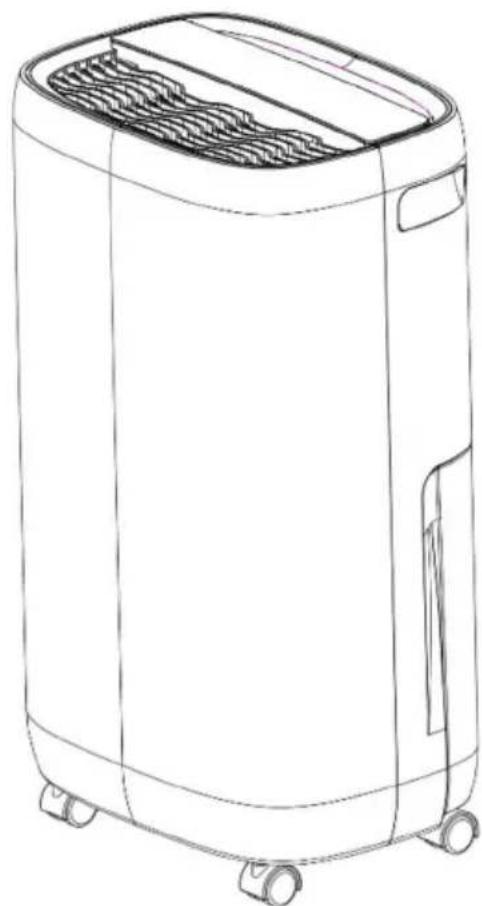
Line drawing of a portable air purifier with ventilation slots and wheels (no text or symbols)(IT) AVVERTENZE
L'APPARECCHIO CONTIENE 52g di GAS R290 (CLASSIFICAZIONE INFIAMMABILITÀ A3).
ATTENZIONE
(IT) RISOLUZIONE DEI PROBLEMI
WARNING: Carefully read the warnings contained in the following booklet as they provide important information regarding safety of installation, use and maintenance.
Important instructions to keep for further reference.
- The appliance can be used by children not younger than 8 and by persons with reduced physical, sensory or mental capabilities, or without experience or the necessary knowledge, provided that they are under supervision or after they have received instructions relating to safe use of the appliance and to understanding of the dangers involved.
• Children must not play with the appliance.
- Cleaning and maintenance intended to be carried out by the user must not be performed by children without supervision.
- If the power cable is damaged, it must be replaced by the manufacturer or by its technical assistance service or in any case by a person with a similar qualification, in order to prevent any risk.
- This appliance is intended to be used at a maximum altitude of 2.000m above sea level.
- The appliance must not be installed near appliances that generate heat or near flammable or hazardous materials.
- During operation, leave a free space of 45cm at the back and on each side of the product.
EXPLANATION OF SYMBOLS
 | Read the operator's manual | |
 | Read the operating instructions in the operator's manual. | |
 | Read the maintenance instructions in the technical manual. | |
 | ATTENTION: risk of fire. |
WARNINGS FOR FLAMMABLE REFRIGERANT R290

THE APPLIANCE CONTAINS 52g of R290 GAS (FLAMMABILITY CLASSIFICATION A3).
WARNING
- DO NOT USE MEANS TO ACCELERATE THE DEFROSTING PROCESS OR FOR CLEANING, OTHER THAN THOSE RECOMMENDED BY THE MANUFACTURER.
- THE APPLIANCE MUST BE PLACED IN A ROOM THAT DOES NOT HAVE CONTINUOUSLY OPERATING IGNITION SOURCES (FOR EXAMPLE, NAKED FLAMES, A GAS APPLIANCE OR AN ELECTRIC HEATER IN OPERATION).
• DO NOT PUNCTURE OR BURN. - PAY ATTENTION TO THE FACT THAT REFRIGERANT FLUIDS MAY BE ODOURLESS.
- THE APPLIANCE MUST BE INSTALLED, OPERATED AND STORED IN A ROOM WHOSE FLOOR AREA IS GREATER THAN 4m^2 .
- The appliance must be placed in a well-ventilated area, the size of which corresponds to the surface area specified for operation ( 4 m^2 ).
- Comply with the national gas regulations.
- Keep ventilation openings clear of obstructions.
- The appliance must be kept in such a way as to avoid mechanical damage.
- Anyone who has the opportunity to perform work on or within a refrigerant circuit should have a valid certificate issued by an industry-accredited certification body, certifying their competence in safely handling
• refrigerant fluids according to an industry-recognised assessment specification. - Maintenance must be performed as indicated by the manufacturer. Maintenance and repairs requiring the assistance of other qualified personnel must be performed under the supervision of a person competent in the use of flammable refrigerant fluids.
MAINTENANCE INFORMATION

Checks in the area
- Before starting work on systems containing flammable refrigerant fluids, safety checks must be performed to ensure that the risk of combustion is minimised. To repair the refrigeration system, the following precautions must be taken before starting work on the system.
• Work procedure
The work must be undertaken following a controlled procedure, to minimise the risk of the presence of flammable gases or vapours while the work is being performed.
- General work area
All maintenance personnel and other persons working in the surrounding area must be instructed on the type of work to be performed. Avoid working in confined spaces. It is necessary to delimit the area around the workspace. Safe working conditions must be ensured around the area by checking the flammable material.
- Check for the presence of refrigerant fluid
The area must be checked with a dedicated refrigerant detector before and during work so that the technician is aware of the potentially flammable atmospheres. Ensure that the spill detection apparatus is suitable for use with flammable refrigerant fluids, i.e. does not produce sparks, is adequately sealed or is inherently safe.
• Presence of a fire extinguisher
In the event that it is necessary to perform hot work on the refrigeration apparatus or on an associated part thereof, it is necessary to have appropriate flame extinguishing equipment available. A powder or CO_2 fire extinguisher must be close to the loading area.
- Sources that do not generate combustion
Persons performing work on a refrigeration system that involves the exposure of pipes that contain or have contained a flammable refrigerant fluid must not use any combustion source that could result in the risk of fire or explosion. All possible sources of combustion, including smoking a cigarette, should be kept sufficiently away from the place of installation, repair, removal and disposal, operations during which flammable refrigerant fluid could be released into the surrounding space. Before starting work, the area surrounding the equipment must be checked to ensure that there are no fire hazards or combustion risks.
Signs must be displayed with the words "No smoking".
- Ventilated areas
Ensure that the area is outdoors and adequately ventilated before intervening inside the system or proceeding with hot work. During the work period, there must be a continuous degree of ventilation. Ventilation must safely disperse any refrigerant fluid released and preferably expel it to the outside in the atmosphere.
- Checks on the refrigeration system
If replacing electrical components, they must be suitable for the intended purpose and meet the correct specification. The maintenance and operation guidelines provided by the manufacturer must be followed at all times. If in any doubt, consult the technical department of the manufacturing company for assistance. The following checks must be performed on appliances that use flammable refrigerant fluids:
– that the magnitude of the charge is in accordance with the size of the room in which the parts containing the refrigerant fluid are installed;
– that the equipment and ventilation outlets work properly and are not obstructed;
- if an indirect refrigeration circuit is used, the presence of refrigerant fluid in the secondary circuit must be checked;
– the marking affixed to the appliance must remain visible and legible. Markings and graphic signs that are illegible must be corrected;
– refrigerant pipes and components are installed in a position where they are unlikely to be exposed to substances that could corrode parts containing refrigerant fluids, unless the components are constructed of materials that are intrinsically resistant to corrosion or are adequately protected from corrosion.
- Checks on electrical devices
The repair and maintenance of electrical components must include the initial safety checks and component examination procedures. In the event of a fault that could compromise safety, there must be no power supply to the circuit until it has been satisfactorily resolved. If the fault cannot be resolved immediately but it is necessary to continue with the operation, a suitable temporary solution must be implemented. This should be reported to the owner of the appliance so that all parties are aware of the fact.
Initial safety checks must include:
- that the capacitors are discharged: this operation must be performed safely to avoid the possibility of creating sparks;
- that there are no live electrical components and that the cables are not exposed while charging, recovering or purging the system;
- that there is continuity in the earth connection.
• Repairs on sealed components
- During repairs to sealed components, all power supplies must be disconnected from the appliance being worked on before removing the sealed covers. If it is absolutely essential for the appliance to have a power supply
during maintenance, it is then necessary to place a leak detector permanently in operation at the most critical point, to warn in case of a potentially dangerous situation.
- Particular attention must be paid to the following to ensure that, when working on the electrical components, the casing does not alter in such a way as to compromise the level of protection. Attention must also be paid to damage to cables, an excessive number of connections, terminals not connected according to the original requirements, damage to gaskets, incorrect fixing of cable glands.
- Ensure that the appliance is assembled securely.
- Make sure that the gaskets and sealing materials have not deteriorated to the point that they are no longer suitable for the purpose of preventing fire generation within flammable atmospheres. Spare parts must be in accordance with the manufacturer's requirements.
NOTE The use of silicone sealant may affect the effectiveness of certain types of leak detection instruments. Intrinsically safe components must not be isolated before work begins on them.
• Repairs to inherently safe components
- Do not apply any permanent inductive or capacitive load to the circuit without making sure that this will not exceed the voltage and current permitted for the appliance in use.
- Intrinsically safe components are the only types that can be worked on while under voltage in the presence of a flammable atmosphere. The test apparatus must have correct nominal values.
- Replace the components only with parts indicated by the manufacturer. Different parts can cause the refrigerant fluid to escape into the atmosphere, resulting in combustion.
- Cables
- Check that the cables are not subjected to wear, corrosion, excessive pressure, vibrations, sharp edges or any other adverse environmental situation. The control should also take into account the effects of ageing and continuous vibration from sources such as compressors and fans.
• Detection of flammable refrigerant fluids
Under no circumstances should potential combustion sources be used to look for or detect leaks of refrigerant fluid. Do not use a halogen torch (or any other detection system that uses a naked flame).
• Methods for spill detection
The following methods for detecting spills are considered to be acceptable for systems containing flammable refrigerant fluids.
- Electronic leak detectors should be used to detect the presence of flammable refrigerant fluids, but their sensitivity may not be adequate or they may need to be recalibrated. (The detection equipment must be calibrated in an area free from refrigerant fluid). Make sure that the detector is not a potential source of combustion, that it is suitable for the refrigerant fluid being used.
The detection equipment must be set to a percentage of the LFL of the refrigerant fluid and must be calibrated for the refrigerant fluid used, and the appropriate percentage of gas (maximum 25%) must be confirmed.
- Fluid leak detectors are suitable for use with most refrigerant fluids but detergents containing bleach should be avoided as they can react with the refrigerant fluid and corrode the copper piping network.
- If the presence of a spill is suspected, all naked flames must be eliminated.
- If a leak of refrigerant fluid is found that requires brazing, all the refrigerant fluid must be recovered from the system or isolated (by means of shut-off valves) in a part of the system away from the leak. The oxygen-free nitrogen (OFN) must then be purged through the system, both before and after the brazing process.
- Removal and evacuation
- When intervening inside the refrigerant circuit to perform repairs or for any other reason, conventional procedures must be followed. However, it is important to follow best practice as there is a danger of flammability being a possibility. The following procedure should aim to:
- remove the refrigerant fluid;
- purge the circuit with an inert gas;
- evacuate;
- purge again with an inert gas;
- open the circuit by cutting or by brazing.
- The charge of the refrigerant fluid must be stored in the appropriate storage cylinders. The system must be "cleaned" with OFN to make the unit safe. This process may need to be repeated several times. Compressed air or oxygen must not be used for this work.
- Cleaning is achieved by interrupting the vacuum condition in the system with OFN and continuing to fill until the operating pressure is reached, creating a vent to the atmosphere and, finally, recreating the vacuum condition. This process must be repeated until there is no trace of refrigerant fluid left in the system. When using the last OFN refill, the system must be at atmospheric pressure to be able to work.
This operation is of vital importance in the event that it is necessary to perform brazing operations on the piping network.
- Make sure that for each of the ignition sources the outlet duct of the depressurisation pump is not closed and that there is ventilation.
- Charging procedures
In addition to conventional charging procedures, the following requirements must be followed.
- Ensure that contamination between different refrigerant fluids does not occur when using charging equipment. The hoses or ducts must be as short as possible to minimise the quantity of refrigerant fluid contained in them.
- The cylinders must be kept in an upright position.
- Make sure that the refrigeration system is earthed before proceeding to recharge the system with the refrigerant fluid.
- Label the system when charging is completed, (if not already done).
– Special care must be taken not to overload the refrigeration system.
Before proceeding to recharge, the system must be subjected to the pressure test with OFN. The system must be subjected to the leak test at the end of charging but before commissioning. A further leak test must be performed before leaving the site.
- Decommissioning
Before performing this procedure, it is essential that the technician is fully familiar with the apparatus and with every detail of it. It is best practice for all refrigerant fluids to be stored safely. Before performing the work, samples of oil and refrigerant must be taken if an analysis is required before using the refrigerant again. It is essential that electricity is available before starting the work.
a) Become familiar with the apparatus and its operation.
b) Electrically isolate the system.
c) Before attempting the procedure, make sure that:
- a mechanical manoeuvring device is available, if required, to handle the cylinders of the refrigerating fluids;
- all personal protection equipment is available and used correctly;
- that the recovery process is constantly under the control of a competent person;
- that the recovery apparatus and cylinders comply with the relevant Standards.
d) Depressurise the refrigerant system, if possible.
e) If vacuum cannot be obtained, connect a manifold so that the refrigerant fluid can be removed from various parts of the system.
f) Make sure the cylinder is located on the scale before recovery takes place.
g) Start the machine for recovery and run it according to the manufacturer's instructions.
h) Do not overfill the cylinders (no more than 80% by volume of the refill liquid).
i) Do not exceed, even momentarily, the maximum operating pressure of the cylinder.
j) When the cylinders have been filled correctly and the process is finished, check that the cylinders and equipment are promptly removed from the site and that all the isolation valves of the appliance are closed.
k) Recovered refrigerant fluids must not be charged to another refrigeration system unless they have been cleaned and checked.
- Labelling
The equipment must bear a label stating that it has been taken out of service and emptied of the refrigerant fluid. The label must be dated and signed. Make sure that labels have been affixed to the appliance stating that the appliance contains a flammable refrigerant fluid.
- Recovery
- When removing refrigerant fluids from a system, whether for maintenance or decommissioning, it is good practice for this to be performed safely.
- When transferring the refrigerant fluid into the cylinders, check that only cylinders suitable for the recovery of refrigerant fluids are used. Ensure that the exact number of cylinders is available to hold the total system recharge. All cylinders to be used are designated for the refrigerant
being stored and labeled for that refrigerant (i.e., dedicated refrigerant storage cylinders). The cylinders must include a pressure relief valve and associated shut-off valves, in good working order. Empty casing cylinders are removed and, if possible, cooled before recovery takes place.
- The recovery apparatus must be in a good operating condition with a series of instructions concerning the apparatus under management and must be suitable for the recovery of flammable refrigerant fluids.
A set of calibrated weighing scales must also be available. The pipes must be equipped with disconnection fittings that do not leak and are in good working order. Before using the recovery machine, check that it is in a satisfactory condition of use, that it has been properly maintained and that any associated electrical components are sealed to prevent ignition in case of leakage of refrigerant fluid. If in doubt consult the manufacturer.
- The recovered refrigerant must be returned to the refrigerant supplier in the appropriate recovery cylinder, preparing the relative Waste Transfer Note. Do not mix refrigerant fluids in the recovery units and, in particular, not in the cylinders.
- If compressors or their oils must be removed, make sure they have been emptied to an acceptable level to ensure that flammable refrigerant fluid does not remain in the lubricant. The evacuation process must be performed before the compressor returns to the suppliers. Only electric heating to the compressor body should be used to accelerate this process. The operation of draining oil from a system must be performed safely.
TRANSPORTATION, MARKING AND STORAGE OF UNITS USING FLAMMABLE REFRIGERANT FLUIDS
Transportation of equipment containing flammable refrigerant fluids
Observe the transportation regulations.
Marking of the appliance by means of signals
Please refer to local regulations.
Disposal of equipment using flammable refrigerant fluids
Please refer to the National Regulations.
Storage of equipment/appliances
The storage of equipment must take place according to the manufacturer's instructions.
Storage of packed (unsold) equipment
The protection of the storage packaging must be constructed so that mechanical damage to the equipment contained within the packaging does not cause a leakage of the refrigerant fluid charge.
The maximum number of units of appliances that can be stored together is determined by the local regulations.
(EN) DESCRIPTION OF THE PARTS
(see the images at the end of the booklet)
Description of the appliance:
A1. Control Panel
A2. Air Outlet Grid
A3. Water Collection Tank
A4. Condensate Continuous Drain Connection
A5. Handles
A6. Air Filter
A7. Air Inlet Grid
Control Panel Description:
B1. ON/OFF button
B2. Mode button
B3. - button (for desired humidity adjustment and TIMER)
B4. + button (for desired humidity adjustment and TIMER)
B5. TIMER setting button
B6. Full Water Collection Tank Indicator
B7. Display
B8. TURBO Mode Indicator
B9. NORMAL Mode Indicator
B10. AUTO Mode Indicator
(EN) OPERATION
Additional warnings before use
- Keep the warranty, the receipt and the instruction booklet for any further consultation.
- After removing the packaging, make sure that the appliance is intact and in case of visible damage, do not use it and contact professionally qualified personnel.
- Do not leave parts of the packaging within the reach of children to avoid the danger of suffocation.
- Before connecting the appliance, make sure that the voltage in the socket corresponds to the details indicated on the plate.
- If the plug and socket are not compatible, have the socket replaced with a suitable type by professionally qualified personnel.
- During operation, leave a free space of 45cm at the back and on each side of the product.
- The drain hose (if installed) must be installed at an angle that allows the condensed water to be emptied continuously.
- Do not use adapters or extensions that do not comply with the current safety regulations or that are not suitable for the power (W) of the appliance.
- Disconnect the appliance from the mains supply when not in use.
- Do not pull on the power cable or the appliance itself to take the plug out of the socket.
- The use of any electrical appliance requires the observance of certain fundamental rules, in particular:
➢ Do not touch the appliance with wet or damp hands.
➢ Do not leave the appliance exposed to atmospheric agents (rain, sun).
Do not subject it to impacts.
- In the event that it is decided to no longer use this type of appliance, it is advisable to make it inoperative by cutting the power cable, obviously after disconnecting it from the power socket.
- To avoid dangerous overheating, it is advisable to unwind the power cable along its entire length.
- For safety reasons, the appliance cannot be disassembled.
-
The appliance has been built and designed to operate in domestic environments, therefore any other use is to be considered improper and consequently dangerous.
-
Do not introduce any object through the air inlet and outlet grid to avoid the risk of electric shock, fire or damage to the appliance.
- Do not use the appliance without the filters correctly positioned.
- Do not use this appliance in the immediate vicinity of a bathtub, shower or swimming pool.
- Keep the cable away from heat sources.
- Use the appliance in environments with a temperature of between 5°C and 35°C.
- Before transporting or moving the appliance, empty the water tank.
Using the device
Always place the appliance on a stable, flat and level surface at least 45 cm from the wall or any other object, in order to ensure correct air circulation.
Place the appliance on a water-resistant surface as any leakage of water could damage the surface itself. Before using the appliance, leave it upright for at least 2 hours to allow the refrigerant to reflux normally and to improve the life of the compressor.
ATTENTION: keep the appliance upright even when not in use or while in storage.
Before use, remove the water tank and the adhesive on the float and make sure that the float can move freely.
Power ON / Stand-by OFF- Button B1
Press this button to turn on or place the appliance on standby.
When switched on, the display (B7) shows the humidity level in the room, and the appliance is activated in AUTO mode (indicator B10 lights up).
Operating mode selection – Button B2
When the appliance is switched on, press the mode button (B2) repeatedly to select one of the possible operating modes from:
- TURBO mode - indicator B8
- NORMAL mode -indicator B9
- AUTO mode A-B10 indicator
With each press of the mode button (B2), the dehumidifier emits a "Beep" sound and the indicator corresponding to the selected operating mode flashes for 5 seconds, then becomes steady once the selection is confirmed.
NORMAL mode \* indicator B9
In this operating mode it is possible to select the desired relative humidity.
Once this mode of operation is selected, press the - Button (B3) or + Button (B4) to set the desired relative humidity level.
If the percentage value of moisture present in the environment is:
- 10% higher than the set humidity level, the fan inside the dehumidifier will work at maximum speed
- Above the set humidity level, but not more than 10%, the fan inside the dehumidifier will work at the minimum speed
- Less than or equal to the set one, the compressor stops.
Once this mode of operation is selected, press the – Button (B3) or + Button (B4) to set the desired relative humidity level between 20% and 95%, with steps of 5%, and CO (Continuous Cycle):
$$ \text { CO (Continuous Cycle) } \rightarrow 20 \% \rightarrow 25 \% \rightarrow 30 \% \dots \rightarrow 85 \% \rightarrow 90 \% \rightarrow 95 \% \rightarrow \text { CO (Continuous Cycle) } $$
CO (Continuous Cycle): By selecting this value, the compressor will continue to operate regardless of the percentage humidity level present in the environment.
AUTO mode A-indicator B10
In this operating mode the desired relative humidity level is set to 55%, and is not changeable. If the percentage of moisture present in the environment is:
- Above 70% , the dehumidifier activates the fan at maximum speed
- Between 55% and 70% , the dehumidifier activates the fan at the minimum speed
• Below 55%, the compressor stops
TURBO Mode * (Laundry Mode) – Indicator 8
This mode is ideal for speeding up the drying of cloths.
In this operating mode the compressor will continue to operate regardless of the percentage humidity level present in the environment, with the fan at maximum speed.
WARNING: The appliance is equipped with a safety device (wait 3 minutes) that protects the compressor from overly frequent starts and stops.
WARNING: When the appliance is in operation, dehumidification may be temporarily interrupted to defrost the heat exchanger.
TIMER setting – Button B5
Press the Timer Button (B5) to set the deferred power off (in ON mode), or the deferred power on (in stand-by mode, OFF).
When the appliance is switched on, ON mode:
- press the TIMER button (B2), the display shows the current value of the flashing timer
- press the - (B3) and + (B4) buttons to set the deferred shutdown (0 -> 1 -> 2 -> 3 -> .... -> 22 -> 23 -> 24 -> 0).
• After 5 seconds the display (B7) again displays the ambient relative humidity value
When the appliance is switched off, stand-by OFF mode:
- press the TIMER button (B2), the display shows the current value of the flashing timer
- press the - (B3) and + (B4) buttons to set the deferred ignition (0 -> 1 -> 2 -> 3 -> .... -> 22 -> 23 -> 24 -> 0).
• after 5 seconds the display (B7) displays the ambient relative humidity value again.
With Timer set, it is possible to view the remaining time by pressing the TIMER button (B2).
Full Water Collection Tank Indicator – indicator B6
The Full Water Collection Tank indicator (B6) indicates that the water collection tank is full and that it must be emptied.
- when the full water collection tank indicator (B6) comes on, the dehumidifier stops, and emits a "beep" sound for 20 seconds.
- Remove the Water Collection Tank (A3) with both hands.
- Empty the Water Collection Tank (A3) and reposition it correctly, otherwise the Full Water Collection Tank indicator (B6) does not turn off and the dehumidifier does not work.
ATTENTION: do not remove the float inside the Full Water Collection Tank, otherwise the appliance will not be able to correctly detect the water level inside the tank.
(EN) CONTINUOUS WATER DISCHARGE
If necessary, it is possible to connect a rubber hose (diam. 10mm), not supplied, to the appliance to continuously discharge the water collected by the dehumidifier.
- Switch off the appliance and disconnect it from the mains socket
- Remove the Water Collection Tank (A3).
- Connect a 10mm diam rubber hose to the fitting (A4) and secure it gently with a clamp (not supplied)
- Reposition the Water Collection Tank (A3) being sure to pass the hose into the dedicated inlet on the tank. Otherwise the appliance will not work.
ATTENTION: the hose must be installed at an angle that allows the condensed water to be emptied continuously.
ATTENTION: during operation with continuous water drain, do not remove the Water Collection Tank.
ATTENTION: any problems related to the continuous discharge of water are not detected by the appliance. Periodic supervision is recommended in order to avoid damage to the appliance or abnormal situations
(EN) DEFROSTING
When the ambient temperature is below a certain value, the appliance activates the low temperature operating mode (defrost). In this operating mode, the appliance alternates dehumidification cycles with ventilation-only cycles, in order to avoid the formation of ice on the battery.
Specifically:
- Ambient temperature above 20^ : the appliance does not activate any mode of operation at low temperature.
- Ambient temperature between 12^ and 20^ : the appliance alternates cycles of 35 minutes of dehumidification, followed by 8 minutes of ventilation only.
- Ambient temperature between 5°C and 12°C: the appliance alternates cycles of 25 minutes of dehumidification and 12 minutes of ventilation only.
When the appliance enters the defrost mode, the display (B7) displays the code E4.
WARNING: The appliance is equipped with a safety device (wait 3 minutes) that protects the compressor from overly frequent starts and stops.
(EN) CLEANING and MAINTENANCE
Before performing normal cleaning operations, turn off the appliance and disconnect it from the mains power supply.
For external cleaning, use a soft, dry cloth.
DO NOT immerse the appliance in water or spray it with liquids of any kind.
DO NOT use solvents or other cleaning chemicals.
Use a vacuum cleaner to remove dust from the air inlet/outlet grids.
(EN) AIR FILTER CLEANING
The appliance is equipped with a filter (A6). If the filter becomes dirty, the efficiency of the dehumidifier decreases.
It is advisable to clean the filter periodically. In cases of continuous use, ideally clean the filter every week:
- Turn off the appliance and disconnect the plug from the mains socket.
- Remove the Air Inlet Grid (A7)
- Pull out the filter (A6)
- To remove the dust deposited on the Filter (A6) use a vacuum cleaner. If the Filter (A6) is very dirty, it can be washed with warm water (temperature below 40^ C), then wait until it is completely dry before proceeding to the next point
- Reposition the Filter (A6).
- Reposition the Air Inlet Grid (A7).
(EN) CLEANING THE WATER COLLECTION TANK
Empty the water collection tank regularly; empty the tank at least every 3 days.
If the Water Collection Tank (A3) is dirty, it can be washed with cold or warm water:
- Turn off the appliance and disconnect the plug from the mains socket.
- Remove the Water Collection Tank and proceed with cleaning. Wait until the Water Collection Tank (A3) is dry.
- Carefully reposition the Water Collection Tank (A3).
(EN) TROUBLESHOOTING
During operation, the appliance may display error messages:
| E1 Humidity sensor faulty | |
| E2 Temperature sensor faulty | |
| E3 Ambient temperature below 5°C or above 40°C | |
| E4 Defrosting in progress | |
| E5 | The appliance has been in operation for more than 8 hours. The appliance will stop for 10 minutes and then resume operation. |
In the event that the appliance displays the codes E1 or E2, contact the nearest assistance centre.
(EN) DISPOSAL
PACKAGING
To respect the environment, the packaging material must be disposed of correctly, respecting the separate waste collection.
Check the provisions of your municipality.
USER INFORMATION
"Implementation of Directive 2012/19/EU on Waste Electrical and Electronic Equipment
(WEEE)”, pertaining to reduced use of hazardous substances in electrical and electronic equipment, as well as to waste disposal.
The symbol of the crossed-out wheelie bin on the equipment or on its packaging indicates that
the product must be disposed of separately from other waste at the end of its service life.
The user must therefore take the dismissed equipment to suitable separate collection centres for electrical and electronic waste.
For more details, please contact the appropriate local authority.
Suitable segregated collection of the equipment for subsequent recycling, treatment or environmentally friendly disposal helps prevent damage to the environment and to human health, and encourages the reuse and/or recycling of the materials that make up the equipment.
Abusive disposal of the product by the user shall result in the application of administrative fines in accordance with the laws in force.
(EN) LIMITED WARRANTY
1. SCOPE OF APPLICATION
1.1. Poly Pool S.p.A., with registered office in Via Sottocorna, 21/B, 24020 PARRE (BG) provides this Limited Warranty under the terms and conditions set forth herein for Ardes-branded products (hereinafter "Products").
This Limited Warranty includes only the Products in their original configuration, including any accessory equipment.
This Limited Warranty is not effective and therefore does not apply to consumable parts of the product, such as, where present, batteries inserted into Products, bulbs, filters, etc.
2. CONSUMER RIGHTS
2.1 This Limited Warranty is not affected by the rights of the consumer that are provided for by the national legislative provisions transposing Directive (EU) 2019/771 and subsequent amendments on guarantees for consumer goods (“Legal Warranty”).
The Limited Warranty does not replace, limit, impair or exclude the Legal Warranty, but is in addition to the latter. The consumer may, therefore, always assert the rights referred to in the Statutory Warranty against the seller, under the conditions and within the terms provided for by the aforementioned legislation.
3. PURPOSE OF THE WARRANTY
3.1 On the basis of this Limited Warranty, in the event that the lack of conformity of the Product due to manufacturing defects is ascertained and recognised, Poly Pool S.p.A. undertakes to repair or, at its discretion, replace the Products or components.
4. CASES OF EXCLUSION OF WARRANTY
4.1 This Limited Warranty does not apply in the event of breakages, malfunctions or otherwise defects caused by the following:
i) installation errors caused by negligence, imprudence, inexperience or carelessness;
ii) failure or incorrect compliance with the instructions and warnings contained in the manuals or on any additional instruction sheets;
iii) failure or incorrect maintenance of the products in the manner indicated by Poly Pool S.p.A.;
iv) poor storage of the Product;
v) tampering, modifications or interventions carried out by the End Customer or commissioned by the End Customer to third parties, and in any case not carried out by persons authorised by Poly Pool S.p.A;
vi) improper use and not in accordance with the normal use or intended use of the Product;
vii) aggravated damage caused by further use by the end customer once the possible malfunction or defect has already become apparent;
viii) any external factors both during installation and use of the Product not assignable or otherwise attributable to Poly Pool S.p.A.;
ix) if the model, serial code or label on the product has been deliberately counterfeited or erased;
x) loss of performance and/or visual appearance or such that the essence of the features is not compromised.
4.2 This Limited Warranty does not include clear defects immediately recognisable on delivery of the Product, nor defects or malfunctions caused by deterioration due to normal wear and tear.
4.3 This Limited Warranty is void if breakages, malfunctions, defects or faults are caused by products, parts or components manufactured by third parties other than Poly Pool S.p.A. to which the product is connected or with which it is otherwise used.
5. WARRANTY CLAIM REQUEST
5.1 For any request for support, the Consumer can contact customer support at ardes@polypool.it
For Italy, San Marino and Vatican City only, you can directly contact your nearest Authorised Technical Support Centre. Contact details can be found on the SUPPORT page on the www.ardes.it website.
5.2 In order to be able to activate this Limited Warranty, the End Customer must be in possession of a sales receipt and/or a purchase invoice for the product and/or delivery note and/or other document certifying delivery. Poly Pool S.p.A. reserves the right to refuse to provide this Limited Warranty if the End Customer does not provide at least one of these documents.
6. DURATION
6.1 The duration of this warranty is 2 years (hereinafter, the "Warranty Period") from the date of purchase of the product (and, therefore, from the date shown on the tax receipt and/or on the invoice) or, at the latest, from the date of delivery (resulting from the delivery note or other delivery documentation).
6.2 In the event of replacement, the original Warranty Period will continue to apply and will therefore not be renewed or extended.
7. REGIONAL SCOPE
7.1 This warranty is valid only for warranty services to be rendered in the European Union, Vatican City or San Marino.
(FR) AVERTISSEMENTS
natural_image
Warning symbol of a flame inside a triangle (no text or numbers)L'APPAREIL CONTIENT 52g de GAZ R290 (CLASSIFICATION D'INFLAMMABILITÉ A3).
AVERTISSEMENT
O APARELHO CONTÉM 52g de GÁS R290 (CLASSIFICAÇÃO DE INFLAMABILIDADE A3).
AVISO

- (IT) AVVERTENZE
- L'APPARECCHIO CONTIENE 52g di GAS R290 (CLASSIFICAZIONE INFIAMMABILITÀ A3).
- ATTENZIONE
- (IT) RISOLUZIONE DEI PROBLEMI
- WARNINGS FOR FLAMMABLE REFRIGERANT R290
- THE APPLIANCE CONTAINS 52g of R290 GAS (FLAMMABILITY CLASSIFICATION A3).
- WARNING
- MAINTENANCE INFORMATION
- Checks in the area
- • Work procedure
- - General work area
- - Check for the presence of refrigerant fluid
- • Presence of a fire extinguisher
- - Sources that do not generate combustion
- - Ventilated areas
- - Checks on the refrigeration system
- - Checks on electrical devices
- • Repairs on sealed components
- • Repairs to inherently safe components
- - Cables
- • Detection of flammable refrigerant fluids
- • Methods for spill detection
- - Removal and evacuation
- - Charging procedures
- - Decommissioning
- - Labelling
- - Recovery
- TRANSPORTATION, MARKING AND STORAGE OF UNITS USING FLAMMABLE REFRIGERANT FLUIDS
- Storage of equipment/appliances
- Storage of packed (unsold) equipment
- (EN) DESCRIPTION OF THE PARTS
- (EN) OPERATION
- Additional warnings before use
- Using the device
- ATTENTION: keep the appliance upright even when not in use or while in storage.
- Power ON / Stand-by OFF- Button B1
- Operating mode selection – Button B2
- NORMAL mode \* indicator B9
- AUTO mode A-indicator B10
- TIMER setting – Button B5
- Full Water Collection Tank Indicator – indicator B6
- (EN) CONTINUOUS WATER DISCHARGE
- (EN) DEFROSTING
- Specifically:
- (EN) CLEANING and MAINTENANCE
- (EN) AIR FILTER CLEANING
- (EN) CLEANING THE WATER COLLECTION TANK
- (EN) TROUBLESHOOTING
- (EN) DISPOSAL
- PACKAGING
- USER INFORMATION
- (EN) LIMITED WARRANTY
- SCOPE OF APPLICATION
- CONSUMER RIGHTS
- PURPOSE OF THE WARRANTY
- CASES OF EXCLUSION OF WARRANTY
- WARRANTY CLAIM REQUEST
- DURATION
- REGIONAL SCOPE
- (FR) AVERTISSEMENTS
- L'APPAREIL CONTIENT 52g de GAZ R290 (CLASSIFICATION D'INFLAMMABILITÉ A3).
- AVERTISSEMENT
- O APARELHO CONTÉM 52g de GÁS R290 (CLASSIFICAÇÃO DE INFLAMABILIDADE A3).
- AVISO
Brand : ARDES
Model : Sekko 12 ARDEHU12
Category : Dehumidifier