EDM 2TS - Steam cleaner Essentiel B - Free user manual and instructions
Find the device manual for free EDM 2TS Essentiel B in PDF.

| Product type | Handheld steam garment steamer (steam cleaner) |
| Brand | Essentiel B |
| Model | EDM 2TS |
| Power | 1500 W |
| Power supply | 220-240 V ~ 50/60 Hz |
| Steam flow | 20 g/min (2 flows: normal and reduced) |
| Water tank capacity | 25 cl (removable) |
| Heating time | 45 seconds |
| Auto standby mode | After 8 minutes of inactivity |
| Power cord length | 2.8 meters |
| Steam head | Stainless steel |
| Steam button | 2 positions: burst and continuous steam (with lock) |
| Indicator lights | Flashing red (heating), solid red (off), solid blue (ready), solid green (reduced flow) |
| Included accessories | 50 cl bottle adapter, lint brush, delicate fabric brush, hanging hook, storage bag |
| Dimensions (approx.) | 25 x 15 x 10 cm (estimated) |
| Weight (approx.) | 0.9 kg (estimated) |
| Maintenance | Empty the tank after each use; clean the head with a soft cloth; descale the nozzles with a stick soaked in white vinegar |
| Standby consumption | Not applicable (complete shutdown) |
| Warranty | Valid from the date of purchase, does not cover damage due to improper use |
Frequently Asked Questions - EDM 2TS Essentiel B
User questions about EDM 2TS Essentiel B
0 question about this device. Answer the ones you know or ask your own.
Ask a new question about this device
Download the instructions for your Steam cleaner in PDF format for free! Find your manual EDM 2TS - Essentiel B and take your electronic device back in hand. On this page are published all the documents necessary for the use of your device. EDM 2TS by Essentiel B.
USER MANUAL EDM 2TS Essentiel B
natural_image
Black hair dryer with digital lamp and Max scale indicator (no text or symbols on device body)Notice d'utilisation / User guide / Bedienungsanleitung / Gebruiksaanwijzing
We thank you for purchasing an Essentiel a brand product. We pay special attention to the RELIABILITY, the EASE OF USE and the DESIGN of our products.
We hope that you will be completely satisfied with this handheld steamer.
your product
Box contents
| 1 handheld steamer | 1 hanger hook |
| 1 x 50 cl bottle adapter | 1 carrying bag |
| 1 lint brush | 1 user manual |
| 1 brush for delicate fabrics |
Technical features
| Power: 1500 WVoltage: 220 - 240 V~ 50/60 HzSteam output: 20 g/min2 steam settingsPower/steam ready/low steam setting indicatorsDetachable tank capacity: 25 cl | Heating-up time: 45 secondsAuto-standby after 8 minutesPower cord length: 2.8 metresStainless steel steam headSteam button lock for continuous steaming |
| Product Information for power consumption and maximum time to reach applicable low power mode | |
| Power consumption in off mode | 0 W |
| Power consumption in standby | NA |
| The maximum time needed to automatically reach the applicable low power mode or condition | NA |
| Power consumption in network standby if all wired network ports are connected and all wireless network ports are activated | NA |
appliance description
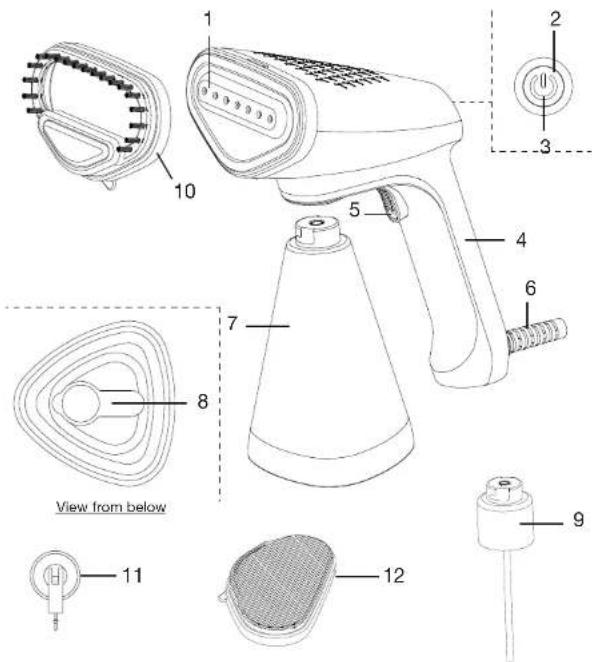
- Steam head
- On/Off button
- LED indicators:
- red, blinking: heating up
- red, steady (1 second): off
- blue, steady: ready to use
-
green, steady: low steam setting
-
Handle
-
2-Position steam button; pulsed/continuous output
-
AC power cord
- Detachable graduated tank
- Filling tab
- Small bottle adapter attachment
- Lint brush
- Hanging hook
- Delicate fabrics brush
before initial use
- Carefully remove the self-adhesive protective film from the steam head (1).
- Fully unwind the power cord.
- When using the appliance for the first time, allow it to operate for a few minutes to eliminate any manufacturing residues, then do a trial run on a small patch on the back or inside of the garment before proceeding to full steaming.
- Drops of water may drip from the steam head when the appliance is in use. This is normal.
- IMPORTANT NOTE: To prevent overheating, we recommend against plugging this appliance into the same socket as other appliances.
fi lling the water tank
- Turn the water tank (7) around and lift up the tab (8).
- Fill the tank via the filling hole.

What water should I use for steaming?
We recommend a half-and-half mixture of tap water and demineralised water. The proportion of demineralised water should be increased in hard water areas. Never use demineralised water on its own.
- Warning! Do not overfi ll beyond the "MAX" level mark. Tank capacity: 25 cl.
- Now put the tab back in place and return the tank to its operating position.
- Never immerse the appliance in water or any other liquid.
- Never add perfume, vinegar, starch, descaler or other products to the tank.
- Make sure you empty the tank after each use.
assembly
Fitting/removing the tank
- Insert the tank into its housing under the steam head by aligning the (unlocked) symbol on the tank with the symbol ▼ on the device, then swivel the tank towards the (locked) symbol.
• To remove, swivel the tank so that the (unlocked) symbol lines up with the symbol ▼
Fitting/removing the brushes
- Attach the lint brush (10) or the delicate fabrics brush (12) to the steam head (1) if needed to steam the chosen garment. The brushes should click securely into place.
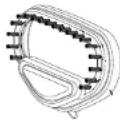
The lint brush protects and brushes the material to remove the lint. It is also perfect for delicate materials such as velvet and the thicker material used in suits, sofas, cushions, curtains and the like.
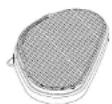
With the delicate fabrics brush, the steam comes into contact with the brush, not the garment. This makes it possible to steam delicate clothes such as dresses, formal wear, silk garments, etc.
- To remove the lint brush (10) or delicate fabrics brush (12), grasp it by the tab. - If you are using the steamer without either of the brushes, please leave a space of a few centimetres (to suit the material) between the steamer and the cloth.
Use the bottle adapter fi tting (9).
Your handheld steamer comes with a special fitting that attaches to a small 50 cl water bottle (instead of the tank) for use when travelling.
- Insert the tube (fixed to the fitting) into the bottle and firmly press and turn the fitting onto the bottle to make a hermetic seal.
- Place the fitting under the steam head by aligning the symbol ■ on the fitting with the symbol ▼ on the appliance, then gently turn the fitting anticlockwise to lock it in place.
WARNING:
. Never use bottles over 50 cl.
Although the adapter can be used on most water bottle brands, you should still check that it is compatible with your particular bottle and that it is securely fixed to it.
use
Your steamer is ideal for getting rid of creases in clothes and curtains and refreshing your garments.
Switching on
- Install the hanging hook on the wall and hang the garment you want to steam on a hanger.
- Plug the steamer into a mains outlet and press the on/off button. The LED indicator blinks red while the water is heating up (approximately 45 seconds).
- When the indicator turns to a steady blue, the appliance is ready to use.
- To select the low steam output settings (for very delicate clothes), press the on/off button again. The LED indicator turns green.
- Press the steam pulse button (5) to release the steam. This button can also be locked for continuous steaming.
- Press the steamer head against the garment with one hand, and stretch it out with the other. Use top-down movements.

WARNING: BURN RISK! Never touch the steam head when in use.
- To turn off the steamer, press and hold the on/off button for 3 seconds. The LED indicator comes on for 1 second, then goes out.
- NOTE: The appliance may vibrate slightly and make a pumping noise when steam is generated: this is normal. It shows that water is being pumped through the system.
Standby
- The steamer switches to standby automatically after 8 minutes of not being used. This is a safety feature and saves energy.
How to remove creases
- After washing your clothes, it is best to hang them up on hangers to minimise creasing while drying. This makes ironing much easier. The final step is to remove the creases directly on the hangers.
- You can steam the most delicate materials from the inside of the garment. You also have the option of using one of the brushes provided with the appliance.
- Do not use your hand to support the garment you are steaming.
- Make sure you empty the pockets before steaming.
- Do not steam metal accessories such as buttons, zip fasteners, embellishments or print - work around them instead.
- To prevent burns, always aim the steam away from yourself and never at someone. Never steam a garment that is being worn.
- For best results, do up the top button on shirts, etc. to help smooth out the material.
- To steam the sleeves, start at the shoulder and move the steamer head downwards and towards the cuff.
- For best results on clothes that are badly creased or very thick like jeans, use an iron instead.
- Wash and hang up the curtains and allow to dry. When you steam the curtains, gently stretch out the material with one hand while making top-down movements with the steamer to get rid of the creases.
- You can also refresh upholstery (e.g. on sofas, cushions, etc.) with your steamer. Begin by testing a small patch of the material. Use the steamer in the upright position. The cushions can be removed so that they can be steamed upright. When you have finished steaming them, allow them to dry completely before putting them back on the sofa.
cleaning and maintenance
WARNING:
- Always unplug the appliance from the mains outlet and allow it and its accessories to cool completely before cleaning or maintenance.
- Never immerse the appliance or power cable in water or any other liquid.
Do not use abrasive products to clean the appliance.
Emptying and cleaning the water tank
- The water tank should be emptied after each use to prevent unpleasant odours and limescale build up.
- Rinse the tank out with tap water. Do not descale.
Cleaning
- Remove the lint from the lint brush (10) by hand.
- Use a slightly damp soft cloth to clean the outer surfaces of the steamer and the two brushes. If necessary, a you can use a mild detergent such as washing up liquid.
- Make sure that the steam head holes are not blocked by limescale. If they are, use a cotton bud soaked in white vinegar to unblock them.
Storage
- To prevent damage, do not wind the power cord around the appliance when storing it.
- Store your appliance upright in its storage cover, perhaps in a wardrobe or closet for example.
troubleshooting guide
Before contacting the service desk please carry out checks listed below. If this does not solve your specific problem, please contact your retail store service desk. Never attempt to repair the appliance yourself.
| Problem Possible causes and solutions | |
| The steamer is not producing any steam and the on/off button LED indicator is off. | ·Check that your appliance is connected properly to a mains outlet.·Check the power cord.·Check that the power outlet in your home is working properly. |
| There is no steam coming out of the fi tting even though the LED indicator is on. | ·The water level in the tank is either too low or it is empty. Fill it up.·Press the steam button.·Keep the steamer upright. |
| Water is leaking from the tank. | ·Make sure that the water level in the tank is not above the maximum fi ll level mark.·Make sure that the tank locking tab it is hermetically sealed.·Use the steamer in the upright position. |
| The steamer is making a pumping noise. | ·Check the water level in the tank. If the tank is empty or the water level is too low, fi ll it up. |
| The steamer is not removing the creases properly. | ·Stretch out the material with one hand and keep the steamer upright.·If the material is too thick or too creased, use an iron instead. |
| When should I use the brushes? | ·You should use the brush on delicate fabrics such as silk to prevent it from getting wet.·You should use the lint brush to remove lint and animal hair, on velvet jackets, etc. |
| The brush will not attach properly to the steam head. | ·The clips or fi xing notches are damaged. Contact your retail store service desk to replace the damaged brush. |
All information, designs, drawings and pictures in this document are the property of SOURCING & CREATION. SOURCING & CREATION reserves all rights to its brands, designs and information. Any copy and reproduction through any means shall be deemed and considered as counterfeiting.
Protection of the environment
This symbol attached to the product means that it is an appliance whose disposal is subject to the directive on waste from electrical and electronic equipment (WEEE). This appliance may not in any way be treated as household waste and must be subject to a specific type of removal for this type of waste. Recycling and
recovery systems are available in your area (waste removal) and by distributors. By taking your appliance at its end of life to a recycling facility, you will contribute to environmental conservation and prevent any harm to your health.
Umweltschutz
\* Tested in our laboratories
Warranty valid from the date of purchase (receipt as proof of purchase). This warranty does not cover defects or damage caused by improper set up, incorrect use, or normal wear and tear of this product.
\* In unseren Labors getestet
SERVICE RELATION CLIENTS / Customer Relations Department / Kundenservice / Klantenafdeling
Avenue de la Motte CS 80137 59811 Lesquin cedex
Art. 8008723 Ref. EDM 2TS
FABRIQUÉ EN R.P.C. / Made in China / Hergestellt in VR China / Gefabriceerd in VRC.
SOURCING & CREATION Avenue de la Motte 59810 Lesquin - FRANCE contact@sc-ub.com