ERSC-4262b - Heating Essentiel B - Free user manual and instructions
Find the device manual for free ERSC-4262b Essentiel B in PDF.

| Product type | Fan heater |
| Brand | Essentiel B |
| Model | ERSC-4262b |
| Heating power | 1 300 W / 2 000 W (min/max) |
| Power supply | 220-240 V ~ 50/60 Hz |
| Dimensions (L x D x H) | 23.2 x 18.7 x 65.8 cm |
| Weight | 2.8 kg |
| Power cord length | 1.6 m |
| Set temperature | 15°C to 35°C |
| Operating modes | Eco, Frost protection (7°C) |
| Timer | 24 hours (delayed stop and delayed start) |
| Oscillation | Yes, angle approx. 80° |
| Display | Digital |
| Remote control | Yes, with CR2032 battery included |
| Tip-over safety | Yes |
| Auto standby | After 12 hours without change |
| Overheat protection | Shutdown with "EE" display |
| Memory function | Keeps settings after power cut |
| Dust filter | Washable, regular maintenance recommended |
| Recommended heating area | Up to 20 m² |
| Not bathroom compatible | Yes |
| Carrying handle | Yes |
| Warranty | From date of purchase (subject to conditions) |
Frequently Asked Questions - ERSC-4262b Essentiel B
User questions about ERSC-4262b Essentiel B
0 question about this device. Answer the ones you know or ask your own.
Ask a new question about this device
Download the instructions for your Heating in PDF format for free! Find your manual ERSC-4262b - Essentiel B and take your electronic device back in hand. On this page are published all the documents necessary for the use of your device. ERSC-4262b by Essentiel B.
USER MANUAL ERSC-4262b Essentiel B
natural_image
Modern digital temperature control tower with heat exchanger and control panel (no visible text or symbols)Notice d'utilisation / User guide / Instrucciones de uso / Bedienungsanleitung / Gebruiksaanwijzing
This product may only be used in well-insulated rooms or occasionally.
natural_image
Line drawing of a vacuum cleaner with labeled part '6' (no text or symbols on the device itself)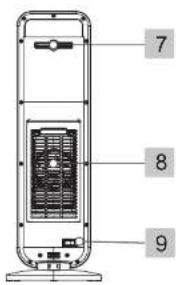
| FR EN ES DE NL | |||||
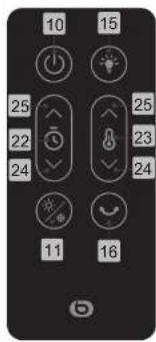
| 1 | Pognée de transport | Carrying handle | Aes de transporte | Transportgrift | Transportbandgreep |
| 2 | Bendeau de commande avec touchbas tachiles at sifoneur | Control panel with touch-sensitive buttons and display | Panel de control con techas tachiles y pantala | Bedienfeld mit Touch-Testan und Anzige | Bedieringspareel met touchbuttons en schom |
| 3 | Soria de l'air Air vent Salido | cei are Luftauslas Lichtuillast | |||
| 4 | Grills de protection | Protective cover | Rejita de protacción | Schutzgitter | Boschemroaster |
| 5 | Base | Base | Base | Socket | Vet |
| 6 | Cable d'alimentation | Power cord | Cable | Stronikabel | Viedingskapael |
| 7 | Rangement de la télécommande | Remote control storage | Espacio para guardar elmando a distancia | Aufbewahrung der Fennbedierung | Opslag van de afstandsbediening |
| 8 | Brilla de protection aníbra avec filtre anti poussage | Heat protective cover with dust filter | Rejita de protacción trascola con filtro antipovo | Hinteres Schutzpiter mit Anti-Staub-Filter | Beschenmroaster achterzijds mit antistoftifier |
| 9 | Interruptour marché/arrêt | Main button | Interruptor encoendido/sapagado | Schäter Start/Stopp | Hoofd-knop |
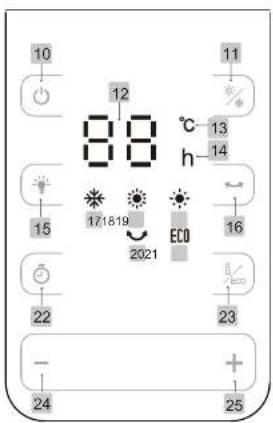
| 10 | Bouton de marche/mise en veille | On/stendby mode button | Rotón de encandido/suspensión | Knop! En/Standby Aar | Full-knop |
| 11 | Bouton de selección de la puissance/Moda hora gel | Power selector/Ant-freeze mode button | Botón de selección de la potencia del vapor/modo archeladas | Knop! zur Auswahr der Leistungstufe/Hostschutzmodus | Knop voor het kizen van het vermogen/Vorstvrij modus |
| 12 | Afchage de la température/minuterie | Temperature/timer display | Visualización de la temperature/temperizador | Anzige Températur/Zeilschatuhr | Temperatuurworga-ve/liner |
| 13 | Voyant da température | Temperature light | Indicator de temperatura | Kontrollkauchte Temperatur | Temperatuurampje |
| 14 | Voyant de minuterie | Timer light | Indicator de temporizador | Kontrollkauchte Zeilschatuhr | Timerampje |
| 15 | Bouton marche/arrêt de l'affichage | Display on/off button | Botón de encandido/apogado de la pantalla | Enn-/Aus-Knopf der Anzige | Aeruit-knop van de voorgowe |
| 16 | Bouton oscillation | Oscillation button | Botón de oscillation | Oscillatorstaate | Oscillatorsknop |
| 17 | Voyant du mode hors gel | Anti-freeza mode light | Indicator del modo Antiheladas | Kontrollkauchte Frostschutzmodus | Signaalampje vorstvri modus |
| 18 | Voyant da puissance élèvise | High power light | Indicator de potencia alta | Kontrollkauchte Hohà Leistung | Signaalampje hoog vermogen |
| 19 | Voyant de puissance fabie | Low power light | Indicator de potencia baja | Kontrollkauchte Niedrge Leistung | Signaalampje laag vermogen |
| 20 | Voyant de fonction oscillation | Oscillation function light | Indicator de función oscillación | Kontrollkauchte Dextillation | Lampje oscillatotuncia |
| 21 | Voyant du modo Éco | Eco modo light | Indicator del modo Eco | Kontrollkauchte Eco-Modus | Lampje econodus |
| 22 | Bouton de réglage de la minuterie | Timer control knob | Selector de ajuste del temporizador | Enstellknopf der Zeitschatuhr | Regelknop van de tijd |
| 23 | Bouton de réglage de la température/moda Eco | Temperature control/Eco mode button | Botón de ajuste de la temperatura/moda Eco | Enstellstaate für Températur/Eco-Modus | Knop temperatuur-replinge/Eco modus |
| 24 | Bouton - | - button | Botón - | Minustaste (-) | Knop - |
| 25 | Bouton + | + button | Botón + | Plustaste (+) | Knop + |
natural_image
Line drawing of a vertical tower connected to a power outlet cable (no text or symbols)
flowchart
graph LR
    A["Device with four windows"] --> B["Conversion to next panel"]
    B --> C["Final state"]
natural_image
Technical line drawing of a vertical cylindrical device with internal fan and control panel (no text or symbols)We thank you for purchasing an Essential brand product. We pay special attention to the RELIABILITY, EASE OF USE and DESIGN of our products
We hope that you will be fully satisfied with this space heater.
contents
your product 18
Contents of the box 18
Technical features 18
datasheet 19
use 21
Using the remote control 24
Automatic standby mode 25
Tlp-over safety feature 25
Memory function 25
Protection function If there is an abnormally high temperature 25
cleaning and maintenance 26
Filter maintenance
your product
Contents of the box
- 1 space heater
• 1 remote control
• 1 CR2032 3V battery
• 1 user guide
• 1 safety instructions booklet
Technical features
• Supply voltage: 220-240 V-
• Mains frequency: 50/60 Hz
- Remote control with 1 CR2032 3V battery included
• 2 heating powers: 1300 & 2000 W
• Electronic thermostat from 15°C to 35°C
• Digital display
• Eco and anti-freeze modes
• 24-hour Timer
• Delayed start and shutdown
• Single position or oscillating (at around 80°)
• Tip-over safety feature
• Automatic standby mode after 12 hours
• Memory function if there is a power cut
• Protection function if there is an abnormally high temperature
- Carrying handle
• Power cord length: 1.6 m
• Weight: 2.8 kg
• Ideal for rooms up to 20 m² in size
• Not bathroom compatible
- Dimensions (L x D x H): 23.2 x 18.7 x 65.8 cm
datasheet
| Model number: | 8009997 Space Heater Essentiel B ERSC-4262b | |||||
| Feature Symbol | Value Unit | Feature Yes/ | No | |||
| Thermal output | Type of heat gain, only for decentralised electrical thermal storage room heaters (select one type) | |||||
| Nominal thermal output | Pnom 2.0 kW Manual thermal control of the load with built-in thermostat | NA | ||||
| Minimum thermal output (indicative) | Pmin 1.0 kW Manual thermal control of the load with information received about room and/or outdoor temperature | NA | ||||
| Continuous maximum thermal output | Pmax,c 2.0 kW Electronic control of the load with information received about room and/or outdoor temperature | NA | ||||
| Auxiliary power consumption Fan regulated thermal output | Output | NA | ||||
| At the nominal thermal output | elmax NA kW Type of thermal output/room temperature control (select one type) | |||||
| At the minimum thermal output | elmin NA kW Single-stage thermal output control, no room temperature control | No | ||||
| In standby eISB | 0.00021 kW Thermal output control at two or more manually set stages, no room temperature control | No | ||||
| Room temperature control with mechanical thermostat | No | |||||
| Feature Symbol | Value Unit | Feature | Yes/ | No | ||
| Electronic room temperature control | Yes | |||||
| Electronic room temperature control and daily timer | No | |||||
| Electronic room temperature control and weekly timer | No | |||||
| Other control options (select one or more options) | ||||||
| Room temperature control with presence detector | No | |||||
| Room temperature control, with open window detector | No | |||||
| Remote control option No | ||||||
| Adaptive activation control | No | |||||
| Limited ON time Yes | ||||||
| Black globe sensor No | ||||||
| Contact details: Sourcing & Création, Avenue de la Motte 59810 LESQUIN - FRANCE | ||||||
use
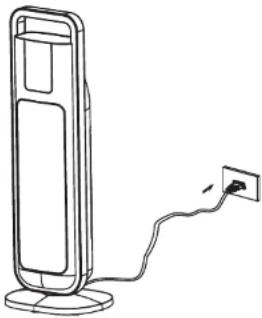
Place the device on a flat and stable surface.
natural_image
Line drawing of a vertical tower with a cable and a small plug inserted into the wall (no text or symbols)
- Make sure the main switch (9) at the rear of the device is in the "0" (off) position, then plug the power cord (6) into the mains socket.

- Put the main switch (9) in the "I" (on) position: the device beeps twice and the screen displays "--", indicating that the device entered standby mode.

- Press the on/standby mode button(10): the device beeps once and turns on at low power, represented by the appearance of the light (19) on the control panel.
NOTE: When you turn the device on for the first time or after unplugging it and plugging it back in, it turns on at low power, to a temperature of 35^ C.
4. Oscillation

Press the oscillation button ☺ (16) If you want to enable oscillation: the device beeps once and oscillates from left to right and back at an 80° angle; the light ☺(20) appears on the control panel. To stop the oscillation, press the button ☺(16) again.
5. Power selector/anti-freeze mode

Press the power selector/anti-freeze mode button × (11) once or several times to switch from the lowest power to the highest power, then to the anti-freeze mode and so on.
1) To set the heating power:
- For the lowest heating power, the light ⚙ (19) is displayed on the control panel.
- For the highest heating power: the light ⚙ (18) is displayed on the control panel.
2) For the anti-freeze mode: the light ✪ (17) is displayed on the control panel.
The device automatically maintains the room temperature at 7^ C. If the room temperature is high, the heater enters standby mode.
In the anti-freeze mode, you cannot change the default temperature (7°C).
6. Adjusting the temperature/Eco mode

1) Push the temperature control button 8rec (13) once. The display (12) flashes. You then have 3 seconds to set your choice of temperature between 15 and 35°C using the + (25) and - (24) buttons. The temperature is saved automatically after 3 seconds and the display stops flashing.
When the desired temperature is reached, the device stops running. It automatically restarts when the temperature in the room drops again.
2) Push the button 1eco (13) a second time to switch to Eco mode. The light ECO (22) appears on the control panel.
The Eco mode allows the heating power to be set automatically, without your involvement, using a temperature sensor that detects the temperature in the room in order to save energy.
The device automatically selects:
- high heating power if the room temperature is below or equal to 18^ C;
- low heating power if the room temperature is between 18°C and 25°C;
- off if the room temperature is above 25^ C (it enters standby).
To turn off the Eco mode, press the button 1eco (13) again. The most recently selected settings are reactivated.
NOTES:
- The control panel shows the set temperature and not the temperature in the room.
- If you press and hold the + (25) or - (24) button, the numbers will cycle through faster.
7. Screen Light On/off

Press the button (e5) to turn the screen light on or off.
8. Programming a delayed shutdown
This function is used to set the operating time after which the device will automatically shut down.

- With the device plugged in and operating, press the timer control button ⏻ (22). The light h (14) appears and the display (19) flashes.
You then have 3 seconds to set your choice of duration between 1 and 24 hours using the + (25) and - (24) buttons. - Once the selected duration elapses, the device automatically shuts down and enters standby mode.
NOTE: The control panel alternates between showing the set temperature and the timer countdown.
- To change the timer, push the button ⏻ (22) and use the + (25) and - (24) buttons to set another timer.
- To turn off a timer, push the - button (24) until the display reads "0", which indicates that no timer is on.
9. Programming a delayed start
This function is used to set the time after which the device will automatically turn on.
-
With the device plugged in and the main switch (9) in the "I" position (on), turn the appliance on using the on/standby mode button (10).
-
Select your choice of power (button / ✘ (11)) and temperature (button / ecc (13)). You also have the option of turning on the oscillation.
- Put the device in standby mode by pushing the on/standby mode button ⏻ (10). The screen displays “--”.
- Push the timer control button (22), the device beeps and the screen displays
"1 h". You then have 3 seconds to set your choice of duration between 1 and 24 hours using the + (25) and - (24) buttons. - To turn off the timer, press the timer button (22), the device beeps, then, press the - button (24) until the display reads "0".
After a few seconds, the display shows "--", indicating that the programming is turned off and the device is in standby mode.
NOTES:
- The selected time flashes on the screen until the device is turned on.
- Turning off the display is not possible in this mode.
10. When you have finished
Push the on/standby mode button (10): heating and oscillation stop. The internal fan continues to run for 30 seconds to cool the device down. A countdown appears on the control panel. After 30 seconds, the device enters standby mode, represented by the appearance of “--” on the control panel.
Switch the main switch (9) to the "0" position (off) and unplug the device.
Note: do not switch the main switch to the "0" position (off) or unplug the device before it has entered standby mode and if a delayed start has been programmed.
Using the remote control
The remote control has the same functions as the control panel. Please refer to the diagrams in the beginning of the user guide.
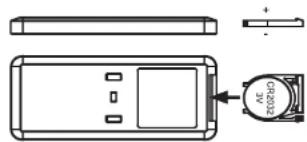
To insert or replace the battery in the remote control:
Remove the battery holder on the back of the remote control as indicated above (press down to unlock the holder and remove it):

flowchart
graph LR
    A["Rectangular Device"] --> B["Arrow to next rectangle"]
    B --> C["Circle Component"]
Insert a CR2032 3V battery (included) respecting the indicated + and - polarities.
natural_image
Technical line drawing of a device casing with internal components and a labeled component (no text or symbols present)Then, put the battery holder back in the remote control.
Automatic standby mode
After 12 hours of continuous operation with no changes to settings during this time or no programmed delayed shutdown, the device turns off automatically and enters standby mode.
Tip-over safety feature
If the device tips over, it enters standby mode. When you put it back on a flat, horizontal surface, it restarts normal operation. This also turns off programmed delayed starts or shutdowns.
Memory function
The device has a memory function that saves the latest settings in the event of a power outage.
This feature does not apply when the main switch (9) is in the "0" position (off) or if the device is unplugged.
Protection function If there is an abnormally high temperature
If the ambient temperature sensor detects a temperature above 55^ C or if the air outlet is obstructed, the heater will turn off and the screen will display "EE".
The device will not restart automatically.
Set the main switch (9) to the "0" position (off), unplug the device and leave it to cool. You can restart the heater once the ambient temperature has dropped below 45°C or once the device has cooled down.
cleaning and maintenance
IMPORTANT:
- Always unplug the power cord from the mains and allow the device to cool before cleaning or maintenance.
- Never immerse the appliance in water or any other liquid.
For optimal operation, the device requires regular maintenance;
- Wipe the outer surfaces of the device using a soft, slightly damp cloth to remove dust and dirt. Never use abrasive cleaning products on this device (alcohol, solvent, etc.).
- Use a vacuum cleaner to remove dust from the grilles.
- Make sure the device is completely dry before plugging it back in.
- If not used for an extended period, turn off and unplug the device, then store it in a clean dry place.
Filter maintenance
Regular filter maintenance ensures the device will operate optimally. Please follow the steps below:
- Remove the rear protective cover using the provided notches (see image opposite). You can then access the dust filter installed behind the cover.
- Vacuum any dirt on the filter and cover.
- If necessary, you can rinse the cover and filter with clean water.
• After checking that the cover and filter are completely dry,
reinstall them on the device: - position the filter behind the protective cover by sliding it under the retaining notches, then,
- clip the protective cover onto the device. It should fit into the provided notches.

natural_image
Technical line drawing of a vertical cylindrical device with internal components and mounting base (no text or symbols)natural_image
Line drawing of a tower-mounted device with a cable and power outlet, no text or symbols present
flowchart
graph LR
    A["Rectangular Device"] --> B["Device with Circular Connector"]
mS
natural_image
Technical line drawing of a device casing with internal components and a close-up view of the lid (no text or symbols)natural_image
Technical line drawing of a vertical cylindrical device with internal components and base (no text or symbols)natural_image
Line drawing of a vertical tower connected to a power outlet (no text or symbols)
flowchart
graph LR
    A["Device with four windows"] --> B["Change to next panel"]
    B --> C["Final state"]
natural_image
Technical line drawing of a vertical electronic device with internal components and mounting base (no text or symbols)natural_image
Line drawing of a vertical tower with a cable and plug inserted, no text or symbols present
flowchart
graph LR
    A["Device with four ports"] --> B["Change to next port"]
    B --> C["Final state"]
natural_image
Technical line drawing of a vertical tower with internal grid structure and base mount (no text or symbols)All information, designs, drawings and pictures in this document are the property of SOURCING & CREATION. SOURCING & CREATION reserves all rights to its brands, designs and information. Any copy and reproduction through any means shall be deemed and considered as counterfeiting.
Protection of the environment
This symbol attached to the product means that it is an appliance whose disposal is subject to the directive on waste from electrical and electronic equipment (WEEE). This appliance may not in any way be treated as household waste and must be subject to a specific type of removal for this type of waste. Recycling and recovery systems are available in your area (waste removal) and by distributors. By taking your appliance at its end of life to a recycling facility, you will contribute to environmental conservation and prevent any harm to your health.
• Tested in our laboratories
Warranty valid from the date of purchase (receipt as proof of purchase). This warranty does not cover defects or damage caused by improper set up, incorrect use, or normal wear and tear of this product.
Please behave responsibly towards the environment. Recycle this product at the end of its life.