
MD 13100 - Refrigerator MEDION - Free user manual and instructions
Find the device manual for free MD 13100 MEDION in PDF.

User questions about MD 13100 MEDION
0 question about this device. Answer the ones you know or ask your own.
Ask a new question about this device
Download the instructions for your Refrigerator in PDF format for free! Find your manual MD 13100 - MEDION and take your electronic device back in hand. On this page are published all the documents necessary for the use of your device. MD 13100 by MEDION.
USER MANUAL MD 13100 MEDION
natural_image
Line drawing of a portable kitchen appliance with ventilation grilles and control buttons (no text or symbols)Kühlbox mit Wärmefunktion Glacière avec fonction de chauff age Koelbox met Verwarmingsfunctie Caja de refrigeración con función de calor Frigorifero con funzione di riscaldamento Cooling Box with heating function
MEDION MD 13100
Inhaltsverzeichnis
natural_image
Illustration of a portable air purifier device with a close-up inset showing the internal structure (no text or symbols)natural_image
Diagram showing a device with directional arrows indicating rotation or movement (no text or symbols)Abb. 4 - Gurt verbinden
natural_image
Diagram of a mechanical joint or grip with rotational arrows indicating movement (no text or symbols)natural_image
Illustration of a belt buckle being adjusted, showing a scroll and belt (no text or symbols)natural_image
Technical line drawing of a mechanical device with a downward arrow indicating motion or assembly (no text or symbols)17. Impressum
Copyright 2025
natural_image
Illustration of a portable electronic device with a close-up inset showing the interior compartment (no text or symbols)Fig. 3 - Enfiler la sangle
natural_image
Diagram showing a device with directional arrows indicating rotation or movement (no text or symbols)Fig. 4 - Attacher la sangle
natural_image
Diagram of a tennis racket grip with motion arrows indicating movement (no text or symbols)Fig. 5 - Bloquer l'attache
natural_image
Diagram of a belt buckle being adjusted, showing force direction (no text or symbols)Fig. 6 - Serrer la sangle
natural_image
Technical line drawing of a mechanical device with a vertical shaft and base component, showing a downward shift arrow (no text or symbols)natural_image
Illustration of a portable appliance with a handle and ventilation slots, shown in 3D (no text or symbols)natural_image
Diagram showing a device with directional arrows indicating movement or force (no text or symbols)natural_image
Diagram of a mechanical component with rotating arrows indicating motion (no text or symbols)natural_image
Illustration of a belt buckle being adjusted with arrows indicating motion (no text or symbols)natural_image
Technical line drawing of a mechanical device with a base and adjustment knob (no text or symbols)17. Colofon
Copyright 2025
Fig. 1 – Vista exterior
natural_image
Illustration of a portable air purifier device with a close-up inset showing the internal structure (no text or symbols)Fig. 3 - Insertar la correa
natural_image
Diagram showing a device with directional arrows indicating rotation or movement (no text or symbols)Fig. 4 - Unir la correa
natural_image
Diagram of a basketball hoop with rotation arrows indicating movement (no text or symbols)natural_image
Diagram of a belt buckle being adjusted, showing rope movement with arrows indicating direction (no text or symbols)Fig. 6 - Apretar la correa
natural_image
Technical line drawing of a mechanical device with a base and adjustment knob, no text or symbols presentFig. 7 – Cambiar el fusible (Similar a la figura)
MEDION Service Center
ENAME, S.A
17. Aviso legal
Copyright 2025
Fig. 1 – Vista esterna
natural_image
Illustration of a portable electronic device with a close-up inset showing the internal structure (no text or symbols)Fig. 3 - Infilare la tracolla
natural_image
Diagram showing a device with directional arrows indicating rotation or movement (no text or symbols)Fig. 4 - Far passare la tracolla
natural_image
Diagram of a tennis racket grip with motion arrows indicating movement (no text or symbols)natural_image
Diagram of a belt buckle being adjusted, showing force direction (no text or symbols)Fig. 6 - Stringere la tracolla
natural_image
Technical line drawing of a mechanical device with a downward arrow indicating motion or assembly (no text or symbols)17. Note legali
Copyright 2025
- Information about this user manual ....84
1.1. Explanation of symbols.... 84 FR - Proper use 85
- Safety instructions .....85
3.1. Handling the appliance ....87 - Package contents .....88
- Appliance overview 89
- Preparing the cool box....89 IT
6.1. Connecting the cool box to an earthed socket....89
6.2. Connecting the cool box to an on-board socket 89
6.3. Securing the cool box in the car 90
6.4. Attaching the carrying strap to the cool box 90 - Using the cool box....91
- Tips for saving energy 91
- Cleaning and maintenance 92
9.1. Changing the fuse in the 12 V universal plug....92 - Troubleshooting 93
- Longer periods without use ....94
- Disposal....94
- Technical specifications....95
13.1. Product data sheet 95 - EU declaration of conformity....96
- Spare parts 96
- Service information....96
- Legal Notice....96
1. Information about this user manual

Thank you for choosing our product. We hope you enjoy using this appliance.
Please read the safety instructions and the user manual carefully before using the appliance for the first time. Note the warnings on the appliance and in the user manual.
Always keep the user manual close to hand. If you sell the appliance or give it away, please ensure that you also pass on this user manual. It is an essential component of the product.
1.1. Explanation of symbols
If a block of text is marked with one of the warning symbols listed below, the hazard described in that text must be avoided to prevent the potential consequences described there from occurring.

DANGER!
Warning: risk of fatal injury!

WARNING!
Warning: risk of possible fatal injury and/or serious irreversible injuries!

CAUTION!
Warning: risk of minor and/or moderate injuries!

NOTICE!
Follow these instructions to prevent damage to the appliance!

More detailed information about using the appliance!

Follow the instructions in the user manual!
WARNING!
Warning: risk of electric shock!

Symbol for protection class II electrical appliances

Symbol for direct current (DC)

Symbol for alternating current (AC)
2. Proper use
This appliance is intended for cooling and warming foods and drink bottles.
This appliance is intended for private use. However, it is not designed for use in areas similar to domestic settings, such as:
- Staff kitchens in shops, offices and other workplaces
- In agriculture and by guests in hotels, motels and other types of accommodation
• Bed-and-breakfast establishments - Catering establishments and wholesale use
The manufacturer accepts no liability for damages if the appliance is used for purposes other than cooling and warming foods and drink bottles.
Please note that we shall not be liable in cases of improper use:
Do not modify the appliance without our consent and do not use any auxiliary equipment that we have not approved or supplied.
▶ Only use replacement parts or accessories that we have supplied or approved.
Comply with all the information in this user manual, especially the safety instructions. Any other use is considered improper and can cause personal injury or property damage.
3. Safety instructions
IMPORTANT SAFETY INSTRUCTIONS – READ CAREFULLY AND KEEP FOR FUTURE REFERENCE!
■ This appliance can be used by children of 8 years and older, and by people with reduced physical, sensory or mental capacity, or with a lack of experience and/or knowledge, but only with proper supervision, or if they have been told how to use the appliance safely, and have understood the risks involved if they use it improperly.
■ Children must not be allowed to play with the appliance.
■ Cleaning and user maintenance must not be carried out by children unless they are supervised.
■ Children between the ages of 3 and 8 are allowed to load and remove items from refrigerating appliances.

WARNING!
Risk of electric shock!
There is a risk of electric shock due to live parts.
■ Only connect the cool box to a properly installed, earthed socket, on-board socket with mains voltage as per the type plate. The appliance can be connected to a mains voltage range of 220–240 V, to a 12 V-on-board socket of your car, boat or campervan. Never use these connections simultaneously.
■ The socket must be easily cessible so that you can unplug the appliance from the mains quickly if necessary.
■ WARNING! Ensure the mains cable used does not become a tripping hazard. Do not use an extension cable.
■ WARNING! Do not allow the mains cable used to become trapped or damaged during installation.
■ WARNING! Do not place portable power strips or power supplies in the immediate vicinity of the appliance.
■ To avoid fires and short-circuits, never open the lid housing or insert objects into the vents.
■ Place the cool box in a location that is protected from the effects of weather such as wind, rain, splashing or dripping water.
■ If there is damage to the mains connection cable on this appliance, it must be replaced by the manufacturer, its customer service department or another suitably qualified person. This is necessary to avoid hazards.
■ Always unplug the appliance from the socket before cleaning or servicing.
■ Do not allow the mains cable to come into contact with hot or sharp-edged objects.
■ Do not use if the appliance or the mains cable is visibly damaged or if the appliance has been dropped.
■ Do not immerse the appliance in water or other liquids, hold it under running water or use it in damp environments, as this may result in an electric shock.
■ Unplug the appliance from the socket:
- when you are cleaning the appliance
- if the appliance is damp or wet
- when the appliance is un- attended
- when you are no longer using the appliance
■ Do not use the cool box on a damp or wet surface.
■ Never touch the appliance or the mains cable with damp or wet hands.
3.1. Handling the appliance
■ WARNING! Make sure that the vents on the lid are not blocked.
■ To ensure good ventilation of the cool box, make sure that the cool box is at least 15 cm away from other objects on each side.
■ Do not expose the appliance to extreme conditions. Avoid: IT
– high humidity or wetness (to prevent condensation in the cool box)
- extremely high or low temperatures
- direct sunlight
- other sources of heat (heating, gas ovens etc.)
- naked flames.
■ Do not store any explosive materials, e.g. aerosol containers containing propellant gas, in the appliance.
■ Do not fill the cool box with unpacked ice or liquids.
■ If the lid is left open for a long time, this can cause the temperature inside the cool box to increase significantly.
■ Regularly clean all surfaces that come into contact with food.
■ If the appliance is not going to be used for a longer period of time, pull the mains
plug out of the socket and clean the appliance, leaving the cool box lid open to avoid unpleasant odours and to prevent mould from forming.
■ WARNING! Do not operate
electrical appliances inside the cool box that do not conform to the design recommended by the manufacturer.
■ Never use the appliance in an environment without an adequate supply of fresh air. If you are using the appliance in the car, switch on the car ventilation.
■ The appliance is suitable for use when camping. However, daily use over several months is not recommended.
4. Package contents

DANGER!
Risk of choking and suffocation!
There is a risk of choking and suffocation due to swallowing or inhaling small parts or plastic wrap.
- Keep the plastic packaging out of the reach of children.
- Keep all packaging materials used (bag, pieces of polystyrene etc.) out of the reach of children.
■ Do not allow children to play with the packaging material.
▶ Remove the product from the packaging and remove all packaging materials.
▶ Please check your purchase to ensure that all items are included and in perfect condition. If anything is missing or damaged, please contact us within 14 days of purchase.
The following items are supplied with your product:
- Cool box
or Mains cable with 12 V universal plug
- Mains cable with mains plug (220–240 V\~)
- Carrying strap
- Short manual
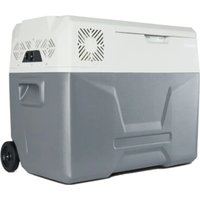
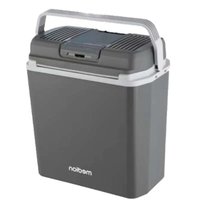
5. Appliance overview
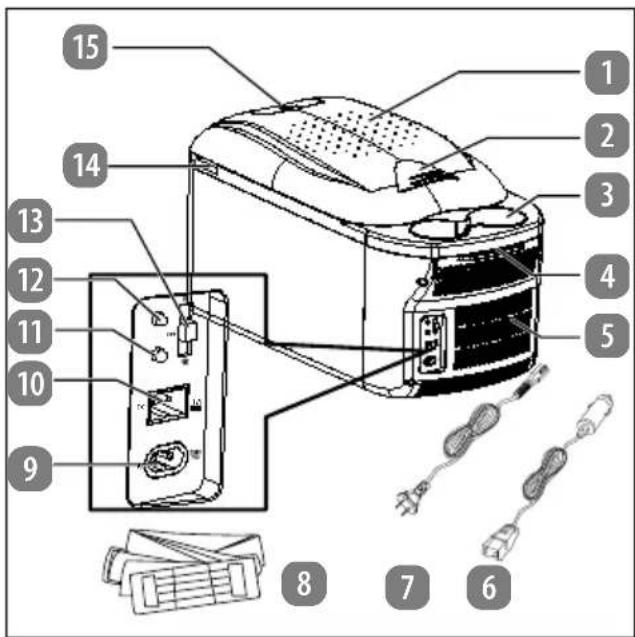
Fig. 1 - Exterior view
- Cool box lid
- Latch
- Drinks holder
- Carrying strap eyelet
- Vents
- Mains cable with 12 V universal plug/co-axial power connector, 12 V=---
- Mains cable with mains plug/two-pin plug 220–240 V\~
- Carrying strap
- Mains cable connection socket 220–240 V\~
- Mains cable connection socket 12 V ---
- Cooling operating light
- Heating operating light
- Operating switch*/OFF/
- Seat belt guide
- Cable compartment
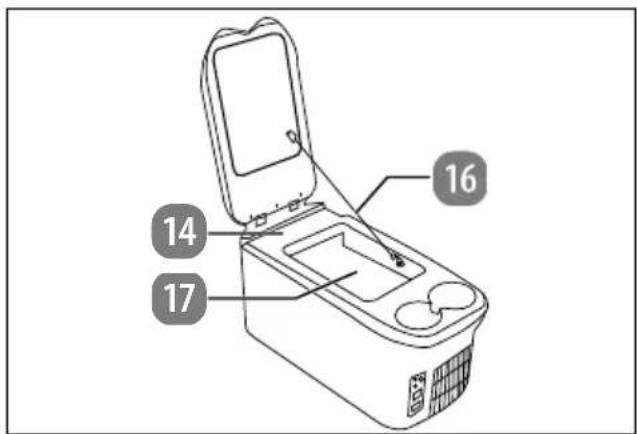
Fig. 2 - Interior view
- Seat belt guide
- Securing cord
- Cooling/warming container
6. Preparing the cool box
▶ Unpack the appliance and dispose of all packaging.
Clean the cool box as described in the section "9. Cleaning and maintenance".
Before connecting, ensure that the cool box is switched off (operating switch in OFF position (13))
6.1. Connecting the cool box to an earthed socket
Use the mains cable (7) when operating via an earthed socket 220–240 V AC.
Insert the two-pin plug into the mains cable connection socket 220–240 V\~ (9).
Insert the flat plug of the mains cable (7) into the earthed socket.
6.2. Connecting the cool box to an on-board socket
Use the mains cable (6) when operating via an on-board socket (in a car, boat or camper-van) with 12 V DC current.
▶ Insert the two-pin plug into the mains cable connection socket 12 V === (10).
Insert the 12 V universal plug of the mains cable (6) into the on-board socket.

The appliance is equipped with a battery protection circuit that switches the cool box off at a voltage of 11.2 V.
■ Disconnect the mains cable when the engine is switched off to protect the vehicle battery from complete discharge.
6.3. Securing the cool box in the car

NOTICE!
Possible material damage!
■ Ensure stability against tipping over, especially when transporting in vehicles.
Place the cool box on the car seat.
▶ Open the cool box lid (1).
▶ Guide the hip belt of the car seat belt through the seat belt guide of the cool box.
▶ Close the cool box lid.
▶ Secure the seat belt in the latch in the car.
6.4. Att aching the carrying strap to the cool box
▶ Attach the carrying strap (8) to the eye-lets (4) on the cool box.
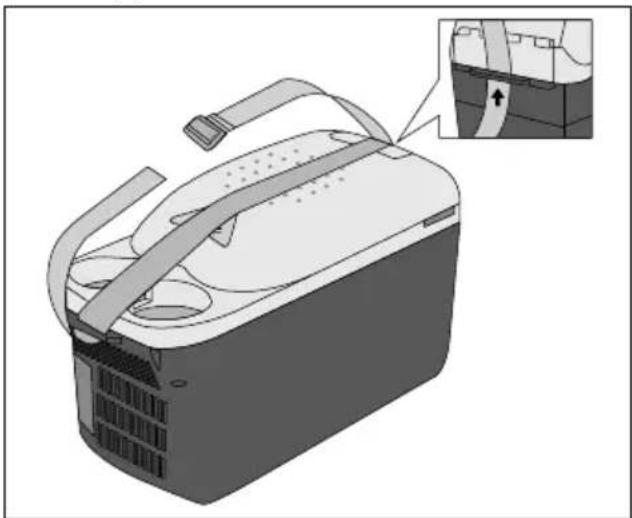
natural_image
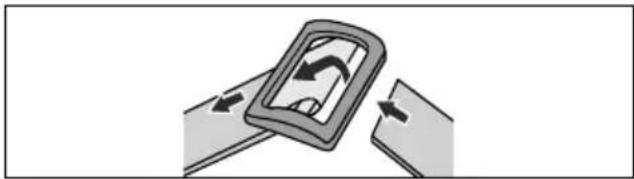
Illustration of a portable air purifier device with a close-up inset showing the interior compartment (no text or symbols)Fig. 3 - Threading the strap
Thread the loose end of the strap into the buckle.
natural_image
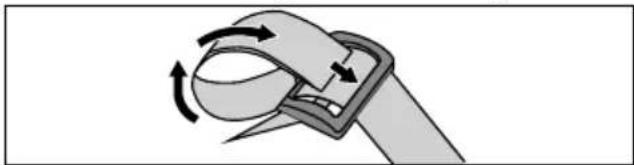
Diagram showing a device with directional arrows indicating rotation or movement (no text or symbols present)Fig. 4 - Connecting the strap
▶ Secure the connection by passing the loose end through the buckle again.
natural_image
Diagram of a mechanical joint or grip mechanism with rotational arrows indicating movement (no text or symbols)Fig. 5 - Securing connection
▶ Tighten the loose end of the strap to ensure a stable connection.
natural_image
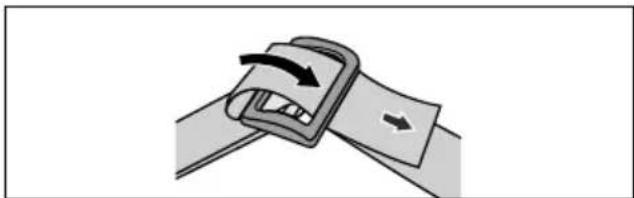
Diagram of a belt buckle being adjusted, showing force direction arrows (no text or symbols)Fig. 6 - Tightening the strap
Carry the cool box over your shoulder using the carrying strap. A rubber pad prevents slipping or cutting into the skin.

Stow the cables in the cable compartment (15) during transport.
7. Using the cool box

Storing food
- Store raw meat and fish in appropriate containers in the appliance to ensure that they do not come into contact with or drip onto other food.
- Depending on your cooling requirements, store sensitive food at the top and less sensitive food at the bottom of the cool box.
- Leave enough space for air to circulate between the food to ensure even cooling.
▶ Select the mode using the (13) operating switch:

/OFF/

| Switch position | Operating mode | Display |
 | Cooling Operating light (11) lights up green | |
| [gws3] | Keeping warm | Operating light (12) lights up red |
| OFF | Switched off | Operating lights off |
The cool box cools down to approx. 18^ C ( ± 10%) below ambient temperature and heats up to approx. 55^ C ( ± 10%).
▶ Pull the latch (2) to lift up the cool box lid (1).
Fill the cool box, observing the information in the following table.
| Cool-ing | ▸ To ensure optimal cooling fill the cool box with food and drinks that have already been chilled.▸ Cooling food and drinks that have not been pre-chilled takes considerably longer and uses more energy.____Standard drink bottles with a volume of 1 litre and over cannot be placed upright in the box; they must be transported lying down.____When operating without electricity, use pre-chilled ice packs. |
| Keeping warm | ▸ Fill the cool box with food and drinks that are already warm. Warming up food and drinks that have not been pre-warmed takes considerably longer and uses more energy. |
8. Tips for saving energy
The actual cooling capacity depends on the outside temperature. Choose a location to use the appliance that is well ventilated and protected from the sun's rays.
▶ Allow warm foods to cool off before you keep them cool in the cooling appliance.
▶ Use additional pre-chilled ice packs. Place the ice packs on the base and on the side walls.
If the cool box lid (1) is left open for a long time, this can cause the temperature inside the cool box to increase significantly. To avoid loss of cold/heat, open the cool box lid (1) only briefly and not too often.
▶ Do not cover the vents.

The appliance is suitable for climate class N (see technical specifications). Correct cooling performance of the appliance is guaranteed at ambient temperatures from +16 °C to 32°C. If temperatures deviate from this range, the appliance performance may be reduced.
9. Cleaning and maintenance

WARNING!
Risk of electric shock!
There is a risk of electric shock from electrified parts.
■ Before cleaning, pull out the mains plug (6 or 7) and allow the appliance to cool down.
■ Do not immerse the appliance in water or other liquids or hold it under running water.

NOTICE!
Possible material damage!
Damage to the appliance due to improper handling of the sensitive surfaces of the appliance.
■ Never use acidic, abrasive or granular, acetic-acid-, soda- or solvent-based cleaning agents. These may damage the surfaces of your appliance.
■ Do not operate any electronic devices in the cool box. Both appliances may be damaged irreparably.
▶ Wipe the cool box lid (1) with a slightly damp cloth and then dry it off.
▶ Clean the cooling/warming container (17) with a damp cloth, and a little mild washing-up liquid if necessary. Then dry off the cooling/warming container.
9.1. Changing the fuse in the 12 V universal plug
natural_image
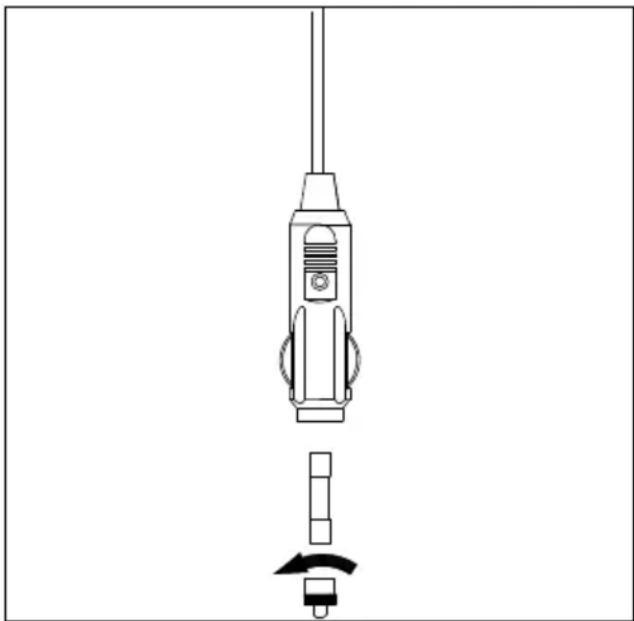
Technical line drawing of a mechanical device with a downward arrow indicating motion or assembly (no text or symbols)Fig. 7 – Changing fuse (Similar to illustration)
▶ Use only the same type of fuse (see "13. Technical specifications" on page 95) when changing the fuse in the 12 V universal plug.
Damage to the appliance that occurs due to the use of incorrect fuses is not covered under warranty.
▶ Unscrew the cap from the connector housing in an anti-clockwise direction.
▶ Take out the fuse carefully. Make sure that the contact tip is not also removed.
▶ Insert a new fuse into the connector housing.
▶ Screw the cap back onto the connector housing in a clockwise direction and make sure that the contact tip is located in the cap.
10. Troubleshooting
Faults may occur during operation. Please use the following table to check whether you can resolve the problem yourself. All other repairs are prohibited and invalidate the warranty. Therefore, in the event of a fault, contact the Service Centre or another suitable professional repair workshop.
| Fault Cause Solution | ||
| The appliance is not working | No power ▶ Check whether | the mains plug is plugged in. ▶ Check whether the socket is sup- plying power. ▶ Check that the connection cable is not damaged. |
| Voltage too low ▶ Switch of | ff the appliance and start it again after the voltage has sta- bilised. | |
| Fan is not working | Fan fault ▶ Contact Service | Centre |
| Appliance is not cooling/ warming, but fan is running | The Peltier element is de- fective. | ▸ Contact Service Centre |
| Appliance inter- nal temperature too high | The Peltier element is de- fective. | ▸ Contact Service Centre |
| The ambient temperature is above +32°C. | The appliance is designed to work in a temperature range from +16 °C to +32°C. | |
| The air circulation is insuf- ficient. | ▸ Increase clearance from other ob- jects. | |
| The appliance has been set up in a location exposed to direct sunlight or next to a heat source. | ▸ Place the appliance in a different position. | |
| When operating via a 12 V connection:The appliance does not work. | On-board socket is powered only when ignition is switched on. | ▸ Switch on vehicle ignition. |
| On-board socket is dirty ▶ | Carefully clean the inside of the on-board socket with a small, non-conductive (i.e. non-metallic) brush, until the centre contact pin is clean again. | |
| The fuse in the 12 V universal plug has blown. | ▸ Change the fuse.▸ Contact the Service Centre for a replacement. | |
| The voltage is below 11.2 V. ▶ | Charge the vehicle battery. | |
11. Longer periods with-out use
If the appliance is not going to be used for a longer period of time, pull the mains plug (6 or 7) out of the socket, clean the appliance, and leave the cool box lid (1) open to avoid unpleasant odours and to prevent mould from forming.
12. Disposal

- During disposal, please note that the appliance/insulation contains cyclopentane (a flammable expanded gas for insulation).
- The appliance/insulation must be disposed of correctly.

PACKAGING
Your appliance has been packaged to protect it from damage in transit. The packaging is made of materials that can be recycled in an environmentally friendly manner.

Observe the following packaging material label regarding waste separation with the abbreviations (a) and numbers (b):
1–7: plastics/20–22: paper and cardboard/80–98: composite materials

(France only)
The “Triman” symbol tells the consumer that the product can be recycled, is covered by an extended system of manufacturer’s responsibility and must be sorted by material type in France.
(Spain only)
This symbol indicates disposal according to the type of packaging material used (blue = paper and cardboard; yellow = plastic, metal, composite packaging; green = glass).
Use the disposal options available to you in your area.
APPLIANCE
All old appliances marked with the symbol shown must not be disposed of in normal household waste.
In accordance with Directive 2012/19/EU, the appliance must be properly disposed of at the end of its service life.
This involves separating the materials in the appliance for the purpose of recycling as well as minimising the environmental impact and negative effects on human health.
Take old appliances to an electrical scrap collection point or a recycling centre.
Contact your local waste disposal company or your local authority for more information on this subject.
13. Technical specifi ca-DE tions
Supplier's ad-
MEDION AG
dress:
Am Zehnthof 77
45307 Essen
Germany
FR
NL
ES
Model: MD 13100
Rated voltage: 220–240 V ∼, 50 Hz
or 12 V---
IT
EN
Power
consumption:
Cooling: 57 W at 220–240 V \~
46 W at 12 V---
Keeping warm: 55 W at 220–240 V \~
42 W at 12 V---
Insulation gas: Cyclopentane (C 5H10 )
Weight: Approx. 4.3 kg
Protection class II
Fuse: 250 V 6.3 A, fast-acting,
integrated into 12 V universal plug)
Climate class N (+16 °C to +32°C)
13.1. Product data sheet

Scan the QR Code shown to download the product data sheet or contact the Service Centre at www.medion.com/contact to obtain a printed
copy of the product data sheet. You will also find the QR code on the energy label.
14. EU declaration of conformity
CE MEDION AG hereby declares that this appliance complies with the essential requirements and other relevant provisions of:
• EMC Directive 2014/30/EU
• Low Voltage Directive 2014/35/EU
• Ecodesign Directive 2009/125/EC
• RoHS Directive 2011/65/EU
15. Spare parts
Please visit our MEDIONService- shop at https://www.medion.com/ medionserviceshop to order any spare parts you need.
You will be able to find out all the details about your specific product while you're there.
16. Service information
Please contact our Customer Service team if your device ever stops working the way you want or expect it to. There are several ways for you to contact us:
- In our Service-Community, you can meet other users, as well as our staff, and you can exchange your experiences and pass on your knowledge there.
You will find our Service-Community at community.medion.com.
• Alternatively, use our contact form at www.medion.com/contact. - You can also contact our Service team via our hotline or by post.
Hotline number
0333 3213106
Opening times
Mon - Fri: 08.00 - 20.00
Sat – Sun: 10.00 – 16.00
Service address
MEDION Electronics Ltd. 120 Faraday Park, Faraday Road, Dorcan Swindon SN3 5JF, Wiltshire United Kingdom
You can download this and many other sets of operating instructions from our service portal at www.medionservice.com.
We have stopped providing printed copies of our warranty terms and conditions as part of our commitment to sustainability, but you can access the warranty terms and conditions on our service portal.
You can also scan the QR code below and to download the operating instructions onto your mobile device from the service portal.

17. Legal Notice
Copyright 2025
Date: 11. February 2025
All rights reserved.
These operating instructions are protected by copyright.
Mechanical, electronic and any other forms of reproduction are prohibited without the written permission of the manufacturer.
Copyright is owned by the company:
MEDION AG
Am Zehnthof 77
45307 Essen
Germany
Please note that you cannot use the address above for returns. Please always contact our Customer Service team first.


- Inhaltsverzeichnis
- Impressum
- Colofon
- Aviso legal
- Note legali
- Information about this user manual
- Explanation of symbols
- DANGER!
- WARNING!
- CAUTION!
- NOTICE!
- Proper use
- Safety instructions
- Risk of electric shock!
- Handling the appliance
- ■ WARNING! Do not operate
- Package contents
- Risk of choking and suffocation!
- Appliance overview
- Preparing the cool box
- Connecting the cool box to an earthed socket
- Connecting the cool box to an on-board socket
- Securing the cool box in the car
- Possible material damage!
- Att aching the carrying strap to the cool box
- Using the cool box
- Storing food
- Tips for saving energy
- Cleaning and maintenance
- Changing the fuse in the 12 V universal plug
- Troubleshooting
- Longer periods with-out use
- Disposal
- PACKAGING
- APPLIANCE
- Technical specifi ca-DE tions
- Product data sheet
- EU declaration of conformity
- Spare parts
- Service information
- Hotline number
- Opening times
- Service address
- Legal Notice
- MEDION AG
Brand : MEDION
Model : MD 13100
Category : Refrigerator