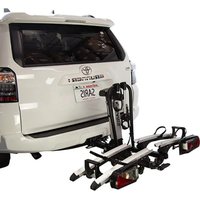
Door County - Bike racks Saris - Free user manual and instructions
Find the device manual for free Door County Saris in PDF.


User questions about Door County Saris
0 question about this device. Answer the ones you know or ask your own.
Ask a new question about this device
Download the instructions for your Bike racks in PDF format for free! Find your manual Door County - Saris and take your electronic device back in hand. On this page are published all the documents necessary for the use of your device. Door County by Saris.
USER MANUAL Door County Saris
natural_image
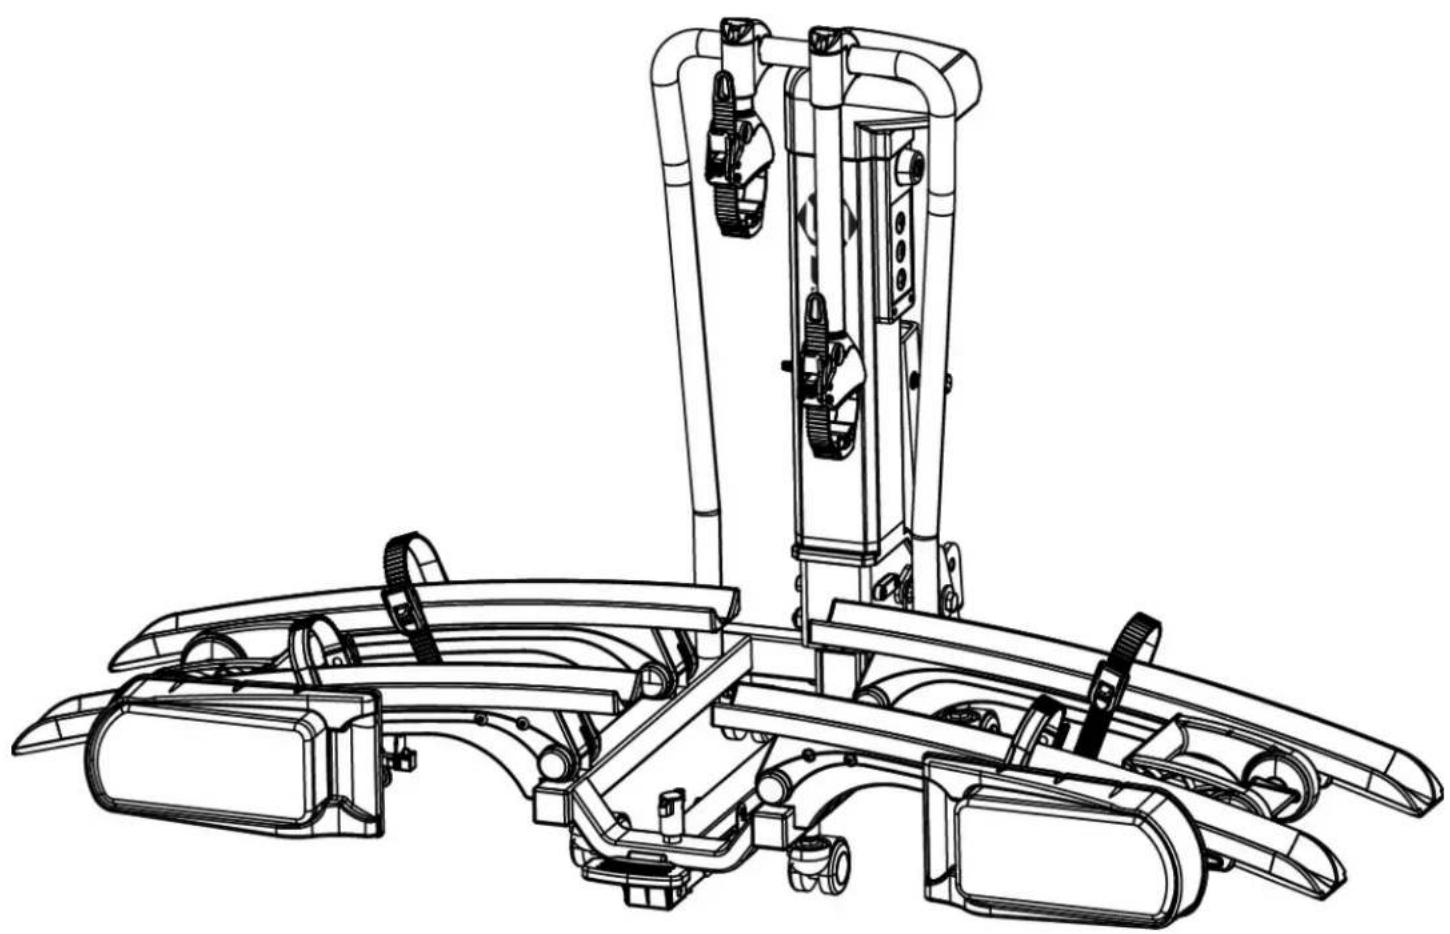
Technical line drawing of a mechanical assembly with articulated arms and pipes (no text or symbols)Operating Instructions
CONTENTS:
Details about this Instruction Manual 3
Foreword 3
Obligations Concerning the Handling of this Instruction Manual 3
Intended Use 3
Explanation of the Safety Instructions 3
Delivery Contents 4
Technical Specifications 4
Safety Instructions 5
Fitting and Use 6
Fitting the Bicycle Carrier on the Receiver 6-7
Lifting the Bicycle Carrier onto the Receiver 7-8
Lowering and Raising the Bicycle Carrier 9
Lowering the Bicycle Carrier 9-10
Raising and Securing the Bicycle Carrier 10
Attaching Bicycles 11-14
Tilting the Bicycle Carrier, Access to the Hatch 15
Removing the Bicycle Carrier 16
Carrying and Storage 17
Cleaning and Care 17
Maintenance 18
Disposal 18
Contact 18
Annex 19
Pin Assignment, 7-Pin 19
Warranty 20
Exclusions 21
Details about this Instruction Manual
FORWARD:
This instruction manual helps you with the proper and safe use of the Saris Door County bicycle carrier.
OBLIGATIONS CONCERNING THE HANDLING OF THIS INSTRUCTION MANUAL
Any person who
- Fits,
- Cleans or
- Disposes of
This bicycle carrier must have noted and understood the complete content of this instruction manual.
Always keep this instruction manual to hand and in a safe place. If the bicycle carrier is passed on, pass on the instruction manual with it.
PROPER USE:
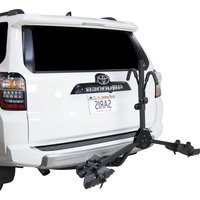
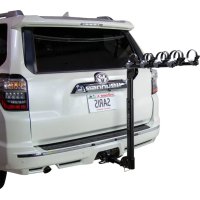
The Saris Door County bicycle carrier serves to transport a maximum of two bicycles. It may be fitted only on tow hitches that meet the requirements specified in the chapter on Coupling Requirements. Moreover, under no circumstances is the maximum permitted load of the bicycle carrier to be exceeded. Proper use also includes adherence to all information in these fitting instructions and particularly adherence to the safety instructions. Any other use is considered to be improper and may cause damage to property or injury to people. Saris accepts no liability for damages caused by improper use.
Explanation of the Safety Instructions
The following categories of safety instructions can be found in the instructions:
DANGER
Instructions with the signal word DANGER warm of a hazard with a high risk level. If it is not avoided then it will result in death or serious injury.
WARNING
Instructions with the signal word WARNING warn of a potential hazard with a medium risk level. If it is not avoided then it may result in death or serious injury.
CAUTION
Instructions with the signal word CAUTION warn of a potential hazard with a low risk level. If it is not avoided then it may result in minor or moderate injury.
ATTENTION
Instructions with the word ATTENTION warn of a risk with potential damage to property. If it is not avoided then the product or something nearby may be damaged.

NOTE
Other instructions:
Useful tip. Makes operation or fitting of the product easier or gives a better understanding.
The respective safety symbol used does not replace the text of the safety instruction.
You must therefore read the safety instruction and follow it exactly!
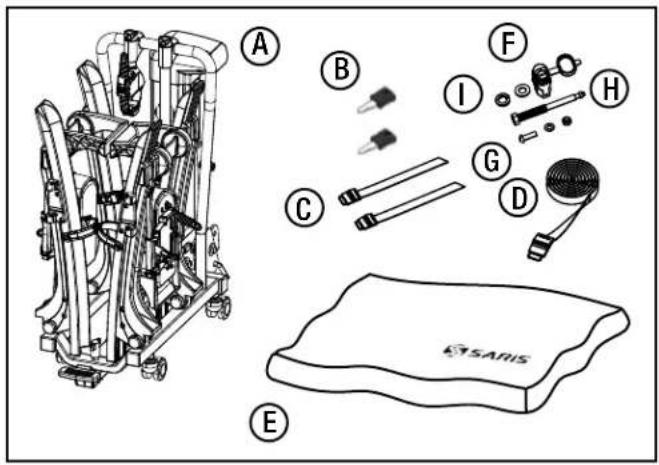
Delivery Contents
text_image
A B C D E F G H I SARISA = Bicycle carrier
B = 2 keys
C = 2 safety belts for front wheels
D = 1 safety belt for bicycle frames
E = Protection cover
F = Lock
G = Pin
H = Tilt Pin
I = Hardware
Technical Specifications
| Material: Aluminum | SteelPlastic |
| Dead weight: 55 lb | |
| Max. load: 132 lb | |
| Power consumption, average: | 2A |
| Power consumption, maximum: | 5.5A |
| Dimensions (WxHxD), minimum: | 12 x 30 x 30 in |
| Dimensions (WxHxD), maximum: | 53 x 30 x 30 in |
| Packaging size (WxHxD): 32 x 30 x 13 in | |
Do not exceed the max. load of the bicycle carrier and the permitted tongue load of the 2" receiver. The total permitted weight and permitted axle load of the vehicle must not be exceeded with the bicycle carrier and load.
Examples of Saris Door County

natural_image
Simple line drawing of a bicycle (no text or symbols)Max = 60 lbs/kg 27
Máx.= 27 kg/60 libras
Max = 60lb/27kg

natural_image
Two identical line-drawn bicycles side by side, no text or symbols presentMax = 120 lbs/54kg
(Max = 60 lbs/27kg per bike)
Máx.= 54 kg/120 libras
natural_image
Three circular diagrams showing a van, a bus, and a campfire, all crossed by diagonal lines (no text or symbols)Not approved for use on RVs or tow-behind RVs and trailers
Safety Instructions
Follow the fitting instructions exactly. Not following the instructions can cause injury to people and damage to property.
If you are unsure when fitting, please ask your dealer or the manufacturer for further information. Neither the manufacturer nor the dealer is liable for damages due to improper use or incorrect fitting. Check the bicycle carrier and its load regularly! You have an obligation to do this and will be held responsible in the case of damage.

NOTE
When driving with the bicycle carrier fitted, the legal requirements and regulations on transporting goods behind your vehicle apply.

text_image
Black background with white warning symbol containing an exclamation markWARNING
Driving with the bicycle carrier affects the handling properties of your vehicle. Injury to people or damage to property due to altered vehicle behavior.
- Adjust your driving speed to the new vehicle behavior.
- Never drive faster than 80mph (130 km/h).
- Avoid sudden and jerky steering movements.
- Be aware that your vehicle is longer than usual.

text_image
Warning symbol with exclamation mark inside a triangle on black backgroundWARNING
Parts that protrude beyond the edge of the vehicle or bicycle carrier may cause injury to people or damage to property during the journey.
Injury to people or damage to property due to protruding parts.
- Fit only parts that do not protrude beyond the edge of the vehicle.

text_image
!WARNING
Exceeding the max. load of the bicycle carrier and the permitted tongue load of the tow hitch or the total permitted weight can cause serious accidents.
Injury to people or damage to property due to overloading.
- You must observe the specifications of the max. load, permitted tongue load and total permitted weight of your vehicle. Do not exceed these specifications in any circumstances!

text_image
!WARNING
Traveling without safety belts can cause accidents.
Injury to people or damage to property due to loss of the bicycles.
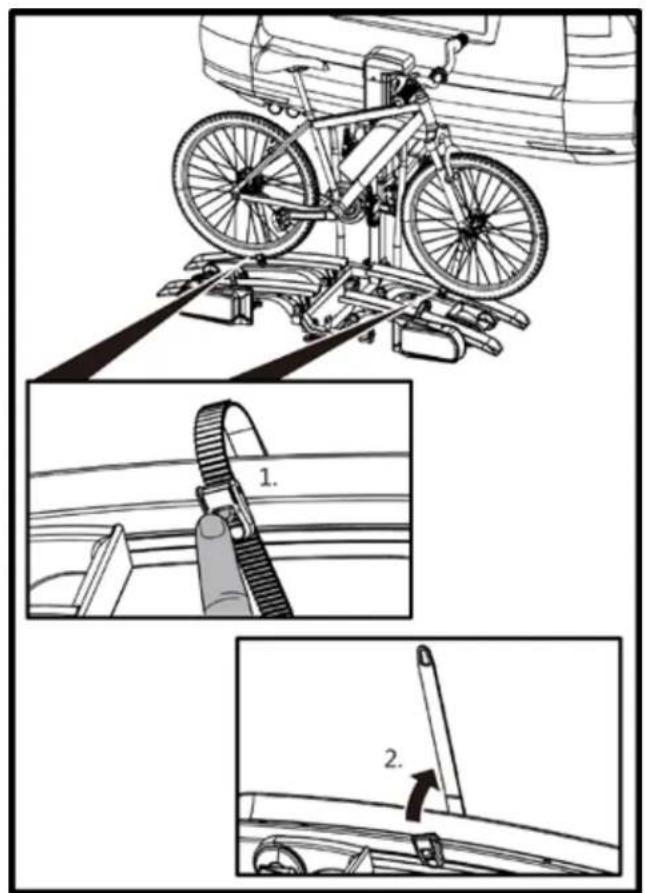
- Before beginning each journey, check that the belt around the bicycles and the carrier U-bracket is sitting correctly and securely, see chapter on "Attaching Bicycles".
- Before beginning each journey, check that both belts around the front wheel and the belt around the back wheel of the bicycle are sitting correctly and securely.
• Re-tighten the belts if necessary. - Before beginning each journey, check that the belts used are undamaged and unworn.
- Replace damaged or worn belts with undamaged belts before beginning the journey. Use only belts that are approved by Saris for the purpose.

text_image
Warning symbol with exclamation mark inside a triangle on black backgroundWARNING
Driving with the bicycle carrier folded up can cause accidents. The moving parts of the bicycle carrier represent a safety hazard when not fully fitted. Injury to people or damage to property due to incompletely fitted bicycle carrier.
- Remove the bicycle carrier when you do not need it.
- Never drive with the bicycle carrier folded up.

WARNING
Tarpaulins increase the air resistance. They can become detached and fly around, which can cause serious accidents.
Injury to people or damage to property due to tarpaulins.
- Do not use tarpaulins.

WARNING
Driving on rough terrain with the bicycle carrier fitted can cause the carrier to break off.
Injury to people or damage to property due to the bicycle carrier breaking off.
- Do not use the bicycle carrier on rough terrain.

text_image
Warning symbol with exclamation mark inside a triangle on black backgroundATTENTION
The hatch could hit the bicycle carrier and be damaged.
Damage to property due to hatch lid opening.
- Switch off electric hatch lids and operate manually.
- Fold down the bicycle carrier before opening the hatch.

ATTENTION
The carrier or bicycles could be damaged if they are directly adjacent to the exhaust outlet.
Damage to property due to hot exhaust gases.
- Use an exhaust embellisher if necessary.
ATTENTION
Carrier reduces vehicles departure angle. Damage to vehicle or carrier. Avoid steep driveways and or parking lot exits.
Fitting and Use
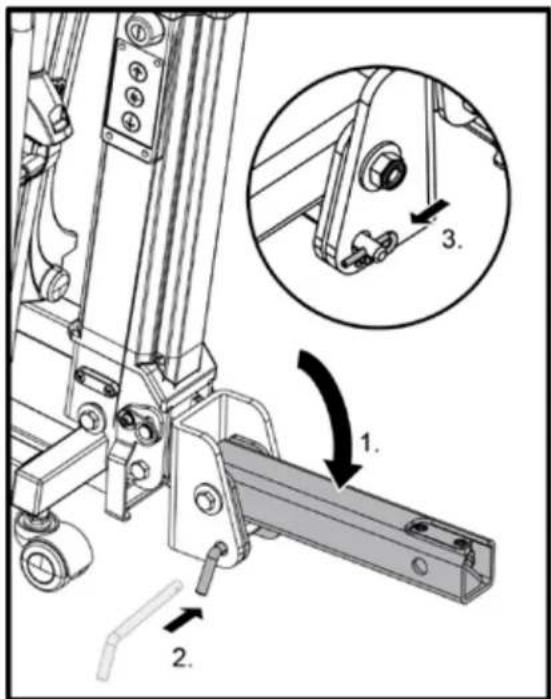
FITTING THE BICYCLE CARRIER ON THE TOW HITCH
- Park your vehicle on a flat surface.
- Apply the parking break.

text_image
Warning symbol with exclamation mark inside triangle on black backgroundWARNING
Damage to the carrier, e.g. due to bent parts, cracks or scratches, precludes safe functioning of the carrier.
Injury to people or damage to property due to damaged bicycle carrier.
- Do not fit the bicycle carrier if there is any damage.
• Proceed as described in the chapter on Maintenance.
text_image
Technical diagram of a mechanical assembly with numbered components and an inset showing a close-up detail of a component.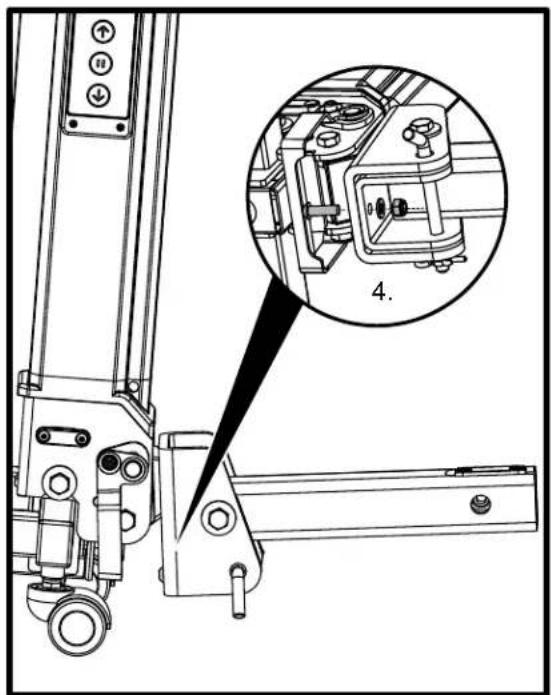
natural_image
Technical line drawing of a mechanical assembly with an inset close-up showing a component detail (no text or symbols present)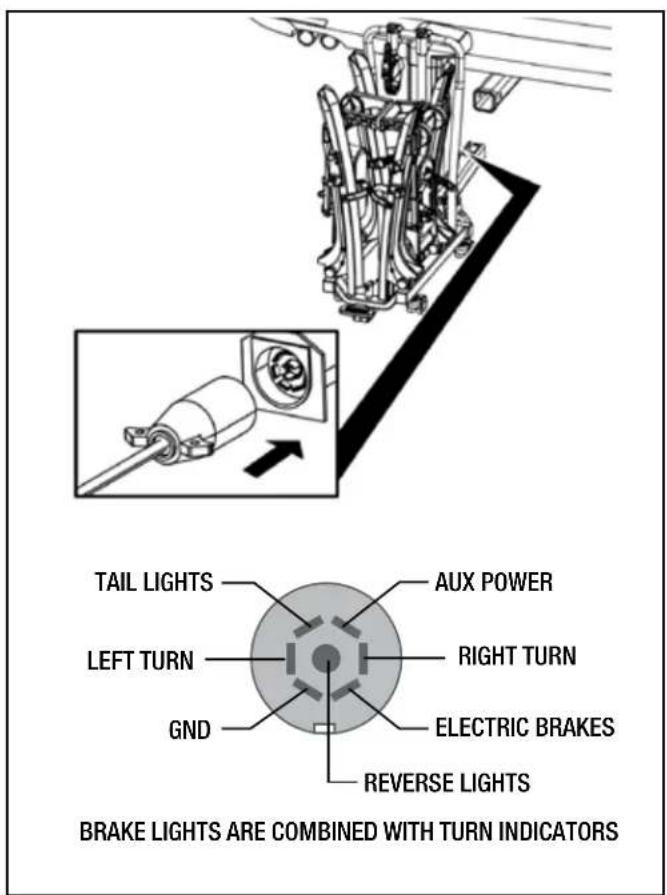
text_image
TAIL LIGHTS LEFT TURN GND AUX POWER RIGHT TURN ELECTRIC BRAKES REVERSE LIGHTS BRAKE LIGHTS ARE COMBINED WITH TURN INDICATORS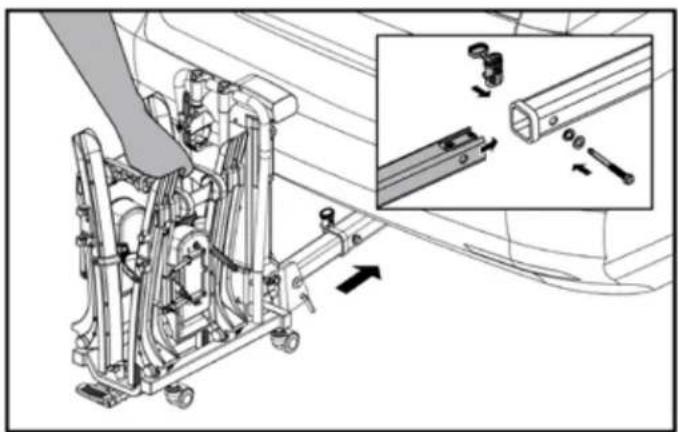
natural_image
Mechanical assembly diagram showing a vehicle's internal components and a close-up of a mechanical assembly with arrows indicating motion (no text or labels present)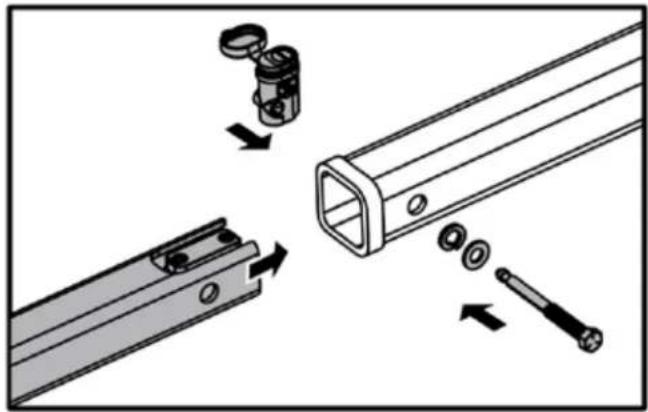
natural_image
Technical illustration of a mechanical assembly with exploded view and disassembled parts (no text or symbols)Insert receiver tube into hitch as shown. Line up hole in receiver tube with holes in hitch. Install split washer on hitch pin. Insert hitch pin on right passenger side of receiver. Thread pin and tighten with 3/4" wrench or socket. Once tight, lift up on rack and tighten hitch pin again. Install lock head. *To ensure properly tightened, lift up on rack and tighten pin until all play has been removed. Periodically check pin tightness on long trips.
natural_image
Mechanical assembly diagram showing internal components with bidirectional arrows indicating motion (no text or labels)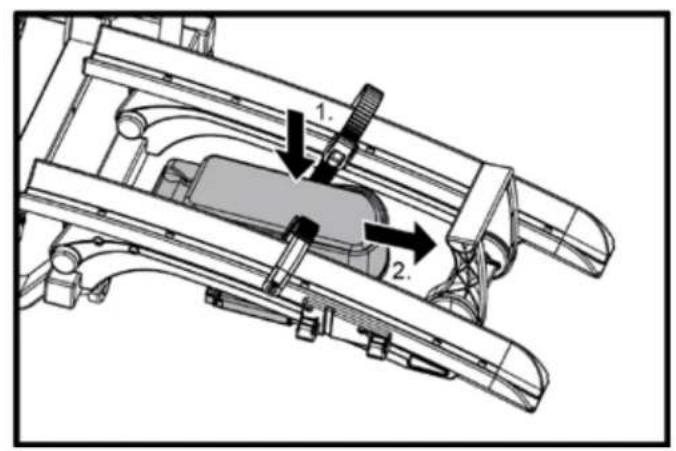
text_image
Technical diagram of a mechanical assembly with labeled components and directional arrows indicating motion or movement.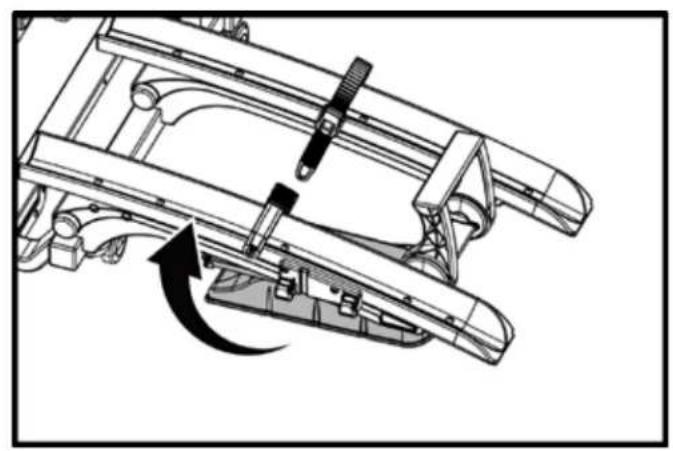
natural_image
Mechanical assembly diagram showing a lever mechanism with a curved arrow indicating motion (no text or symbols present)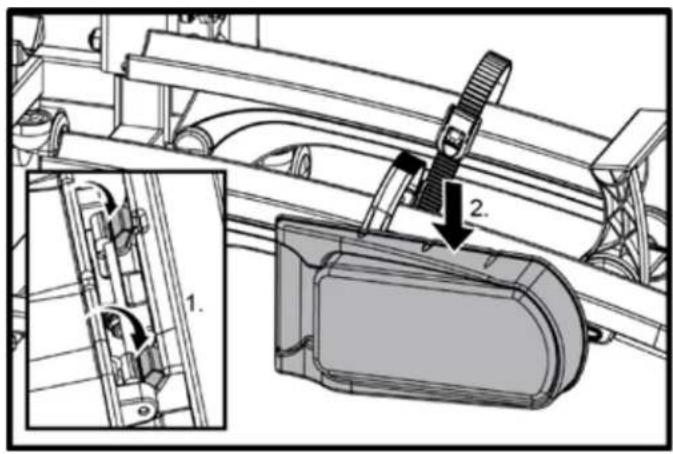
text_image
Technical diagram showing mechanical assembly with labeled components and directional arrows indicating motion or movement.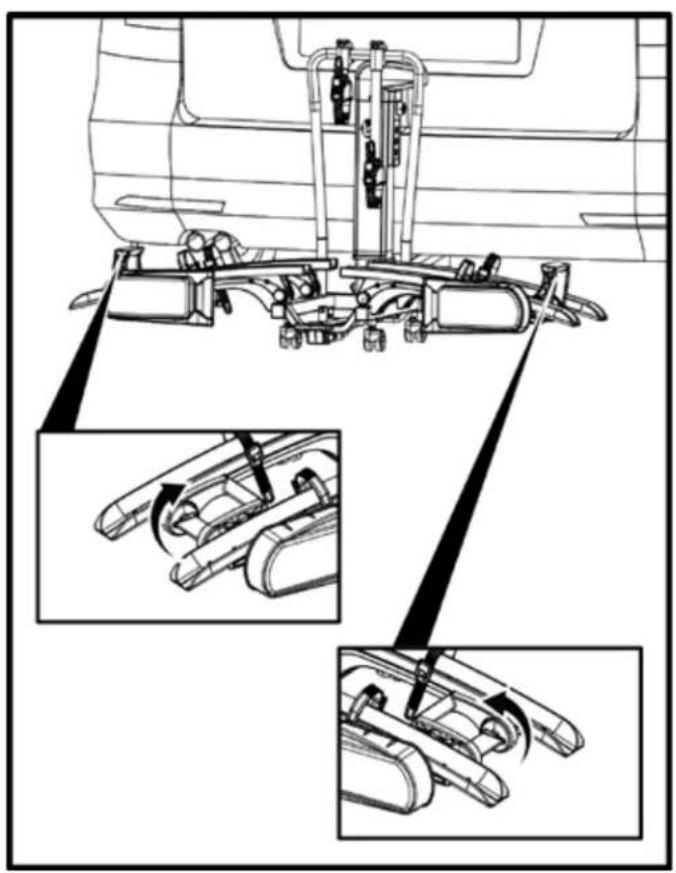
natural_image
Technical line drawing of a vehicle suspension system with three inset views showing internal components (no text or labels)
text_image
Warning symbol with exclamation mark inside a triangle on black backgroundWARNING
Driving without a working lighting system can cause accidents.
Injury to people due to not being seen by other road users.
- Before beginning each journey, check that the lighting system is working correctly.
- Replace any defective bulbs.
- Check the connection between the plug and the coupling.
Lowering and Raising the Bicycle Carrier
LOWERING THE BICYCLE CARRIER

text_image
Warning symbol with exclamation mark inside a triangle on black backgroundWARNING
An unraised or unsecured bicycle carrier can become caught on obstacles.
Injury to people or damage to property due to loss of the bicycle carrier during the journey.
- Raise the bicycle carrier to the end position before each journey.
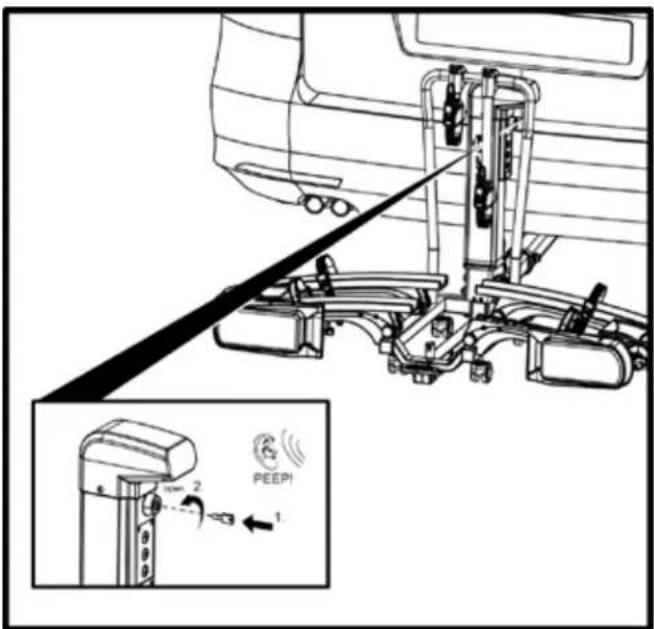
- Ensure that you secure the bicycle carrier with the keyswitch, as described under "Raising the Bicycle Carrier".

text_image
Warning symbol with exclamation mark inside triangle on black backgroundCAUTION
Body parts or objects that are under the carrier when it is lowered may be crushed. Injury to people or damage to property due to lowering the carrier.
- Ensure that there is nothing under the carrier.
- Watch out for your body; maintain a safe distance.
text_image
Technical diagram showing a vehicle's seatbelt assembly with labeled components and a PEEP warning icon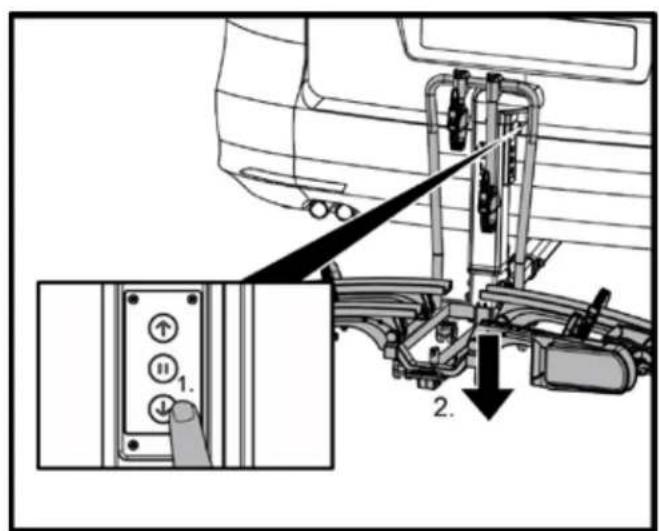
text_image
Technical diagram showing a mechanical assembly with labeled parts and directional arrows indicating movement or assembly.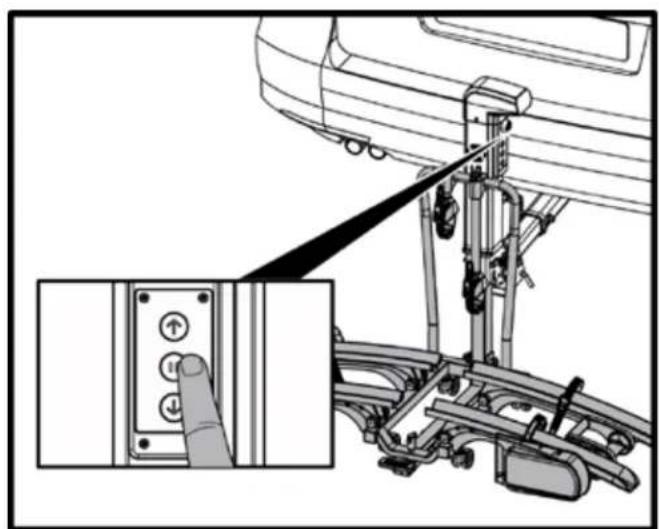
natural_image
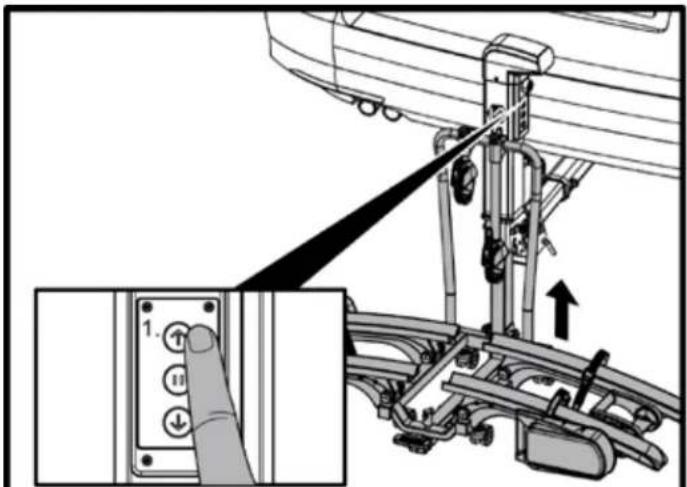
Mechanical assembly diagram showing a hand pressing a button on a vehicle chassis, with an inset close-up of the button (no text or symbols visible)Raising and Securing the Bicycle Carrier
- Raise the bicycle carrier until it stops.
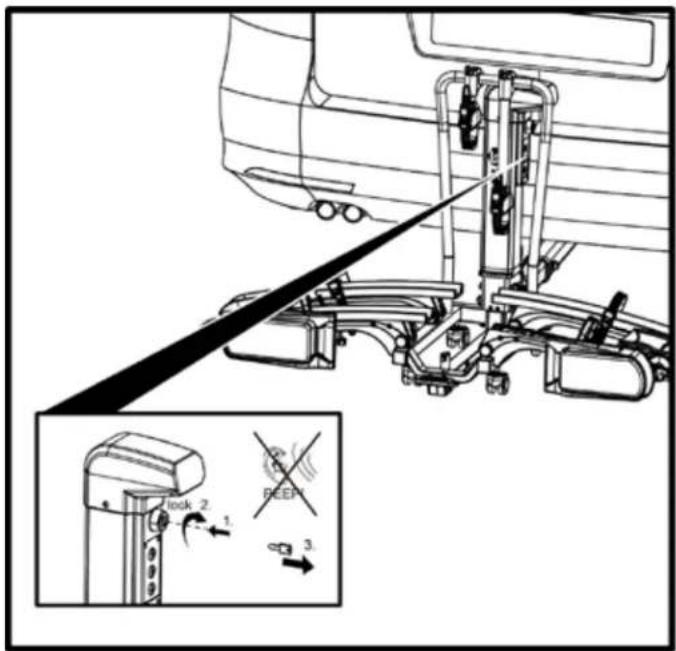
- Pull the key out of the switch lock. After removing the key, the warning tone stops and control panel lights turn off.

text_image
Black background with a white warning symbol containing an exclamation mark.WARNING
Lowering the carrier during the journey can cause serious accidents.
Injury to people or damage to property due to lowering the carrier during the journey.
- Might the Door County not have raised to the end position a warning tone sounds.
- Release the keyswitch and restart the raising until the end position is reached. The warning tone will shut down.
- In the end position, lock the system and make sure the key is removed and stored properly.
text_image
Technical diagram showing a mechanical assembly with labeled components and an inset view of a finger pressing a button.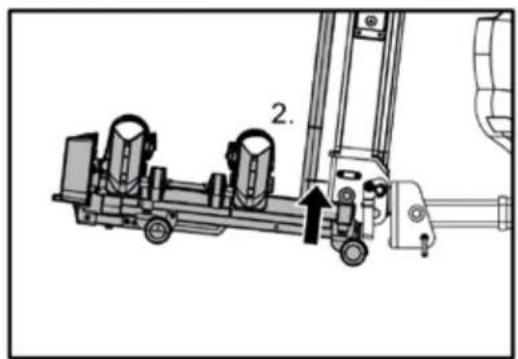
text_image
2.
text_image
Technical diagram showing a vehicle seatbelt mechanism with labeled parts and directional arrows indicating lock, reep, and switch functions.Attaching Bicycles
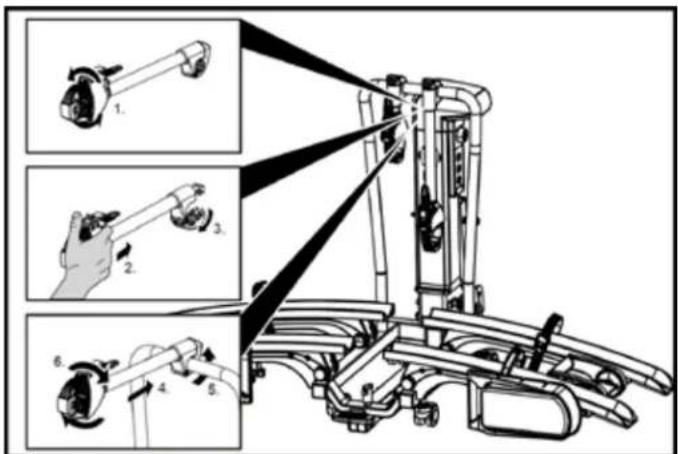
- Start by lowering the holding area for the bicycles, as described in the chapter on "Lowering the Bicycle Carrier".

text_image
!WARNING
Parts on the bicycles that are not screwed on securely can become detached during the journey.
Injury to people or damage to property is possible due to parts flying around.
- Remove all parts that are not securely connected to the bicycle, e.g. air pumps, panniers, navigation devices or batteries.
- Also remove all parts that generate additional resistance, e.g. such as luggage baskets and child seats.
i
NOTE
To improve the handling of your vehicle, it is best to fit the heaviest bicycle first. Also, if you are fitting only one bicycle, you should place the bicycle in the rail that is closest to the rear of the vehicle.
text_image
Technical diagram of a mechanical device with numbered instructions for assembly or maintenance steps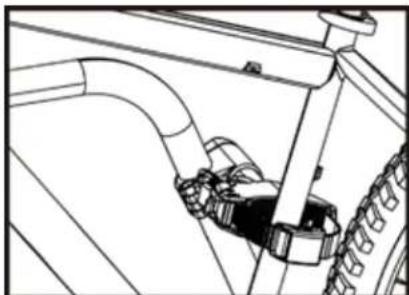
natural_image
Technical line drawing of a vehicle suspension system with no visible text or symbols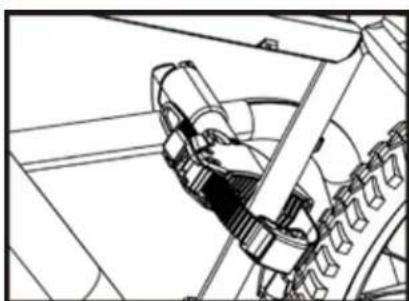
natural_image
Technical line drawing of a mechanical assembly with springs and gears (no text or symbols)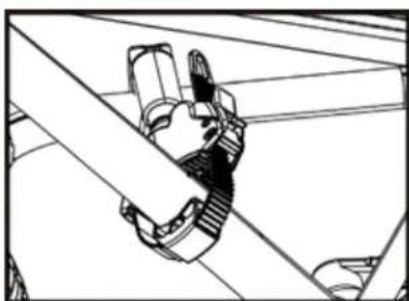
natural_image
Technical line drawing of a mechanical assembly with gears and rods (no text or symbols)Attaching Bicycles

text_image
Technical diagram showing bicycle track maintenance steps with labeled diagrams and instructions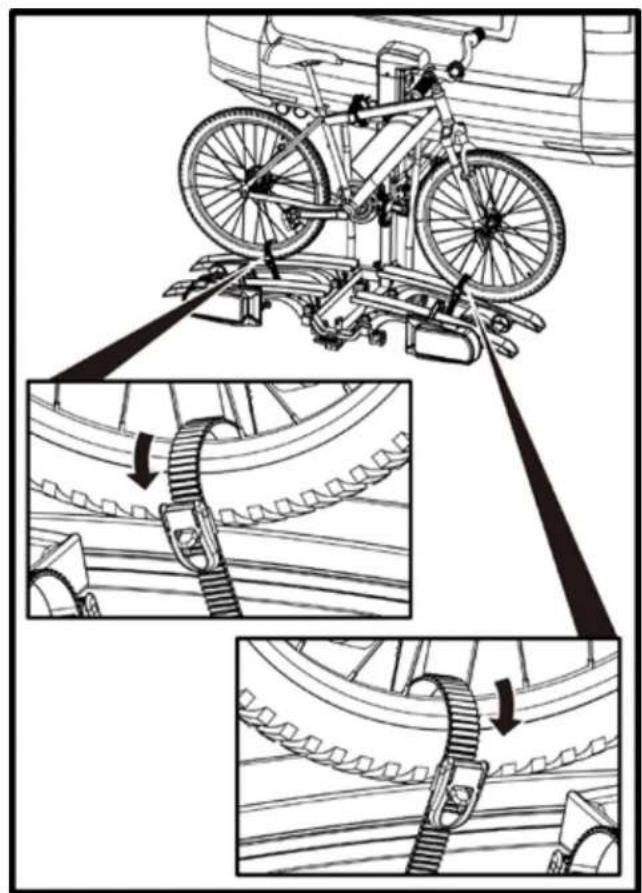
natural_image
Technical illustration of a bicycle suspension system with mechanical components and structural details (no text or symbols)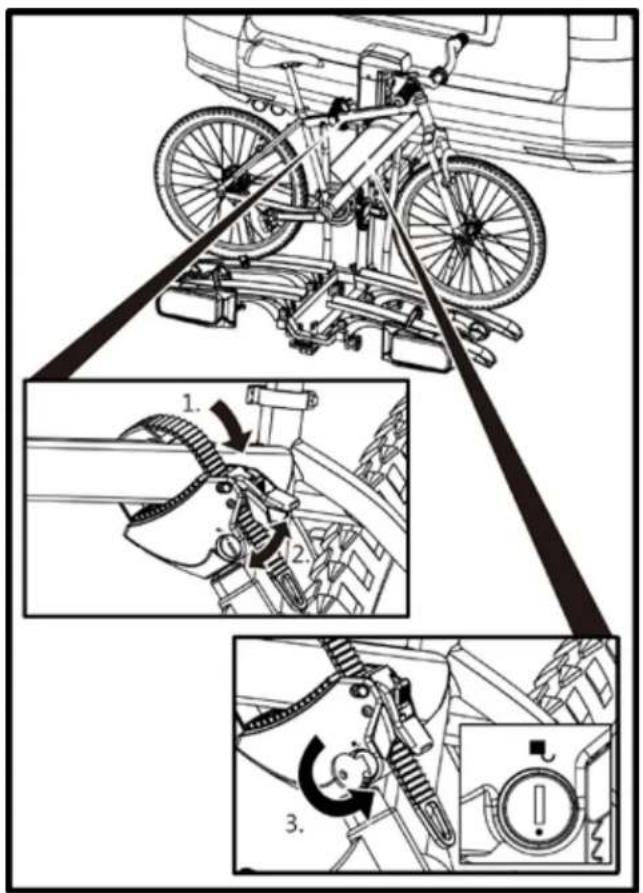
text_image
Technical diagram illustrating bicycle wheel assembly and mechanical adjustment steps with labeled diagrams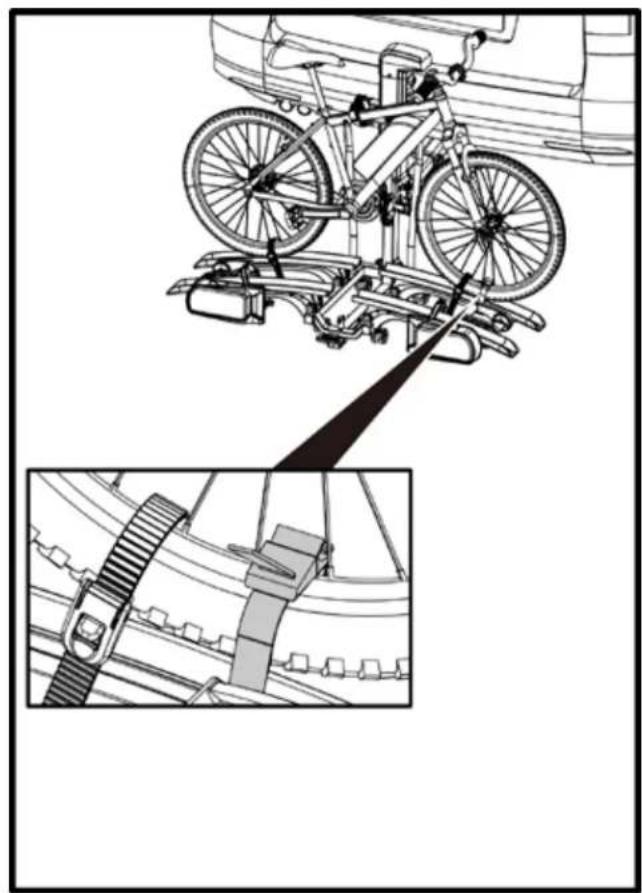
natural_image
Technical line drawing of a bicycle-mounted platform with a close-up inset showing its structural components (no text or symbols)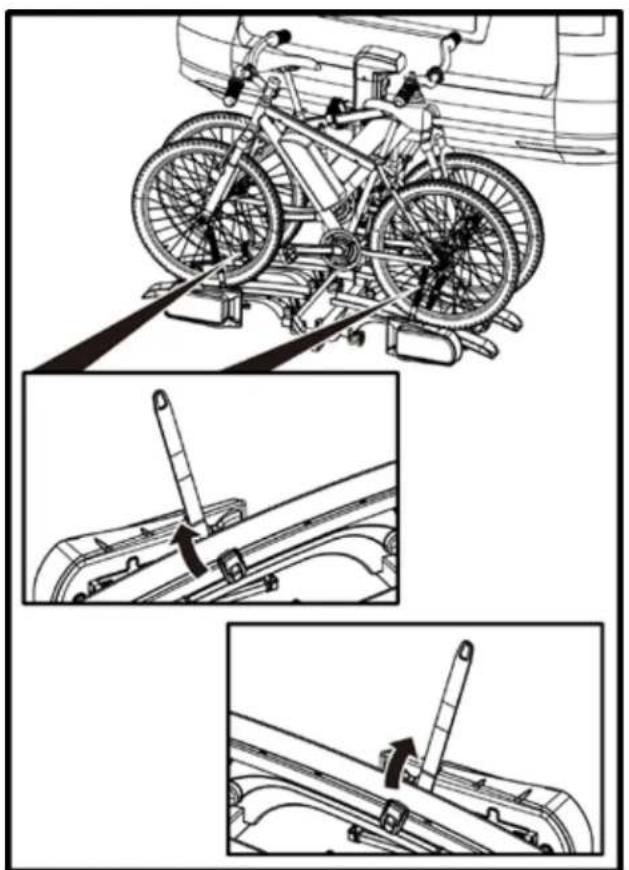
natural_image
Technical illustration of a bicycle-mounted platform with three zoomed-in views showing mechanical components (no text or symbols)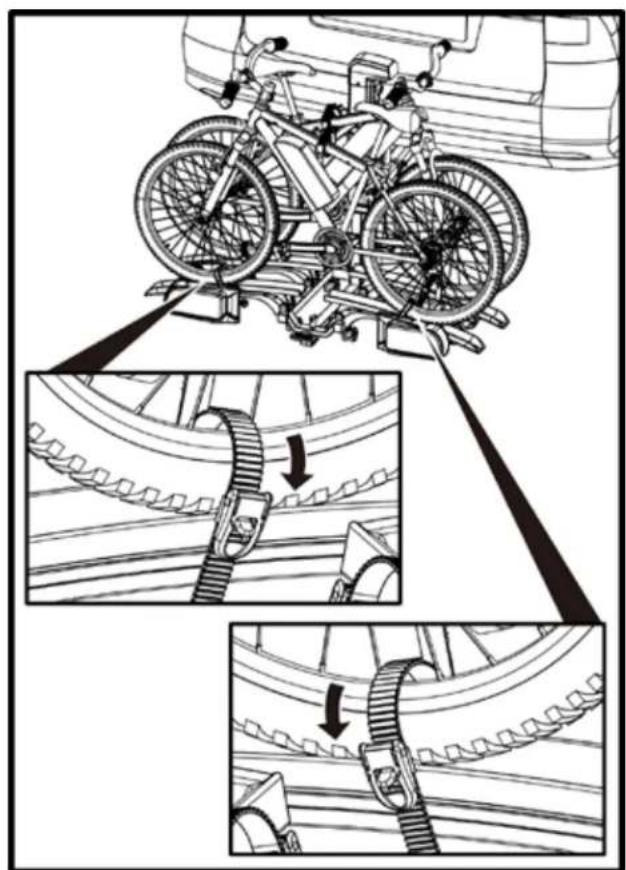
natural_image
Technical illustration of a bicycle mounting mechanism with three steps showing gear assembly and structural details (no text or symbols)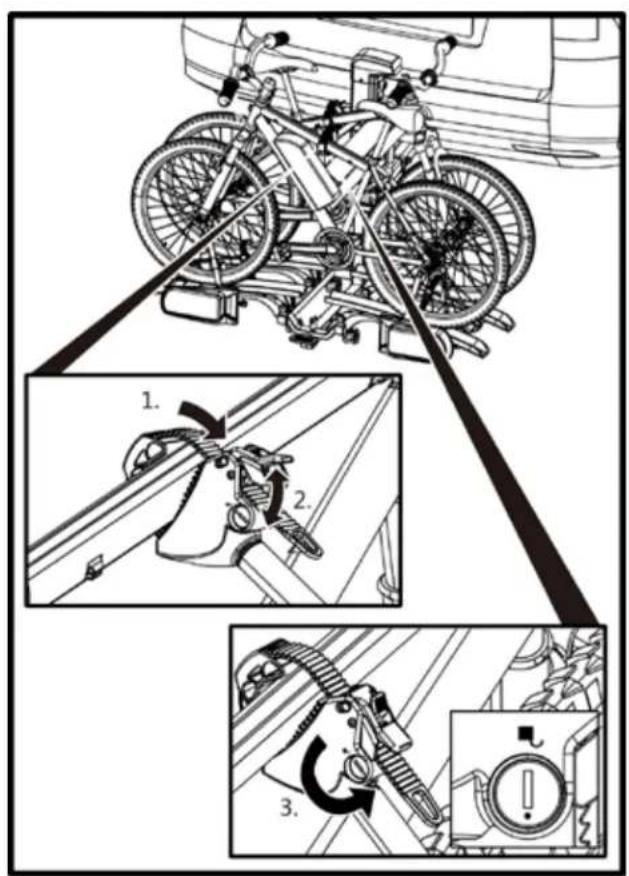
text_image
Technical diagram illustrating bicycle wheel assembly and safety instructions with labeled steps 1, 2, and 3.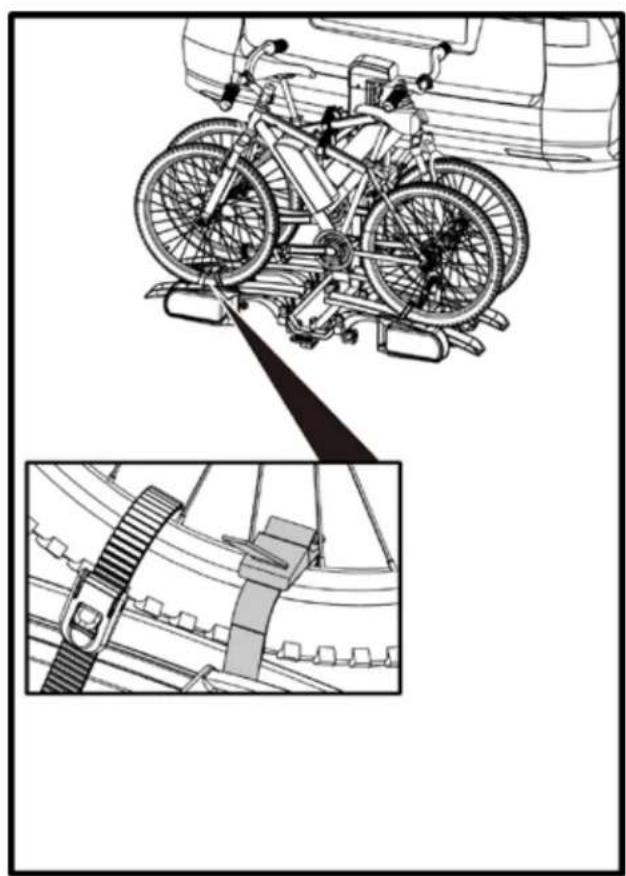
natural_image
Technical illustration of a bicycle-mounted sensor system with an inset showing its structural components (no text or symbols present)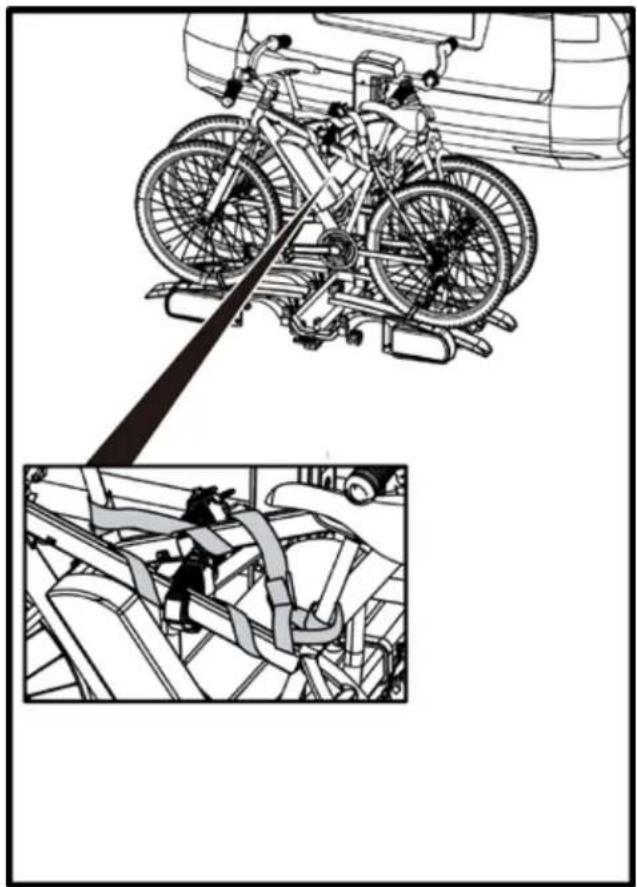
natural_image
Technical illustration of a bicycle under assembly with a close-up inset showing the same components (no text or symbols present)
text_image
!WARNING
Traveling without safety belts can cause accidents.
Injury to people or damage to property due to loss of the bicycles.
- Before beginning each journey, check that the belt around the bicycles and the carrier U-bracket is sitting correctly and securely, see step 12 in this chapter.
- Before beginning each journey, check that both belts around the front wheel and the belt around the back wheel of the bicycle are sitting correctly and securely.
• Re-tighten the belts if necessary. - Before beginning each journey, check that the belts used are undamaged and unworn.
- Replace damaged or worn belts with undamaged belts before beginning the journey. Use only belts that are approved by Saris for the purpose.

text_image
Warning symbol with exclamation mark inside a triangle on black backgroundWARNING
A loose connection between the carrier and the bicycle can cause the connection to become detached and loss of the bicycle.
Injury to people or damage to property due to loss of a bicycle during the journey.
- Check that the bicycles are fixed securely and fully.
- If the connection is loose, repeat steps 1 to 12 from this chapter.
Now raise the bicycle carrier as described in the chapter on "Raising the Bicycle Carrier".

text_image
Warning symbol with exclamation mark inside a triangle on black backgroundWARNING
An unraised or unsecured bicycle carrier can become caught on obstacles.
Injury to people or damage to property due to loss of the bicycle carrier during the journey.
- Raise the bicycle carrier to the end position before each journey.
- Ensure that you secure the bicycle carrier with the keyswitch.
Tilting the Bicycle Carrier, Access to the Hatch

text_image
Diagram illustrating bicycle seatbelt adjustment with labeled parts and directional arrows
text_image
Warning symbol with exclamation mark inside a triangle on black backgroundCAUTION
The hatch could hit the bicycle carrier and be damaged.
Damage to property due to hatch lid opening.
- Switch off electric hatch lids and operate manually.
- Fold down the bicycle carrier before opening the hatch lid.

text_image
Black background with a white warning symbol containing an exclamation mark.CAUTION
Injury to people or damage to property due to sudden folding down.
Body parts or objects that are under or in front of the carrier when it is folded down may be crushed.
- Ensure that there is nothing under the carrier.
- Watch out for your body and particularly your head; maintain a safe distance.
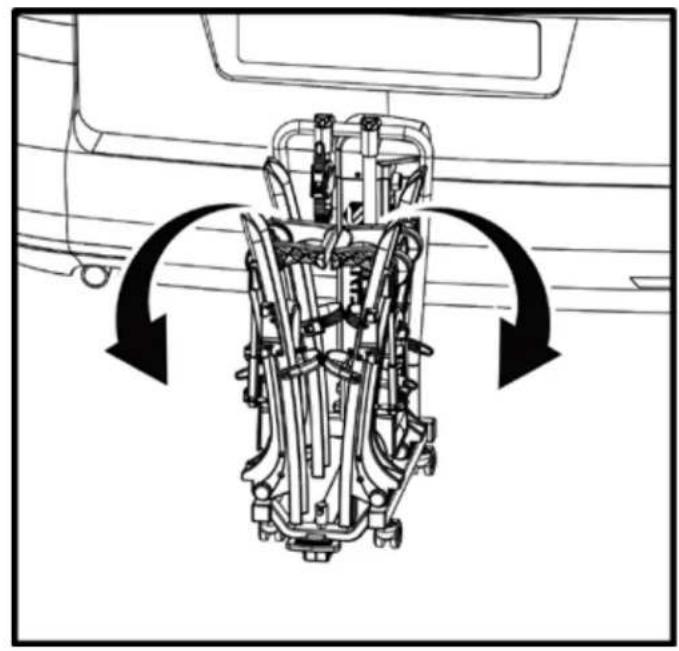
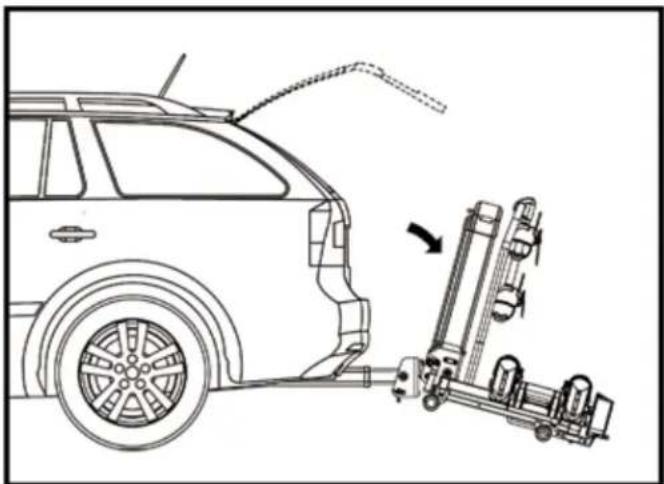
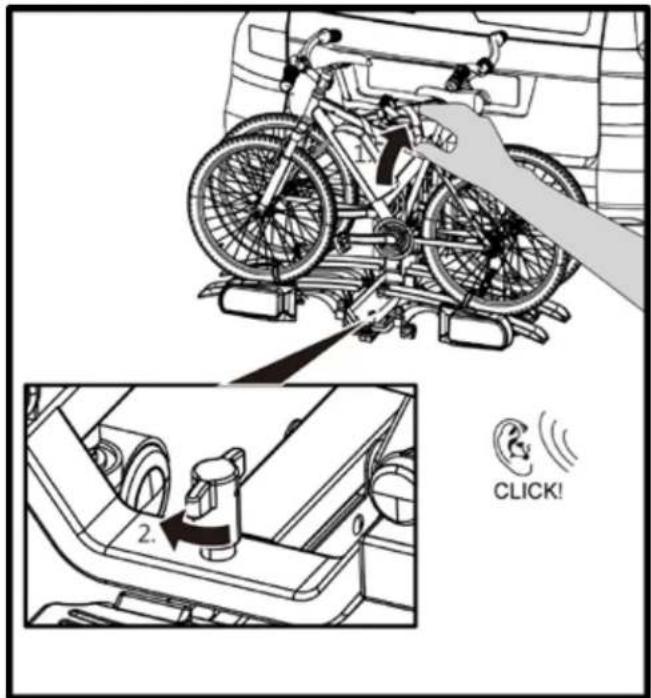
- Release the lock (1.). Hold the carrier on the U-bracket when folding down (2.). Release the lock with a foot (3.) and tilt the carrier down with a hand.
natural_image
Line drawing of a car with a mounted vehicle attachment system (no text or symbols)
text_image
Warning symbol with exclamation mark inside triangle on black backgroundCAUTION
Injury to people or damage to property possible by folding up.
Body parts or objects that are between the carrier and the vehicle may be crushed.
- Ensure that there is nothing between the carrier and the vehicle.
- Remove everything from the space between the carrier and the vehicle.
text_image
Diagram illustrating bicycle wheel assembly and earplacing process with labeled steps 1 and 2, showing a hand using a bicycle to adjust the seat.
text_image
Warning symbol with exclamation mark inside triangle on black backgroundWARNING
A bicycle carrier that is not folded up can cause the carrier or coupling to break off. Injury to people or damage to property due to loss of the bicycle carrier during the journey.
- Fold up the carrier before the journey.
- Check that the bicycle carrier is engaged properly. If necessary, engage the carrier as described previously.
Removing the Bicycle Carrier
text_image
Technical diagram showing mechanical assembly with labeled parts and directional arrows, likely illustrating a process or assembly.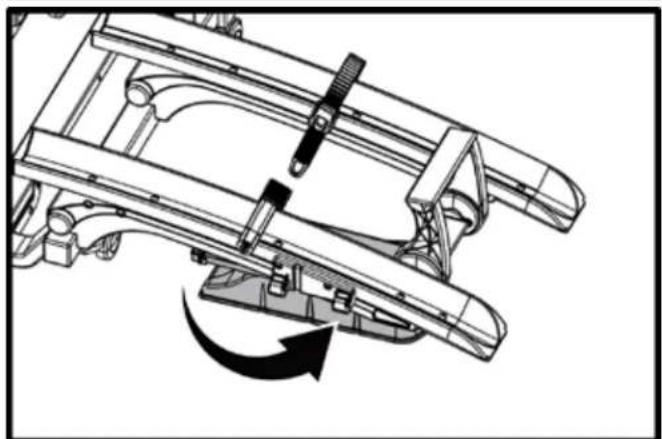
natural_image
Technical line drawing of a mechanical assembly with a lever and curved components, no visible text or symbols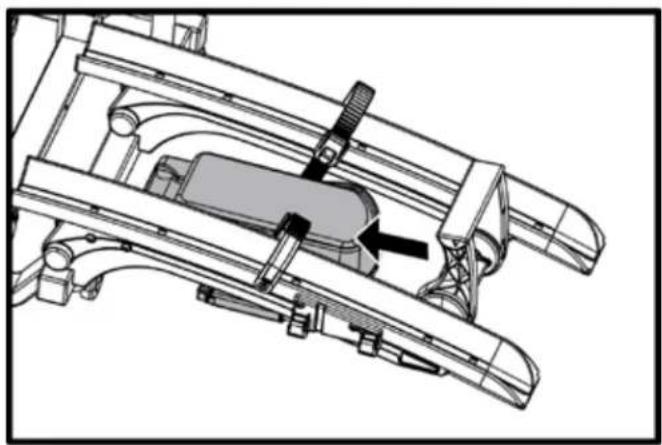
natural_image
Technical line drawing of a mechanical assembly with no visible text or symbols
natural_image
Mechanical assembly diagram showing a shaft being inserted into a housing with a close-up of the component (no text or symbols present)Carrying the Bicycle Carrier
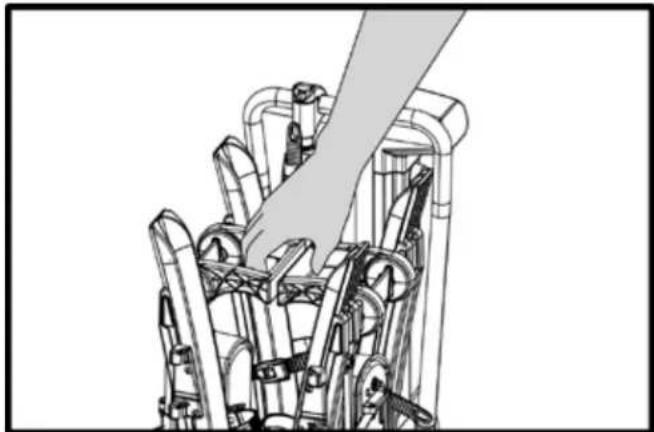
natural_image
Technical line drawing of a mechanical assembly with a hand operating a component (no text or symbols)Rolling the Bicycle Carrier
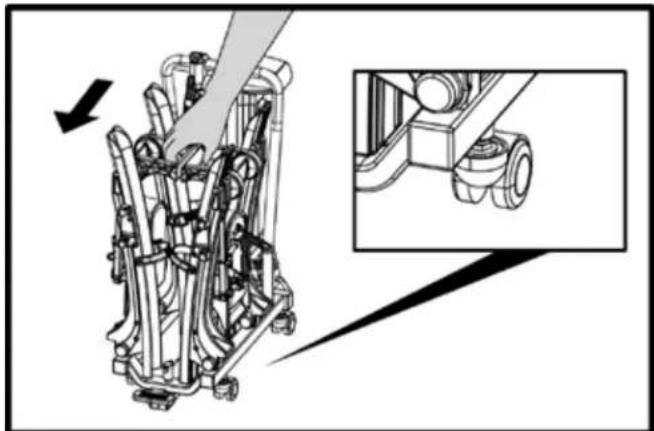
natural_image
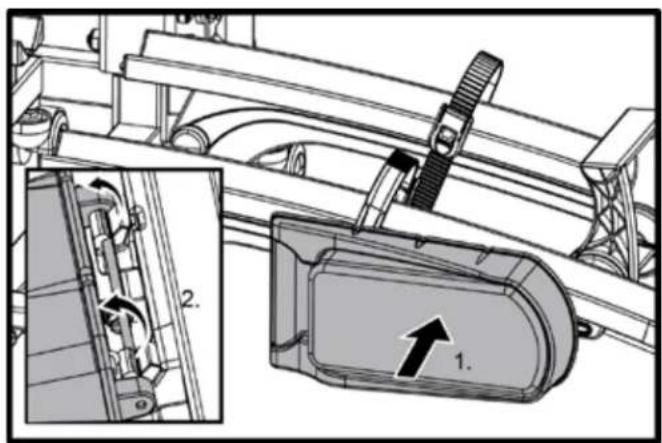
Mechanical assembly diagram showing a motor with gears and shafts, including a close-up inset of the gear mechanism (no text or labels)Storing the Bicycle Carrier in the Protective Cover
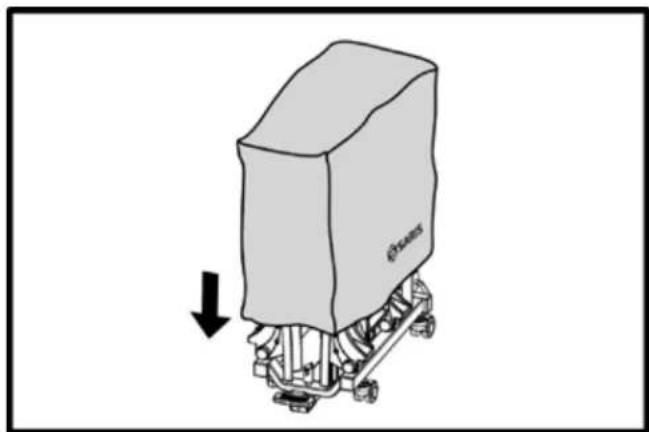
natural_image
Illustration of a cart with a branded box and directional arrow (no text or symbols)Cleaning and Care
The bicycle carrier can be cleaned with a mild detergent warm water, and/or a soft cloth.
Remove coarse dirt and dust in advance. Do not use solvents or similar cleaners, as these could damage the bicycle carrier.
Allow the bicycle carrier to dry by itself. Do not use a hairdryer or other heated appliances to speed up the drying process. Clean the bicycle carrier regularly in coastal areas and in the case of use in winter conditions, to rinse off salt and prolong the life of the bicycle carrier.
In prolonged periods without use (e.g. over winter), store the bicycle carrier in a place that is dry and protected, to prolong its life.
Maintenance
Before each journey, check the bicycle carrier for wear. Defective metal parts and tension belts in particular must be replaced.
To replace the parts, contact our customer service. Any change to original parts and materials or to the structure of the bicycle carrier may impair safety and performance.
The steel parts of the bicycle carrier have been protected from corrosion by powder coating in the factory. If this layer of paint is damaged, ensure that the damage is rectified professionally as soon as possible.
Disposal
Observe the local official regulations for disposal. Also, dispose of the packaging by type in the collection containers provided for this. More information can be obtained from your local waste disposal center.
Contact:
Saris Cycling Group, Inc.
5253 Verona Road
Madison, WI 53711
Phone: 608-274-6550
Fax: 608-274-1702
Email: custserv@saris.com
www.saris.com
PIN ASSIGNMENT
The bicycle carrier is equipped with a lighting system. This is connected to the tow hitch socket with a 7-pole plug.
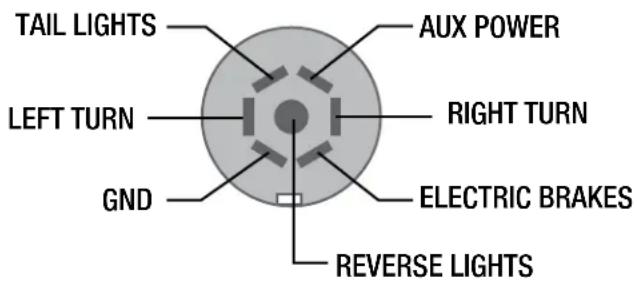
text_image
TAIL LIGHTS LEFT TURN GND AUX POWER RIGHT TURN ELECTRIC BRAKES REVERSE LIGHTSBRAKE LIGHTS ARE COMBINED WITH TURN INDICATORS
Recommended Rack Maintenance & Care Instructions
EACH USE:
- Wipe down trunk rack feet
- Avoid ground contact with trunk rack feet
- Check straps for signs of wear
- Check bike cradles and wheel scoops
- Check for loose bolts
EVERY 90 DAYS ACTIONS:
- Clean with water and mild soap
- Lubricate locks if applicable (use wet, oil-based lubricant; NO WD-40)
- Grease hitch bolt threads
- Check for scratches in paint.
Official Warranty Terms: Saris Racks
Saris Cycling Group, Inc (SCG), parent company of Saris Racks, warrants our products to the original consumer to be free from defects in materials and workmanship. Your purchase includes the following warranty which is in lieu of all other express warranties. This warranty is extended only to the initial consumer purchaser. This warranty gives you specific legal rights. You may have other legal rights which vary from state to state. Please retain your sales slip for your records, as proof of purchase will be required.
Warranty Term
Door County 2 Year
* Warranty only valid for original purchaser. Limited lifetime warranty available in North America only.
Manufacturing defects are most likely to be identified on new products or early in the product's lifespan. Each warranty claim is unique, and it is solely up to SCG to determine if a product can be covered by the limited lifetime warranty due to defects, or if the product has suffered wear and tear.
Any product or part thereof found to be defective within the term as set forth above will be replaced without charge provided that: (1) its failure resulted from a defect in material or workmanship and not from normal wear and tear expected in the use of the product; (2) the product was not abused, misused, improperly assembled, improperly maintained or damaged by accident or installation of parts or accessories not originally intended or compatible with the racks as originally sold., (3) there was no failure to follow instructions or warnings in Owner's Manual; (4) no alterations or modifications were made; and (5) the product or part is delivered, freight prepaid, to Saris Cycling Group or an authorized service center. Please call 1-800-783-7257 to obtain return authorization prior to return. Any other claims not included in the statements above are void and will not be honored. SCG reserves the right to inspect any product before issuing a replacement. SCG's only obligation shall be to replace such products or parts that it determines are defective.
Limitations
THE FOREGOING WARRANTIES ARE THE ONLY WARRANTIES MADE BY SCG. THERE ARE NO OTHER WARRANTIES. ANY WARRANTY THAT MIGHT OTHERWISE BE IMPLIED BY LAW INCLUDING, BUT NOT LIMITED TO ANY IMPLIED WARRANTY OF MERCHANTABILITY OR FITNESS FOR A PARTICULAR PURPOSE ARE LIMITED STRICTLY TO THE APPLICABLE LENGTH OF THIS LIMITED WARRANTY.
SCG shall not be liable for incidental or consequential losses, damages, or expenses in connection with its products. SCG's liability hereunder is expressly limited to the replacement of goods not complying with this warranty or, at SCG's election, to the repayment of an amount of the purchase price of the product in question.
Exclusions
- If consumer does not comply with all warnings, cautions, or instructions listed in Instruction Manual, damage is not covered under warranty
- Impact/collision damage is not covered under warranty
- Cradles and strap damage due to improper arm placement are not covered under warranty
- Carrying anything other than a bicycle is not covered under warranty
- Paint damage – chipping, cracking, or fading is not covered under warranty
- Rust is wear and tear and is preventable with rack maintenance
• Weather impact (UV, salt air/water) - Damage to mounting surface
- Damage or loss resulting from failure to replace/maintain consumable items not covered.
• Not following Recommended Rack Maintenance - Consumable Items not covered by warranty. Including but not limited to.
- Arm and wheel tray adjustment knobs
• Frame and wheel straps
• Vehicle attachment straps - Molded wheel trays
- Frame cradles
- Threaded assemblies
- Ratcheting assemblies
© 2021 SARIS CYCLING GROUP
DOOR COUNTY
PORTABICICLETAS
DE ENGANCHE
Art. n.° 4800

SARIS
natural_image
Technical line drawing of a mechanical assembly with articulated arms and pipes (no text or symbols)natural_image
Simple line drawing of a bicycle (no text or symbols)Máx = 27 kg/60 libras
Max = 60 lbs/kg 27
Máx. = 27 kg/60 lb

natural_image
Two identical line-drawn bicycles side by side (no text or symbols)Máx. = 54 kg/120 libras
(Max = = 60 lbs/27kg per bike)
Max = 120lb/54kg
natural_image
Three circular diagrams showing a van and bus crossing over a shared road, with no text or symbols present.text_image
Black background with white warning symbol containing an exclamation markADVERTENCIA
text_image
Warning symbol with exclamation mark inside triangle on black backgroundADVERTENCIA
text_image
Warning symbol with exclamation mark inside a triangle on black backgroundADVERTENCIA
text_image
Warning symbol with exclamation mark inside a triangle on black backgroundADVERTENCIA
text_image
Warning symbol with exclamation mark inside a triangle on black backgroundATENCIÓN
text_image
Warning symbol with exclamation mark inside triangle on black backgroundADVERTENCIA
text_image
Technical diagram of a mechanical assembly with numbered components and an inset showing a close-up detail of a component labeled '3.'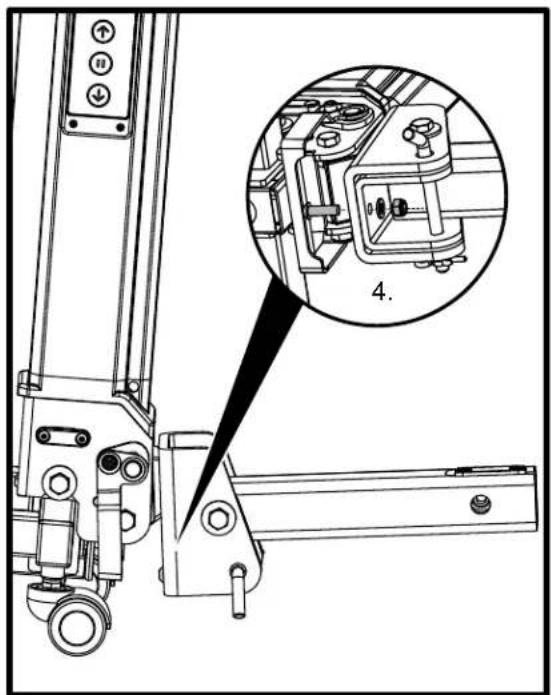
natural_image
Technical line drawing of a mechanical assembly with an inset close-up showing a component detail (no text or symbols present)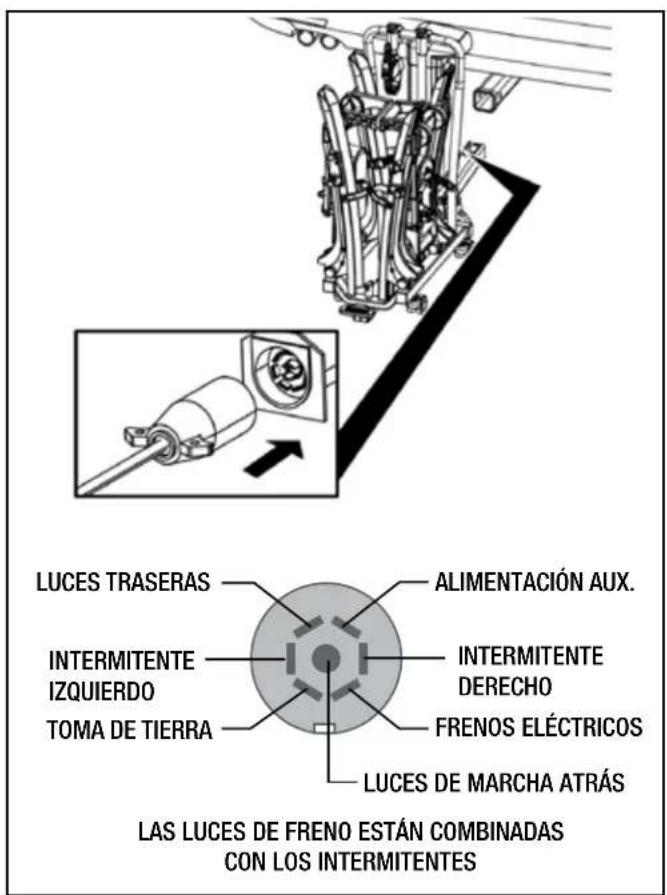
natural_image
Mechanical assembly diagram showing a vehicle's internal components and a close-up of a bracket assembly (no text or labels)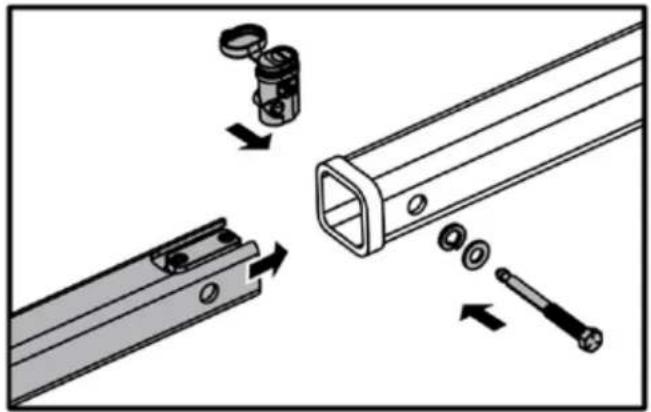
natural_image
Technical illustration of a mechanical assembly with exploded view and disassembled parts (no text or symbols)natural_image
Mechanical assembly diagram showing internal components with bidirectional arrows indicating motion (no text or labels)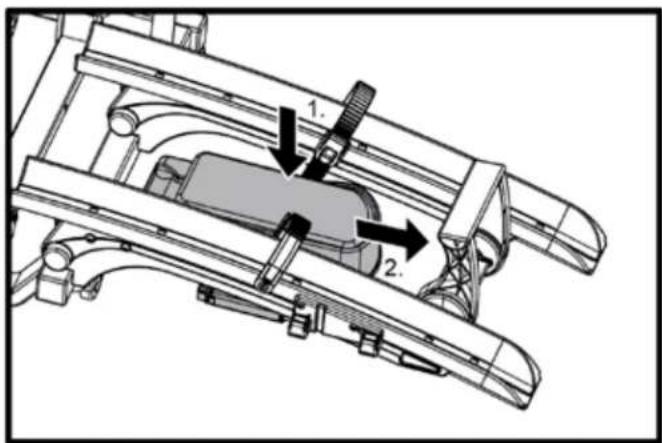
text_image
Technical diagram of a mechanical assembly with labeled components and directional arrows indicating motion or force directions.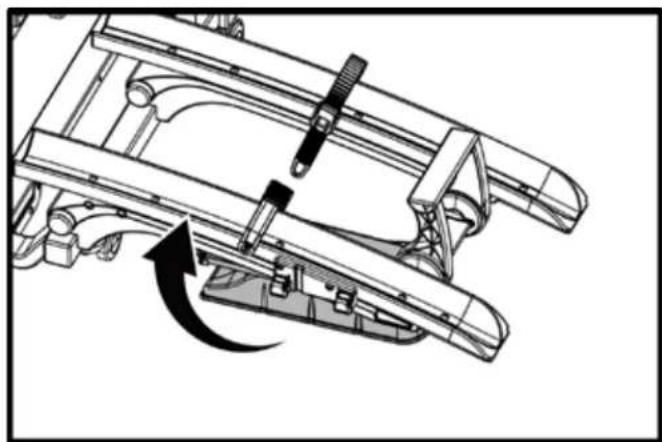
natural_image
Mechanical assembly diagram showing a lever mechanism with a curved arrow indicating motion (no text or symbols present)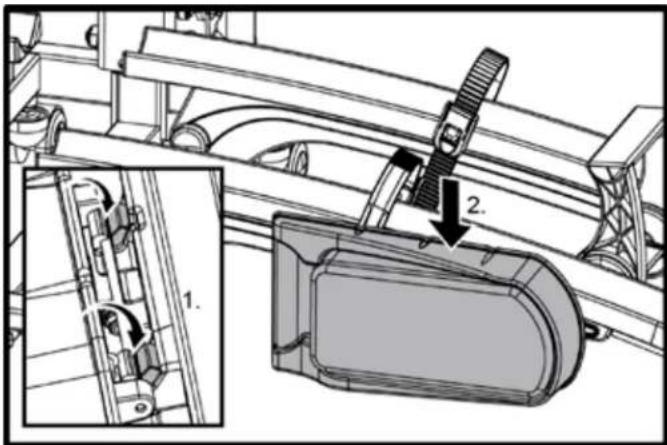
text_image
Technical diagram showing mechanical assembly with labeled components and directional arrows indicating motion or movement.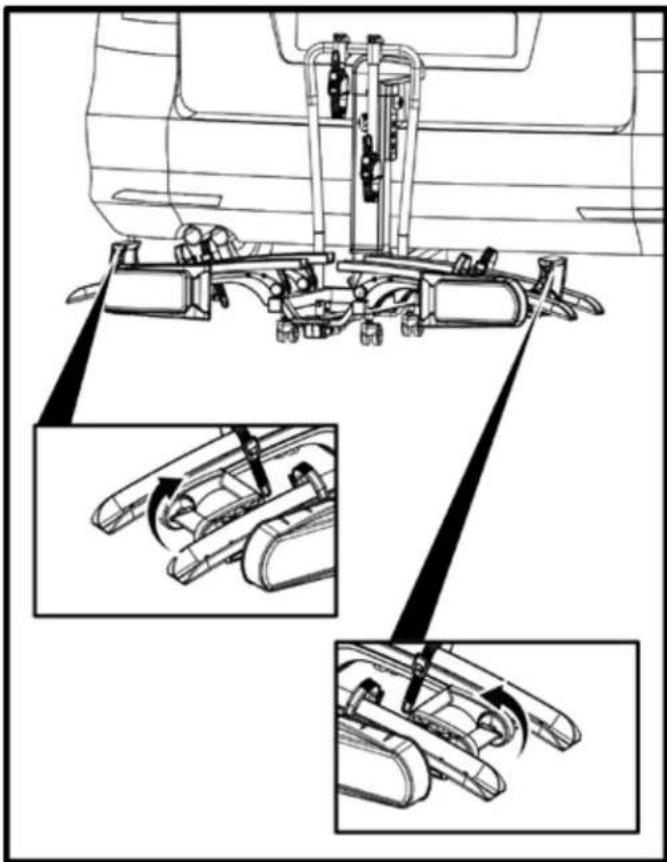
natural_image
Technical line drawing of a mechanical assembly with multiple views and components, no visible text or symbols
text_image
Black background with white warning symbol containing an exclamation markADVERTENCIA
text_image
Warning symbol with exclamation mark inside a triangle on black backgroundADVERTENCIA
text_image
Warning symbol with exclamation mark inside triangle on black backgroundPRECAUCIÓN
text_image
Technical diagram of a vehicle's seatbelt assembly with labeled components and a PEEP warning icon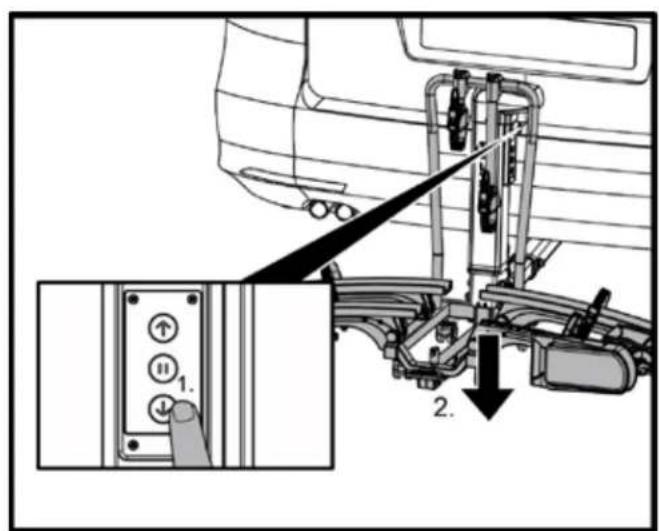
text_image
Technical diagram showing a mechanical assembly with labeled parts and directional arrows indicating movement or assembly.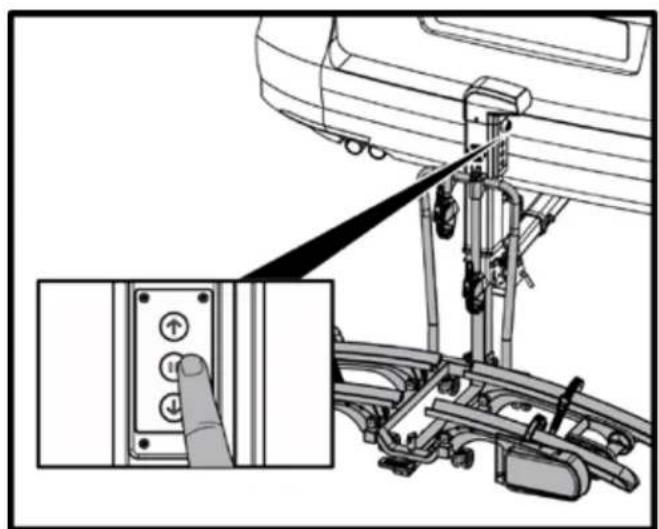
natural_image
Mechanical assembly diagram showing a hand pressing a button on a vehicle chassis, with an inset close-up of the button (no text or symbols visible)text_image
Black background with a white warning symbol containing an exclamation mark.ADVERTENCIA
text_image
Technical diagram showing mechanical assembly steps with labeled components and directional arrows indicating movement or force.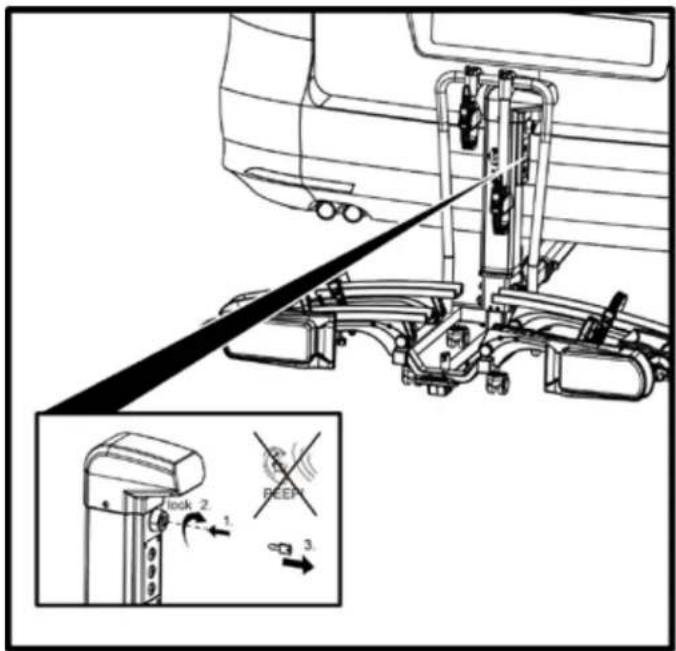
text_image
Technical diagram showing a vehicle seatbelt mechanism with labeled parts and directional arrows indicating lock, reep, and switch functions.text_image
Warning symbol with exclamation mark inside a triangle on black backgroundADVERTENCIA
text_image
Technical diagram of a mechanical device with numbered instructions for assembly or maintenance steps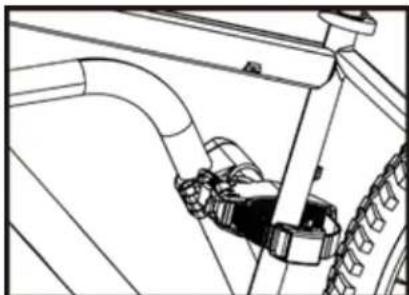
natural_image
Technical line drawing of a vehicle suspension system with no visible text or symbols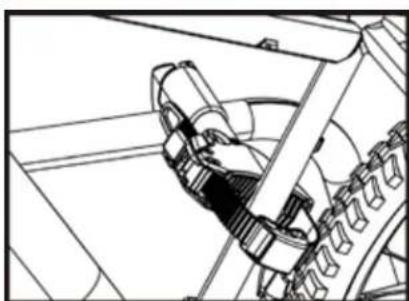
natural_image
Technical line drawing of a mechanical assembly with springs and gears (no text or symbols)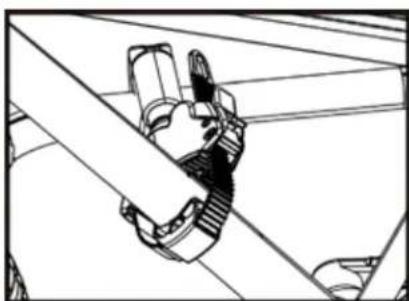
natural_image
Technical line drawing of a mechanical assembly with gears and rods (no text or symbols)text_image
Technical diagram showing bicycle track maintenance with labeled steps and component details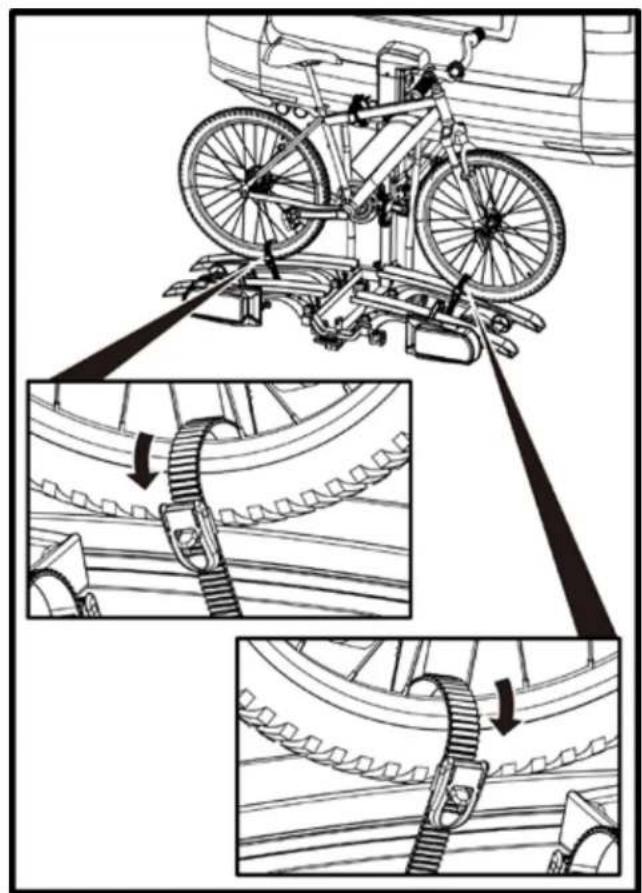
natural_image
Technical illustration of a bicycle suspension system with mechanical components and structural details (no text or symbols)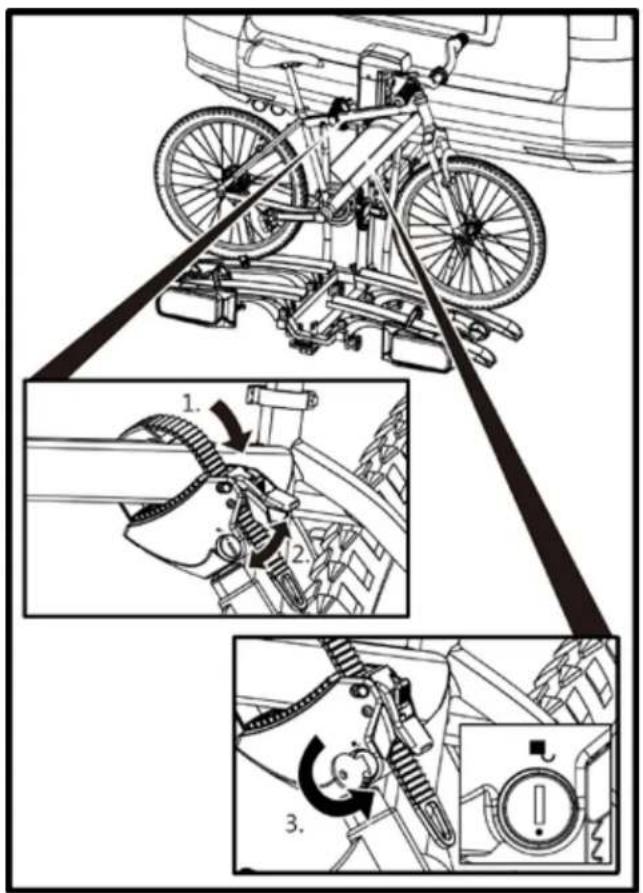
text_image
Technical diagram illustrating bicycle wheel assembly and mechanical adjustment steps with labeled diagrams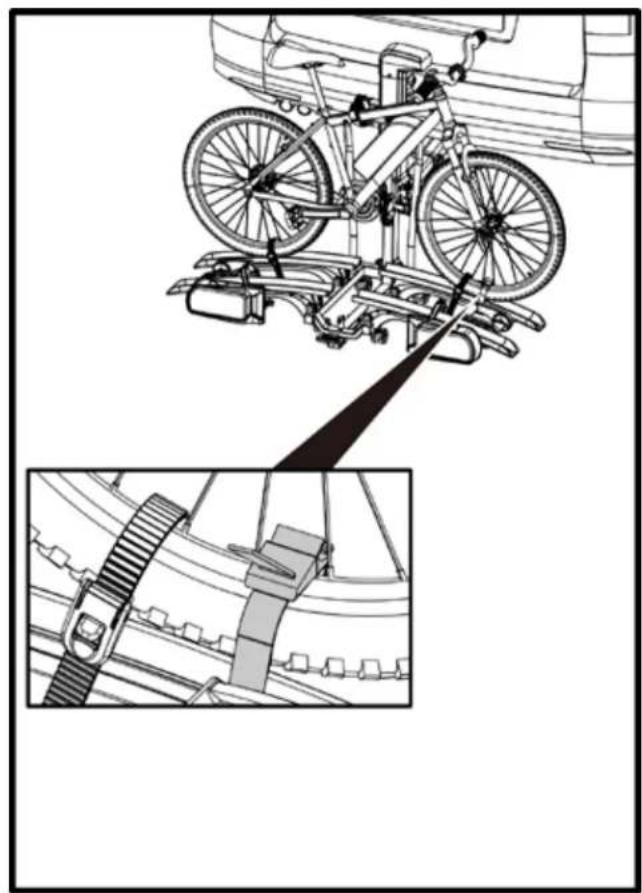
natural_image
Technical line drawing of a bicycle-mounted platform with a close-up inset showing its structural components (no text or symbols)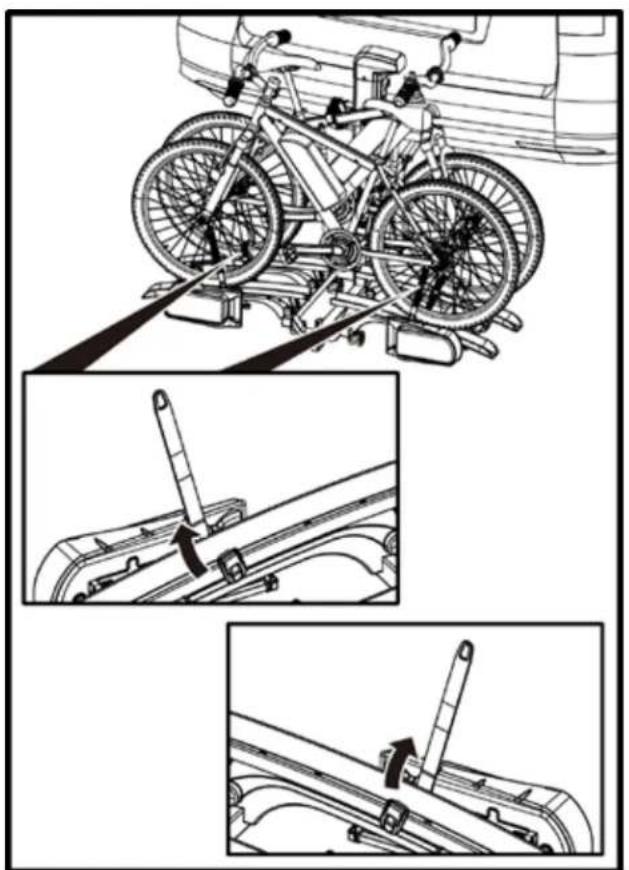
natural_image
Technical illustration of a bicycle-mounted platform with three zoomed-in views showing mechanical components (no text or symbols)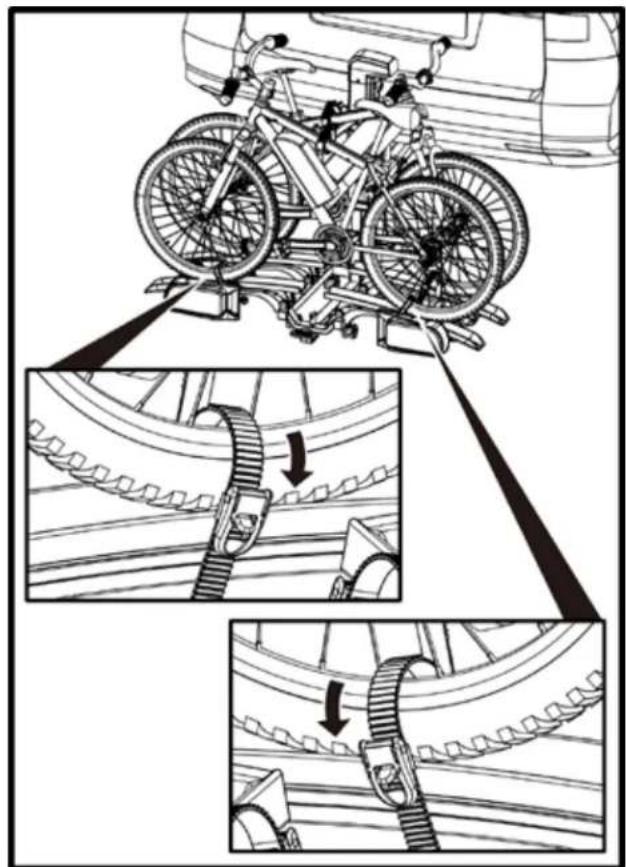
natural_image
Technical illustration of a bicycle under load, showing structural components and gear assembly (no text or symbols)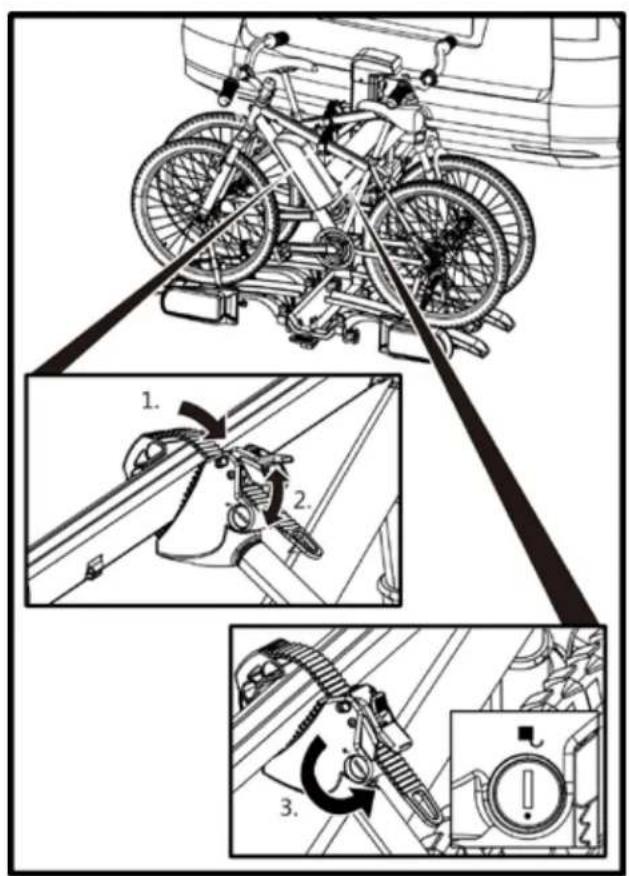
text_image
Technical diagram illustrating bicycle wheel assembly and safety instructions with labeled steps 1, 2, and 3.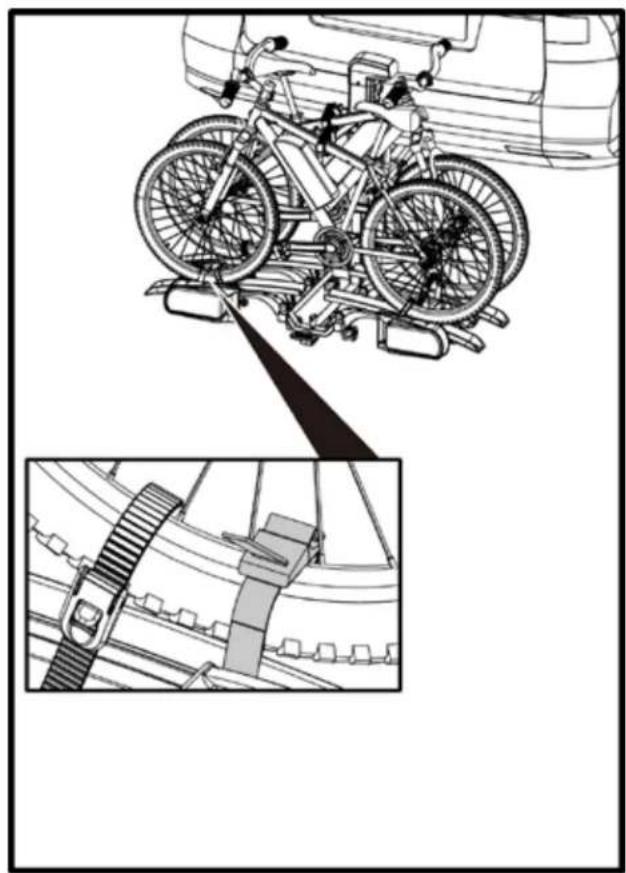
natural_image
Technical line drawing of a bicycle under load with a close-up inset showing its structural components (no text or symbols)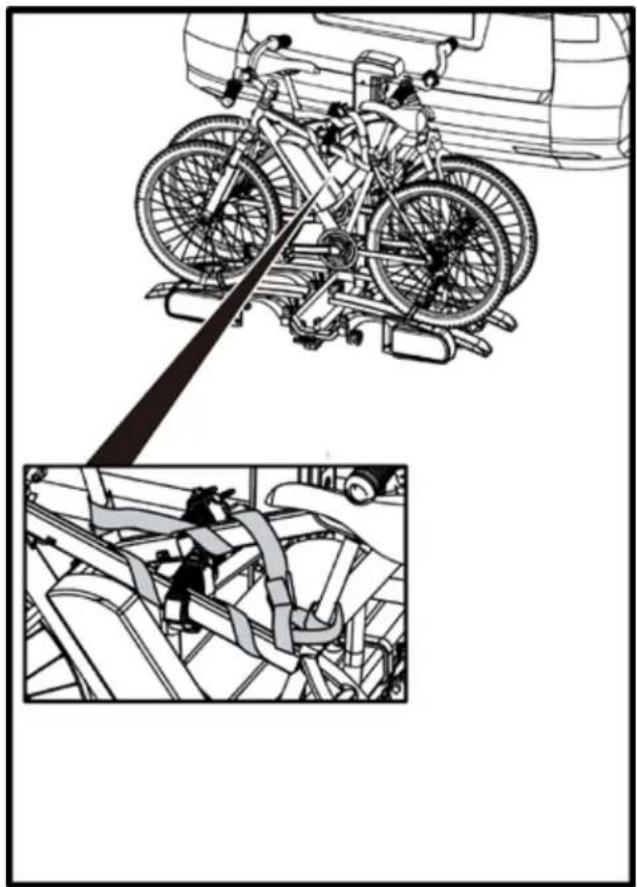
natural_image
Technical illustration of a bicycle under assembly with a close-up inset showing the same components (no text or symbols present)
ADVERTENCIA
text_image
Diagram illustrating bicycle seatbelt adjustment with labeled parts and directional arrows
text_image
Warning symbol with exclamation mark inside a triangle on black backgroundPRECAUCIÓN
text_image
Black background with a white warning symbol containing an exclamation mark.PRECAUCIÓN
natural_image
Line drawing of a car with a mechanical lift system attached to the side, showing no text or symbols.
text_image
Warning symbol with exclamation mark inside a triangle on black backgroundPRECAUCIÓN
text_image
Diagram illustrating bicycle wheel assembly and earplacing process with labeled steps 1 and 2, showing a hand using a bicycle to adjust the seat.
text_image
Warning symbol with exclamation mark inside a triangle on black backgroundADVERTENCIA
text_image
Technical diagram showing mechanical assembly with labeled components and directional arrows indicating movement or force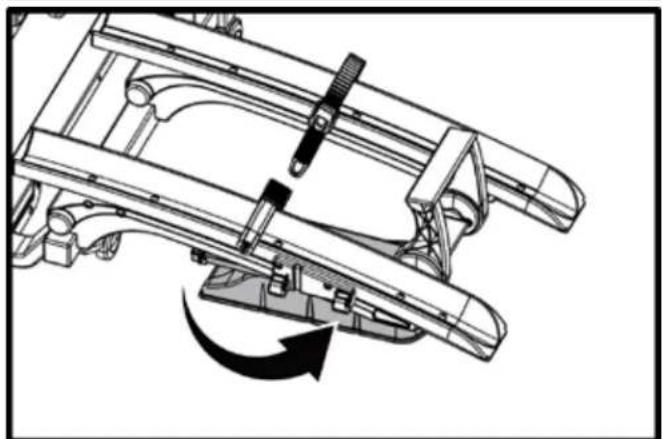
natural_image
Technical line drawing of a mechanical assembly with a lever and curved components, no visible text or symbols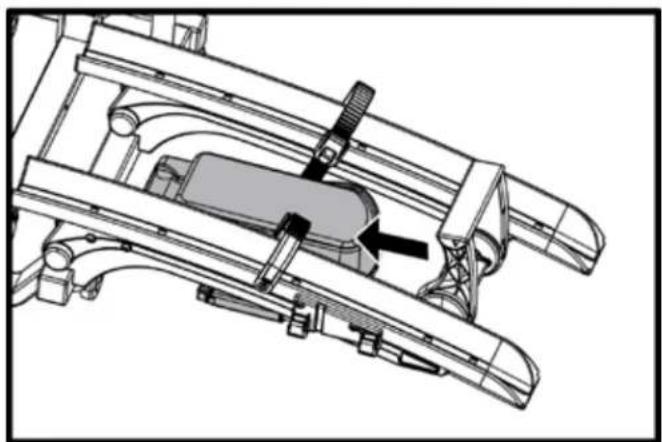
natural_image
Technical line drawing of a mechanical assembly with no visible text or symbols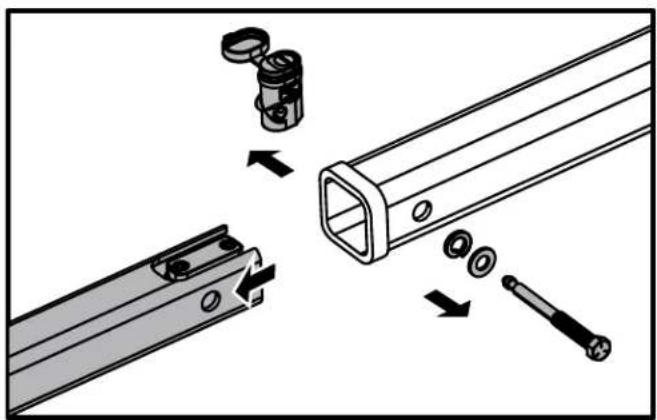
natural_image
Mechanical assembly diagram showing a shaft being inserted into a housing with a close-up of the component (no text or symbols present)natural_image
Illustration of a hand operating a mechanical device with multiple pipes and gears (no text or symbols visible)Rodadura del portabicicletas
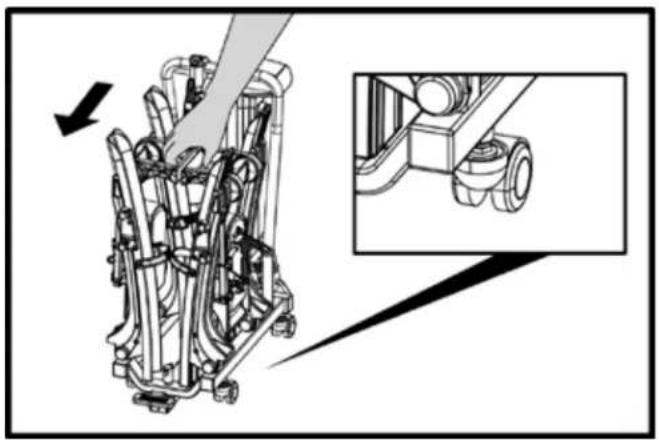
natural_image
Mechanical assembly diagram showing internal components and a close-up view of a mechanical assembly (no text or labels)natural_image
Diagram of a device with a labeled box and directional arrow, no readable text or symbols presentLimpieza y cuidados
Saris Cycling Group, Inc.
5253 Verona Road
natural_image
Technical line drawing of a mechanical assembly with articulated arms and pipes (no text or symbols)Mode d'emploi
natural_image
Simple line drawing of a bicycle (no text or symbols)Max = 60 lbs/kg 27
Máx.= 27 kg/60 libras
Max = 60 lb/27 kg

natural_image
Two identical line-drawn bicycles side by side (no text or symbols)Max = 120 lbs/54 kg
(Max = 60 lbs/27kg per bike)
Máx.= 54 kg/120 libras
natural_image
Three circular diagrams showing a van and bus crossing over a shared road, with no text or symbols present.text_image
Warning symbol with exclamation mark inside triangle on black backgroundATTENTION
text_image
Warning symbol with exclamation mark inside a triangle on black backgroundAVERTISSEMENT
text_image
Technical diagram of a mechanical assembly with numbered components and an inset showing a close-up view of a component labeled '3.'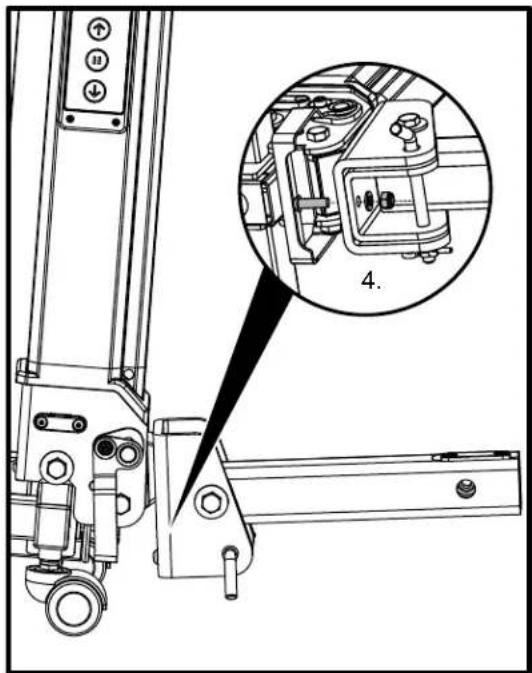
natural_image
Technical line drawing of a mechanical assembly with an inset close-up showing a component detail (no text or symbols present)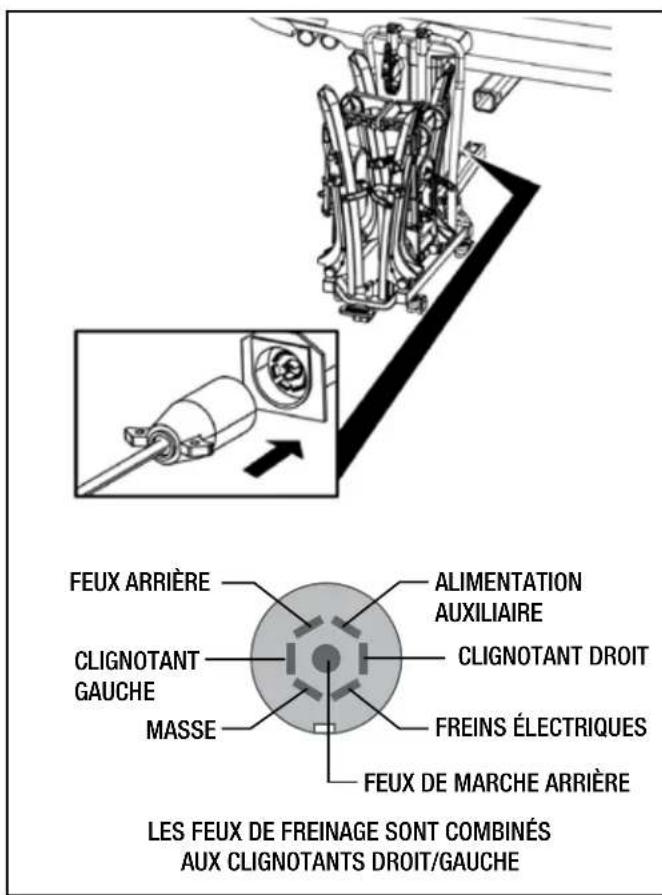
text_image
FEUX ARRIÈRE ALIMENTATION AUXILIAIRE CLIGNOTANT DROIT CLIGNOTANT GAUCHE FREINS ÉLECTRIQUES MASSE FEUX DE MARCHE ARRIÈRE LES FEUX DE FREINAGE SONT COMBINÉS AUX CLIGNOTANTS DROIT/GAUCHE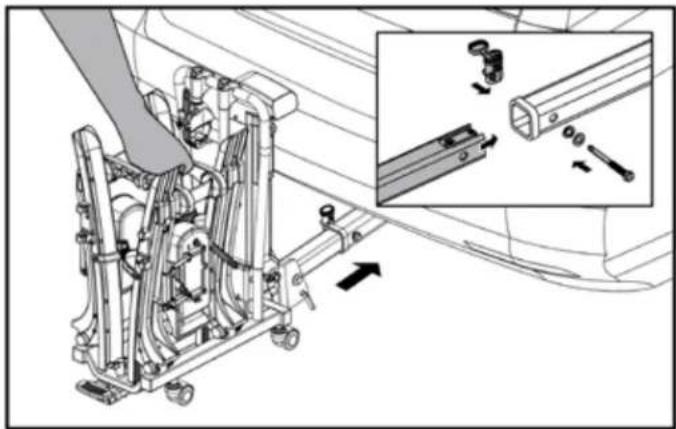
natural_image
Mechanical assembly diagram showing a vehicle's internal components and a close-up of a mechanical assembly with parts removed (no text or labels visible)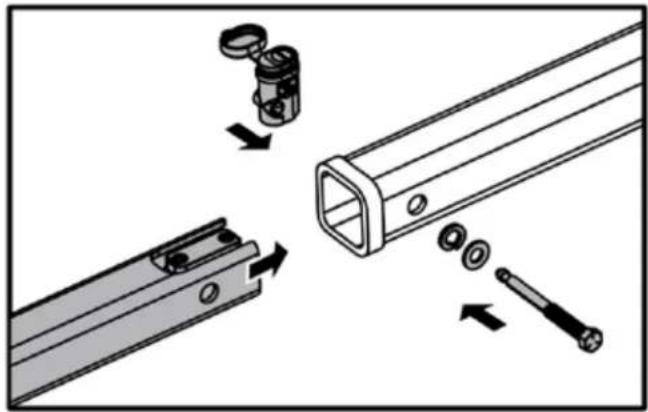
natural_image
Technical illustration of a mechanical assembly with exploded view and disassembled parts (no text or symbols)natural_image
Mechanical assembly diagram showing internal components with bidirectional arrows indicating motion (no text or labels)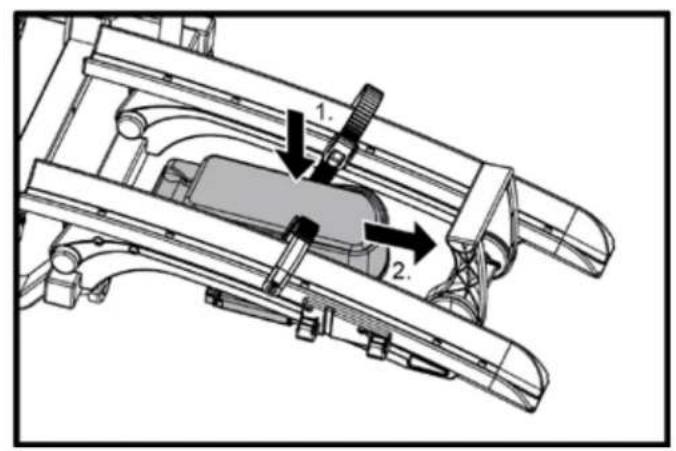
text_image
Technical diagram of a mechanical assembly with labeled components and directional arrows indicating motion or movement.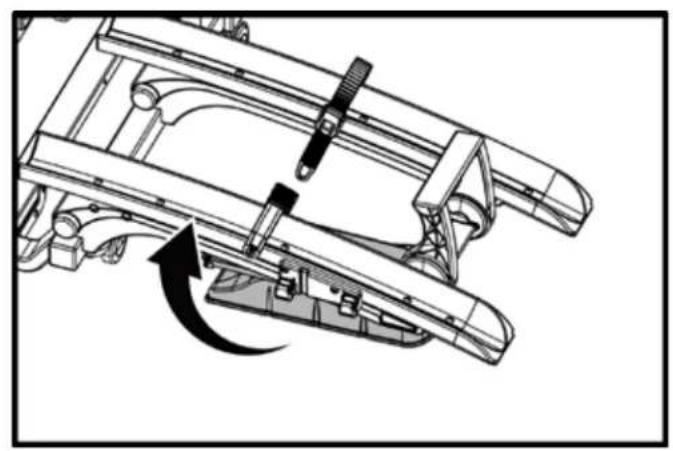
natural_image
Mechanical assembly diagram showing a lever mechanism with a curved arrow indicating motion (no text or symbols present)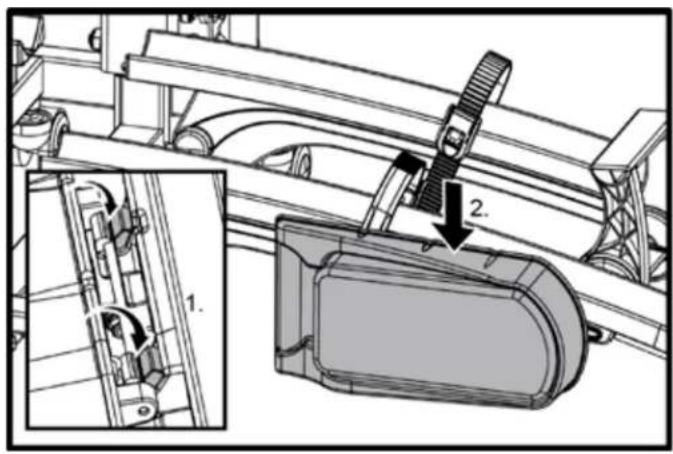
text_image
Technical diagram showing mechanical assembly with labeled components and directional arrows indicating motion or movement.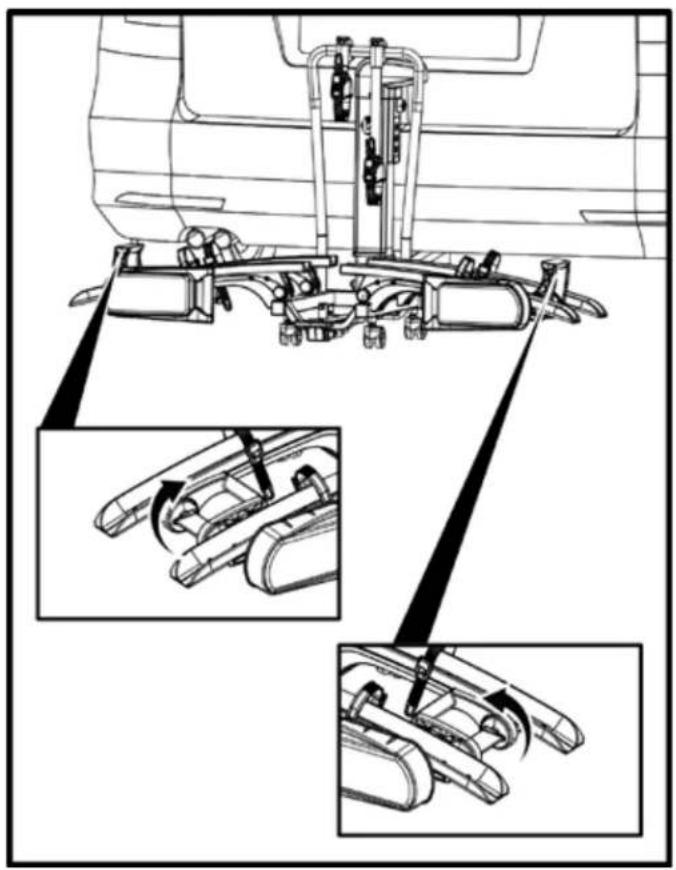
natural_image
Technical line drawing of a mechanical assembly with multiple views and components (no text or symbols)
text_image
Warning symbol with exclamation mark inside a triangle on black backgroundAVERTISSEMENT
text_image
Black background with white warning symbol containing an exclamation markAVERTISSEMENT
text_image
Warning symbol with exclamation mark inside triangle on black backgroundPRUDENCE
text_image
Technical diagram showing a vehicle's seatbelt assembly with labeled components and a PEEP1 sensor indicator.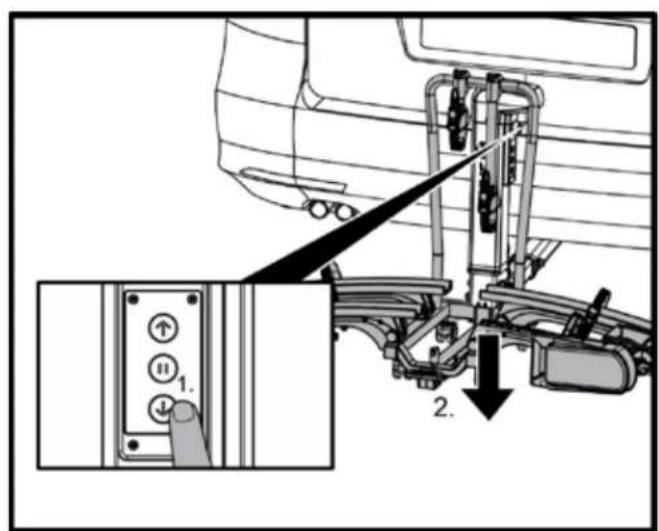
text_image
Technical diagram showing a mechanical assembly with labeled parts and directional arrows indicating movement or assembly.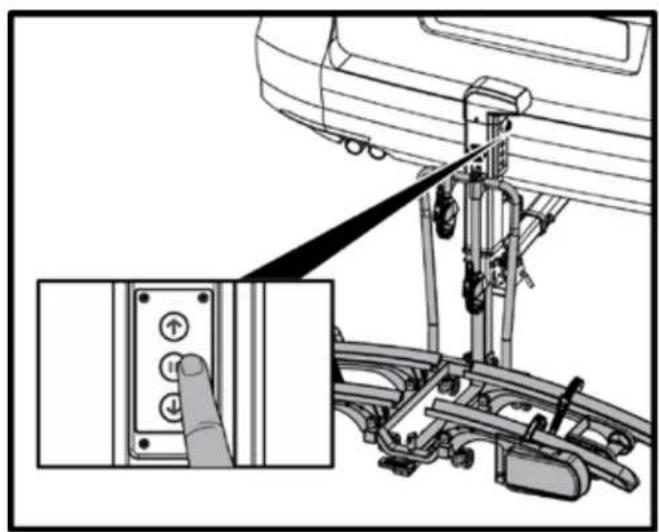
natural_image
Mechanical assembly diagram showing a hand pressing a button on a vehicle chassis, with an inset close-up of the button (no text or symbols visible)text_image
Black background with white warning symbol containing an exclamation markAVERTISSEMENT
text_image
Technical diagram showing mechanical assembly steps with labeled components and directional arrows indicating motion or movement.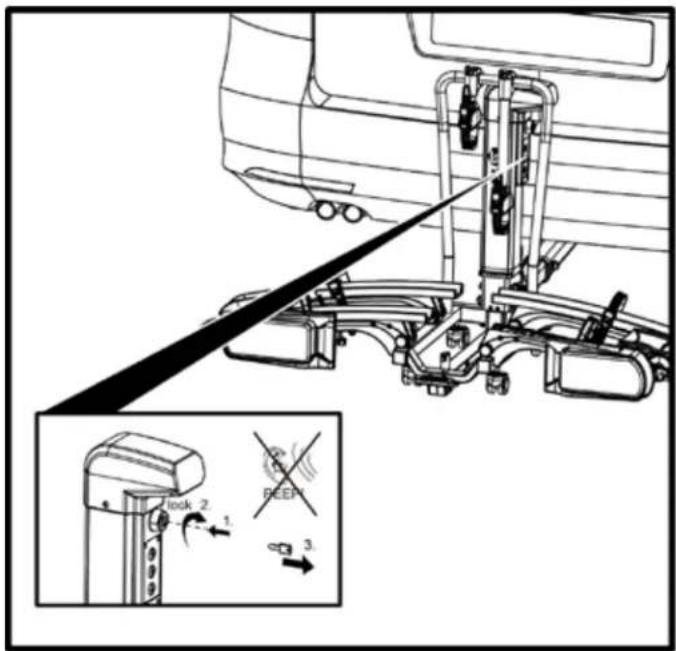
text_image
Technical diagram showing a vehicle seatbelt mechanism with labeled parts and directional arrows indicating lock, reep, and switch functions.Arrimage des vélos
text_image
Warning symbol with exclamation mark inside a triangle on black backgroundAVERTISSEMENT
text_image
Technical diagram of a mechanical device with numbered instructions for assembly or maintenance steps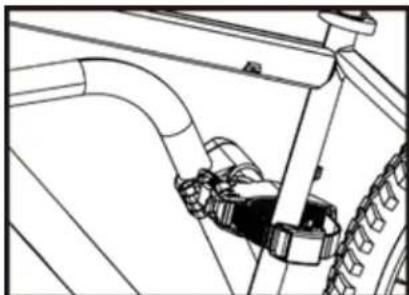
natural_image
Technical line drawing of a vehicle suspension system with no visible text or symbols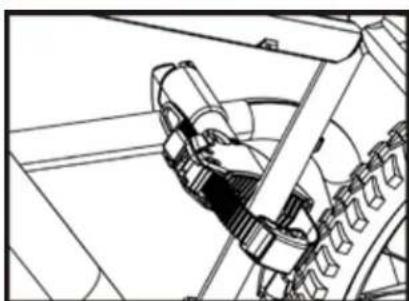
natural_image
Technical line drawing of a mechanical assembly with springs and gears (no text or symbols)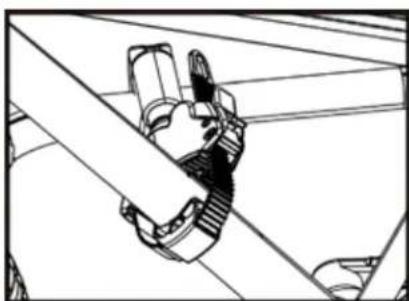
natural_image
Technical line drawing of a mechanical assembly with gears and rods (no text or symbols)Arrimage des vélos
text_image
Technical diagram showing bicycle track maintenance steps with labeled diagrams and instructions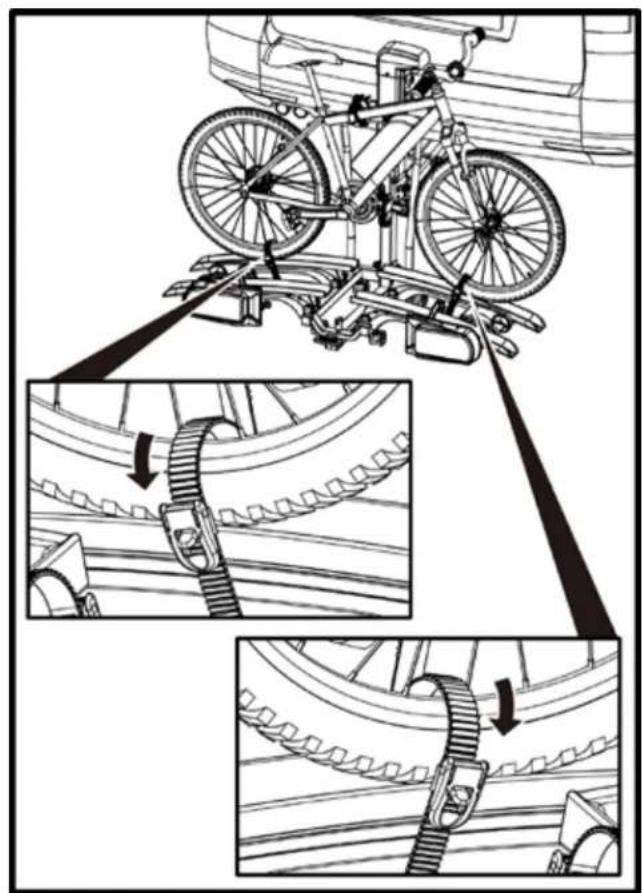
natural_image
Technical illustration of a bicycle suspension system with mechanical components and structural details (no text or symbols)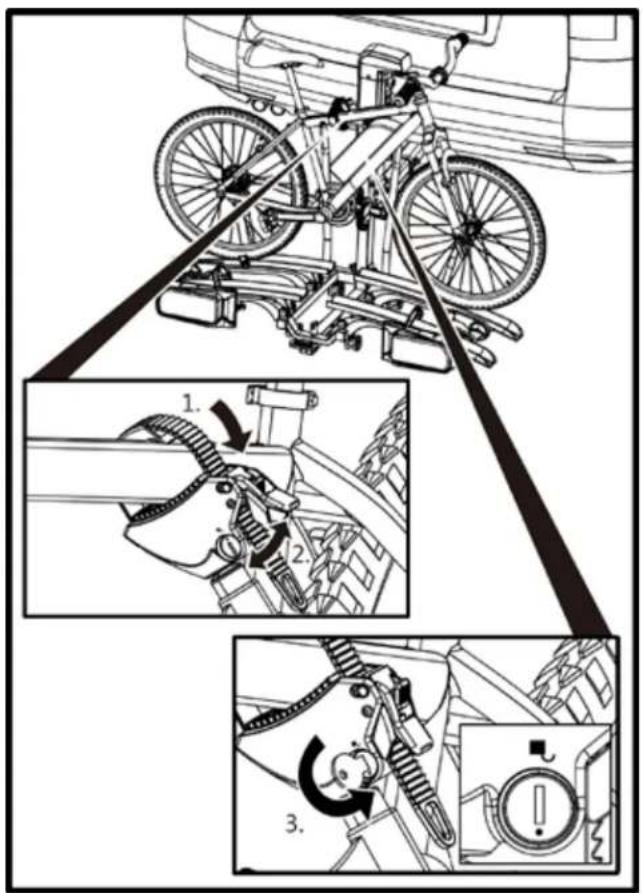
text_image
Technical diagram illustrating bicycle wheel assembly and mechanical components with numbered steps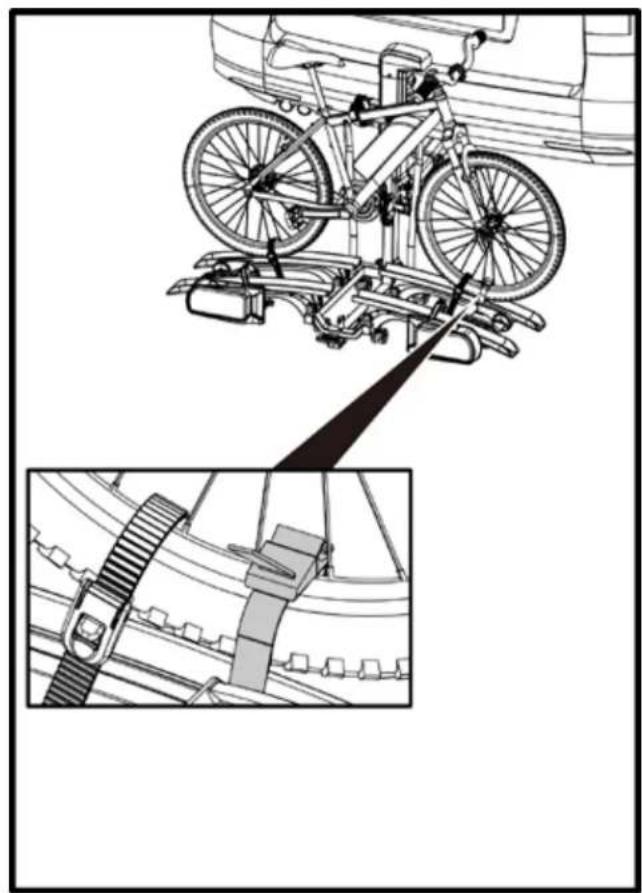
natural_image
Technical line drawing of a bicycle-mounted platform with a close-up inset showing its structural components (no text or symbols)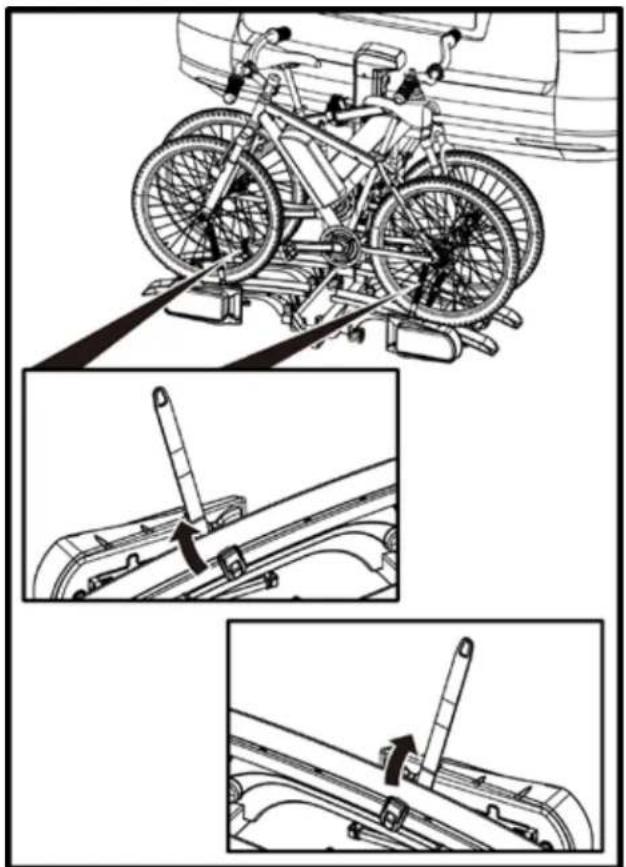
natural_image
Technical line drawing of a bicycle under assembly, showing front wheel, rear wheel, and side-mounted sensors (no text or symbols)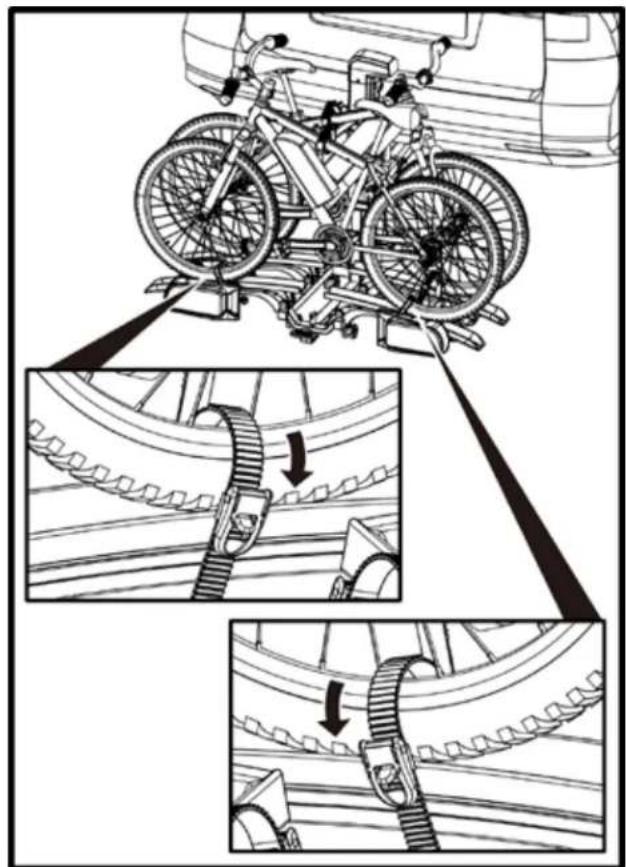
natural_image
Technical illustration of a bicycle mounted on a platform, showing three steps: before and after assembly, with no visible text or symbols.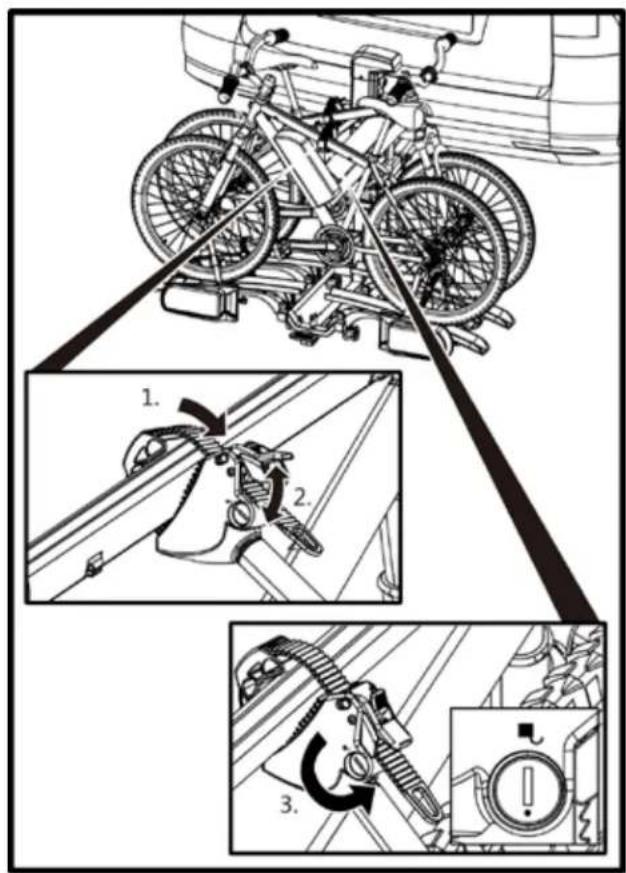
text_image
Technical diagram showing bicycle suspension system with three labeled steps: grip, lock, and switch mechanism.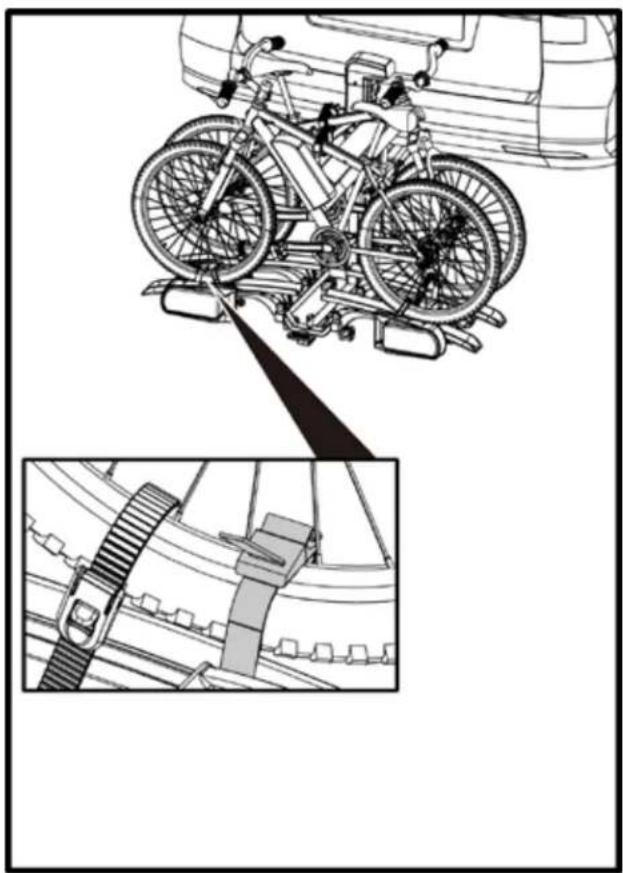
natural_image
Technical line drawing of a bicycle under load, showing front and side views with no text or symbols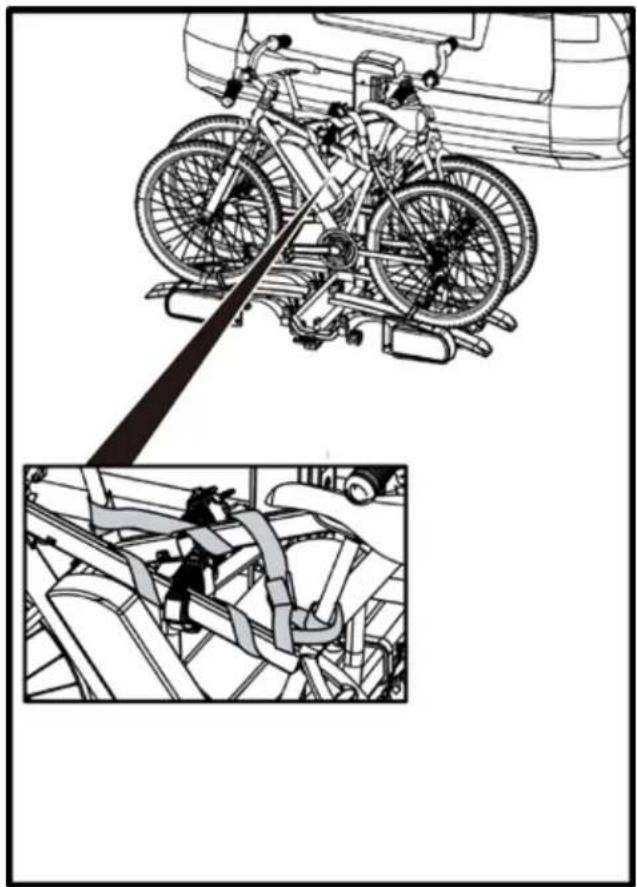
natural_image
Technical illustration of a bicycle under assembly with a close-up inset showing the same components (no text or symbols present)
text_image
!AVERTISSEMENT
text_image
Warning symbol with exclamation mark inside triangle on black backgroundAVERTISSEMENT
text_image
Diagram illustrating bicycle seatbelt adjustment with labeled steps 1 and 3 showing mechanical components and safety improvements.
text_image
Warning symbol with exclamation mark inside a triangle on black backgroundPRUDENCE
text_image
Black background with white warning symbol indicating caution or hazardPRUDENCE
natural_image
Line drawing of a car with a mounted vehicle attachment system (no text or symbols)
text_image
Warning symbol with exclamation mark inside a triangle on black backgroundPRUDENCE
text_image
Diagram illustrating bicycle wheel assembly and earplacing process with labeled steps 1 and 2, showing a hand using a bicycle to adjust the seat.
text_image
Warning symbol with exclamation mark inside a triangle on black backgroundAVERTISSEMENT
text_image
Technical diagram showing mechanical assembly with labeled components and directional arrows indicating movement or force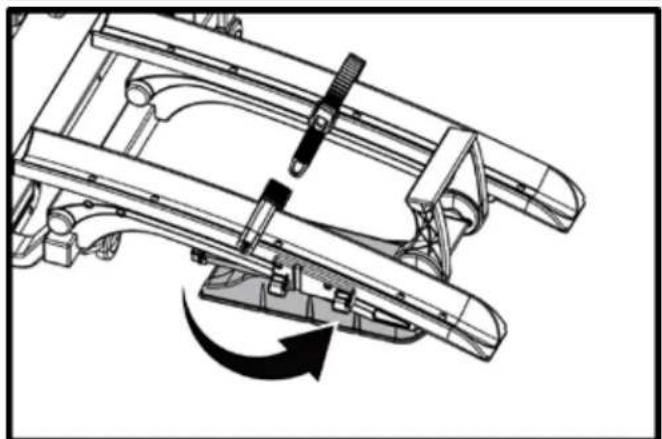
natural_image
Technical line drawing of a mechanical assembly with a lever and curved components, no visible text or symbols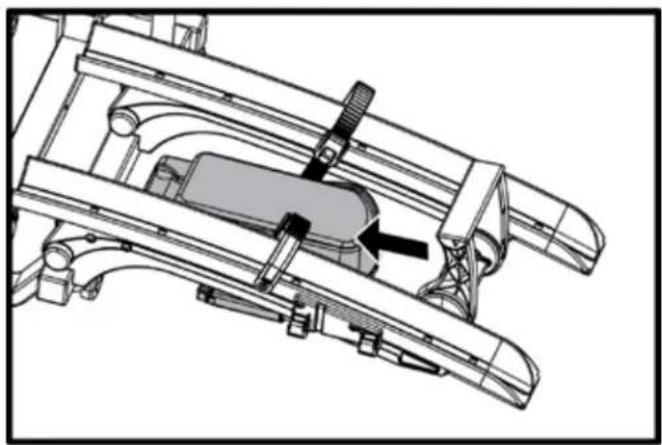
natural_image
Technical line drawing of a mechanical assembly with no visible text or symbols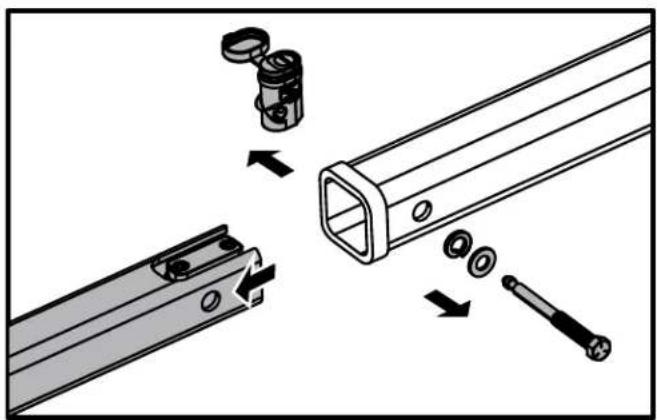
natural_image
Mechanical assembly diagram showing a shaft being inserted into a housing with a close-up of the component (no text or symbols present)natural_image
Technical line drawing of a mechanical assembly with a hand operating a component (no text or symbols)natural_image
Mechanical assembly diagram showing a motor with gear and shaft components, including a close-up inset of the gear mechanism (no text or labels)natural_image
Illustration of a cart with a branded box and directional arrow (no text or symbols)Saris Cycling Group, Inc.
5253 Verona Road
Madison, WI 53711