ECFV1 - Coffee machine Essentiel B - Free user manual and instructions
Find the device manual for free ECFV1 Essentiel B in PDF.

| Product type | Filter coffee machine |
| Brand | Essentiel B |
| Model | ECFV1 |
| Power | 900 W |
| Power supply | 220-240 V ~ 50/60 Hz |
| Capacity (glass carafe) | 1,5 L |
| Capacity (thermal carafe) | 1 L |
| Automatic shut-off | 40 minutes (glass carafe) |
| Anti-drip system | Yes |
| Filter holder | Swivel and removable |
| Permanent filter included | Yes |
| Compatible paper filters | No. 4 |
| Measuring spoon included | Yes |
| Delay start function | Yes (programmable models) |
| LCD display | Yes (programmable models) |
| Cleaning | Removable parts washable with soapy water |
| Recommended descaling | Every 2 months |
| Warranty | From date of purchase |
| Box contents | 1 coffee maker, 1 permanent filter, 1 measuring spoon, 1 instruction manual |
Frequently Asked Questions - ECFV1 Essentiel B
User questions about ECFV1 Essentiel B
0 question about this device. Answer the ones you know or ask your own.
Ask a new question about this device
Download the instructions for your Coffee machine in PDF format for free! Find your manual ECFV1 - Essentiel B and take your electronic device back in hand. On this page are published all the documents necessary for the use of your device. ECFV1 by Essentiel B.
USER MANUAL ECFV1 Essentiel B
natural_image
Black and white photo of a modern black coffee maker with a glass pitcher (no visible text or symbols)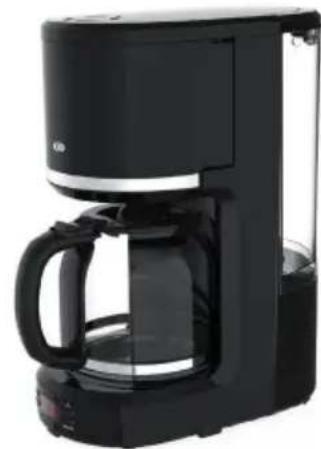
natural_image
Black and white photo of a black coffee maker with a glass mug (no visible text or symbols)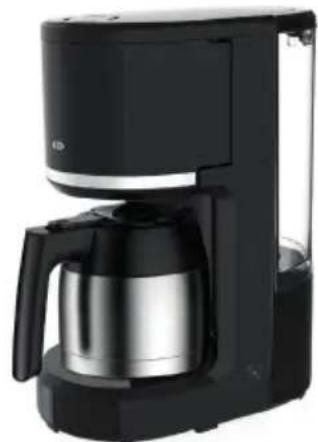
natural_image
Black and silver coffee maker with a glass pitcher, no visible text or symbols
natural_image
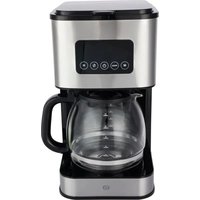
Exterior view of a modern black and silver coffee maker with a glass pitcher (no text or symbols visible)To help you get the best out of your purchase
We thank you for purchasing an Essential brand product. We pay special attention to the RELIABILITY, EASE OF USE and DESIGN of our products. We hope that you will be completely satisfied with this coffee machine.
your product
Contents of the box
• 1 filter coffee machine
- 1 user manual
• 1 permanent filter
• 1 measuring scoop
Technical features
• Power: 900 W
• Voltage: 220-240 V\~ 50/60 Hz
• Capacity (glass jug): 1.5 litre / Capacity (insulated jug): 1 litre
• Swivelling removable filter holder
- Anti-drip system
• Auto-off after 40 minutes (only for models with glass jug)
• Takes a No. 4 paper filter
description of the appliance (non-programmable coffee machine)
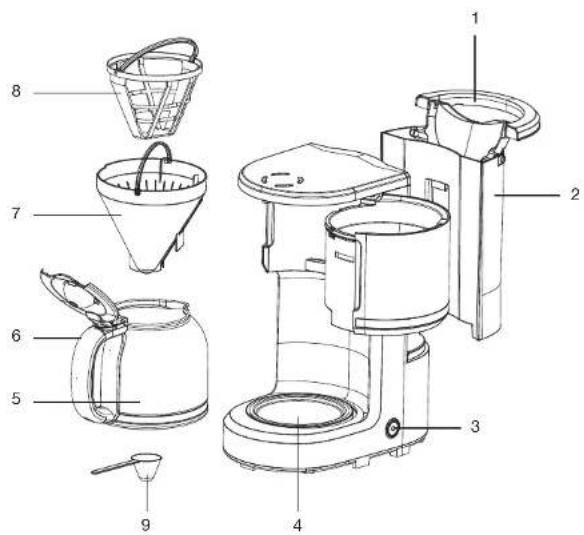
- Water tank lid
- Water tank
- "ON/OFF" button
- Hotplate
- Insulated or glass jug depending on the model
- Jug handle
- Detachable filter holder
- Permanent filter
- Measuring scoop
description of the appliance (programmable coffee machine)
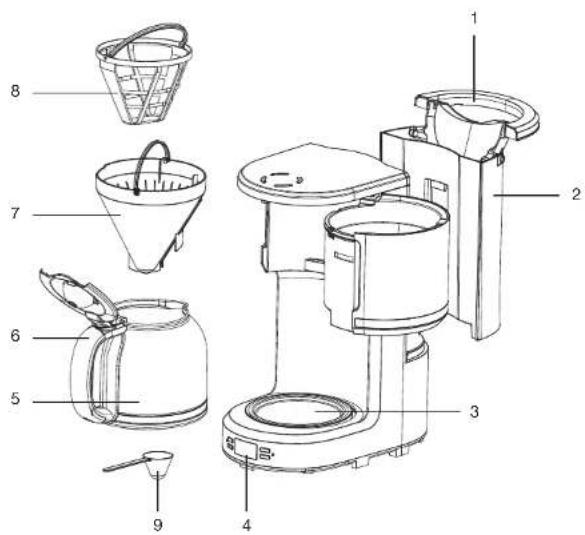
- Water tank lid
- Water tank
- Hotplate
- Control panel with display screen
- Insulated or glass jug depending on the model
- Jug handle
- Detachable filter holder
- Permanent filter
- Measuring scoop
Description of the control panel (programmable coffee makers only)
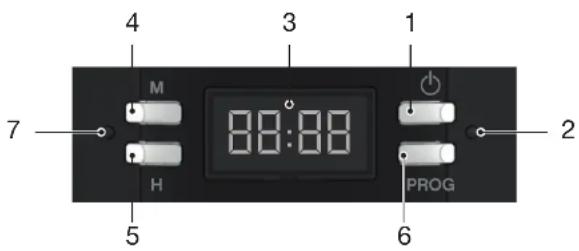
- Coffee machine on/off key
- Red light for the brew cycle: when on, coffee is being brewed
- Screen
- Set minute key
- Set hour key
- Program key
- Green delayed start light: when on, a time delay has been set
before initial use
- Carefully rinse all removable parts (glass jug, permanent filter and filter holder) with hot soapy water, following the instructions in the “Cleaning and maintenance” section. Rinse with clean water and dry carefully.
- Fill the container with cold water up to the maximum level indicated.
- Run the coffee machine for two cycles using only water (no coffee). Pour away the hot water collected.
using the device
Setting the clock (24-hour display) (programmable coffee machines only)
- Plug the power cord into the mains outlet. The LCD screen displays a flashing "12:00".
- Press on "H" (Hour) to move forward by an hour. You can move the time forward faster by keeping the button pressed down for more than 2 seconds.
- Press on "M" (Minute) to move forward by a minute. You can change the minutes faster by keeping the button pressed down for more than 2 seconds.
Preparing the coffee
- Open the top lid and fill the water tank with drinking water. The water level must never exceed the MAX mark indicated on the tank.
- Place the filter holder into its bracket, ensuring that it is properly in place, otherwise you will not be able to close the top lid. Place the permanent filter or paper filter inside the filter holder.
- Add ground coffee into the filter. Usually, a level spoon of ground coffee is used per cup, but the quantity can be adjusted according to taste. Place the top lid firmly in place.
- Place the glass jug with its lid closed horizontally on the hotplate.
- Press on the "ON/OFF" button. The "ON/OFF" light turns red, and the coffee starts to percolate.

The glass jug can be removed and you can pour a cup of coffee at any time. The anti-spill system temporarily stops the dripping. The glass jug should be replaced on the hotplate within 30 seconds to prevent spillage.
Coffee machine with glass jug
Once the brew cycle has run (approximately one minute after the coffee has finished dripping), remove the glass jug to pour a mug of coffee. If you don't want to serve the coffee immediately, leave the coffee machine switched on. The coffee will be kept warm on the hotplate. However, for the best coffee taste, we recommend that the coffee is served straight after brewing. The coffee machine will switch off automatically after 40 minutes.
Coffee machine with insulated jug

The quantity of coffee brewed will be less than the quantity of water added, this is because some of the water is absorbed by the coffee grounds and it sticks to the plastic.
Once the brew cycle has run (approximately one minute after the coffee has finished dripping), remove the jug to pour a cup of coffee.
After pouring your coffee, or if you do not wish to serve immediately, do not place the insulated jug back into the coffee machine. The anti-drip system will maintain the jug in open position and the coffee will not be kept hot. In order for the coffee to remain hot after dripping, the insulated jug must be removed and placed on the counter top, for example.
- Do not open the cover when the coffee is brewing. Steam and scalding water may be ejected: burn risk!
- The glass jug gets hot when the appliance is in use. Only pick it up by the handle. Do not touch the hot surfaces of the appliance.
- Always switch off the coffee machine and unplug the power cord when not in use.
Delayed start
(programmable coffee machines only)
- Plug the coffee machine into a mains socket. Prepare the water tank and coffee.
- Set the timer by following Steps 1 to 3 in the "Setting the clock" section.
- Start preparing the coffee machine following Steps 1 to 4 in the "Preparing the coffee" section.
Set the delayed start functionality as follows:
- Press the "PROG" button once. The "PROG" light flashes green.
- Use the hours and minutes keys to set the desired delayed start time.
- After having set the delayed start time, press on "PROG". The "PROG" light turns solid green. After a few seconds, the LCD screen indicates the current time.

The delayed start function can be cancelled by pressing on the "PROG" button a second time. If you want to change the delayed start time, only repeat Steps 2 and 3 above.
- Once the desired time has been set, the ON/OFF light turns solid green. Once the delayed start time has been reached, it turns red and the device starts brewing.

The timer cannot be adjusted when the appliance is in use, or when the delayed start function has been set.
- If there is a power outage or you unplug the appliance, the timer program will not be saved.
- You can program a delayed start up to 24 hours in advance.
Advice for the best coffee taste
- It is important to use a clean coffee machine to ensure the very best taste. Clean out the coffee machine regularly as indicated in the "Cleaning and maintenance" section. Always use fresh, cold water in the coffee machine.
- Store any unopened packets of coffee in a cool, dry place. After having opened a packet of ground coffee, seal it and store it in the refrigerator to keep it fresh.
- For the best taste, buy whole coffee beans and grind them finely just before use.
- Never reuse ground coffee, this will reduce the coffee flavour considerably. We advise you not to reheat coffee, it tastes the best straight after brewing.
- Clean out the coffee machine when over-extraction causes fatty deposits. The presence of small fatty deposits on the surface of black coffee can be caused by the leaching of oil from the coffee grounds.
- There may be more fatty deposits present if you use dark roasted coffee grounds.
cleaning and maintenance
Cleaning
- Unplug the coffee machine from the mains outlet and allow to cool before cleaning.
- Never immerse the appliance, power cord or plug in water or any other liquid.
- Do not use abrasive cleaners or scouring pads for cleaning to avoid damaging the coating.
- Open the lid and remove the filter holder. Dispose of the paper filter and coffee grounds or just the coffee grounds if you are using the permanent filter.
- Clean the detachable parts of the coffee machine (jug, fixed filter, filter holder, measuring spoon) using hot soapy water. Be gentle with the permanent filter. Rinse with clean water and dry carefully.
- You can wipe down the outer and inner surfaces (including the hotplate) with a lightly moistened sponge or soft cloth.
Descaling
- If the coffee machine switches off before the end of the cycle, it probably has scale.
• We recommend that you descale your appliance regularly to keep it in good condition. - How often descaling is required depends on how hard the water is and how often the appliance is used. If used daily, we recommend descaling your coffee machine once every two months.
- You can use a special 'coffee machine' descaling liquid or powder sold in shops. When you do so, make sure you follow the descaler manufacturer's instructions.
- You can also use white vinegar to descale your coffee machine. Fill up the coffee machine container with a half-and-half mixture of white vinegar and water, then switch it on.
- Afterwards, run the coffee machine 2 or 3 times without coffee to thoroughly rinse it through. Pour away the hot water collected into a sink.
• 1 permanent filter
• 1 maatschepje
All information, designs, drawings and pictures in this document are the property of SOURCING & CREATION, SOURCING & CREATION reserves all rights to its brands, designs and information. Any copy and reproduction through any means shall be deemed and considered as counterfeiting.
Protection of the environment
This symbol attached to the product means that it is an appliance whose disposal is subject to the directive on waste from electrical and electronic equipment (WEEE). This appliance may not in any way be treated as household waste and must be subject to a specific type of removal for this type of waste. Recycling and recovery systems are available in your area (waste removal) and by distributors. By taking your appliance at its end of life to a recycling facility, you will contribute to environmental conservation and prevent any harm to your health.
Customer Relations Department /
Tested in our laboratories
Warranty valid from the date of purchase (receipt as proof of purchase). This warranty does not cover defects or damage caused by improper set up, incorrect use, or normal wear and tear of this product.
Please behave responsibly towards the environment. Recycle this product at the end of its life.