ECP4s - Coffee machine Essentiel B - Free user manual and instructions
Find the device manual for free ECP4s Essentiel B in PDF.

| Product type | Drip coffee maker |
| Brand | Essentiel B |
| Model | ECP4s |
| Power | 900 W |
| Power supply | 220-240 V ~ 50-60 Hz |
| Capacity | 12 cups (graduation from 4 to 12 cups) |
| Delayed programming | Up to 24 hours in advance |
| Display | Touchscreen with indicator lights and audible signals |
| Water level indicator | Yes |
| Dispensing nozzle | Multidirectional |
| Filter | Removable built-in (optional paper filter #4) |
| Carafe | Graduated glass with handle, plastic lid |
| Weight | 2.110 kg |
| Dimensions (H × W × D) | 33.3 cm × 18 cm × 23 cm |
| Strength setting | 3 levels: normal, strong, very strong |
| Keep warm | Up to 40 minutes after brewing ends |
| Anti-drip system | Yes (temporary stop if carafe removed, max 30 seconds) |
| Standby consumption | 0.7 W |
| Cleaning | Removable parts washable in soapy water; do not immerse the appliance |
| Recommended descaling | Every 2 months (with special product or white vinegar) |
| Included accessories | Coffee maker, manual, measuring spoon |
Frequently Asked Questions - ECP4s Essentiel B
User questions about ECP4s Essentiel B
0 question about this device. Answer the ones you know or ask your own.
Ask a new question about this device
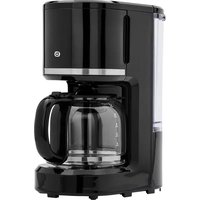
Download the instructions for your Coffee machine in PDF format for free! Find your manual ECP4s - Essentiel B and take your electronic device back in hand. On this page are published all the documents necessary for the use of your device. ECP4s by Essentiel B.
USER MANUAL ECP4s Essentiel B
natural_image
Modern digital coffee maker with digital display and coffee cup on saucer (no text or symbols visible)Notice d'utilisation / User guide / Bedienungsanleitung / Gebruiksaanwijzing
| FR EN DE NL | ||||
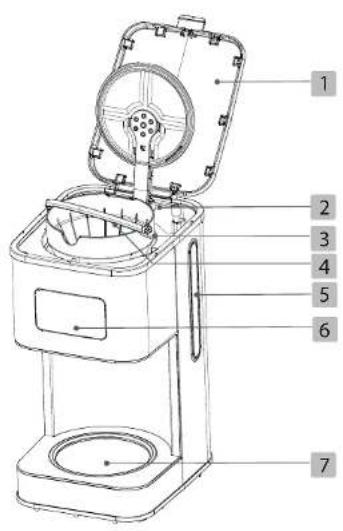
| 1 | Couvercle de la cafetière | Coffee maker lid | Deckel der Kaffeemaschine | Deksel koffiezetapparaat |
| 2 | Réservoir Container Wassertank Reservoir | |||
| 3 | Porte-filtre Filter holder Filterhalterung Filterhouder | |||
| 4 | Filtre amovible Removable filter Abnehmbarer Filter Verwijderbaar filter | |||
| 5 | Indicateur de niveau d'eau | Water level indicator | Wasserstandsanzeige | Aanduiding waterpeil |
| 6 | Bandeau de commande avec écran d'affichage | Control panel with display screen | Bedienleiste mit Anzeigedisplay | Bedieningspaneel met weergavescherm |
| 7 | Plaque chauffante Hot plate Heizplatte Warmhoudplaat | |||
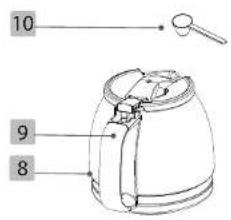
| 8 | Carafe en verre | Glass carafe | Glaskanne | Glazen karaf |
| 9 | Manche de la carafe | Carafe handle | Griff der Kanne | Handvat karaf |
| 10 | Cuillère à doser | Measuring spoon | Dosierlöffel Maatiepel | |
votre produit
Contenu de la boîte
Programmer un départ diff éré
• 1 filter coffee maker
• 1 measuring spoon
- 1 user guide
Technical characteristics
Power : 900 W
• Power supply: 220-240 V\~ 50-60 Hz
• Capacity: 12 cups
• 24-hour programmable coffee maker
• Water level indicator
- Touchscreen with indicator lights and audible signals
• Multi-directional spray nozzle
• Built-in removable fi Iter
• Glass carafe with 4 to 12 cup graduations
- Plastic lid
• Weight: 2.110 kg
• Dimensions: H 33.3 cm x W 18 cm x D 23 cm
• Coffee strength adjustment from 0 to 3
- Keep warm function for up to 40 minutes
| Product Information for power consumption and maximum time to reach applicable low power mode | |
| Power consumption in off mode | NA |
| Power consumption in standby | 0.7W |
| The maximum time needed to automatically reach the applicable low power mode or condition | 0min |
| Power consumption in network standby if all wired network ports are connected and all wireless network ports are activated | NA |
description
Description of the control panel
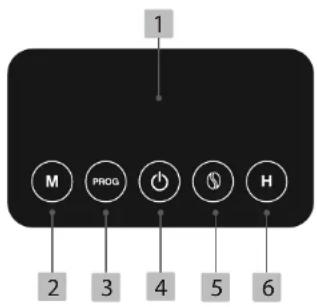
- Display screen
- Minute setting button
- Programming button
- On/off button
- Coffee strength adjustment button
- Time setting button
before first use
- Rinse all removable parts of the coffee maker (carafe, fi liter holder and removable fi liter) thoroughly in hot soapy water. Rinse with clean water and dry thoroughly.
- Fill the tank with cold water to the maximum level indicated.
- Let the coffee maker run for two cycles using only water (without coffee). Discard the hot water.
use
Setting the time (24-hour display)
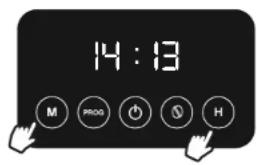
- Plug the appliance into a wall socket. The screen displays "12:00".
- Press the "H" (hour setting) button for
3 seconds and then press one or more times to set the hours. - Press the "M" (minute setting) one or more times to set the minutes.
NOTE: if you press and hold down the "H" or "M" button, the hours and minutes will scroll quickly.
Making coffee
- Open the lid and fill the tank with cold water using the jug. Use the water level indicator; do not exceed the maximum mark.
The water level in the reservoir must never fall below the minimum level indicated (2 cups), or above the maximum level indicated (12 cups).

- Insert the built-in removable filter into the filter holder (make sure the filter holder is correctly seated). The use of an additional paper fi liter is not essential, but it can help to fi liter the coffee more fi nely. We recommend a no.4 paper fi liter in this case.
- Fill it with the desired amount of ground coffee and close the lid (usually, 1 measuring spoon of ground coffee per cup).
- Place the jug on the hotplate.
- Plug the coffee maker into a wall socket.
- Press ⏻ (on/off button). A red LED lights up to indicate that the appliance is switched on.
- After a few seconds, the coffee starts to pour into the coffee pot.
- Your coffee maker is fitted with an anti-drip system: while the coffee is brewing, you can remove the jug for a few moments and pour yourself a cup of coffee. If you remove the coffee pot from the hotplate, the flow of coffee will stop momentarily. Replace the jug on the plate within 30 seconds to prevent any spillage.
- At the end of use, press the ⏻ (on/off) button to switch off the coffee maker.
- The hotplate remains hot for 40 minutes after preparation is complete. This keeps the coffee hot so that it doesn't get cold during this time.
Before restarting a new cycle, allow the coffee maker to cool for 3 to 4 minutes and refi ll the water tank.
- Do not open the lid while the coffee is brewing. Steam and hot water can be ejected: risk of burns!
- What's more, the coffee pot heats up when the appliance is in operation. So hold it by the handle only. Do not touch the hot surfaces of the appliance.
Adjusting the coffee strength
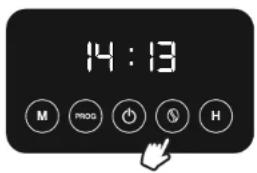
This machine has a function that lets you choose the coffee strength.
Press the coffee strength adjustment button one or more times according to your preference: normal strength, strong, very strong. The corresponding LED lights up.
By default, the machine is set to normal strength.
Programming a delayed start
- Plug the coffee maker into a wall socket. Prepare the water tank and coffee.
- Set the time (see "Setting the time" section).
To set the time at which you want coffee preparation to start:
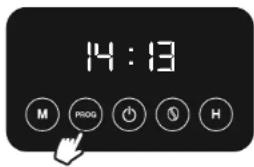
- Press the "PROG" (programming) button once. The white LED on the left of the screen will start flashing.
- Press the "H" (hour setting) button one or more times to set the hours, and press the "M" (minute setting) button one or more times to set the minutes.
-
Press the "PROG" (programming) button once to confirm programming. The white light on the left of the screen remains steady.
-
Note: you can press the "Prog" (programming) button to check the delayed start time programmed.
-
The coffee machine will start at the time you have set. A red LED lights up to indicate that it has been set up.
-
To cancel the delayed start, press the (on/off) button.
- To reprogramme, repeat steps 1 to 3 above. If you have not unplugged the coffee maker from the socket, the previously programmed delayed start time will be retained in the memory.
- In the event of a power cut or if you unplug the appliance, the timer programme will not be saved.
- You can programme a delayed start by up to 24 hours.
cleaning and maintenance
Cleaning
- Unplug the coffee maker from the socket and allow it to cool before cleaning.
- Never immerse the appliance, power cable or plug in water or any other liquid.
- Do not use aggressive or abrasive detergents or scouring sponges for cleaning, to avoid damaging the coatings.
- Open the lid, remove the filter holder and removable filter. If you also use a paper filter, discard it with the ground coffee.
- Clean the removable parts of the coffee maker (jug, fi lter holder, measuring spoon) with hot soapy water. Rinse with clean water and dry thoroughly.
- You can wipe the exterior and interior surfaces (including the hotplate) with a slightly damp sponge or soft cloth.
Descaling
- If the coffee maker stops before the end of the cycle, it is probably scaled.
• We recommend you descale your appliance regularly to keep it in good condition. - The frequency of descaling depends on the hardness of the water and how often the appliance is used. If you use your coffee maker on a daily basis, we recommend descaling it every two months.
- You can use a special coffee-maker descaler in liquid or powder form sold in shops. In this case, please refer to the instructions provided by the manufacturer of the descaling product.
- You can also descale your coffee maker with white vinegar. Fill the reservoir with half white vinegar and half water, then run the coffee maker.
- Then run the coffee maker 2 or 3 times without coffee to rinse it thoroughly. Pour the hot water into the sink.
Ihr Produkt
Verpackungsinhalt
All information, designs, drawings and pictures in this document are the property of SOURCING & CREATION. SOURCING & CREATION reserves all rights to its brands, designs and information. Any copy and reproduction through any means shall be deemed and considered as counterfeiting.
Protection of the environment
This symbol attached to the product means that it is an appliance whose disposal is subject to the directive on waste from electrical and electronic equipment (WEEE). This appliance may not in any way be treated as household waste and must be subject to a specific type of removal for this type of waste. Recycling and
recovery systems are available in your area (waste removal) and by distributors. By taking your appliance at its end of life to a recycling facility, you will contribute to environmental conservation and prevent any harm to your health.

Umweltschutz
\* Tested in our laboratories
Warranty valid from the date of purchase (receipt as proof of purchase). This warranty does not cover defects or damage caused by improper set up, incorrect use, or normal wear and tear of this product.
\* In unseren Labors getestet
Customer Relations Department / Kundenservice / Klantenafdeling
Avenue de la Motte
CS 80137
59811 Lesquin cedex
Art. 8011790
Ref. ECP4s