
Dust Mite Pro - Vacuum Cleaner Xiaomi - Free user manual and instructions
Find the device manual for free Dust Mite Pro Xiaomi in PDF.


| Product type | Dust mite vacuum cleaner |
| Brand | Xiaomi |
| Model | Dust Mite Pro (B402HW) |
| Dimensions | 265 × 246 × 142 mm |
| Net weight | 2.06 kg |
| Rated power | 400 W |
| Rated voltage | 220–240 V~ |
| Rated frequency | 50–60 Hz |
| Noise level | ≤ 78 dB(A) |
| Suction modes | Low, Intelligent, High |
| Additional functions | UV light, hot drying air, ultrasound |
| Dust mite sensor | Yes, with density indicator (green, orange, red) |
| Filter type | Washable filter with filter cotton |
| Dust compartment capacity | Approximately 0.5 L (estimated) |
| Cable length | Approximately 5 m (estimated) |
| Compatible materials | Household fabrics: mattresses, blankets, pillows, sofas |
| Maintenance | Regular cleaning of dust compartment and filter; wash filter every 5-6 uses; replace filter every 2-3 months; clean roller brush at least once a month |
| Safety | Automatic UV light shut-off if unit is lifted (>5 cm); overheat protection; brush jam protection |
| Spare parts and repairability | Disassembly not recommended by user; contact after-sales service for repair; use of Xiaomi-approved accessories |
| Box contents | Vacuum cleaner, dust compartment assembly, user manual, warranty |
| Compliance | European WEEE directive (2012/19/EU); EU declaration of conformity available at www.mi.com |
Frequently Asked Questions - Dust Mite Pro Xiaomi
User questions about Dust Mite Pro Xiaomi
0 question about this device. Answer the ones you know or ask your own.
Ask a new question about this device
Download the instructions for your Vacuum Cleaner in PDF format for free! Find your manual Dust Mite Pro - Xiaomi and take your electronic device back in hand. On this page are published all the documents necessary for the use of your device. Dust Mite Pro by Xiaomi.
USER MANUAL Dust Mite Pro Xiaomi
Read this manual carefully before use, and retain it for future reference.
WARNINGS
- This appliance is not intended for use by persons (including children) with reduced physical, sensory or mental capabilities, or lack of experience and knowledge, unless they have been given supervision or instruction concerning use of the appliance by a person responsible for their safety. Children should be supervised to ensure that they do not play with the appliance.
- This appliance can be used by children aged from 8 years and above and persons with reduced physical, sensory or mental capabilities or lack of experience and knowledge if they have been given supervision or instruction concerning use of the appliance in a safe way and understand the hazards involved. Children shall not play with the appliance. Cleaning and user maintenance shall not be made by children without supervision.
- If the supply cord is damaged, it must be replaced by the manufacturer, its service agent or similarly qualified persons in order to avoid a hazard.
- The plug must be removed from the socket-outlet before cleaning or maintaining the appliance.
- The dust mite vacuum cleaner comes with a UV light. Do not expose the eyes or skin of humans or animals to UV radiation; otherwise, it may cause damage.
- To prevent burns, do not touch the UV light with your hands during use or immediately after it is turned off.
- Before cleaning the UV light, make sure the dust mite vacuum cleaner is powered off and avoid pressing the power button during cleaning. Otherwise, the dust mite vacuum cleaner may suddenly start and cause damage.
- Do not use the dust mite vacuum cleaner outdoors or on any wet surface. Only use the vacuum cleaner on dry indoor surfaces.
- Do not touch the plug or any part of the dust mite vacuum cleaner with wet hands.
- Do not use the dust mite vacuum cleaner to vacuum water, any flammable or explosive liquids like gasoline, or any solutions containing toxic and harmful ingredients such as chlorine bleach, ammonia, and drain cleaner.
- Do not use the dust mite vacuum cleaner to vacuum drywall particles, ashes like fireplace ash, or smoking or burning materials such as coal, cigarette butts or matches.
- Do not use the dust mite vacuum cleaner to vacuum hard or sharp objects, such as glass, nails, screws, or coins, which may damage the product.
- Keep the dust mite vacuum cleaner away from heating appliances and direct sunlight to prevent fires.
- Avoid using the dust mite vacuum cleaner for a long time if the suction inlets, heat dissipation vent, or hot air outlet is blocked. Otherwise, the cleaner may be damaged.
- Make sure the dust mite vacuum cleaner is unplugged when not used for extended periods or before performing any maintenance or repairs.
- Please install the roller brush and dust compartment as instructed in this user manual before using the dust mite vacuum cleaner. To prevent any mechanical injury, do not touch the roller brush with your hands during use.
- Only use accessories and replacement parts that are approved by Xiaomi.
- The dust mite vacuum cleaner is solely intended for cleaning and removing dust mites from home textiles like mattresses, blankets, pillows, and sofas. Do not use it for other purposes.
- Do not leave the dust mite vacuum cleaner running in the same position for a long time. Otherwise, the surface of items, such as the mattress or sheet, may be damaged by ultraviolet rays, hot air, or the roller brush.
- Keep the power cord away from sharp objects that may damage it.
- Do not place the dust mite vacuum cleaner on unstable surfaces of objects, such as chairs or tables, to prevent damage or personal injury caused by its falling off.
- If the dust mite vacuum cleaner gives off smoke or odors, or produces powders from the heat dissipation vent during use, stop using and unplug it immediately, and contact the after-sales service team.
- Never attempt to disassemble the dust mite vacuum cleaner by yourself. Contact an authorized service center if it needs repairs.
- WARNING - This appliance contains a UV emitter. Do not stare at the light source.
Package Contents
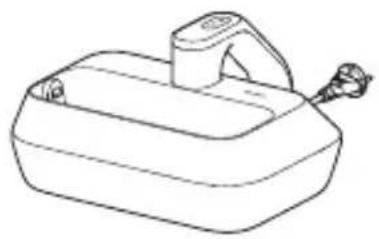
Dust Mite Vacuum Cleaner
Dust Compartment Assembly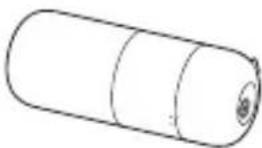
User Manual Warranty Notice
Note:
Illustrations of product, accessories, and user interface in the user manual are for reference purposes only. Actual product and functions may vary due to product enhancements.
Product Overview
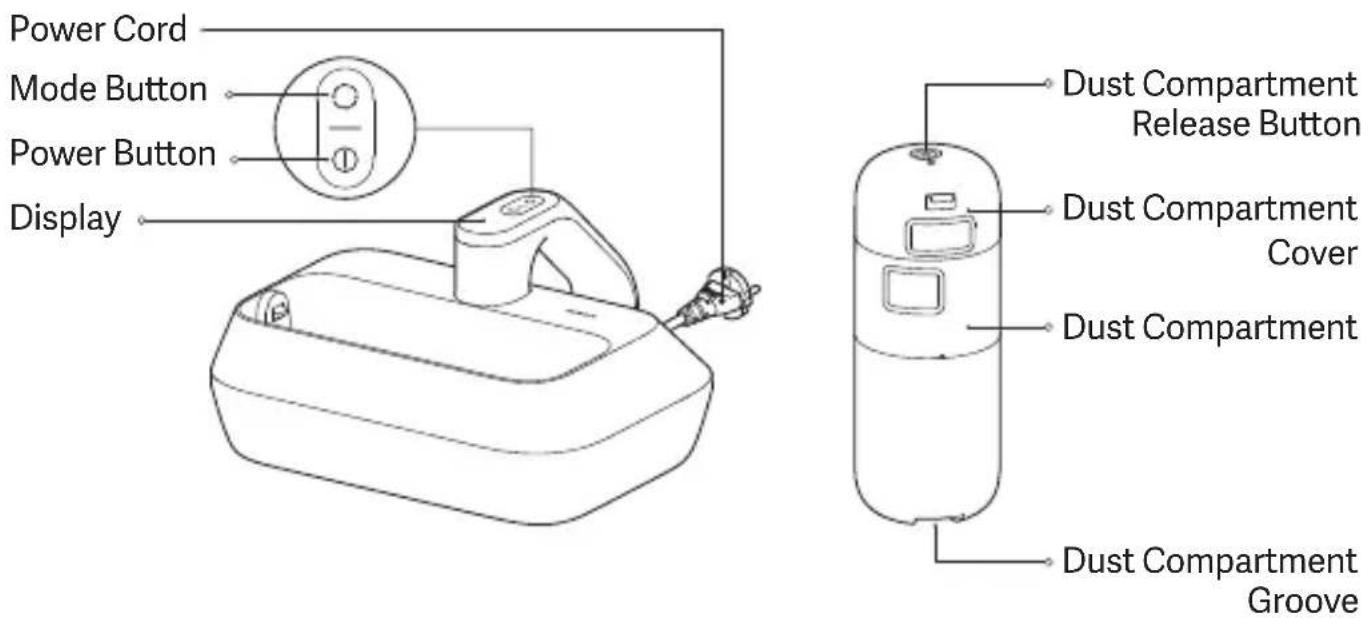
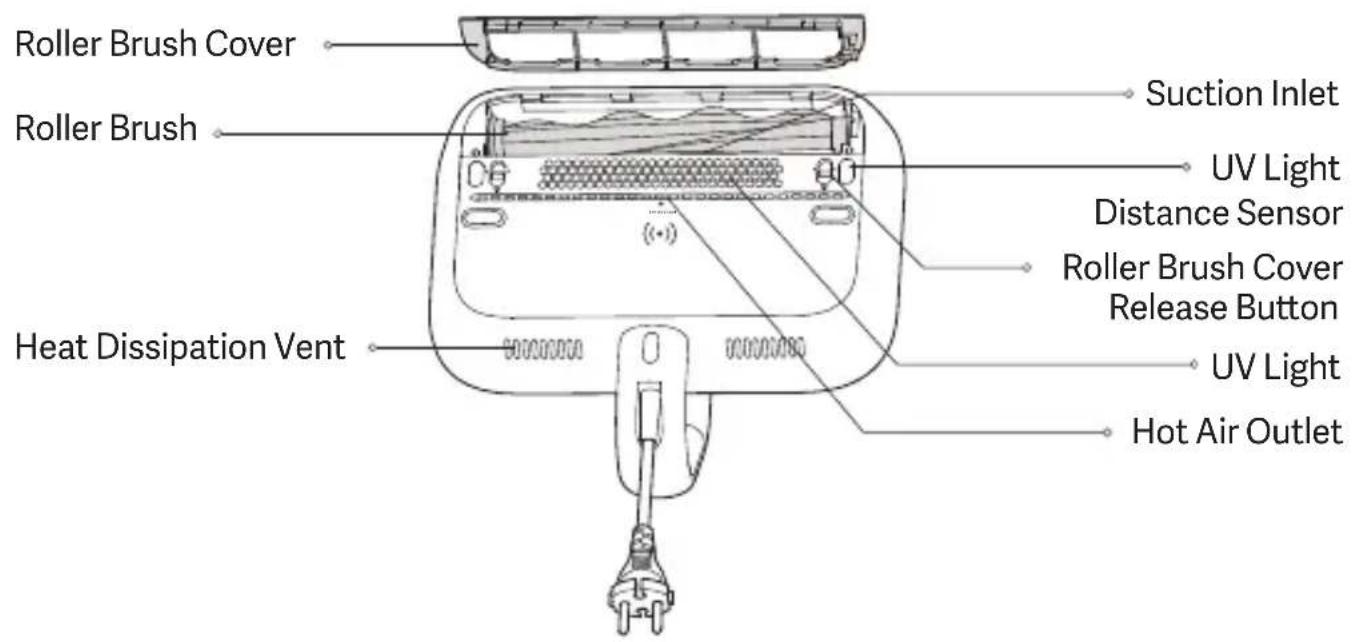
Display
Notes:
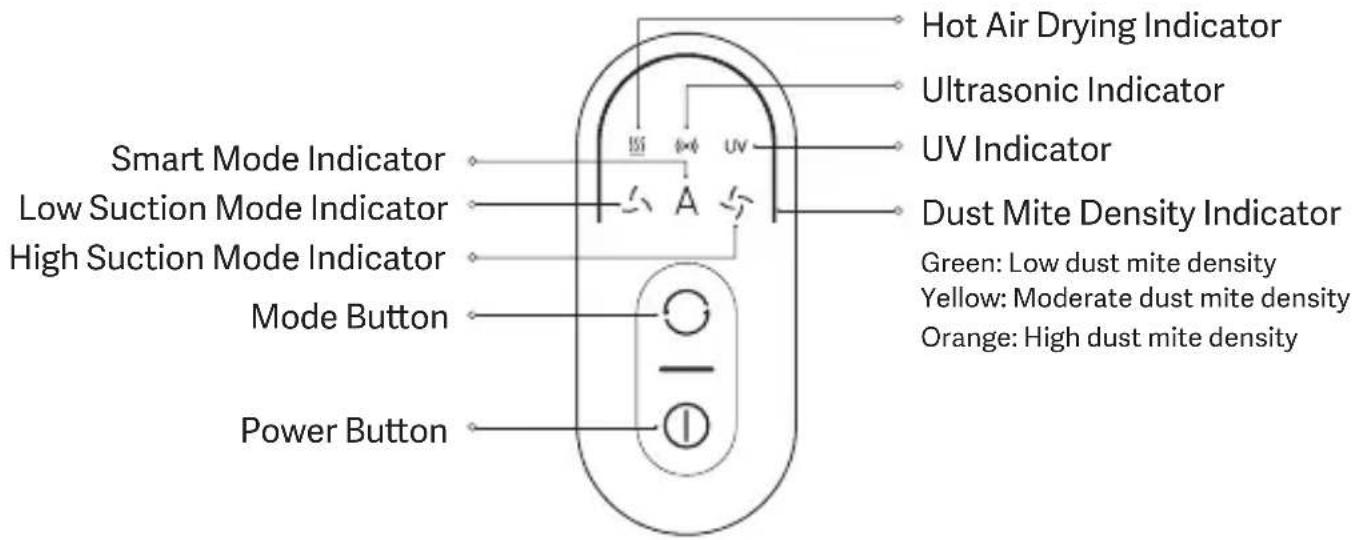
• The Hot Air Drying, Ultrasonic, and UV functions are enabled by default. - When the UV function is enabled, the UV indicator is on. When the UV function is disabled, the UV indicator is off. - It is normal for the UV indicator to go out when you lift (more than 5 cm from the textile surface) or tilt the dust mite vacuum cleaner during operation, or clean dark-colored textiles. - During cleaning, a steady yellow or orange dust mite density indicator indicates a high dust mite density in the current area. It is recommended to clean this area multiple times.
How to Use
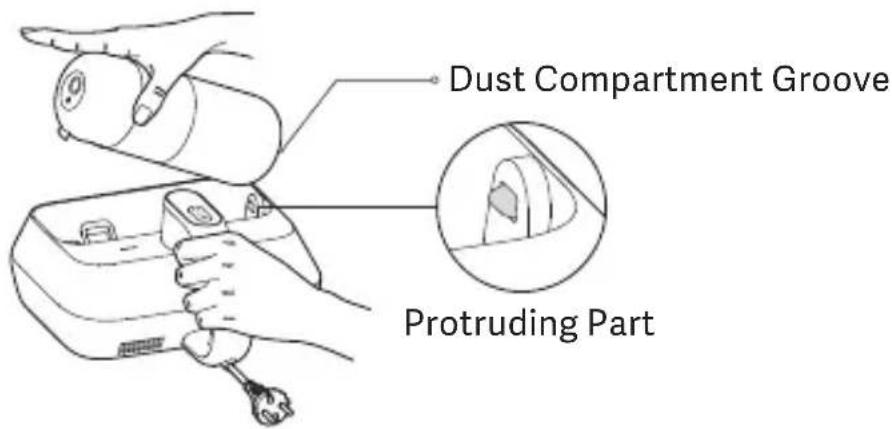
Installing the dust compartment assembly
Align the dust compartment groove with the protruding part. Press down on the dust compartment until you hear a "click", indicating it is installed in place.
Turning on/off
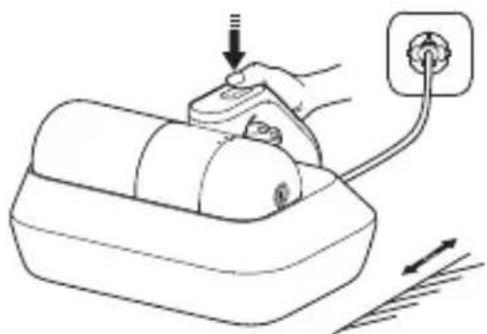
- Connect the dust mite vacuum cleaner to power, and press its power button to turn it on.
- The dust mite vacuum cleaner defaults to the low suction mode the first time it is turned on.
Note: During use, hot air will come out from the heat dissipation vent. For first-time use, it is normal for a slight odor to come from the cooling vent, and the odor will naturally dissipate after a period of use.
Switching modes
Turn on the dust mite vacuum cleaner, and press the mode button to switch from low suction, smart, to high suction modes.
- Low suction mode: Suitable for daily cleaning of soft textiles such as dolls and quilts.
- Smart mode: Suitable for various cleaning scenarios. The dust mite vacuum cleaner will automatically adjust its suction to the density of dust mites; the higher the density of the dust mite is, the more powerful the suction is.
- High suction mode: Suitable for deeply cleaning hard textiles such as mattresses and sofas.
Care & Maintenance
Dust Compartment Cover Assembly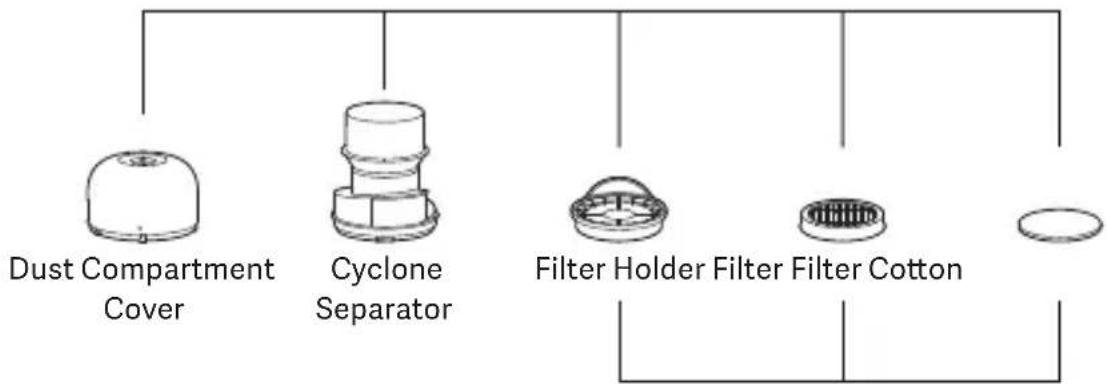
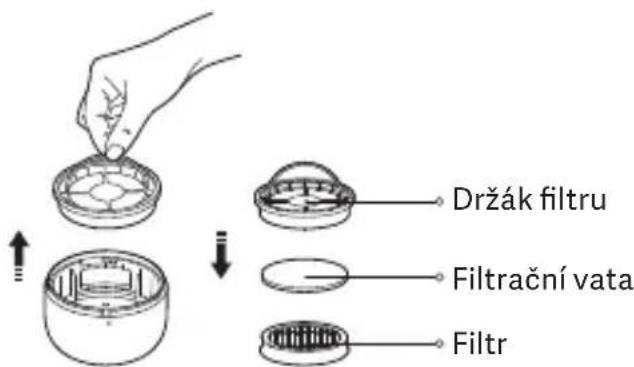
Filter Holder Assembly
WARNING: Before cleaning or maintaining the dust mite vacuum cleaner, turn it off and unplug it.
Notes:
- Clean the dust compartment regularly to avoid the buildup of dust that could cause blockage and a decrease in suction.
- It is recommended to release the dust compartment over a trash bin to prevent dust from falling onto the floor.
- Do not submerge the dust mite vacuum cleaner in water for cleaning.
Daily cleaning of the dust compartment assembly
- Press and hold the dust compartment release button, and simultaneously pull out the dust compartment assembly.
Dust Compartment Release Button
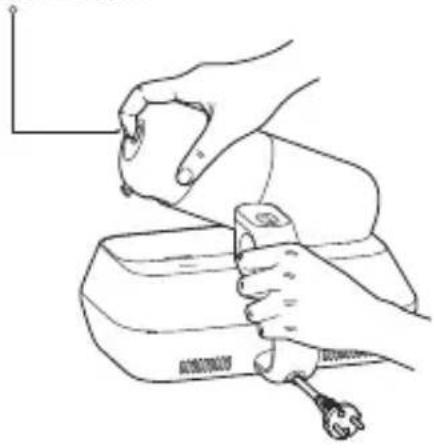
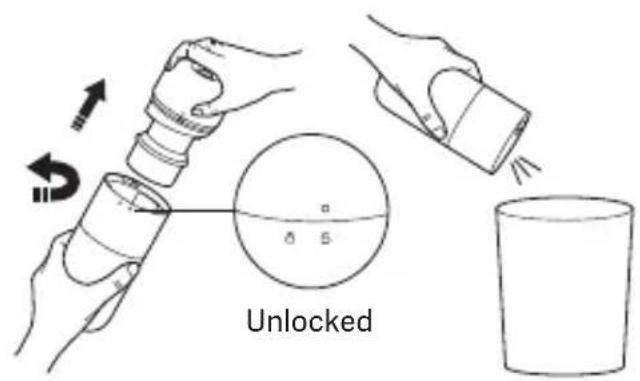
- Rotate the dust compartment over a trash bin until the mark ○ is aligned with the icon Ⓐ. Open the dust compartment assembly upside down, empty the dust compartment, and clean the surface of the dust compartment cover assembly.
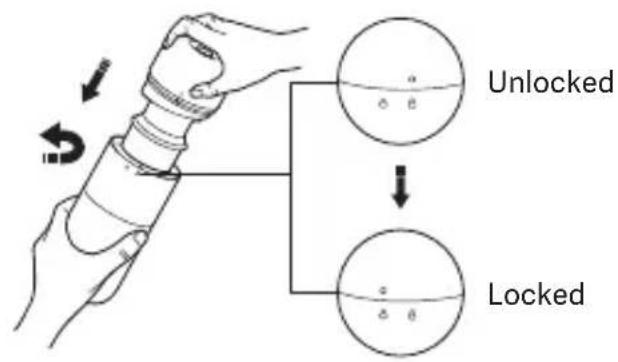
- After emptying the dust compartment, align the mark with the icon to reinstall the dust compartment cover assembly to the dust compartment. Then, rotate the dust compartment until its mark aligns with the icon. When you hear a "click", they are properly locked.
- Check that the baffle of the dust compartment assembly is properly installed. Then reinstall the dust compartment assembly into the main body.
![graph TD A["Device"] --> B{Correct} A --> C{Wrong Wrong} B --> D["Baffle"] C --> E["Image 1"] C --> F["Image 2"] C --> G["Image 3"]](/content/2026/04/726301/images/1e48bf6abb6d4c62969f0c8741c40545a79108da5f3a5a5a930883657c0c4913.jpg)
Washing the dust compartment assembly
If suction decreases, clean the dust compartment assembly promptly to regain the mite removal performance and prevent blockage from the air duct that may cause the dust mite vacuum cleaner to shut down.
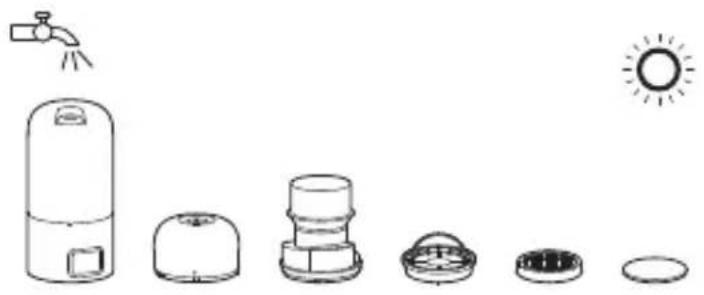
- Remove the dust compartment cover, and rotate it to remove the cyclone separator from it.
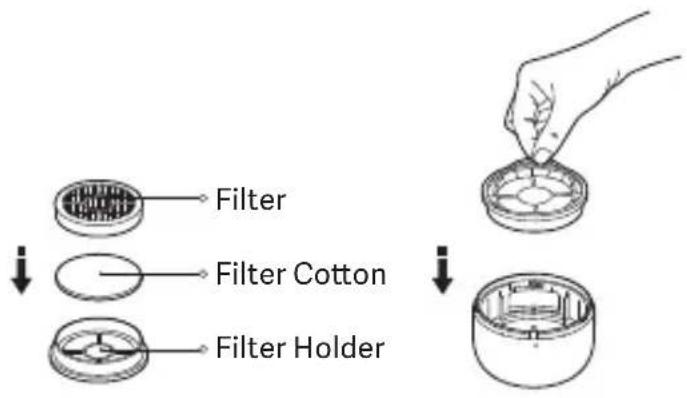
- Take the filter holder assembly out of the dust compartment cover, and then remove the filter and filter cotton in turn.
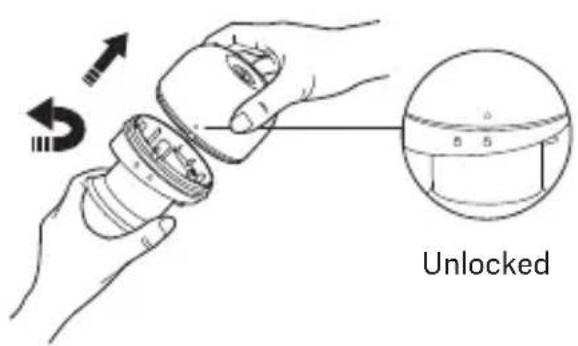
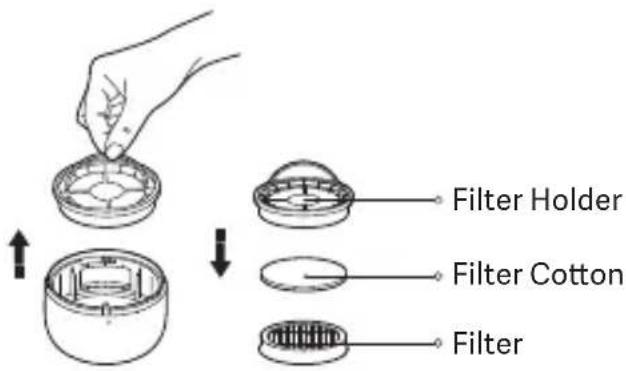
- Clean the surfaces of the dust compartment, dust compartment cover, cyclone separator, filter holder, filter, and filter cotton. Then rinse them with clean tap water, and air-dry them thoroughly.
Notes:
- It is recommended to wash and clean the filter every 5 to 6 vacuuming, or you can change the cleaning frequency as needed.
- It is recommended to replace the filter every 2-3 months to ensure optimal vacuuming performance. After rinsing, be sure to thoroughly air-dry the components (away from direct sunlight) before re-installation.
- Reinstall the filter cotton and filter into the filter holder, and press them in place. Then place the filter holder assembly into the dust compartment cover and press it in place.
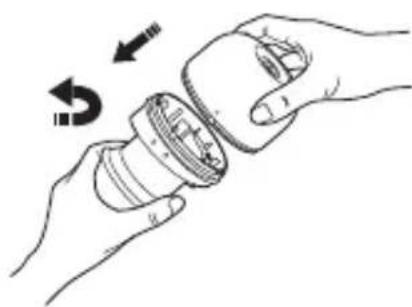
- Align the icon Ⓐ on the cyclone separator with the mark ○ on the dust compartment cover. Then, rotate the cyclone separator until the mark ○ aligns with the icon Ⓐ. When you hear a "click", they are firmly locked.
- Lock the dust compartment and the dust compartment cover assembly securely, and then reinstall the dust compartment assembly into the dust mite vacuum cleaner.
Cleaning the roller brush
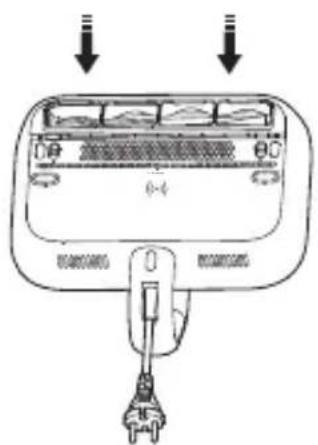
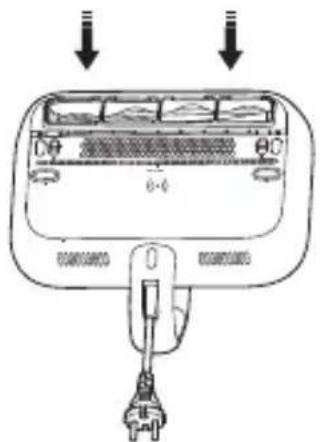
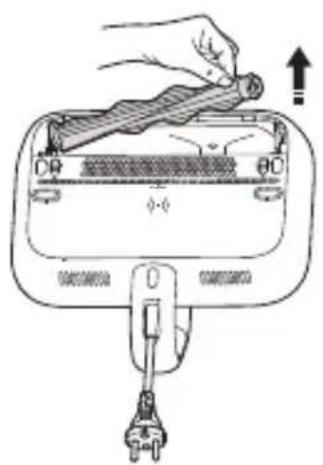
- Toggle the roller brush release button as indicated on the dust mite vacuum cleaner and the roller brush cover will pop open automatically. Remove the roller brush cover.
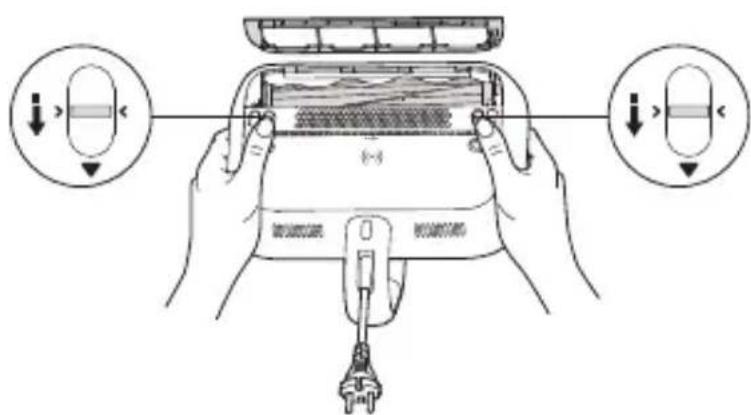
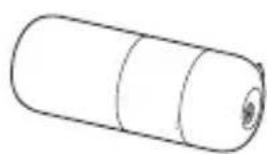
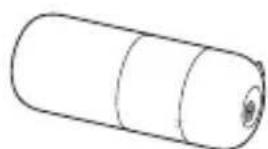
- Remove the roller brush from the right side by pulling it upwards. Remove any hair and other waste from the roller brush.
Note: It is recommended to clean the roller brush at least once a month. Rinsing is not recommended.
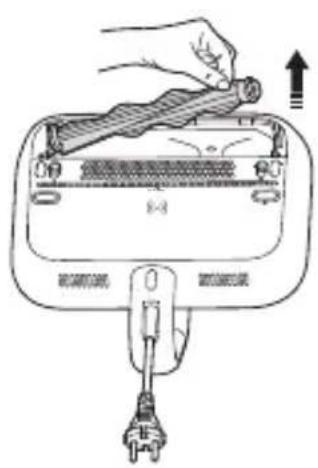
- After cleaning, reinstall the roller brush. Then, align the clips on the roller brush cover with the corresponding slots to reinstall the roller brush cover, and press it down until you hear a "click".
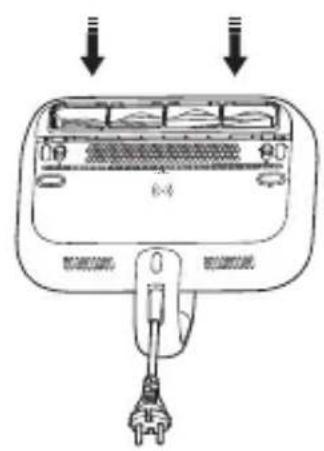
Clean the suction inlet and dust mite sensors
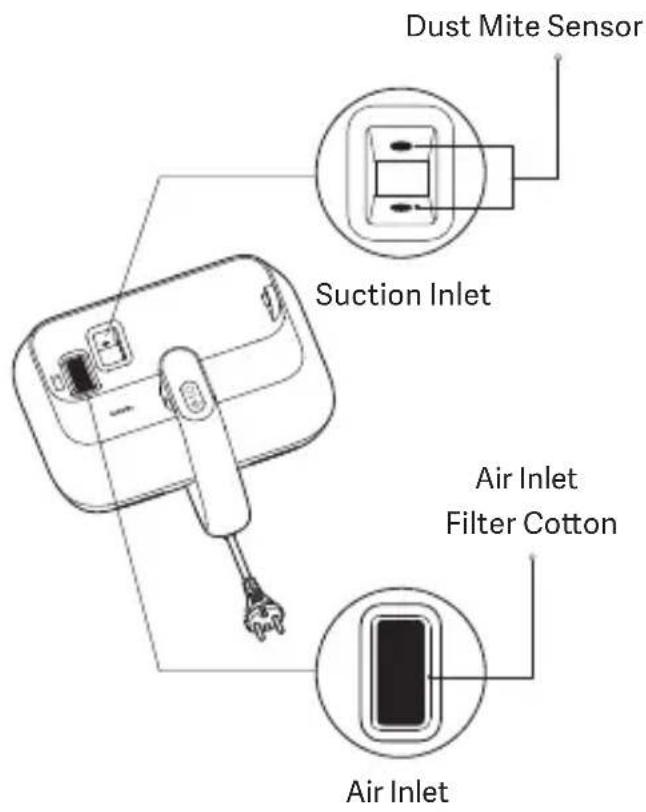
Remove the dust compartment assembly, and you will see dust mite sensors in the suction inlet. Clean them with a dry cloth or tissue.
Notes:
- It is normal for dust and other particles to adhere to the suction inlet. Clean it in a timely manner.
- When the dust mite sensors are dirty, the dust mite density indicator will blink orange. Clean the dust mite sensors promptly. Frequent cleaning of the dust mite sensors can prevent dust buildup to ensure their detection accuracy.
The air inlet filter cotton functions as a
- filter, and do not discard it. If the filter cotton becomes dirty, remove and rinse it with clean tap water. Be sure to thoroughly air-dry it (away from direct sunlight) before reinstallation.
Specifications
| Name: Dust Mite Vacuum Cleaner | Rated Voltage: 220–240 V ~ |
| Model: B402HW | Rated Power: 400 W |
| Rated Frequency: 50–60 Hz | Noise: ≤ 78 dB(A) |
| Item Dimensions: 265 × 246 × 142 mm | Net Weight: 2.06 kg |
| Power Consumption | Time to Enter the Condition |
| Off mode: ≤ 0.5 W | Off mode: ≤ 20 min |
Troubleshooting
| Possible Causes SolutionsIssues | ||
| The dust mite vacuum cleaner does not start. | The power cord is not plugged properly. | Plug in the power cord properly. |
| The power outlet has no power. | Check to ensure the power outlet is supplying power normally. | |
| The dust mite vacuum cleaner is not turned on. | Press the power button to turn it on. | |
| The circuit has an error. | Contact the after-sales service team. | |
| The main motor of the dust mite vacuum cleaner does not start. | Temperature protection for the main motor is on. | Turn off and unplug the dust mite vacuum cleaner. Restart it after the main motor temperature resumes normal. |
| The main motor is damaged. | Contact the after-sales service team. | |
| The suction decreases. | Clean the dust compartment.The dust com | |
| Suction inlets are blocked by foreign objects. | Clean the suction inlets. | |
| The filter blocked or not fully dried after washing. | Clean the filter and fully air-dry it. | |
| The UV light is not on. | To prevent UV leakage, the UV light will be off if the dust mite vacuum cleaner does not come in contact with the textile. | Put the dust mite vacuum cleaner back on the textile surface, and the UV light will resume working. |
| when cleaning dark-colored textiles. | This is normal.The UV light may not light up | |
| The UV light or UV light distance sensor is damaged. | Contact the after-sales service team. | |
| The noise is too loud. | The dust compartment is full. Clean the dust compartment. | |
| Suction inlets are blocked by foreign objects. | Clean the suction inlets. | |
| The roller brush does not work. | The roller brush jam protection is triggered. | Clean the roller brush. |
| The motor is not woking. Contact the after-sales service team. | ||
| The dust mite density indicator blinks red and then remains red. | The roller brush jam protection is triggered. | Clean the roller brush. |
| The dust mite density indicator blinks orange. | The dust mite sensors are dirty. | Clean the dust mite sensors. |
Notes:
- In the event of a malfunction during use, turn off and unplug the dust mite vacuum cleaner before troubleshooting. • If the issue persists after following the above steps, please contact the after-sales service team.
Regulatory Compliance Information
WEEE Disposal and Recycling Information
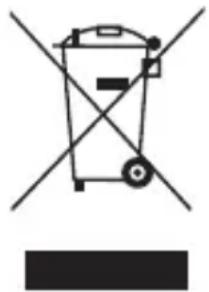
All products bearing this symbol are waste electrical and electronic equipment (WEEE as in directive 2012/19/EU) which should not be mixed with unsorted household waste. Instead, you should protect human health and the environment by handing over your waste equipment to a designated collection point for the recycling of waste electrical and electronic equipment, appointed
by the government or local authorities. Correct disposal and recycling will help prevent potential negative consequences to the environment and human health. Please contact the installer or local authorities for more information about the location as well as terms and conditions of such collection points.
EU Declaration of Conformity

We, Guangdong Deerma Technology Co., Ltd., hereby declare that this equipment is in compliance with the applicable Directives and European Norms, and amendments. The full text of the EU declaration of conformity is available at the following internet address: http://www.mi.com/global/service/support/declaration.html For detailed e-manual, please go to www.mi.com/global/service/userguide
Safety Instructions
Switching Modes
Notes:
Change mode
Notes:

Box
Manual
Bag
Net
Handles
PAP 20
PAP 22
CPE7
PAP 21
LDPE4/PP5
Paper
Paper
Plastic
Paper
Plastic
SEPARATE COLLECTION
Remarks:

FR
http://www.mi.com/global/service/support/declaration.html
Dust mite vacuum
Mode switching
Notes:
Notes:
Dust mite vacuum
Mode switching
Notes:
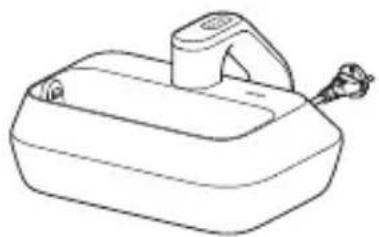
Parts
User Manual
Warranty Notice
Note:
Mode Switching
Notes:
Vacuum Cleaner
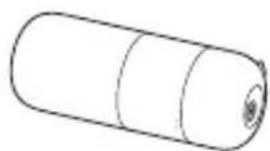
Dust Compartment Assembly
User Guide
Mode Switching
Note:
http://www.mi.com/global/service/support/declaration.html
Notes:
Dust Compartment Assembly
User Guide
Warranty Notice
Note:
Mode switching
Note:
Mode switching
Notes:
Mode switching
Notes:
https://www.mi.com/global/service/support/declaration.html
www.mi.com/global/service/userguide
Dust mite vacuum
Mode switching
Notes:
Dust mite vacuum
Hot air drying indicator
Ultrasonic indicator
UV indicator
Switching modes
Notes:
For further information, please go to www.mi.com
Manufactured for: Xiaomi Communications Co., Ltd.
Manufactured by: Guangdong Deerma Technology Co., Ltd.
(a Mi Ecosystem company)
Address: No.4-1 Longhui Road, Malong Village Committee, Beijiao Town, Shunde District, Foshan City, Guangdong Province, China
Address: No.4-1 Longhui Road, Malong Village Committee, Beijiao Town, Shunde District, Foshan City, Guangdong Province, China
User Manual Version: V2.0
Address: No.4-1 Longhui Road, Malong Village Committee, Beijiao Town, Shunde District, Foshan City, Guangdong Province, China
Address: No.4-1 Longhui Road, Malong Village Committee, Beijiao Town, Shunde District, Foshan City, Guangdong Province, China
Address: No.4-1 Longhui Road, Malong Village Committee, Beijiao Town, Shunde District, Foshan City, Guangdong Province, China
Address: No.4-1 Longhui Road, Malong Village Committee, Beijiao Town, Shunde District, Foshan City, Guangdong Province, China
Address: No.4-1 Longhui Road, Malong Village Committee, Beijiao Town, Shunde District, Foshan City, Guangdong Province, China
Foshan City, Guangdong Province, China
Address: No.4-1 Longhui Road, Malong Village Committee, Beijiao Town, Shunde District, Foshan City, Guangdong Province, China
Address: No.4-1 Longhui Road, Malong Village Committee, Beijiao Town, Shunde District, Foshan City, Guangdong Province, China
Address: No.4-1 Longhui Road, Malong Village Committee, Beijiao Town, Shunde District, Foshan City, Guangdong Province, China
User Manual Version: V2.0
Address: No.4-1 Longhui Road, Malong Village Committee, Beijiao Town, Shunde District,
Foshan City, Guangdong Province, China
Address: No.4-1 Longhui Road, Malong Village Committee, Beijiao Town, Shunde District,
Foshan City, Guangdong Province, China
Address: No.4-1 Longhui Road, Malong Village Committee, Beijiao Town, Shunde
District, Foshan City, Guangdong Province, China
Address: No.4-1 Longhui Road, Malong Village Committee, Beijiao Town,
Shunde District, Foshan City, Guangdong Province, China
Address: No.4-1 Longhui Road, Malong Village Committee, Beijiao Town, Shunde
District, Foshan City, Guangdong Province, China
District, Foshan City, Guangdong Province, China
Address: No.4-1 Longhui Road, Malong Village Committee, Beijiao Town, Shunde
District, Foshan City, Guangdong Province, China
Address: No.4-1 Longhui Road, Malong Village Committee, Beijiao Town, Shunde District, Foshan City, Guangdong Province, China
Xiaomi Technology Netherlands B.V.
Prinses Beatrixlaan 582, 2595BM, The Hague, The Netherlands
contact@support.mi.com
UK REP.
Xiaomi Technology UK Limited
Davidson House, Forbury Square, Reading, Berkshire RG1 3EU
contact@support.mi.com





- WARNINGS
- PACKAGE CONTENTS
- NOTE
- PRODUCT OVERVIEW
- DISPLAY
- NOTES
- HOW TO USE
- INSTALLING THE DUST COMPARTMENT ASSEMBLY
- TURNING ON/OFF
- SWITCHING MODES
- CARE & MAINTENANCE
- DAILY CLEANING OF THE DUST COMPARTMENT ASSEMBLY
- WASHING THE DUST COMPARTMENT ASSEMBLY
- CLEANING THE ROLLER BRUSH
- CLEAN THE SUCTION INLET AND DUST MITE SENSORS
- REGULATORY COMPLIANCE INFORMATION
- WEEE DISPOSAL AND RECYCLING INFORMATION
- EU DECLARATION OF CONFORMITY
- SAFETY INSTRUCTIONS
- CHANGE MODE
- SEPARATE COLLECTION
- REMARKS
- FR
- MODE SWITCHING
Brand : Xiaomi
Model : Dust Mite Pro
Category : Vacuum Cleaner