
XH 4C4F1S - Dishwasher HAIER - Free user manual and instructions
Find the device manual for free XH 4C4F1S HAIER in PDF.

| Product type | Semi-integrated dishwasher |
| Brand | Haier |
| Model | XH 4C4F1S |
| Capacity | 14 place settings |
| Energy class | C |
| Energy consumption (Eco cycle) | 0.740 kWh |
| Water consumption (Eco cycle) | 9.5 L |
| Eco program duration | 4 h 40 min |
| Noise level | 44 dB(A) |
| Dimensions (H x W x D) | 84.8 x 59.6 x 57.2 cm |
| Net weight | Approx. 45 kg |
| Power supply | 230 V, 50 Hz |
| Wash programs | 5 programs: 59 min, Universal, Eco, Intensive, Pre-wash |
| Options | Smart Door, Half-load, Delay start (1-24 h), Child lock, Tablets |
| Water softener | Yes, adjustable from S0 to S8 |
| Rinse aid | Yes, adjustable from R0 to R6 |
| Tub material | Stainless steel |
| Installation type | Under counter |
| Water pressure | 0.3 - 10 bar |
| Inlet water temperature | Max. 25 °C |
| Spare parts available | Filters, spray arms, seals, etc. (via Haier customer service) |
Frequently Asked Questions - XH 4C4F1S HAIER
User questions about XH 4C4F1S HAIER
0 question about this device. Answer the ones you know or ask your own.
Ask a new question about this device
Download the instructions for your Dishwasher in PDF format for free! Find your manual XH 4C4F1S - HAIER and take your electronic device back in hand. On this page are published all the documents necessary for the use of your device. XH 4C4F1S by HAIER.
USER MANUAL XH 4C4F1S HAIER
natural_image
Technical line drawing of a computer tower with ventilation slots and drive bays (no text or labels)DE
Inhalt
DE
natural_image
Technical line drawing of a mechanical device with mounting brackets and internal components (no text or symbols)Stecken Sie die
natural_image
Technical line drawing of a mechanical assembly with no visible text or symbolsSchließen Sie die
3
natural_image
Technical diagram of a mechanical assembly with gears and a rotating component (no text or symbols)WICHTIG!
natural_image
Technical diagram of a mechanical assembly with spring and housing components (no text or labels)
4
natural_image
Technical line drawing of a mechanical assembly with a saw and handle (no text or symbols)
natural_image
Simple diagram of three white cabinets with vertical lines on the left side, one filled in gray (no text or symbols)natural_image
Simple line drawing of a cable inserted into a wall socket (no text or symbols)natural_image
Technical line drawing of a mechanical assembly with layered components and scaffolding (no text or symbols)
natural_image
Technical line drawing of a structural framework with pipes and supports (no text or symbols)natural_image
Technical line drawing of a mechanical assembly with layered components and structural supports (no text or symbols)natural_image
Technical line drawing of a mechanical device with an arrow indicating rotation or assembly (no text or symbols present)natural_image
Technical line drawing of a device casing with internal components and mounting holes (no text or symbols)natural_image
Technical line drawing of a mechanical assembly with mounting brackets and a diagonal bracket (no text or symbols)natural_image
Diagram of a mechanical device with internal components and an arrow indicating rotation (no text or symbols)natural_image
Diagram of a device interior showing a tray with a lid and a vent, with an arrow indicating rotation or movement (no text or symbols present)natural_image
Technical line drawing of a mechanical device with no visible text or symbolsnatural_image
Technical line drawing of a 3D mechanical housing or enclosure with internal structural components (no text or symbols)natural_image
Technical line drawing of an industrial machine with coiled components and structural framework (no text or symbols)natural_image
Technical line drawing of a mechanical assembly with internal components and mounting holes (no text or symbols)natural_image
Technical line drawing of a multi-chamber electrical enclosure with no visible text or symbolsnatural_image
Line drawing of a mechanical device with a handle and internal components (no text or symbols)natural_image
Technical line drawing of a mechanical assembly or factory floor with workers and structural beams (no visible text or symbols)natural_image
Technical line drawing of a mechanical device with internal components and mounting features (no text or symbols)natural_image
Pure mechanical assembly diagram without any text, numbers, or symbolsnatural_image
Mechanical assembly diagram showing a lever mechanism with no text or symbolsnatural_image
Technical line drawing of a mechanical component inside a transparent housing (no text or symbols)natural_image
Interior view of an appliance with multiple kitchen units and plastic enclosures (no visible text or labels)natural_image
Interior view of a mechanical or electrical device with layered components and a central valve (no visible text or symbols)
natural_image
Industrial cooling unit with coiled metal mesh structure (no visible text or symbols)Dritter Korb
Dishwasher user manual
natural_image
Technical line drawing of a computer tower with ventilation slots and mounting brackets (no text or symbols)EN
Safety and warnings ....57
Assembly instructions....61
Description of the product 77
Control panel....78
Program 81
First use 82
Loading recommendations....83
Setting a wash cycle 84
Start delay....86
Key lock 87
Settings....88
Water softener system 89
Detergent 91
Rinse aid....93
Daily use....94
Maintenance 97
Troubleshooting 101
Error codes 104
Standard test....105
Technical data....106
Intended use
The appliance is intended for domestic use in the home or in similar areas, such as staff kitchens in work areas, in holiday homes, by guests in hotels, motels or other residential environments as well as in bed and breakfast settings. It is not intended for commercial or industrial use. Do not use it for purposes other than those for which it is intended.
Changes or modifications to the device are not permitted. Improper use may cause hazards and invalidate warranty claims.
Standards and guidelines
This product complies with the requirements of all applicable EC directives with the corresponding harmonised standards that apply for a CE marking.
Read and keep these instructions
Observe basic precautions when using your dishwasher, including the following:
General information
The information in this manual must be followed to minimise the risk of fire or explosion or to prevent damage to property, injury or loss of life.
▶ Only use the dishwasher for the purpose described in these instructions.
This appliance is designed for household use or for household-related use, e. g.:
- in kitchenettes for staff in offices, shops or similar work areas
- in holiday homes
• by guests in hotels, motels and other residential facilities
• in bed & breakfast settings.
▶ Only use detergents or rinse aids that are suitable for household dishwashers and keep them out of the reach of children. Make sure that the detergent compartment is empty at the end of each wash program.
When loading crockery, position sharp objects in such a way that they cannot damage the dish-washer. Sharp knives must always be inserted with the handle facing upwards to minimise the risk of cuts.
▶ Do not touch the filter plate in the base of the dishwasher during or immediately after use as it may be hot.
▶ Only operate the dishwasher when all the panels are properly fitted.
▶ Never tamper with the controls.
▶ Never sit or stand on the door or crockery basket of the dishwasher or carry out any other improper actions.
The door must not be left in the open position, as this can be a tripping hazard.
The hinged cup inserts are designed to hold cups, glasses and kitchen utensils. Do not lean on the hinged cup inserts and do not use them to support your body weight.
▶ To minimise the risk of injury, never allow children to play in, on or near the dishwasher.
▶ Under certain conditions, hydrogen gas can form in a hot water heating system that has not been used for a fortnight or longer. HYDROGEN GAS IS EXPLOSIVE. If the hot water system has not been used for such a period, turn on all hot water taps and allow the water to flow from each tap for several minutes before using the dishwasher. This releases accumulated hydrogen gas. As the gas is flammable, smoking or the use naked flames during this time is forbidden.
Remove the door from the dishwasher compartment when decommissioning or disposing of an old dishwasher.
▶ Some dishwasher detergents are highly alkaline. They can be extremely dangerous if swallowed. Avoid contact with skin and eyes and keep children away from the dishwasher when the door is open.
The dishwasher may only be operated if the filter plate, filter and spray arm(s) are installed. These parts are described in the "Maintenance" section.
If the dishwasher is not used for a long period of time, you should disconnect the power supply and switch off the water supply.
▶ Children may only clean and maintain this appliance under supervision.
▶ Make sure that you do not load the crockery in such a way that the door cannot be closed.
Household appliances are not intended for use by children. Children under 8 years of age must be kept away from the appliance unless they are supervised at all times. This appliance may only be used by children aged 8 years or older and by persons with reduced physical, sensory or mental abilities or lack of experience and knowledge, if they are supervised or instructed on how to use the appliance safely and therefore understand the hazards involved. Children should be supervised to ensure they do not play with the appliance.
If a dishwashing detergent is used, we recommend carrying out a wash program with detergent immediately afterwards to prevent damage.
The dishwasher is designed for washing standard household crockery. Items contaminated with petrol, paint, steel or iron residues, corrosive, acidic or alkaline chemicals must not be cleaned in the dishwasher.
Do not wash plastic items unless they are labelled dishwasher-safe or equivalent. For plastic articles that are not labelled, follow the manufacturer's recommendations.
- Avoid rinsing containers with labels. Labels that come off during a wash cycle can damage the washing system.
Installation
Before using this dishwasher, it must be installed and set up in accordance with the installation instructions. If you did not receive any installation instructions with your dishwasher, you can request them from your dealer or download them from our local Haier website listed on the back cover.
▶ Installation and maintenance must be carried out by a service technician trained and supported by Haier.
If the power cord is damaged, it must be replaced by a service technician trained and supported by Haier or a qualified tradesperson to prevent any hazards.
▶ Ensure that the dishwasher is secured to the adjacent cupboards using the brackets and holders supplied. Otherwise, the product may become unstable and cause damage or injury.
▶ Do not operate the appliance if it is damaged, not working properly, partially disassembled or if parts are missing or broken. This also includes damaged mains cables or plugs.
▶ Do not store or use petrol or other flammable vapours and liquids in the vicinity of the dishwasher.
▶ Connect the appliance to a properly rated and protected circuit to avoid electrical overload.
▶ Make sure that the mains cable is laid in such a way that nobody can step on it or trip over it and that it cannot be damaged or stressed in any other way.
▶ Do not install or store the dishwasher in places where it is exposed to temperatures below freezing or to the weather.
Do not use extension leads or portable sockets (e.g. a multiple socket) to connect the dishwasher to the mains supply.
This appliance must be earthed. In the event of a fault or failure, earthing reduces the risk of electric shock as it offers the electric current the path of least resistance.
This appliance is fitted with a cable that has an earthing conductor and an earthing contact plug. The plug must be plugged into an appropriate outlet that is installed and earthed in accordance with all local guidelines and regulations. Improper connection of the appliance's protective earth conductor can create the risk of electric shock. Contact a qualified electrician or a service technician trained and supported by Haier if you have any doubts as to whether the appliance is properly earthed.
Do not modify the plug supplied with the appliance; if it does not fit into the socket, contact a service technician trained and supported by Haier or a qualified electrician.
If the dishwasher is installed as a permanently connected appliance, this appliance must be connected to an earthed, permanently installed metal wiring system or an earthing conductor must be installed with the circuit conductors and connected to the earthing terminal or the earthing cable of the appliance.
Maintenance
▶ Always disconnect the appliance from the power supply before cleaning or maintenance.
When disconnecting the appliance, always pull the plug and not the mains cable or cable connection to avoid any damage.
▶ Never attempt to repair, replace or service any part of the appliance unless specifically recommended in this manual. We recommend that you contact a service technician trained and supported by Haier or Customer Service.
▶ Keep the floor around your appliance clean and dry to minimise the risk of slipping.
- Keep the area around/under your appliance clear of flammable materials, such as lint, paper, rags and chemicals, that may accumulate.
■ Supplied parts

Drain hose holder (1)

Inlet hose (1)
Salt funnel (1)

Cotton felt (1)
User manual (1)
Warranty card (1)
Installation instructions (1)
Energy consumption label (1)
Moisture protection tape (1)
(to prevent moisture damage to cupboards)

Skirting board (2)

Mounting part (2)

Upper decorative moulding (5)
Screws
∅3.9×13 mm (7)
Screws
∅4x25 mm (4)
Screws
∅3.9×38 mm (4)
■ Before installation
Unpacking and handling
- Check the packaging and dishwasher for signs of transport damage. If the dishwasher is damaged in any way, it must not be installed. Contact the dealer from whom the dishwasher was purchased.
- Disposal of the packaging: Some of the packaging is recyclable. Check the symbols and labels and recycle if possible.
- Never lift the dishwasher by the door handle or top. This can cause damage.
• Always take care with the hoses and power cable at the rear of the dishwasher. Careful handling prevents damage and malfunctions caused by crushing, bending or cutting. - When installing the dishwasher, make sure that the drain hose is not crushed or bent.
Connections and power/water supply
- Check that the mains cable reaches a power socket. If this is not the case, it must be replaced by an authorised Haier technician. The dishwasher must not be connected to the power supply using extension cables or distributors with multiple sockets.
- Check that the hoses reach all the way to the corresponding connections. If a hose needs to be extended, make sure that the extension hose is new and of the same quality and diameter as the one already fitted.
- The dishwasher must not be connected to a water system in which the temperature exceeds 25^ .
- The dishwasher must not be connected to a high-pressure hot water system in a cabinet, as this may cause damage to the system.
1 Product dimensions

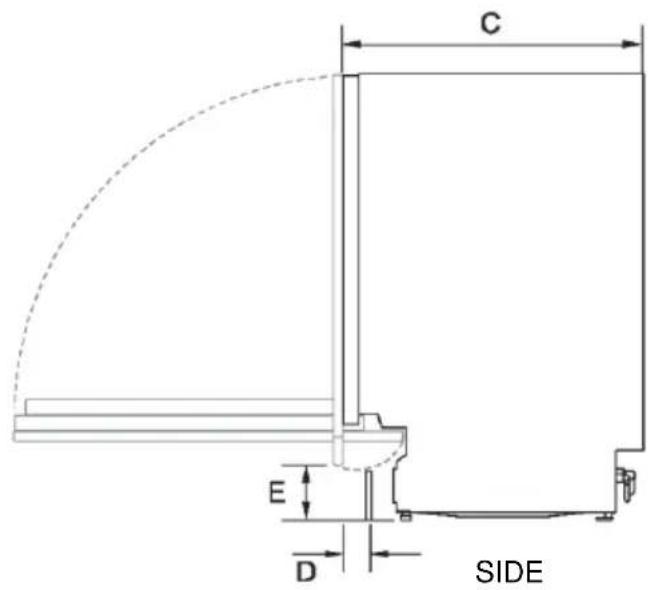
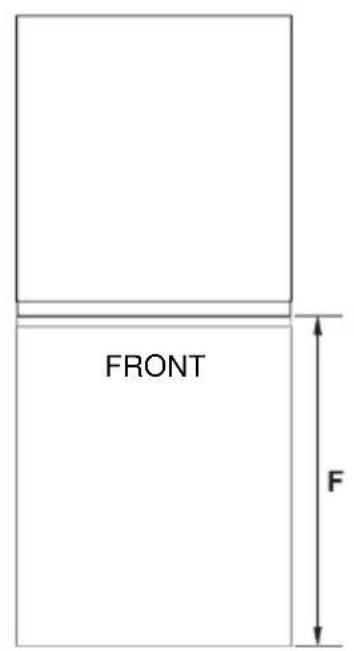
NOT TO SCALE
| PRODUCT DIMENSIONS | MM | |
| A | Total height of the product* | 818-878 |
| B | Overall width of the appliance (without side seals) | 596 |
| C | Overall depth of the appliance (without customised cover and handle) | 572 |
| D | Depth of skirting board | 30-95 |
| E | Height from the floor to the underside of the customised cladding | 67-137 |
| F | Depth of the open door(Measured from the front of the appliance) (without customised cladding) | 616 |
| * Depending on the setting of the levelling feet | ||
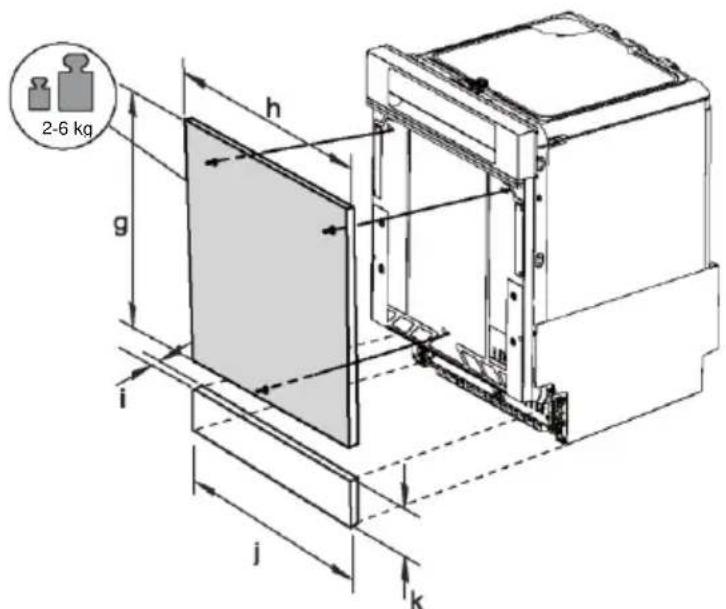
| DIMENSIONS OF CUSTOMISED CLADDING (custom-made) | MM | |
| G | Height of the customised door panel | 560-630 |
| H | Width of the customised door panel | 590 |
| I | Depth of the customised door panel | 16-20 |
| J | Width of the customised skirting board | 590 |
| K | Height of the customised skirting board | 60-110 |
| * Depending on cabinet dimensions | ||
2 Dimensions of the cabinets

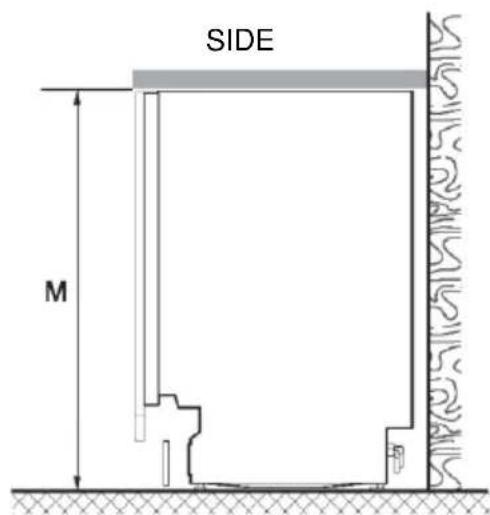
| CABINET DIMENSIONS | MM | |
| L | Inner width of the cavity | min. 600 |
| M | Inner height of the cavity* | 820-880 |
| N | Inner depth of the cavity | min. 574 |
| * Depending on the setting of the levelling feet | ||
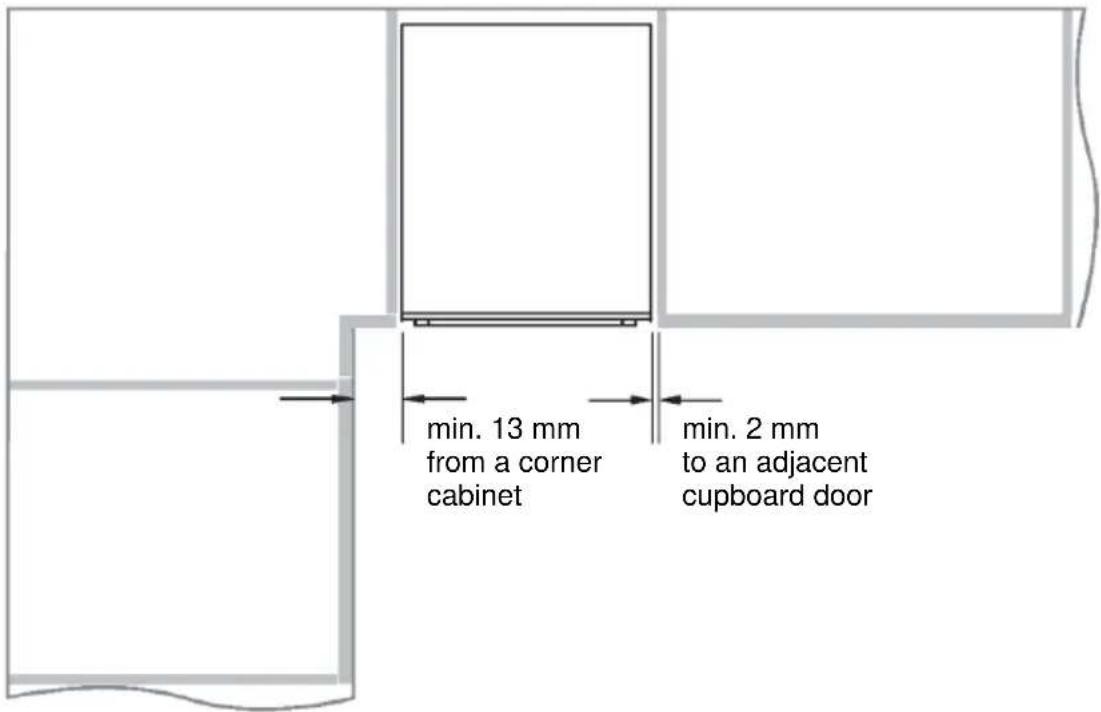
Minimum distances to neighbouring cabinets
3 Preparation of the cavity
IMPORTANT!
To avoid possible vapour damage to the cabinets, ensure that the wood surrounding the dishwasher is sealed with an oil-based paint or moisture-resistant polyurethane.
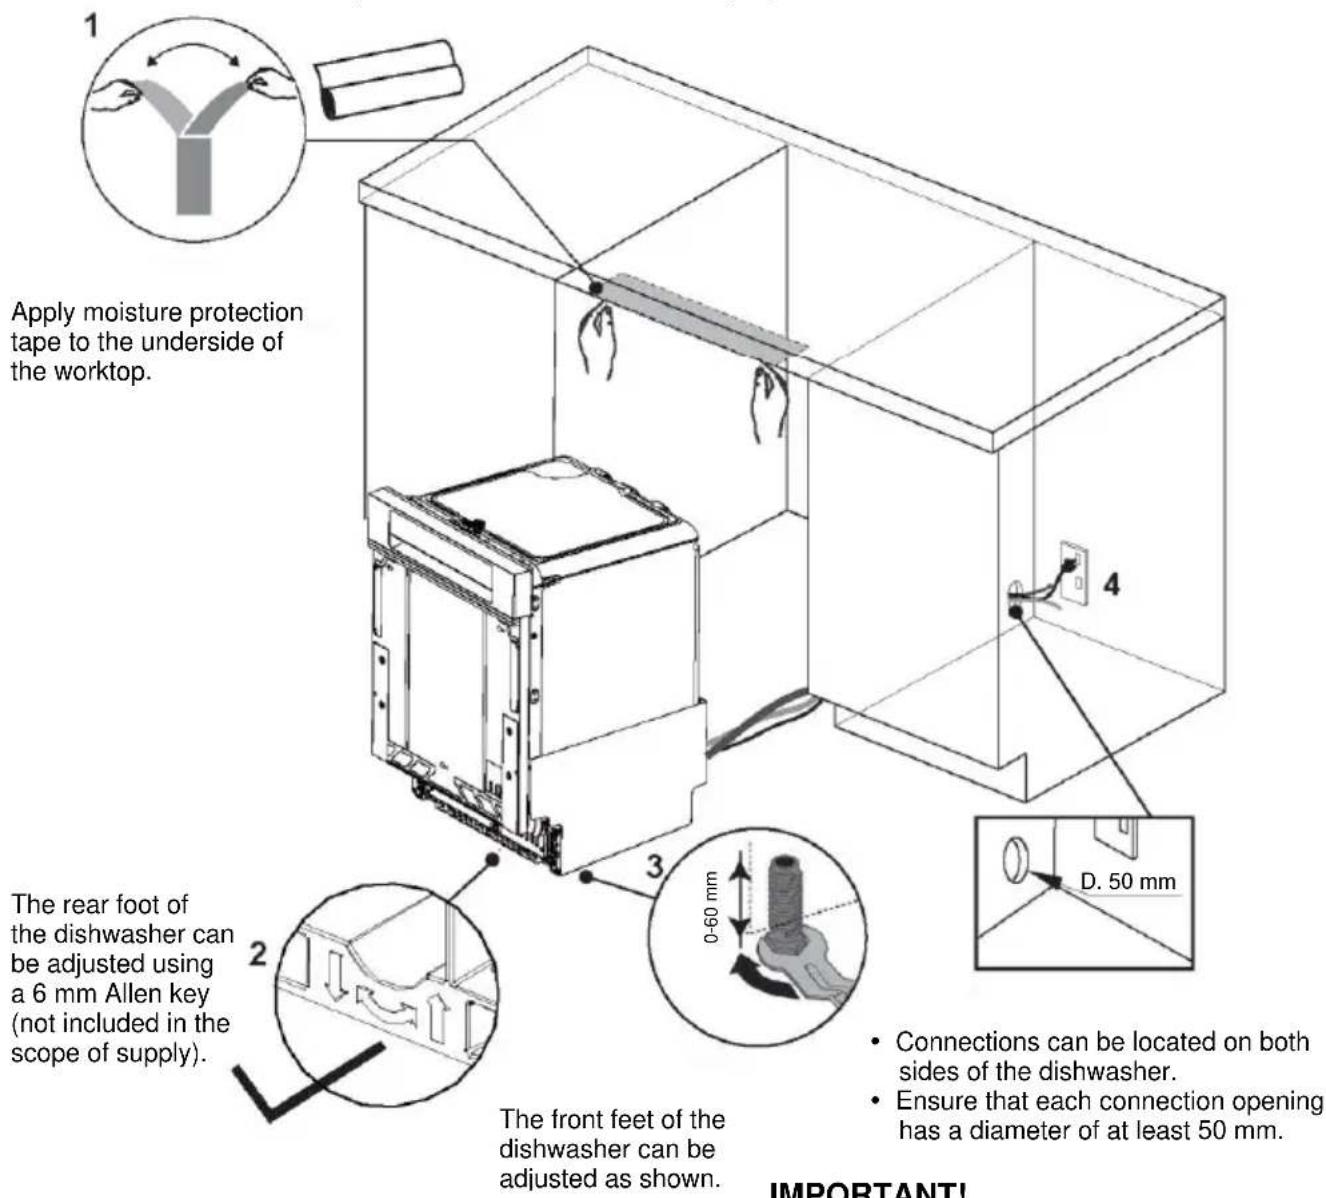
IMPORTANT!
The socket must be located in a cabinet next to the dishwasher cavity.
Setting up and stabilising the dishwasher
- Never lift the dishwasher by the door handle.
- When inserting the appliance, pull the hoses and power cable through so that they are not bent or twisted.
-
To improve the stability, plastic spacers can now be used on the side of the dishwasher next to the hinge. Further information on attaching spacers is provided in step 7.
-
After placing the dishwasher in the desired position, adjust the rear foot using a 6 mm Allen key. The front feet can also be adjusted manually.
- We recommend adjusting the feet so that the dishwasher sits securely under the worktop without tilting.
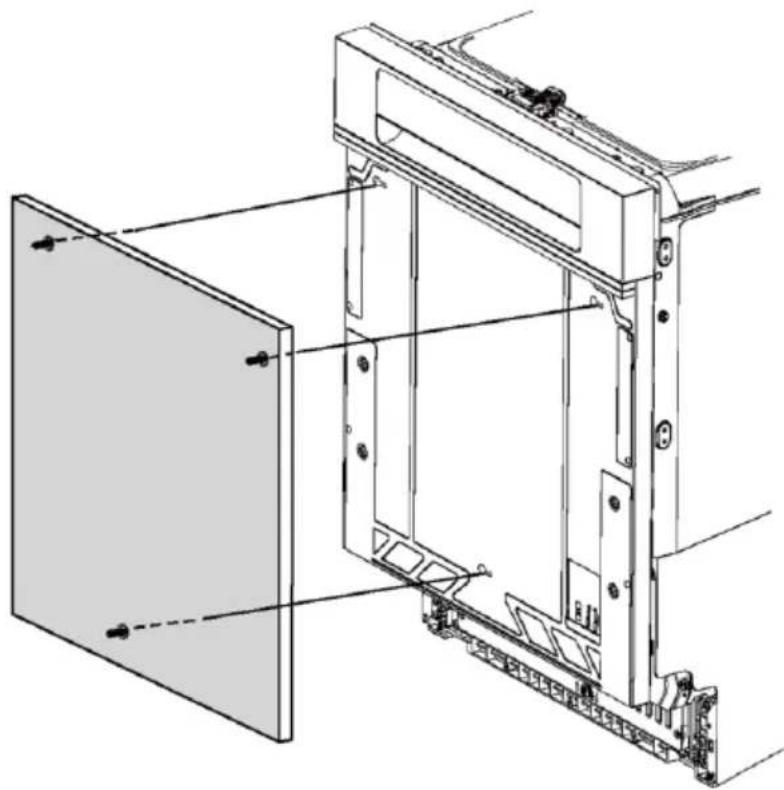
4 Preparing the door panelling
Material specifications for the front panel
The front of the dishwasher can be covered with a front panel with the following specifications: It must be adequately sealed to withstand moisture (50°C at 80% relative humidity). As the back and sides of the panel are generally hot and moist, they should be completely covered with a waterproof vapour blocker (i.e. polyurethane) to prevent the panel being damaged.
natural_image
Technical line drawing of a mechanical device with mounting brackets and internal components (no text or symbols)5 Attaching the customised door panelling

Insert the ∅3.9x13 mm screws through the pilot holes and attach the small sliding bracket to the panelling.

natural_image
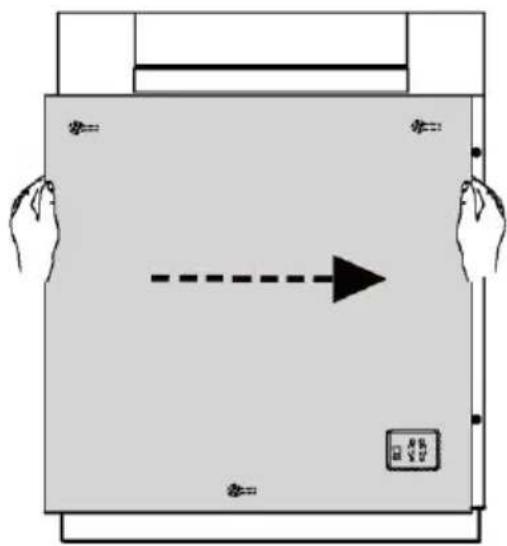
Technical line drawing of a mechanical assembly with no visible text or symbolsClose the dishwasher door and then hang the customised panelling in the front of the door.
natural_image
Diagram of a device with hands holding a rectangular panel and a dashed arrow indicating direction (no text or symbols)3
Move the door into the correct position.
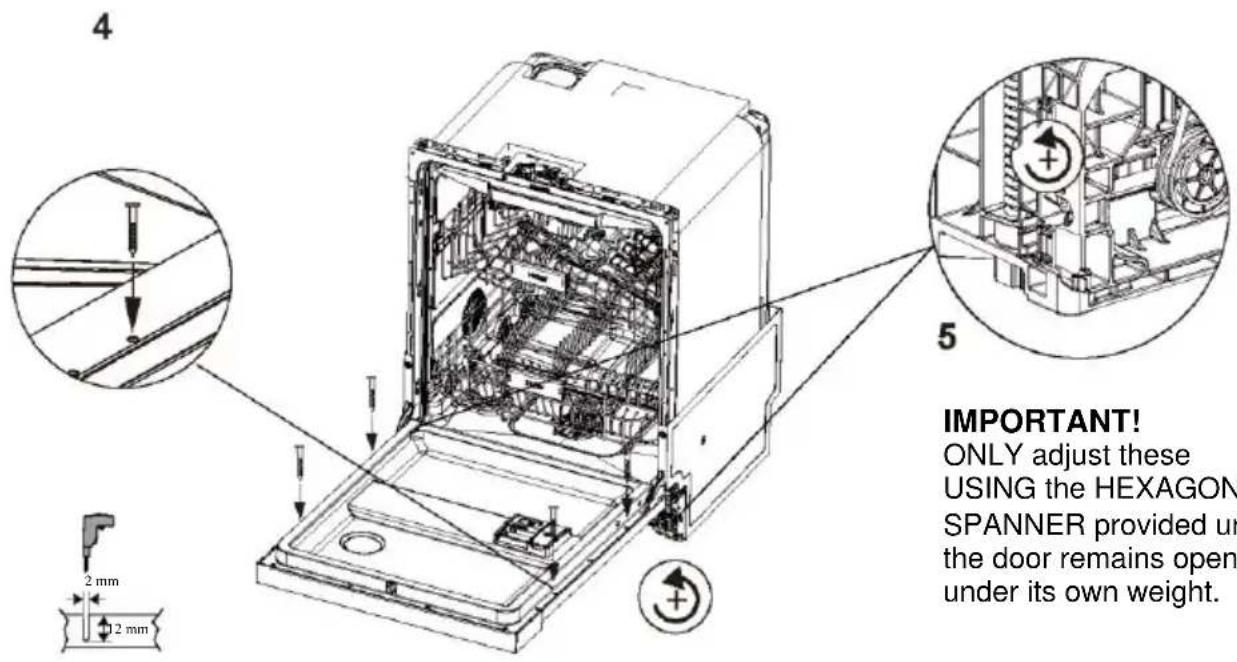
Open the door and remove the screws before replacing them with ∅3.9x38 mm screws to secure the cladding.
Adjusting the door balance The balance of the door can be adjusted using two screws that can be accessed through two holes on the front.
Adjust both sides alternately at the same time so that an even balance is achieved.
6 Attaching the skirting board
Separate panel
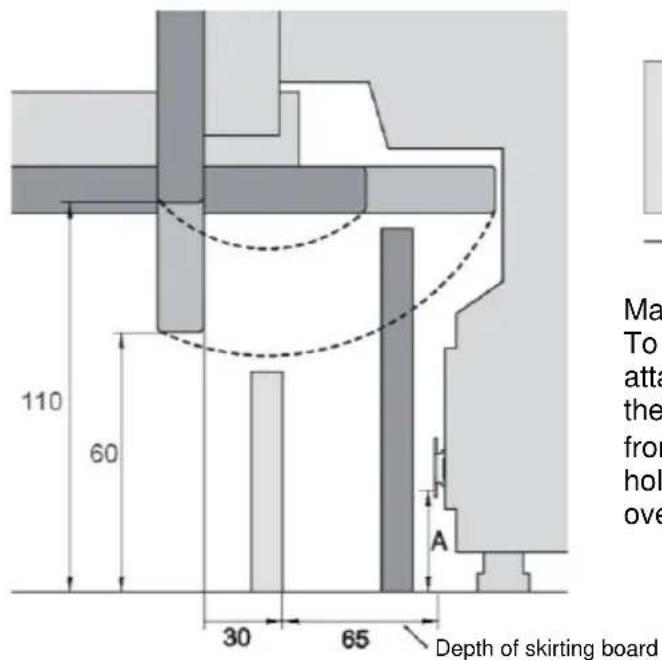
Mark the position of the pilot holes for each bracket. To determine the height at which the bracket is attached, measure the distance from the floor to the lowest hole in the bracket. Remove the bracket from the device and mark the position of the other holes relative to this measurement. Note the door overhang and pivoting range.
Fasten the brackets to the panelling using ∅3.9x13 mm screws. Place the skirting board on the appliance and mark the desired alignment depth on the bracket. Remove the panelling. Use a screwdriver to bend out the marked tabs on both brackets to prevent the skirting board from being pushed further into the appliance.

natural_image
Technical diagram of a mechanical assembly with spring and housing components (no text or symbols)
Push the skirting board firmly into the gaps on both sides of the housing to fix it in place.
Continuous panelling
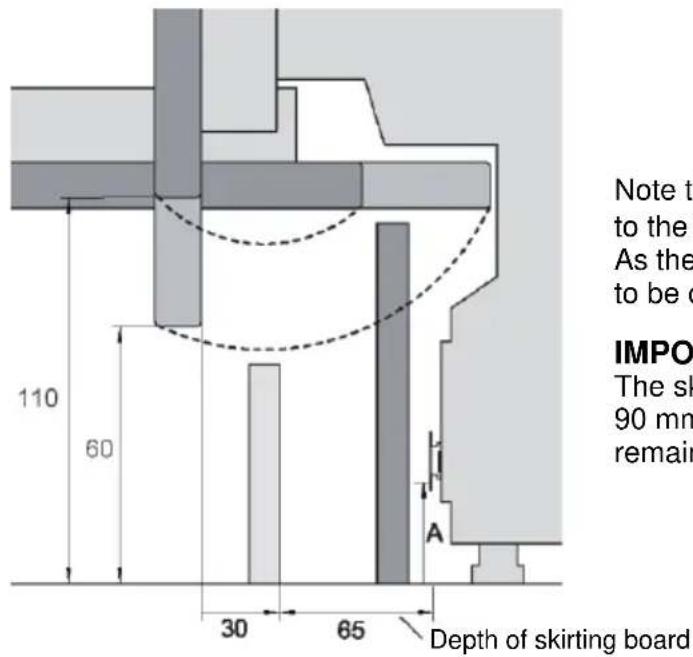
Note the door overhang and pivoting range relative to the height and depth of the skirting board.
As the panelling is continuous, it will probably have to be cut back to ensure a seamless connection.
IMPORTANT!
The skirting board must not protrude more than 90 mm from the dishwasher so that the floor light remains clearly visible.
Align the skirting board to the desired position and mark the point at which the skirting board meets the bottom edge of the door panelling. Cut back any protruding material.
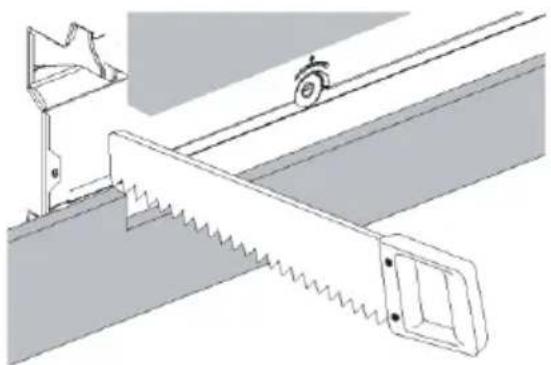
natural_image
Technical line drawing of a mechanical saw and lever system (no text or symbols)
natural_image
Simple diagram of a cabinet with two white doors and one gray cabinet, no text or symbols present.Fit continuous panelling to surrounding cabinets
7 Securing the device
A Attachment to the cabinet on the sides
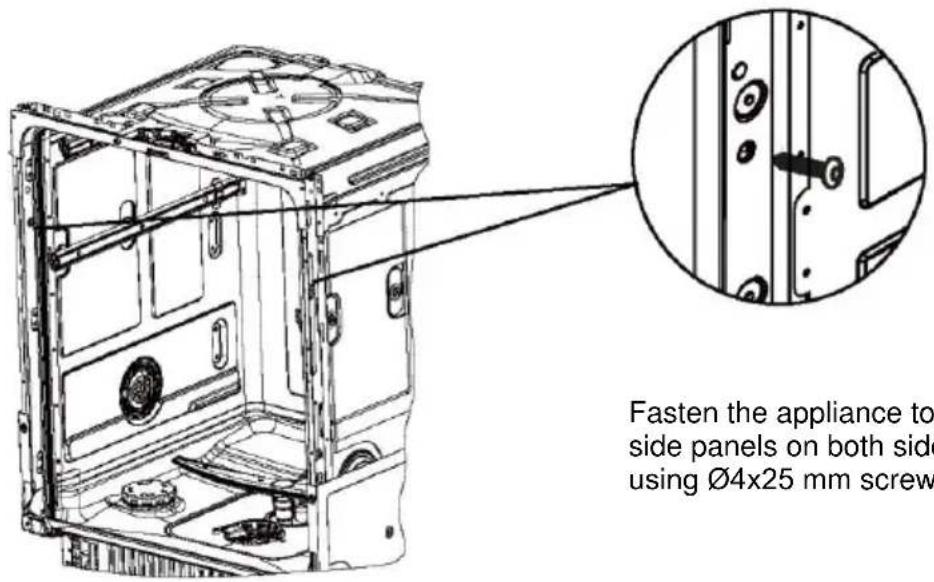
Fasten the appliance to the surrounding side panels on both sides of the housing using ∅4x25 mm screws.
B Optional: Attachment to upper panels
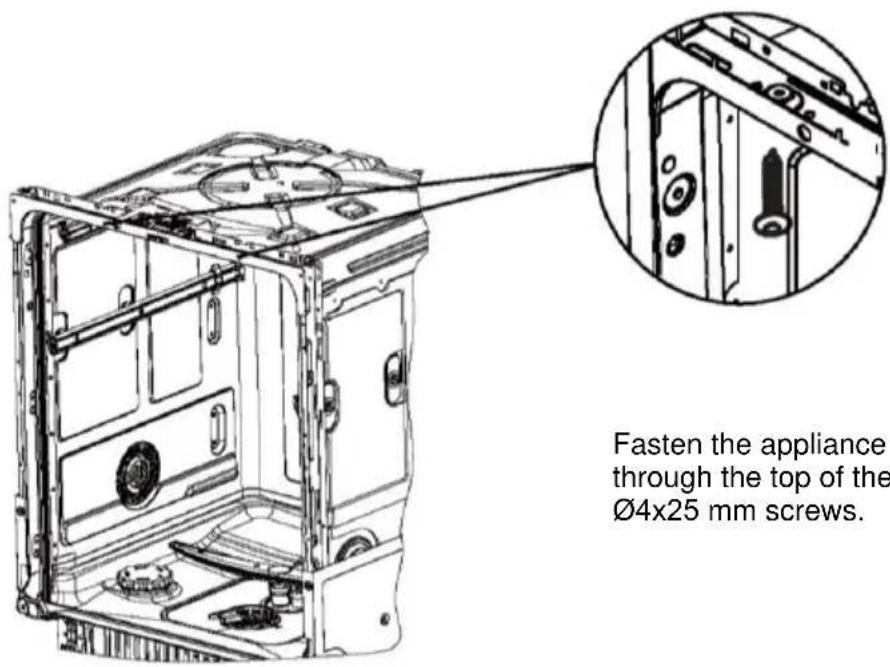
Fasten the appliance to the worktop through the top of the housing using ∅4x25 mm screws.
8 Attaching the water connections. Determining the most favourable option
Dishwasher and ∅38 mm standpipe
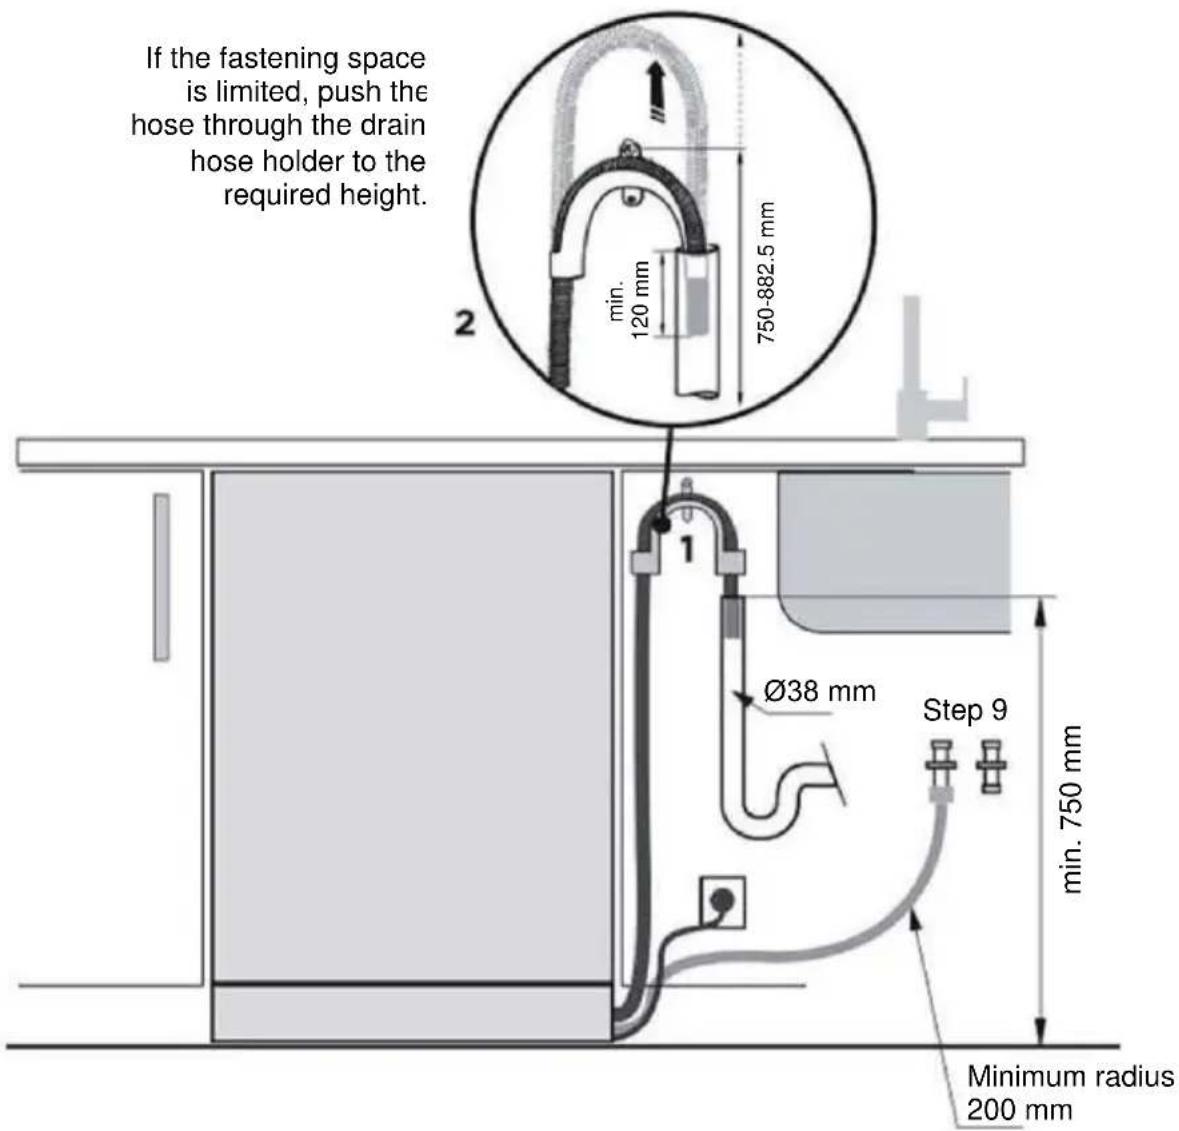
Dishwasher with drain hose connector on sink/drainage T-piece
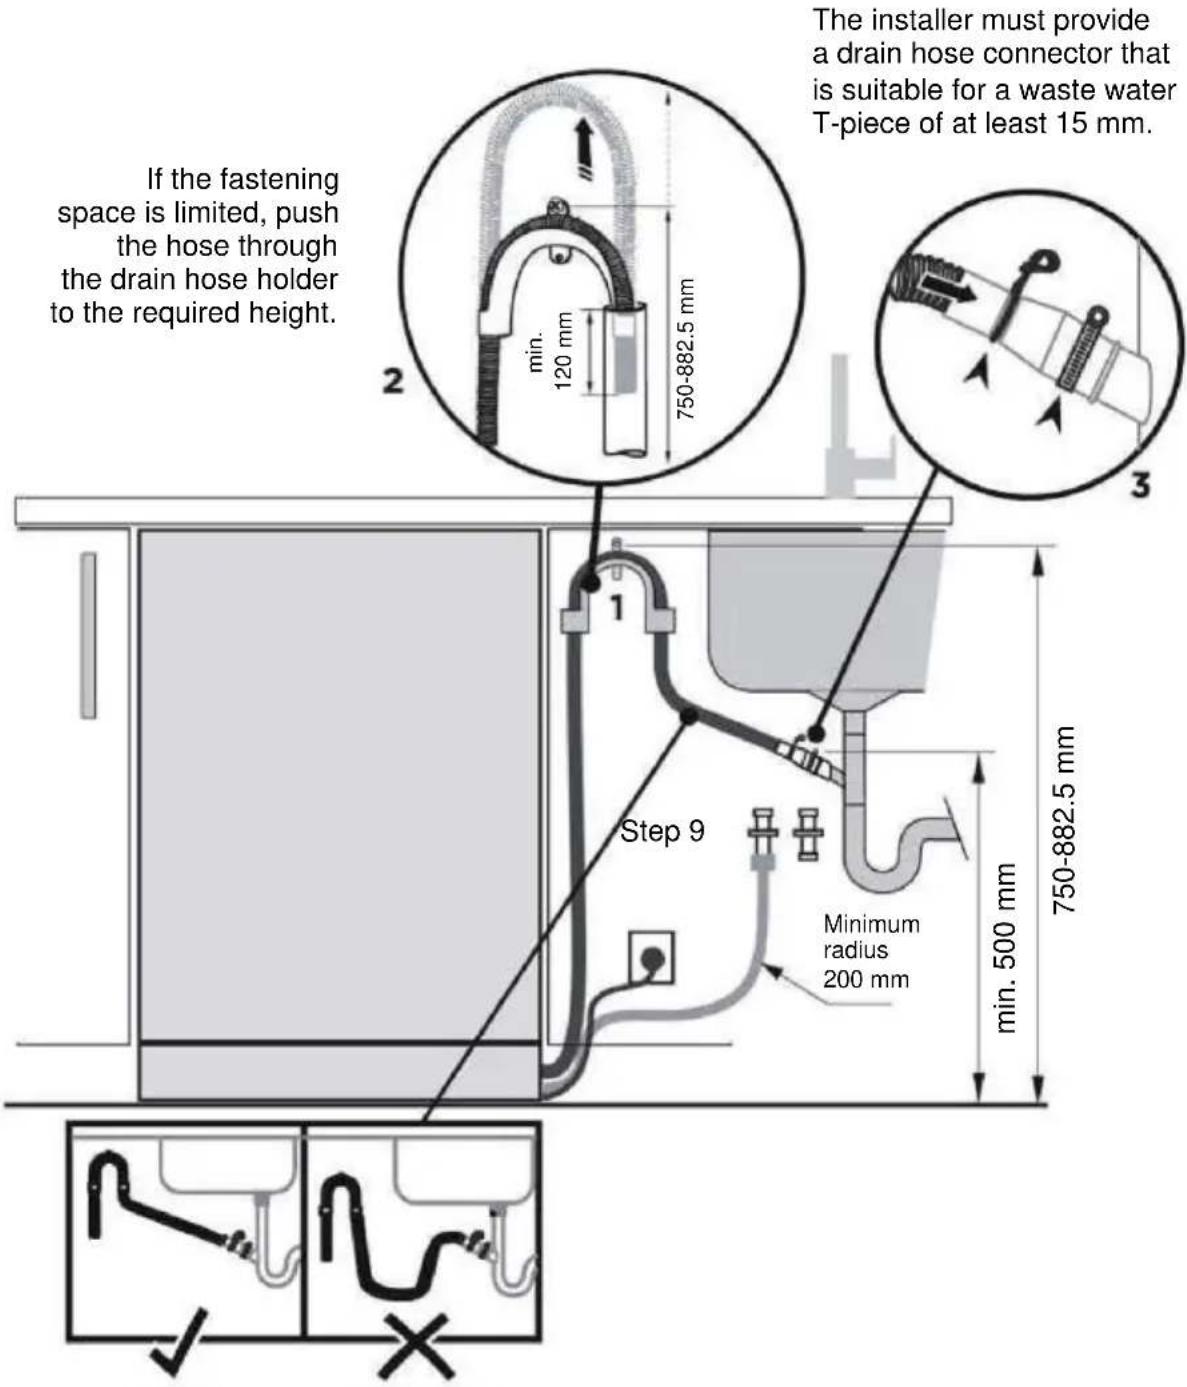
Make sure that the drain hose leads directly to the hose connector. Remove any excess drain hose material. Do not shorten the inlet hose.
IMPORTANT!
Do not connect the drain hoses to a waste disposal unit, as this type of connection can block the drain hoses.
9 Connecting the inlet hose to the cold water supply
3/4" BSP connection
The supplied rubber disc seal must be fitted in the coupling.
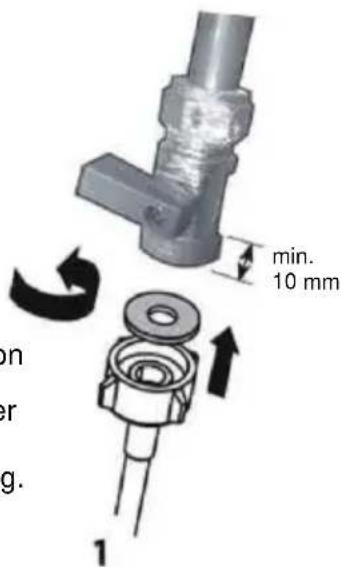

Water inlet connection
IMPORTANT!
- The appliance should be connected to the water supply using the new water inlet hose supplied. Old hoses must not be used.
-
Do not shorten the inlet hose.
-
Observe the requirements for the water supply.
-
The dishwasher has a water connection valve.
• To ensure optimum performance and energy efficiency, we recommend a cold water connection.
• The temperature of the incoming water must not exceed 25^ C. -
Observe the permissible water pressure limits.
• Minimum pressure: 0.3 bar = 3 N/cm2 = 0.03 MPa
- Contact a qualified installer if the pressure is below 1 bar.
• Maximum pressure: 10 bar = 100 N/cm2 = 1 MPa
- If the pressure is above 10 bar, a pressure reducing valve must be installed. Contact a qualified installer.
-
Connect the water inlet hose to an accessible tap using a 3/4" BSP connection piece. Make sure that the inlet hose does not have any bends that could restrict the water flow. A 90° bend requires a minimum height of 200 mm for a bend-free curve.
-
Incoming water must be clear and clean. If the water pipes have not been used for a long time, let the water run first to ensure that it is clear and free of impurities. Otherwise, the water inlet hose may become blocked and damage the appliance.
-
If necessary, filter deposits out of the pipework using a filter insert. Such filter inserts are available from your local authorised dealer or from Customer Service.
-
Tighten the hose coupling a further half turn after contact with the seal.
-
Make sure that the connection is watertight.
10 Connecting the device to the power supply

natural_image
Simple line drawing of a cable inserted into a wall socket (no text or symbols)Electrical connection
- Never connect the dishwasher to the power supply during installation. All household cables must be earthed properly.
- Check the rating plate (left on the stainless steel inside of the dishwasher door) and ensure that the voltage and frequency values for the power supply in the house correspond to those on the rating plate.
- Insert the plug into a properly earthed socket with a circuit breaker.
IMPORTANT!
- Earthing the appliance is a statutory safety requirement.
- If the mains cable does not reach the socket or the socket to which the appliance must be connected is not suitable for the plug, the entire dishwasher mains cable must be replaced. This may only be carried out by an authorised Haier technician. The plug must not be modified or cut off. Never connect the dishwasher to the power supply using adapters, extension cables or distribution sockets, as this can lead to overheating and be a fire hazard.
- The socket to which the dishwasher is connected must remain easily accessible even when the appliance is installed (e.g. in an adjacent cupboard). This ensures that the dishwasher can be disconnected from the power supply to be cleaned and maintained safely.
■ Final checklist
To be carried out by the installer
- Are all parts installed?
- Are all of the panels and parts secure, and have final electrical tests been performed in accordance with applicable local electrical regulations?
- Is the dishwasher level? Readjust the levelling feet if necessary.
To ensure optimum performance, the dishwasher must not be tilted by more than 1 degree. Check with a spirit level. - Is the inlet hose to the water supply fitted with a rubber disc seal?
This must be tightened by a further half turn after contact with the seal. - Have all recesses or plugs in the drain connection been drilled out and has the drain connection been established?
- The drain hose connector must not bear the weight of excess hose material. To avoid sagging, the drain hose should be stretched as far as possible. Any excess length of drain hose should be stored on the dishwasher in a raised loop.
- When connecting the drain hose to the siphon, ensure that the raised loop is at least 150 mm higher than the drain hose connector.
- Has all of the packaging and adhesive tape used to secure the rack during transport been removed from the dishwasher?
- Can the door be opened and closed freely without bumping into adjacent cabinets?
- Is the socket outlet accessible and located in an adjacent cabinet?
- Check the operation of the dishwasher:
If an error code is displayed, information is provided in the "Error codes" section of the operating instructions.
▶ Ensure that the installer has completed the "Final checklist" in the installation instructions.
Read these instructions and pay particular attention to the "Safety and warnings" section.
Remove all inner and outer packaging and dispose of it responsibly. Recycle everything that can be recycled.
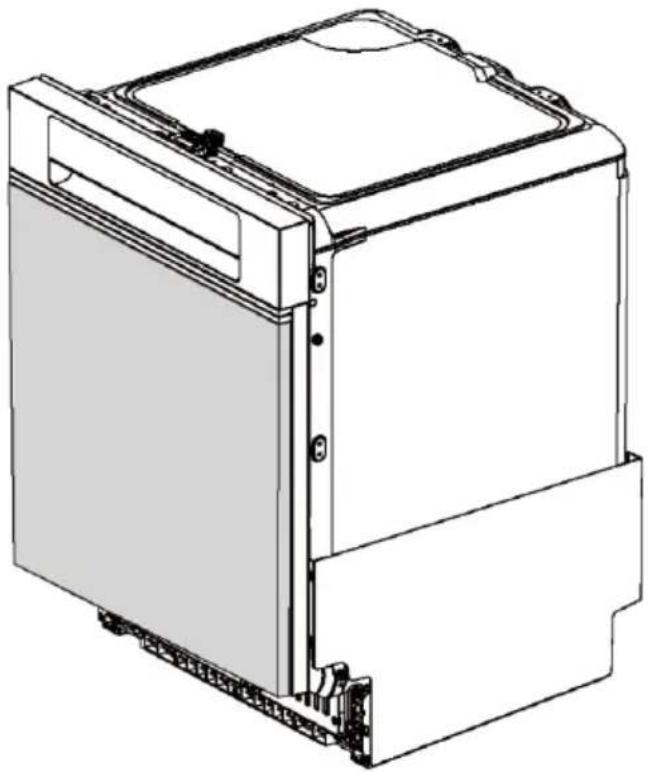
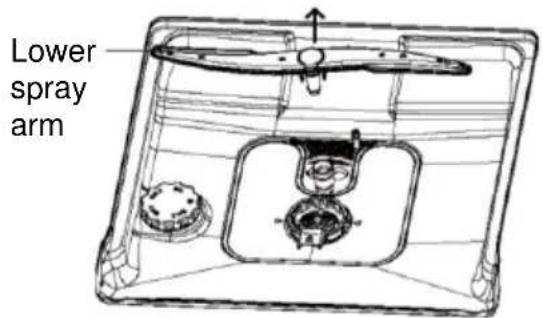
Overview of the dishwasher
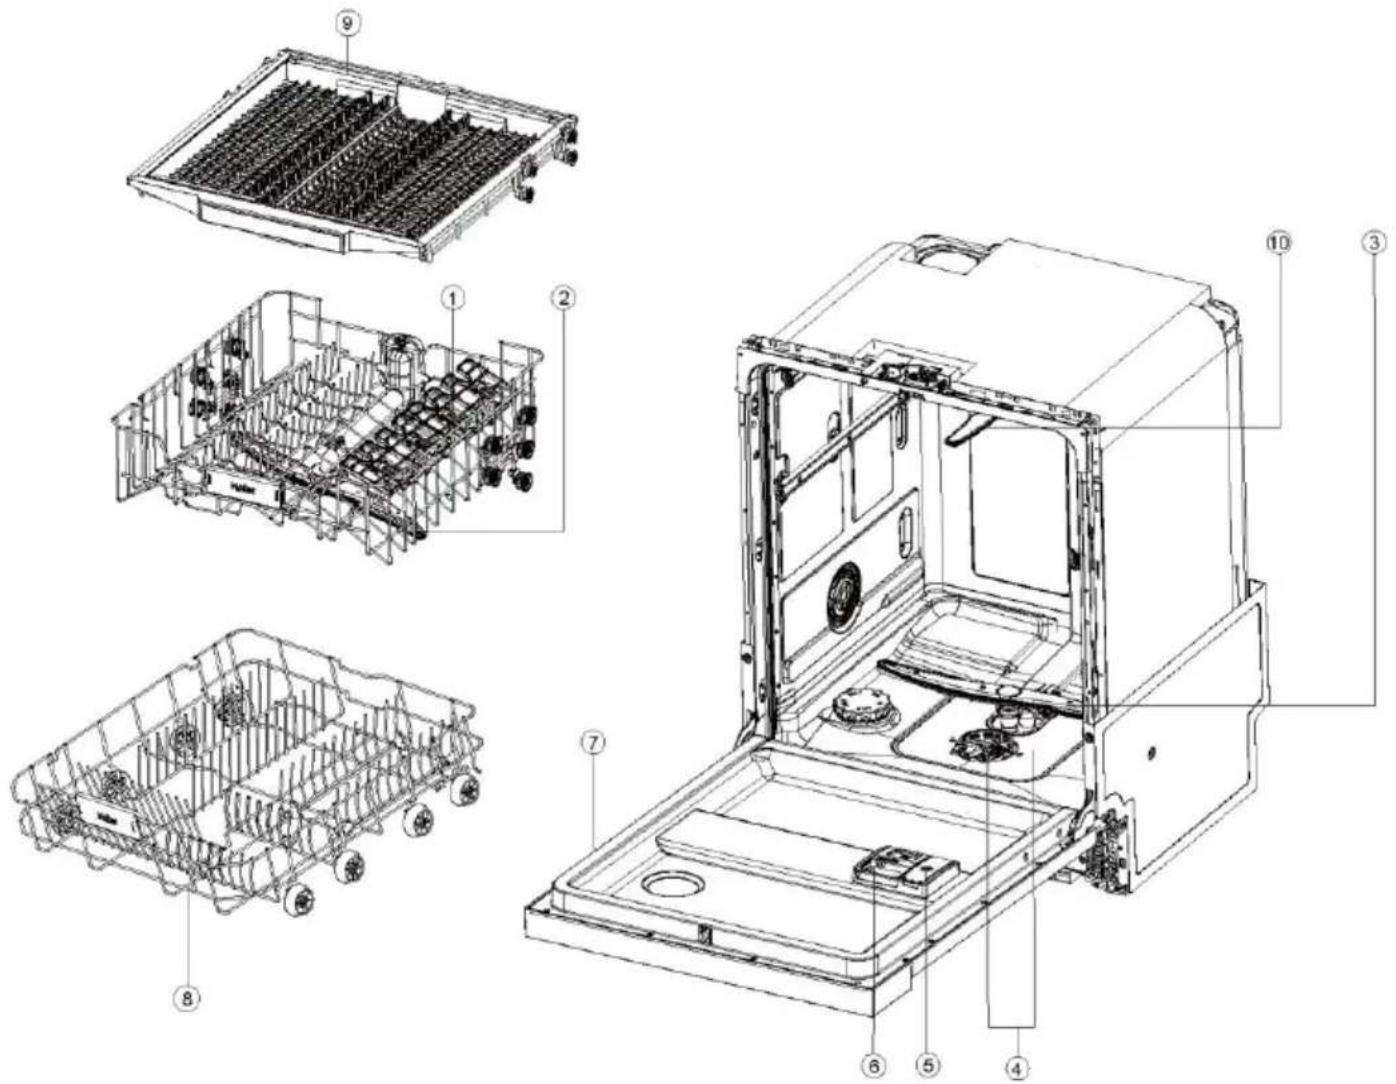
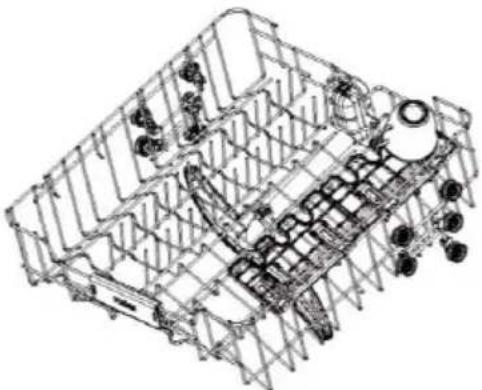
- Upper basket
- Upper spray arm
- Lower spray arm
- Filter
-
Rinse aid compartment
-
Cleaner compartment
- Type plate
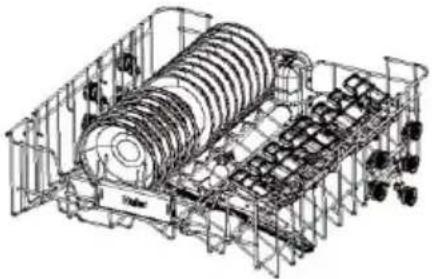
- Lower basket
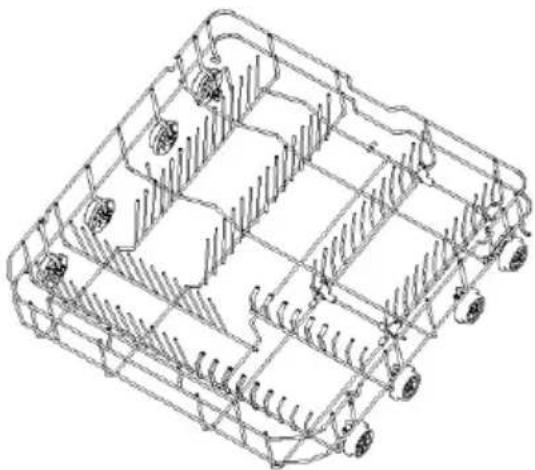
- Third basket
- Top spray arm

- ON/OFF symbol
- Child lock
- Delay symbol
-
Program selection symbol
-
Display of the time and info/display symbol
- Half load indicator symbol
- Auto Door display symbol
- START/RESET symbol
Time and info display
When selected, the display shows relevant information, such as the following:
▶ Program cycle time
▶ Delay time for program start
▶ Error codes
Once a process is started, the following is displayed without flashing:
▶ Remaining time in hours for a delayed program start, e.g. 24H
▶ Remaining program cycle time in hours + minutes, e.g. 1:59
During operation, the display may vary depending on local conditions and the daily workload.
Display symbol
Salt

When the display lights up: The salt has been used up. The dishwasher needs salt.
Rinse aid

When the display lights up: The rinse aid has been used up. The dishwasher needs rinse aid.
Description of the options
Child lock

Press and hold the symbol for 5 seconds to lock or unlock the option for other symbols.
Delay


You can delay the start of a program by up to 24 hours.
Half load


Adjusts the wash program to wash smaller loa more efficiently.
Smart Door

The door automatically opens a few centimetres to allow the air to circulate. Improves the drying effect.
Reset


Press and hold the symbol for 5 seconds to reset the salt or rinse aid indicator light.
Tablets


Press and hold the symbol for 5 seconds to activate user settings mode. You can then activate the "Tablets" function. This option allows you to optimise the performance of the program by simply selecting the type of detergent you want to use.
The main program has been coordinated with the optional function.
| WASH PROGRAM | Additional function |
| 59 MIN. | Smart Door, Half load |
| UNIVERSAL | Smart Door, Half load |
| ECO | Smart Door, Half load |
| INTENSIVE | Smart Door, Half load |
| PREWASH | - |
Your dishwasher has a range of wash programs that can be adapted to your needs. Choosing the most suitable wash cycle for each load helps to achieve the best wash result.
| Wash program | Description of the programs | ||
| PI | 59 MIN. | [WKSZ] | For heavily soiled crockery or food stains that have dried overnight |
| P2 | UNIVERSAL |  | Best suited for heavily soiled crockery or for removing food stains that have dried overnight |
| P3 | ECO |  | For normally soiled crockery to optimise the use of water and energy |
| P4 | INTENSIVE |  | For heavily soiled pots, pans and crockery |
| P5 | PREWASH1) |  | Prevents odours and dirt from drying on the crockery |
1). Use this program to wash dishes quickly. This prevents food residues from sticking to the crockery and bad odours from developing in the appliance. Do not use a cleaning agent with this program.
Crockery
The combination of high temperatures and dishwashing detergent can damage some items. Follow the manufacturer's instructions or, if in doubt, wash by hand.
Cutlery and silverware
Rinse cutlery and silverware immediately after use to prevent tarnishing. Silver should not come into contact with stainless steel, as mixing can cause stains. Remove silver cutlery from the dishwasher and dry it immediately by hand.
Aluminium
Aluminium can be dulled by cleaning agents. The degree of change depends on the quality of t detergent or the aluminium.
Other metals
Iron and cast iron can rust and stain other objects Copper, tin and brass are prone to staining.
Wooden goods
Wooden products are generally sensitive to heat and water. Regular use in the dishwasher can damage them over time.
Glassware
Most glassware is dishwasher-safe. Crystal, very fine and antique glass can corrode and take on a cloudy appearance.
Plastics
Some plastics can change their shape or colour when exposed to hot water. Follow the manufacturer's instructions. Dishwasher-safe plastic shou be weighted down so that the container does not tip over and fill with water or fall through the rack during the wash cycle.
Decorated objects
Most modern porcelain items are dishwasher-safe. Antique items, such as items with a pattern painted over the glaze, gold rims or hand-painted porcelain may react more sensitively to machine washing.
Glued objects
Certain adhesives soften or dissolve when washed in the dishwasher.
Water hardness
Hard water is water with a high concentration of minerals such as calcium and magnesium. These can affect the performance of your dishwasher and parts may fail over time. Glasses washed in hard water become cloudy over time and the crockery becomes stained or has a white coating. The water hardness varies depending on the geographical location. If you live in an area with hard water, we recommend installing a water softener in the household water supply.
For water supply with hard water
• See "Recommendations for the quantity of powder detergent".
- Use rinse aid. We recommend increasing the rinse aid setting to improve the rinsing performance. Further information is provided under "Settings".
Use a dishwasher detergent/softening agent regularly or whenever you notice limescale deposits in your dishwasher.
For water supply with soft water
- Avoid using too much detergent.
When loading your dishwasher, make sure that the items are positioned in such a way that the water from the rotating spray arm below can reach all areas. If this is not the case, the washing performance will be impaired.
Your dishwasher can hold up to 11 place settings.
natural_image
Technical line drawing of a mechanical assembly with layered components and structural supports (no text or symbols)Ensure the following
- The lower and centre spray arms can be rotated freely.
• Large objects must not obstruct the upper spray arm.
• Glass and other fragile objects are secure. - All openings in the objects are pointing downwards.
• The plates are distributed evenly. - All sharp-edged objects are securely fastened to prevent injury or damage to the product.

natural_image
Technical line drawing of a mechanical assembly with pipes and structural elements (no text or symbols)Avoid the following
• Overloading.
- Protrusions under the racks and basket that could prevent the spray arm from rotating.
- Any protrusions at the front of the dishwasher.
- Blocking the water with objects on the hinged cup inserts.
1
natural_image
Technical line drawing of a mechanical assembly with layered components and structural supports (no text or symbols)Remove all food residues from the crockery before carefully loading it in the dishwasher. Make sure that the spray arms are free of obstacles and can rotate freely.
2
natural_image
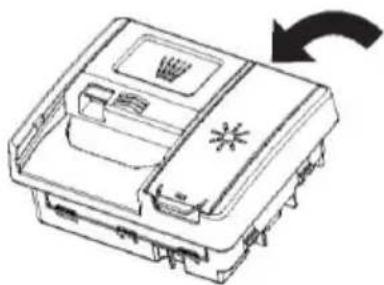
Technical line drawing of a mechanical device with an arrow indicating rotation or assembly (no text or symbols present)If the rinse aid indicator lights up, fill the rinse aid compartment.
Further information is provided under "Rinse aid".
3
natural_image
Isometric line drawing of a device casing with internal components and no visible text or symbolsPour detergent into the compartment and close the lid.
Tablets can be placed in the detergent compartment.
4

Make sure that the dishwasher is switched on and press the button.

Select a wash cycle if required.

Close the door and press 's to start the wash cycle.

Press and hold the button for 3 seconds to cancel the process.
natural_image
Technical line drawing of a mechanical bracket or frame assembly (no text or symbols)After the wash cycle, the door automatically opens slightly to aid the drying process.*
You will achieve the best results if you unload the crockery after it has cooled down.
* This function can be activated or deactivated by the user.
Set your dishwasher to start later in the day and run a selected wash program. START DELAY can be set after selecting a wash program and can be set to up to 24 hours.
Setting the start delay
1

2

Add detergent and select a wash program and, if necessary, a rinse option. Press the button to activate START DELAY and extend the delay time.
* From 0 to 4 hours, you can increase or decrease the value by 30 minutes for each press, and from 4 to 24 hours, you can increase or decrease the value by 1 hour.
Press to confirm.
The wash program starts at the end of the count down, provided the door is closed.
* Open the door to stop START DELAY. Close the door to continue.
Cancelling start delay

Open the door and press and hold the button for 3 seconds to cancel the delayed start.
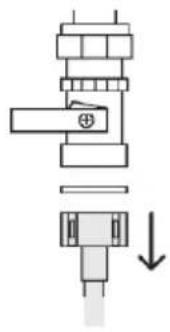
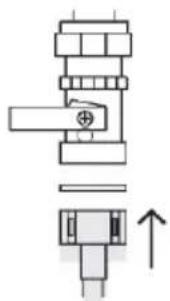
The dishwasher controls can be locked for cleaning purposes or to prevent unintentional use.
Locking the controls

Press and hold the button for 5 seconds to lock the dishwasher controls.
Note: Run the program before locking the controls Once locked, only the unlocking and deactivation functions are available.
Unlocking the controls

Press and hold the button for 5 seconds to cancel the lock.
You can implement one of the following settings before starting a wash cycle.
| Option | Description | Standard | Display of the settings |
| LANGUAGE | The setting is implemented as detailed below. | ENGLISH | LANGUAGE |
| TABLETS | The setting is implemented as detailed below. | NO | TABLES |
| On YES | |||
| Off NO | |||
| SOFTENER | The setting is implemented as detailed below. | S 5 | SOFTENER |
| Min: S 0 | |||
| Max: S 8 | |||
| RINSE AID | Controls the amount of rinse aid dispensed.Further information is provided under "Rinse aid" | R 5 | RINSE AID |
| Min: R 0 | |||
| Max: R 6 | |||
| BUZZER | Adjusts the sound settings. In the NO setting, all sounds except error messages are muted. | YES | BUZZER |
| On YES | |||
| Off NO | |||
| LAST USED | Program memory function: Select whether the last program used should be saved. | NO | LAST USED |
| On YES | |||
| Off NO |
Changing the settings
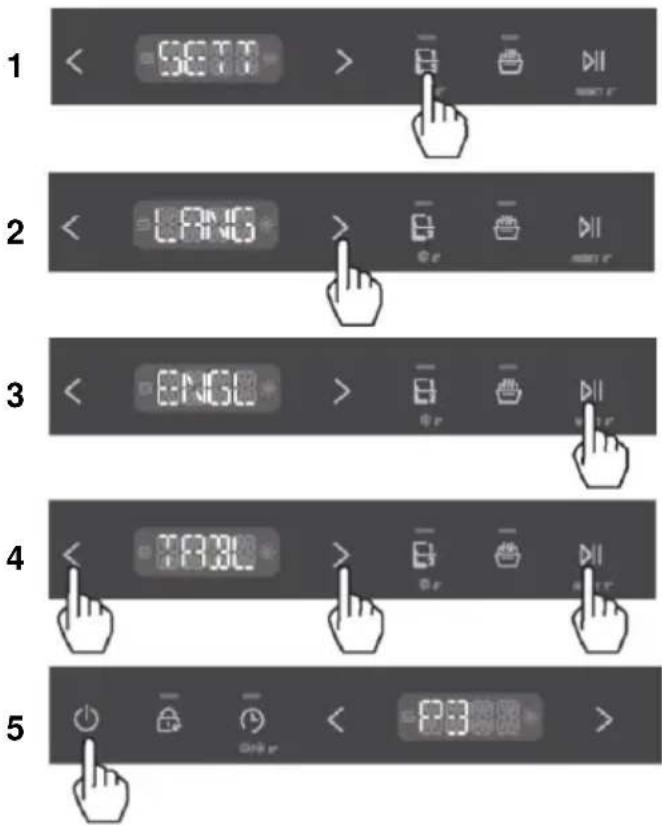
Make sure that no wash cycle is running. Press and hold the button for 5 seconds to access the menu.
Press the > button to scroll through the settings.
Press the button to select the menu you want to set.
Press the
Press the button to save the settings.
Press the ⏻ button to exit.
The dishwasher requires soft water to ensure a good washing result. Hard water can impair the performance of your dishwasher. Over time, glassware washed in hard water becomes cloudy and crockery becomes stained or coated with a white film. Using very hard water can cause parts of the dishwasher to fail over time. Salt can improve this situation.
Setting the water softener system
The amount of salt dispensed can be set to levels S 0 to S 8 depending on the hardness of your water.
- Find out the hardness value of your tap water from your local water supply company.
- The setting can be found in the water hardness table.
Identifying the local water hardness
| Water hardness | Water softener setting | |||
| German degrees (°dH) | French degrees (°fH) | Mmol/l | Clark degrees | Electronic |
| 31-50 | 54-89 | 5.4-8.9 | 39-63 | S 8 |
| 22-30 | 38-53 | 3.8-5.3 | 27-38 | S 7 |
| 17-21 | 29-37 | 2.9-3.7 | 21-26 | S 6 |
| 13-16 | 22-28 | 2.2-2.8 | 16-20 | S 5 1)* |
| 11-12 | 18-21 | 1.8-2.1 | 13-15 | S 4 |
| 9-10 | 15-17 | 1.5-1.7 | 11-12 | S 3 |
| 7-8 | 11-14 | 1.1-1.4 | 8-10 | S 2 |
| 0-6 | 0-11 | 0-1.1 | 0-7 | S 1 2)* |
| - | - | - | - | S 0 3)* |
* Note
1) Factory default setting for powder detergent.
2) Recommended setting for combination tablets.
3) The display for salt is switched off.
Use of special salt
As soon as the salt indicator on the control panel lights up, salt should be topped up. Always top up with special salt immediately before switching on the appliance. This ensures that any excess special salt solution is washed off immediately and does not corrode the washing area.
Top up with salt as follows:

CAUTION
Only ever use salt for dishwashers. Other products can damage the appliance. Spilt salt causes corrosion. Run a program after each refill.
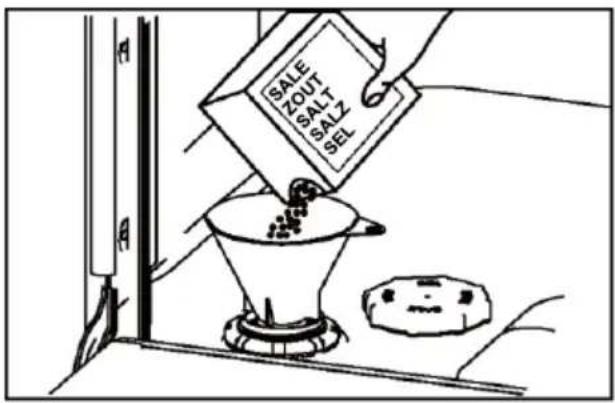
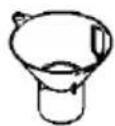
- Turn the lid anti-clockwise and open the salt container.
- Fill the salt compartment with 1 litre of water.
- Fill the compartment with special salt (water runs out).
- Remove any spilt salt from the opening area.
- Turn the lid clockwise and close the salt containe
WARNING: Dishwasher detergents are highly alkaline. They can be extremely dangerous if swallowed. Avoid contact with skin and eyes and keep children and vulnerable individuals away from the dishwasher when the door is open. Check that the powder detergent container is empty after each wash cycle.
Unsuitable detergent
These detergents are not suitable and may damage your dishwasher or require maintenance work that is not covered by the guarantee:
▶ Liquids for washing hands
Soaps
▶ Detergent
▶ Disinfectant
Use of powder detergent
The quantities of powder detergent are specified in the following table "Recommendations for the quantity of powder detergent" and in the instructions provided by the detergent manufacturer.
1
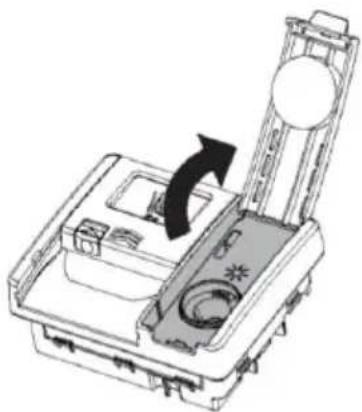
Check that the compartment is empty and dry. Fill the detergent compartment with detergent powder or tablets.
2

natural_image
Diagram of a vehicle air conditioner unit with airflow arrow (no text or symbols)Remove any excess detergent and close the lid. It snaps into place.
If necessary, pour additional detergent into the prewash compartment at the top of the compartment.
More detergent may be required when washing heavily soiled crockery in hard water. See "Recommendations for the quantity of powder detergent".
Recommendations for the quantity of powder detergent
▶ Use the table below to determine the optimum amount of powder detergent for each wash program.
▶ If you have hard water in your area, more detergent may be required.
| Wash program | Prewash compartment | Main detergent compartment | ||
| P1 | 59 MIN. |  | Full | 15/25 |
| P2 | UNIVERSAL |  | Full | 15/25 |
| P3 | ECO |  | Full | 15/25 |
| P4 | INTENSIVE |  | Full | 15/25 |
| P5 | PREWASH |  | None | None |
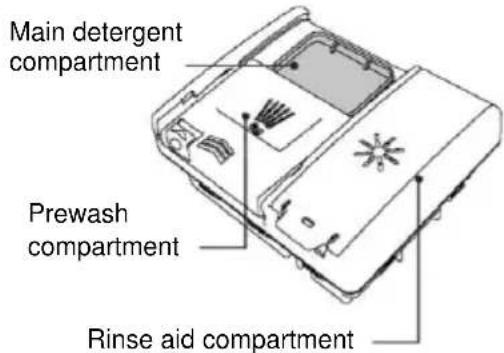
The rinse aid ensures a streak-free surface on glass and crockery and prevents metal tarnishing. We recommend using liquid rinse aid on a regular basis to achieve optimum drying results.
The rinse aid compartment is located on the inside of the door next to the detergent compartment.
Using rinse aid
The amount of rinse aid dispensed during each wash cycle may need to be adjusted to the water conditions. Further information is provided under "Settings" and "Water hardness". Rinse aid is not required if it is already included in the tablets that are being used.
1

If the rinse aid level is low, the rinse aid indicator on the control panel lights up to remind you to top up the compartment.
2
natural_image
Diagram of a mechanical device with an arrow indicating direction, showing internal components and a circular component (no text or symbols)Lift the lid and pour the rinse aid into the opening. Do not fill beyond the MAX line. Make sure that yo do not spill any on the door or detergent container
3
natural_image
Technical line drawing of a mechanical or electronic component with no visible text or symbolsClose the lid and make sure it clicks into place.
Any liquids accidentally spilt in the dishwasher or detergent container must be removed immediately. Spilled rinse aid can lead to excessive foaming. Maintenance work linked to this type of fault is not covered by the warranty.
Load baskets

Ensure that delicate glasses and porcelain are labelled as dishwasher-safe.
✗ Do not place objects made of wood, horn, aluminium, tin or copper in the appliance.
✗ Do not place any objects in the appliance that can absorb water (sponges, household cloths).
▶ Only use the appliance to wash items that are suitable for the dishwasher.
▶ Remove any remaining food from the items.
▶ Soak burnt-on food on the items before washing.
Place hollow objects (cups, glasses and pans) in the appliance with the opening facing downwards.
▶ Place objects with deep recesses at an angle.
▶ Position spoons next to other cutlery so that they do not stick together.
▶ Make sure that cutlery and crockery do not stick together and that there is a gap between the individual items.
▶ Make sure that the glasses do not touch any other glasses.
▶ Place small items in the cutlery basket.
▶ Place light objects in the upper basket. Make sure that the objects cannot move.
▶ Make sure that the spray arms can move freely before starting a program.

If clinking noises are heard while the program is running: Make sure that the crockery and glasses are secure.
natural_image
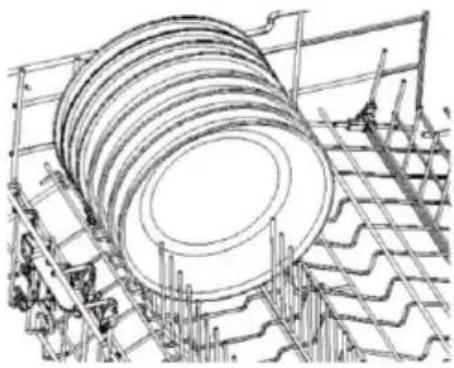
Technical line drawing of a 3D mechanical housing or enclosure with internal components and mounting holes (no text or symbols)Place heavily soiled objects (such as pots and pans or dinner plates) in the lower basket. The stronger spray jet ensures a better wash result.
Upper baskets
natural_image
Technical line drawing of an electrical insulator assembly (no text or symbols visible)The upper basket is designed for glasses, cups, saucers, plates, small bowls and shallow pans.
Folding cup inserts
natural_image
Technical line drawing of a mechanical assembly with internal components (no text or symbols)Adjust the height or fold them out of the way to make room for other items. Use the recesses to insert the stems of wine glasses.
Fold them up or down to support items.
To adjust the upper basket:
Make sure the basket is empty before adjusting the height.
Remove:
Replace:
Basket for cutlery/kitchen utensils
natural_image
Technical line drawing of a multi-chamber electronic device with grid-like internal structure (no text or symbols)Use the basket to secure cutlery and utensils. Place the cutlery in the recesses to secure it. Place larger utensils in the centre of the basket. Slide the side panels into the centre to create more space for the items underneath.
Disconnect the dishwasher from the power supply and leave it to cool down before carrying out any cleaning or maintenance work.
Properties
1 Filter
2 Filter plate
3 Lower spray arm
Not shown: centre and upper spray arms
Cleaning surfaces
Wipe the surfaces with a damp cloth and dry them with a lint-free cloth. We advise against using the following cleaning agents as they can damage the surfaces:
Scouring pads made of plastic or stainless steel
▶ Scouring agents, solvents, household cleaning agents
▶ Acidic or alkaline cleaning agents
Liquids for washing hands or soap
▶ Cleaning or polishing agent for stainless steel
▶ Detergent or disinfectant
Cleaning the filter, spray arms and filter plate
We recommend removing and cleaning the drain filter and filter plate once a month or when there are signs of food particles. Under normal use, the spray arms should need to be cleaned less frequently. The lower and centre spray arms can be shaken to remove foreign particles and then cleaned in hot water and rinsed with clean water.
The dishwasher must be operated with the filter plate, drain filter and spray arms inserted correctly. If you use a dishwasher detergent or softening agent, follow the manufacturer's instructions.
Not used for a long period
If your dishwasher will not be used for a longer period of time, we recommend switching off the power and water supply and leaving the dishwasher clean and empty with the door ajar. If you are using your dishwasher for the first time after a long period of not using it, we recommend filling the dishwasher with 3 cups of water before use. This helps to lubricate components that may have dried out when not in use.
Removing and cleaning the filter
1
natural_image
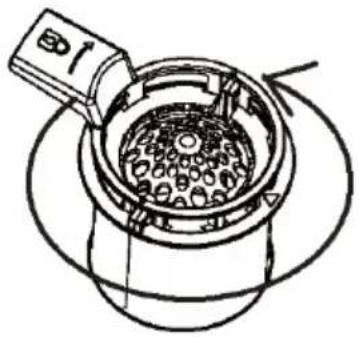
Line drawing of a cooking pot with a lid and lid removed, showing contents inside (no text or symbols)Turn the filter anti-clockwise to loosen it. Lift it up to remove it.
2
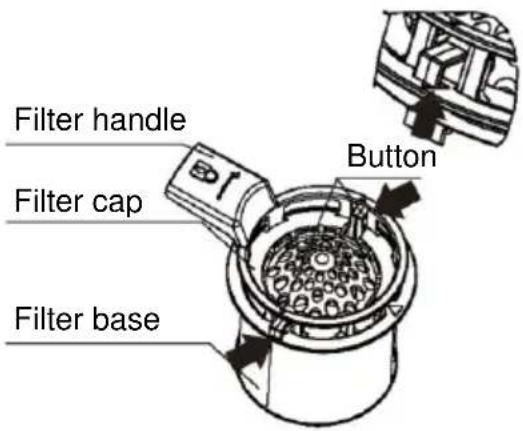
Turn the filter handle anti-clockwise to loosen it. Lift it u to remove it from the filter plate. Separate the filter cap from the base by pressing the release buttons and lifting the cap. Carefully remove the filter plate from the retaining clips on the back of the drain. Do not attempt to remove the filter by force as this may cause damage Clean it under hot water and rinse it thoroughly.
Replacing the filter:
1
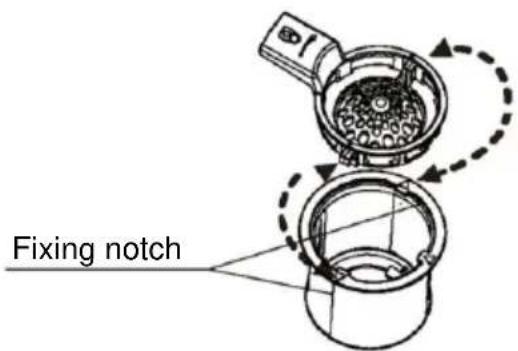
- Align the filter cap with the notch on the filter base for one side.
- Press the button to attach the filter cap under the filter base with the cut-outs for the other sides.
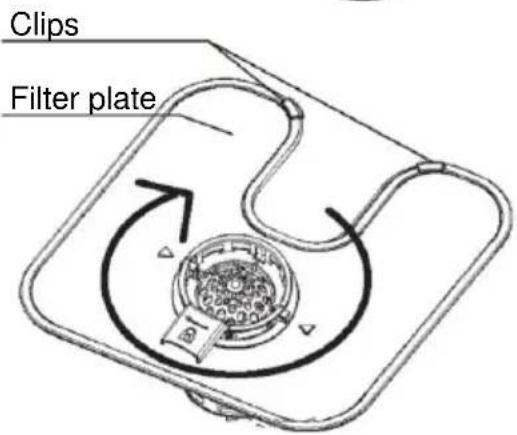
- Slide the filter plate under the retaining clips on the r of the drain and press it firmly into the clips. Ensure that the filter plate is flush with the base of the dishwasher.
- Reinsert the drain filter in the dishwasher base. Turn the filter handle clockwise until it clicks into place.
2
Reinsert the drain filter in the dishwasher base. Turn it clockwise twice until it clicks into place.
Removing and cleaning the filter plate
Filter plate
natural_image
Technical line drawing of a mechanical component with internal cavity and housing (no text or symbols)With the filter removed, carefully lift the filter plate up and out.
Clean it under hot water and rinse it thoroughly.
Replacing the filter plate
Filter plate

natural_image
Technical line drawing of a mechanical component with internal structure and directional arrow (no text or symbols)Slide the filter plate under the retaining clips on the rear of the drain and press it firmly into position. Ensure that the filter plate is flush with the base of the dishwasher.
Cleaning the upper spray arm
natural_image
Technical line drawing of a mechanical assembly with no visible text or symbolsUpper spray arm
Do not remove the upper spray arm for cleaning. Clean it with a small brush with plastic bristles.
Use a dishwasher cleaner/softening agent in the even of heavy soiling or blockages. Follow the manufacture instructions.
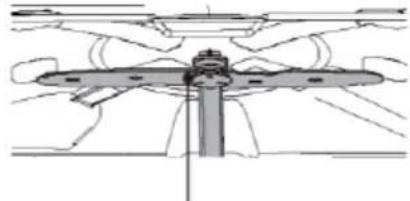
Cleaning the centre spray arm
natural_image
Architectural line drawing of a building complex with structural elements and roof grid (no text or labels)Lock nut Centre spray arm
To remove the centre spray arm, turn the locking nut clockwise to release it. Rinse the spray arm thoroughly under running water and then reinsert it.
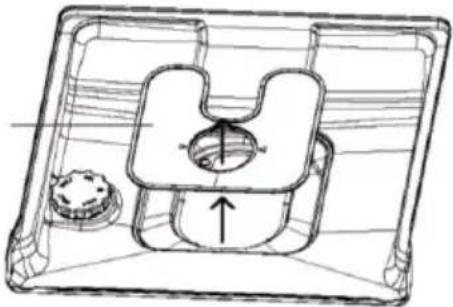
Cleaning the lower spray arm
To remove the lower spray arm, lift it off the base of tl dishwasher.
Rinse the spray arm thoroughly under running water and then reinsert it.
After reinstallation, ensure that the arm can rotate freely.
Preparation for winter (cold climate zones)
If the dishwasher is installed in a cold climate with temperatures below freezing, we recommend preparing it for winter.
1
natural_image
Pure mechanical assembly diagram without any text, numbers, or symbolsSwitch off the water supply.
Disconnect the drain hoses from the sink drain pipe and the water inlet hose from the water valve.
2
natural_image
Mechanical assembly diagram showing a valve mechanism with an upward arrow indicating motion (no text or labels)Drain the water from the hoses, inlet pipe and water valve and collect the water in a bucket or tub.
Reconnect the water inlet pipe to the water valve and the hoses to the sink drain pipe.
3

natural_image
Technical line drawing of a mechanical component inside a transparent housing (no text or symbols)Remove the drain filter and filter plate. Use a sponge to remove the remaining water from the underside before reinserting it.
| Fault | Possible cause | Remedial measure |
| The dishwasher does not start. | No electricity. | Make sure that the dishwasher is connected to the wall socket and is switched on. |
| The door is not closed properly. | Close the door. | |
| The button was not pressed. | Press the button. | |
| The water tap is not turned on. | Make sure that the water is connected and turned on. | |
| Clogged strainer in the water inlet hose. | Check the strainer and clean it if necessary – it is located where the water inlet hose is screwed into the water tap. | |
| The lower spray arm is difficult to turn. | The openings of the spray arm are blocked by small objects or food particles. | Clean the spray arm. Instructions are provided under "Maintenance". |
| The lid of the detergent container cannot be closed. | The detergent compartment is overfilled. | Remove detergent until the lid can be closed. |
| The detergent compartment is clogged with detergent residue. | Wipe the compartment with a damp cloth.Dry the compartment before adding detergent. | |
| Detergent residue is stuck in the compartment. | The compartment was damp when it was filled with detergent. | Wipe the compartment with a damp cloth.Dry the compartment before adding detergent. |
| Utensils are blocking the detergent compartment from opening. | Make sure that no large utensils are positioned in such a way that the lid of the compartment cannot open when the dishwasher door is closed | |
| The drain connection is blocked. | Make sure that the drain connection is free of blockages. | |
| Water remains in the dishwasher at the end of the wash cycle. | The drain hose is crushed, bent or blocked. | Check the drain hose and adjust it if necessary. |
| The pump is blocked. | Contact your authorised Haier service centre or Customer Service. | |
| The filter is blocked. | Clean the filter. For instructions, see "Maintenanc | |
| The display flashes while the key lock is activated. | That is normal. The display remains switched on even though the buttons are deactivated. | No measures required. |
| Foaming is present. | Incorrect amount or type of detergent used. | See "Detergent" or consult the detergent manufacturer's instructions. |
| Too much rinse aid in the rinse load. | Increase the amount of detergent. | |
| The rinse aid dosage is too high. | Reduce the rinse aid dosage. | |
| Rinse aid residues were not wiped up. | Make sure that all of the rinse aid that may have been spilt has been wiped up. | |
| Knocking or rattling noises when washing. | The spray arm is hitting the crockery. | Pause the wash cycle and place the crockery in different positions. See "Setting a wash cycle" and "Loading recommendations". |
| The crockery was stacked incorrectly. | ||
| The crockery is not clean. | An unsuitable wash program was selected for the relevant load. | Select the appropriate wash program for the loaded dishes. See "Wash programs". |
| Residues have dried on too much | The crockery may need to be soaked. | |
| The spray arm(s) cannot rotate. | Make sure that no objects obstruct the movement of the spray arm. | |
| The basket/insert was loaded incorrectly. | See "Loading recommendations". | |
| The filter plate or filter was installed incorrectly. | See "Maintenance". | |
| The detergent was poured into the wrong compartment. | See "Wash programs" and "Detergent". | |
| Food residues were not removed from the crockery before loading. | Scrape all food residues from the crockery before putting it in the dishwasher. | |
| Unsuitable detergent was used. | Only use powder detergent or tablets intended for household dishwashers. | |
| Not enough detergent was used. | The recommended quantities are specified under "Detergent". You may need to adjust these values to the loaded crockery and hardness of your water. | |
| The openings of the spray arm(s) are blocked. | Clean the spray arm(s). Instructions are provided under "Maintenance". | |
| The filters are blocked. | Clean the filters. Instructions are provided under "Maintenance". | |
| Plastic items are discoloured (e.g. due to stains from tomato sauce). | Not enough detergent was used or items were not rinsed. | Rinse plastic dishes before putting them in the dishwasher and/or add more detergent. Alternatively, using the wash program immediately after loading the dishes can also minimise the formation of stains. |
| The dishwasher suddenly stops during the wash cycle. | The power or water supply was interrupted. | Check the power and water supply. |
| White stains remain on crockery and glasses, giving them a milky appearance. | Not enough detergent was used. | The recommended quantities are specified under "Detergent". You may need to adjust these to the degree of hardness of your water supply. |
| The rinse aid dosage is too low. | Increase the rinse aid dosage. See "Rinse aid". | |
| Crockery and cutlery are not dry. | The rinse aid dosage is too low. | Increase the rinse aid dosage. See "Rinse aid". |
| The items were removed too early. | Leave the door ajar after the end of the wash program and wait a few minutes to help it dry. | |
| The rinse aid compartment is empty. (The rinse aid indicator lights up.) | Add rinse aid. See "Rinse aid". | |
| The glasses have a dull appearance. | The rinse aid dosage is too low. | Increase the rinse aid dosage. See "Rinse aid". |
| Tea stains or traces of lipstick have not been completely removed. | Not enough detergent was used. | See section "Detergent" for the recommended quantities. You may need to adjust the quantity to the amount of crockery loaded in each case. |
| The washing temperature is too low. | Select a wash program for heavily soiled dishes. Information on this is available under "Wash programs". | |
| Traces of rust remain on the cutlery. | The cutlery is not sufficiently rustproof. | Rinse it by hand. |
| Glasses are cloudy and discoloured and have a milky coating. | This is caused by hard water. | Increase the amount of detergent. |
| The glasses are not dishwasher safe. | Rinse them by hand. | |
| Water stains remain on glasses and cutlery. | The rinse aid level or the dosage is set too low. | Make sure that there is rinse aid in the compartment. If necessary, increase the setting for the rinse aid or try a wash program with a higher temperature. Information on this is available under "Rinse aid". |
| The salt indicator lights up. | The softener salt has been used up. | Fill the tank with specific salt until it is full. |
Error codes
Error codes on the display
Carry out the following steps to rectify the problem.
| Fault | Possible cause | Remedial measure |
| E10No water | The water tap is not turned on. | Make sure that the water is connected and turned on. Touch the corresponding button to restart the dishwasher. |
| Insufficient pressure in the water supply. | Check the domestic water pressure. | |
| The water inlet hose is kinked or pinched so that no or not enough water is entering the dishwasher. | Check the water inlet hose and adjust it if necessary. Touch the corresponding button to restart the dishwasher. | |
| E30Leak | Water is leaking from the appliance. | Turn off the water tap. |
| The water inlet valve is open and blocked. | Disconnect the appliance from the power supply. | |
| The drain is blocked. | Please contact Customer Service. | |
| Wash program | EcoThe program has an automatic door opening function as standard. | |
| Amount of powder detergent | 22 g main wash program | |
| Rinse aid dosing | R0-R6, R5 (standard) | |
| Maximum number of place settings | 14 | |
| Height adjustment of the upper basket | Make sure that the upper basket is in the highest position. |
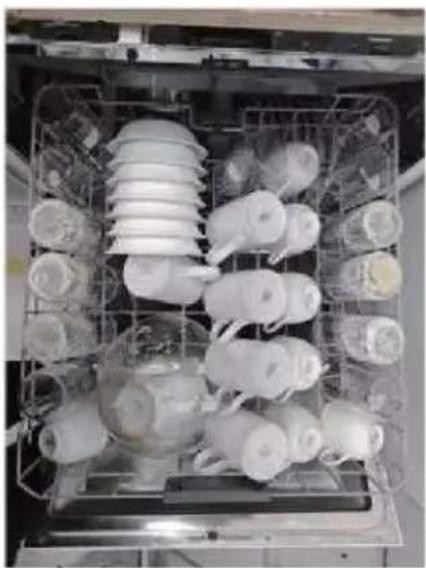
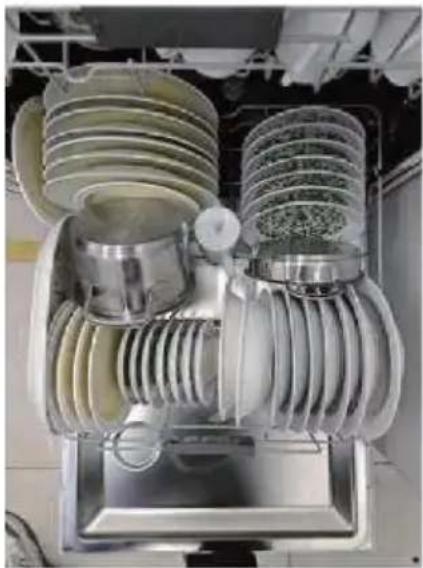
Recommended loading patterns
natural_image
Interior view of an appliance oven with multiple empty kitchenware and a tray holding white ceramic items (no visible text or labels)Upper basket
natural_image
Cross-sectional view of an electrical insulator assembly (no visible text or labels)Lower basket

natural_image
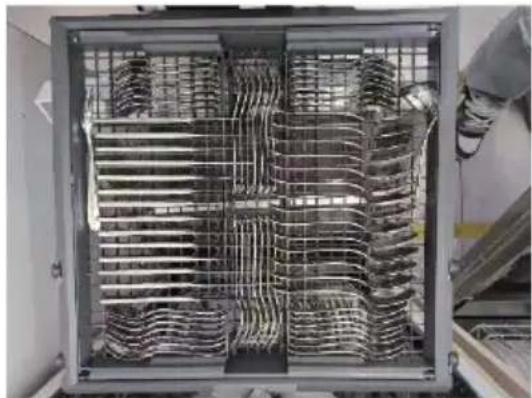
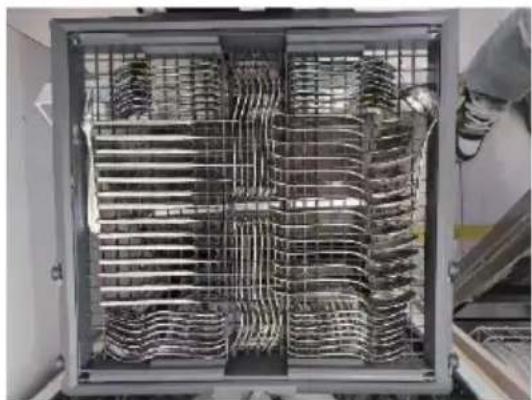
Interior view of a large industrial machine with coiled metal components (no visible text or symbols)Third basket
| Supplier name or trademark: Haier | ||||
| Address of the supplier(b): CANDY HOOVER GROUP S.R.L., Via Comolli, 16, Brugherio(ME 20861, Italy | ||||
| Model designation: XH 4B2F1S | ||||
| General product parameters: | ||||
| Parameter | Value | Parameter | Value | XH 4B2F1S |
| Rated power(a) (ps) | 14 | Dimensions in cm | Height | 84.8 |
| Width | 59.6 | |||
| Depth | 57.2 | |||
| EEI (a) | 37.6 | Energy efficiency class(a) | [B](C) | |
| Cleaning performance index(a) | 1.121 | Drying performance index(a) | 1.061 | |
| Energy consumption in kWh [per cycle], based on the Eco program with cold water filling. The actual energy consumption depends on how the appliance is used. | 0.640 | Water consumption in litres [per cycle], based on the Eco program. The actual water consumption depends on the type of use of the appliance and the water hardness. | 9.5 | |
| Program duration(a) (h:min) | 4:40 | Type | [Semi-integrated] | |
| Airborne sound emissions (a) (dB(A) re 1 pW) | 42 | Airborne sound emission class(a) | [B](c) | |
| Off mode (W) | 0.50 | Standby mode (W) | 0.50 | |
| Start delay (W) (if applicable) | 4.00 | Networked standby mode (W) (if applicable) | / | |
| Minimum duration of the warranty offered by the supplier(b): 24 | ||||
| Additional information: - | ||||
| Weblink to the supplier's website where the information according to Annex II, point 6 of EU Commission Regulation 2019/2022 (1) b | ||||
| (a) for the Eco program.(b) Changes to these points shall not be considered relevant for the purposes of Article 4, paragraph 4 of EU Regulation 2017/1369.(c) If the product database automatically generates the final content of this cell, the supplier must not enter this data. | ||||
Information to be included in the technical documentation
| PARAMETER | UNIT | VALUE |
| Energy consumption of the Eco program (EPEC), rounded to three decimal places | kWh/cycle | 0.640 |
| Energy consumption of the standard program (SPEC), rounded to three decimal places | kWh/cycle | 1.700 |
| Energy Efficiency Index (EEI) | - | 37.6 |
| Water consumption of the Eco program (EPWC), rounded to one decimal place | l/cycle | 9.5 |
| Cleaning performance index (I c) | - | 1.121 |
| Drying performance index (I D) | - | 1.061 |
| Duration of the Eco program (Tt), rounded to the nearest minute | h:min | 4:40 |
| Power consumption in Off mode (Po), rounded to two decimal places | W | 0.50 |
| Power consumption in standby mode (Psm), rounded to two decimal places | W | 0.50 |
| Does standby mode include the display of information? | - | No |
| Power consumption in standby mode (Psm) (networked standby mode) (if applicable), rounded to two decimal places | W | - |
| Power consumption with start delay (Pds) (if applicable), rounded to two decimal places | W | 4.00 |
| Airborne noise emissions | dB(A) re 1 pW | 42 |
| Supplier name or trademark: Haier | ||||
| Address of the supplier^(b) : CANDY HOOVER GROUP S.R.L., Via Comolli, 16, Brugherio(MB)20861, Italy | ||||
| Model designation: XH 4C4F1S | ||||
| General product parameters: | ||||
| Parameter | Value | Parameter | Value | XH 4C4F1S |
| Rated power^(a) (ps) | 14 | Dimensions in cm | Height | 84.8 |
| Width | 59.6 | |||
| Depth | 57.2 | |||
| EEI^(a) | 43.5 | Energy efficiency class^(a) | [C] (c) | |
| Cleaning performance index^(a) | 1.121 | Drying performance index^(a) | 1.061 | |
| Energy consumption in kWh[per cycle], based on the Eco program with cold water filling.The actual energy consumption depends on how the appliance is used. | 0.740 | Water consumption in litres[per cycle], based on the Eco program. The actual water consumption depends on the type of use of the appliance and the water hardness. | 9.5 | |
| Program duration^(a) (h:min) | 4:40 | Type | [Semi-integrated] | |
| Airborne sound emissions^(a) (dB(A) re 1 pW) | 44 | Airborne sound emission class^(a) | [B](c) | |
| Off mode (W) | 0.50 | Standby mode (W) | 0.50 | |
| Start delay (W) (if applicable) | 4.00 | Networked standby mode (W)(if applicable) | / | |
| Minimum duration of the warranty offered by the supplier^(b) : 24 | ||||
| Additional information: - | ||||
| Weblink to the supplier's website where the information according to Annex II, point 6 of EU Commission Regulation 2019/2022 (1)b | ||||
| (a) for the Eco program.(b) Changes to these points shall not be considered relevant for the purposes of Article 4, paragraph 4 of EU Regulation 2017/1369.(c) If the product database automatically generates the final content of this cell, the supplier must not enter this data. | ||||
Information to be included in the technical documentation
| PARAMETER | UNIT | VALUE |
| Energy consumption of the Eco program (EPEC), rounded to three decimal places | kWh/cycle | 0.740 |
| Energy consumption of the standard program (SPEC), rounded to three decimal places | kWh/cycle | 1.700 |
| Energy Efficiency Index (EEI) | - | 43.5 |
| Water consumption of the Eco program (EPWC), rounded to one decimal place | l/cycle | 9.5 |
| Cleaning performance index (I c) | - | 1.121 |
| Drying performance index (I D) | - | 1.061 |
| Duration of the Eco program (Tt), rounded to the nearest minute | h:min | 4:40 |
| Power consumption in Off mode (Po), rounded to two decimal places | W | 0.50 |
| Power consumption in standby mode (Psm), rounded to two decimal places | W | 0.50 |
| Does standby mode include the display of information? | - | No |
| Power consumption in standby mode (Psm) (networked standby mode) (if applicable), rounded to two decimal place | W | - |
| Power consumption with start delay (Pds) (if applicable), rounded to two decimal places | W | 4.00 |
| Airborne noise emissions | dB(A) re 1 pW | 44 |
Haier
natural_image
Technical line drawing of a computer tower with ventilation slots and mounting brackets (no text or symbols)FR
Sommaire
FR
NE PAS DÉTARTRER
natural_image
Technical line drawing of a mechanical device with mounting brackets and internal components (no text or symbols)natural_image
Technical line drawing of a mechanical assembly with no visible text or symbolsnatural_image
Diagram of a device with hands holding a rectangular panel and a dashed arrow indicating direction (no text or symbols)3
natural_image
Technical diagram of a mechanical assembly with spring and frame components (no text or symbols)
natural_image
Technical line drawing of a mechanical lever system with a saw and pivot (no text or symbols)
natural_image
Simple diagram of a cabinet with two white doors and one gray cabinet, no text or symbols present.Raccordement 3/4" BSP
natural_image
Simple line drawing of a cable inserted into a wall socket (no text or symbols)natural_image
Technical line drawing of a large cylindrical industrial component mounted on a grid base (no text or symbols)natural_image
Technical line drawing of a mechanical assembly with pipes and structural elements (no text or symbols)natural_image
Technical line drawing of a mechanical assembly with layered components (no text or symbols)natural_image
Diagram of a device interior showing a handle with an arrow indicating rotation or movement (no text or symbols present)natural_image
Line drawing of a mechanical device with internal components and mounting holes (no text or symbols)natural_image
Technical line drawing of a mechanical bracket or frame assembly (no text or symbols)natural_image
Diagram of a vehicle air conditioner unit with a black arrow indicating airflow direction (no text or symbols)natural_image
Diagram of a mechanical device with an arrow indicating rotation or movement, no text or symbols presentnatural_image
Diagram of a device casing with internal components and a curved arrow indicating rotation (no text or symbols)natural_image
Technical line drawing of a mechanical housing or enclosure with internal components and mounting holes (no text or symbols)natural_image
Technical line drawing of an electrical insulator assembly (no text or symbols visible)natural_image
Technical line drawing of a mechanical assembly with internal components (no text or symbols)natural_image
Technical line drawing of a multi-tiered mechanical or electrical component with no visible text or symbolsnatural_image
Line drawing of a cooking pot with a lid and lid removed, showing contents inside (no text or symbols)natural_image
Technical line drawing of a mechanical component with internal cavity and housing (no text or symbols)natural_image
Technical line drawing of a mechanical component with internal structure and directional arrows (no text or symbols)natural_image
Technical line drawing of a mechanical assembly with no visible text or symbolsnatural_image
Technical line drawing of a mechanical component inside a transparent frame, showing internal parts and no text or symbols.natural_image
Pure mechanical assembly diagram without any text, numbers, or symbolsnatural_image
Mechanical assembly diagram showing a lever mechanism with no visible text or symbolsnatural_image
Technical line drawing of a mechanical component inside a transparent housing (no text or symbols)natural_image
Interior view of an oven with rows of empty kitchenware and a rack, no visible text or symbolsPanier supérieur
natural_image
Cutaway view of an electrical insulator showing internal components and housing (no text or labels visible)Panier inférieur
natural_image
Interior view of a large industrial cooling unit with coiled metal pipes (no visible text or labels)Troisième panier
natural_image
Technical line drawing of a computer tower with ventilation slots and mounting brackets (no text or symbols)NL
natural_image
Technical line drawing of a mechanical device with mounting bracket and side panel (no text or symbols)natural_image
Technical line drawing of a mechanical assembly with no visible text or symbolsnatural_image
Diagram of a device with hands holding a rectangular panel and a dashed arrow indicating direction (no text or symbols)3
natural_image
Technical diagram of a mechanical assembly with spring and housing components (no text or symbols)
natural_image
Technical line drawing of a mechanical saw and lever system (no text or symbols)
natural_image
Simple diagram of a cabinet with three white doors and one gray cabinet (no text or symbols)natural_image
Simple line drawing of a cable inserted into a wall socket (no text or symbols)natural_image
Technical line drawing of a large cylindrical mechanical component mounted on a grid base (no text or symbols)natural_image
Technical line drawing of a mechanical assembly with rods and a central component (no text or symbols)natural_image
Technical line drawing of a mechanical assembly with concentric cylindrical components and grid lines (no text or symbols)natural_image
Diagram of a mechanical device with an arrow indicating rotation or movement, no text or symbols presentnatural_image
Isometric line drawing of a mechanical device with no visible text or symbolsnatural_image
Technical line drawing of a mechanical bracket or frame assembly (no text or symbols)Houd de toets 5. seconden ingedrukt om de vergrendeling te annuleren.
natural_image
Diagram of a vehicle air conditioner unit with airflow arrow (no text or symbols)natural_image
Diagram of a mechanical device with an arrow indicating rotation or movement, no text or symbols presentnatural_image
Technical line drawing of a mechanical device with no visible text or symbolsnatural_image
Technical line drawing of a mechanical housing or enclosure with internal components and mounting holes (no text or symbols)natural_image
Technical line drawing of an electrical insulator assembly (no text or symbols visible)natural_image
Technical line drawing of a mechanical assembly with internal components (no text or symbols)natural_image
Technical line drawing of a multi-chamber industrial tray with internal grid structure (no text or symbols)Eigenschappen
natural_image
Line drawing of a cooking pot with a lid and lid removed, showing contents inside (no text or symbols)natural_image
Technical line drawing of a mechanical component with internal cavity and housing (no text or symbols)natural_image
Technical line drawing of a mechanical component with a central hole and internal structure (no text or symbols)natural_image
Technical line drawing of a mechanical assembly with no visible text or symbolsBovenste sproeiarm
natural_image
Architectural line drawing of a building complex with structural elements and roof grid (no text or labels)
Middelste
sproeiarm
natural_image
Technical line drawing of a mechanical component with internal structure and directional arrows (no text or symbols)natural_image
Interior view of an appliance with multiple kitchen units and plastic cups arranged in a rack (no visible text or labels)Bovenste korf

natural_image
Cross-sectional view of an electrical insulator assembly (no visible text or labels)Onderste korf
natural_image
Industrial equipment enclosure with coiled metal pipes inside a transparent frame (no visible text or symbols)Derde korf