
Revolut - Stroller Chipolino - Free user manual and instructions
Find the device manual for free Revolut Chipolino in PDF.

| Product type | Stroller |
| Brand | Chipolino |
| Model | Revolut |
| Recommended age | From birth to 4 years |
| Maximum child weight | 22 kg |
| Storage basket capacity | 2 kg |
| Storage bag capacity | 1 kg |
| Number of backrest positions | Adjustable (variable recline) |
| Seat rotation | Yes, 360° (forward-facing or parent-facing) |
| Front wheel type | Swivel (rotating) |
| Rear wheel type | Fixed (non-swivel) |
| Parking brake | Yes, rear pedal |
| Canopy | Expandable with zipper extension |
| Safety bar | Removable with unlock button |
| Restraint system | Harness with click buckle |
| Footrest | Adjustable (horizontal or vertical position) |
| Folding | Compact with secondary lock |
| Frame material | Metal (aluminum or steel) |
| Cleaning | Soft cloth and soapy water |
| Spare parts | Available from the manufacturer/distributor |
Frequently Asked Questions - Revolut Chipolino
User questions about Revolut Chipolino
0 question about this device. Answer the ones you know or ask your own.
Ask a new question about this device
Download the instructions for your Stroller in PDF format for free! Find your manual Revolut - Chipolino and take your electronic device back in hand. On this page are published all the documents necessary for the use of your device. Revolut by Chipolino.
USER MANUAL Revolut Chipolino
natural_image
Black and white photo of a QDOLI baby stroller with wheels and canopy (no text or symbols visible)Chipolino
продуктов номер / item number / cikkszám/ número de artículo / codice articolo / artikelnummer / numéro d'article / broj proizvoda / αριθμός προϊόντος / numărul produsului / número de produto / productnummer / číslo produktu / ʒιπεργηζηλύ δισχήση:
LKRV02xxxxx
EN 1888-1:2018+A1:2022
EN 1888-2:2018+A1:2022
natural_image
Close-up of a baby stroller with a mesh pattern and curved arrow indicating rotation (no text or symbols)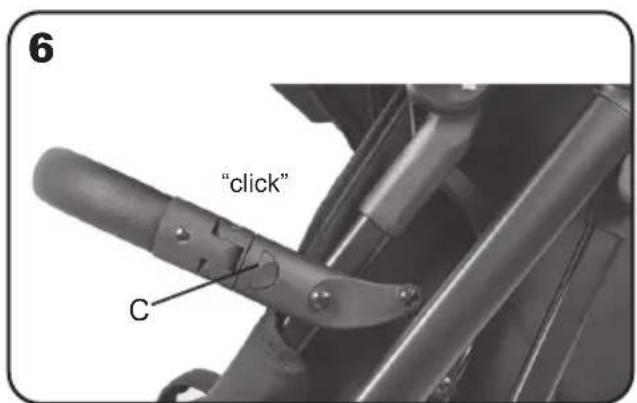
ФИГУРИ / FIGURES / ÁBRÁK / CIFRAS / FIGURE / FIGUREN / LES FIGURES / FIGURE / ФІГОYPEΣ / FIGURILE / FIGURAS / FIGUREN / OBRÁZKY / gradesMDON
natural_image
Back view of a baby car seat with a highlighted seatbelt (no text or symbols)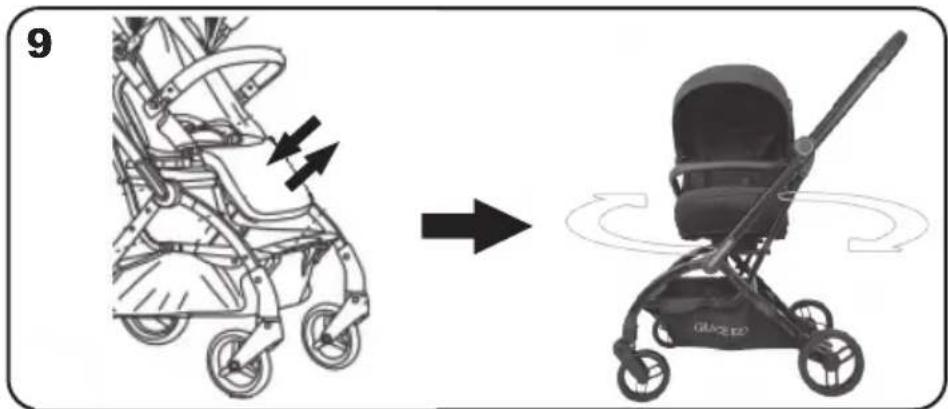
natural_image
Illustration of a stroller with motion arrows indicating change, showing the side profile and side view (no text or symbols)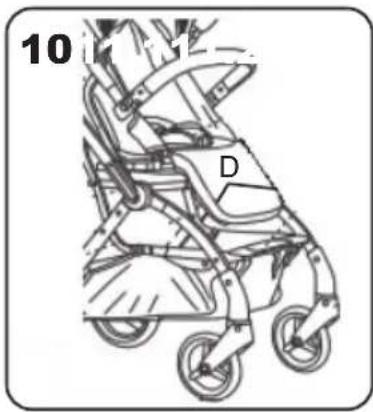
natural_image
Mechanical assembly diagram showing a cylindrical component being inserted into a housing, with two arrows indicating direction (no text or symbols present)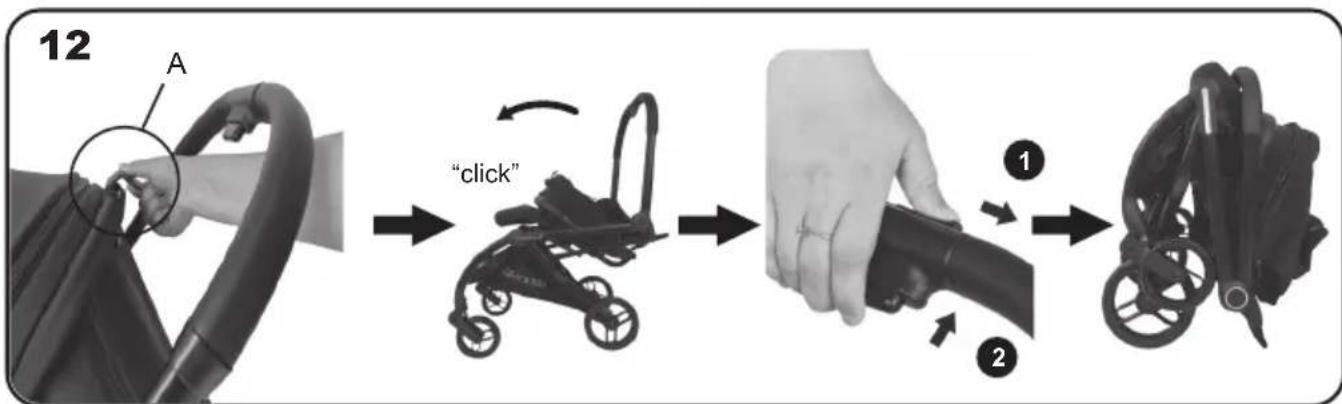
flowchart
graph LR
    A["Car Cable Attachment"] --> B[""Click" Action"]
    B --> C["Hand Holding Bicycle"]
    C --> D["Car Rental"]
ВАЖНО! ЗАПАЗЕТЕ ЗА БЪДЕЩА СПРАВКА: ПРОЧЕТЕТЕ ВНИМАТЕЛНО!
TO ASSURE SAFE USAGE OF THIS PRODUCT
FOLLOW ALL WARNINGS, INSTRUCTIONS AND
RECOMMENDATIONS GIVEN IN THIS USER MANUAL!
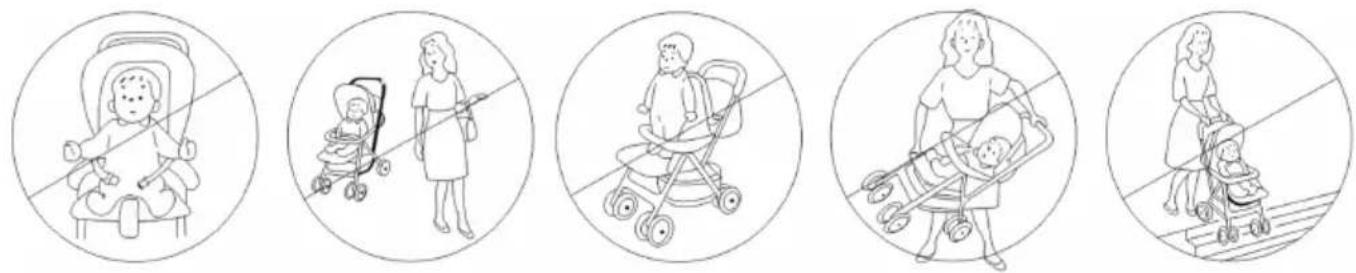
WARNINGS!
✿ ATTENTION! NEVER LEAVE THE CHILD UNATTENDED!
✿ ATTENTION! ENSURE THAT ALL LOCKING DEVICES ARE ACTIVATED BEFORE USE!
✿ ATTENTION! TO AVOID INJURY, MAKE SURE THE CHILD IS AT A SAFE DISTANCE BEFORE FOLDING OR UNFOLDING THIS PRODUCT!
✿ ATTENTION! DO NOT LET THE CHILD PLAY WITH THIS PRODUCT!
✿ ATTENTION! ALWAYS USE THE RESTRAINT SYSTEM!
✿ ATTENTION! THIS PRODUCT IS NOT SUITABLE FOR RUNNING OR SKATING!
For newborns, use the most reclined position of the seat backrest.
Use the sitting position of the backrest only for children over 6 months old.
The sitting position of the backrest is not suitable for children under 6 months old.
◆ Keep the product away from fire.
Do not lift the stroller using the safety bar.
Use the stroller only for a child weighing no more than 22 kg.
- Assembly of the product should only be performed by an adult.
❖ ALWAYS engage the parking device when placing or removing the child from the stroller.
Before use, ensure that the safety belts are correctly fastened and adjusted.
Do not add an extra mattress thicker than 20 mm to the stroller.
The maximum load for the storage basket must not exceed 2 kg.
The maximum load for a storage bag (if used) must not exceed 1 kg.
Do not overload the stroller! Any load placed or attached to the handle, safety bar, backrest, canopy, or sides of the stroller may affect its stability.
This stroller is designed to carry only one child. Do not place two or more children in the stroller.
Use only spare parts provided or recommended by the manufacturer/distributor. The manufacturer assumes no responsibility for safety if non-original or unauthorized spare parts are used.
Do not make any changes or modifications to the product structure. If necessary, contact the retailer or an authorized service center for consultation or repairs.
Do not use the product if you notice missing or damaged parts.
Do not allow children under 3 years of age to be present before fully assembling the stroller to avoid access to small and disassembled parts.
Do not add extra cords or straps to avoid the risk of strangulation.
Do not use the stroller on stairs or escalators, and exercise caution when stepping up or down curbs or steps.
- Keep plastic packaging away from children to avoid the risk of suffocation.
ASSEMBLY AND FEATURES
The stroller is suitable for newborns or children up to 4 years old or weighing up to 22 kg (whichever comes first).
No tools are required to assemble the stroller.
CAUTION! Follow the instructions and assembly sequence exactly as described in the manual's text and illustrations.
CAUTION! Check the security of each fixation after completing each step!
CAUTION! Fixation in a specific position is usually accompanied by a clicking sound.
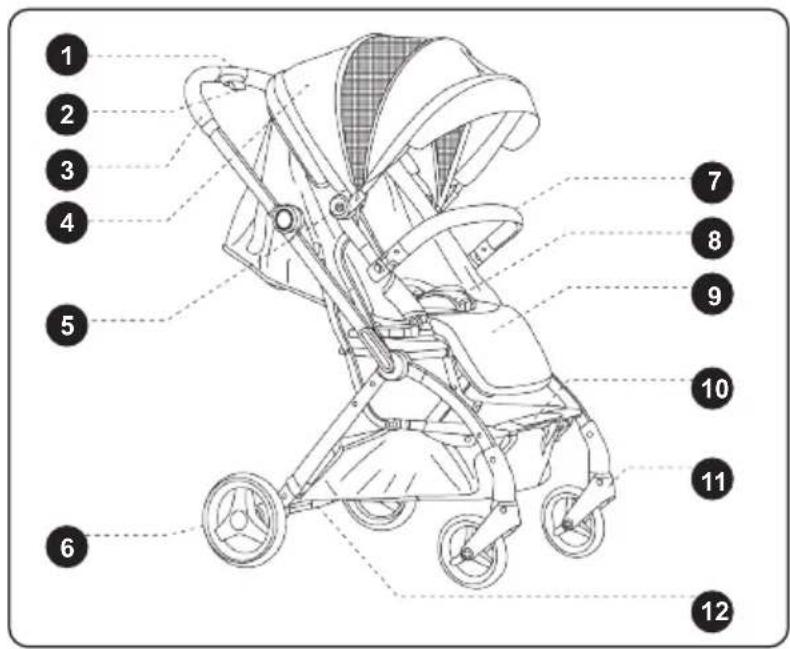
MAIN PARTS
1 - Secondary locking mechanism
2 - Folding button
3 - Handle
4 - Canopy
5 - Canopy adjustment mechanism
6 - Rear wheel
7 - Bumper bar
8 - Seat
9 - Footrest
10 - Footrest support
11 - Front wheel
12 - Parking device
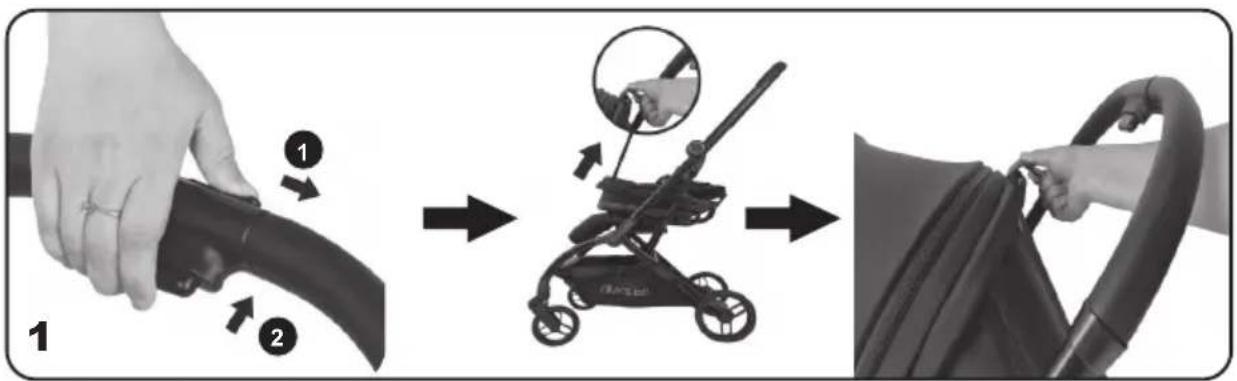
1. UNFOLDING THE STROLLER
Slide the secondary locking mechanism (1) and press the folding button (2). Grab the handle with one hand and pull it upward. Press button “A” and unfold the backrest until you hear the locking sound “click.”
Note: Ensure the backrest is fully unfolded.
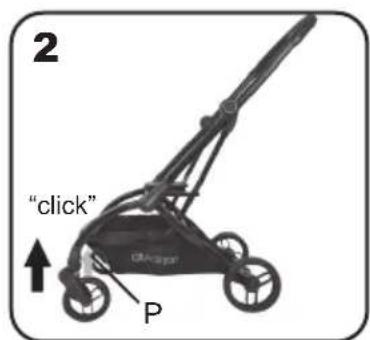
2. ATTACHING AND DETACHING THE FRONT WHEELS
Insert the front wheel into the frame opening and press until you hear the locking sound "click." Ensure the wheel is securely fixed by trying to pull it out of the stroller frame.
Note: The front wheels perform only rotational movement. Detach the front wheels by pressing button "P" and pulling downward.
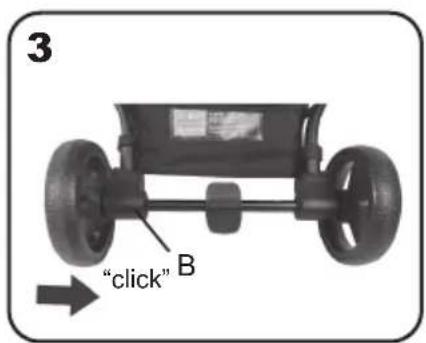
3. ATTACHING AND DETACHING THE REAR WHEELS
Insert the rear wheels into the frame openings and press until you hear the "click" sound. Ensure the wheel is securely fixed by attempting to pull it outward. Press buttons "B" on both wheels to detach them from the rear axle.
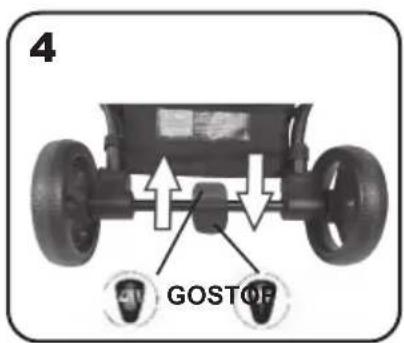
4. PARKING DEVICE
To activate the parking device, press the pedal downward. To deactivate it, press the rear part of the pedal upward.
IMPORTANT! Always activate the parking device when the stroller is stationary to prevent the risk of sliding!
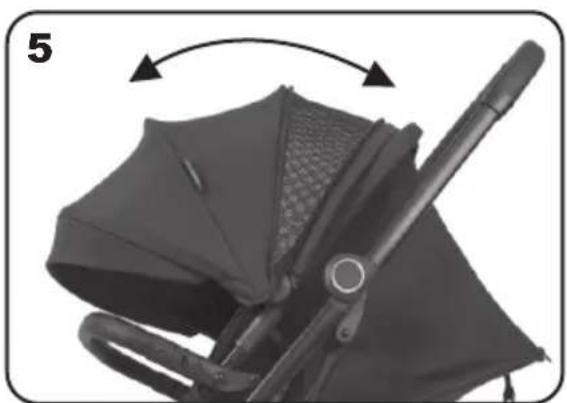
5. ADJUSTING THE CANOPY
Pull the canopy outward to unfold it, and push it back with your hand to fold it. Open zipper "Z" to increase the canopy's coverage area.
6. SAFETY BAR
Insert the safety bar into the frame openings and press until it locks with a "click" sound. Ensure the bar is securely fixed to the frame! To release the safety bar, press button C.
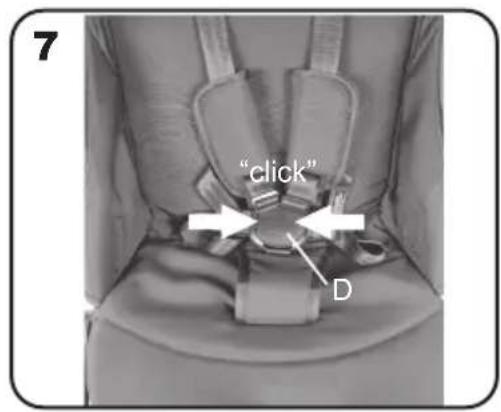
7. RETENTION SYSTEM
Insert the straps into buckle D until you hear a "click." Adjust the length and width of the straps by moving the buckles.
Note: The straps should fit snugly around the child and must not be twisted.
IMPORTANT! Periodically check that the straps are securely attached to the stroller's frame and ensure the buckles are properly fastened. Straps must not be worn or torn, and the plastic buckles and fasteners must be intact and provide a secure connection!
WARNING! Babies under 6 months old should only be placed in the seat when the backrest is in the fully reclined position! Before placing the child in the stroller, unbuckle the straps, tuck them to the sides, and cover with a mattress no thicker than 20 mm or a thin cushion.
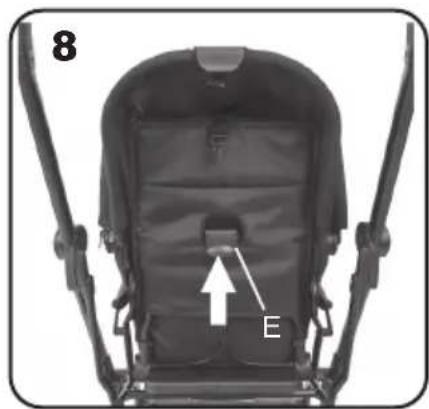
8. ADJUSTING THE BACKREST POSITIONS
Pull mechanism E on the back of the seat outward and move the backrest up or down. Release the mechanism to lock the desired position.
9. ROTATING THE SEAT 360°
IMPORTANT! Before rotating the seat, ensure the backrest is in the most upright position!
Raise the footrest (1) and rotate the seat (2) to one of two possible positions:
– The seat faces forward, with the child looking ahead.
– The seat faces backward, with the child looking toward the adult pushing the stroller.
WARNING! To lock the seat in the chosen position, lower the footrest and slightly rotate the seat to the left or right until you hear a "click," indicating the seat is securely locked.
WARNING! Ensure the seat is securely fixed in the chosen position before placing the child in the stroller!
10. FOOTREST
Press the buttons (D) located at the bottom of the footrest (under the fabric) on both sides and move it to the desired position (horizontal or vertical, only downward).
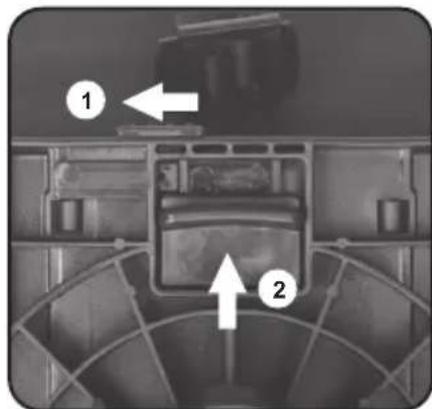
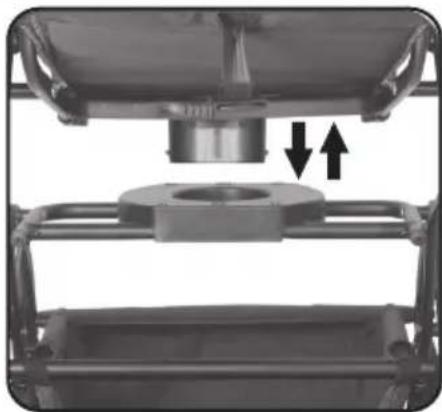
11. ATTACHING AND DETACHING THE SEAT
11.1 Attaching the Seat: Simultaneously press buttons (1) and (2). Place the seat into the frame openings and press until you hear a "click." Ensure the seat is securely fixed by attempting to remove it from the frame.
11.2 Detaching the Seat: Simultaneously press both buttons (1) and (2) and remove the seat from the stroller frame.
12. FOLDING THE STROLLER
IMPORTANT! Always activate the parking device, empty the storage basket, and place the seat backrest in the reclined position before folding the stroller.
Press lever "A" at the base of the canopy and push forward until you hear a "click." Slide the button on the secondary locking mechanism in the direction indicated in the figure, then press the
folding button. Push the stroller handle forward until the stroller is fully folded.
MAINTENANCE AND CARE INSTRUCTIONS
✿ Brakes, wheels, and tires wear out faster than other parts. Replace them when necessary.
- Regularly lubricate the moving mechanisms with silicone oil or spray.
- Regularly clean and lubricate dirty metal and plastic parts with oil.
- Clean the product parts using a soft cotton cloth or sponge dampened with water or a mild detergent.
Do not use aggressive cleaners containing abrasive particles, ammonia, bleach, or alcohol.
Always dry the product thoroughly and let it air dry before storing it. Mold may develop if the product is stored while damp.
- Store the product in a clean and dry place. Do not expose it to environmental factors such as direct sunlight, rain, humidity, or sudden temperature changes!
A TERMÉK BIZTONSÁGOS HASZNÁLATÁNAK BIZTOSÍTÁSA ÉRDEKÉBEN KÖVESSE A FELHASZNÁLÓI KÉZIKÖNYVBEN TALÁLHATÓ ÖSSZES FIGYELMEZTETÉST, UTASÍTÁST ÉS AJÁNLÁST!
FIGYELMEZTETÉSEK!
11. MONTÁŽ A DEMONTÁŽ SEDADLA
1. assembly of software
Assubmssngon dgmng lszgdn dgrsbnbdn (1) qss qssgnfgn on qslusgbn gnmssbl (2), bgmnon dmznqgn lszgmnfl n s sljgn on gbdmon. qssgnfgn gnmssbl "A" qss gsdsmgn lszghnfg, lsbsd sm gsnmbgdon hszgtnl bds "qsshsdgbd".
3. grades 65 grades 70 grades 75 grades 80 grades 85
35m_3n_3g_0n_1 3m_3ym_0n_0m_0n_1 2s_1ss_1g_1n_1y_0g_0d_0m_0 2ss_1g_1n_1g_0n_1 3g_0m_1 . 35m_3n_3g_0n_1 3m_3ym_0n_0m_0n_1 2s_1m_3m_0n_0n_1 3n_0b_0n_0 , 2ss_1g_1n_1g_0n_1 3g_0m_1 3n_1 2s_1s_1s_1s_1s_1s_1s_1s_1s_1s_1s_1s_1s_1s_1s_1s_1s_1s_1s_1s_1s_1s_1s_1s_1s_1s_1s_1s_1s_1s_1s_1s_1s_1s_1s_ 1s_ 1s_ 1s_ 1s_ 1s_ 1s_ 1s_ 1s_ 1s_ 1s_ 1s_ 1s_ 1s_ 1s_ 1s_ 1s_ 1s_ 1s_ 1s_ 1s_ 1s_ 1s_ 1s_ 1s_ 1s_ 第

- Chipolino
- ВАЖНО! ЗАПАЗЕТЕ ЗА БЪДЕЩА СПРАВКА: ПРОЧЕТЕТЕ ВНИМАТЕЛНО!
- WARNINGS!
- ASSEMBLY AND FEATURES
- MAIN PARTS
- UNFOLDING THE STROLLER
- ATTACHING AND DETACHING THE FRONT WHEELS
- ATTACHING AND DETACHING THE REAR WHEELS
- PARKING DEVICE
- ADJUSTING THE CANOPY
- SAFETY BAR
- RETENTION SYSTEM
- ADJUSTING THE BACKREST POSITIONS
- ROTATING THE SEAT 360°
- FOOTREST
- ATTACHING AND DETACHING THE SEAT
- FOLDING THE STROLLER
- MAINTENANCE AND CARE INSTRUCTIONS
- FIGYELMEZTETÉSEK!
- MONTÁŽ A DEMONTÁŽ SEDADLA
- assembly of software
- grades 65 grades 70 grades 75 grades 80 grades 85
Brand : Chipolino
Model : Revolut
Category : Stroller