FRITZ!Smart Control 350 - Home Automation AVM - Free user manual and instructions
Find the device manual for free FRITZ!Smart Control 350 AVM in PDF.

| Brand | AVM |
| Model | FRITZ!Smart Control 350 |
| Product type | Connected door/window contact |
| Sensor dimensions (L x H x W) | 91 x 24 x 12 mm |
| Magnet dimensions (L x H x W) | 28.5 x 15 x 6.5 mm |
| Sensor weight (with batteries) | 36 g |
| Magnet weight | 6 g |
| Power supply | 2 AAA alkaline batteries (non-rechargeable) |
| Radio standard | DECT ULE |
| Frequency range | 1880 – 1900 MHz |
| Range (indoors) | Up to 40 m |
| Transmission power (max.) | 250 mW |
| Usage range | 0 – 50 °C (dry indoor) |
| Compatibility | FRITZ!Box with DECT and FRITZ!OS 7.50 or higher |
| Main functions | Detection of door/window opening/closing; triggering of scenarios, routines; coupling with radiator thermostats, sockets, bulbs |
| Installation | Adhesive mounting on frame or sash; position markers facing each other |
| Cleaning | Damp cloth |
| Protection rating | Not specified (indoor use only) |
| General information | Do not install on aluminum or iron windows, nor on window sill (humidity) |
Frequently Asked Questions - FRITZ!Smart Control 350 AVM
User questions about FRITZ!Smart Control 350 AVM
0 question about this device. Answer the ones you know or ask your own.
Ask a new question about this device
Download the instructions for your Home Automation in PDF format for free! Find your manual FRITZ!Smart Control 350 - AVM and take your electronic device back in hand. On this page are published all the documents necessary for the use of your device. FRITZ!Smart Control 350 by AVM.
USER MANUAL FRITZ!Smart Control 350 AVM
Installation and Operation
DE EN FR ES IT NL
DEUTSCH
7
ENGLISH 19
FRANÇAIS 31
ESPANOL 43
ITALIANO 55
NEDERLANDS 67

-Explosionsgefahr!
Inappropriate handling of batteries can cause burns or injuries from explosion. Do not recharge, short-circuit, or dismantle!
- Do not use rechargeable batteries!
The lower voltage of rechargeable batteries can limit the device's service life and runtime.
- Use high-quality batteries!!
Suitable batteries include Varta Industrial Pro AAA, Varta Longlife Max Power AAA, GP Super Alkaline LR03, and Duracell Industrial AAA. Do not use any rechargeable batteries or zinc-carbon batteries!

- Make sure that the batteries are inserted with the poles in the correct position.
-
Keep the magnet in the FRITZ!Smart Control 350 away from pacemakers, magnetic stripe cards and data storage devices.
-
Remove dead batteries immediately.
- Do not mix new and used batteries.
- Keep batteries away from children and avoid contact with skin, eyes, or the inside of the mouth. If battery acid comes into contact with the skin, rinse immediately with water and seek medical advice.

- Only use the FRITZ!Smart Control 350 indoors in dry and dust-free areas and protect it from liquids.
- Use a damp cloth for cleaning.
Illustration Number and Name
| 1 sensor with top and bottom cover | |
| 1 magnet | |
| 2 x 2 yellow adhesive strips (for test assembly) 4 white adhesive strips (for permanent installation) | |
| 2 AAA batteries | |
| 1 reset pin tool | |
| No illustration 1 Booklet |
Device Overview
FRITZ!Smart Control 350 is a window/ door sensor to be operated with a FRITZ!Box that has DECT and FRITZ!OS 7.50 (or later).
In a FRITZ smart home, FRITZ!Smart Control 350 can
control radiator thermostats
- switch LED lights and sockets
- apply scenes and templates
- trigger routines
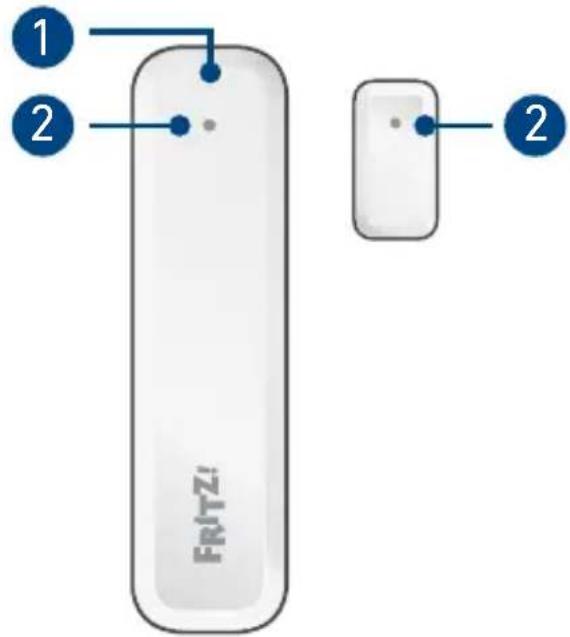
| LED: on the back of the upper cover | |
| Off Standby, | updating |
| Flashes Ready | for registration |
| Lights for 10 seconds | Registration successful |
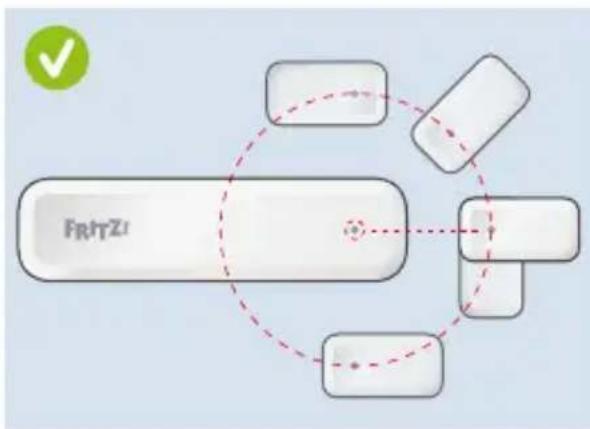
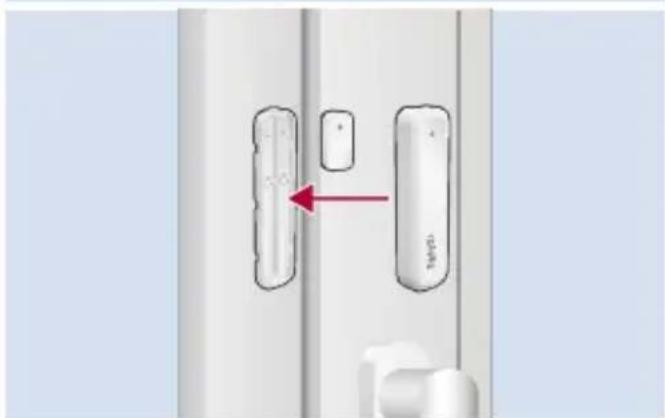
2 Positioning mark
The positioning marks of the sensor and the magnet must be aligned with each other in the installed sensor. Please note the instructions on page 23.
Register
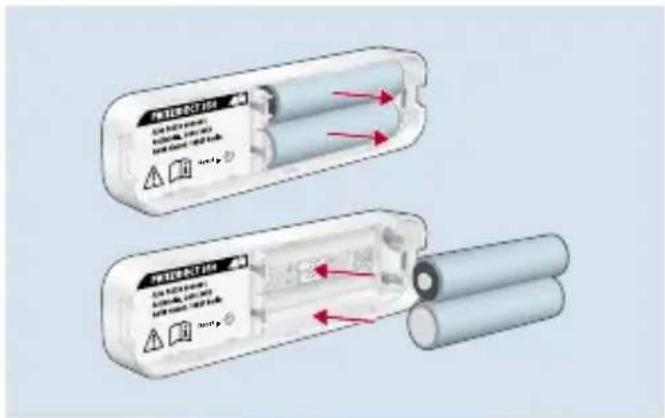
- Insert the batteries in the top shell of the sensor.
The LED will start to flash.
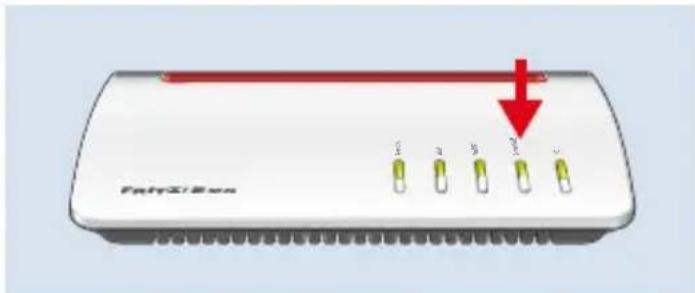
- Press the Connect button on your FRITZ!Box within 2 minutes.
or
Within 2 minutes, press the DECT button on your FRITZ!Box for 6 seconds.
-
The sensor LED lights up for 10 seconds and FRITZ!Smart Control 350 is registered.
-
Close FRITZ!Smart Control 350.
Push lightly to connect the top shell of the sensor with the lower shell.

If FRITZ!Smart Control 350 was not registered, remove the batteries for 1 minute and repeat the registration process.
Types of Installation
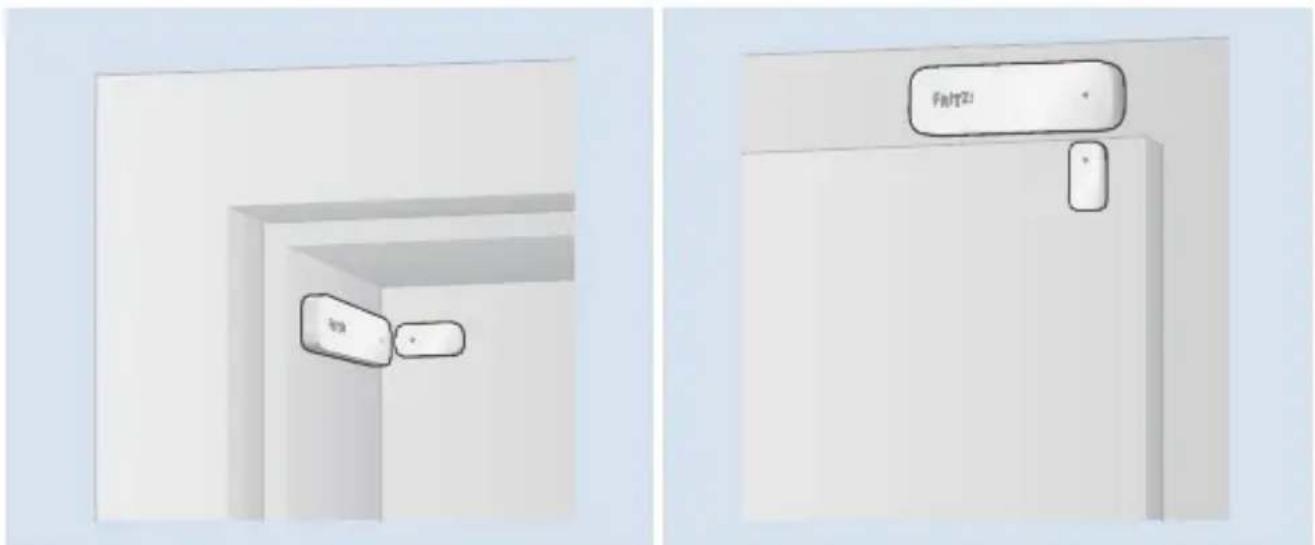
FRITZ!Smart Control 350 is suitable for installing on windows and doors. This overview shows installation examples for the sensor and magnet.
Installation in the frame Installation on the frame
WindowDoor
Installation Tips
Please note the following tips when installing FRITZ!Smart Control 350.
in the frame on the frame
- FRITZ!Smart Control 350 can not be installed in windows made of aluminium or iron.
- FRITZ!Smart Control 350 can be installed in windows with EuroFold.
- Check whether FRITZ!Smart Control 350 fits in your window frame.
-
Test the installation and functionality before final installation using the removable yellow adhesive strips.
-
FRITZ!Smart Control 350 can be installed on windows and doors made of aluminium or iron.
- Test the installation and functionality before final installation using the removable yellow adhesive strips.
During installation, make sure that the positioning marks are aligned with each other and comply with the recommended spacing.
- For windows and doors to be detected as closed, the positioning marks on closed windows and doors must be no more than 40mm apart.
- For windows and doors to be detected as open, the positioning marks on opened windows and doors must be at least 90mm apart.
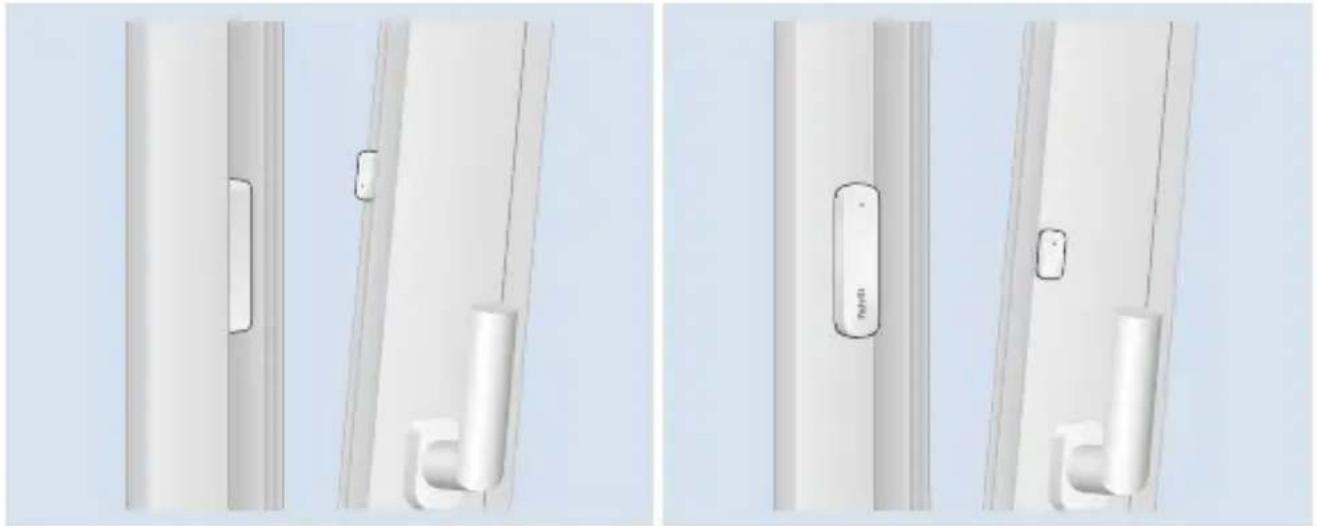
Installation in the Window Frame

Use the yellow adhesive strips for a test installation and the white adhesive strips to attach the FRITZ!Smart Control 350. Stick the adhesive strips to the back of the sensor and magnet.
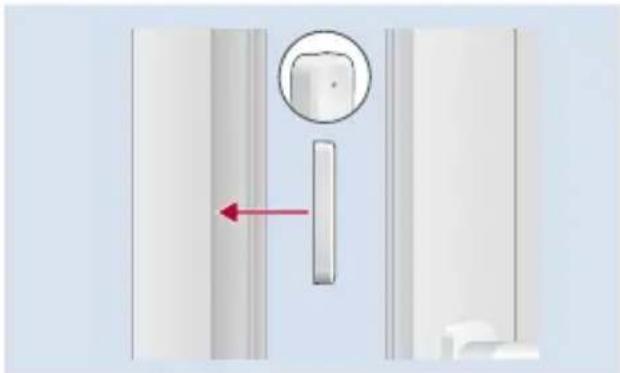
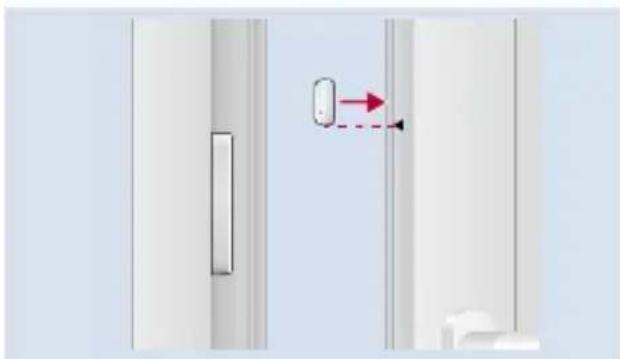
- Open the window all the way. Hold the sensor with the positioning mark on top and stick it in the window frame above the window handle.

Do not install FRITZ!Smart Control 350 on the sill. Moisture can collect there which would damage the sensor.
-
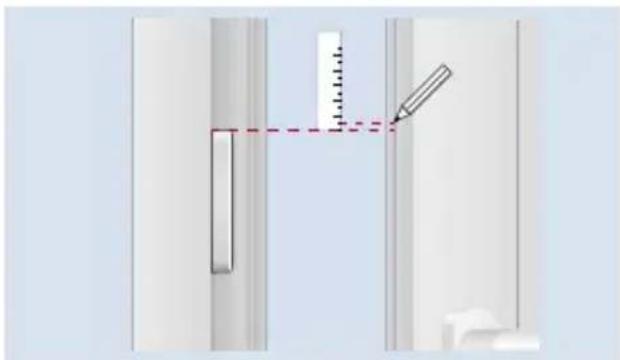
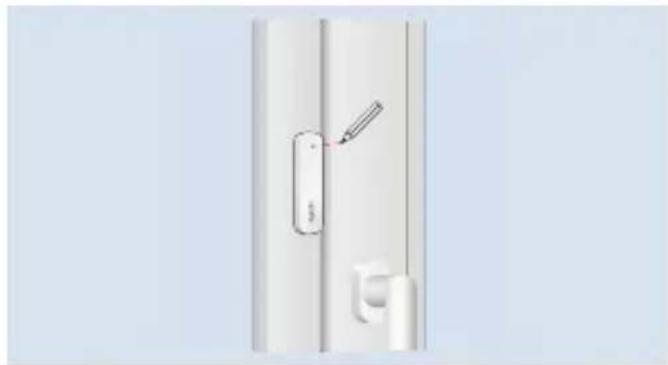
Transfer the position of the sensor to the sash and make a marking for the position of the magnet 2 to 3 millimetres above it.
-
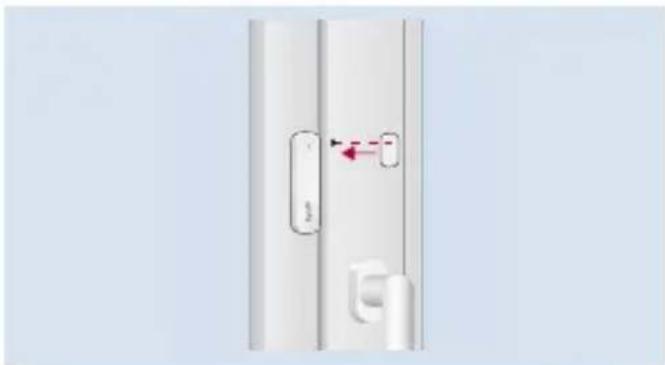
Attach the magnet to your marking on the window sash so that the positioning marks are aligned with each other.
FRITZ!Smart Control 350 is mounted and can be configured.
Installation on the Window/Door Frame

Use the yellow adhesive strips for a test installation and the white adhesive strips to attach the FRITZ!Smart Control 350. Stick the adhesive strips to the back of the sensor and magnet.
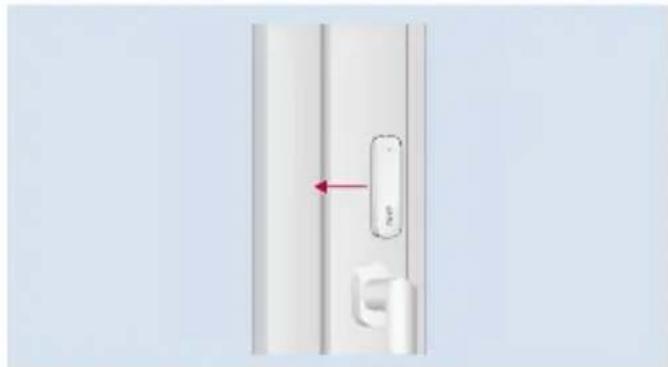
- Close the window completely and attach the sensor on the window frame above the window handle with the positioning mark facing upwards.
- Transfer the position of the sensor to the window sash.
- Attach the magnet to your marking on the edge of the window sash so that the positioning marks are aligned with each other.
FRITZ!Smart Control 350 is mounted and can be configured.
Configure
You can configure FRITZ!Smart Control 350 in the FRITZ!Box user interface. For more information, see .
For Sockets and LED Lights
- Open a web browser and enter http://fritz.box.
The FRITZ!Box user interface will open.
- Open the Smart Home > Devices and Groups menu.
- Click on behind your FRITZ!Smart Control 350.
Configure FRITZ!Smart Control 350 on the FRITZ!Smart Control 350 tab.
For Radiator Controls
- Open a web browser and enter http://fritz.box.
The FRITZ!Box user interface will open.
- Open the Smart Home > Devices and Groups menu.
- Click on behind your FRITZ!Smart Control 350.
- Select the desired radiator control under Open window detection for radiator control.
FRITZ!Smart Control 350 is set up as an external sensor for the radiator control. The radiator control interrupts heating as long as the window is open:

When Open window detection for radiator control is enabled, you can still configure FRITZ!Smart Control 350 to switch additional smart home devices.

For Scenes and Templates

Scenes and templates must be created before they can be applied with FRITZ!Smart Control 350.
- Open a web browser and enter http://fritz.box.
The FRITZ!Box user interface will open.
- Open the Smart Home > Devices and Groups menu.
- Click on behind your FRITZ!Smart Control 350.
Configure FRITZ!Smart Control 350 on the FRITZ!Smart Control 350 tab.
For Routines
- Open a web browser and enter http://fritz.box. The FRITZ!Box user interface will open.
- Open the Smart Home > Automation menu.
- Click on Create Routine.
- Enter a name for the routine and click on Next.
- Select the Sensors device type and select FRITZ!Smart Control 350 which is to trigger the routine.
- Click Next and follow the wizard's instructions.
The routine will be set up for FRITZ!Smart Control 350.
Replace Batteries
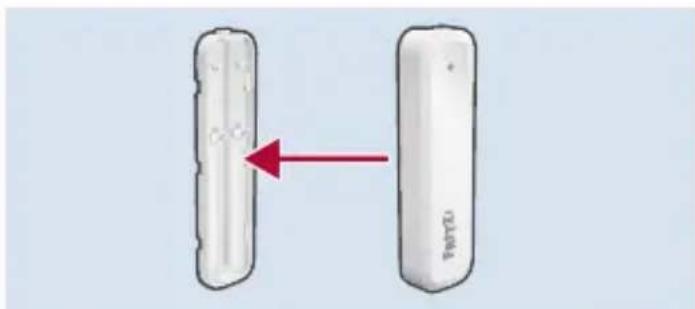
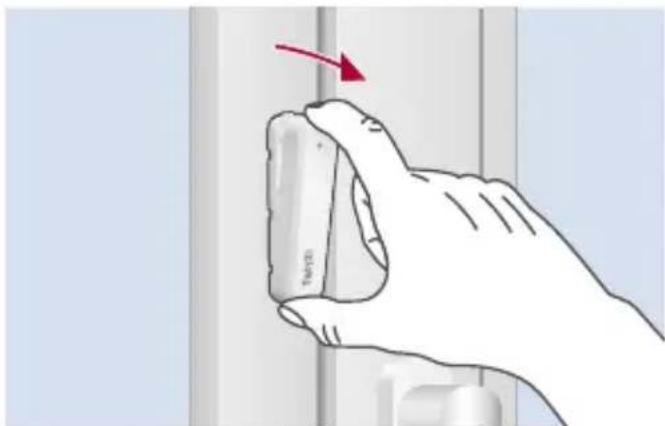
- Open FRITZ!Smart Control 350.
Hold the sensor between your thumb and index finger.
Pull the point of the sensor toward you.
-
Replace the batteries. The LED will light up for one second.
-
Close FRITZ!Smart Control 350.
Push lightly to connect the top shell of the sensor with the lower shell.
Reset
To re-register FRITZ!Smart Control 350, or to register it with another FRITZ!Box, reset the sensor.
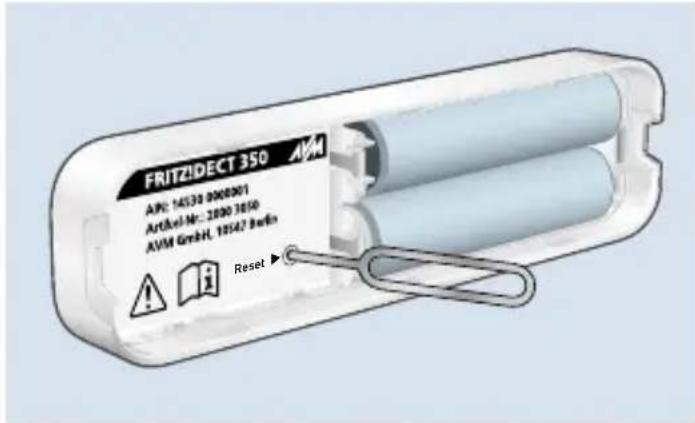
- Open FRITZ!Smart Control 350.
- Carefully insert the reset needle for at least one second into the Reset opening and then remove it.
- The LED will start to flash.
FRITZ!Smart Control 350 is reset and ready for registration.

After resetting, FRITZ!Smart Control 350 still appears in the FRITZ!Box user interface under Smart Home > Devices and Groups. Delete FRITZ!Smart Control 350 there manually if desired; see "Deregister".
Deregister
- Open a web browser and enter http://fritz.box.
The FRITZ!Box user interface will open.
- Open the Smart Home > Devices and Groups menu.
- Click on Delete Device.
appears behind your FRITZ!Smart Control 350.
- Click on to delete FRITZ!Smart Control 350.
FRITZ!Smart Control 350 is deregistered from the FRITZ!Box.
Technical specifications
| Dimensions (W x H x D) | Sensor: 91 x 24 x 12 mm Magnet: 28.5 x 15 x 6.5 mm |
| Weight | Sensor: 36 g (with batteries) Magnet: 6 g |
| Battery operation | 2 x AAA batteries |
| Wireless communication standard | DECT ULE |
| Frequency range | 1880 – 1900 MHz |
| Range | up to 40 m (indoors) |
| Transmitter power (max.) | 250 mW |
| Operating temperature | 0 – 50 °C (not in wet and/or damp areas) |
EU Declaration of Conformity
AVM declares herewith that the device is compliant with Directive 2014/53/EU. The full text of the declaration of EU conformity is available at en.avm.de/service/declarations/.