SCA702 0901 - Vacuum Cleaner Armor All - Free user manual and instructions
Find the device manual for free SCA702 0901 Armor All in PDF.


User questions about SCA702 0901 Armor All
0 question about this device. Answer the ones you know or ask your own.
Ask a new question about this device
Download the instructions for your Vacuum Cleaner in PDF format for free! Find your manual SCA702 0901 - Armor All and take your electronic device back in hand. On this page are published all the documents necessary for the use of your device. SCA702 0901 by Armor All.
USER MANUAL SCA702 0901 Armor All
Read and understand this manual before use. Keep this manual for future reference.
POUR GARANTIR VOTRE SECURITE
Greenville, SC 29607
1-866-384-8432
©2024 Energizer Auto. Armor All is a trademark of Energizer Auto and is used under license by Cleva North America, Inc.
Warranty 2
Important Safety Instructions 3
Double Insulation Instructions 5
Unpacking & Checking Carton Contents 6
General Assembly Instructions 7
Operation 8
Maintenance 11
Troubleshooting 13
Exploded View 15
Parts List 16
Thank you for purchasing this Armor All spot cleaner. Feel confident that with our Armor All spot cleaner you are obtaining a high-quality product engineered for optimal performance. This spot cleaner is capable of picking up liquids.
FOR YOUR SAFETY: CAREFULLY READ AND UNDERSTAND ALL INSTRUCTIONS.
WARRANTY
We take pride in producing a high-quality, durable product. This cleaner carries a limited two (2) year warranty against defects in workmanship and materials from date of purchase (or, for deliveries in the State of California, two years from the date of delivery), under normal household use. Please keep your receipt as proof of purchase. This warranty gives you specific legal rights, and you may have other rights, which vary from state to state. For customer service please call 1-866-384-8432.
Not Covered by Warranty:
- Any part that has become inoperative due to misuse, negligence, direct/indirect abuse, accidents, improper maintenance, repairs or alterations;
- Consumables such as filters and accessories;
- Normal wear and tear of parts and attachments, such as nozzles or filters;
- Normal deterioration of the exterior finish due to use or exposure;
- Any product where serial number/data label is tampered with or removed;
- Any product purchased from an unauthorized retailer.
IMPORTANT SAFETY INSTRUCTIONS
When using an electrical appliance, basic precautions should always be followed, including the following:
READ ALL INSTRUCTIONS BEFORE USING THIS SPOT CLEANER.
Failure to follow the warnings and instructions may result in electric shock, fire and/or serious injury.

WARNING: TO REDUCE THE RISK OF FIRE, ELECTRIC SHOCK OR INJURY:
- Use your spot cleaner only as described in this Operator's Manual. Use only manufacturer's recommended attachments.
- Fully assemble before operating.
- Operate spot cleaner only at voltage specified on data plate.
- Do not leave spot cleaner when plugged in. Unplug from outlet when not in use and before performing maintenance.
- Do not expose to rain. Store indoors.
- Do not immerse. Use only on carpet moistened by cleaning process.
- Do not allow to be used as a toy. Close attention is necessary when used by or near children.
- Do not use with a damaged cord or plug. If spot cleaner is not working as it should, has been dropped, damaged, left outdoors, or dropped in water, immediately discontinue use and call Customer Service at 1-866-384-8432 for assistance.
- Do not pull or carry by cord, use cord as a handle, close a door on cord, or pull cord around sharp edges or corners. Do not run spot cleaner over cord. Keep cord away from heated surfaces.
- Do not unplug by pulling on cord. To unplug, grasp the plug, not the cord.
- Do not handle plug or spot cleaner with wet hands.
- Do not put any objects into openings.
- Do not use with any opening blocked; keep free of dust, lint, hair, and anything that may reduce air flow.
- Keep hair, loose clothing, fingers, and all parts of body away from openings and moving parts.
- Turn off all controls before unplugging.
- Use extra care when cleaning on stairs. To avoid personal injury or damage, and to prevent the spot cleaner from falling, always place spot cleaner at bottom of stairs or on floor. Do not place spot cleaner on stairs or furniture, as it may result in injury or damage.
- Do not put on chairs, tables, etc. Keep on floor.
- Do not use spot cleaner to pick up flammable or combustible liquids (gasoline, cleaning fluid, perfumes, etc.), or use in areas where they may be present. The
fumes from these substances can create a fire hazard or explosion.
- To reduce the risk of health hazards from vapors or dusts, do not vacuum toxic materials.
- Do not use or store near hazardous materials.
- Do not pick up anything that is burning or smoking, such as cigarettes, matches, or hot ashes.
- Do not use spot cleaner without tanks in place.
- Do not clean over floor electrical outlets.
- Do not use the spot cleaner to pick up sharp hard objects, small toys, pins, paper clips, etc. They may damage the spot cleaner or dust cup.
- Do not use sharp objects to clean out hose as they can cause damage.
- To help prevent matting and resoiling, avoid contact with carpets until they are dry. Keep children and pets away from carpets until they are completely dry.
- Do not store the spot cleaner with solution in tanks.
- This spot cleaner is provided with double insulation. Use only identical replacement parts. See DOUBLE INSULATION INSTRUCTIONS.
- You are responsible for making sure that your spot cleaner is not used by anyone unable to operate it properly.

CAUTION: TO REDUCE THE RISK OF INJURY FROM MOVING PARTS - UNPLUG BEFORE SERVICING.

WARNING: TO REDUCE THE RISK OF ELECTRIC SHOCK - UNPLUG BEFORE CLEANING OR SERVICING.
SAVE THESE INSTRUCTIONS
For Household Use Only
DOUBLE INSULATION INSTRUCTIONS
This Spot Cleaner is double insulated, eliminating the need for a separate grounding system. Use only identical replacements parts. Read the instructions for Servicing Double-Insulated Spot Cleaner before servicing. Use this spot cleaner as described in this manual.
Observe the following warnings that appear on the motor housing of your spot cleaner.

DOUBLE INSULATED - GROUNDING NOT REQUIRED - WHEN SERVICING USE ONLY IDENTICAL REPLACEMENT PARTS.

WARNING: TO REDUCE THE RISK OF ELECTRIC SHOCK - DO NOT EXPOSE TO RAIN. STORE INDOORS.

WARNING: FOR YOUR OWN SAFETY, READ AND UNDERSTAND THE OPERATOR'S MANUAL. DO NOT RUN UNATTENDED. DO NOT PICK UP HOT ASHES, COALS, TOXIC, FLammable OR OTHER HAZARDOUS MATERIALS. DO NOT USE AROUND EXPLOSIVE LIQUIDS OR VAPORS.

WARNING:ServICING OF DOUBLE-INSULATED SPOT CLEANER
WITH A DOUBLE-INSULATED SPOT CLEANER, TWO SYSTEMS OF INSULATION ARE PROVIDED INSTEAD OF GROUNDING. NO GROUNDING MEANS IS PROVIDED ON A DOUBLE-INSULATED APPLIANCE, NOR SHOULD A MEANS FOR GROUNDING BE ADDED. SERVICING A DOUBLE- INSULATED SPOT CLEANER REQUIRESTEXTREME CARE AND KNOWLEDGE OF THE SYSTEM AND SHOULD BE DONE ONLY BY QUALIFIED SERVICE PERSONNEL. REPLACEMENT PARTS FOR A DOUBLE-INSULATED SPOT CLEANER MUST BE IDENTICAL TO THE PARTS THEY REPLACE. YOUR DOUBLE-INSULATED SPOT CLEANER IS MARKED WITH THE WORDS 'DOUBLE INSULATED' AND THE SYMBOL 口 (SQUARE WITHIN A SQUARE) MAY ALSO BE MARKED ON THE APPLIANCE.
UNPACKING & CHECKING CARTON CONTENTS
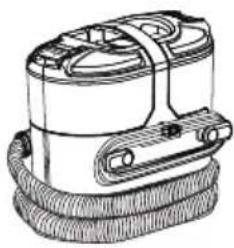
A
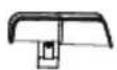
B
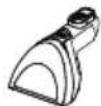
C
Remove all contents from the carton. Check each item against the carton contents list.
Carton Contents List:
Key Description Qty.
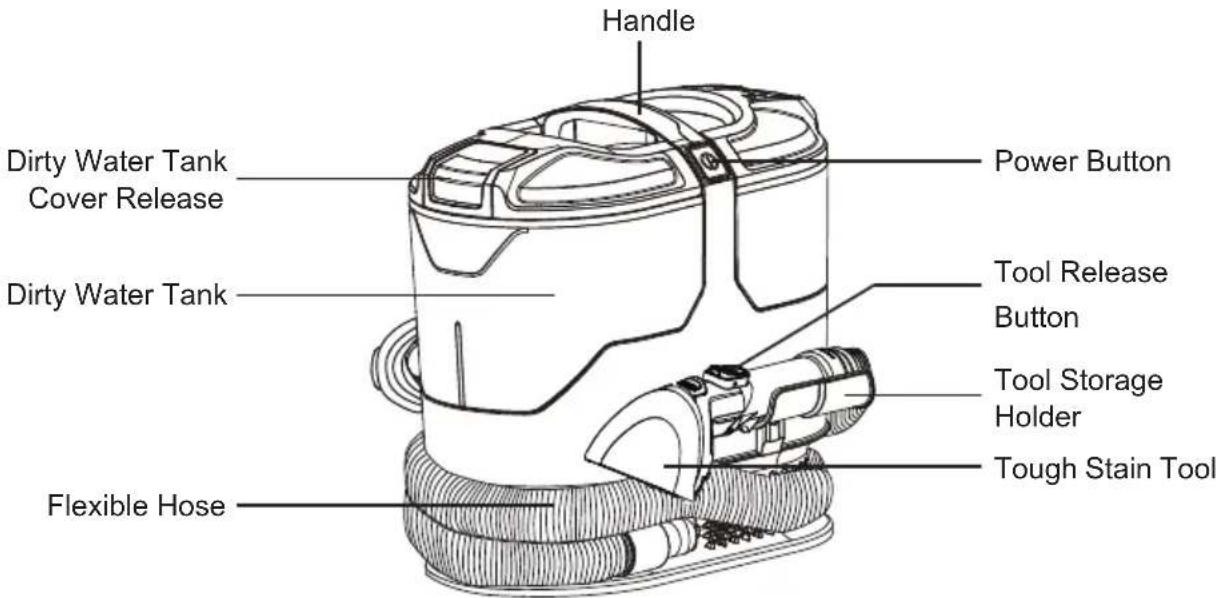
A Spot Cleaner 1
B Tool Storage Holder (with 1 screw pre-attached)
C Tough Stain Nozzle. 1
D Hose Cleaning Tool. 1
E Cleaning Solution. 1
F Operator's Manual. 1

D
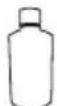
E
F
GENERAL ASSEMBLY INSTRUCTIONS
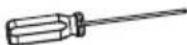
A Phillips head screwdriver is required.
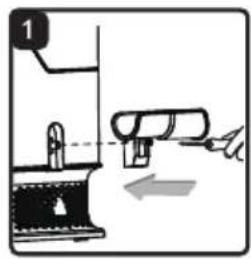
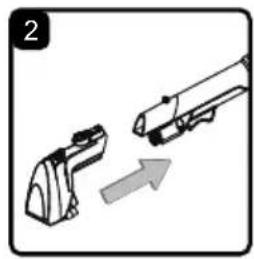
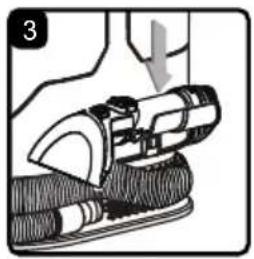
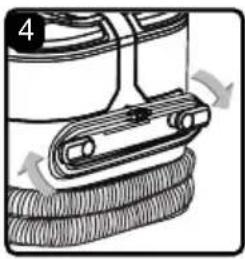
UNPACKING YOUR SPOT CLEANER & GENERAL ASSEMBLY
- Loosen the screw pre-attached on the tool storage holder. Secure the tool storage holder onto the carpet cleaner body with the screw (Fig. 1).
NOTE: Tighten the screw with a Phillips screwdriver. Ensure that the screw is secured. - Slide the tough stain tool onto the end of the hose until it clicks into place (Fig. 2).
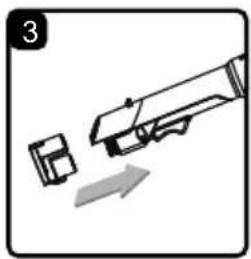
To remove: Press the tool release button and pull away the tool. - Snap the end of the hose with the tool installed into the tool storage holder when not in use (Fig. 3).
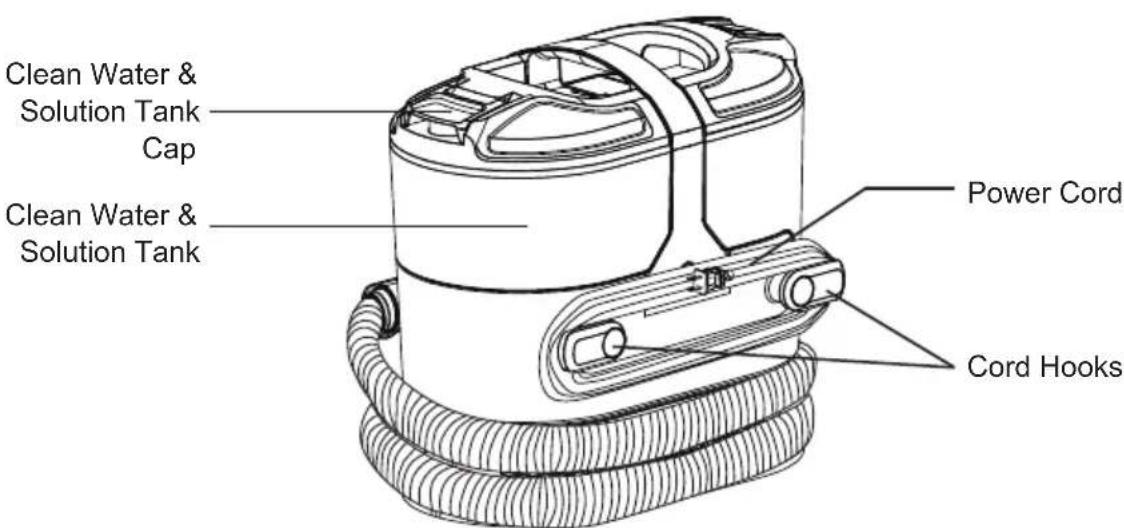
- Make sure both cord hooks are in the proper position as shown. Wrap the power cord loosely around the cord hooks (Fig. 4).
NOTE: Make sure to wrap the power cord around the right cord hook first, and then around the left cord hook to avoid damaging the power cord.
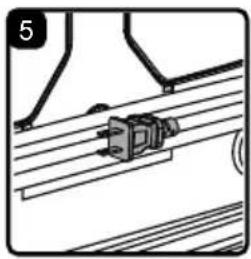
- Lock power cord plug onto the power cord (Fig. 5).

WARNING: WRAPPING THE CORD TOO TIGHTLY WITH EXCESSIVE STRESS ON THE CORD MAY CAUSE CORD DAMAGE. A DAMAGED CORD IS AN ELECTRICAL SHOCK HAZARD AND COULD CAUSE PERSONAL INJURY OR DAMAGE.
POLARIZED PLUG
To reduce the risk of electrical shock, this appliance has a polarized plug (one blade wider than the other). This plug will fit in a polarized outlet only one way. If the plug does not fit fully in the outlet, reverse the plug. If it still does not fit, contact a qualified electrician to install the proper outlet. Do not change the plug in any way. Double insulation eliminates the need for the three-wire grounded power cord and grounded power supply system.
OPERATION
FILLING THE CLEAN WATER & SOLUTION TANK
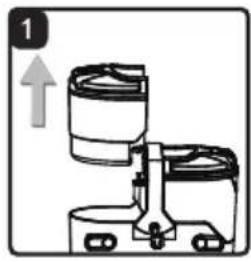
- Lift up the clean water tank from the side of the unit (Fig. 1).
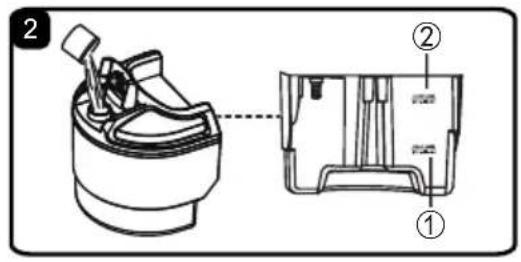
- Open the clean water tank cap. Fill the tank with room temperature water to the desired water fill line (for SMALL or LARGE messes). For a small job, add 3 caps full of cleaning solution to the tank. For a large job, add 9 caps full of cleaning solution (Fig. 2).
| Room Temperature Water Cleaning | ing Solution |
| Small mess - bottom fill line (0.2 gal liquid ①) | 3 caps |
| Large mess - top fill line (0.6 gal liquid ②) | 9 caps |

CAUTION: DO NOT FILL WITH WATER ABOVE 104^ (40^) .
NOTE: An 8 oz. (236ml) bottle of cleaning solution is provided with this spot cleaner. Ensure the cleaning solution and water are mixed correctly. Once the sample is depleted, a high-quality low-foaming cleaning solution is recommended for use with this appliance to prevent internal component damage.
NOTE: Using more than the recommended amount of cleaning solution may cause excessive foaming. KEEP OUT OF REACH OF CHILDREN. Do not ingest. In case of eye contact, thoroughly flush with cold water. If irritation persists, consult a physician.
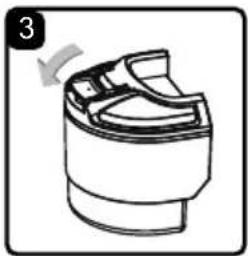
- Snap the clean water tank cap back into place (Fig. 3).
- Slide the clean water tank back into the unit, pressing down firmly until it feels secure.
USING THE SPOT CLEANER
NOTE: Before using the spot cleaner, use a vacuum to remove loose dirt from area to be cleaned. Test a small hidden area for colorfastness. Gently rub surface with a dampened white cloth. Wait 10 minutes and check for color removal with a white paper towel. If color changes, do not use.
NOTE: To prevent staining, use plastic or aluminum foil to protect wood or metal surfaces from possible water spray.
To protect the wood floors underneath rugs or carpet, place waterproof material (e.g. plastic) underneath them before cleaning.
- Unwrap the hose from the unit. Make sure the tough stain nozzle is attached securely.
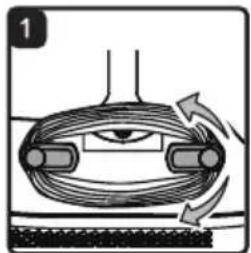
NOTE: The tough stain nozzle can be used for cleaning carpet stains, furniture and other hard-to-reach surfaces. - Turn the cord hooks inward from either side to release the power cord (Fig. 1).
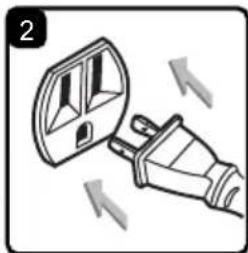
- Detach the power cord plug from the power cord. Plug the power cord plug into an outlet located near the floor (Fig. 2).
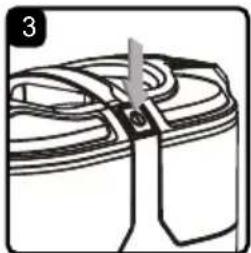
- Press the power button to turn the spot cleaner on (Fig. 3).
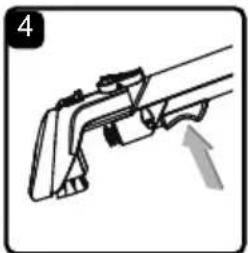
- Hold the tool about 1 inch over the stain to be cleaned. Squeeze the spray trigger to spray a generous amount of cleaning solution over the soiled area. Use the brush on the tool to agitate stains by scrubbing in a back and forth motion (Fig. 4).
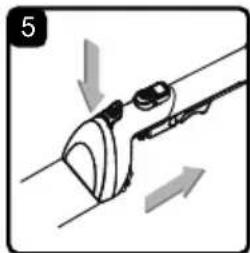
- To lift away the stain, apply downward pressure on the front of the cleaning tool and pull the tool backward slowly to vacuum up excess dirty liquids. Repeat as necessary (Fig. 5).
- Empty the dirty water tank when the dirty liquid reaches the "Max Fill" line and there is a loss in suction. See instructions in the EMPTYING DIRTY WATER TANK section (page 10).
- Once you have completed cleaning, press the power button; unplug the power cord plug from the outlet.
- Turn the cord hooks to the proper position and wrap the cord loosely around the cord hooks.

WARNING: ALWAYS UNPLUG POWER CORD FROM ELECTRICAL OUTLET BEFORE PERFORMING ANY SERVICE ON SPOT CLEANER.
EMPTYING THE DIRTY WATER TANK
Empty the dirty water tank when the dirty liquid reaches the "Max Fill" line and there is a loss in suction. During normal use, debris may accumulate in the dirty water tank. In order to keep the spot cleaner functioning properly, rinse out the dirty water tank with clean water after each use.
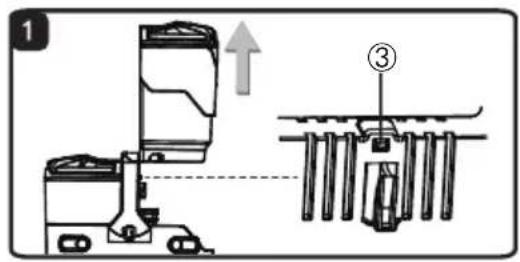
- Lift up the dirty water tank from the side of the unit. A security latch (③) is positioned to keep the dirty water tank in position to avoid unintentional release. The latch will automatically release when the tank is pulled upwards (Fig. 1).
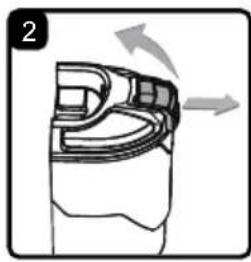
- Pull the dirty water tank cover release horizontally, and open the cover (Fig. 2).
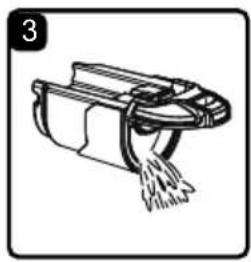
- Empty the tank into a sink or toilet. Rinse the tank thoroughly with clean water. If continuing to use after emptying the dirty water tank, be sure to dry the outside of the tank before reinstalling (Fig. 3).
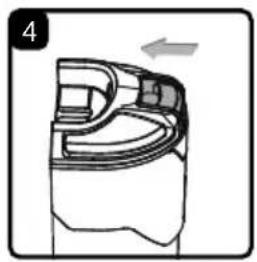
- Close the tank cover. Push back the cover release to original place to secure the cover until a click is heard (Fig. 4).
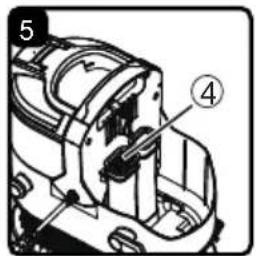
- Before replacing tank back into the unit, remove any debris from the air outlet ( 4 ) area (Fig. 5).
- Reinstall the dirty water tank back onto the unit. The security latch will automatically secure the dirty water tank in position. A click will be heard when correctly installed.

WARNING: THE MOTOR NOISE CHANGES TO A HIGHER PITCH WHEN THE DIRTY WATER TANK IS FULL OR BLOCKED. STOP THE SPOT CLEANER IMMEDIATELY AND EMPTY THE DIRTY WATER TANK.
MAINTENANCE


WARNING: TO REDUCE THE RISK OF SHOCK, TURN OFF AND DISCONNECT THE POWER CORD BEFORE PERFORMING ANY SERVICE OR MAINTENANCE.
CLEANING EXTERIOR AND ATTACHMENTS
- Turn off and unplug spot cleaner. DO NOT drip water on spot cleaner.
- To clean exterior, or to reduce static electricity and dust build-up, wipe outer surface with a clean, damp and soft cloth. Wipe dry after cleaning.
CLEANING THE TOUGH STAIN NOZZLE
It is recommended to clean the tough stain nozzle with water after each use.
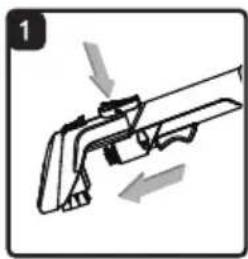
- Press the tool release button to remove the tool from the hose (Fig. 1).
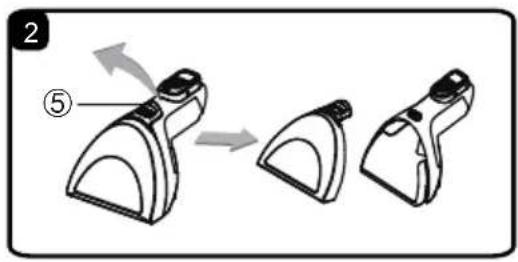
- Pull up the cover release tab ( ⑤ ) on the nozzle to remove the cover (Fig. 2).
- Rinse thoroughly with clean water. Allow the parts to dry before storing.
- Reinstall the nozzle cover and then insert back into place until a click is heard.
HOSE CLEANING TOOL
- Remove the clean water tank and fill with warm water (Max 104^ (40^)
- Attach the hose cleaning tool to the flexible hose. Ensure the tough stain nozzle is removed (Fig. 3).
- Make sure both the clean water and dirty water tanks are secured on the unit.
- Press the power button to turn the spot cleaner on and hold the spray trigger for 30 seconds. The clean water will rush through the flexible hose, effectively cleaning and removing any trapped dirt and debris in the hose which may build up over time. Repeat as needed. Let the machine run for 5-10 seconds before turning off (Fig. 4).
- Turn off and unplug spot cleaner.
STORAGE

WARNING: WRAPPING THE CORD TOO TIGHTLY PUTS STRESS ON THE CORD AND CAN CAUSE CORD DAMAGE. A DAMAGED CORD IS AN ELECTRICAL SHOCK HAZARD AND COULD CAUSE PERSONAL INJURY OR DAMAGE.
- Replace flexible hose and attachments in storage position.
- Wrap the power cord loosely around the cord hooks. Attach plug retainer clip onto the power cord.
- Empty the clean water tank (if necessary). Rinse it out before replacing on the unit. Open the clean water tank cap to allow it to air dry.
- Empty the dirty water tank then rinse, clean and dry before placing back on the unit. The wide tank opening is designed to fit your hand inside to thoroughly clean, rinse and dry.
- Store the spot cleaner in a dry and cool indoor area.
REPAIRS
Repairs for this spot cleaner should be performed only by qualified service person using only identical replacement parts.
TROUBLESHOOTING

WARNING: DISCONNECT ELECTRICAL SUPPLY BEFORE PERFORMING MAINTENANCE TO THE SPOT CLEANER. FAILURE TO DO SO COULD RESULT IN ELECTRICAL SHOCK OR PERSONAL INJURY.
| PROBLEM POSSIBLE CAUSE SOLUTION | ||
| The spot cleaner is not operational. | Unplugged at power outlet. Plug | in firmly to suitable power outlet. |
| Defective power outlet. | Check with a good appliance. Be sure the power cord plug is fully plugged into an electrical outlet. | |
| The motor is damaged. | Call customer service at 1-866-384-8432 for assistance. | |
| Poor pick-up performance. | Dirty water tank is not installed correctly. | Check the dirty water tank for correct installation. Ensure it is installed in place. |
| Dirty water tank is full. Empty the | dirty water tank. | |
| The flexible hose is clogged. | Clean the hose. | |
| Float valve is activated. Empty the | the dirty water tank. | |
| Water escapes from the spot cleaner. | Dirty water tank is full. Empty the | dirty water tank. |
| Dirty water tank is not installed correctly. | Check the dirty water tank for correct installation. Ensure it is installed in place. | |
| Clean water tank is not installed correctly. | Check the clean water tank for correct installation. Ensure it is installed in place. | |
| No solution spraying out. | Clean water tank is empty. Fill the | clean water tank. |
| Clean water tank is not installed correctly. | Check the clean water tank for correct installation. Ensure it is installed in place. | |
| PROBLEM POSSIBLE CAUSE SOLUTION | ||
| Hose nozzle will not spray after filling the clean water tank. | Air is trapped in the pump and hose. | Turn on the spot cleaner. If hose does not spray, prime the pump by lowering the hose down to the floor and hold the trigger for up to 1 minute. |
| Motor noise becomes high-pitched. | Dirty water tank is full. Empty the The flexible hose is clogged. Clean the hose. | dirty water tank. |
| The float in the dirty water tank has been activated. | Empty and clean the dirty water tank. | |
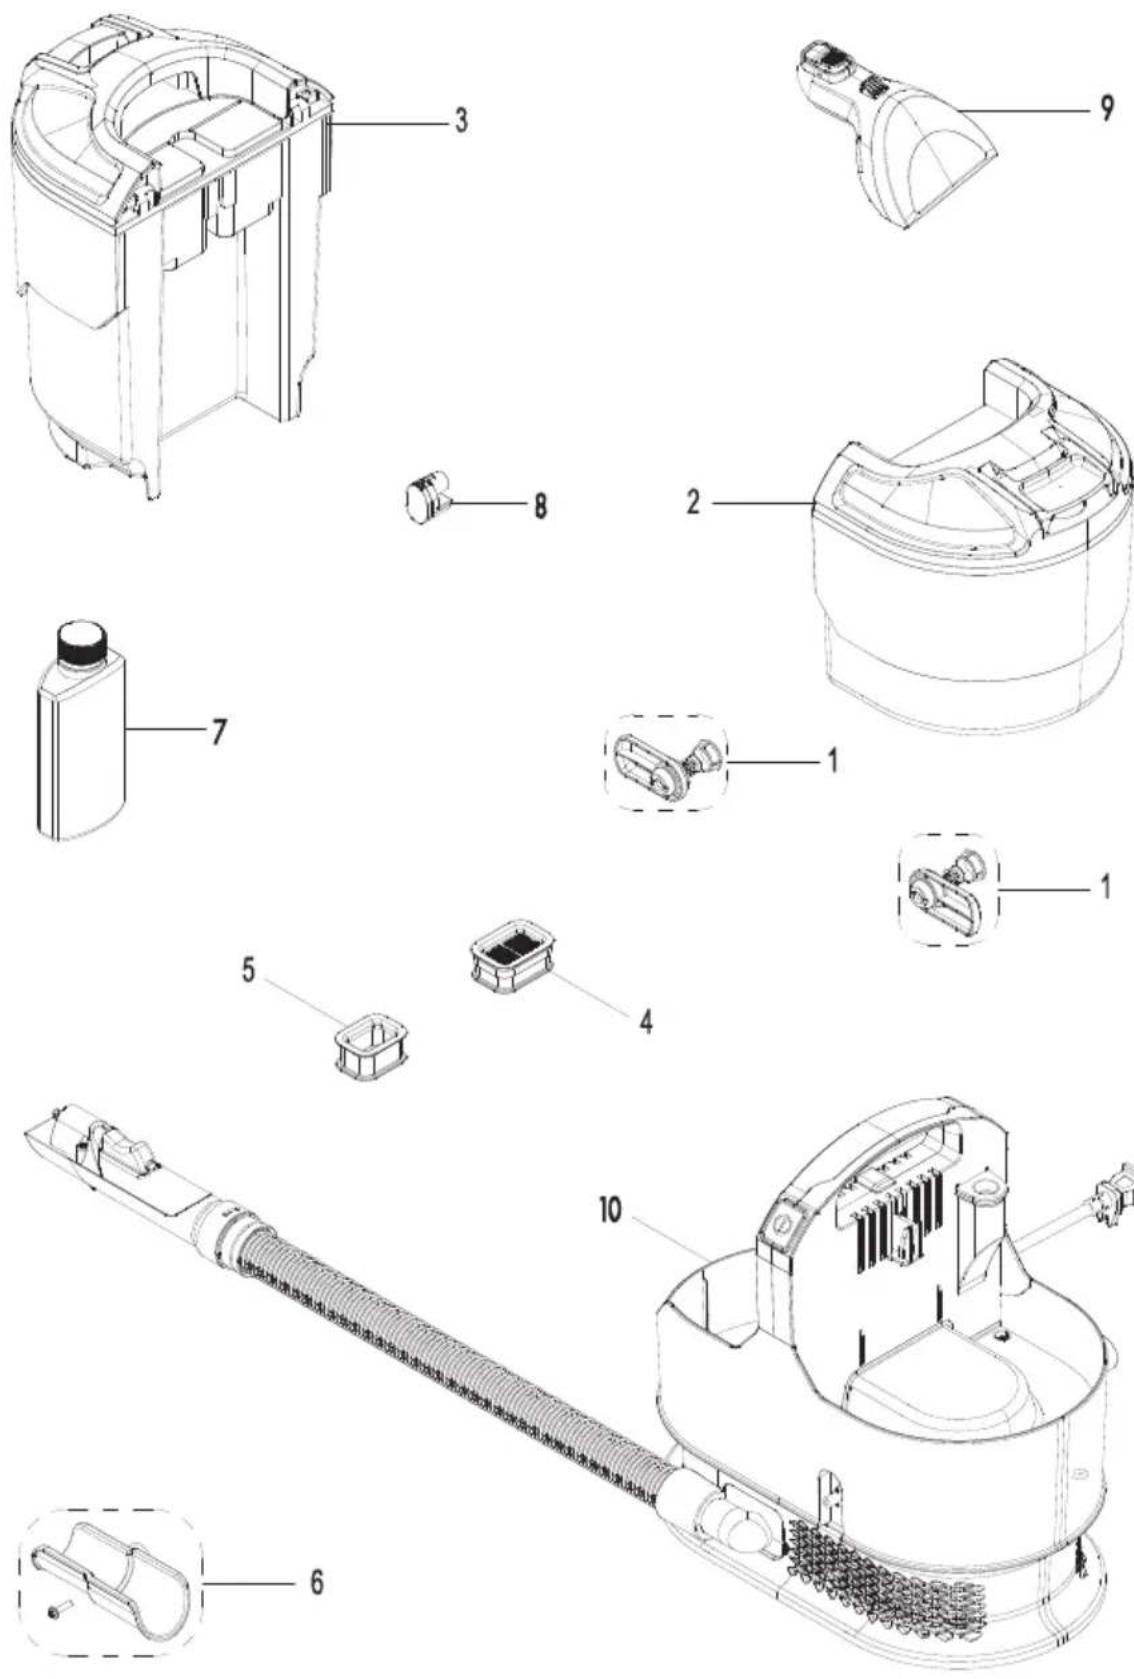
EXPLODED VIEW
PARTS LIST
| Part Part Number Description Quantity | |
| 1 671013101 Cord Hook Assembly 2 | |
| 2 671013102 Clean Water & Solution Tank 1 | |
| 3 671013103 Dirty Water Tank 1 | |
| 4 671005103 Filter Cover Assembly 1 | |
| 5 671005102 Seal Ring 1 | |
| 6 671013104 Tool Storage Holder 1 | |
| 7 Cleaning Solution 1 | |
| 8 671013106 Hose Cleaning Tool 1 | |
| 9 671013107 Tough Stain Nozzle 1 | |
| 10 Powerhead Assembly 1 |