AA07V2 0901 - Vacuum Cleaner Armor All - Free user manual and instructions
Find the device manual for free AA07V2 0901 Armor All in PDF.


User questions about AA07V2 0901 Armor All
0 question about this device. Answer the ones you know or ask your own.
Ask a new question about this device
Download the instructions for your Vacuum Cleaner in PDF format for free! Find your manual AA07V2 0901 - Armor All and take your electronic device back in hand. On this page are published all the documents necessary for the use of your device. AA07V2 0901 by Armor All.
USER MANUAL AA07V2 0901 Armor All
natural_image
Black cylindrical device with a small button labeled 'Power' on its side (no visible text or symbols on the device body)- Model No.
Read and understand this manual before use. Keep this manual for future reference.
POUR GARANTIR VOTRE SÉCURITÉ
Important Safety Instructions 3
Unpacking & Checking Carton Contents 6
Operation 7
Maintenance 9
Troubleshooting 11
Exploded View 12
Parts List 13
Thank you for purchasing this Armor All ^® 7.4 volt handheld car vacuum. Feel confident that with our Armor All ^® handheld car vac you are obtaining a high-quality product engineered for optimal performance. This vacuum is capable of picking up dry materials.
FOR YOUR SAFETY: CAREFULLY READ AND UNDERSTAND ALL INSTRUCTIONS.
WARRANTY
We take pride in producing a high-quality, durable product. This vacuum carries a limited one (1) year warranty against defects in workmanship and materials from date of purchase (or, for deliveries in the State of California, one year from the date of delivery), under normal household use. Please keep your receipt as proof of purchase. This warranty gives you specific legal rights, and you may have other rights, which vary from state to state.
For customer service please call 1-866-384-8432.
Not Covered by Warranty:
- Any part that has become inoperative due to misuse, negligence, direct/indirect abuse, accidents, improper maintenance, repairs or alterations;
- Consumables such as filters and accessories;
- Normal wear and tear of parts and attachments, such as nozzles or filters;
- Normal deterioration of the exterior finish due to use or exposure;
- Any product where serial number/data label is tampered with or removed;
- Any product purchased from an unauthorized retailer.
EN
IMPORTANT SAFETY INSTRUCTIONS
READ AND UNDERSTAND ALL INSTRUCTIONS BEFORE USING THIS VACUUM.
Read and understand this operator's manual and all labels on the vacuum cleaner before operating. Safety is a combination of common sense, staying alert and knowing how your vacuum works. Use this vacuum only as described in this manual. To reduce the risk of personal injury or damage to your vacuum, use only manufacturer recommended accessories.
SAVE THIS MANUAL FOR FUTURE REFERENCE.
When using a vacuum, basic precautions should always be followed including the following. Failure to follow the warnings and instructions may result in explosion, fire and/or serious injury.

WARNING: TO REDUCE THE RISK OF FIRE, ELECTRIC SHOCK OR INJURY:
- Do not run vacuum unattended.
- Do not use outdoors or on wet surfaces.
- Do not use to pick up flammable or combustible liquids, such as gasoline, or use in areas where they may be present.
- Do not vacuum, or use this vacuum near flammable liquids, gases, or explosive vapors like gasoline or other fuels, lighter fluids, cleaners, oil-based paints, natural gas, hydrogen, or explosive dust like coal dust, magnesium dust, grain dust, or gun powder. Sparks inside the motor can ignite flammable vapors or dust.
- To reduce the risk of health hazards from vapors or dust, do not vacuum toxic materials.
- Do not use or store near hazardous materials.
- Do not pick up anything that is burning or smoking, such as cigarettes, matches, or hot ashes.
- Do not pick up hard or sharp objects such as glass, nails, screws, coins, etc.
- Use only on dry, indoors surfaces.
- Do not expose to rain. Store indoors.
- If vacuum is not working as it should, has been dropped, damaged, left outdoors, or dropped into water, return it to a service center.
- Do not allow to be used as a toy. Close attention is necessary when used by or near children.
- Do not put any object into openings. Do not use with any opening blocked; keep free of dust, lint, hair, and anything that may reduce air flow.
- Keep hair, loose clothing, fingers, and all parts of body away from openings and moving parts.
- Do not unplug by pulling on cord. To unplug, grasp the plug, not the cord.
-
Do not handle vacuum, charger, charger plug, or charger terminal, with wet hands.
-
Do not charge the vacuum outdoors.
- Use only the charger supplied by the manufacturer to recharge.
- Do not incinerate the appliance even if it is severely damaged. The batteries can explode in a fire.
- Be careful not to pinch the cord in the vehicles' doors, windows or levers.
- Do not use with damaged cord or plug.
- Do not pull or carry by cord, use cord as a handle, close a door on cord, or pull cord around sharp edges or corners.
- Keep cord away from heated surfaces.
- Do not use without filters in place.
- To reduce the risk of injury from accidental starting, ensure the power is OFF before changing or cleaning filter.
- Use extra care when cleaning stairs.
- Turn off the vacuum before connecting or disconnecting accessories.
- Prevent unintentional starting. Ensure the power is OFF before picking up or carrying the vacuum. Carrying the vacuum with your finger on the power button can cause the vacuum to turn on and cause accidents.
- Keep the temperature range between 40°F (4°C) and 100°F (40°C) when charging battery, storing machine or during use.
- Recharge only with the charger specified by the manufacturer. A charger that is suitable for one type of battery pack may create a risk of fire when used with another battery pack.
- Under abusive conditions, liquid may be ejected from the battery; avoid contact. If contact accidentally occurs, flush with water. If liquid contacts eyes, additionally seek medical help. Liquid ejected from the battery may cause irritation or burns.
- Do not expose a vacuum to fire or excessive temperature. Exposure to fire or temperature above 265°F (130°C) may cause explosion.
- Follow all charging instructions and do not charge the vacuum outside of the temperature range specified in the instructions. Charging improperly or at temperatures outside of the specified range may damage the battery and increase the risk of fire.
- Have servicing performed by a qualified repair person using only identical replacement parts. This will ensure that the safety of the product is maintained.
- Do not modify or attempt to repair the vacuum except as indicated in the instructions for use and care.
- Use only as described in this manual. Use only manufacturer's recommended attachments.
- Use only with Listed/Certified ITE equipment/power supply or Class II power unit.

CAUTION: TO REDUCE THE RISK OF INJURY FROM MOVING PARTS - TURN OFF THE VACUUM BEFORE CLEANING OR SERVICING.
FCC COMPLIANCE
This device complies with part 15 of the FCC Rules. Operation is subject to the following two conditions:
- This device may not cause harmful interference.
- This device must accept any interference received, including interference that may cause undesired operation.
NOTE: This equipment has been tested and found to comply with the limits for a Class B digital device, pursuant to part 15 of the FCC Rules. These limits are designed to provide reasonable protection against harmful interference in a residential installation.
This equipment generates, uses and can radiate radio frequency energy and, if not installed and used in accordance with the instructions, may cause harmful interference to radio communications. However, there is no guarantee that interference will not occur in a particular installation. If this equipment does cause harmful interference to radio or television reception, which can be determined by turning the equipment off and on, the user is encouraged to try to correct the interference by one or more of the following measures:
- Reorient or relocate the receiving antenna.
- Increase the separation between the equipment and receiver.
- Connect the equipment into an outlet on a circuit different from that to which the receiver is connected
- Consult the dealer or an experienced radio / TV technician for help.
CAN ICES-3 (B)/NMB-3(B)
Product Disposal
This product contains an internal Lithium-ion battery pack formulated from environmentally sensitive materials. This product must be disposed of properly with due care for the environment. Do not dispose of product with household garbage. Consult your local waste authority for information regarding available recycling or disposal options.

Li-ion
RECYCLE OR DISPOSE OF IN ACCORDANCE WITH FEDERAL AND LOCAL REGULATIONS.
SAVE THESE INSTRUCTIONS
For Household Use Only
UNPACKING & CHECKING CARTON CONTENTS
A
B
C
D
E

F

Remove all contents from the carton. Check each item against the carton contents list.
Carton Contents List:
Key Description
Qty.
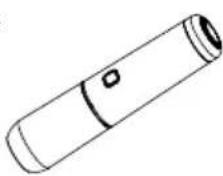
A Car Vacuum Assembly ....1
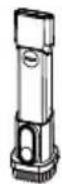
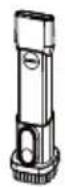
B 2-in-1 Crevice Tool and Brush .....1
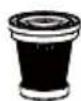
C Reusable Washable Filter .....1
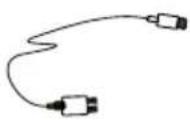
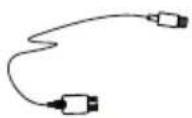
D Charging Cord ....1
E Storage Bag 1
F Operator's Manual ....1
text_image
5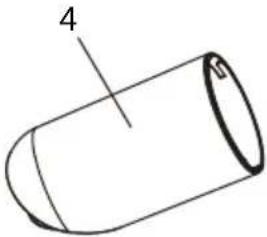
text_image
4 s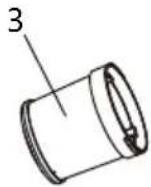
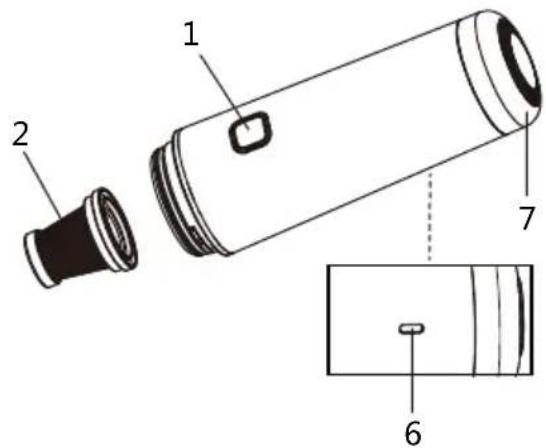
text_image
Technical diagram of a thermos flask with labeled parts and exploded viewComponents:
- On/Off Button
- Reusable Washable Filter
- Filter Holder
- Dust Cup
- Front Cover
- Charging Port
- Battery Indicator
OPERATION
natural_image
Simple line drawing of a pipe fitting with a cable and a sensor inserted (no text or symbols)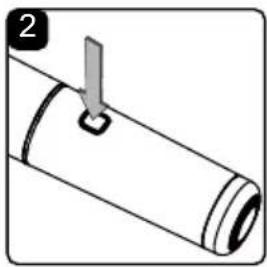
natural_image
Diagram of a cylindrical object with a pointed tip and a labeled arrow (no text or symbols present)CHARGING THE VACUUM

WARNING: BEFORE CHARGING, MAKE SURE THE VACUUM IS TURNED OFF.
NOTE: Before using the vacuum for the first time, charge vacuum to full capacity. Suggested to use a 5V/2A or 5V/3A power adapter (not included) with the type-C charging cord (included) to charge the unit. The charging time is 3.5-4 hours.
- Connect the type-C charging cord to an appropriate adapter and plug into a wall outlet.
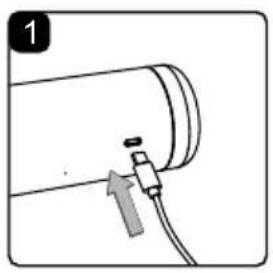
- Insert the charging cord into the charging port on bottom of the vacuum (Fig. 1).
- The battery indicator on the vacuum will pulse blue while charging. When the battery is fully charged, the battery indicator light will glow a constant blue and will turn off after 1 hour.
NOTE: If the battery indicator does not pulse blue when charging, check to ensure that the charging cord is fully inserted into the charging port on the vacuum, and is properly plugged into the adapter and the wall outlet.
- Remove the charging cord from the vacuum. Remove the charging adapter from the outlet.
- When the battery needs to be re-charged, the battery indicator light will begin to flash blue to indicate it is time to charge the vacuum. The blue flashing will continue until the vacuum is charged or is completely out of battery power.
USING THE VACUUM
- Make sure that the vacuum is fully charged before use.
- Your vacuum comes ready for dry vacuum cleaning. If the filter is not installed, refer to page 9-10 for installation instructions.
- To power on the vacuum, press the On/Off button (Fig. 2). Once turned on, the battery indicator lights up blue.
- To power off the vacuum, press the On/Off button again. The battery indicator goes out.
natural_image
Diagram of a cylindrical device with an arrow indicating a change or insertion process (no text or symbols present)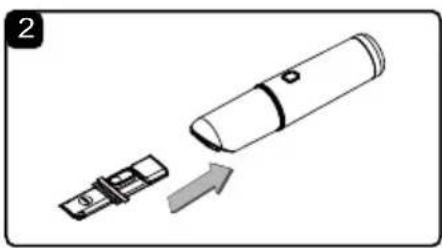
natural_image
Diagram showing a device being inserted into a cylindrical device with an arrow indicating direction (no text or symbols present)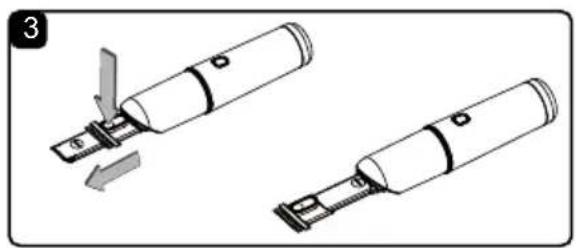
natural_image
Two mechanical components with arrows indicating assembly or movement, no visible text or symbols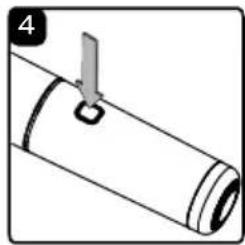
natural_image
Simple line drawing of a cylindrical object with a clip attached, no text or symbols present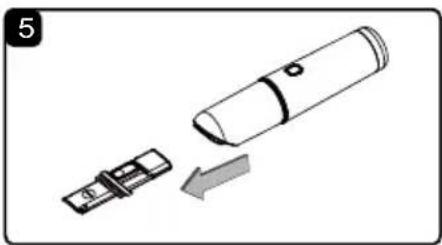
natural_image
Diagram showing a device being inserted into a cylindrical device with an arrow indicating the process (no text or symbols present)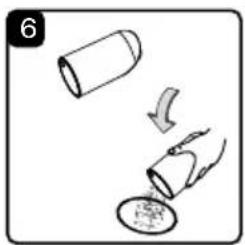
natural_image
Simple line drawing showing a cylindrical object being dropped into a container with liquid, no text or symbols present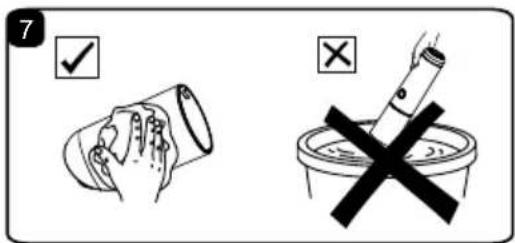
text_image
7 ✓ ×OPERATING INSTRUCTIONS: DRY VACUUMING
The vacuum should be used with the included 2-in-1 crevice tool and brush. For use with the tool:
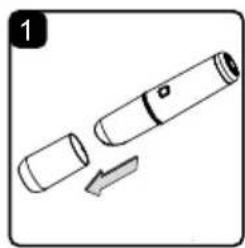
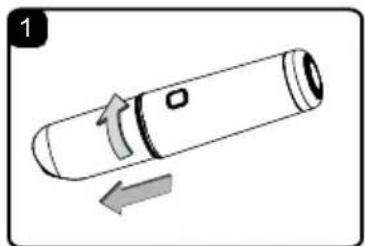
- Verify that the vacuum is turned off. Remove the front cover (Fig. 1).
- Insert the tool into the end of the dust cup until secured in place (Fig. 2).
- The tool can be used as a crevice tool or as a dusting brush. To use as a dusting brush, simply squeeze the release button and shift the brush forward to the end of the tool until a click is heard (Fig. 3).
To return the tool to crevice tool mode, press the release button and slide the brush down the tool until it clicks into place.
Use the tool in crevice tool mode to clean between tight spaces. Use in dusting brush mode for cleaning loose surfaces such as drapes. - Turn the vacuum on by pressing the On/Off button and begin vacuuming (Fig. 4).
- After use, turn the vacuum off. Remove the tool from the dust cup by pulling it out (Fig. 5).
- Remove the dust cup by rotating it counter-clockwise and pulling the dust cup away from the vacuum. Remove the reusable washable filter and the filter holder. Refer to page 10 for removal instructions.
- Empty the dust cup, clean and dry the inside and outside before storage (Fig. 6 & 7).
IMPORTANT!
The vacuum is designed for dry vacuuming only. Do not use this vacuum for cleaning up liquids.
MAINTENANCE
natural_image
Diagram of a cylindrical device with an arrow indicating rotation and direction (no text or symbols)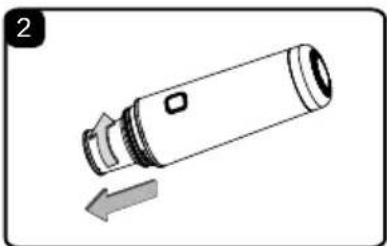
natural_image
Simple line drawing of a cylindrical device with a left-pointing arrow indicating direction (no text or symbols)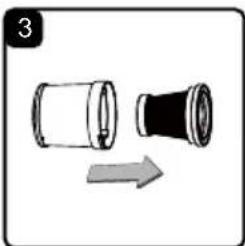
natural_image
Diagram showing a cylindrical object with an arrow pointing to a black-and-white component, no text or symbols present.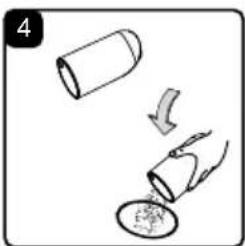
natural_image
Simple line drawing showing a cylindrical object being dropped into a container with a curved arrow indicating motion (no text or symbols)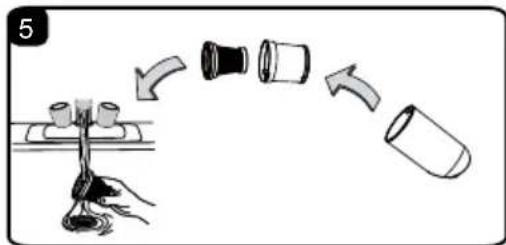
text_image
5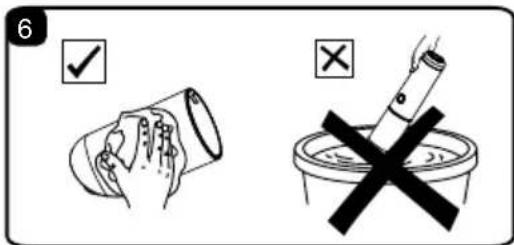
text_image
6 ✓ ×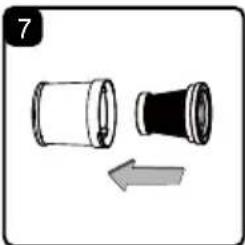
natural_image
Diagram showing two mechanical components with an arrow indicating rotation (no text or symbols)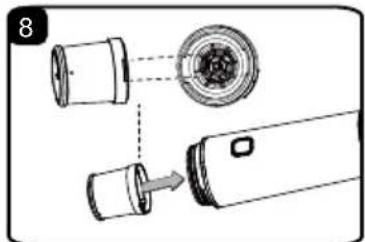
natural_image
Diagram showing a device with internal components and an arrow indicating direction (no text or symbols)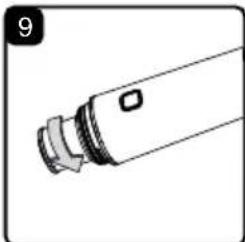
natural_image
Simple line drawing of a cylindrical object with a handle and a small square mark, no text or symbols present.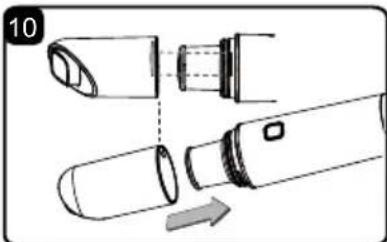
natural_image
Diagram of a device being cut with an arrow indicating rotation (no text or symbols present)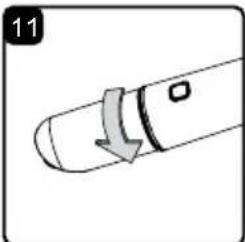
natural_image
Simple line drawing of a pen tip with an arrow indicating direction (no text or symbols)CLEANING & REPLACING FILTER

WARNING: BEFORE CLEANING, MAKE SURE THE VACUUM IS TURNED OFF.

WARNING: DO NOT USE ALCOHOL, ACETONE, BENZENE, AGGRESSIVE CLEANING AGENTS, ETC., TO CLEAN THE SYNTHETIC PARTS OF THE DEVICE. DO NOT USE HARD BRUSHES OR METALLIC OBJECTS.
NOTE: The filter is re-usable and should be cleaned regularly. For best performance, it is suggested to clean the filter after every use.

WARNING: IF THE MACHINE IS USED WITHOUT THE FILTER, THE MOTOR WILL BURN OUT AND THE WARRANTY WILL BE VOIDED. ALWAYS KEEP SPARE FILTERS ON HAND.
NOTE: A dry filter is necessary to pick up dust. If the filter is wet, it will clog quickly and be very difficult to clean. If wet, let the filter completely air dry before using it for dry pick-up. Handle the filter carefully when removing it for cleaning and replacing. Check the filters for tears or small holes. A small hole can let dust pass through and out of the filter. Do not use a filter with holes or tears; replace it immediately. Call customer service at 1-866-384-8432 for replacement filter.

WARNING: DO NOT USE THE FILTER UNTIL IT HAS COMPLETELY DRIED.
- Verify that the vacuum is turned off.
- Hold and rotate the dust cup counter-clockwise and pull the dust cup away from the vacuum (Fig. 1).
- Rotate the filter holder counter-clockwise and remove it from the vacuum (Fig. 2).
- Remove the reusable washable filter from the filter holder, and then clean any loose dust off the filter with a soft bristle brush (Fig. 3).
- Empty all debris and any dust from the dust cup (Fig. 4).
- Use a mild soap and water solution to wash the filter and rinse with clean water, air dry and re-insert filter once completely dry (Fig. 5).
- Allow the wet filter to air dry for 24 hours before fitting into the dust cup. For optimal performance, a new filter is recommended after 12 months.
- Make sure the dust cup, the filter holder and reusable washable filter are clean and dry before using it again. DO NOT immerse the vacuum in water (Fig. 6).
- Clean the vacuum housing using a damp cloth. Make sure no fluid enters the housing.
- Refit the reusable washable filter into the filter holder (Fig. 7). If required, replace with new filter.
- Align and insert the filter holder together with the filter into the vacuum. Rotate the filter holder clockwise to secure (Fig. 8 & 9).
- Align and refit the dust cup onto the vacuum. Rotate the dust cup clockwise to secure (Fig. 10 & 11).
- Refit the front cover onto the vacuum.

CAUTION: CLEANING THE FILTER SHOULD NOT BE DONE INDOORS IN LIVING AREAS.

WARNING: NEVER USE THE VACUUM WITHOUT THE FILTER INSTALLED.
IMPORTANT! To assure product SAFETY and RELIABILITY, repairs, maintenance, and adjustments (other than those listed in this manual) should be performed by an authorized service center or other qualified service technicians, always using identical replacement parts.
STORAGE
Before storage, empty the dust cup. Clean and dry the inside and outside of the dust cup. The accessories should be cleaned and stored so they can be readily available when needed. Place the vacuum in the storage bag. Store the vacuum indoors.
REPAIRS
Repairs for this car vacuum should be performed only by qualified service person using only identical replacement parts.
TROUBLESHOOTING

WARNING: TO REDUCE THE RISK OF ELECTRIC SHOCK, TURN OFF THE VACUUM BEFORE TROUBLESHOOTING.
| PROBLEM POSSIBLE CAUSE SOLUTION | ||
| The vacuum will not operate. | The battery pack is discharged. | Charge the vacuum. |
| Hand vacuum or battery is damaged. | Call customer service at 1-866-384-8432 for assistance. | |
| Dust is being released through the vents. | The filter is missing or damaged. | Attach or replace the filter. |
| Reduced efficiency and motor/speed vibration. | There are blockages in the nozzle, or the vacuum inlets. | Turn off the vacuum and check nozzle, and inlets for blockages. |
| The filter is clogged by fine dust. | Take off the filter and clean it or install a new filter. | |
| Dust cup full. | Empty the dust cup and clean the filter. | |
| The vacuum will not charge. | Charging cord is not inserted into the charging port on the vacuum firmly. | Be sure the charging cord is fully inserted into the charging port on the vacuum, and is properly plugged into the adapter and the wall outlet. |
| The charging cord is damaged. | Replace the charging cord. Call customer service at 1-866-384-8432 for assistance. | |
| Dust accumulated on the charging port of the vacuum. | Clean off any dust accumulated on the charging port of the vacuum. | |
| The battery indicator is damaged. | Call customer service at 1-866-384-8432 for assistance. | |
| No power at electrical outlet. | Check circuit breakers. Replace the charging adapter. | |
| The battery is damaged. | Call customer service at 1-866-384-8432 for assistance. | |
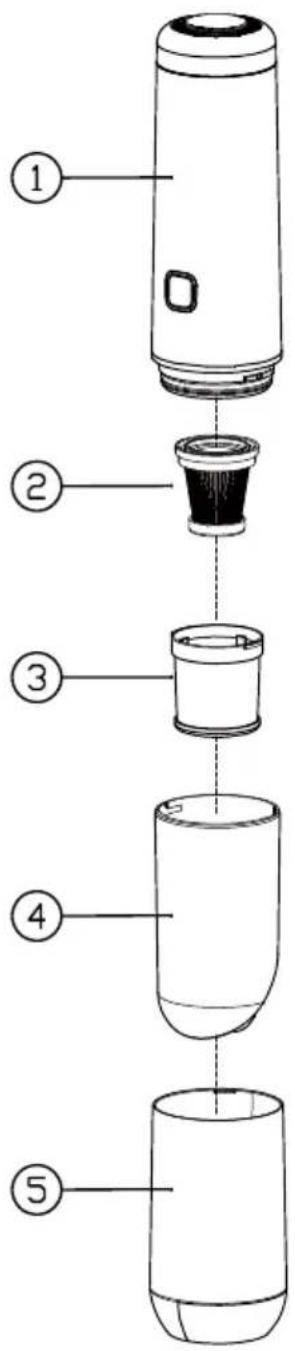
EXPLODED VIEW
text_image
Exploded view diagram of a device with numbered parts for identification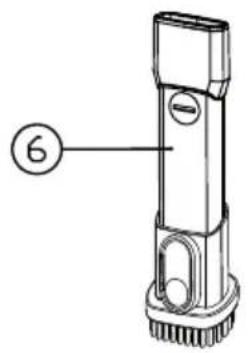
text_image
⑥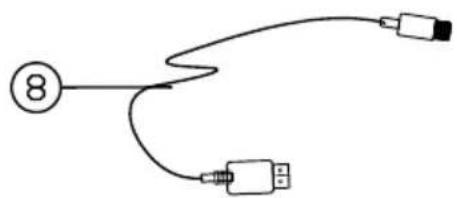
flowchart
graph TD
    A["8"] --> B["USB Device"]
    A --> C["USB Device"]
natural_image
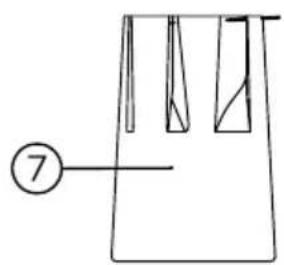
Simple line drawing of a container with three vertical strips and a numbered label (7) pointing to one strip, no text or symbols present.PARTS LIST
| Part Part | Number Description Quantity | ||
| 1 Powerhead Assembly 1 | |||
| 2 56111 | 7101 Reusable Washable Filter 1 | ||
| 3 56111 | 7102 Filter Holder 1 | ||
| 4 Dust Cup 1 | |||
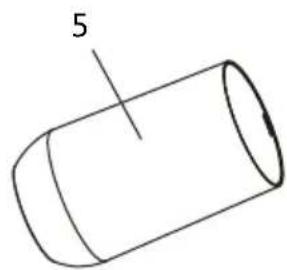
| 5 Front Cover 1 | |||
| 6 56111 | 7105 2-in-1 Crevice Tool and Brush 1 | ||
| 7 56111 | 7106 Storage Bag 1 | ||
| 8 56111 | 7107 Charging Cord | 1 | |
SOMMAIRE
SECTION
PAGE
Garantie 14
natural_image
Simple line drawing of a cylindrical object with a small circular mark on its side (no text or symbols)B
C

D
E

F

text_image
Technical diagram of a device with labeled parts, showing exploded and assembled viewsCOMPOSANTS :
natural_image
Simple line drawing of a pipe fitting with a cable and a small component, no text or symbols present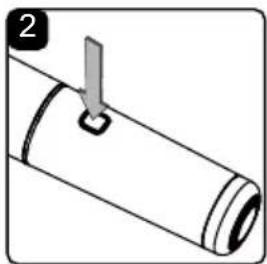
natural_image
Diagram of a cylindrical object with a pointed tip and a small square mark, labeled with number 2 (no text or symbols on the object itself)CHARGEMENT DE L'ASPIRATEUR

AVERTISSEMENT : AVANT DE PROCÉDER À LA CHARGE, ASSUREZ-VOUS QUE L'ASPIRATEUR EST HORS TENSION.
natural_image
Diagram of a cylindrical device with an arrow indicating a change or insertion process (no text or symbols present)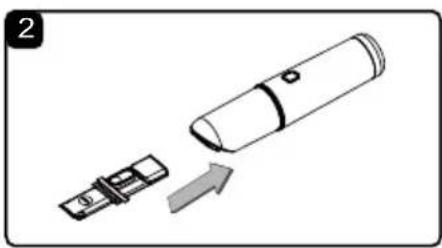
natural_image
Diagram showing a device being inserted into a cylindrical device with an arrow indicating insertion (no text or symbols present)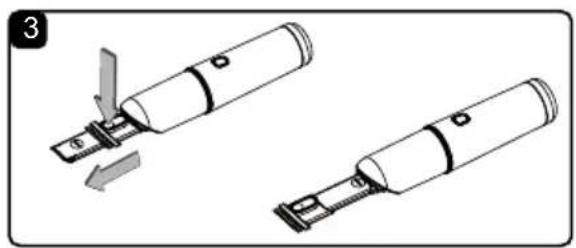
natural_image
Two mechanical components with arrows indicating assembly or movement, no visible text or symbols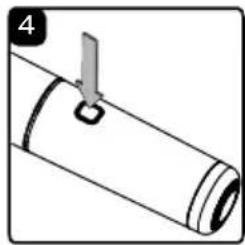
natural_image
Simple line drawing of a cylindrical object with a clip attached, no text or symbols present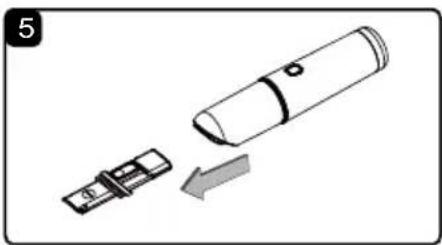
natural_image
Diagram showing a device being inserted into a cylindrical device with an arrow indicating the process (no text or symbols present)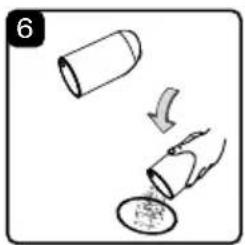
natural_image
Simple line drawing showing a cylindrical object being dropped into a container with liquid, no text or symbols present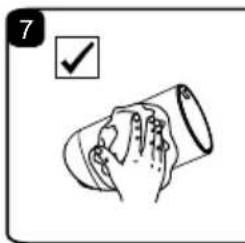
natural_image
Simple line drawing of a hand holding a cylindrical object with a checkmark above it (no text or symbols)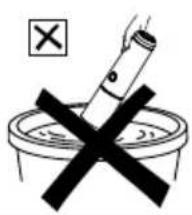
text_image
Lightbulb symbol crossed out of a bowl, indicating no smoking or rejectionOINSTRUCTIONS D'UTILISATION – ASPIRATION DE POUSSIÈRES
natural_image
Diagram of a cylindrical device with an arrow indicating rotation and direction (no text or symbols)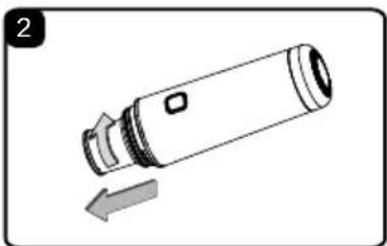
natural_image
Simple line drawing of a cylindrical device with a left-pointing arrow indicating motion (no text or symbols)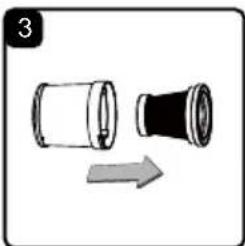
natural_image
Diagram showing a cylindrical object with an arrow pointing to a black-and-white object, no text or symbols present.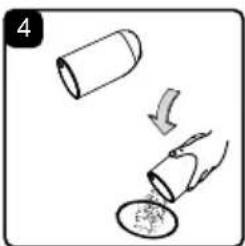
natural_image
Simple line drawing showing a cylindrical object being dropped into a container with a curved arrow indicating motion (no text or symbols)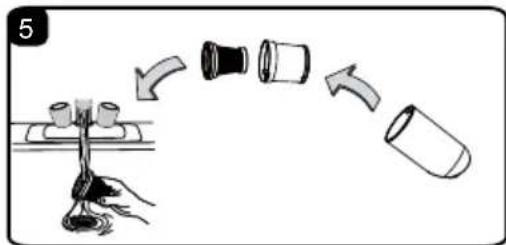
text_image
5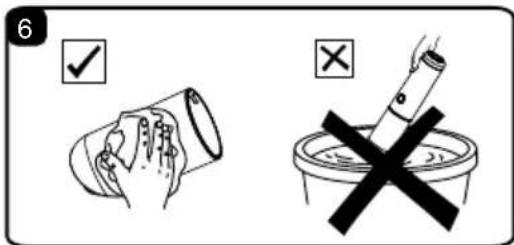
text_image
6 ✓ ×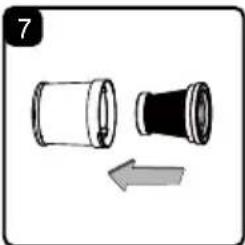
natural_image
Diagram showing two mechanical components with an arrow indicating rotation (no text or symbols)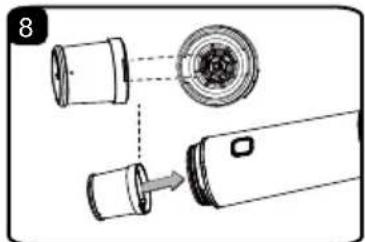
natural_image
Diagram showing a device with two ports and a circular component, no text or symbols present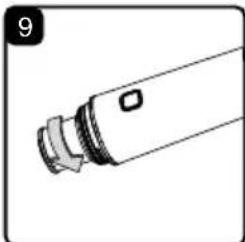
natural_image
Simple line drawing of a cylindrical object with a small protrusion and a label '9' in the corner (no text or symbols on the object itself)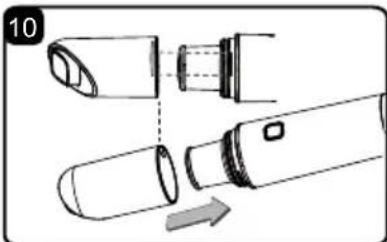
natural_image
Diagram of a device being processed into a cylindrical component, showing internal structure and motion direction (no text or symbols)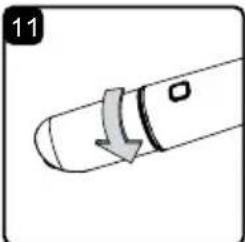
natural_image
Simple line drawing of a pen tip with an arrow indicating direction (no text or symbols)NETTOYAGE ET REMPLACEMENT DU FILTRE

AVERTISSEMENT : AVANT LE NETTOYAGE, ASSUREZ-VOUS QUE L'ASPIRATEUR EST HORS TENSION.

AVERTISSEMENT : N'UTILISEZ PAS D'ALCOOL, D'ACÉTONE, DE BENZÈNE, DE PRODUITS DE NETTOYAGE AGRESSIFS, ETC. POUR NETTOYER LES PARTIES SYNTHÉTIQUES DE L'APPAREIL.N'UTILISEZ PAS DE BROSSES DURES OU D'OBJETS MÉTALLIQUES.
text_image
Diagram of a device's internal structure with numbered parts for identification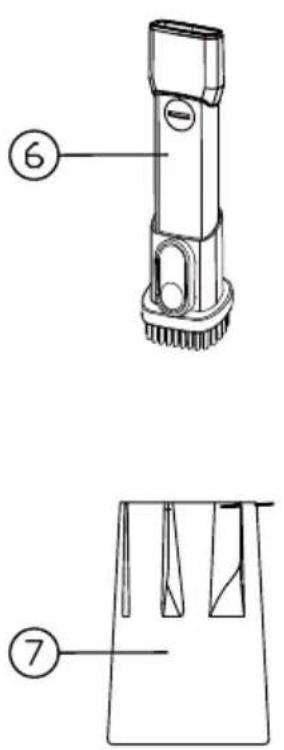
text_image
Technical diagram showing two views of a device with numbered annotations (6 and 7) indicating different components.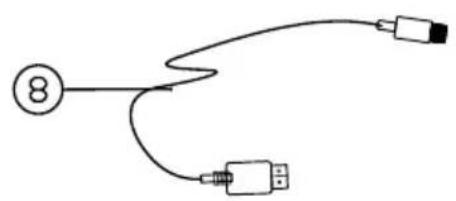
flowchart
graph TD
    A["8"] --> B["USB Device"]
    A --> C["USB Device"]
LISTE DES PIÈCES
text_image
Technical diagram of a thermos flask with labeled parts and exploded viewCOMPONENTES:
natural_image
Simple line drawing of a pipe fitting with a cable and a sensor inserted (no text or symbols)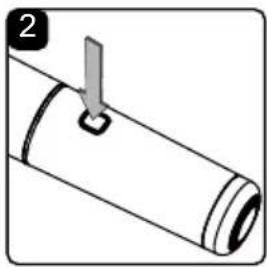
natural_image
Diagram of a cylindrical object with a pointed tip and a labeled arrow (no text or symbols present)CÓMO CARGAR LA ASPIRADORA

natural_image
Diagram of a cylindrical device with an arrow pointing to it, showing internal components (no text or symbols)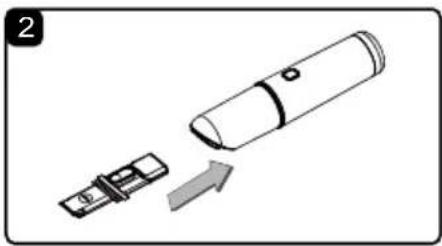
natural_image
Diagram showing a device being inserted into a cylindrical device with an arrow indicating direction (no text or symbols present)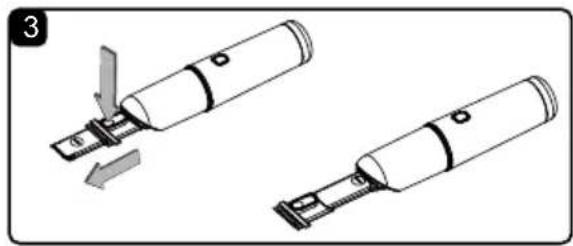
natural_image
Diagram showing two mechanical components with a tool inserted, no text or symbols present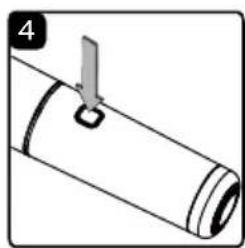
natural_image
Simple line drawing of a cylindrical object with a clip attached, no text or symbols present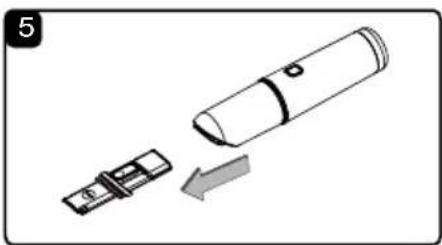
natural_image
Diagram showing a device being inserted into a cylindrical component with an arrow indicating direction (no text or symbols present)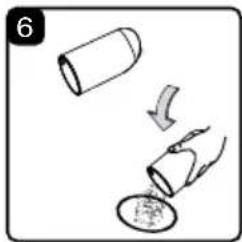
natural_image
Simple line drawing showing a cylindrical object being dropped into a container with liquid, no text or symbols present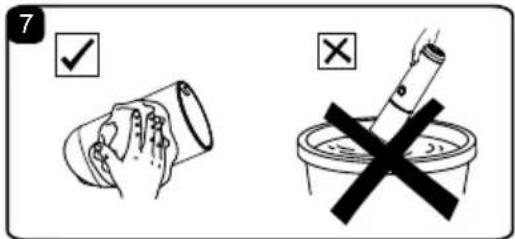
text_image
7 ✓ ×natural_image
Diagram of a cylindrical device with an arrow indicating rotation and direction (no text or symbols)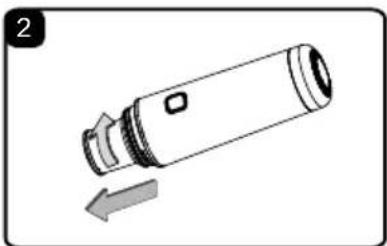
natural_image
Simple line drawing of a cylindrical device with a left-pointing arrow indicating motion (no text or symbols)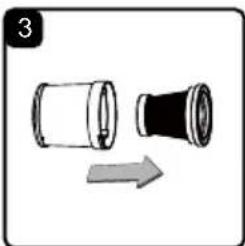
natural_image
Diagram showing a cylindrical object with an arrow pointing to a black-and-white component, no text or symbols present.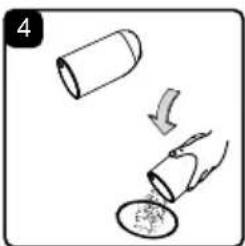
natural_image
Simple line drawing showing a cylindrical object being dropped into a container with a curved arrow indicating motion (no text or symbols)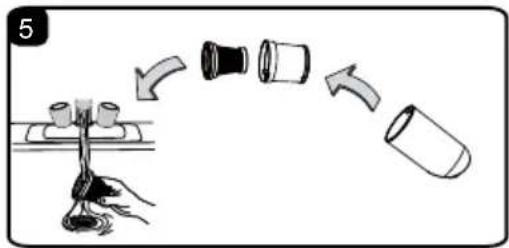
text_image
5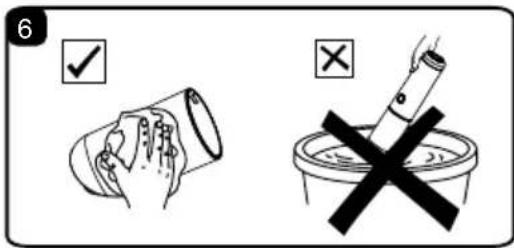
text_image
6 ✓ ×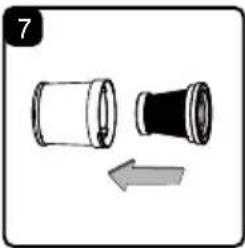
natural_image
Diagram showing a cylindrical object with a pointed tip and a black funnel-like object with an arrow indicating rotation (no text or symbols)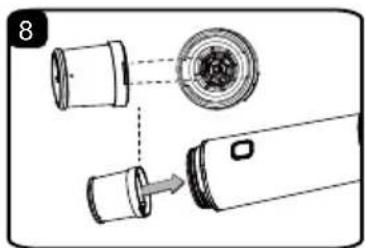
natural_image
Diagram showing a device with internal components and an arrow indicating direction (no text or symbols)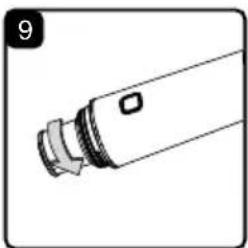
natural_image
Simple line drawing of a cylindrical object with a small protrusion and a label '9' in the corner (no text or symbols on the object itself)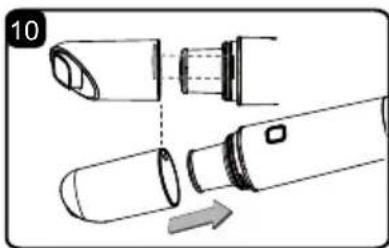
natural_image
Diagram of a device being processed into a cylindrical component, showing internal structure and motion direction (no text or symbols)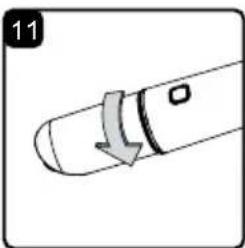
natural_image
Simple line drawing of a pen tip with an arrow indicating direction (no text or symbols)LIMPIEZA Y REEMPLAZO DE FILTRO

text_image
Diagram of a device with numbered parts, showing a vertical assembly from top to bottom.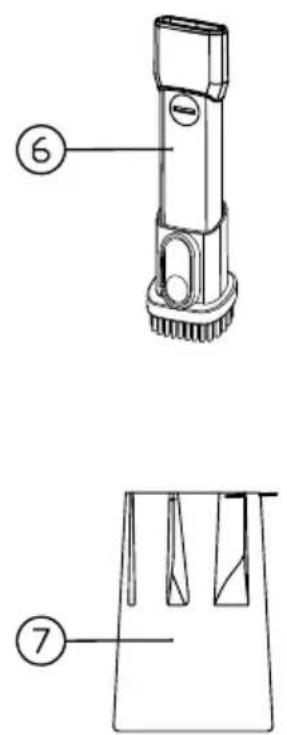
text_image
Technical diagram showing two views of a mechanical device with numbered annotations (6 and 7) indicating different components.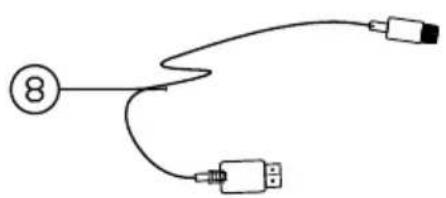
flowchart
graph TD
    A["⑧"] --> B["USB Device"]
    A --> C["USB Device"]
    A --> D["USB Device"]
    A --> E["USB Device"]