DW90F89T0U12 - Washing machine SAMSUNG - Free user manual and instructions
Find the device manual for free DW90F89T0U12 SAMSUNG in PDF.

User questions about DW90F89T0U12 SAMSUNG
0 question about this device. Answer the ones you know or ask your own.
Ask a new question about this device
Download the instructions for your Washing machine in PDF format for free! Find your manual DW90F89T0U12 - SAMSUNG and take your electronic device back in hand. On this page are published all the documents necessary for the use of your device. DW90F89T0U12 by SAMSUNG.
USER MANUAL DW90F89T0U12 SAMSUNG

Scan this with your smartphone
Scan the QR code to view our helpful installation videos.
Requires reader to be installed on your smartphone.
Contents
Safety instructions 3
Important safety symbols 3
California Proposition 65 Warning 4
Important safety instructions 4
Before using your dishwasher 5
Preparing the installation 6
Required parts and tools 6
Dimensions
Installation requirements 10
Unpacking and inspecting the dishwasher 11
Installation 13
Preparing the cabinet 13
Preparing the dishwasher for installation 15
Connecting the power cable 16
Placing the dishwasher into the cabinet 18
Connecting the drain hose 19
Leveling the dishwasher 21
Securing the dishwasher 23
Attaching the kick plate 25
Mounting the Bespoke panel (applicable models only) 26
Testing the dishwasher 29
Appendix 31
Specifications 31
English2
Safetyinstructions
Throughout this manual, you will see Warning and Caution notes. The warnings, cautions, and the important safety instructions that follow do not cover all possible conditions and situations that may occur. It is your responsibility to use common sense, caution, and care when installing, maintaining, and operating the dishwasher. Samsung is not liable for damages resulting from improper use.
Important safetysymbols
What the icons and signs in this installation guide mean:
WARNING
Hazards or unsafe practices that may result in severe personal injury or death.
CAUTION
Hazards or unsafe practices that may result in personal injury or property damage.
CAUTION
To reduce the risk of fire, explosion, electric shock, or personal injury when using the dishwasher, follow these basic safety precautions:
TE
Indicates that a risk of personal injury or material damage exists.
These warning signs are here to prevent injury to you and others.
Please follow them explicitly.
After reading this section, keep it in a safe place for future reference.
STOP
These installation instructions are intended for use by qualified installers.
If you are having problems installing this dishwasher
U.S.A
Please call: 1-800-SAMSUNG (726-7864)
1-844-SAM-PAYS(726-7297)
for assistance: www.samsung.com/us/support
CANADA
Please call: 1-800-SAMSUNG (726-7864)
for assistance: www.samsung.com/ca/support (English)
www.samsung.com/ca_fr/support(French)
SAVE THESE INSTRUCTIONS
English
Safety instructions
CaliforniaProposition65Warning
WARNING
Cancer and Reproductive Harm - www.P65Warnings.ca.gov
Important safety instructions
Read all instructions before using the appliance.
Install and store the dishwasher inside, away from exposure to weather.
CAUTION
- Do not install the dishwasher near electrical components. Keep the dishwasher away from open flames.
- Do not install the dishwasher on a carpet as this is a fire hazard.
- Do not install the dishwasher in a location where the water may freeze (where the temperature falls below 32^ ( 0^ )). Frozen water in the hoses or pipes may damage the dishwasher.
- As with all equipment using electricity, water, and moving parts, potential hazards exist. To safely operate this appliance, become familiar with its operation and exercise care when using it.
The dishwasher must be properly grounded. Never connect it to an ungrounded outlet.
Prior to removal of original dishwasher and the installation of your new unit, make sure to switch off your circuit breaker. Do not connect the dishwasher until you have completed the installation. Connecting the power cable is the last step when installing the dishwasher.
All wiring and grounding must be done in accordance with the electrical code applicable to the region.
GROUNDINGINSTRUCTIONS
For a permanently connected appliance:
This appliance must be connected to grounded metal, a permanent wiring system, or an equipment-grounding conductor must be run with the circuit conductors and connected to the equipment-grounding terminal or lead on the appliance.
The dishwasher is very heavy. Do not attempt to move or carry a dishwasher alone. Two or more people are needed to move a dishwasher and avoid potential injuries.
CAUTION
- If the power cable is damaged, it must be replaced by the manufacturer, a service agent or similarly qualified person in order to avoid a hazard.
- Do not touch the power cable with wet hands.
- Do not connect another appliance to the same power outlet as the dishwasher.
SAVE THESE INSTRUCTIONS
English4
Make sure to use a new water supply line. Old lines are susceptible to breakage because they become hardened and may cause property damage due to a water leakage.
The dishwasher must be connected to a hot water supply with a temperature between 120^ (49^) 149^ (65^) . This temperature range provides the best washing result and shortest cycle time.
Temperature should not exceed 149^ (65^) to prevent damage to dishes.
Ensure that the water supplied to the dishwasher does not freeze. Frozen water can damage the hoses, valves, pump, or other components.
Certified residential dishwashers are not intended for licensed food establishments.
(NSF/ANSI Standard 184 for Residential Dishwashers)
For a full list of safety information, please refer to the User Manual.
Beforeusingyourdishwasher
WARNING


Tip-OverHazard
- Do not use the dishwasher until it is correctly installed.
- Do not push down on the dishwasher door when it is open.
- Do not place excessive weight on the dishwasher door when it is open.
Electric Shock Hazard
Failure to follow these instructions can result in death, fire, or electric shock:
Electricallygroundthedishwasher.
- Connect the ground wire to the green ground connector in the junction box.
- Do not use an extension cord.
To reduce the risk of electric shock, fire, or injury to persons, the installer must ensure that the dishwasher is completely enclosed at the time of installation.
SAVE THESE INSTRUCTIONS
English
Preparingtheinstallation
Ensure all necessary preparations are complete before starting the installation process.
Requiredpartsandtools
Before beginning the installation, gather all the necessary tools and parts to save time and simplify the process.
Providedparts
The following parts are provided with the dishwasher. Verify that all parts are present when unpacking.

Mountingbracket(2)Kickplate Screw (4) - Mounting bracket

ProtectivestickerPlasticcap(4) Black screw (2) - Kick plate

Screw (2) - Bespoke door Plastic cap (2) - Bespoke door Dooropeningtool
English6
Partstobepurchasedeparately
The following parts are not included in the dishwasher and must be purchased separately.
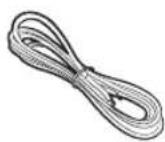
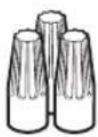
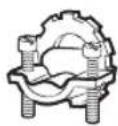
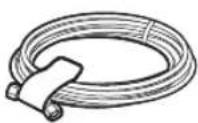
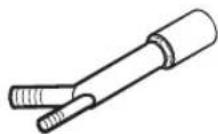
PowercableTwist-onwireconnector(3)Strainrelief


Electrical tape & Standard duct tape
Hotwatersupplyhose
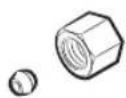
^3 / _4^n90^ Fitting
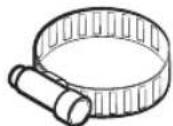
Tube fittings Airgap Hoseclamp
Recommendationsforunprovidedparts
| Hotwatersupplyhose | · Outerdiameter: 3/8"minimum · Material: Braided stainless-steel or copper with a compression fitting WARNING Do not use plastic water supply hoses, which can deteriorate and cause leaks. |
| 90°fitting | · Oneendwith 3/4" N.P.T. external pipe threads, and the other end must fit your hot water supply hose (copper with compression fittings or a stainless-steelbraidedhose). |
| Powercable | · Jacketed 12-2cablewithground. ●TE Some local codes may require a BX-style metal jacket for the power cable. |
Preparing the installation
Requiredtools

English8
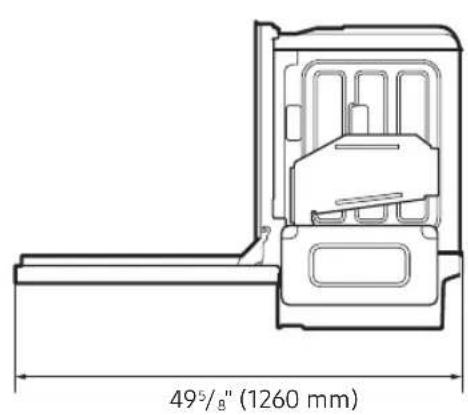
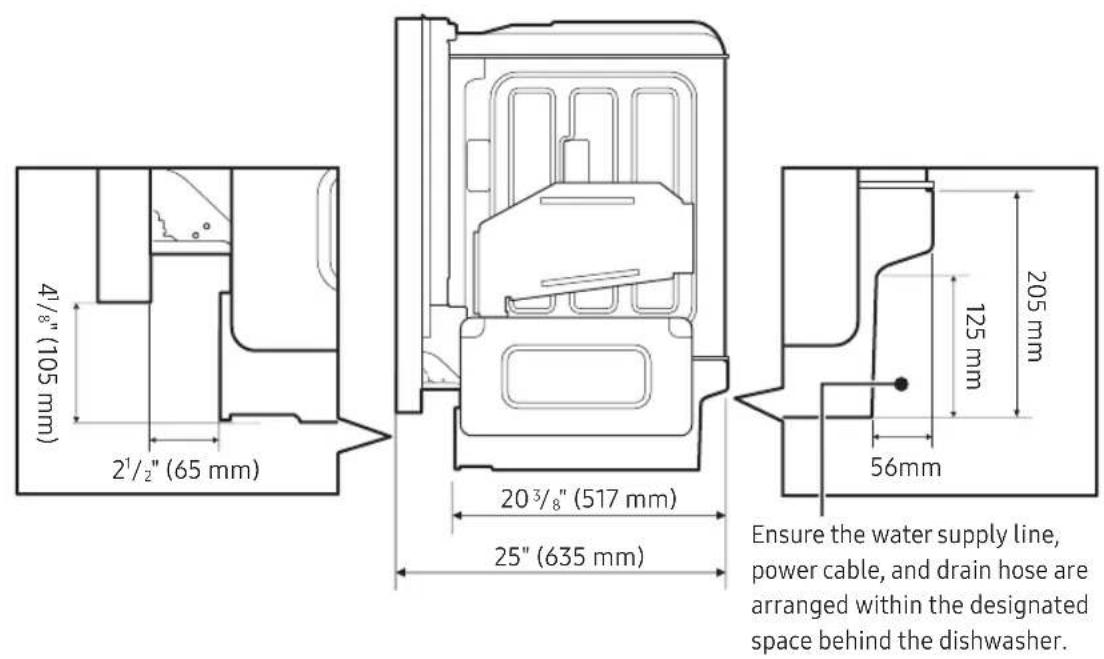
Dimensions
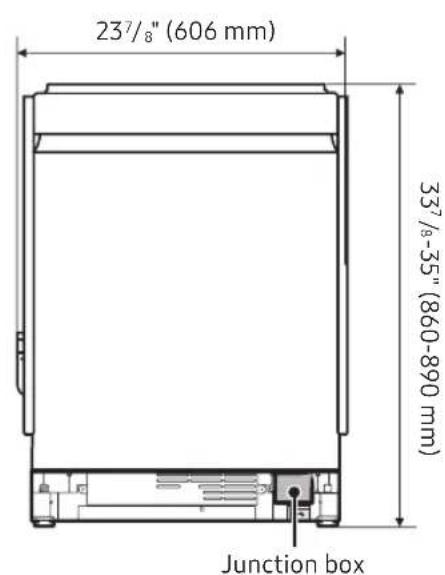
Product
Preparing the installation
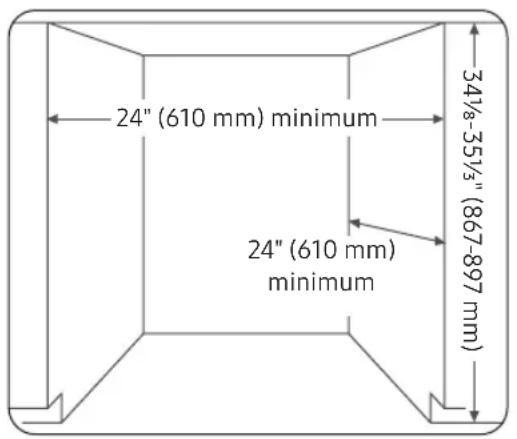
Cabinet
Installationrequirements
Compatibilitycheck
If you are replacing an old dishwasher, you must check the existing dishwasher connections for compatibility with the new dishwasher. Replace the existing connections if necessary.
Electrical
United States: Install according to the National Electric Code, as well as state, municipal, or local codes.
- Canada: Install according to the Canadian Electric Code C22.1 (latest edition), as well as the provincial, municipal, or local codes.
- For direct cable connections:
Use flexible, armored, or non-metallic sheathed copper wire with a ground that meets the wiring requirements of your local codes and ordinances.
WARNING
- DoNOTuseanextensioncord.
- Use only the power cord that comes with the dishwasher.
- Do NOT connect the ground wire to plastic plumbing, gas lines, or hot water pipes.
- Improperly connected grounding conductors may cause electric shock.
Watersupply
Pressure: Ensure the hot water supply line pressure is between 20-120 psi (140-830 kPa).
Water temperature: Set the water heater to supply water between 120^ (49°C) and 149°F (65°C)
- This range provides the best washing results and shortens cycle time.
The water temperature should not exceed 149^ (65^) to avoid damaging the dishes.
English10
Location
Select a location that meets the following conditions.
- The location must have a solid floor that can support the weight of the dishwasher.
-
The location must be near a sink with easy access to the water supply, drain system, and electrical outlet.
-
For proper draining, the dishwasher should be installed within 9.8 feet (3 m) from the sink.
The location must let you load dishes into the dishwasher easily.
- The location must have sufficient space for the dishwasher door to open easily and provide enough space between the dishwasher and the cabinet sides. (at least 0.1 inch (2 mm)).
-
If the dishwasher is installed in a corner, ensure that the side of the dishwasher is more than 2 inches (50 mm) from the wall or cabinet to its right or left.
-
Therearwallmustbefreeofobstructions.
- Make sure the cabinet for the dishwasher is secured to the floor. If the cabinet is not secured, it may increase noise when the dishwasher is operating.
Unpackingandinspectingthedishwasher
Unpack the dishwasher in a clear, open area without obstructions around or above. Keep all packaging materials until installation is complete and the dishwasher is fully operational to ensure all components are removed before disposal.
- Positionthecartonupright.
- Cut the straps securing the packaging.
- Unpack the product and set aside the straps and packingmaterials.
- Locate the kick plate attached to the packaging material and set it aside.
- Inspectthedishwasherforanydamage. Refer to the Inspection list section for details.
- Lift the dishwasher from the base carton tray and place it on the floor.
CAUTION
Always lift the dishwasher to move it. Sliding the dishwasher can damage the dishwasher's feet and the surface underneath.
- Do not remove the sound-absorbent padding around the exterior of the dishwasher tub.
- Keep the internal packing in place until the installation is complete to protect internal components.
Preparing the installation
Inspectionalist
| Mechanical | ·Verify that the plastic base assembly is intact. ·Verify that the leveling feet are in place and adjustable for leveling dishwasher. ·Verify that all visible components on the bottom are intact and secure. ·Test the door latch and hinges and ensure the door is properly secured. |
| Plumbing | ·Inspect the water inlet valve on the back of the dishwasher. (At the bottom right side.) Ensure the water inlet valve is secure, the threads are smooth, and the area is clean. ·Inspect the drain hose for holes or deformities that could cause leaks. |
| Electrical | ·Verify that the cover of the junction box, at the front bottom right corner of the dishwasher, is secure. ·Verify that the junction box is not damaged and secured. |
| Appearance | ·Inspect for any dents or scratches on the front panel. ·Inspect the door edges for roughness or cracks. ·Verify that the control panel is clear and unscratched. |
| Parts | ·Verify that all parts listed in the Required parts and tools are present without anydamages. |
English12:
Installation
Ensure that you or your installer carefully follow these instructions so the dishwasher functions properly and to prevent any risk of injury during use.
CAUTION
- Ensure that the circuit breaker and water supply valve are turned off.
- Fully retract the leveling feet before moving the dishwasher to prevent damage.
Preparingthecabinet
If you install the dishwasher in a new location, follow these instructions before installing the dishwasher.
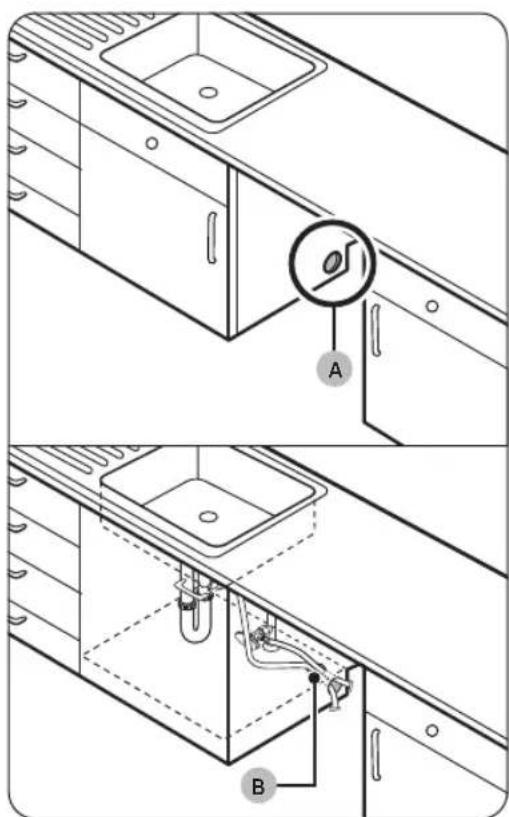
- Usinga2 12 hole saw, drill a hole (A) into the side of the cabinet that holds the sink.
TE
You may need to make an extra hole according to the location of the electrical outlet.
2. If the base inside the sink cabinet is raised above the kitchen floor and is higher than the connections on the dishwasher, make another hole(B) in the base inside the cabinet.
CAUTION
Before inserting the drain hose through the hole, smooth the edges of the hole to prevent damage to the drain hose. Sharp edges may damage the drain hose and causeleaks.
- For metal cabinets, cover the sharp edges with insulationtapeorducttape.
Installation
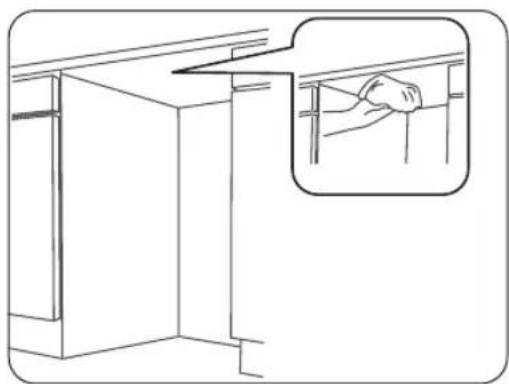
- Cleanthebottomofthecountertop.
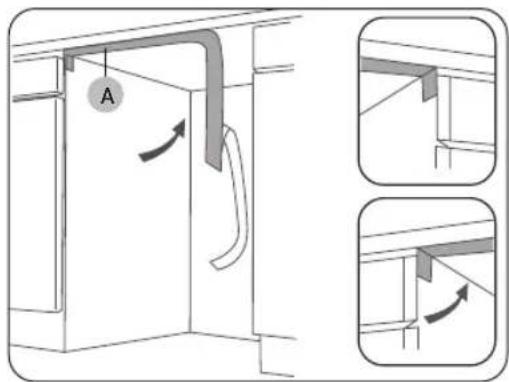
-
Attach the protective sticker(A).
-
The protective sticker prevents damage when sliding the dishwasher in and out of the cabinet during installation.
The length of the protective sticker is 26 inches (660mm).
English14
Preparingthedishwasherforinstallation
CAUTION
- Ensure that the circuit breaker and water supply valve are turned off.
- Fully retract the leveling feet before moving the dishwasher to prevent damage.
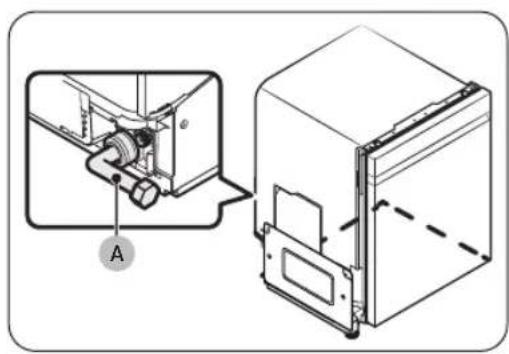
- Connect the 3/4^ 90^ fitting (A) to the water inlet valve.
-
Detach the drain hose secured to the back of the dishwasher.
-
Ensure that no kinks or sharp bends might restrict waterflow.
TE
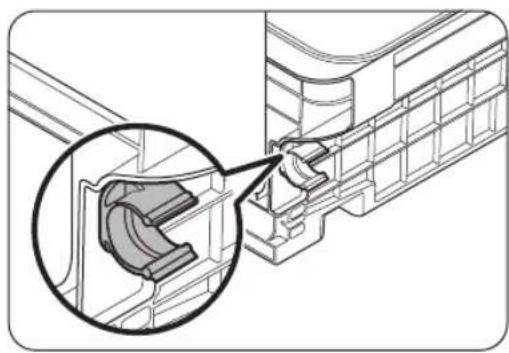
You can use the drain hose holder to secure the drain hose if it needs to be directed to the right side of the dishwasher.
-
The drain hose holder can be detached and repositioned in 3 different locations.
To reposition, gently squeeze and turn the holder left to release it, pull it out, then insert it into the desired position and turn it right to lock it in place. -
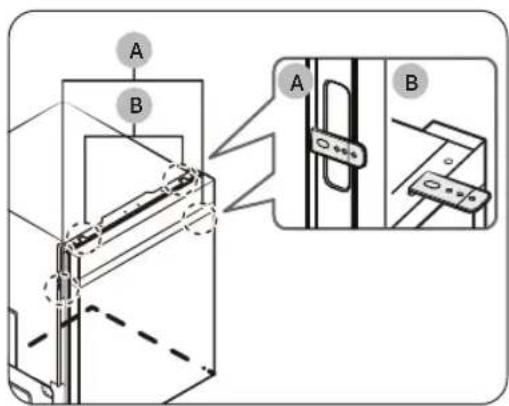
Attach the two mounting brackets on the top or sides of the dishwasher.
A: If the countertop is made of a material that cannot be drilled, attach one bracket on each side (left and right).
B: If the countertop is made of a material that can be drilled, attach the brackets to the top.
Installation
Connectingthepowercable
WARNING
Electrical Shock Hazard
- To avoid electrical shock, do not work on an energized circuit. Doing so could result in serious injury or death. Only qualified electricians should perform electrical work. Do not attempt any work on the dishwasher electric supply circuit until you are certain the circuit is de-energized.
FireHazard
- To avoid a fire hazard, make sure electrical work is properly installed.
- Only qualified electricians should perform electrical work.
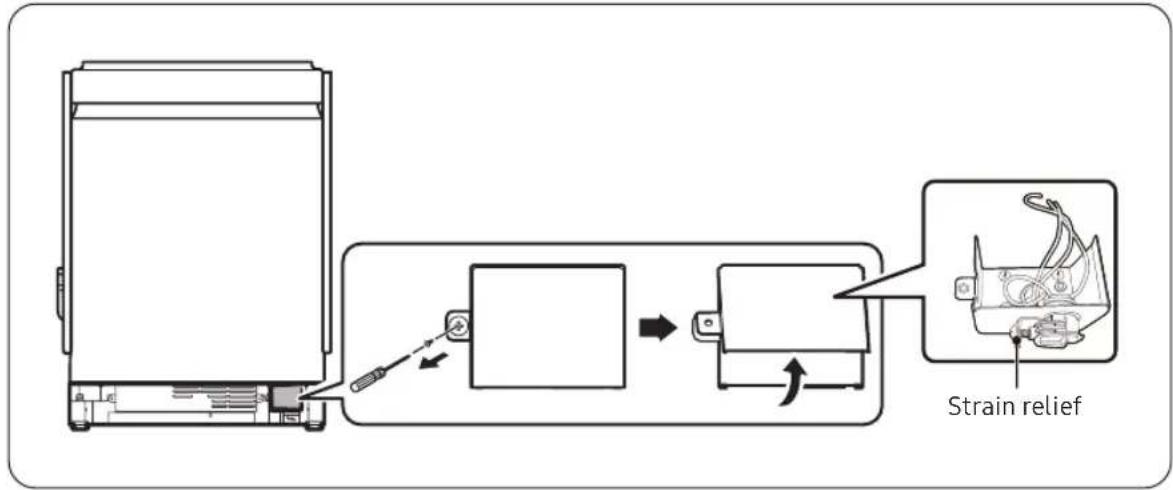
- Removethejunctionboxcover.
Unfasten the screw on the left side of the junction box.
There are three wires in the junction box, including the grounding line.
- Installastrainrelief.
English16
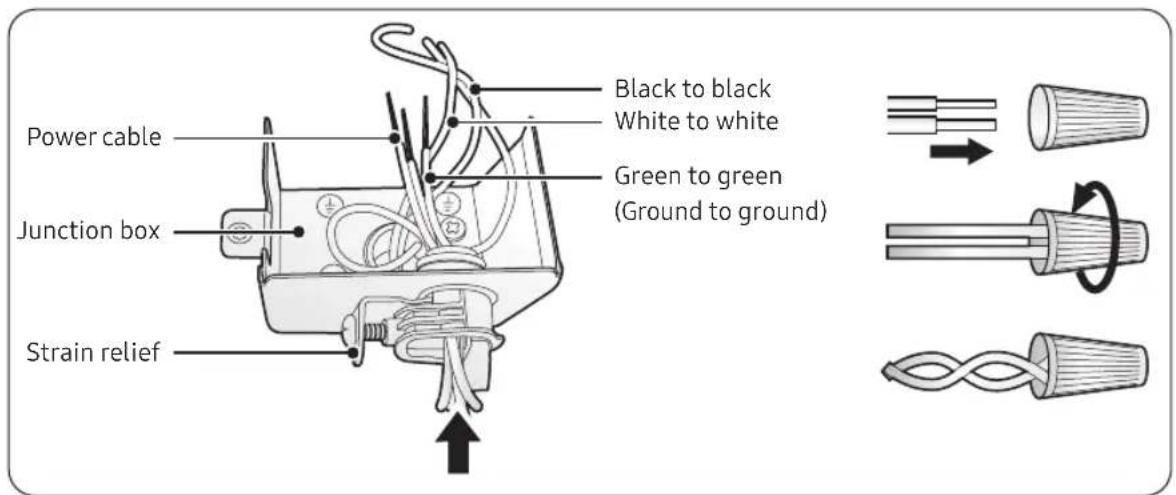
- Insert the power cable through the strain relief and into the junction box securely.
-
Connect the three wires using twist-on wire connectors.
-
First, match the wires of the same color. Then, insert each wire pair into a twist-on connector and twist clockwise to secure.

The twist-on wire should not be twisted counterclockwise.
- Recheck that each wire is securely connected to its matching color (white to white, black to black, green to green).
- Arrange all the wires into the junction box, and then fasten the cover.

CAUTION
Ensure the wires are not pinched and sticking out of the junctionbox.
Installation
Placing the dishwasher into the cabinet
- Place the dishwasher in front of the cabinet.
- Connect the hot water supply hose to the 90^ fitting.
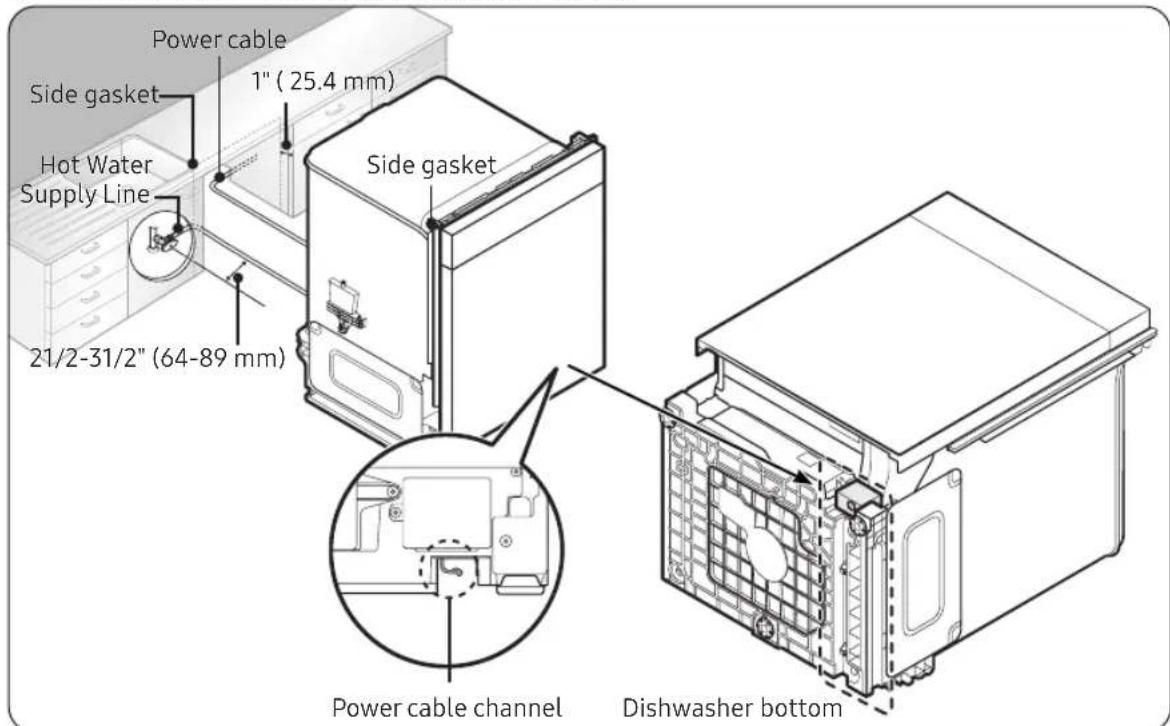
- Arrange the power cable, connected to the junction box, to the back of the dishwasher.
Use the hooks in the power cable channel, at the bottom of the dishwasher, to arrange the power cable. - Pull the power plug, water supply hose, and drain hose through the hole you have previously made in thecabinetwall.
-
Slide the dishwasher carefully into the cabinet.
-
To avoid kinking, bending, or pinching the water supply line, drain hose, or power cable, have a second person pull the excess length of each as you slide the dishwasher in.
Ensure both side gaskets are inserted seamlessly, ^13/16 to 1 inch inward from the front edge of the kitchen cabinet, as improper placement may increase noise during dishwasher operation.
CAUTION
Ensure the water supply line, drain hose, or power cable is not kinked, bent, or pinched.
-
Connect the water supply hose to a hot water supply valve under your sink.
-
Wrap Teflon tape around every connection to prevent water leaks.
-
Connectthedrainhosetoyoursink.
-
Refer to the Connecting the drain hose section for details.
English18

CAUTION
After putting the dishwasher inside the cabinet, check the following.
- Ensure the door opens and closes freely with no interruption to the cabinet.
- Ensure the dishwasher is positioned in the center.
Connectingthedrainhose
There are various ways to connect the drain hose for draining. Ensure the connection follows your local water pipe installation regulations.
CAUTION
Do not extend the drain hose over 3m
#
Before connecting the drain hose to the sink, ensure there is no foreign matter inside the hose.
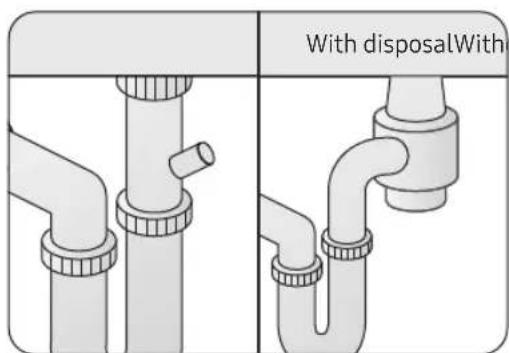
- Check under your sink to see if you have a garbage disposal.
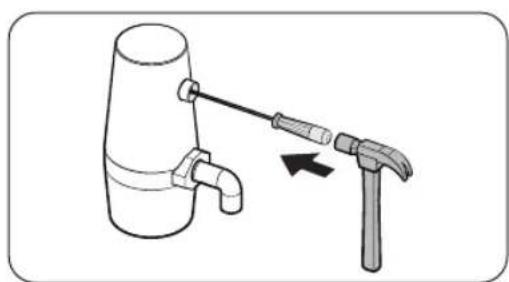
#
Knock out the plug in the garbage disposal connector before connecting the drain hose.
Installation
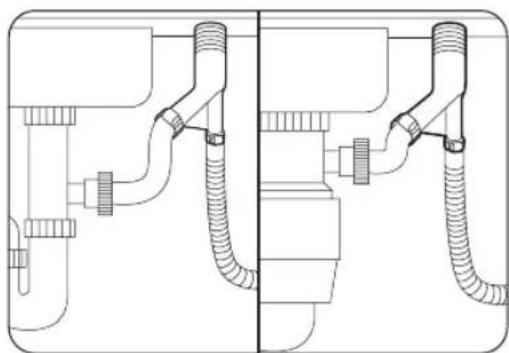

- Check if the air gap installation is required.
Install the air gap. Then, use a hose to connect the air gap outlet to the sink drain or garbage disposal.
If you do not need an air gap installation, loop the drain hose. (Refer to the Looping the drain hose section for details.)
-
Use a hose clamp to connect the drain hose to the air gap inlet, sink drain, or garbage disposal.
-
The drain hose end has three different diameters to fit various sizes, and you can cut off any parts that are not needed.
If the drain hose end does not fit the connection point, purchase a suitable adaptor from a plumbing or hardware supply store.
CAUTION
- You must use a hose clamp. Failure to do so may cause waterleakage.
- Be careful when cutting off the end of the drain hose as there is a risk of injury.
- Do not cut the ribbed area of the drain hose.
Loopingthedrainhose
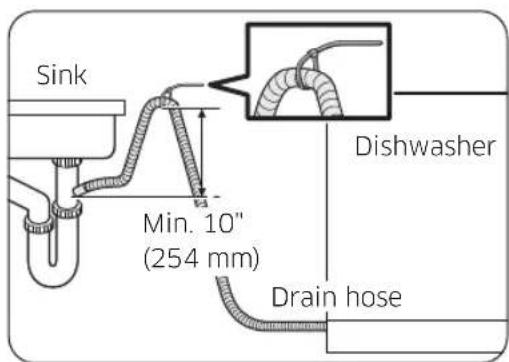
To prevent backflow, secure the drain hose to the side or back wall of the cabinet using cable ties or other fixtures. Make sure the drain hose height is at least 10 inches (254 mm) from the sink connector.
English20
Levelingthedishwasher
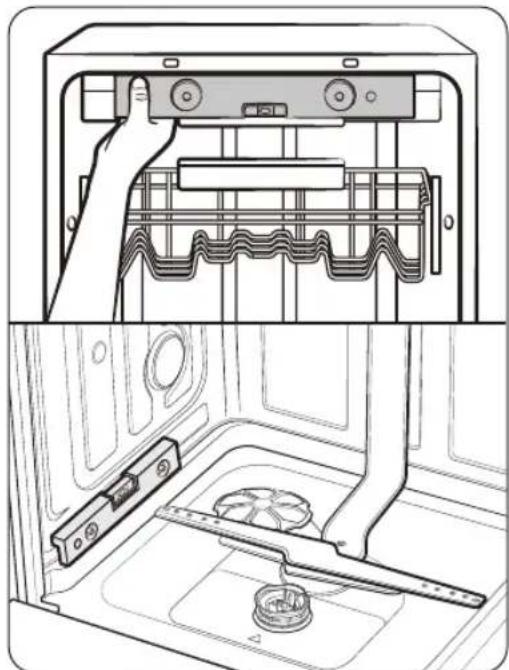
-
Use the level to check if the dishwasher is level side to side and front to back.
-
Use the front leveling feet to level the dishwasher side to side.
- Use the rear leveling foot to level the dishwasher fronttoback.
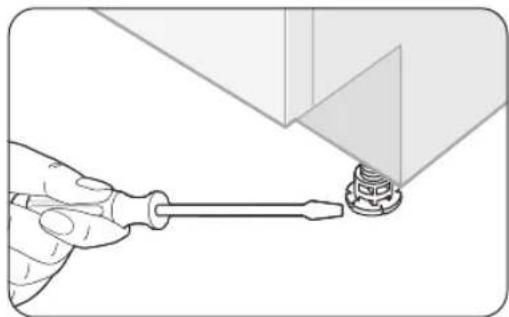
- Use a flat-head screwdriver to adjust the front height.
To lower the height, turn the leveling foot clockwise.
To raise the height, turn the leveling foot counterclockwise.
TE
You can adjust the leveling feet by a max of 1 inch. However, leveling up to the max height is not recommended.
Installation
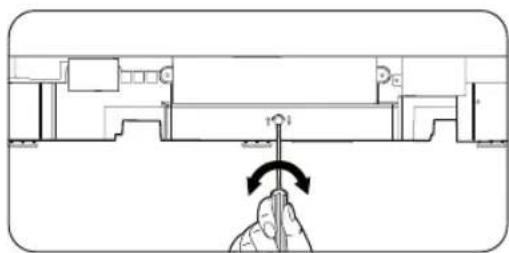
- To adjust the rear height, insert the Torx T20 screwdriver in the bottom center of the dishwasher.
To lower the height, turn the screwdriver clockwise.
To raise the height, turn the screwdriver counterclockwise.
#
To prevent leaks from the door, make sure that the front of the dishwasher is not lower than the back.
CAUTION
- If the product is installed unlevelled or without any of the leveling feet, the door may not close completely, causing a leak of steam or water.
- When adjusting the height of the dishwasher, make sure the top gasket is inserted seamlessly underneath the top of the kitchen cabinet. Otherwise, it may increase noise when the dishwasher is operating.
English22
Securingthedishwasher
Secure the dishwasher to the countertop or adjacent cabinet walls for added stability and safety.
CAUTION
Before securing the dishwasher, put a large towel on the bottom of the dishwasher (covering the sump) to prevent wood shavings or screws from falling into the dishwasher sump.
Tothecountertop
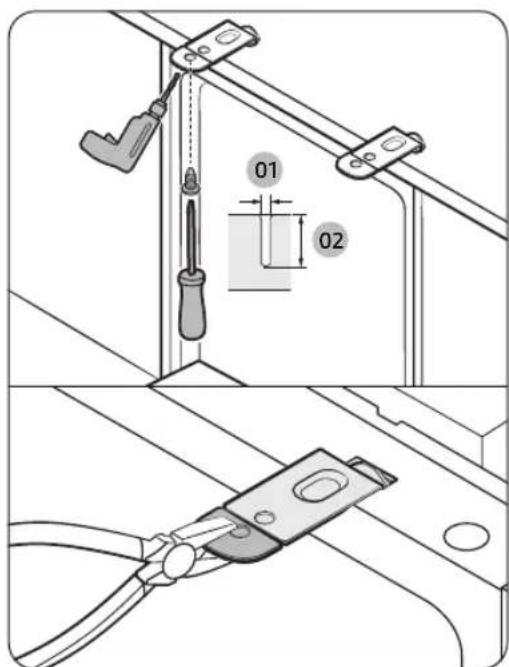
012mm
02 12mm
- Carefully drill 2 screw holes into the bottom of the countertop from beneath, one for each mounting bracket.
Make sure the hole you drill is smaller than the diameter of the screw. - Insert the provided screws into the hole of the brackets, and then tighten them to secure the dishwasher to the countertop.
#
If the provided brackets are too long, cut them down using pliers.
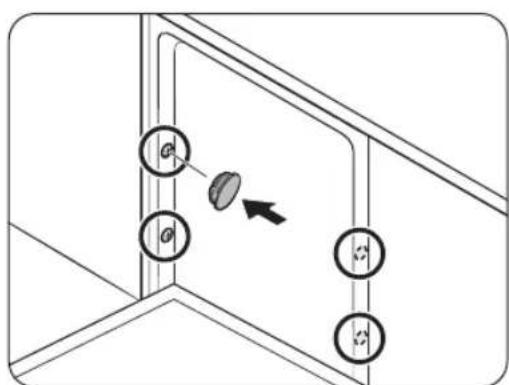
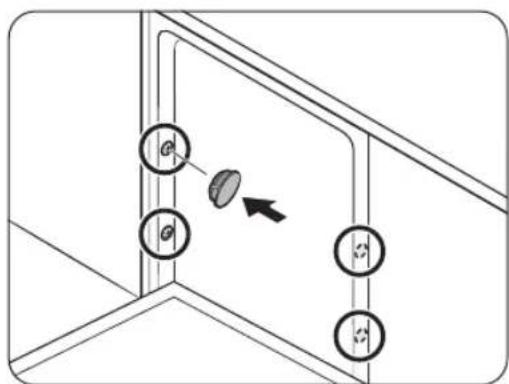
- Cover the four holes with the provided plastic caps.
CAUTION
- If the plastic caps are not assembled, water may leak and cause a fire or electric shock.
After installing the dishwasher inside the cabinet, check if the door opens and closes freely with no interruptionwiththecabinet.
Installation
Tothesides
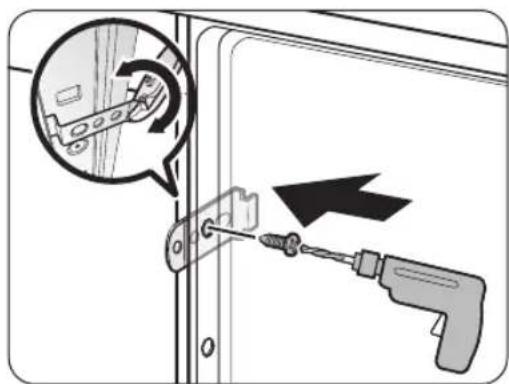
- Drill a hole into both sides of the kitchen cabinet, totaling 2 screw holes.
- Make sure the hole you drill is smaller than the diameter of the screw.
- Tighten the provided screws into the holes to secure the dishwasher to the cabinet.
TE
If the provided brackets are too long, cut them down using pliers.
3. Cover the four holes with the provided plastic caps.
CAUTION
If the plastic caps are not assembled, water may leak and cause a fire or electric shock.
After installing the dishwasher inside the cabinet, check if the door opens and closes freely with no interruptionwiththecabinet.
English24
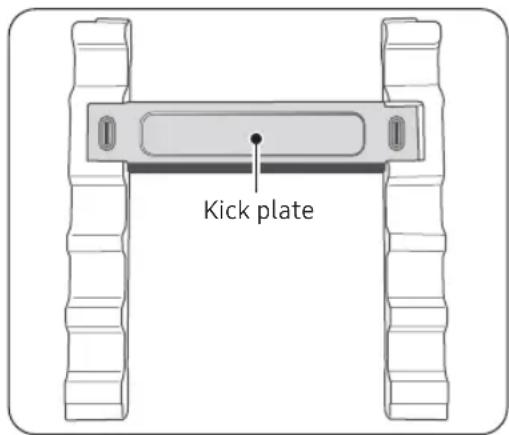
Attachingthekickplate
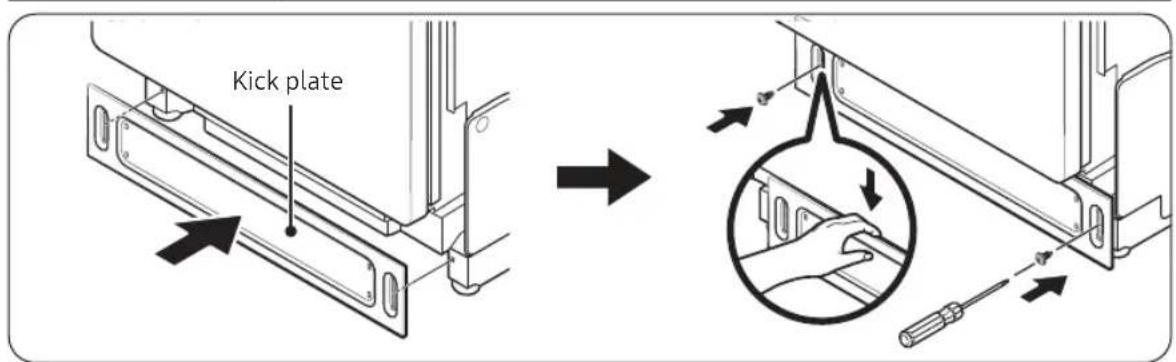
- Keep the rubber skirt of the door taut.
- Push the kick plate from the front of the rubber skirt inward, underneath the dishwasher door.
- Ensure the gaskets of the kick plate are flush with the floor and the side walls.
- Tighten the screws to secure the kick plate.
CAUTION
Make sure the kick plate does not interfere with the dishwasher door's operation. Open the door to 90^ and ensure it moves freely without noise.
Installation
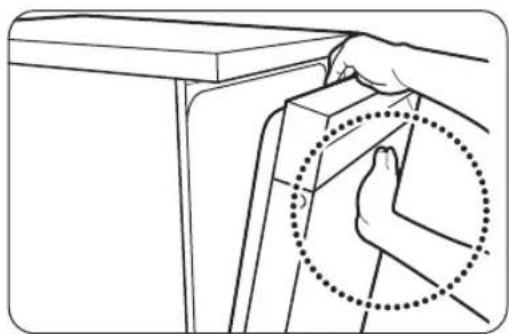
Mounting the Bespoke panel (applicable models only)
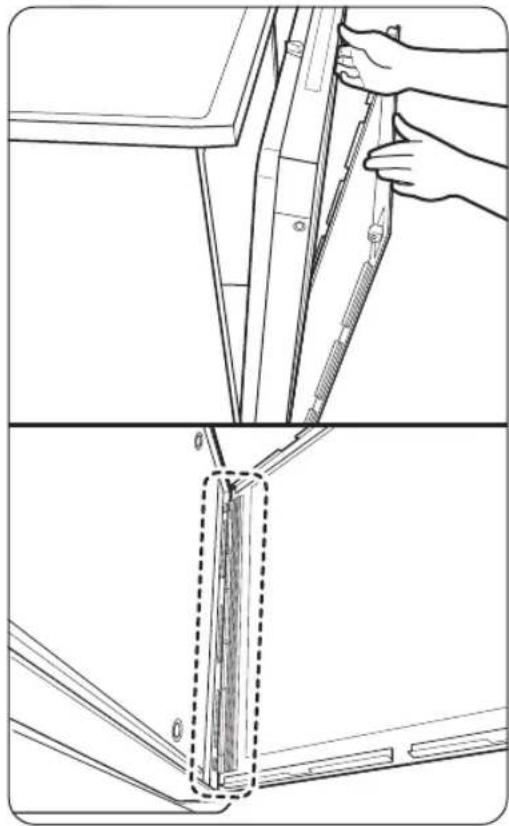
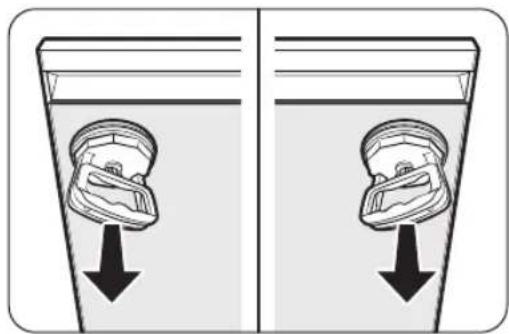
- Open the door and fit the custom panel in the front bottomofthedoor.
- While holding the door and the custom panel with both hands, press the panel evenly from bottom to top to lock into the dishwasher.
English26
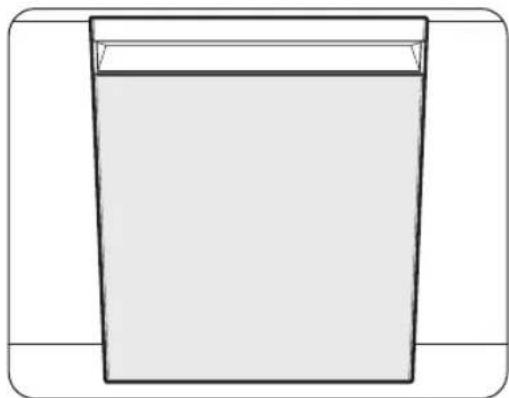
- When both sides of the panel lock into place, press the top center of the custom panel to secure it to the top of the door.
TE
Make sure that the custom panel fits in the dishwasher properly.
- The panel is properly attached if the gap between the dishwasher and the panel is less than 0.1 inch (2 mm). If the gap is over 0.1 inch (2 mm), reattach the panel.
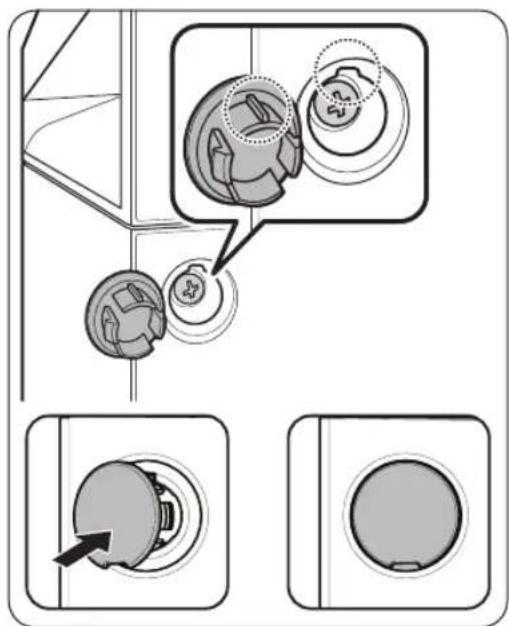
4. Unpack the provided plastic caps and screws (two for each).
5. Tighten the screws on both sides of the dishwasher.
TE
When tightening the screw on each side, tighten evenly to prevent the panel from shifting to either side.
-
Insertthecapsonbothsides.
-
Make sure the rib of the cap fits in the hole of the dishwasherintherightdirection.
Installation
- This is the completion of mounting the custom panel.
#
After inserting the panel, check it with bare eyes. If the panel is not correctly inserted, or the gaps are not even in all four corners, reinstall the panel. (Refer to the Reinstalling the custom panelsectionfordetails.)
CAUTION
Use only the genuine Samsung Bespoke panel (available in authorized Samsung retailers). Using a third-party panel is not allowed, and the user is fully responsible for any problems caused by using a third-party panel.
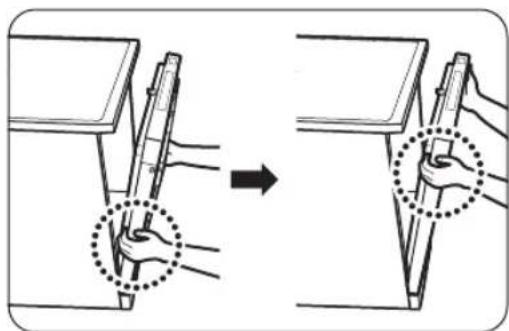
Reinstallingthecustompanel
- Remove the plastic caps and screws on both sides of the door.
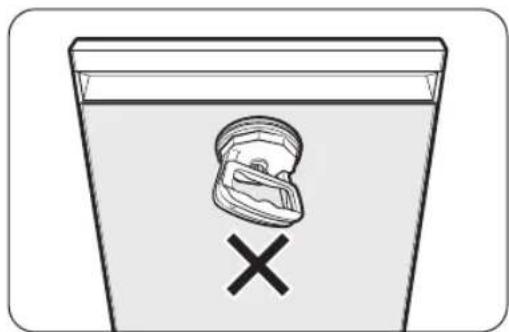
- Attach the suction cup on the top left or right side of the panel.
- Pull the suction cup to detach the panel from the door.
- Reinstall the panel as instructed in the previous section.
CAUTION
- Do not attach the suction cup to the center of the panel to remove it, as this may cause damage to the panel.
Make sure the door is secured and stable before usingthesuctioncups.
English28
Testingthedishwasher
- Open the door and remove all foam, paper packaging, and unnecessary parts.
- Turn on the circuit breaker and open the water supply valve.
- Turn on the dishwasher and run the Smart Install Cycle.
a. Tap Settings, and select Delay Start.
b. Tap< and> to set the time to "17".
c. Touch and hold the Start until "AS" appears on the display.
d. Tap Start and close the door.
e. The Smart Install Cycle will start and run for about 7 minutes. Then the dishwasher door will open and flash the number "5" for about 1 minute.
f. Once the Smart Install Cycle is completed, "Ot" will appear on the display.
CAUTION
Ensure there is no water leakage at both ends of the water supply line and drain hose connector.
- If there is no problem, turn off the dishwasher.
If you detect a leak, refer to the Managing the water leakage section.
Installation
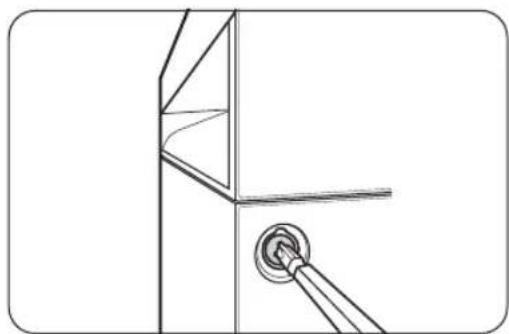
Managingthewaterleakage
If you see the leakage check code (LC) on the control panel after the test operation, follow these instructions.
- Touch and hold the Start button for more than 3 seconds to start draining.
- When the draining is complete, unplug the dishwasher and close the water supply valve.
- Check if the water inlet valve leaks. If the leak is from the water inlet valve, reconnect the 90^ fitting with the hot water supply line.
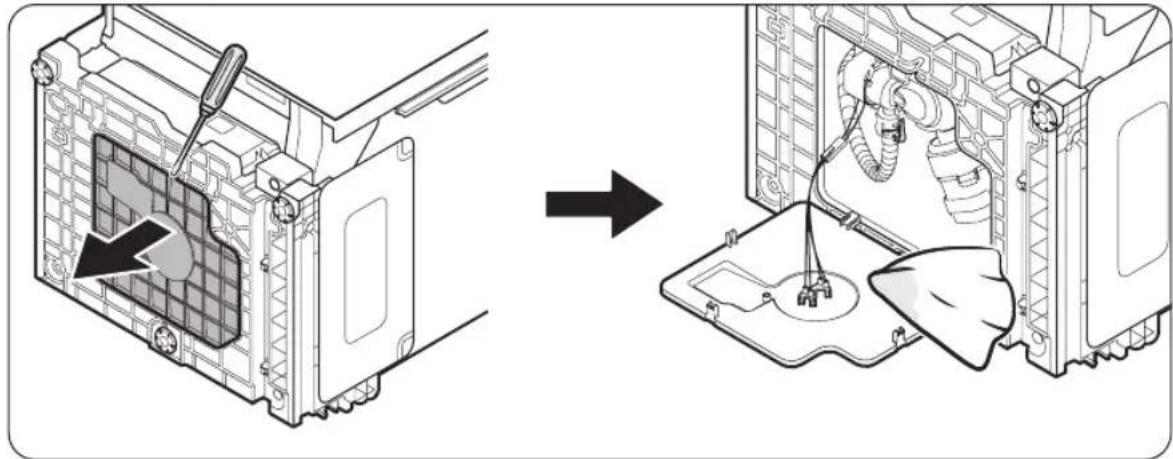
- After reconnecting the 90^ fitting with the hot water supply line, lay down the dishwasher and wipe out moisture from the water leakage sensor. (Refer to the figure.)
- Plug in the dishwasher and open the water supply valve.
- Run the Smart Install Cycle again.
TE
If the leakage check code (LC) remains after following the steps, stop the installation and contact a local servicecenterforassistance.
English30
Appendix
Specifications
| Powersupply120V,15A,60HzAC | |
| Waterpressure 20~120 psi (140~830 kPa) | |
| Dimensions (Width × Depth × Height) 23 | 7/8 x 25 x 33/8 inches (606 x 635 x 860 mm) |
| Minimuminletwatertemperature 120 °F (49 °C) |
OTE
Specifications are subject to change without notice for quality improvement purposes. The actual appearance of the dishwasher may differ from the illustrations in this manual.
SAMSUNG
Lavavajillas
Manualdeinstalación
DW90F89****