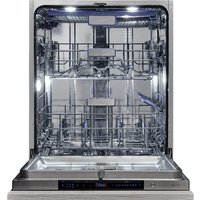
PLT-7461 - Dishwasher Pando - Free user manual and instructions
Find the device manual for free PLT-7461 Pando in PDF.


| Brand | Pando |
| Model | PLT-7461 |
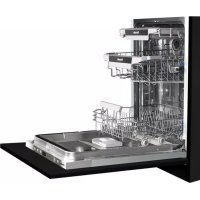
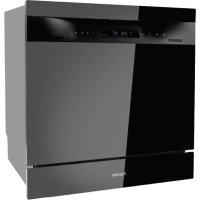
| Product type | Built-in dishwasher |
| Capacity | 16 place settings |
| Dimensions (H x W x D) | 815 x 598 x 550 mm (door closed) |
| Depth with door open at 90° | 1185 mm |
| Water pressure | 0.04 - 1 MPa |
| Power supply | See rating plate (10/13/16 A, time-delay fuse) |
| Wash programs | Auto, Hygiene, Universal, ECO, Crystal, 58 min, Quick, Self-cleaning |
| Additional functions | Extra Dry, Intensive Wash, Turbo Speed, Auto Open |
| ECO program consumption | 0.559 kWh, 9.0 L, 280 min |
| Water softener | Adjustable (H1 to H6) with salt reservoir |
| Detergent dispenser | Main compartment + pre-wash |
| Rinse aid reservoir | Adjustable (d1 to d5) with low level indicator |
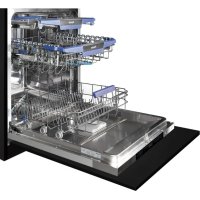
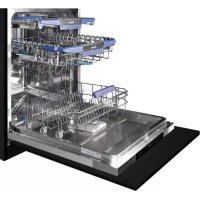
| Baskets | Height-adjustable upper basket, lower basket with foldable tines, removable cutlery basket |
| Spray arms | Upper and lower, removable for cleaning |
| Filtration system | Coarse, fine and main filter, removable |
| Interior lighting | Turns on when opened, turns off after 3 min if door left open |
| Automatic door opening | Opens the door at cycle end to improve drying |
| Standby mode | Automatic shut-off after 15 min without interaction |
| Warranty | 3 years (subject to conditions) |
Frequently Asked Questions - PLT-7461 Pando
User questions about PLT-7461 Pando
0 question about this device. Answer the ones you know or ask your own.
Ask a new question about this device
Download the instructions for your Dishwasher in PDF format for free! Find your manual PLT-7461 - Pando and take your electronic device back in hand. On this page are published all the documents necessary for the use of your device. PLT-7461 by Pando.
USER MANUAL PLT-7461 Pando
natural_image
Interior view of a kitchen appliance showing a double door opening through the window, with no visible text or symbols.Pando
integralcooking
PLT-7461

User's manual and warranty EN
Pando
integralcooking
CAMPANASDECORATIVAS
HORNOS&MICROONDAS
Certificate of registration of carbon footprint, offsetting and CO2 absorption projects of the Ministry for Ecological Transition and Demographic Challenge (MITERD).
The Global Kitchen Partner
natural_image
Symbol of a trash bin with crossed lines indicating no waste or discharge, and a solid rectangle below (no text or labels)
DEL MEDIOAMBIENTE Y TRATAMIENTO DEL RESIDUO
natural_image
Technical line drawing of a mechanical component with grid-like internal structure (no text or symbols)natural_image
3D wireframe model of a mechanical or structural component with no visible text or symbolsnatural_image
3D wireframe diagram of a grid structure with no visible text or symbolsflowchart
graph LR
    A["SALT"] --> B["Add 100% of salt"]
    B --> C["Add 50% of salt into a container with multiple layers"]
    C --> D["Add 20% of salt into a final container with air filter and exhaust pipe"]
flowchart
graph LR
    A["Person mixing shell"] --> B["Salt with salt container"]
    B --> C["Add salt to container"]
    C --> D["Heating salt from container"]
    D --> E["Final container with arrow indicating rotation"]
natural_image
Architectural line drawing of a building interior with structural framework (no text or symbols)natural_image
Diagram showing a structural transformation from a grid-like structure to a curved layered structure, with an arrow indicating the process (no text or symbols present)NOTA:
natural_image
Diagram showing structural deformation of a building frame, with no visible text or symbolsnatural_image
Two-step diagram showing a grid-patterned container being lifted by an arrow, no text or symbols present.natural_image
Diagram showing two views of a grid structure before and after modification, with no visible text or symbols.natural_image
Diagram showing two views of a mechanical component before and after processing, with no visible text or symbols.natural_image
Diagram of a door with a window display and directional arrows indicating movement (no text or symbols)natural_image
Diagram of a device with a hand inserting a plug into a device, showing internal components and directional arrows (no text or symbols)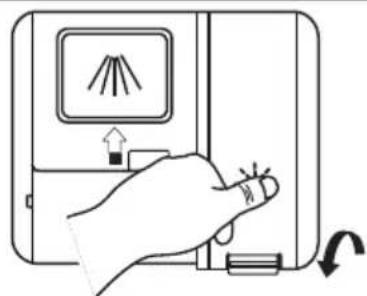
natural_image
Hand pressing down on a device with a slide and scroll, showing no text or symbols2
natural_image
Diagram of a device with airflow indicators and a warning symbol (no text or labels)flowchart
graph LR
    A["Container with lid"] -->|3 seg| B["Hand gesture pointing to finger"]
    B --> C["ECO logo with 'E' icon"]
    C --> D["Printer with '−' label"]
flowchart
graph LR
    A["Container with horizontal bars"] --> B["Storage unit with vertical bars"]
    B --> C["Storage unit with horizontal bars"]
ADVERTENCIA

natural_image
Simple line drawing of a box with a lid and handle (no text or symbols)natural_image
Simple line icon of a file bin with a circular arrow indicating rotation (no text or symbols)CÓDIGOS DE ERROR
natural_image
Simple line drawing of a mechanical component with a central circular component and a horizontal bar (no text or symbols)natural_image
Illustration of a hand using a tool to clean or wash a small container, with no text or symbols present.natural_image
Simple line drawing of a mechanical component with a circular base and a curved top, no text or symbols present.natural_image
Architectural diagram of a building with structural grid lines and an inset showing a mechanical component (no text or symbols)natural_image
Diagram of a mechanical device with a central component and an upward arrow, no text or symbols presentnatural_image
Line drawing of a hand using a tool to clean or spray water on a kitchen sink (no text or symbols)natural_image
Symbolic illustration of a hand with a lightning bolt and smoke trail (no text or numbers)natural_image
Illustration of hands holding a pipe fitting with a handle (no text or symbols)Manguera de suministro ordinaria
natural_image
Line drawing of a faucet with a handle and valve (no text or symbols)natural_image
Technical line drawing of a mechanical assembly with curved components and a labeled component (A), no readable text or symbols present.Or
natural_image
Technical line drawing of a screw fastener inserted into a bracket (no text or symbols)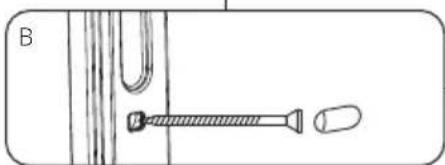
natural_image
Diagram of a screwdriver and a U-shaped tube with a label B, no text or symbols present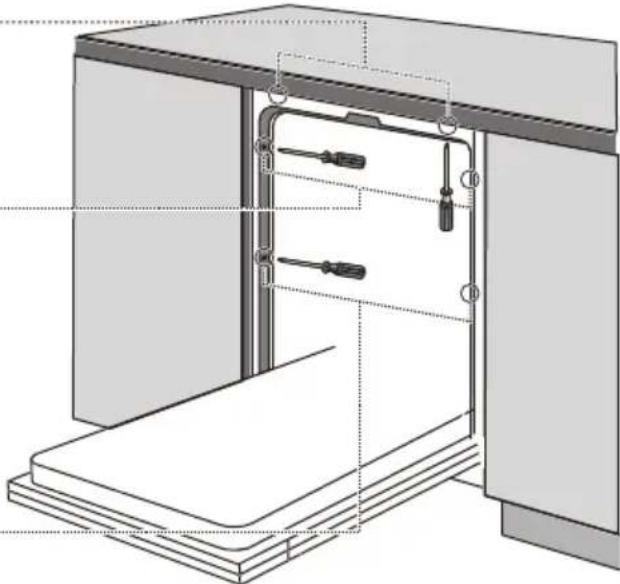
natural_image
Technical line drawing of a cabinet interior with screwdrivers and a tray (no text or symbols)natural_image
Symbol of a trash bin crossed with no text or numbers, representing waste sorting or disposal (no text present)
flowchart
graph LR
    A["SALT"] --> B["Add material"]
    B --> C["Process with waste disposal into a device"]
    C --> D["Final packaging with waste disposal and cleaning"]
flowchart
graph LR
    A["Hand holding a salt container"] --> B["Salt with a container labeled 'SALT'"]
    B --> C["Add to a container with a salt container"]
    C --> D["Hand pouring liquid into a container with a salt container"]
    D --> E["End with a hand holding a salt container"]
natural_image
Technical line drawing of a mechanical assembly or housing with internal components (no text or symbols)natural_image
Diagram showing a structural transformation from a grid-like structure to a curved panel with an arrow indicating rotation (no text or symbols present)NOTA:
natural_image
Diagram showing structural deformation of a reinforced concrete slab, with no text or symbols present| Número | Artigo |
| 1 | Canecas |
| 2 | Pratos de sobremesa |
| 3 | Copos |
| 4 | Canecas grandes |
| 5 | Tigelas de sobremesa |
| 6 | Tigela de vidro |
2. Cestainferior:
| Número | Artigo |
| 7 | Pratos de sopa |
| 8 | Tigelas de melamina |
| 9 | Pratos de sobremesa |
| 10 | Pratos de sobremesa de melamina |
| 11 | Pratos de jantar |
| 12 | Spanela pequena |
| 13 | Tacho de forno |
| 14 | Prato oval |
natural_image
Two-step diagram showing a grid-patterned container being lifted by an arrow, no text or symbols present.natural_image
Diagram showing two views of a grid structure before and after modification, with no visible text or symbols.natural_image
Diagram showing two mechanical or structural components with internal grid patterns, one being rotated and the other tilted (no text or symbols)natural_image
Diagram of a door with a window display and directional arrows indicating movement (no text or symbols)natural_image
Diagram of a device with a hand inserting a plug into a device, showing internal components and directional arrows (no text or symbols)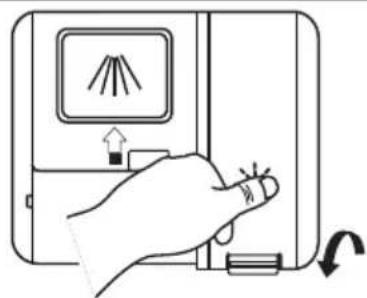
natural_image
Hand pressing down on a device with a slide and scroll, showing no text or symbolsnatural_image
Diagram of a device with airflow indicators and a door, showing no text or symbolsflowchart
graph LR
    A["Coffee Cup"] --> B["Hand Gesture"]
    B --> C["3seg Screen"]
    C --> D["ECO Box with Waste icon"]
    D --> E["Delivery Box with Waste icon"]
natural_image
Simple line drawing of a box with a lid and handle (no text or symbols)natural_image
Simple line icon of a file bin with an arrow indicating rotation (no text or symbols)CÓDIGOS DE ERRO
natural_image
Simple line drawing of a mechanical component with a central circular feature and two horizontal plates (no text or symbols)natural_image
Illustration of a hand using a tool to clean or wash a cleaning machine, with a tray and bucket nearby (no text or symbols)natural_image
Simple line drawing of a kitchen sink with a bowl and tray, no text or symbols presentnatural_image
Diagram of a 3D structural model with an inset showing a mechanical component (no text or symbols present)natural_image
Simple line drawing of a mechanical assembly with a central component and an upward arrow (no text or symbols)natural_image
Line drawing of a hand washing a faucet on a kitchen sink (no text or symbols)natural_image
Symbolic illustration of a hand with a lightning bolt and smoke trail (no text or numbers)natural_image
Line drawing of a hand holding a pipe fitting with a handle (no text or symbols)natural_image
Line drawing of a faucet with handle and valve (no text or symbols)natural_image
Technical line drawing of a mechanical assembly with a labeled component (A), showing curved and straight components without any text or symbols.Ou
natural_image
Technical line drawing of a screw fastener inserted into a bracket (no text or symbols)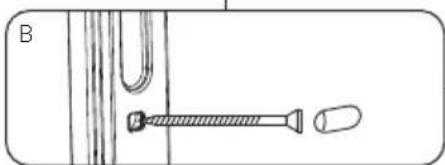
natural_image
Diagram of a mechanical setup with a U-shaped tube and two screws, no text or symbols present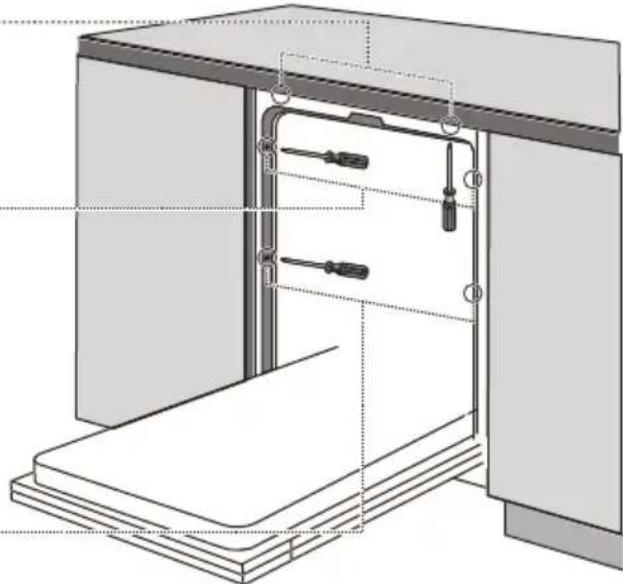
natural_image
Technical line drawing of a cabinet interior with screwdriver and drawer components (no text or symbols)https://www.pando.es/en/after-sales-services/
FR
natural_image
Symbol of a trash bin crossed out by two crossed lines, with a solid black rectangle below (no text or labels)
PROTECTION DE L'ENVIRONNEMENT ET TRAITEMENT DES DÉCHETS
natural_image
Technical line drawing of a mechanical component with grid-like structure (no text or symbols)Support à couverts
natural_image
3D wireframe model of a mechanical or structural component with no visible text or symbolsnatural_image
3D wireframe diagram of a mechanical or structural component with no visible text, numbers, or symbolsSupport pour tasses

REMARQUE :
Panier supérieur
flowchart
graph LR
    A["SALT"] --> B["Add material"]
    B --> C["Process with waste disposal"]
    C --> D["Final packaging with waste disposal and waste into a container"]
flowchart
graph LR
    A["Person holding a circular object"] --> B["Add water into a container with a 'SEL' label"]
    B --> C["Transfer to a water container with liquid"]
    C --> D["Hand pouring water into a container with a 'SET' label"]
natural_image
Technical line drawing of a mechanical assembly or housing with internal components (no text or symbols)natural_image
Diagram showing a structural change before and after, with no visible text or symbolsREMARQUE :
natural_image
Two-step diagram showing a grid-patterned container being lifted by an arrow, no text or symbols present.natural_image
Diagram showing two views of a grid structure before and after modification, with no visible text or symbols.natural_image
Diagram showing two mechanical or structural components with internal grid patterns, one being rotated and the other tilted (no text or symbols)natural_image
Diagram of a door with a window display and directional arrows indicating movement (no text or symbols)natural_image
Diagram of a device with a hand inserting a plug into a device, showing internal components and directional arrows (no text or symbols)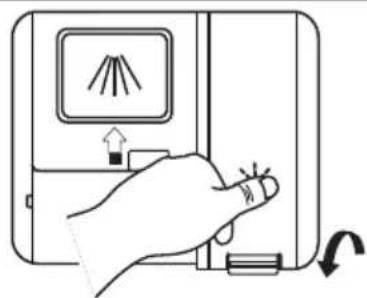
natural_image
Hand pressing down on a device with a slide and scroll, showing no text or symbolsnatural_image
Diagram of a device with airflow indicators and a door, showing no text or symbolsflowchart
graph LR
    A["Receipt with icon"] --> B["3 sec"]
    B --> C["Hand gesture pointing to finger"]
    C --> D["ECO Interface with icons"]
    D --> E["Delivery to printer icon"]
natural_image
Simple line drawing of a box with a lid and handle (no text or symbols)natural_image
Simple line icon of a file bin with a circular arrow indicating rotation (no text or symbols)CODES D'ERREUR
natural_image
Simple line drawing of a mechanical component with a central circular feature and a horizontal bar (no text or symbols)natural_image
Illustration of a hand using a tool to clean or wash a cleaning machine, with a small tray and a cylindrical container nearby (no text or symbols)natural_image
Simple line drawing of a kitchen sink with a bowl and tray, no text or symbols presentnatural_image
Diagram of a 3D structural model with an inset showing a mechanical component (no text or symbols present)natural_image
Simple line drawing of a mechanical device with an upward arrow indicating motion or force (no text or symbols)natural_image
Line drawing of a hand washing a faucet on a kitchen sink (no text or symbols)natural_image
Symbolic illustration of a hand with a lightning bolt and smoke trail (no text or numbers)natural_image
Line drawing of a hand holding a pipe fitting with a handle (no text or symbols)natural_image
Line drawing of a faucet with handle and valve (no text or symbols)Tuyau de sécurité
natural_image
Technical line drawing of a mechanical assembly with a labeled component (A), showing curved and straight components without any text or symbols.Ou
natural_image
Technical line drawing of a screw fastener inserted into a bracket (no text or symbols)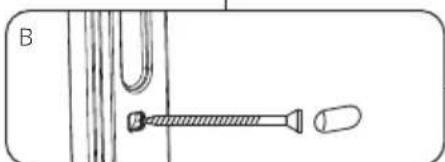
natural_image
Technical line drawing of a mechanical assembly with a screw and U-shaped component (no text or symbols)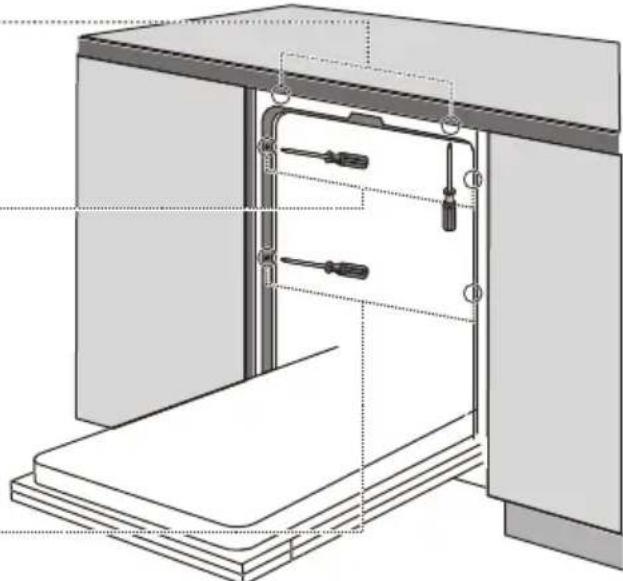
natural_image
Technical diagram of a cabinet interior with screwdriver and drawer components (no text or labels)Pando reserves the right to change or cancel any measures of the articles in the manual without prior notice, without affecting the essential characteristics of functionality and safety, and is not responsible for any errors or omissions that may occur in the manual.
Technical specifications valid except for typographical errors, omission, or printing.
The images and content of this manual are the exclusive property of Pando - INOXPAN S.L., and any appropriation of images and total or partial reproduction without prior written authorization is strictly prohibited.
THE IMAGES SHOWN IN THIS MANUAL ARE NOT CONTRACTUAL.
Pando's Technical Management reserves the right to modify, alter, or improve the technical drawings displayed in this manual without prior notice.
The paper version of this manual cannot be updated in real-time, to ensure the latest version of your product's instructions, we recommend consulting the digital version at www.pando.es
First of all, we would like to thank you for the trust you have placed in our company by purchasing one of our products.
For purchasing one of our products. We are sure that you have made the right decision.
At Pando, not only do we offer top quality products, but we also have a large team of professionals who will help you and advise you on any queries you may have during installation or operation.
To get to know us better, we invite you to visit our website (www.pando.es) where you can see our full range of products with the most up to date commercial and technical information.
Here you will find a wide selection of Decorative Hoods; wall-mounted, ceiling-mounted, island, integrated into furniture and integrated into the hob.
This variety allows us to adapt to any style of kitchen.
We also show you our collection of essential appliances in any home.
Appliances such as our collection of high-performance Ovens and Microwaves with high performance, Induction and Gas Hobs that will help you to make the best recipes, Wine Cellars and Ageing Cellars to maintain and preserve your wines in the best conditions, Dishwashers with the most modern technology and our with the most up-to-date technology and our range of Refrigerators and Freezers with Freezers and Refrigerators for panel integration together with those for free installation.
All this under a brand with a very long trajectory of more than 40 years in the sector, which manufactures its products as a sector, which manufactures its products like a true craftsman. Bringing the best of our experience to everything we do.
We sincerely hope you have fun, experience and enjoy the comfort and capabilities of what is already your new capabilities of what is already your new kitchen ally.
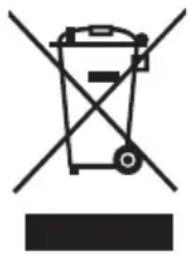
The symbol on the product or its packaging indicates that this product cannot be disposed of like normal domestic waste. The product must be handed over at a collection point for recycling electrical and electronic equipment. If you ensure that this product is correctly disposed of, you will help to avoid the possible negative environmental and public health effects that could arise from incorrect disposal. For more detailed information about recycling this product, please contact your city authorities, the domestic waste service or the establishment where you purchased it. This electrical appliance is marked in compliance with European Directive 2012/19/EU on electrical and electronic appliance waste (WEEE).
COLLECTION OF
HOUSEHOLD APPLIANCES
natural_image
Symbol of a trash bin crossed with no text or labels, representing waste sorting or disposal (no text present)
ENVIRONMENTAL PROTECTION AND WASTE TREATMENT
DISPOSAL OF THE PACKAGING. The packaging is marked with in Green Dot.
In its commitment to the protection of the environment and in compliance with the provisions of the European Directive 94/62 / EC on packaging and packaging waste and the derived Law 22/2011 on Contaminated Residues and Soils, Pando entrusts entities of social economy an Integrated Management System, responsible for the periodic collection at the consumer's home or in its vicinity of used packaging and packaging waste for subsequent treatment.
To remove all packaging materials such as cardboard, expanded polyurethane, and film, use the appropriate containers.
This ensures the correct treatment and reuse of packaging materials.
INDEX
CONSIGNES DE SÉCURITÉ....104
DESCRIPTION DU PRODUIT....108
UTILISATION DU LAVE-VAISSELLE....109
PORTER LES PANIERS....117
SÉLECTION DES PROGRAMMES....123
CODES D'ERREUR 127
COMPTEUR D'UTILISATION ....128
ENTRETIEN ET NETTOYAGE....129
INSTRUCTIONS D'INSTALLATION....134
INFORMATIONS TECHNIQUES....137
CONSEILS POUR LA SOLUTION DU PROGRAMME....142
CERTIFICAT DE GARANTIE 146
SAFETY INSTRUCTIONS
WARNING
When using your dishwasher, follow the precautions outlined below:
• Installation and repair should only be performed by a qualified technician.
- This appliance is intended for use in domestic and similar applications such as:
-kitchen areas for staff in stores, offices, and other work environments; -country
houses;
-by hotel, motel, and other residential-type guests;
-Bed and breakfast type environments.
- This appliance can be used by children from 8 years old and by persons with reduced physical, sensory, or mental capabilities or with lack of experience and knowledge if they have received supervision or instructions on the safe use of the appliance and understand the associated dangers.
Children should not play with the appliance. Cleaning and maintenance should not be carried out by children without supervision. (For EN60335-1) This
- appliance is not designed to be used by persons (including children) with reduced physical, sensory, or mental capabilities, or with lack of experience and knowledge, unless they have received supervision or instructions on the use of the appliance from a person responsible for their safety. (For IEC60335-1)
- The packaging material may be dangerous for children! Chil-
- dren should be supervised to ensure they do not play with the appliance.
- This appliance is for indoor domestic use only.
To protect against the risk of electric shock, do not immerse the unit, the cord, or the plug in water or any other liquid. - Please unplug before cleaning and maintaining the appliance.
Use a soft cloth dampened with mild soap, and then use a dry cloth to wipe it dry again. - If the supply cord is damaged, it must be replaced by the manufacturer, its service agent, or a similarly qualified person to avoid a hazard.

Ground connection instructions
- This appliance must be grounded. In the event of malfunction or failure, grounding will reduce the risk of electric shock by providing a path of least resistance for electric current. This appliance is equipped with a ground connection conductor plug.
- The plug must be connected to an appropriate socket that is installed and grounded in accordance with all local codes and ordinances.
- Improper connection of the equipment's ground connection conductor may result in the risk of electric shock.
-
Consult a qualified electrician or service representative if you have questions about whether the appliance is properly grounded.
-
Do not modify the plug provided with the appliance if it does not fit into the power outlet.
- Have a suitable power outlet installed by a qualified electrician.
- Do not abuse, sit, or stand on the door or on the dishwasher's rack.
- Do not operate your dishwasher unless all the housing panels are properly in place.
- Open the door very carefully if the dishwasher is in operation, there is a risk of water splashing. Do
- not place heavy objects on the door or climb on it when it is open. The appliance could tip forward.
- When loading items to be washed: 1) Place the items in such a way that they do not damage the door seal; 2) Warning: Knives and other sharp utensils must be loaded in the basket with the sharp ends down or placed horizontally.
- Some dishwasher detergents are strongly alkaline. They can be extremely dangerous if ingested. Avoid contact with skin and eyes and keep children away from the dishwasher when the door is open.
- Ensure that no detergent residues remain after completing the wash cycle.
- Do not wash plastic items unless they are marked as 'dish-washer safe' or the equivalent.
- For unmarked plastic items, refer to the manufacturer's recommendations.
- Only use detergent and rinse agents recommended for use in an automatic dishwasher
- Never use soap, laundry detergent, or hand-washing detergent in your dishwasher.
- The door should not be left open, as this could increase the risk of tripping.
- During installation, the power supply should not be excessively or dangerously bent or crushed.
- Do not manipulate the controls.
- The appliance must be connected to the main water valve using new hose sets.
- Old hose sets should not be reused.
- To save energy, in standby mode, the appliance will automatically turn off after 15 minutes of no user interaction.
- The maximum number of cutlery items that can be washed is 16.
- The maximum permissible water inlet pressure is 1MPa. The minimum permissible water inlet pressure is 0.04MPa.
PRODUCT DESCRIPTION
IMPORTANT:
To achieve the best performance from your dishwasher, please read all operating instructions before using it for the first time.

natural_image
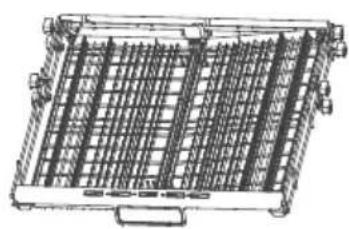
Technical line drawing of a mechanical component with grid-like structure (no text or symbols)Cutlery holder
natural_image
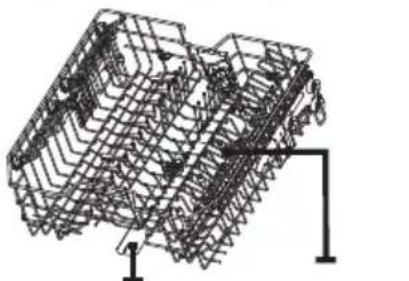
3D wireframe model of a mechanical component with mounting brackets (no text or symbols)Upper spray arm
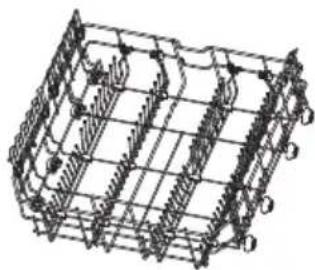
natural_image
3D wireframe diagram of a mechanical or structural component with no visible text, numbers, or symbolsCup holder
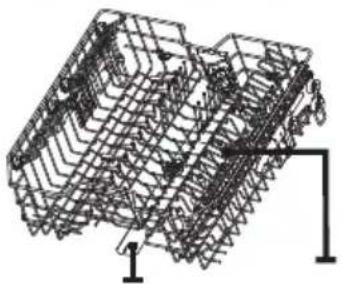
Upper basket
NOTE:
The images are for reference only; different models may vary.
USING THE DISHWASHER
Before using your dishwasher:
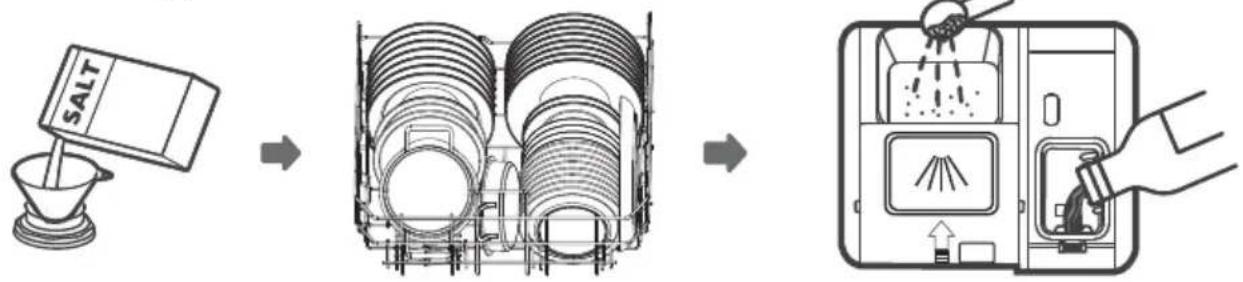
flowchart
graph LR
    A["SALT"] --> B["Add mortar"]
    B --> C["Add oven with material handling"]
    C --> D["Add oven with hand holding lid"]
- Adjust the water softener
- Loading salt into the softener
- Loading the basket
- Fill the detergent dispenser

The interior lights turn on every time you open the dishwasher. If the unit remains open for more than three minutes, this light will turn off.
Load the salt into the tank

NOTE:
If your model does not have any salt container, you can skip this section.
You must use salt intended for dishwashers.
The salt container is located beneath the lower basket and must be filled as explained below:

WARNING
- Use only salt specifically designed for use in dishwashers! Any other type of salt that is not specifically designed for use in dishwashers, especially table salt, will damage the water softener.
In case of damage caused by the use of inappropriate salt, the manufacturer offers no warranty and is not responsible for any damages incurred.
• Only fill with salt before running a cycle.
This will prevent any grains of salt or salty water that may have spilled from remaining at the bottom of the machine for an extended period, which could cause corrosion.
Please follow the steps below to add dishwasher salt:
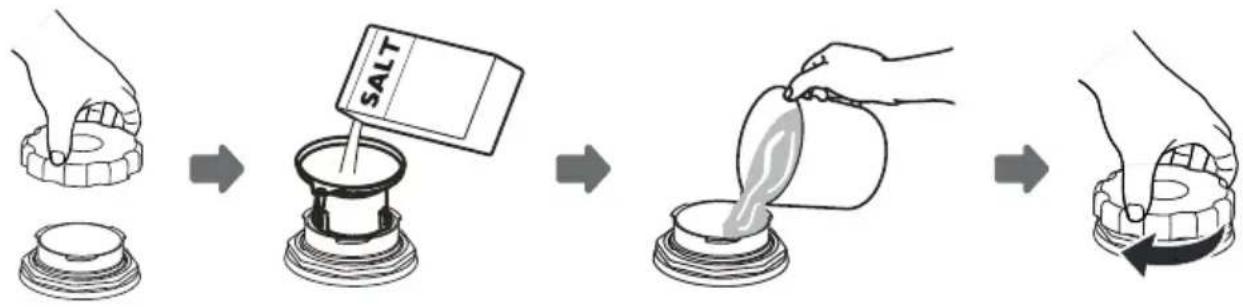
flowchart
graph LR
    A["Hand holding a salt container"] --> B["Salt with salt container"]
    B --> C["Add salt to a container"]
    C --> D["Hearts from steps"]
    D --> E["Final container with arrow indicating rotation or change"]
-
Remove the lower basket and unscrew the cap of the tank.
-
Place the end of the funnel (if provided) into the opening and pour approximately 0.6 kg of dishwasher salt.
-
Fill the salt container to its maximum limit with water. It is normal for a small amount of water to come out of the salt container.
-
After filling the container, screw the cap back on tightly.
-
The salt warning light will turn off after the salt container has been filled with salt.
-
Immediately after filling the salt container, a washing program must be started (we suggest using a short program). Otherwise, the filtering system, the pump, or other important parts of the machine may be damaged by the salty water. This is not covered by the warranty.

NOTE:
- The salt container should only be refilled when the salt warning light ( ) on the control panel is lit. Depending on how well the salt dissolves, the salt warning light may remain on even if the salt container is full.
If there is no salt warning light on the control panel (for some models), you can estimate when to refill the salt in the softener based on the cycles the dishwasher has completed.
• If salt has spilled, run a soak or quick program to remove it.
Control panel
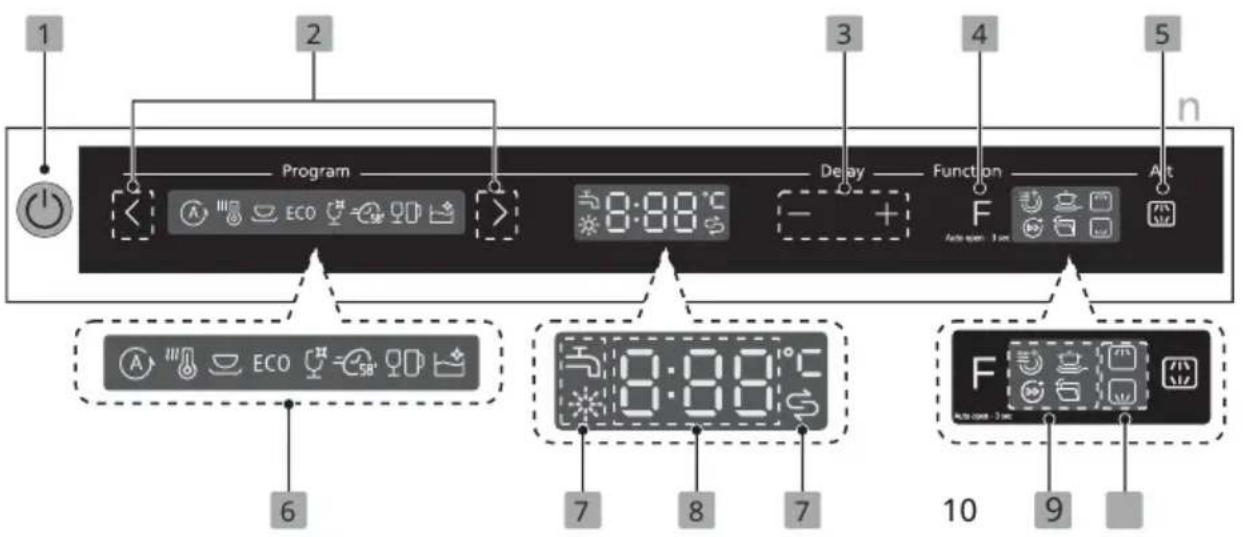
OperationButton)
| 1 | Put on start | Press the button to turn on/off your dishwasher, the screen will light up. |
| 2 | Program | < > ,y |
| 3 | Timer -/+ | Press the button “ + ” to add the delay time or press the button “ - ” to decrease the delay time , a maximum of 24 hours of delay can be set . |
| 4 | Function | Press the button to select a function,the corresponding indicator will light up. |
| 5 | Alt | Press the button to select either the upper basket or the lower basket loaded , the response indicators will light up . |
Display
| 6 Indicator program |  AutoFor lightly ,normally, or heavily soiled dishes with or without food residues. AutoFor lightly ,normally, or heavily soiled dishes with or without food residues. |
 HygieneWith the disinfection option selected, the water temperature increases to 70 °C for high-temperature disinfection. HygieneWith the disinfection option selected, the water temperature increases to 70 °C for high-temperature disinfection. | |
 UniversalFor normally soiled loads, such as pots, plates, glasses, and lightly soiled pans. UniversalFor normally soiled loads, such as pots, plates, glasses, and lightly soiled pans. | |
 ECOThis is the standard program ,it is suitable for cleaning normally dirty dinnerware and is the most efficient in terms of its combined energy and water consumption for that type of dinnerware. ECOThis is the standard program ,it is suitable for cleaning normally dirty dinnerware and is the most efficient in terms of its combined energy and water consumption for that type of dinnerware. | |
 GlassFor lightly soiled dinnerware and glass. GlassFor lightly soiled dinnerware and glass. | |
 58minFor normally soiled loads that need a 58 min wash. 58minFor normally soiled loads that need a 58 min wash. | |
 QuickFor lightly soiled loads, such as glasses, glass and fine porcelain. QuickFor lightly soiled loads, such as glasses, glass and fine porcelain. | |
 Self-cleaningThis program provides effective cleaning of the dishwasher itself. Self-cleaningThis program provides effective cleaning of the dishwasher itself. | |
| 7 Warning indicator |  Rinse AidIf the indicator “” is illuminated, it means that the dishwasher is low on rinse aid and requires a refill. Rinse AidIf the indicator “” is illuminated, it means that the dishwasher is low on rinse aid and requires a refill. |
 SaltIf the indicator “” is lit, it means that the dishwasher has low dishwasher salt and needs to be refilled. SaltIf the indicator “” is lit, it means that the dishwasher has low dishwasher salt and needs to be refilled. | |
 Water TapIf the indicator “” is lit, it means that the water tap is closed. Water TapIf the indicator “” is lit, it means that the water tap is closed. | |
| 8Display | To display the remaining time and delay time, error codes, etc. . |
| 9 Indicator function | Extra dryingTo dry the plates more thoroughly.(Can only be used with Hygiene, Universal, ECO, Glass, 58 min)Heavy washFor washing very dirty, hard-to-clean plates.(Can only be used with Hygiene, Universal, ECO, Glass, 58 min)Turbo speed+Reduceprogramtime.(Can only be used with Hygiene, Universal, ECO, Glass, 58 min, Self-cleaning)Automatic openingThe dishwasher door opens automatically at the end of the program, improving drying results.By pressing the function button for 3 seconds, the corresponding indicator will light up. By pressing the button for 3 seconds again, the corresponding indicator will turn off.The function is invalid in the Self-cleaning and Fast pro-grams, so the indicator will remain off. |
| 10 Indicator Alt | UpperWhen you select the upper part, only the plates in the upper rack will be washed. The spray system of the lower basket will not function.LowerWhen you select Lower, only the plates in the lower rack will be washed. The spray system of the upper basket will not function. |
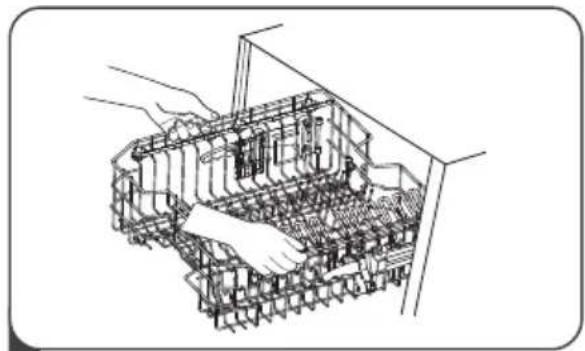
Adjustment of the upper basket
natural_image
Technical line drawing of a mechanical assembly or housing with no visible text or symbols1 To lift the upper basket, simply raise the upper basket in the center of each side until the basket locks into place in the upper position. It is not necessary to lift the adjuster handle.
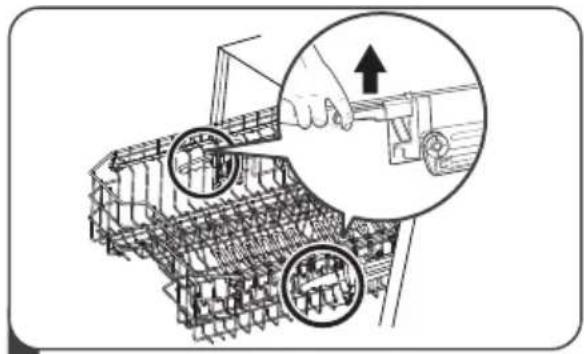
2 To lower the upper basket, lift the adjustment handles on each side to release the basket and lower it to the lower position.
Folding of the cup shelves
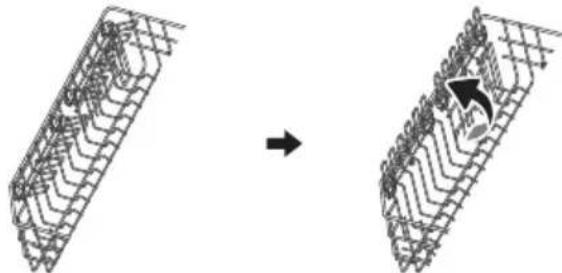
To make space for taller items in the upper basket, lift the cup shelf upwards without forcing the mechanism.
You can also tilt the tall glasses against it. You can also remove it when it's not needed.
natural_image
Diagram showing a wire mesh structure transforming into a curved, layered structure with an arrow indicating rotation (no text or symbols present)NOTE:
When the upper basket is locked in the upper position, the cup shelves cannot be folded down.
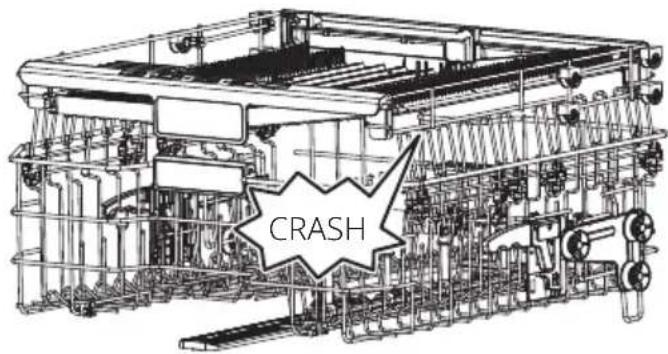
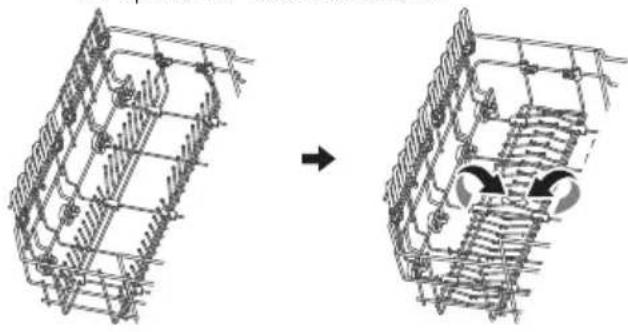
Fold back the shelf racks
The prongs of the lower basket are used to hold plates and a tray. They can be lowered to make more space for large items.
lift upwards fold backwards
natural_image
Diagram showing structural deformation of a reinforced concrete slab, with no text or symbols present- Consider purchasing utensils that are labeled as dishwasher safe.
- For specific items, select a program with the lowest possible temperature.
- To avoid damage, do not remove glass and cutlery from the dishwasher immediately after the program has finished.
To wash the following cutlery/plates.
They are not suitable.
• Cutlery with wooden, horn, porcelain, or mother-of-pearl handles
• Plastic items that are not heat-resistant
• Antique cutlery with glued parts that are not heat-resistant
- Items of cutlery or plates that are glued
- Pewter or copper items
Glass
- Items made of steel susceptible to rust
- Wooden trays
• Items made of synthetic fibers
They have limited suitability.
• Some types of glass may become opaque after a large number of washes.
• Silver and aluminum parts tend to discolor during washing.
- Glazed patterns may fade if washed frequently in the machine.
Recommendations for loading the dishwasher
Remove any large amounts of food residue. Soak burnt food residues in pans. It is not necessary to rinse the plates under running water.
For better dishwasher performance, follow these loading guidelines.
(The features and appearance of the baskets and cutlery baskets may vary by your model.)
Place the items in the dishwasher as follows:
- Items such as cups, glasses, pots, pans, etc. should be placed upside down.
- Curved items, or those with recesses, should be loaded at an angle so that water can drain off.
- All utensils are stacked securely and cannot tip over.
- All utensils are positioned so that the spray arms can rotate freely during washing.
- Load hollow items such as cups, glasses, pans, etc. with the opening facing down so that water does not accumulate in the container or in a deep base.
- Plates and cutlery items should not be nested within each other or cover one another.
- To avoid damage, glasses should not touch each other.
- The upper basket is designed to hold more delicate and lightweight dinnerware, such as glasses, coffee cups, and tea cups.
- Long-bladed knives stored vertically pose a potential hazard. Long and
- pointed cutlery items, such as carving knives, should be positioned horizontally in the upper basket.
- Please do not overload your dishwasher. This is important for achieving good results and reasonable energy consumption.

NOTE:
Very small items should not be washed in the dishwasher, as they could easily fall out of the basket.
Removing the plates
To prevent water from dripping from the upper basket to the lower basket, we recommend emptying the lower basket first, followed by the upper basket.

WARNING
The items will be hot! To avoid damage, do not remove the glass and cutlery from the dishwasher for about 15 minutes after the program has finished.
CARRYING BASKETS
Loading the dishwasher to its maximum capacity will help save energy and water.
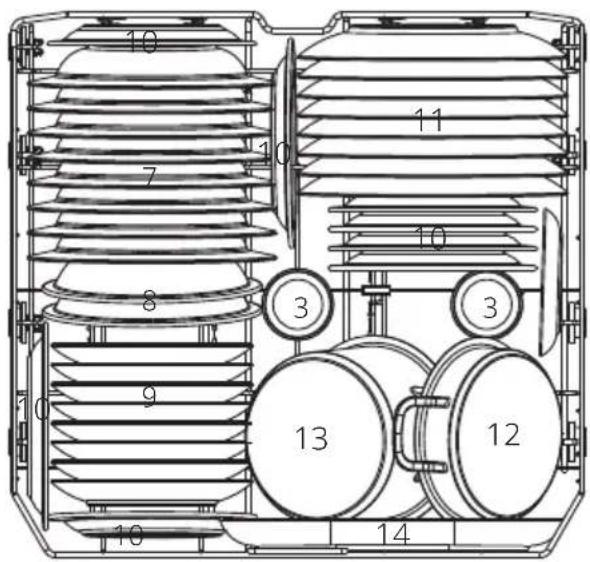
1. Upper basket:
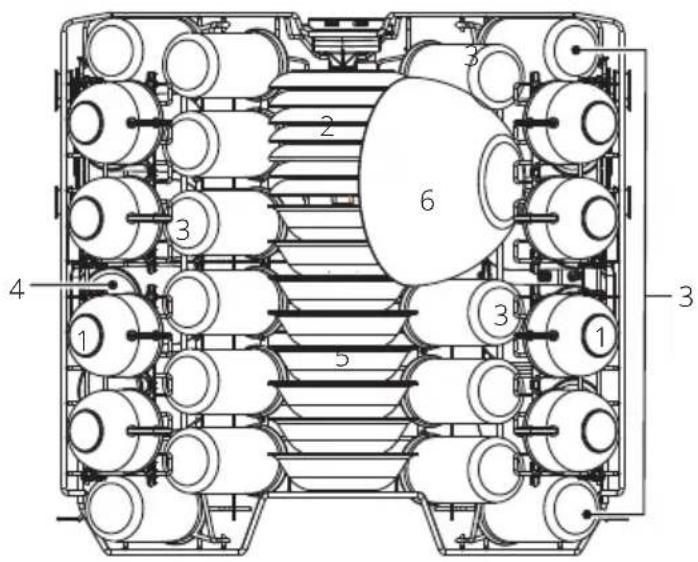
| Number | Item |
| 1 | Cups |
| 2 | Dessert plates |
| 3 | Glasses |
| 4 | Large cups |
| 5 | Dessert bowls |
| 6 | Glass bowl |
2. Lower basket:
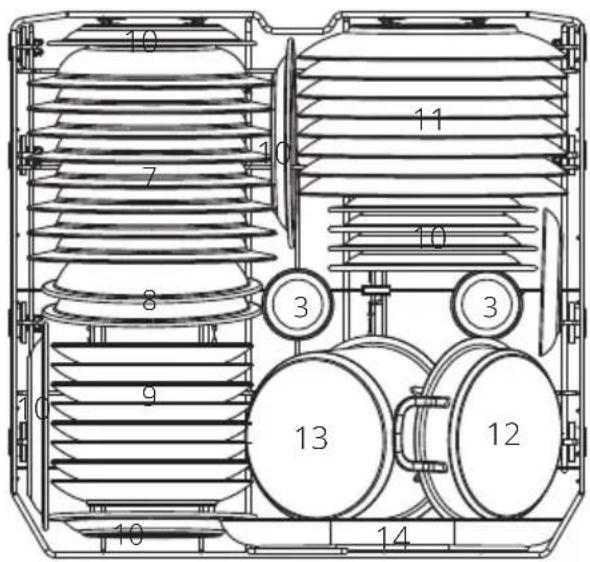
| Number | Item |
| 7 | Soup plates |
| 8 | Melamine bowls |
| 9 | Dessert plates |
| 10 | Melamine dessert plates |
| 11 | Dinner plates |
| 12 | SSmall pot |
| 13 | Oven pot |
| 14 | Oval plate |
3. Cutlery rack:
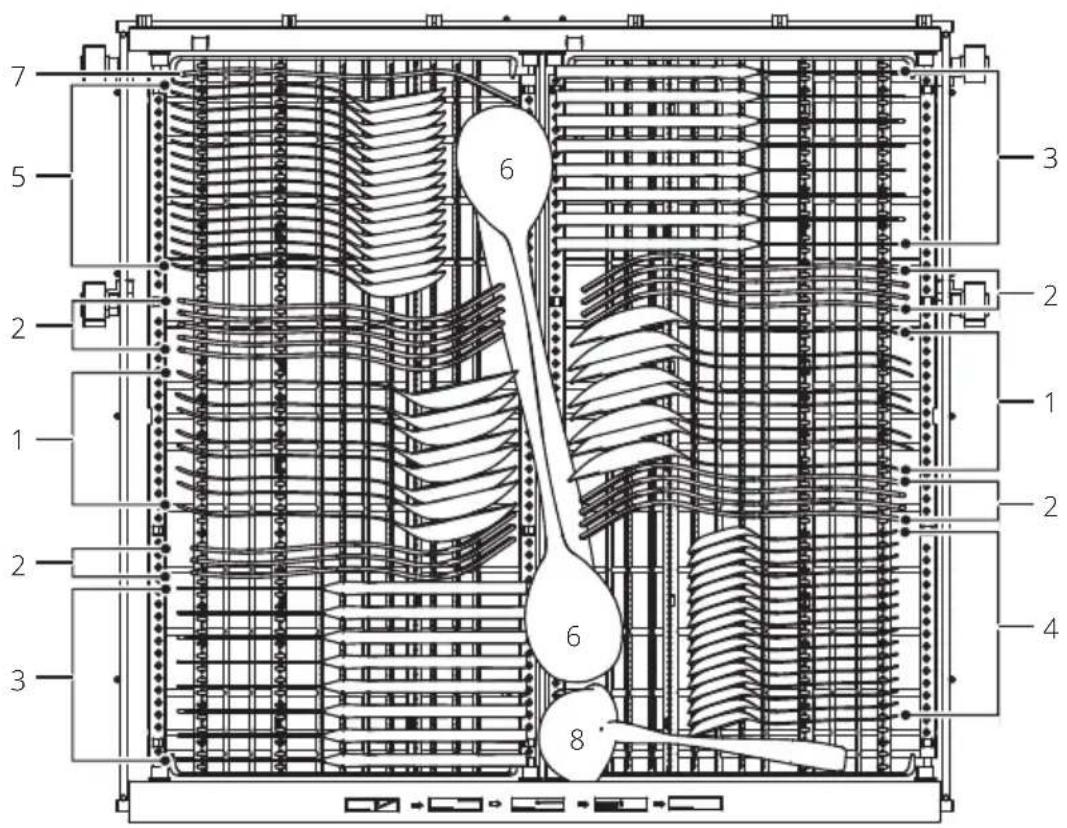
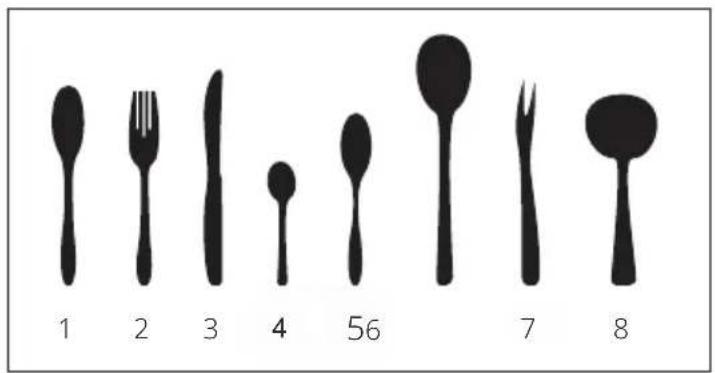
Information for comparability testing
in accordance with EN60436
Capacity:16 cutlery
Upper basket position: lower position
Program:ECO
Rinse setting: Max
Softener setting: H3
| Number | Item |
| 1 | Spoons soup |
| 2 | Forks |
| 3 | Knives |
| 4 | Coffee spoons |
| 5 | Dessert spoons |
| 6 | Flat ladle |
| 7 | Serving fork |
| 8 | Serving ladle |
Tips for using the cutlery rack
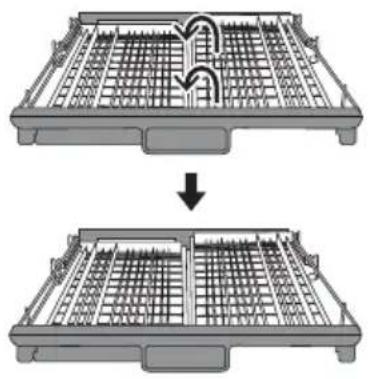
natural_image
Two-step diagram showing a grid-patterned container being lifted by an arrow, no text or symbols present.Lift the right basket; both left and right baskets are flat.
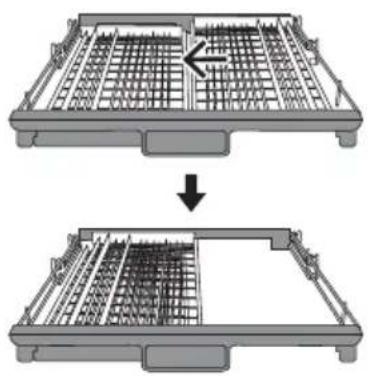
natural_image
Diagram showing two views of a grid structure before and after modification, with no visible text or symbols.Move the right basket from right to left; two baskets are overlapping.
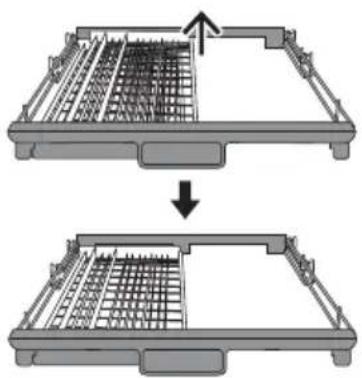
natural_image
Diagram showing two mechanical or structural components with internal grid patterns, one being rotated and the other tilted (no text or symbols)Remove the right basket from the tray; only the left basket remains.
Function of the detergent
The chemical ingredients in dishwasher detergents are necessary to remove, break down, and dispense all the dirt from the dishwasher. Most commercial quality detergents are suitable for this purpose.
WARNING
- Use only detergent specifically made for use in dishwashers. Keep your detergent fresh and dry.
- Do not fill the detergent in the dispenser until you are ready to start the dishwasher.

Dishwasher detergents are corrosive! Keep dishwasher detergent out of reach of children.
Rinse aid function
The rinse aid is released during the final rinse to prevent water from forming droplets on your plates, which can leave spots and streaks. It also improves drying by allowing water to drain off the plates. Your dishwasher is designed to use liquid rinse aids.
WARNING
Never fill the rinse aid dispenser with any other substance (for example, dishwasher cleaning agent, liquid detergent). This would damage the appliance.
When to refill the rinse aid dispenser
Almost all programs use rinse aid in the final rinse. Depending on the frequency of use and the rinse aid setting, the dispenser needs to be refilled.
The rinse aid indicator () will light up when a refill is required. Do not overfill the rinse aid dispenser.
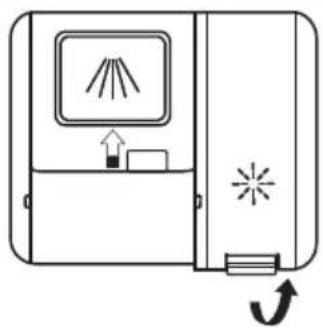
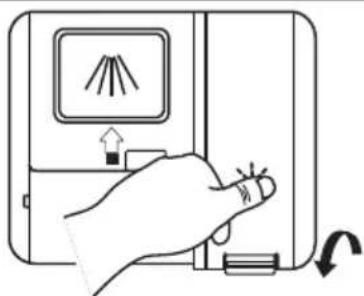
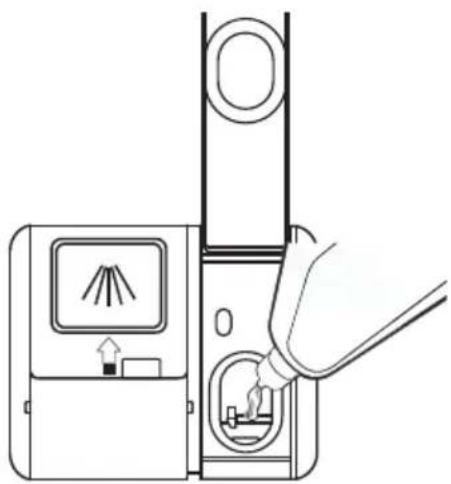
Filling the rinse aid compartment
natural_image
Diagram of a door with a window display and directional arrows indicating movement (no text or symbols)1 Open the rinse aid reservoir lid by lifting the handle.
natural_image
Hand pressing down on a device with a slide and scroll, showing no text or symbols3 Close the lid properly after filling the reservoir.
natural_image
Line drawing of a device with a hand inserting a cable into a device (no text or symbols)2 Slowly pour the rinse aid into the dispenser, avoiding overfilling. Any spilled rinse aid must be wiped up with a cloth.
Adjustment of the rinse aid setting
To achieve better drying performance with limited rinse aid, the dishwasher is designed to adjust consumption by the user. Follow the steps below.
- Open the door and turn on the appliance.
- Within 60 seconds after step 1, press the Program button " > " for more than 5 seconds, and then press the Delay button "+" to enter the setting mode, the rinse aid indicator blinks at a frequency of 1Hz.
-
Press the Program button “>” to select the appropriate setting according to your usage habits; the settings will change in the following sequence: d3->d4->d5->d1->d2->d3. The higher the number, the more rinse aid the dishwasher uses.
-
If there is no operation in 5 seconds, press the Power button to complete the setting and exit configuration mode.
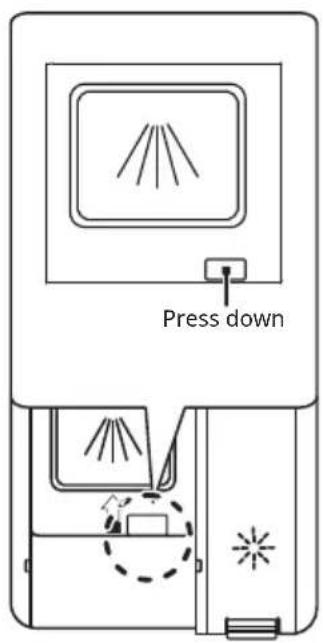
1 Open the lid by pressing down on the release mechanism.
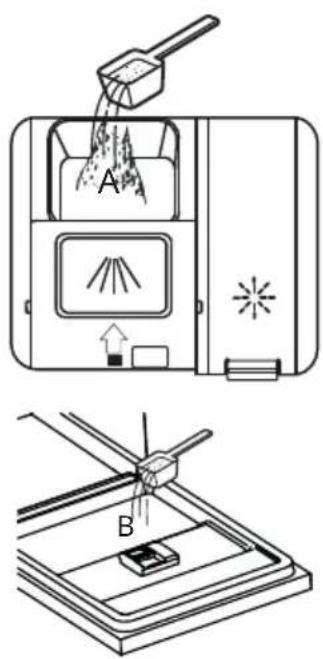
2 Add detergent to the detergent compartment (A) for the main wash phase.
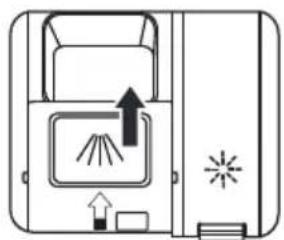
natural_image
Diagram of a device with airflow indicators and a door, no text or symbols present3 Close the dispenser lid by sliding the lid down until it clicks into place.
To achieve better cleaning results, especially when you have very dirty items, pour a small amount of detergent over the nut (B).
The additional detergent will be activated during the prewash phase.

NOTE:
- Please follow the manufacturer's recommendations on the detergent packaging.
PROGRAMME SELECTION
Program Table
The table below shows which programs are best for food residue levels and how much detergent is needed. It also provides various information about the programs. The consumption values and program duration are indicative only, except for the ECO program. (
●) indicates that the program uses rinse aid in the final rinse.
| Program | DescriptionOf The Cycle | DetergentePre/Main Wash | TimeExecution (min) | Energy(kWh) | Water(L) | Rinse-aid |
 Auto Auto | Prewash (45°C)Washing (55-65°C)RinseRinseRinse (50-60°C)Drying | 5/19g1 or 2 tablets | 105-1790.930-1.47010.3-17.0 | ● | ||
 Hygiene Hygiene | Prewash (45°C)Washing (72°C)RinseRinse(50°C)Rinse (60°C)Drying | 5/19g1 or 2 tablets | 165 | 1.650 | 16.0 | ● |
 Universal Universal | Prewash (45°C)Washing (55°C)RinseRinse (65°C)Drying | 5/19g1 or 2 tablets | 130 | 1.175 | 13.5 | ● |
| ECO(*EN60436) | Wash (46°C)RinseRinse (42°C)Drying | 24g1 tablet | 280 | 0.559 | 9.0 | ● |
 Glass Glass | Prewash (40°C)Washing (50°C)RinseRinseRinse (55°C)Drying | 5/19g1 or 2 tablets | 99 | 0.825 | 11.5 | ● |
 58min 58min | Washing (50°C) Rinse Rinse (60°C) Drying | 5/19g 1 or 2 tablets | 58 | 0.795 | 11.5 | ● |
 Quick Quick | Washing (45°C) Rinse Rinse (50°C) | 15g 1 tablet | 45 | 0.710 | 9.0 | ○ |
 Self-cleaning Self-cleaning | Washing (70°C) Rinse Rinse (65°C) Drying | 20g 1 tablet | 1301.24512.0 | ● | ||

NOTE:
ECO : The ECO program is suitable for cleaning normally soiled dinnerware, (*EN60436) which for this use, is the most efficient program in terms of its combined energy and water consumption, and is used to assess compliance with EU ecodesign legislation.
Energy saving
- Prewashing dinnerware items leads to increased water and energy consumption and is not recommended.
- Washing dishes in a household dishwasher generally consumes less energy and water during use than washing by hand, provided the dishwasher is used according to the instructions.
Starting a program
- Remove the upper and lower baskets, load the plates, and push them back in.
- Add the detergent to the dispenser.
- Insert the plug into the power outlet. For the power supply specification, refer to the last page 'Product Information Sheet.'
Ensure that the water supply is turned on within the specified pressure range. - Open the door, press the power button.
- Select a program and press the start button. Then close the door, the dishwasher will start the program.
Changing the program mid-cycle
A program can only be changed if it has been running for a short period of time; otherwise, the detergent may have been released or the wash water with detergent has already been drained. If this is the case, the dishwasher needs to be restarted and the detergent dispenser must be refilled.
To restart the dishwasher, follow the instructions below:
- Open the door slightly to pause the cycle; after the spray arms stop functioning, you can open the door completely.
- Press the program button for more than three seconds, the dishwasher will enter program selection mode.
- You can change the program to the desired cycle setting.
- Close the door, the dishwasher will restart to run

flowchart
graph LR
    A["Receipt with icon"] --> B["3 sec"]
    B --> C["ECO with logo and glass icon"]
    C --> D["Recycle symbol with minus sign"]
Forgot to add a dish
A forgotten dish can be added at any time before the detergent dispenser is opened. If this is the case, follow the instructions below:
- Open the door slightly to stop the wash.
- After the spray arms stop functioning, you can open the door completely.
- Add the forgotten plates.
- Close the door.
- The dishwasher will start working again.
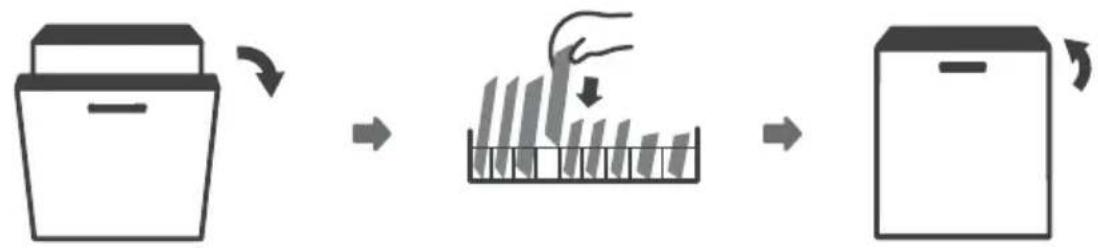
flowchart
graph LR
    A["Container"] --> B["Bar Chart"]
    B --> C["Rectangular Box"]
WARNING

natural_image
Simple line drawing of a box with a lid and handle (no text or symbols)It is dangerous to open the door in the middle of a cycle, as the hot steam can burn you.
Automatic opening
At the end of a program, the door will automatically open to achieve a better drying effect and reduce energy consumption during the drying phase.

NOTE:
The dishwasher door must not be blocked when set to open automatically. This may interrupt the functionality of the door lock.

natural_image
Simple line icon of a file bin with an arrow indicating rotation (no text or symbols)ERROR CODES
If there is a malfunction, the dishwasher will display an error code. The following table shows the possible error codes and their causes.
| Codes | Meaning | Possible causes |
| E1 | Longer input time | The tap is not open, or the water inlet is restricted, or the water pressure is too low |
| E3 | Does not reach the required temperature | Heating element malfunction |
| E4 | Overflow | Some item in the dishwasher is leaking |
| Ec | Control system failure of washing | Defective PCB, drain pump failure, or motor failure |
| L4 | Motor failure | Motor failure |
| Ed | Communication failure between the main circuit board and the display circuit board | Open circuit or broken wiring for communication |

WARNING
- If an overflow occurs, turn off the main water supply before calling for service.
- If there is water in the base tray due to overfilling or a small leak, the water must be removed before restarting the dishwasher.
- If there is an error code that cannot be resolved, seek professional assistance. assistance.
USAGE METER
When the power cord is connected but the dishwasher is not turned on, press and hold the Delay button "+" for 5 seconds, the dishwasher display will show the usage count.
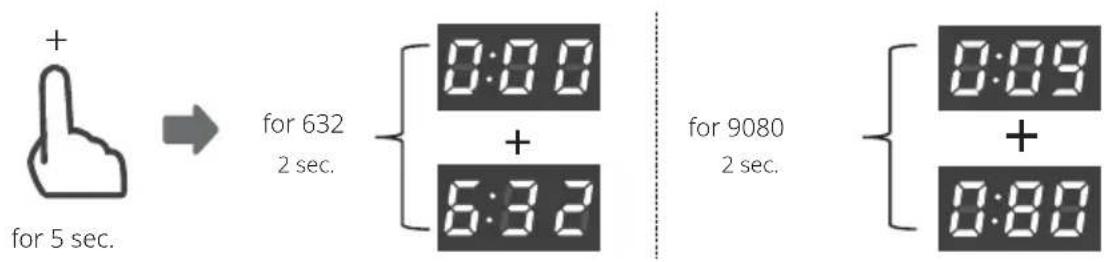
Example:
632: Display "000" for two seconds, then display "632" for two seconds, it will turn off at the end.
9080: Display "009" for two seconds, then display "080" for two seconds, it will turn off at the end.
MAINTENANCE AND CLEANING
External Care
The door and the door seal
Regularly clean the door seals with a soft, damp cloth to remove food deposits.
When loading the dishwasher, food and beverage residues can drip onto the sides of the dishwasher door. These surfaces are outside the wash chamber and are not reached by the water from the spray arms. Any deposits must be cleaned before closing the door.
The control panel
If cleaning is required, the control panel should only be cleaned with a soft, damp cloth.
!
WARNING
- To prevent water from penetrating the door seal and electrical components, do not use any type of spray cleaner.
- Never use abrasive cleaners or scouring pads on exterior surfaces as they may scratch the finish. Some paper towels may also scratch or leave marks on the surface.
Internal Care
Filtration system
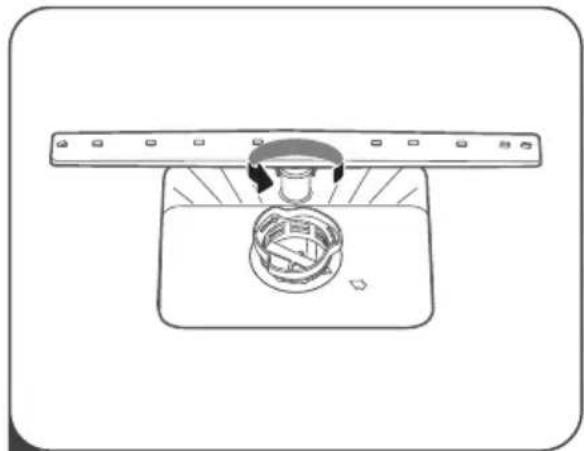
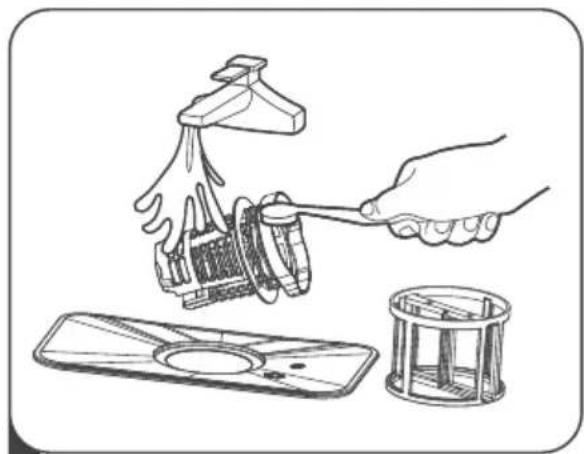
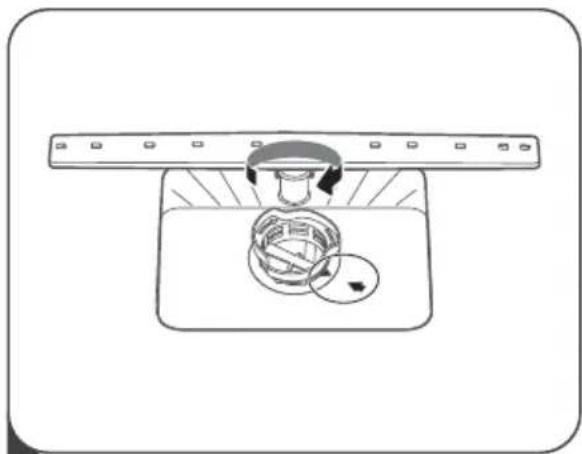
The filtration system at the base of the wash chamber retains coarse debris from the wash cycle, including foreign objects such as toothpicks or fragments. Coarse debris collected can cause the filters to become clogged. Check the condition of the filters regularly, carefully remove foreign objects, and clean the parts of the filtration system if necessary with water. Follow the steps below to clean the filter.

NOTE:
Images are for reference only; different models of the filtration system and spray arms may vary.
natural_image
Simple line drawing of a mechanical component with a central circular feature and a horizontal bar (no text or symbols)1 Hold the coarse filter and turn it counterclockwise to unlock the filter. Lift the filter upwards and remove it from the dishwasher.
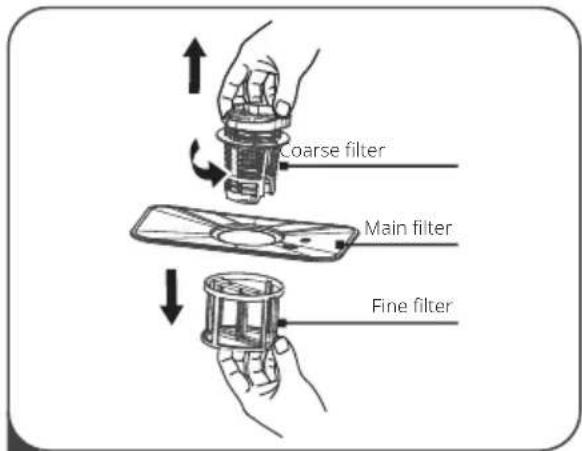
2 The fine filter cannot be removed from the bottom of the filter assembly. The coarse filter can be separated from the main filter by gently pressing the tabs on the top and pulling it out.
natural_image
Illustration of a hand using a tool to lift a mechanical component, with a tray and container nearby (no text or symbols)3 Larger food particles can be cleaned by rinsing the filter under running water.
natural_image
Simple line drawing of a mechanical component with a circular base and a curved top, no text or symbols present.4 Reassemble the filters in the reverse order of disassembly, replace the filter insert, and turn clockwise until it clicks into place.
For a deeper clean, use a soft cleaning brush.
WARNING
- Do not overtighten the filters. Place the filters back in sequence securely; otherwise, large debris could enter the system and cause a blockage.
- Never use the dishwasher without the filters in place. An improper replacement of the filter can reduce the appliance's performance level and damage the plates and utensils.
Spray arms
It is necessary to clean the spray arms regularly, as the chemicals from hard water will clog the jets and bearings of the spray arms.
To clean the spray arms, follow the instructions below:
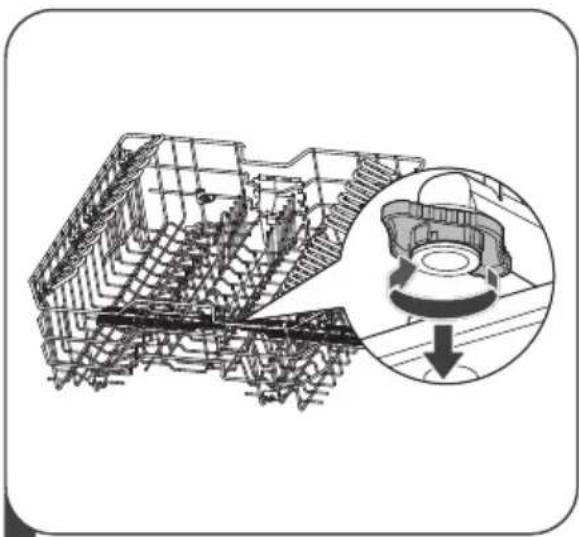
natural_image
Diagram of a 3D structural model with an inset showing a mechanical component (no text or symbols present)1 To remove the upper spray arm, you must hold the nut in the center firmly and rotate the spray arm counterclockwise to take it off.
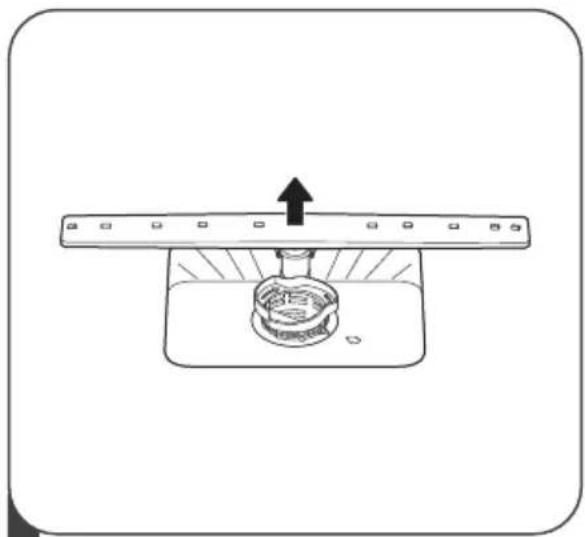
natural_image
Simple line drawing of a mechanical device with an upward arrow and circular component inside a container (no text or symbols)2 To remove the lower spray arm, pull the spray arm upwards.
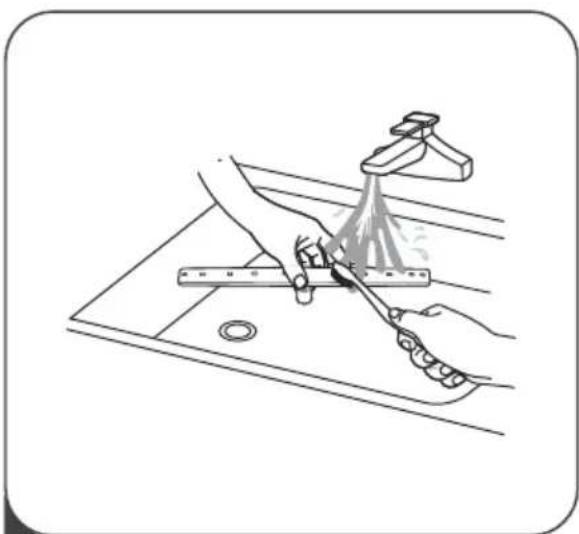
natural_image
Line drawing of a hand using a tool to clean or spray water on a kitchen sink (no text or symbols)3 Wash the arms in warm water with soap and use a soft brush to clean the jets. Replace them after rinsing thoroughly.
Frost precaution
Please take frost protection measures for the dishwasher during the winter. Each time after the washing cycles, please operate as follows:
- Turn off the power supply to the dishwasher at the source.
- Turn off the water supply and disconnect the water inlet hose from the water valve.
- Drain the water from the inlet hose and the water valve.
- Reconnect the water inlet hose to the water valve.
- Remove the filter at the bottom of the tub and use a sponge to soak up the water in the drain.
After each wash
After each wash, turn off the water supply to the appliance and leave the door slightly open for a while to prevent moisture and odors from being trapped inside.
Unplug the appliance
Before cleaning or performing maintenance, always unplug the appliance from the power outlet.
Do not use solvents or abrasive cleaning products
To clean the exterior and rubber parts of the dishwasher, do not use solvents or abrasive cleaning products. Only use a cloth with warm water and soap. To remove stains or marks from the interior surface, use a cloth dampened with water and a little vinegar, or a cleaning product specifically designed for dishwashers.
When not in use for an extended period
It is recommended to run a wash cycle with the dishwasher empty and then unplug the appliance from the power outlet, turn off the water supply, and leave the door of the appliance slightly open. This will help the door seals last longer and prevent odors from forming inside the appliance.
Moving the appliance
If it is necessary to move the appliance, try to keep it in an upright position. If absolutely necessary, it can be placed on its back.
Seals
One of the factors that causes odors to form in the dishwasher is food that gets trapped in the seals. Periodic cleaning with a damp sponge will prevent this from happening.
Water softener
The descaler must be manually adjusted using the water hardness dial. The descaler is designed to remove minerals and salts from the water, which would have a detrimental or adverse effect on the operation of the appliance.
The more minerals there are, the harder your water will be.
The descaler must be adjusted according to the hardness of the water in your area.
Your Local Water Authority can advise you on the hardness of the water in your area.
Salt consumption adjustment
The dishwasher is designed to allow adjustment of the amount of salt consumed based on the hardness of the water used. This aims to optimize and customize the level of salt consumption.
Please follow the steps below for the adjustment of salt consumption.
- Open the door, turn on the appliance;
- Within 60 seconds after turning on the appliance, press the Program button " > " for more than 5 seconds, then enter the descaling configuration mode.
- Press the '>' button again to select the appropriate setting according to your local environment, the setting will change in the following sequence:
$$ \mathrm{H} 3 - > \mathrm{H} 4 - > \mathrm{H} 5 - > \mathrm{H} 6 - > \mathrm{H} 1 - > \mathrm{H} 2; $$
- No operation in 5 seconds or press the power button to complete the configuration and exit configuration mode.
| WATER HARDNESS | Water softener level | Regeneration occurs everyXprogram sequence | Salt consumption (grain/cycle) | |||
| German dH | French fH | British Clarke | mmol/l | |||
| 0 - 5 | 0-9 | 0-6 | 0-0.94 | H1 | No regeneration | 0 |
| 6 - 11 | 10-20 | 7-14 | 1.0-2.0 | H2 | 10 | 9 |
| 12 - 17 | 21-30 | 15-21 | 2.1-3.0 | H3 | 5 | 12 |
| 18 - 22 | 31-40 | 22-28 | 3.1-4.0 | H4 | 3 | 20 |
| 23 - 34 | 41-60 | 29-42 | 4.1-6.0 | H5 | 2 | 30 |
| 35 - 55 | 61-98 | 43-69 | 6.1-9.8 | H6 | 1 | 60 |
1dH=1.25°Clarke=1.78fH=0.178mmol/l
Factory configuration: H3
1) Each cycle with a regeneration operation consumes an additional 2.0 liters of water, energy consumption increases by 0.02 kWh, and the program is extended by 4 minutes.
INSTALLATION INSTRUCTIONS
WARNING

natural_image
Symbolic illustration of a hand with a lightning bolt and smoke trail (no text or numbers)Risk of electric shock Disconnect the power supply before installing the dish-washer.
Failure to do so may result in death or electric shock.
Attention
The installation of pipes and electrical equipment must be carried out by professionals.
About the power connection
WARNING
For personal safety:
- Do not use an extension cord or adapter plug with this appliance.
- Do not cut or remove the ground connection from the power cord under any circumstances.
Electrical requirements
Please refer to the rating label for the rated voltage and connect the dishwasher to the appropriate power supply. Use the required 10A/13A/16A fuse, time-delay fuse, or recommended circuit breaker and provide a separate circuit that serves only this appliance
Electrical connection
Ensure that the voltage and frequency of the power supply match those indicated on the rating plate. Only insert the plug into a socket that is properly grounded. If the socket to which the appliance must be connected is not suitable for the plug, replace the socket instead of using adapters or similar devices, as they could cause overheating and burns.
⚠ Ensure that there is a proper ground connection before use.
Water and drain supplies
Cold water connection
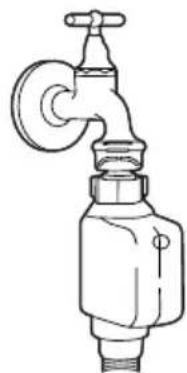
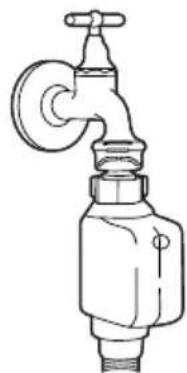
Connect the cold water supply hose to a 3/4 inch threaded connector and en- sure it is securely tightened in place.
If the water pipes are new or have not been used for an extended period, let the water run to ensure it is clear. This precaution is necessary to avoid the risk of the water inlet becoming blocked and damaging the appliance.
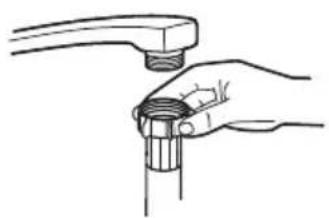
natural_image
Line drawing of a hand holding a pipe fitting with a handle (no text or symbols)Ordinary supply hose
natural_image
Line drawing of a faucet with handle and valve (no text or symbols)Safety hose
About the safety hose
The safety hose consists of double walls. The system ensures intervention by blocking the flow of water in case the supply hose breaks and when the air space between the supply hose and the outer corrugated hose is filled with water.
WARNING
A hose connected to a tap may burst if it is installed on the same water line as the dishwasher. If your sink has one, it is recommended to disconnect the hose and seal the hole.
How to connect the safety hose
-
Remove the safety hoses from the storage compartment located at the back of the dishwasher.
-
Tighten the safety hose screws to the 3/4 inch threaded tap.
-
Fully open the water before starting the dishwasher.
How to disconnect the safety hose
- Shut off the water.
- Unscrew the safety hose from the tap.
Connection of the drain hoses
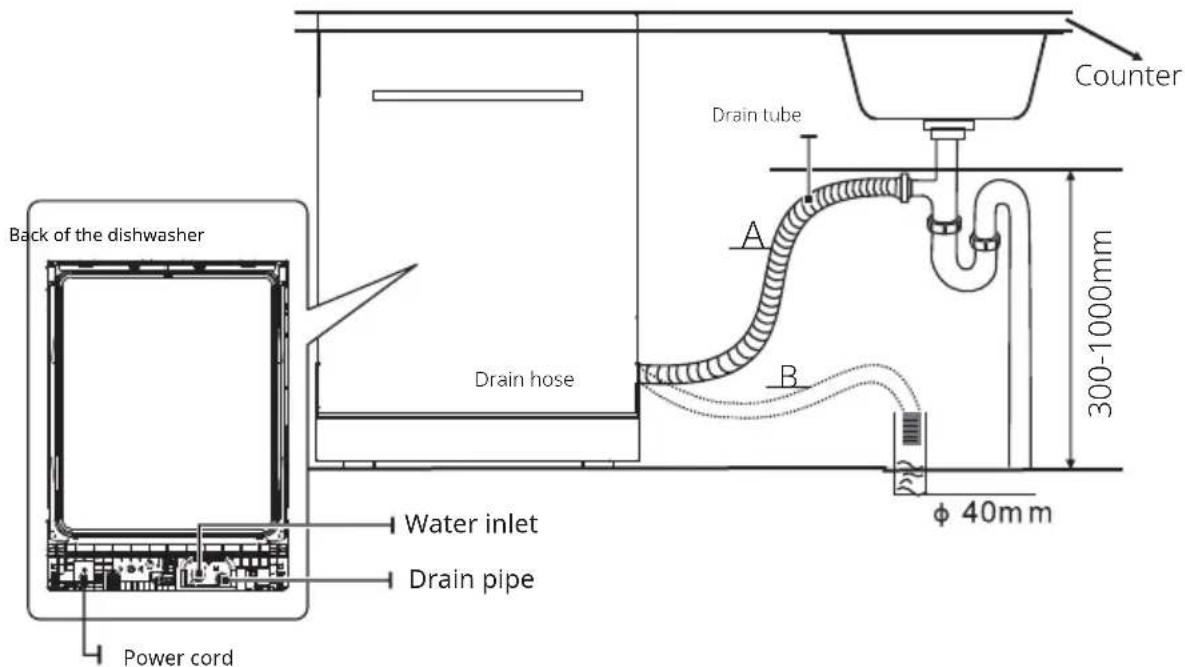
Insert the drain hose into a drain pipe with a minimum diameter of 4 cm, or let it run into the sink, making sure to avoid bending or crushing it. The height of the drain hose must be less than 300-1000 mm. The free end of the hose must not be submerged in water to avoid back-flow.

Please securely fasten the drain hose in position A or position B.
How to drain excess water from the hoses
If the connection to the drain pipe is located more than 1000 mm away, excess water may remain in the drain hose. It will be necessary to drain the excess water from the hose into a suitable container or bowl that is kept outside and lower than the sink.
water outlet
Connect the drain hose. The drain hose must be properly installed to prevent water leaks. Ensure that the drain hose is not bent or crushed.
extension hose
If you need a drain hose extension, make sure to use a similar drain hose.
It should not be longer than 4 meters; otherwise, the cleaning effect of the dishwasher may be reduced.
siphon connection
The waste connection must be at a height lower than 1000 mm (maximum) from the bottom of the dishwasher.
TECHNICAL INFORMATION
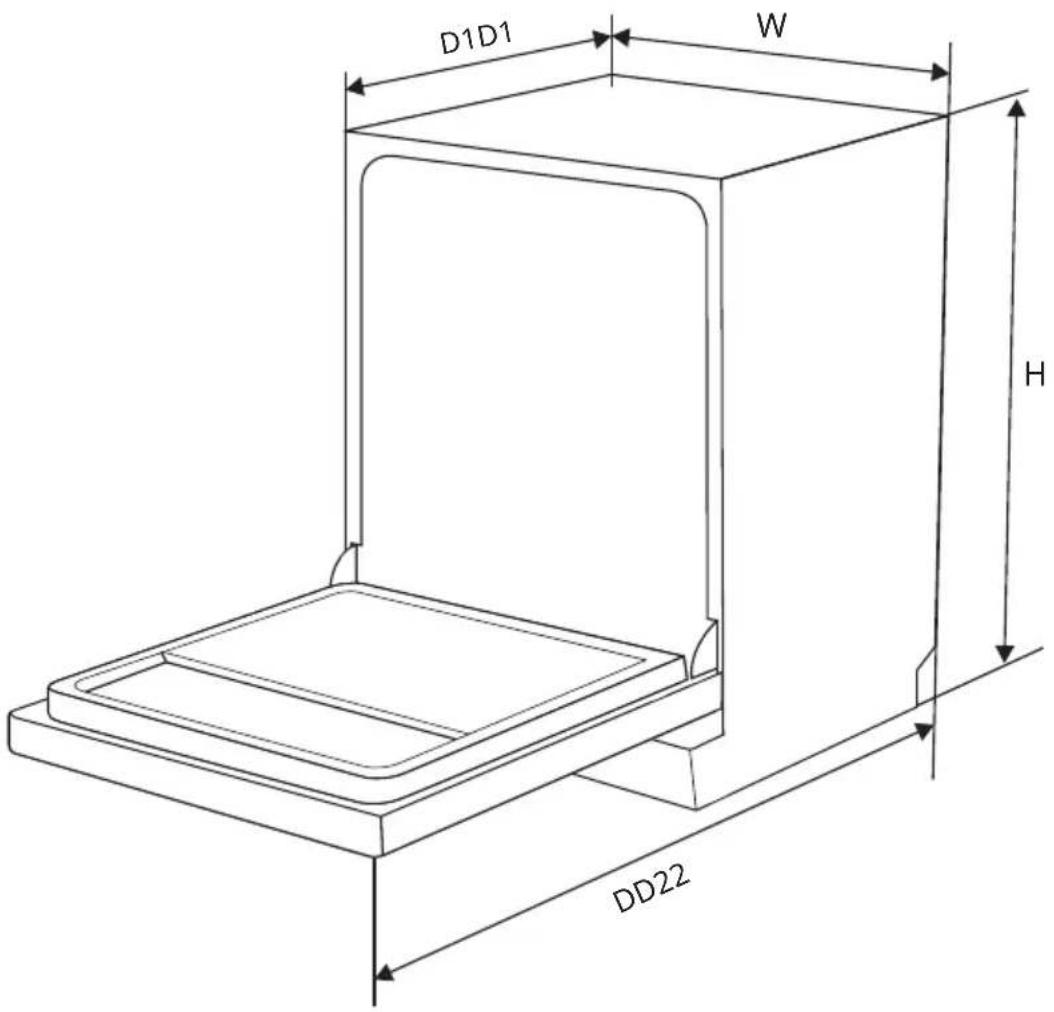
| Height (H) | 815mm |
| Width (W) | 598mm |
| Depth (D1) | 550 mm (with the door closed) |
| Depth (D2) | 1185 mm (with the door open 90°) |
Placement of the appliance
Place the appliance in the desired location. The back must rest against the wall behind it, and the sides next to adjacent cabinets or walls. The dishwasher is equipped with water supply and drain hoses that can be positioned to the right or left for proper installation.
Integrated installation
Step 1. Selecting the best location for the dishwasher
The installation position of the dishwasher should be close to the existing water supply and drain hose, as well as the power outlet.
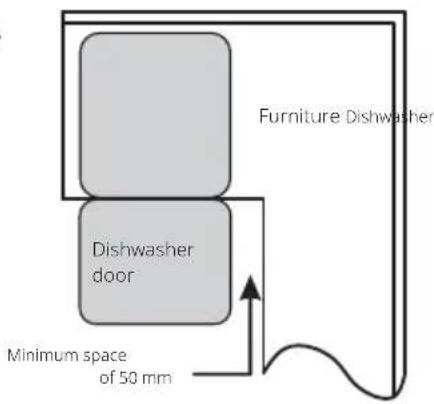
Illustrations of the cabinet dimensions and the installation position of the dishwasher.
- Less than 5 mm between the top of the dishwasher and the cabinet, and the exterior door aligned with the cabinet.
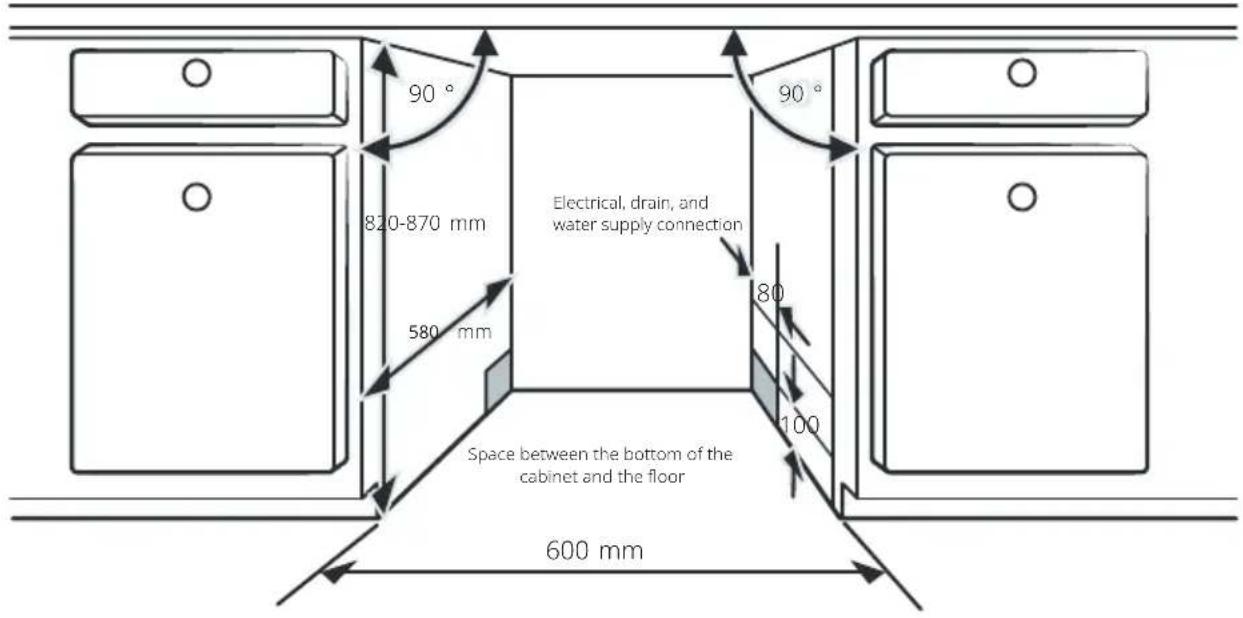
- If the dishwasher is installed in the corner of the furniture, there must be space when the door is opened.

NOTE:
Depending on where your power outlet is located, you may need to make a hole on the opposite side of the cabinet.
Step 2. Dimensions and installation of the aesthetic panel

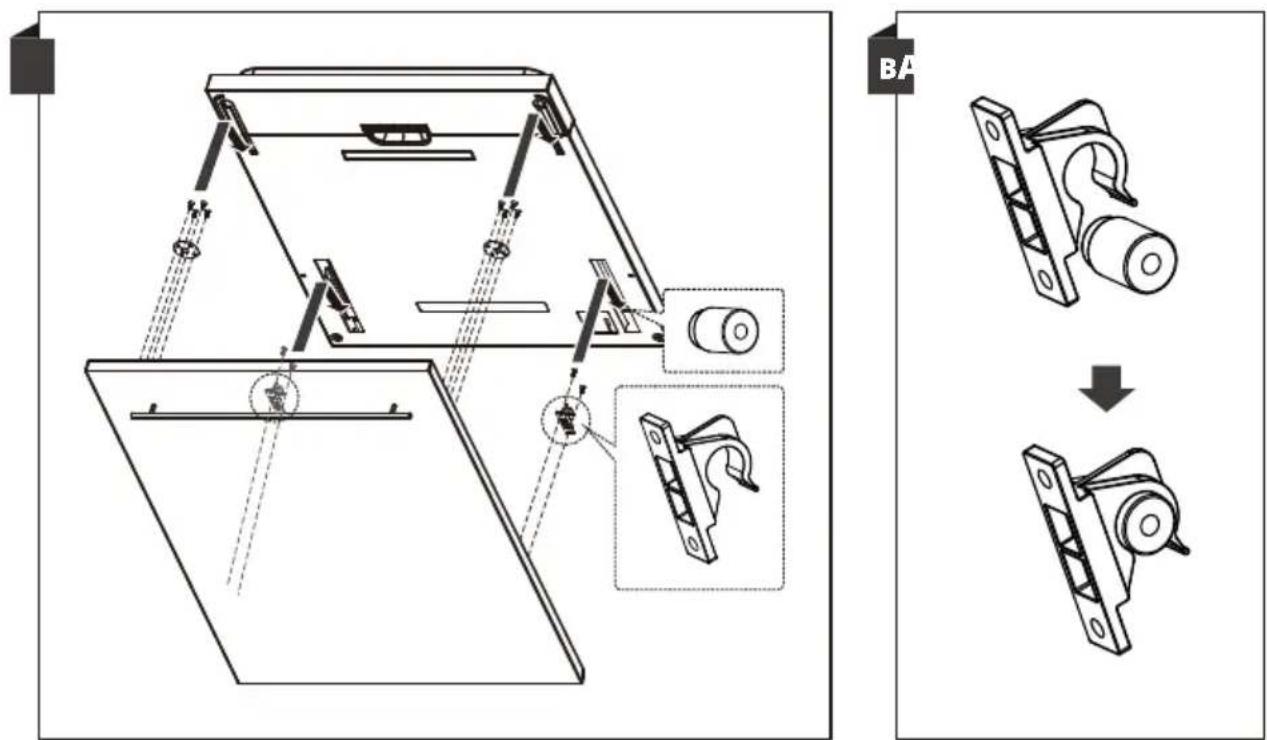
Follow the specific installation instructions to attach the aesthetic panel to the door.
Fully integrated model
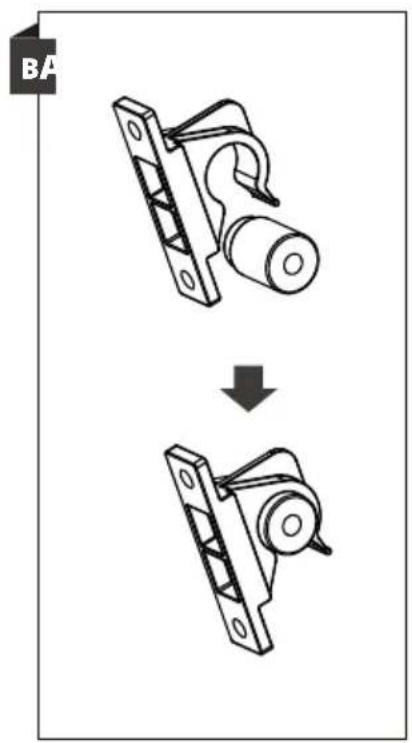
Install the hook on the aesthetic panel (see figure 4A) and place the hook in the slot of the exterior door of the dishwasher (see figure 4B). After positioning the panel, press the top of the aesthetic panel to ensure that the plastic hook is secured.
Step 3. Dishwasher installation steps

Please refer to the specific installation steps in the installation drawings.
- Attach the condensation strip under the countertop of the cabinet. Please ensure that the condensation strip is flush with the edge of the countertop.
- Connect the inlet hose to the cold water supply.
- Connect the drain hose.
- Connect the power cord.
- Place the dishwasher in the cabinet.
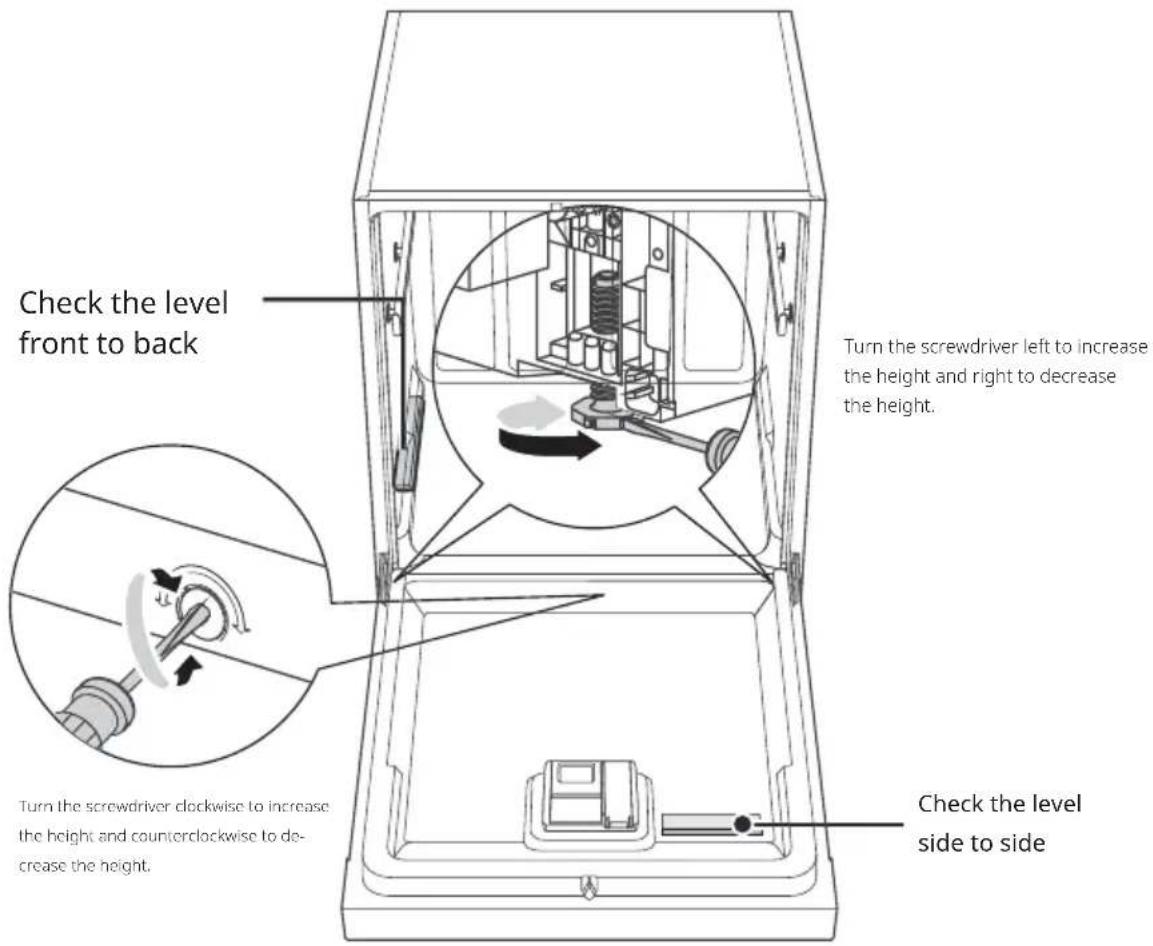
- Level the dishwasher. The rear leg can be adjusted from the front of the dishwasher by turning the Philips screw in the middle of the base of the dishwasher with a Philips screwdriver. To adjust the front legs, use a flat screwdriver and turn the front legs until the dishwasher is level.
- Install the cabinet door on the exterior door of the dishwasher.
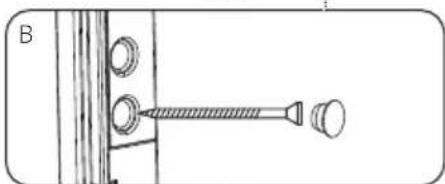
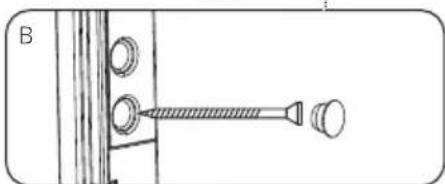
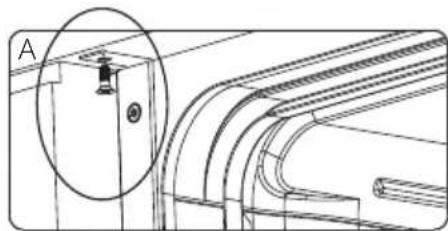
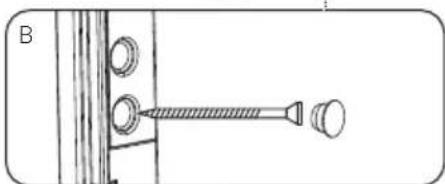
- The dishwasher must be secured in place. Depending on the cabinet, you can choose the top or side installation. The installation operation is as follows:
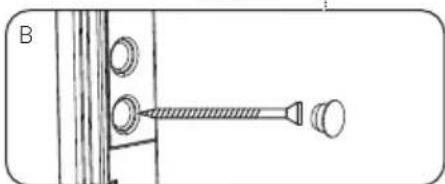
A. Normal work surface: Place the installation hook in the groove of the side panel and secure it to the work surface with screws.
B. Marble or granite countertop: Secure the side with screws.
natural_image
Technical line drawing of a mechanical component with a magnified detail view (no text or symbols)Or
natural_image
Technical line drawing of a screw fastener inserted into a bracket (no text or symbols)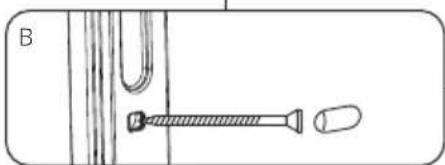
natural_image
Diagram of a screwdriver and U-tube with a labeled component (B), no text or symbols present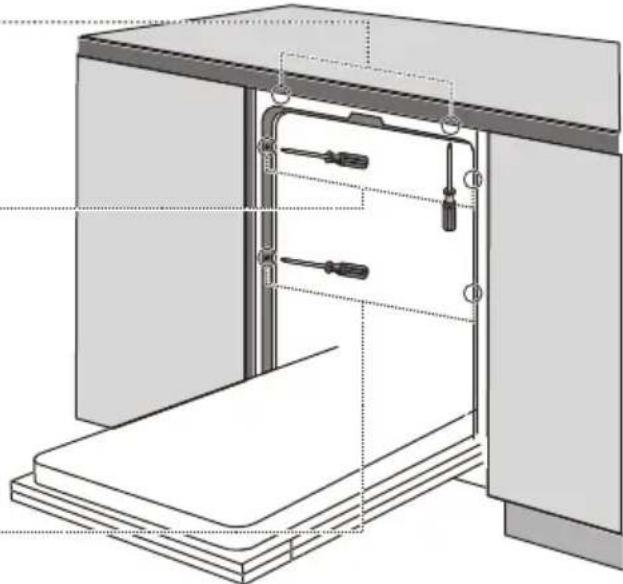
natural_image
Technical line drawing of a cabinet interior with screwdriver and drawer components (no text or symbols)Step 4. Leveling the dishwasher
The dishwasher must be level for proper operation of the plate rack and optimal washing performance.
- Place a level on the door and on the rack track inside the tub as shown to verify that the dishwasher is level.
- Level the dishwasher by individually adjusting the three leveling feet.
- When leveling the dishwasher, be careful not to let it tip over.

NOTE:
The maximum adjustment height of the feet is 50 mm.
PROGRAMME SOLUTION TIPS
Before calling service
Checking the tables on the following pages may save you a service call.
| Problem | Possible causes | What to do |
| The dishwasher does not start | Blown fuse or tripped circuit breaker. | Replace the fuse or reset the circuit breaker.Remove any other appliance sharing the same circuit as the dishwasher. |
| The power supply is not turned on. | Ensure that the dishwasher is turned on and that the door is securely closed.Make sure the power cord is properly plugged into the power outlet. | |
| Water pressure is low. | Verify that the water supply is correctly connected and that the water is turned on. | |
| Dishwasher door not closed properly. | Make sure to close the door properly and secure it. | |
| Water not pumped from the dishwasher. | Drain hose twisted or trapped. | Check the drain hose. |
| Clogged filter. | Check the filter system. | |
| Clogged kitchen sink. | Check the kitchen sink to ensure it is draining properly. If the problem is that the kitchen sink is not draining, you may need a plumber instead of a dishwasher technician. | |
| Foam in the tub. Incorrect detergent.Help for spilled rinse aid. Always clean up rinse aid spills immediately. | Use only the special detergent for dishwashers to avoid foam formation. If this occurs, open the dishwasher and let the foam evaporate. Add 1 liter of cold water to the bottom of the dishwasher.Close the dishwasher door, then select any cycle . Initially, the dishwasher will drain the water. Open the door once the draining stage is complete and check if the foam has disappeared.Repeat if necessary. | |
| Stained interior of the tub.A detergent with dye may have been used. | Make sure the detergent is dye-free. | |
| White film on the interior surface. | Hard water minerals. To clean the interior, use a soft, damp cloth with dishwasher detergent and wear rubber gloves. Never use any cleaner other than dishwasher detergent, as it may cause foam or bubbles. | |
| There are rust stains on the cutlery. | The affected items are not corrosion-resistant. | Avoid washing items that are not corrosion-resistant in the dishwasher. |
| A program was not run after adding dish-washer salt. Traces of salt have entered the washing cycle. | Always run a wash program without any dinnerware after adding salt. Do not select the Turbo function (if present) after adding dishwasher salt. | |
| The softener lid is loose. | Verify that the softener lid is secure. | |
| Banging noise in the dishwasher | A spray arm is hitting an item in a basket. | Interrupt the program and rearrange the items that are obstructing the spray arm. |
| Rattling noise in the dishwasher | Dinnerware items are loose in the dishwasher. | Interrupt the program and rearrange the dinnerware items. |
| Banging noise in the water pipes | This may be caused by the installation in place or the cross-section of the pipe. | This does not affect the operation of the dishwasher. If you have any questions, contact a qualified plumber. |
| The plates are not clean. | The plates were not loaded correctly. | See PART II "Preparation and Loading of Plates." |
| The program was not pow-erful enough. | Selectamoreintensiveprogram. | |
| The plates are not clean. | Insufficient detergent was dispensed. | Use more detergent or change your detergent. |
| Objects are blocking the movement of the spray arms. | Reorganize the objects so that the spray can rotate freely. | |
| The combination of filters is not clean or is not properly placed in the base of the wash chamber.This may cause the spray arm jets to become blocked. | Clean and/or properly place the filter.Clean the spray arm jets. | |
| Cloudiness in the glassware. | Combination of soft water and too much detergent. | Use less detergent if you have soft water and select a shorter cycle to wash the glassware and leave them clean. |
| White spots appear on the plates and glasses. | The hard water area can cause limescale deposits. | Verify the setting of the water softener or the filling status of the salt container. |
| Black or gray marks on the dishes | Aluminum utensils have rubbed against the plates | Use a mild abrasive cleaner to remove those marks. |
| Detergent left in dispensers | The plates block the detergent dispenser | Reload the plates correctly. |
| The plates are not drying | Improper loading | Wear gloves if detergent residue can be found on the plates to avoid skin irritation. |
| Plates are removed toosoon | Do not empty your dishwasher immediately after washing. Open the door slightly to let the steam escape.Remove the plates until the interior temperature is safe to the touch.Unload the lower basket first to prevent water from falling from the upper basket. | |
| Problem | Possible causes What to do | |
| The plates are not drying | An in-correct program has been selected. | With a short program, the washing temperature is lower, decreasing cleaning performance.Choose a program with a long washing time. |
| Use of cutlery with low-quality coating. | Drainage of water is more difficult with these items. Cutlery or plates of this type are not suitable for washing in the dishwasher. | |

WARNING
Self-repair or non-professional repair can pose serious safety risks to the user of the appliance and affect the warranty.
Availability of spare parts
- Seven years after placing the last unit of the model on the market:
Motor, circulation and drainage pump, heaters and heating elements, including heat pumps (separately or grouped), pipes and related equipment including all hoses, valves, filters and water stop systems, structural and interior parts related to door assemblies (separately or grouped), printed circuit boards, electronic displays, pressure switches, thermostats and sensors, software and firmware including reset software. - Ten years after placing the last unit of the model on the market:
Door hinge and seals, other seals, spray arms, drainage filters, interior and peripheral plastic components such as baskets and lids.
WARRANTY CERTIFICATE
INOXPAN S.L. thanks you for choosing and trusting a product from our Pando brand, which is distinguished by its Quality, Design, and Innovation, remaining true to its origins and commitments.
PANDO WARRANTY CONDITIONS:
This appliance comes with a warranty of 3 years from the date of purchase and covers it against any defects. of manufacturing that affects its proper functioning. For its validity, it is essential to present the invoice or purchase receipt before the technician of the Authorized Official Service Pando.
During this period, the Company commits to replace or repair free of charge any defective part due to to manufacturing defects of the appliance, until achieving its correct operation, as well as the labor necessary and expenses incurred as a consequence of such repair or replacement.
EXCLUSIONS FROM PANDO WARRANTY:
The following cases will not be covered by the warranty or may lead to its cancellation, in which case the user will be responsible for the costs of materials, labor, and travel of the technical service:
- Malfunction of the appliance or damage to it due to non-compliance with the rules, instructions, and recommendations indicated in the user and installation manual of the appliance.
- Damage to the appliance, furniture, or external elements due to improper installation or improper handling of the appliance and its connection elements, such as the power cord, water inlet, drain connection, etc.
- When the appliance is intended for non-domestic use, for which it is not designed.
- Inspections of the installation or normal operation. Nor cleaning or maintenance of the product.
- Breakdowns or damages caused by: transport, intervention or handling of the appliance by unauthorized personnel or those not associated with Pando, and by unofficial Pando technical assistance services.
- Dents, scratches, or aesthetic defects in the product due to improper installation, handling, or misuse.
- Aesthetic, usage, and wear components such as panels, filters, trays, baskets, guides, spray arms, and accessories.
- Rust or stains on steel or lacquer caused by improper application or unprotected exposure to corrosive elements such as inappropriate or unsuitable cleaning products.
- Aesthetic or corrosive damage to furniture or external elements of the appliance, as well as inside the cavity of the dishwasher, such as walls and internal accessory elements, on the door and panel, due to the use of unsuitable cleaning products or inappropriate and improper use of cleaning product tanks, such as salt, rinse aid, or detergent, without following the instructions in the appliance manual.
- Breakdowns and damages caused by external agents: anomalies in electrical supply, natural disasters, atmospheric phenomena, geological events, storms, lightning, floods, any type of animal, etc.
- Breakdowns or damages caused by chemical or electrochemical effects of water or by inappropriate water quality such as excessive hardness. Accumulation of hardness in any internal or external component of the dishwasher.
- In the event that there is not easy and safe access to uninstall the appliance from the furniture, as well as to the electrical, water, and drain connections, or if the furniture elements prevent its easy and safe extraction, in this case, the user will be fully responsible for ensuring that the appliance is easily accessible, and will also bear the costs of labor and travel in the event that Pando Technical Service has to arrange for a delay in intervention time or a second visit due to the inaccessibility of the appliance.
INOXPAN, S.L. is expressly excluded from any responsibility for any direct or indirect damage to persons or materials caused by improper handling of the appliance.
Contact details for Authorized Official Technical Service Pando:
| SPAIN, PORTUGAL, AND ANDORRA: | OTHER COUNTRIES: | ||
| ESwww.pando.es/technical-assistance/ |  | ENhttps://www.pando.es/en/after-sales-services/FRhttps://www.pando.es/fr/service-apres-vente/ |  |
Pol. Ind. El Cros
SERVICIO POST VENTA España, Portugal y Andorra

Environmental Management System Certification
UNE-EN ISO 14001:2015
ES20/208675

- Pando
- integralcooking
- PLT-7461
- The Global Kitchen Partner
- DEL MEDIOAMBIENTE Y TRATAMIENTO DEL RESIDUO
- NOTA:
- 2
- CÓDIGOS DE ERROR
- Cestainferior:
- CÓDIGOS DE ERRO
- PROTECTION DE L'ENVIRONNEMENT ET TRAITEMENT DES DÉCHETS
- REMARQUE :
- CODES D'ERREUR
- ENVIRONMENTAL PROTECTION AND WASTE TREATMENT
- INDEX
- SAFETY INSTRUCTIONS
- WARNING
- Ground connection instructions
- PRODUCT DESCRIPTION
- IMPORTANT:
- NOTE:
- USING THE DISHWASHER
- Load the salt into the tank
- Control panel
- Adjustment of the upper basket
- Folding of the cup shelves
- Fold back the shelf racks
- To wash the following cutlery/plates.
- Recommendations for loading the dishwasher
- Removing the plates
- CARRYING BASKETS
- Upper basket:
- Lower basket:
- Cutlery rack:
- Tips for using the cutlery rack
- Function of the detergent
- Rinse aid function
- When to refill the rinse aid dispenser
- Filling the rinse aid compartment
- Adjustment of the rinse aid setting
- PROGRAMME SELECTION
- Program Table
- Energy saving
- Starting a program
- Changing the program mid-cycle
- Forgot to add a dish
- Automatic opening
- ERROR CODES
- USAGE METER
- MAINTENANCE AND CLEANING
- External Care
- The door and the door seal
- The control panel
- !
- Internal Care
- Filtration system
- Spray arms
- Frost precaution
- After each wash
- Unplug the appliance
- Do not use solvents or abrasive cleaning products
- When not in use for an extended period
- Moving the appliance
- Seals
- Water softener
- Salt consumption adjustment
- INSTALLATION INSTRUCTIONS
- Attention
- About the power connection
- Electrical requirements
- Electrical connection
- ⚠ Ensure that there is a proper ground connection before use.
- Water and drain supplies
- Cold water connection
- About the safety hose
- How to connect the safety hose
- How to disconnect the safety hose
- Connection of the drain hoses
- How to drain excess water from the hoses
- water outlet
- extension hose
- siphon connection
- TECHNICAL INFORMATION
- Placement of the appliance
- Integrated installation
- Step 1. Selecting the best location for the dishwasher
- Step 2. Dimensions and installation of the aesthetic panel
- Fully integrated model
- Step 3. Dishwasher installation steps
- Step 4. Leveling the dishwasher
- PROGRAMME SOLUTION TIPS
- Before calling service
- Availability of spare parts
- WARRANTY CERTIFICATE
- PANDO WARRANTY CONDITIONS:
- EXCLUSIONS FROM PANDO WARRANTY:
Brand : Pando
Model : PLT-7461
Category : Dishwasher