DUALIO MS5527 - Vacuum Cleaner MOULINEX - Free user manual and instructions
Find the device manual for free DUALIO MS5527 MOULINEX in PDF.

User questions about DUALIO MS5527 MOULINEX
0 question about this device. Answer the ones you know or ask your own.
Ask a new question about this device
Download the instructions for your Vacuum Cleaner in PDF format for free! Find your manual DUALIO MS5527 - MOULINEX and take your electronic device back in hand. On this page are published all the documents necessary for the use of your device. DUALIO MS5527 by MOULINEX.
USER MANUAL DUALIO MS5527 MOULINEX
natural_image
Black vacuum cleaner with attached microphone and base, no visible text or symbols on the device bodySPÉCIFICATIONS
text_image
Technical diagram of a handheld device with numbered parts labeled 1 to 5natural_image
Simple line drawing of a mechanical device with a labeled component (18), no text or symbols present.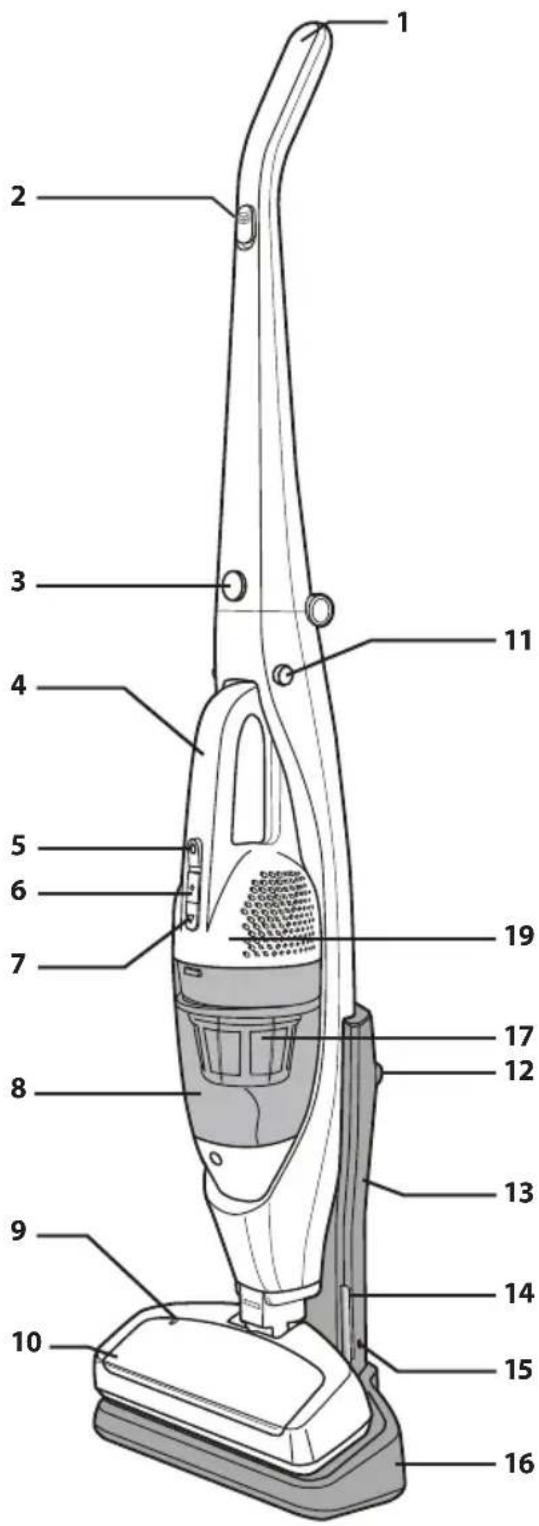
text_image
Labeled diagram of a vacuum cleaner with numbered parts for identificationCONSEILS DE SÉCURITÉ
natural_image
Illustration of a vacuum cleaner with a downward arrow indicating motion (no text or symbols)CHARGE
natural_image
Illustration of a vacuum cleaner next to an electrical outlet (no text or symbols visible)POIGNÉE PLIABLE
natural_image
Illustration of a hand using a manual tool to lift a spray bottle with curved arrows indicating rotation (no text or symbols)STOCKAGE
natural_image
Line drawing of a vacuum cleaner (no text or symbols)ASTUCES RELATIVES À L'UTILISATION
MISE EN GARDE
natural_image
Illustration of a person using a vacuum cleaner to clean or remove objects (no text or symbols visible)natural_image
Diagram of a handheld vacuum cleaner with airflow direction arrows (no text or symbols)CONSIGNES D'UTILISATION
CHARGE
natural_image
Simple line drawing of a curved pipe or duct with a labeled component 'B' (no text or symbols beyond label)text_image
Diagram of a car interior with labeled parts C and D, showing hand positioning and ventilation grillenatural_image
Illustration of three-step cleaning process: hand holding tool, pouring cup into bowl, and pouring powder onto a tray (no text or symbols)natural_image
Illustration showing hands handling a mechanical component and pouring material into a tray (no text or symbols)natural_image
Illustration of hands inserting a component into a device (no text or symbols visible)natural_image
Line drawing of hands holding a device with a handle, no text or symbols presentnatural_image
Illustration of hands holding a tool interacting with a device (no text or symbols visible)natural_image
Illustration of hands holding a device with a tool, no visible text or symbolsnatural_image
Line drawing of a hand holding a device with a scroll wheel (no text or symbols)EN PARTS AND FEATURES
SPÉCIFICATIONS
| ITEM | SPEC |
| Battery | 12 V |
| Vacuuming runtime 15 minutes Max | |
| Charging time 16 hours Max |
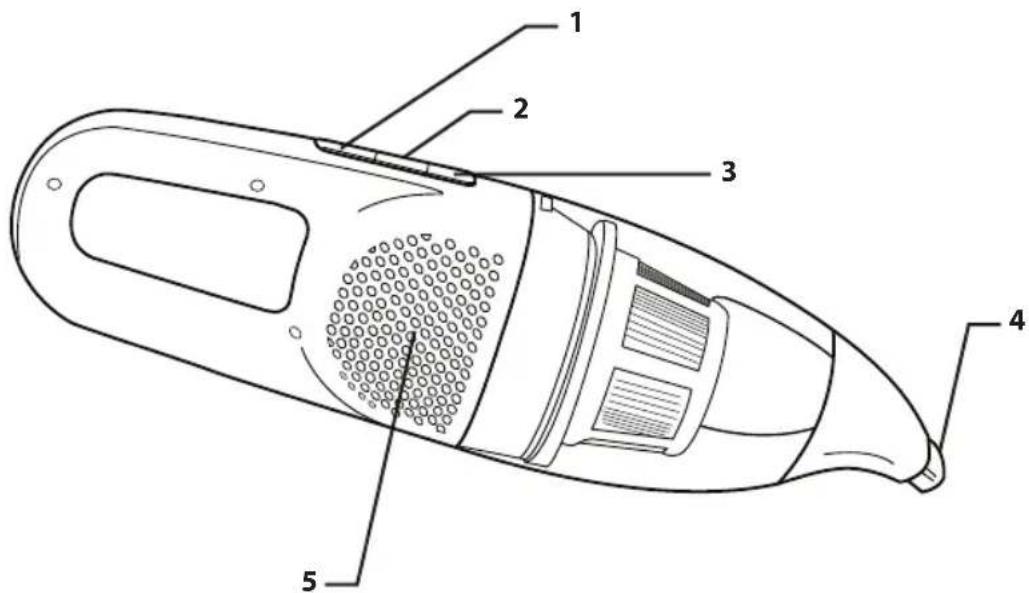
CORDLESS HAND VAC
1 Handy Vac's On/Off Button
2 Battery Indicator
3 Dust Bin Release Button
4 Nozzle
5 Batteries : 12V : ref. RS-RH5379 (not visible)
text_image
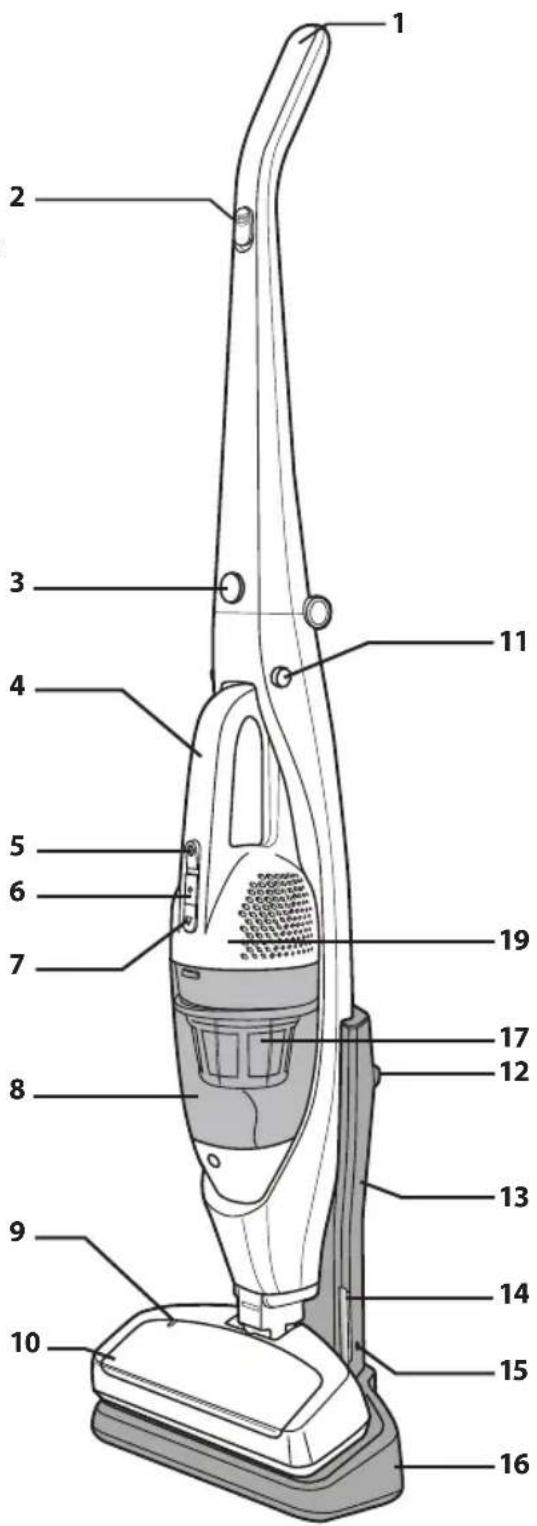
Technical diagram of a handheld device with numbered parts labeled 1 to 5It is important to know your vacuum cleaner's parts and features to ensure its proper and safe use. Review these before using your vacuum cleaner.
CORDLESS STICK VACUUM FULLY ASSEMBLED
1 Handle
2 Stick vac On/Off slider
3 Folding handle button
4 Hand vac
5 Hand vac On/Off slider
6 Battery Indicator
7 Dust bin release button
8 Dust bin
9 Electro-brush lock indicator
10 Floor brush
11 Hand vac release button
12 Mounting hole
13 Support frame
14 Charging indicator
15 Power supply input
16 Charging stand
17 Filter: ref. RS-RH5378
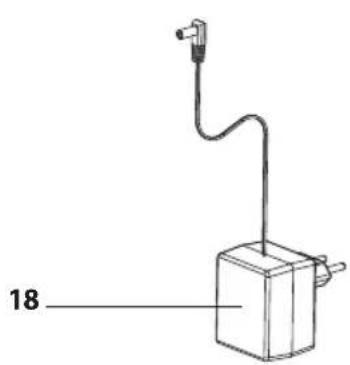
18 Charger: 12V: ref. RS-RH5377
19 Batteries: 12V: ref. RS-RH5379 (not visible)
natural_image
Simple line drawing of a mechanical device with a labeled component (18), no text or symbols present.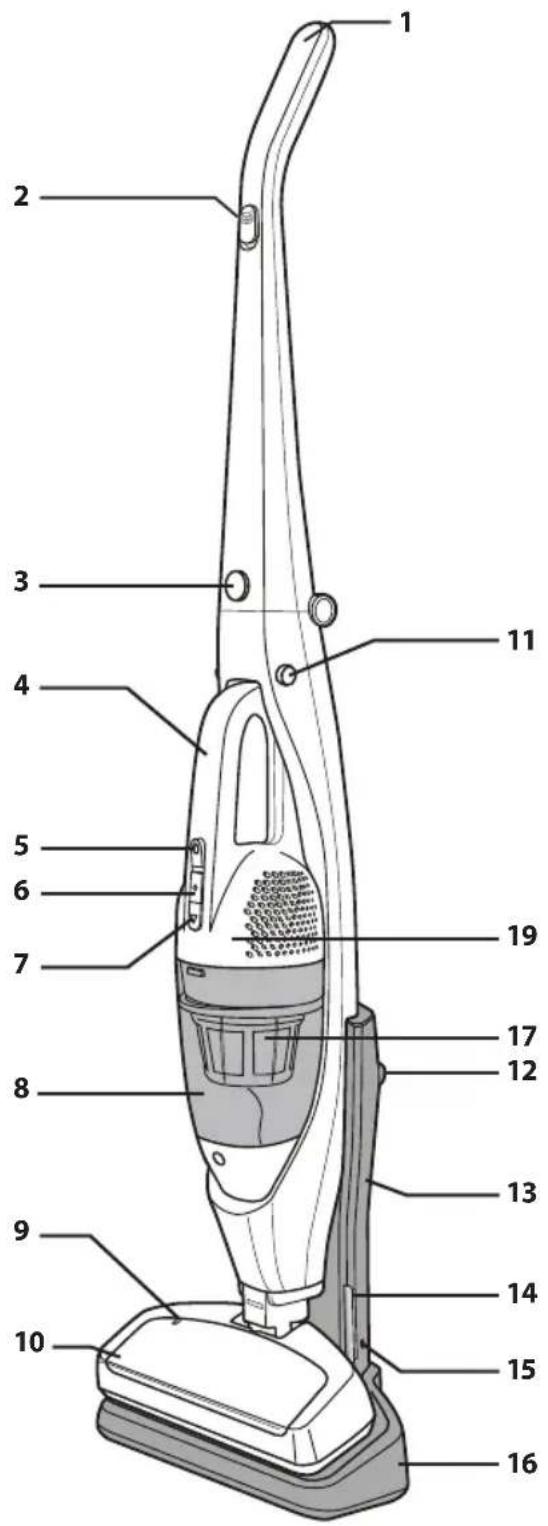
text_image
Labeled diagram of a vacuum cleaner with numbered parts for identificationSECURITY ADVICE
For your safety, this appliance complies with applicable rules and regulations (Low Tension Guidelines, Electromagnetic Compatibility, Environmental Regulations...).
This appliance is not designed to be used by individuals (including children) with reduced physical, sensory or mental capacities, nor by individuals lacking experience or knowledge in the use of the appliance, unless they have the benefit of being under the surveillance of a responsible person, or of having received proper instruction is advisable to keep an eye on children in order to make sure that they do not use the appliance as a toy.
This appliance may be used by children over eight (8) years old and by individuals with reduced physical, sensory or mental capacities, or lacking experience or knowledge, as long as they are properly supervised by a responsible person, as long as they have received instruction concerning the safe use of the appliance, and as long as all possible risks have been addressed.
Children should not play with the appliance. User cleaning and care should not be carried out by children unless they are aged 8 years and over and supervised.
Keep the appliance and its lead out of reach of children under 8 years of age.
This appliance can be used by children aged from 8 years and above and persons with reduced physical, sensory or mental capabilities or lack of experience and knowledge if they have been given supervision or instruction concerning use of the appliance in a safe way and understand the hazards involved. Children shall not play with the appliance. Cleaning and user maintenance shall not be made by children without supervision.
1 • Precautions before use
Read the instructions carefully and then store them safely.
- Your vacuum cleaner is an electric appliance: it must always be used under normal conditions.
Use and store the appliance away from children's reach. Never leave the appliance on and unattended. Never hold the end of the vacuum tube near your eyes or ears.
- Never vacuum wet surfaces or liquids, no matter what their nature; hot substances; ultra-fine substances such as plaster, cement or ashes; large cutting waste materials such as glass; toxic products such as solvents or paint strippers; aggressive products such as acids or strong cleaners; or gasoline or alcohol-based flammable or explosive materials.
- Never submerge the product or charge it under water or under any other liquid. Never spray water on the appliance or on the charger.
- Do not store the appliance outdoors and keep it in a cool, dry place at all times.
- Do not place the appliance near a heat source (ovens, electric heaters or hot radiators).
- Do not expose the batteries to a room temperature above 104^ (40°C).
- Do not take the vacuum cleaner apart while it is on.
- Never use your vacuum cleaner without the dust tray and the foam rubber motor protection filter.
- Do not use the appliance:
- If it fell and shows visible signs of deterioration or functional anomalies.
- If the charger or the charger cable are damaged.
In any of these cases, do not try to take the appliance apart. Rather, take it to the authorized Moulinex Service Center nearest to your home, because special tools will be needed in order to safely carry out any repairs.
• Repairs must only be carried out by specialists using original replacement parts.
• To attempt the repair of an electronic appliance at home may be hazardous to the user.
- Only use original, guaranteed Moulinex replacement parts (filters, batteries...).
This appliance is intended for domestic use only. In case it is used inappropriately, not following the given instructions, Moulinex will not be subject to any liabilities whatsoever.
2 • Electric power source
- Make sure that the voltage indicated on the rating plate of the charger corresponds to that of your power source.
- Never unplug the charger by pulling the electric cord.
- If the charger cord is damaged or if the charger itself does not function properly, do not use any other charger, different from the model provided by the manufacturer, and contact the Moulinex Consumer Service or go to the authorized Service Center nearest to your home.
3 · Repairs
Repairs must only be carried out by specialists using original replacement parts. To attempt the repair of an electronic appliance at home may be hazardous to the user, and will invalidate the guarantee.
BEFORE FIRST USE
Unpack your appliance and throw away any tags attached. Make sure to keep your guarantee and read the instructions carefully before using the appliance for the first time.
Charging the battery
IMPORTANT :
Use only the original charger provided with the appliance. Do not charge the appliance at temperatures lower than 32^ F ( 0^ C) or higher than 104^ F ( 40^ C). Using a universal charger will automatically invalidate the guarantee.
ASSEMBLY INSTRUCTIONS
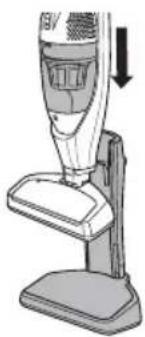
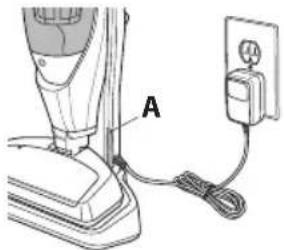
CHARGING STAND
Align the slots on the charging base and the Stick Vacuum and slide the Vaccum down until it stops.
natural_image
Illustration of a vacuum cleaner with a downward arrow indicating motion (no text or symbols)CHARGING
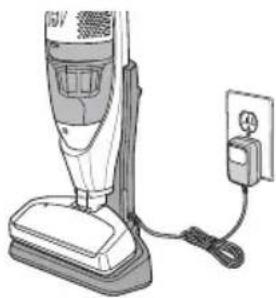
Store the Cordless Stick Vacuum on the charging base when not in use.
Light charge signal :
. Red LED: Product on charge (16 hours max)
. Green LED: Product is charged and changes to battery charge maintenance mode.
natural_image
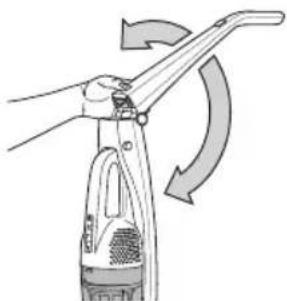
Illustration of a vacuum cleaner next to an electrical outlet connected by wires (no text or symbols visible)FOLDING HANDLE
Pull the handle up until it locks in place.
To fold down the handle, press the Folding Handle Button and push the handle back until it stop
natural_image
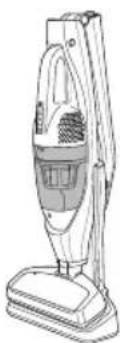
Illustration of a hand using a cleaning tool to lift a spray bottle, with no text or symbols present.STORAGE
Keep the Stick Vac on the charging base with the handle folded down for compact storage.
natural_image
Line drawing of a vacuum cleaner (no text or symbols)VACUUMING TIPS
WARNING
Personal Injury and Product Damage Hazard
- DO NOT pull plug from wall by the power cord. If there is damage to the cord or plug, personal injury or property damage could result.
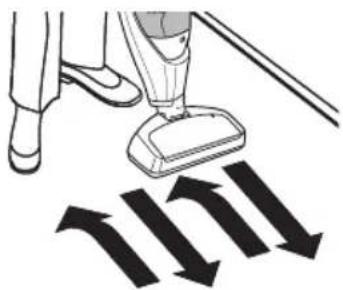
SUGGESTED SWEEPING PATTERN
For best cleaning action, the floor brush should be pushed straight away from you and pulled straight back. At the end of each pull stroke, the direction of the nozzle should be changed to point into the next section to be cleaned. This pattern should be continued across the carpet with slow, gliding motions.
NOTE:
Fast, jerky strokes do not provide complete cleaning.
natural_image
Illustration of a person using a vacuum cleaner to clean or store floor tiles, with arrows indicating direction (no text or symbols)For best cleaning results, keep the airflow passage open.
. Check each assembly area, occasionally for clogs
Check that there is no object obstructing the air inlet.
USING THE HAND VAC
To remove the Handy Vac from the Stick Vacuum, Press the release buttons on each side as shown.

natural_image
Diagram of a hand holding a device with arrows indicating motion or force (no text or symbols present)OPERATING INSTRUCTIONS
CHARGING
Always be sure that the Vacuum is off before placing on the charging stand.
Allow the Stick Vacuum to charge until the Charging Progress Indicator shows green.
text_image
AA Charging Progress Indicator
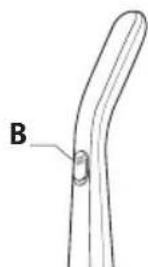
When using the Hand Vac, use the Hand Vac On/Off button to turn the Hand Vac on and off.
natural_image
Simple line drawing of a curved pipe or duct with a labeled component 'B' (no text or symbols beyond label)B On/Off Slider
USING THE HAND VAC
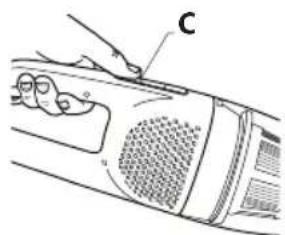
When using the Stick Vacuum in the upright position, use the On/Off slider to turn the Stick Vacuum on and off.
text_image
Diagram of a car interior with labeled parts and hand pointing to component CC Hand Vac On/off Button
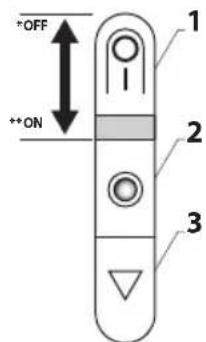
HAND VAC CONTROLS
text_image
+OFF +ON 1 2 3* OFF
** ON
1 Hand Vac On/Off Button
2 Battery Indicator
3 Dust Bin Release Button
IMPORTANT:
. Always turn off the appliance and unplug it before storing or cleaning.
. Never use your vacuum cleaner without its filter.
. Do not use detergents, or aggressive or abrasive products. The transparent color of the dust bin may change with time; however, this will not modify the performance of the appliance.
EMPTYING DUST BIN
WARNING
Turn off vacuum cleaner before performing maintenance to the vacuum cleaner.
natural_image
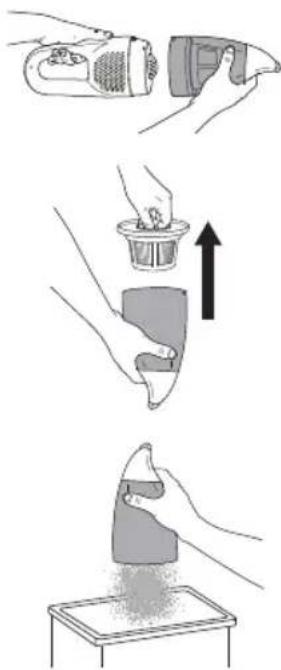
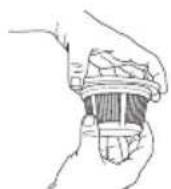
Illustration showing three steps of a hairdryer application: adding a brush, adding a cup, and pouring powder onto a tray (no text or symbols)1 • Push the dust bin release button and remove the dust bin.
2 • Pull the dust bin filter up and out as shown.
3 • Empty the dust bin into a trash receptacle as shown.
CLEANING THE DUST BIN FILTER
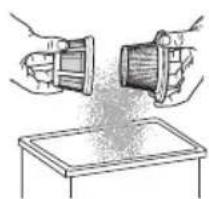
1 • Remove the filter from the filter holder by twisting the lid and filter counterclockwise. To lock the filter back in place turn clockwise
natural_image
Illustration of two hands handling a mechanical component above a tray (no text or symbols)2 • Remove and clean the filter over a trash receptacle.
DO NOT operate without filter installed.
DO NOT wash dust bin in the dishwasher.
DO NOT water-wash the filter.
Brush the filter to clean it
In order to assure optimal performance, wash the dust bin or filter after each vacuum use.
CAUTION
Do not attempt to dry filter with a hair dryer or by placing in clothes dryer. Hot air may cause the filters to warp.
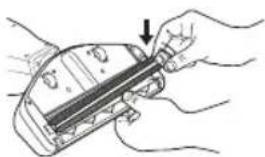
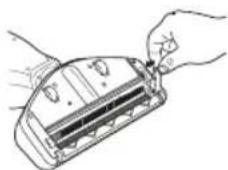
CLEANING THE ROLLER
WARNING
Turn off and unplug vacuum cleaner before performing maintenance to the vacuum cleaner.
natural_image
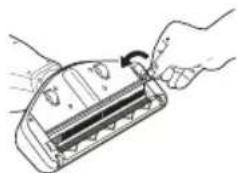
Illustration of hands using a tool to adjust or install a mechanical component (no text or symbols visible)1 • Using a penny or small coin, turn the roller release screw counterclockwise.

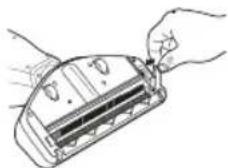
2 • Lift and remove the roller release latch.
natural_image
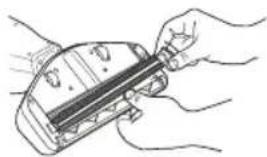
Illustration of hands holding a tool interacting with a device (no text or symbols visible)3 • Pull the roller out by pulling up on the right side – Clean the roller
natural_image
Illustration of hands holding a device with a tool, no visible text or symbols4 • Place the roller back into the slots
5 • Place the roller release latch back into the proper position
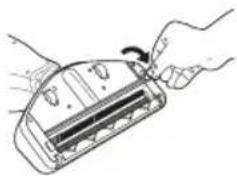
natural_image
Line drawing of a hand inserting a card into a device (no text or symbols)6 • Lock by turning the roller release screw clockwise with a penny or small coin.
TROUBLESHOOTING
Review this table to find do-it-yourself solutions for minor performance problems. Any other service needed should be performed by a qualified service dealer.
WARNING
Always turn off and unplug vacuum cleaner before performing maintenance to the vacuum cleaner. Failure to do so could result in electrical shock or personal injury.
| PROBLEM POSSIBLE CAUSE POSSIBLE SOLUTION | ||
| Vacuum cleaner won’t start | 1. Battery needs charging2. Tripped circuit breaker/blown fuse at household service panel. | 1. Plug in firmly, allow vacuum to charge2. Contact After Sale Service. |
| If the brush does not start | The brush is blocked | Clean the brush and wait for about 10 minutes before restarting. |
| Poor job of dirt pick up | 1. Full or clogged dust bin.2. Clogged airflow passages.3. Dirty filters | 1. Empty dust bin. (page 19)2. Clear airflow passages. (page 19 & 20)3. Change/Clean filters. (page 19) |
BATTERIES
- Battery replacement
This appliance contains nickel-metal hydride (NiMh) accumulators which are, for safety reasons, only accessible to professional engineers. When the battery is no longer capable of retaining its charge, the NiMh block must be removed. In order to replace the accumulators, please visit the authorized Service Center nearest to your home.
- Throwing away the appliance
It is important that you remove the batteries before throwing away your appliance. In order to do this, visit an authorized Service Center or proceed as follows:
- Remove the hand vac from the electro-brush by pressing the unlocking buttons.
- Remove the dust bin.
- Remove the 5 screws located on the body of the appliance and separate the 2 parts that make up the body.
- Remove the assembly made up of the battery unit, motor and turbine.
- Then disconnect the 2 cables connected to the battery.
- Remove the screw located on the battery unit then remove the batteries from the battery unit.
Do not throw the battery unit into the waste bin; take it to the authorized Moulinex Service Center nearest to your home or to a place specially designated to process such type of waste.
ENVIRONMENT
- According to current regulation, any appliance that is out of service must be taken to an authorized Service Center, where it will be safely disposed of.
• Environment: Regulation 2002/95/CE
Warning
Do not place a block of rechargeable batteries with non-rechargeable batteries.
If you wish to change the batteries, visit an authorized Service Center.
The batteries are designed to be used indoors only. Do not immerse them in water. Handle the batteries with care. Do not place the batteries in your mouth. Do not let the batteries come in contact with other metal objects such as rings, nails or screws. Be careful not to provoke internal short-circuits in the batteries by inserting metal objects through their extremities. If a short-circuit does occur, the temperature of the batteries could rise dangerously, causing serious burns or even catching fire. If the batteries start leaking, do not rub your eyes or mucous membranes. Wash your hands and rinse your eyes with clean water. If irritation persists, consult your physician.
Let's help protect the environment!

① Your appliance contains numerous useful or recyclable materials.
Take the appliance to a collection spot so that it can be disposed of properly.
REPAIRS
IMPORTANT :
If you notice that your vacuum cleaner is not functioning properly, before any revision, turn it off by placing the Stop/Start buttons in the Stop position.
Repairs should only be carried out by specialists using original replacement parts. To attempt the repair of an electronic appliance at home may be hazardous to the user.
GUARANTEE
This appliance is intended for domestic use only. In case it is used inappropriately, not following the given instructions, Moulinex will not be subject to any liabilities whatsoever and the guarantee will be invalidated.
Read the instructions before using the appliance for the first time: using the appliance in any way different from the one indicated here would free Moulinex of all liabilities.
ES PIEZAS Y CARACTERÍSTICAS
ESPECIFICACIONES
text_image
Technical diagram of a handheld device with numbered parts labeled 1 to 5natural_image
Simple line drawing of a mechanical device with a labeled dimension (18) and a cable or wire attached to the top part (no text or symbols beyond the label)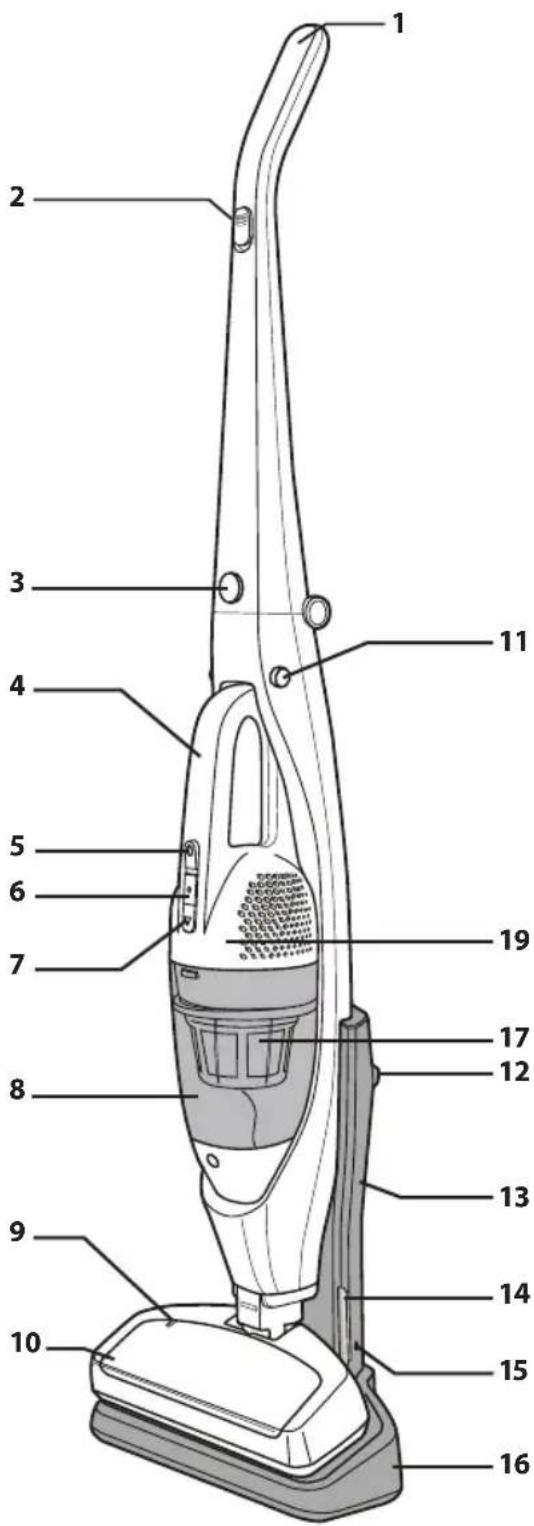
text_image
Labeled diagram of a vacuum cleaner with numbered parts for identificationnatural_image
Illustration of a vacuum cleaner with a downward arrow indicating motion (no text or symbols)CARGA
natural_image
Illustration of a vacuum cleaner next to an electrical outlet (no text or symbols visible)ASA ABATIBLE
natural_image
Illustration of a hand using a manual tool to lift a spray bottle with curved arrows indicating rotation (no text or symbols)ALMACENAMIENTO
natural_image
Line drawing of a vacuum cleaner (no text or symbols)natural_image
Illustration of a person using a vacuum cleaner to clean or remove objects (no text or symbols visible)natural_image
Diagram of a hand holding a device with arrows indicating motion (no text or symbols)text_image
Technical diagram showing a hand pressing a component labeled 'C' on a device panel with labeled parts O and P.natural_image
Illustration of three-step cleaning process: tool, cup, and sanding (no text or symbols)natural_image
Illustration of two hands handling a container and a tray, with no visible text or symbolsnatural_image
Illustration of hands using a tool to adjust or install a rectangular device (no text or symbols visible)natural_image
Line drawing of hands holding a device with a scroll wheel (no text or symbols)natural_image
Line drawing of hands holding a device with a pen inserted (no text or symbols)natural_image
Illustration of hands holding a device with a black arrow pointing to the handle (no text or symbols present)natural_image
Line drawing of hands inserting a card into a device (no text or symbols)natural_image
Line drawing of a hand holding a device with a scroll wheel (no text or symbols)text_image
Technical diagram of a handheld device with numbered parts labeled 1 to 5natural_image
Illustration of a vacuum cleaner with a downward arrow indicating motion (no text or symbols)CARREGAR
natural_image
Illustration of a vacuum cleaner next to an electrical outlet (no text or symbols visible)PEGA DOBRÁVEL
natural_image
Illustration of a hand using a tool to lift a spray bottle with curved arrows indicating motion (no text or symbols)ARMAZENAMENTO
natural_image
Line drawing of a vacuum cleaner with handle and base (no text or symbols)natural_image
Illustration of a person using a vacuum cleaner to clean or push their legs, with black arrows indicating downward motion (no text or symbols)natural_image
Diagram of a handheld device with a handle and control knob, showing motion arrows (no text or symbols)natural_image
Simple line drawing of a curved pipe or duct with a labeled point B (no text or symbols beyond label)text_image
Diagram of a car interior with labeled parts and hand pointing to component Cnatural_image
Illustration of three-step cleaning process: tool, cup, and sanding (no text or symbols)natural_image
Illustration of hands using a device to generate material or dust (no text or symbols present)natural_image
Line drawing of hands using a tool to adjust or install a device component (no text or symbols visible)natural_image
Line drawing of hands holding a device with a handle and control panel (no text or symbols)natural_image
Line drawing of hands holding a mechanical component (no text or symbols)natural_image
Illustration of hands holding a device with a ruler and pointer (no text or symbols)4 • Coloque novamente o rolo nas ranhuras
natural_image
Line drawing of hands holding a device with a scroll wheel (no text or symbols)text_image
Technical diagram of a device with numbered parts labeled 1 to 5, showing internal components and structural details.natural_image
Simple line drawing of a mechanical device with a labeled dimension (18) and a cable or wire attached to the top part (no text or symbols beyond the label)