IR-Sigma Plus - Headphones Irradio - Free user manual and instructions
Find the device manual for free IR-Sigma Plus Irradio in PDF.


User questions about IR-Sigma Plus Irradio
0 question about this device. Answer the ones you know or ask your own.
Ask a new question about this device
Download the instructions for your Headphones in PDF format for free! Find your manual IR-Sigma Plus - Irradio and take your electronic device back in hand. On this page are published all the documents necessary for the use of your device. IR-Sigma Plus by Irradio.
USER MANUAL IR-Sigma Plus Irradio
natural_image
Black hardcover headboard mount with adjustable necks and base mount (no text or symbols visible)
text_image
CEManuale d'uso | User manual | Manual de instrucciones
text_image
Technical diagram of a headset with labeled parts including head, front-mounted device, and cable connectorstext_image
Technical diagram of a pair of headphones with labeled parts, showing front and side views with numbered labels.text_image
Technical diagram showing two connected devices with numbered labels pointing to their components.text_image
Diagram showing connections between headphones, audio equipment, TV, and connected devices with labeled ports and cables.text_image
Technical diagram of a mechanical component with labeled parts and connection pointsControllo balance:
Melchioni S.p.a., owner of the Irradio brand, thanks you for purchasing this appliance. It is the result of a careful selection of features and the meticulous refinement of details, with the aim of offering a complete, versatile, reliable and high-performance solution for both the occasional and the most demanding users.
This manual contains important information both for the correct use of the appliance and for its safe operation. It is essential to read and understand its contents before performing any operations in order to obtain the best performance from the appliance. Keep this manual even after reading it, as you may need to refer to it in the future. The Irradio team is at your disposal for any advice, instructions or suggestions.
2. IMPORTANT INFORMATION FOR CORRECT, SAFE USE OF THE APPLIANCE
The following instructions must be read, understood and complied with before commissioning the appliance. They are especially useful for the protection of the safety, physical conditions and security of the operator and persons nearby, as well as for providing valuable information for preventing faults and malfunctions, for prolonging the service life, for reducing energy consumption and for environmental protection.
- The appliance is designed for household and non-intensive use. Any professional use compromises the safety requirement and is a condition for inapplicability of the warranty.
- The appliance is intended for indoor use and protected from inclement weather: use in an outdoor environment compromises the safety requirement and constitutes a potential hazard for the safety of the operator and persons nearby.
- The appliance must not be used if it shows deformations, bulges, cracks in the casing, missing parts or other structural anomalies. If these conditions occur, turn the appliance off and contact qualified technical personnel.
- The appliance must not be used if it emits unusual noises, foul odours, smoke, vapours or any other type of exhalation. If these conditions occur, turn the appliance off and contact qualified technical personnel.
- The appliance must not be stored or used in excessively humid or dusty environments, in the presence of atmospheres saturated with gas, fumes, in excessive or low temperatures or under direct solar radiation.
- The appliance must not be used in explosive atmospheres, near explosive, combustible, detonating or flammable material (e.g. petrol pumps, gas cylinders, etc.). Such use constitutes a serious risk to the safety of the operator and persons nearby and may cause fires or deflagrations.
- Make sure that each part of the appliance, especially the cord, is placed at a safe distance from heat sources (e.g. electric or gas cookers, heaters, stoves and fireplaces), both during use and when not in use.
- During use, the appliance must be constantly supervised: do not use it in the absence of operators or persons who are able to constantly check its correct operation.
- Use only the original accessories supplied. The use of non-original accessories could constitute a danger of damage to the appliance as well as a potential health hazard.
- Do not use the appliance if it is particularly wet, even partially.
- Do not use the appliance if one or more of the parts listed in the following chapter are missing or damaged: contact your dealer for repair.
- Periodically check the conditions of the parts making up the appliance, in particular the power cord: if any anomalies are found, refrain from using the appliance and contact qualified technical personnel.
- Do not use abrasive sponges or aggressive detergents for cleaning operations: refer to the following chapter for complete requirements.
- Cleaning operations must be carried out taking care to disconnect the appliance from the power supply: see the following chapter for the relevant requirements.
- Do not connect the appliance to extension cords, power strips, multi-socket strips, timers, controlled sockets or other devices that can start it up independently.
- If the appliance is not expected to be used for a prolonged period of time, it is advisable to unplug the power cord: this will extend the life of the appliance and help reduce power consumption.
- Do not disconnect the power by pulling on the cord: grasp the power supply firmly with one hand and grab the plug with the other, then disconnect with a quick, sharp movement.
- Before disconnecting the appliance, make sure that it is switched off, unless you need to disconnect it in an emergency situation due to abnormal behaviour as described in this chapter.
- Fully charge the battery before the first use.
- Do not proceed with excessive use after the low battery warning. Once a warning has been given, charge as soon as possible.
- If the appliance is not used for a long time, charge the battery at least once a month. This prolongs its life and ensures good performance when it is restarted.
• Use a moderate volume considering the health of your auditory system.
- The appliance must be kept out of the reach of children under 8 years of age; in any case make sure that it is not used for play.
- If the appliance is used by children, even if they are over 8 years old, or by persons with reduced cognitive, sensory or motor skills, they must be instructed about the dangers of incorrect use of the appliance and it must be guaranteed that the information has been correctly and fully understood. Adequate supervision must however be ensured.
- Do not use the appliance in the vicinity of liquid accumulations or sources, such as tanks, tubs, showers, sinks, other sanitary fixtures, faucets, pipes, sprinklers, bottles, storage vessels, expansion vessels, watercourses, flowerpots and similar. Do
not place containers holding liquids on top of the appliance; make sure that the power cord or power supply is never submerged.
- There is no reason to disassemble the appliance, not even after it has been decommissioned. It is composed of parts that could be swallowed by children or persons with reduced cognitive ability.
- Do not carry out any repairs yourself; in the event of a fault, have the appliance inspected by a qualified technician.
- None of the parts of the appliance must be modified under any circumstances: doing so normally constitutes a serious impairment of the safety requirement, a condition for immediate forfeiture of the warranty and does not lead to any increase in performance.
- Do not subject the charging cord to excessive bending or kinking: any internal damage to the cord which cannot be detected constitute a serious safety hazard.
- Place the appliance at an adequate distance from moving parts such as curtains, door and window sashes, hatches or similar in order to avoid accidental contact.
- Place the appliance on a flat, stable surface and ensure that the appliance cannot move independently due to gravity or external forces.
- Keep this manual for future reference.
3. IDENTIFICATION OF PARTS
text_image
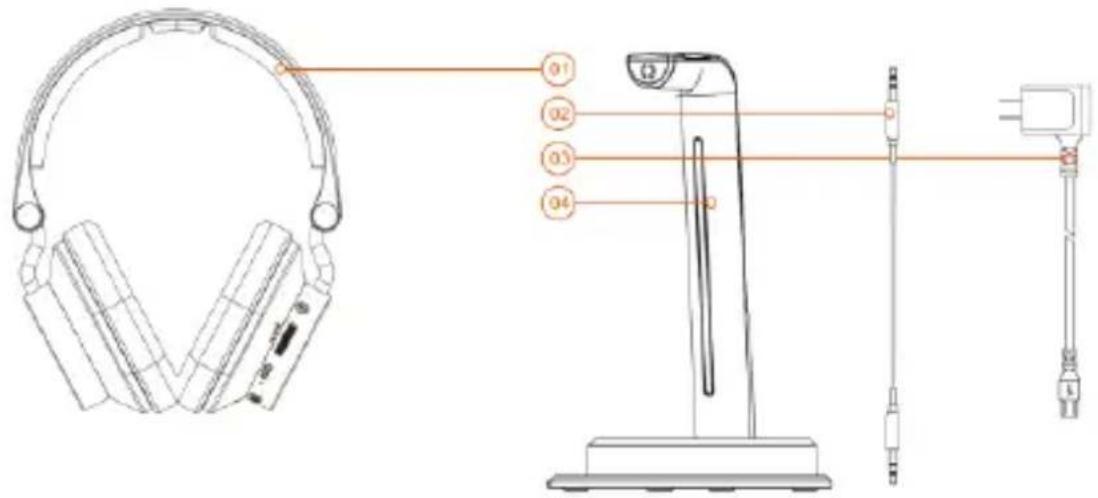
Technical diagram of a headset with labeled parts including front, rear, and side views- Headset body (receiver) | 2. Jack-Jack analogue signal cable | 3. Power supply | 4. Transmitter
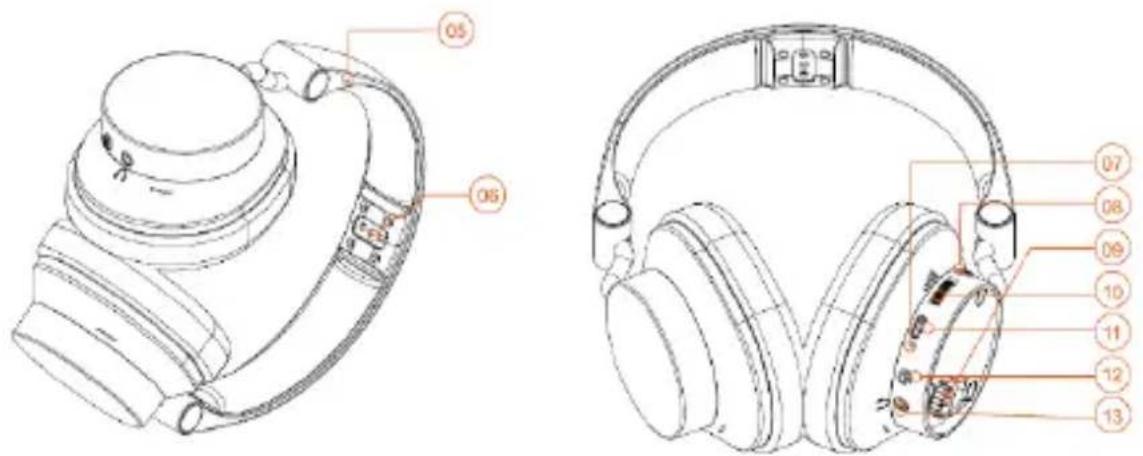
- Built-in microphone | 6. Pogo pin charging connector | 7. Function indicator LED | 8. Equalisation button | 9. Balance adjustment | 10. Volume adjustment | 11. USB-C charging port | 12. On/off button | 13. Input jack for wired use
text_image
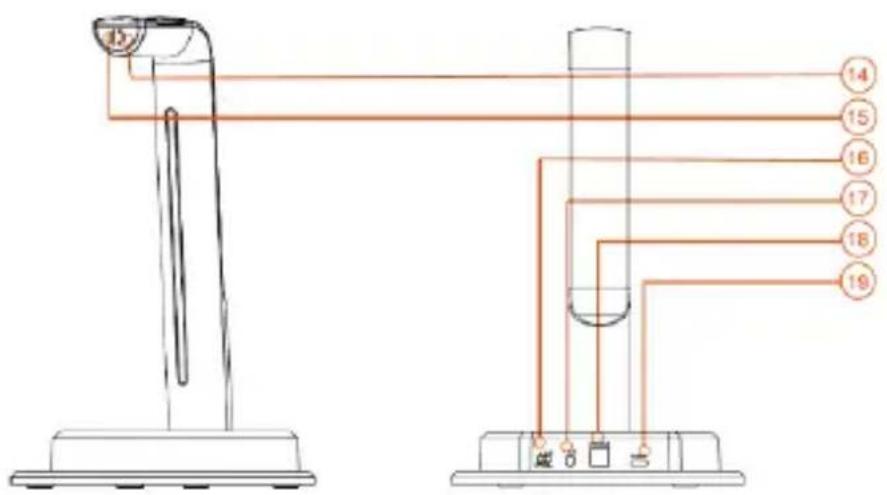
15 14 15 16 17 18 19- Charging indicator LED | 15. Connection indicator LED | 16. Input selector (aux/optical) | 17. AUX input jack | 18. Optical input connector | 19. USB-C power port
4. COMMISSIONING AND FIRST START-UP
Some preliminary operations are necessary before first use. Proceed as follows:
1) Unpack the appliance and check the conditions and completeness of the equipment, as indicated in the previous chapter.
2) Keep the packaging for 15 days in case it needs to be returned to the retailer; after this period, dispose of it in accordance with the instructions on the separation of materials indicated on it.
3) Read this manual in its entirety, paying particular attention to the instructions for safe use.
4) Carefully remove all possible fastening materials from parts, including internal parts.
5) Fully remove any stickers from the surface of the appliance.
6) Place the appliance on a flat, stable surface, taking care to reserve 10 cm of space on all sides, at the rear and above the appliance for the necessary air circulation.
7) Refer to chapter 2 for further details and instructions on appliance positioning and installation
text_image
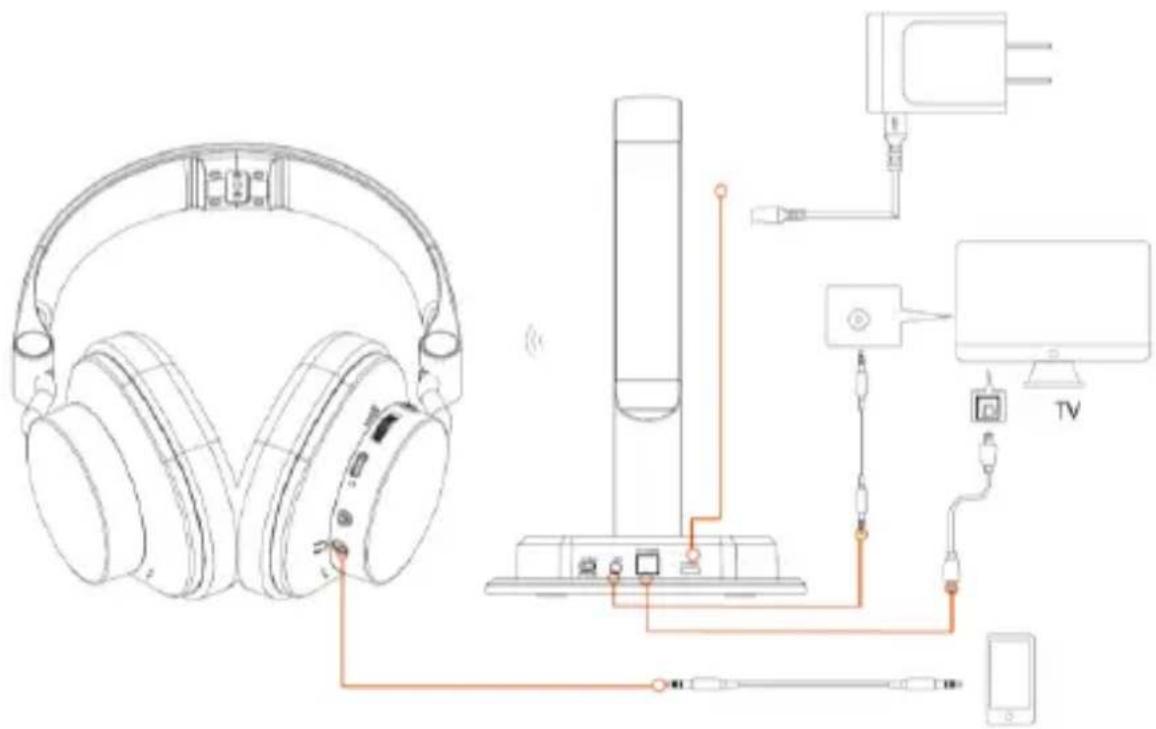
Diagram showing connections between headphones, audio equipment, TV, and connected devices with labeled components.8) Connect the included power supply (03) to the USB-C port (19) via the small connector, then connect the power supply to a household power socket.
9) Ensure that the cord does not come into contact with hot parts and that it is not subjected to excessive bending or kinking
10) Connect the signal cable in one of the following ways:
- Using a Toslink-Toslink fibre optic cable from the digital optical output of a TV or home theatre amplifier to the appliance's "optical in" input (18). In this case, the AUX/OPTICAL selector must be set to "OPTICAL".
- Using the supplied Jack-Jack cable (02) from the headset output of a TV or source to the appliance's "Aux" input (17). In this case the AUX/OPTICAL selector must be set to "AUX".
- Using the supplied Jack-Jack cable (02) from the headset output of a TV or source directly to the headset's wired input (13) without using the transmitter (wired mode).
natural_image
Line drawing of a desktop computer headset with earphones and a stand (no text or symbols)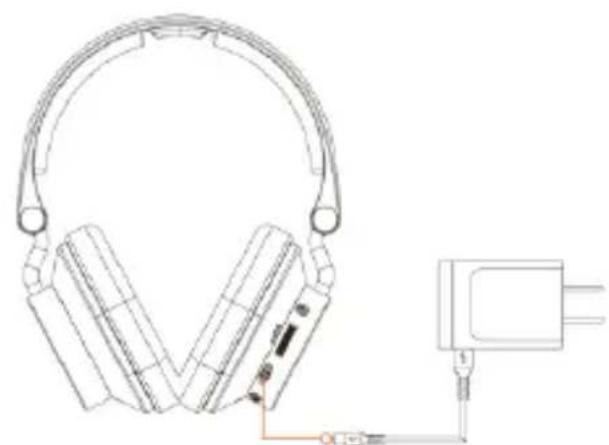
natural_image
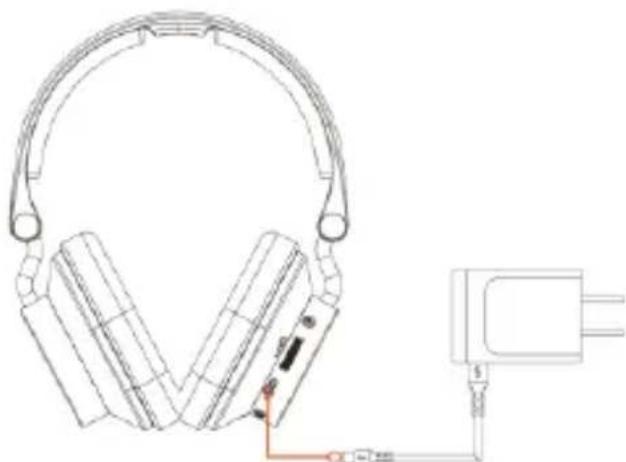
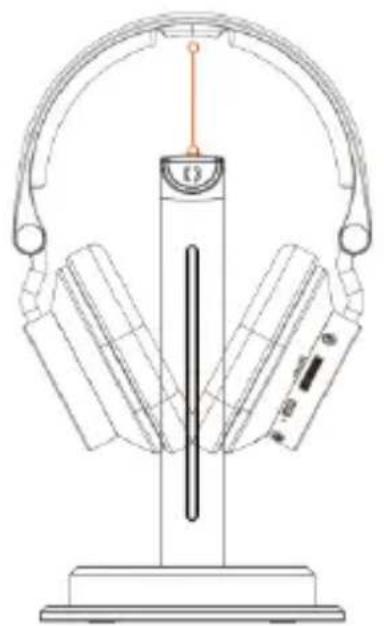
Line drawing of a headset connected to a power adapter (no text or symbols)11) Place the Pogo pin headset charging connector (06) at the top of the transmitter.
12) Check that the appliance's red charging LED (14) turns on.
13) Wait for the charging LED (14) to turn off, indicating that charging is complete.
14) The headset can be directly recharged without being placed on the transmitter by connecting a battery charger with USB-C plug to the charging socket (11). The appliance's power supply is suitable for this purpose.
The appliance can now be used normally. Charging operations (points 11 to 14) can be omitted if the headset is used in wired mode.
5. USING THE APPLIANCE
BT pairing procedure:
Put the headset on and press the on/off button (12) for a few seconds. The announcement “Power on” will be heard. Start searching for new BT devices using your own mobile device (smartphone, tablet or PC) until you find the “IR-Sigma Plus” device. Perform the standard pairing procedure, then control the playback from your own mobile device’s player: when the procedure is complete, the headset’s LED will light up steadily in green and the headset will play the “Connected” sound. Under these circumstances, the headset can also be used for phone calls, if connected to a 3G/4G/5G smartphone or tablet.
Transmitter pairing procedure:
Press the button under the transmitter base for three seconds, holding the headset pairing button (08) pressed at the same time; the pairing procedure is performed
automatically. Once complete, the headset's LED will flash blue and light blue. For playback, use the device previously connected to the transmitter.
For simultaneous connection:
If the headset is simultaneously connected to the transmitter and a BT source, it will play back the audio of the source connected to the transmitter. Only in the event of an incoming call will the BT connection prevail, strictly for the duration of the telephone conversation. In the absence of an inbound signal to the transmitter, the headset will automatically switch to the BT source.
Balance control:
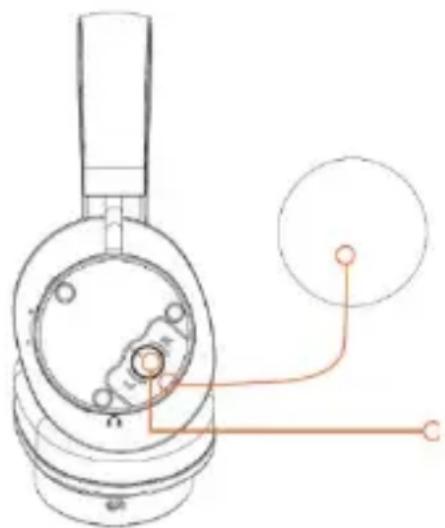
The volume of the channels can be differentiated to compensate for any differences in sound pressure between the two earcups of the headset. To access balance control, press the outer front bottom part of the right earcup to lift the magnetic cover. Once removed, the knob can be operated to adjust the balance. The adjustment should be made while wearing the headset with audio in playback, making sure to reposition the cover when the adjustment is complete to prevent accidental changes to the setting
text_image
Technical diagram of a mechanical component with labeled parts and connection pointsEqualisation:
The headset has three different sound tone settings, with the possibility for prominent bass or treble tones. By holding the button (8) pressed it is possible to cyclically select the type of equalisation according to the following scheme:
Balanced tones -> Prominent bass tones -> Prominent treble tones
Holding the button (12) pressed again, the selection starts again from the balanced tones.
On/off button (12):
| Short press | Long press | |
| In playback | Pauses/restarts | Turns off the headset |
| During ringing | Answers the call | No function |
| In call | Ends the call | No function |
| With the headset off | No function | Turns on the headset |
The equalisation button (8):
| Short press | Long press | |
| In playback | ON/OFF amplification microphone function | Changes the equalisation |
| During ringing | No function | No function |
| In call | No function | No function |
| With the headset off | No function | No function |
Explanation of headset LED indications:
| LED colour | Headset function |
| Light blue flashing | Headset on and not connected |
| Green steady | Headset connected via BT |
| Blue steady | Headset connected via transmitter |
| Light blue steady | Simultaneous BT/transmitter connection |
| Red steady | Headset recharging |
| Off | Headset off |
Explanation of transmitter LED indications:
| LED colour | Transmitter function |
| Blue steady | Operating, audio signal in transmission |
| Red steady | Headset recharging |
| Off | No signal in transmission or headset charged |
Built-in battery charging:
The headset emits an announcement (“Low battery, please recharge”) when the built-in battery needs to be recharged. To prevent the battery autonomy from being compromised in the long term, the appliance should not be excessively used once the announcement has been made and should be charged as soon as possible. Recharging should occur with the headset off and without interruption. For recharging operations, see the end section of chapter 4, from points 11 onwards.
6. CLEANING AND MAINTENANCE
The appliance does not require maintenance, understood as the replacement of consumables or scheduled servicing; periodic removal of dust with a dry cloth suitable for the function is sufficient. Every cleaning operation must absolutely be carried out with the appliance switched off: the use of an overly damp cloth or any atomised detergent must be avoided given the presence of a non-separable battery and given the possibility that certain voltage points may be reached by liquids. Even if stains or accumulations of dirt must be removed, proceed without wetting or soaking the appliance: in any case, avoid aggressive detergents, abrasive sponges, iron wool or other chemical cleaners.
7. TROUBLESHOOTING
Problem: No audio is played through the headset
Possible cause 1: The headset battery is low
Probable solution 1: Recharge the headset battery
PC2: If the BT connection is not active, the transmitter is not powered
PS2: Check that the plug is properly inserted in the USB-C socket (19), or that the power supply is working properly
PC3: The aux/optical input selector is in the wrong position
PS3: Move the aux/optical input selector
PC4: If connected to a TV, the audio output setting is wrong
PS4: Check that the audio output of the TV is set to "headset output" or "optical output", depending on the connection made on the transmitter
PC5: The source connection is an input, not an output
PS5: Connect the transmitter to output connections, normally indicated by the wording "output" or "out"
Problem: When connected to the TV, the headset makes a continuous sound
PC1: The audio protocol is incorrect
PS1: Set the digital audio output mode to "PCM": the "Dolby Digital" mode is not supported
Problem: The BT connection is not made
PC1: Too many BT devices are within range
PS1: Deactivate as many wireless devices as possible within range except the IR-SIGMA-PLUS
Should any malfunctions other than those listed above occur, a self-sufficient solution is not feasible and the product must be inspected by a qualified technician.
8. THECNICAL DATA
Speaker : Wide-band 40 mm
Frequency response : 20 Hz-20 KHz
Charging voltage : DC 5V / 1A
Aux-in input : Jack 3.5 mm
Digital input : Toslink S/PDIF fibre optic connection PCM signal
Built-in battery : Lithium-ion 3.7 V
Charging duration : 3 \~ 4 hours
Dimensions (L x H x D) : 15.8 x 25.2 x 15.8 cm (transmitter)
Weight : 466 g
9. COMPLIANCE
The producer Melchioni Spa declares that the product Headset set 2.4GHz + wireless IR-SIGMA PLUS (cod. 141901050) is in compliance with Directive 2014/35/EU of the European Parliament and of the Council, of 26 february 2014, on the harmonisation of the laws of the Member States relating to the making available on the market of electrical equipment designed for use within certain voltage limits.
SIMPLIFIED EU DECLARATION OF CONFORMITY
Hereby, manufacturer Melchioni Spa declares that the radio equipment type Headset set 2.4GHz + wireless IR-SIGMA PLUS (cod. 141901050) is in compliance with Directive 2014/53/EU. The full text of the EU declaration of conformity is available at the following internet address: http://www.melchioni.com
The producer Melchioni Spa declares that the product Headset set 2.4GHz + wireless IR-SIGMA PLUS (cod. 141901050) is in compliance with Directive 2011/65/EU of the European Parliament and of the Council, of 8 June 2011 and subsequent Commission Delegated Directive 2015/863, on the restriction of the use of certain hazardous substances in electrical and electronic equipment.
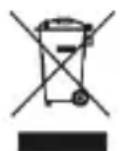
According to Directive 2012/19/EU of the European Parliament and of the Council, of 4 July 2012, on waste electrical and electronic equipment (WEEE), the presence of the crossed-out bin symbol indicates that this appliance is not to be considered as urban waste: its disposal must therefore be carried out by separate collection. Disposal in a non-separate manner may constitute a potential harm to the environment and health. This product can be returned to the distributor when purchasing a new device. Improper disposal of the appliance constitutes misconduct and is subject to sanctions by the Public Security Authority. For further information, contact the local administration responsible for environmental matters.
Product supplied with battery(ies) model LD502535, 3.7 V, 400mAh, 1.48 Wh, imported by Melchioni S.p.A. and compliant with Regulation (EU) 2023/1542 OF THE EUROPEAN PARLIAMENT AND OF THE COUNCIL of 12 July 2023 on batteries and waste batteries, amending Directive 2008/98/EC and Regulation (EU) 2019/1020 and repealing Directive 2006/66/EC.
10. WARRANTY
Melchioni Spa, based in Milan (Italy), via Colletta 37, recognizes a conventional guarantee on the product for a period of two years from the date of the first purchase by the consumer. This guarantee does not affect the validity of the legislation in force concerning consumer goods (Legislative Decree 6 September 2005 n. 206 art. 128 and
following), of which the consumer remains the owner. This guarantee applies to the entire territory of the European Union.
The components or parts that are found to be defective for ascertained manufacturing causes will be repaired or replaced free of charge through the dealer, during the above warranty period. Melchioni Spa reserves the right to make a complete replacement of the device, if repairability is impossible or excessively expensive, with another device of similar characteristics (Legislative Decree 6 September 2005 no. 206 art. 130) during the warranty period. In this case, the validity of the warranty remains that of the original purchase: the service provided under warranty does not extend the warranty period. In any case, this appliance will not be considered defective in terms of materials or manufacture should it be adapted, changed or adjusted, in order to comply with national or local safety and / or technical standards, in force in a country other than that for which it is was originally designed and manufactured. This appliance has been designed and built for domestic use only: any other use will invalidate the benefits of the guarantee. The warranty does not cover:
- parts subject to wear or tear, nor those parts that require periodic replacement and / or maintenance
• professional use of the product - malfunctions or any defects due to incorrect installation, configuration, software / BIOS / firmware update not performed by authorized Melchioni Spa
- repairs or interventions carried out by persons not authorized by Melchioni Spa
- manipulation of assembly components or, where applicable, of the software
• defects caused by fall or transport, lightning, voltage fluctuations, liquid infiltration, opening of the appliance, bad weather, fire, public disturbances, inadequate ventilation or incorrect power supply - any accessories, for example: boxes, bags, batteries, etc. used with this product
• home interventions for convenience checks or presumed defects
The recognition of the guarantee by Melchioni Spa is subject to the presentation of a tax document that proves the actual date of purchase. The same must not show any tampering or deletions, in the presence of which Melchioni Spa reserves the right to refuse the provision of treatment under warranty.
The warranty will not be recognized if the serial number or model of the appliance is non-existent, abraded or modified.
This warranty does not include any right to compensation for direct or indirect damage, of any nature, to people or things, caused by any inefficiency of the appliance. Any extensions, promises or services in this regard, insured by the retailer, will be borne by the latter.
1. NOTA INTRODUCTORIA
text_image
Technical diagram of a headset with labeled parts including front, rear, and side viewstext_image
Technical diagram of a camera with labeled parts and connectors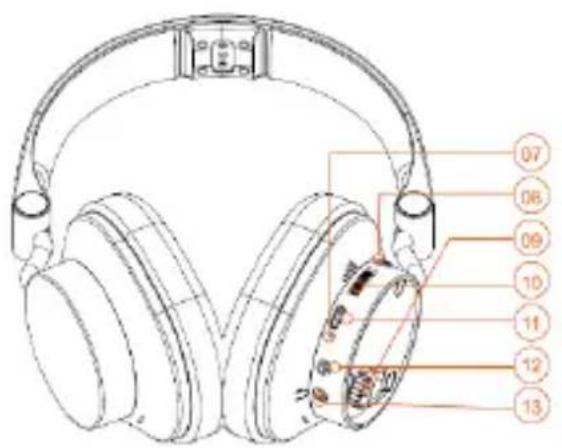
text_image
Technical diagram of a multi-band headphones with numbered labels pointing to internal componentstext_image
Technical diagram showing two connected devices with numbered labels pointing to their components.text_image
Diagram showing connections between headphones, audio equipment, TV, and connected devices with labeled components.natural_image
Line drawing of a dual-panel hard hat with earbuds and a vertical shaft (no text or symbols)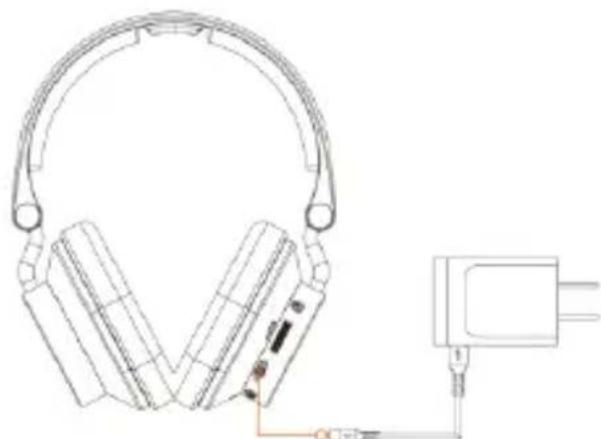
natural_image
Line drawing of a headset connected to a power adapter (no text or symbols)natural_image
Technical line drawing of a mechanical component with no visible text or symbolstext_image
Technical diagram of a headset with labeled parts including front, rear, and side viewstext_image
Technical diagram of a pair of hardcover headphones with labeled parts, showing front and side views with numbered labels.text_image
Diagram showing connections between headphones, audio equipment, TV, and connected devices with labeled components.natural_image
Line drawing of a pair of headphones with a vertical stand and orange headrest (no text or symbols)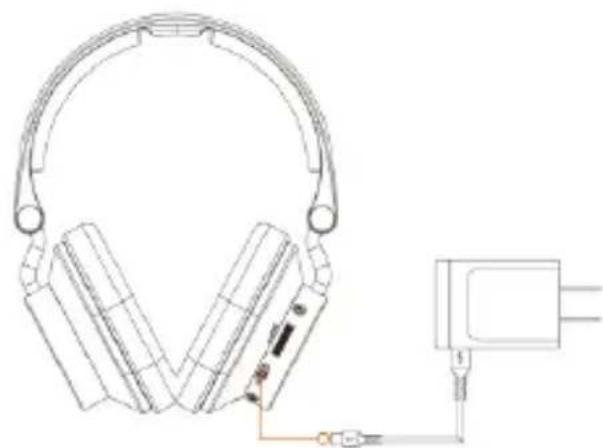
natural_image
Line drawing of a headset connected to a power adapter (no text or symbols)natural_image
Technical line drawing of a mechanical component with no visible text or symbolstext_image
Technical diagram of a headset with labeled parts including head, front-mounted device, and cable connectorstext_image
Technical diagram of a pair of headphones with labeled parts, showing front and side views with numbered labels.text_image
Technical diagram showing two mechanical or electrical components with numbered labels pointing to their connections.text_image
Diagram showing connections between headphones, TV, and audio equipment with labeled componentsnatural_image
Line drawing of a headboard with earphones and a central display stand (no text or symbols)