
SS-5245 - Frozen dessert machine Sogo - Free user manual and instructions
Find the device manual for free SS-5245 Sogo in PDF.

| Brand | Sogo |
| Model | SS-5245 |
| Product type | Frozen dessert machine |
| Power supply | 220-240 V~ 50-60 Hz |
| Power | 150 W |
| Maximum continuous use | 15 minutes |
| Rest time between cycles | 5 minutes |
| Cycles before cooling | 3 cycles then complete cooling |
| Removable parts | Dispenser, grinder, chute, plunger |
| Maintenance | Washable removable parts with warm soapy water; wipe base with damp cloth |
| Safety | Do not immerse, use plunger (not hands), do not use with stone fruits |
| Main functions | Transformation of frozen fruits into frozen desserts (sorbets, ice creams) |
| Compliance | Directives 2014/35/CE, 2014/30/UE, 2015/863/UE, 2009/125/CE |
| Country of origin | China (PRC) |
| Importer | Sanysan Appliances S.L, Valencia, Spain |
| After-sales service | www.sogosat.com / sogosat@sogosat.com / +34 902 222 161 |
| Usage | Household use only |
| Accessories included | Plunger, dispenser, grinder, chute |
Frequently Asked Questions - SS-5245 Sogo
User questions about SS-5245 Sogo
0 question about this device. Answer the ones you know or ask your own.
Ask a new question about this device
Download the instructions for your Frozen dessert machine in PDF format for free! Find your manual SS-5245 - Sogo and take your electronic device back in hand. On this page are published all the documents necessary for the use of your device. SS-5245 by Sogo.
USER MANUAL SS-5245 Sogo
natural_image
Red and black SOGO ice cream dispenser with a bowl of ice cream and strawberries (no text or symbols visible on the device itself)
INCLUYE RECETAS
RECIPES INCLUDED
RECETTES COMPRICES
INCLUI RECEITAS
COMPRENDE RICETTE
ENTHÄLT REZEPTE
Caution: please read and preserve these important instructions
flowchart
graph TD
    A["1. Wire connection"] --> B["2. Internal component"]
    B --> C["3. Final assembly with cylindrical component"]
MONTAJE
natural_image
Six grayscale illustrations showing food preparation steps: serving, pouring, lifting, pouring with a skull, adding dipping sauce, and eating (no text or symbols)INGREDIENTES
This instruction manual can also be downloaded from our web page www.sogo.es
Basic safety precautions should always be followed when using electrical appliances, including the following:
- Read all instructions before operating this appliance.
- DO NOT touch moving parts.
- To protect against electrical shock do not immerse cord, plug or any part of this appliance in water or other liquids.
- To avoid fire or shock hazard, or damage to the unit, this unit should be plugged into a polarized 220 Volt AC outlet ONLY.
- Close supervision is necessary when any appliance is used near children.
- Unplug from outlet when not in use, before removing parts and before cleaning.
- DO NOT operate any appliance with a damaged cord or plug, not if the appliance has been damaged in any manner. Return the appliance to the nearest repair shop for examination or repair.
- DO NOT operate the unit continuously for more than 15 minutes. Allow it to rest for 5 minutes before using again. After three cycles, allow the unit to cool completely before using again.
- The manufacturer does not recommend the use of accessory attachments. Use of accessory attachments may cause injuries.
- DO NOT use outdoors. FOR HOUSEHOLD
USE ONLY.
-
Make sure the Chute, Grinder and Dispenser are securely locked in place before operating.
-
Use the Plunger to force frozen fruit into the Shaft. NEVER use your hands to force ingredients into the unit.
-
Position the appliance as close to the outlet as possible to prevent injury due to tripping over cord.
-
DO NOT place on or near a hot gas or electric burner, nor in a heated oven.
-
Check unit for presence of foreign objects prior to use.
-
DO NOT use the appliance for other than its intended use.
-
An appliance that is plugged into an outlet should not be left unattended while in operation.
-
A short power supply cord is provided to reduce the risk resulting from becoming entangled or tripping over a long cord.
-
Longer detachable power-supply cord or extension cord are available and may be used if care is exercised in their use. Exception: An extension cord or longer detachable cord is not recommended for use with this appliance.
-
If a long detachable power-supply cord or extension cord is used: 1) The marked electrical rating of the cord or extension cord should be at least as great as the electrical rating of the appliance; 2) If the appliance is of the grounded type, the extension cord should be a grounding 3-wire cord; and 3) The longer cord should be arranged so that it does not drape over the countertop or table top where it can be pulled on by children or tripped over unintentionally.
-
This appliance can be used by children aged from 8 years and above and persons with reduced physical, sensory or mental capabilities or lack of experience and knowledge if they have been given supervision or instruction concerning use of the appliance in a safe way and understand the hazards involved. Children shall not play with the appliance. Cleaning and user maintenance shall not be made by children without supervision.
- Do not use this appliance with a programmer, counter or another device which can automatically turn it on because it is dangerous to do so.
- If the supply cord is damaged, it must be replaced by manufacturer, its service agent or similarly qualified persons in order to avoid a hazard.
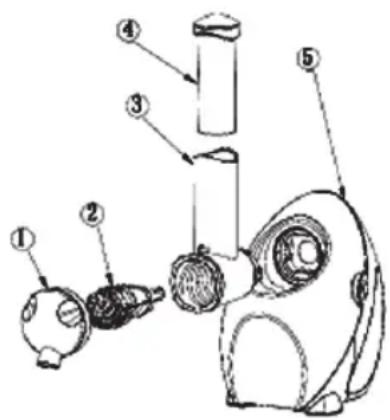
PARTS
- Dispenser
- Grinder
- Chute
- Plunger
- Base
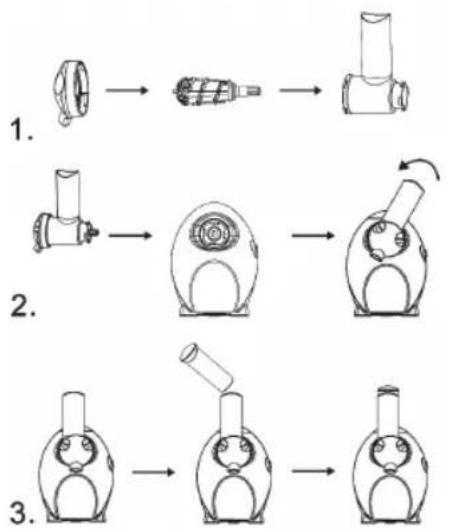
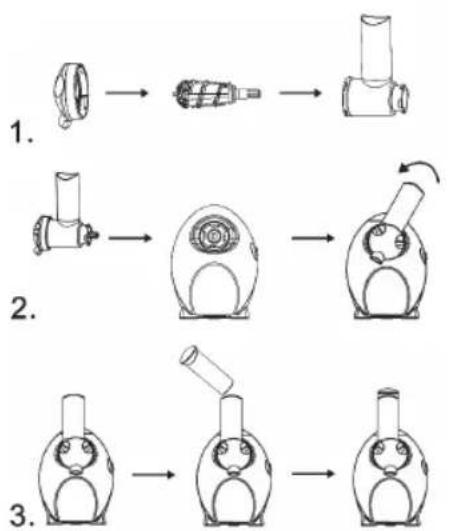
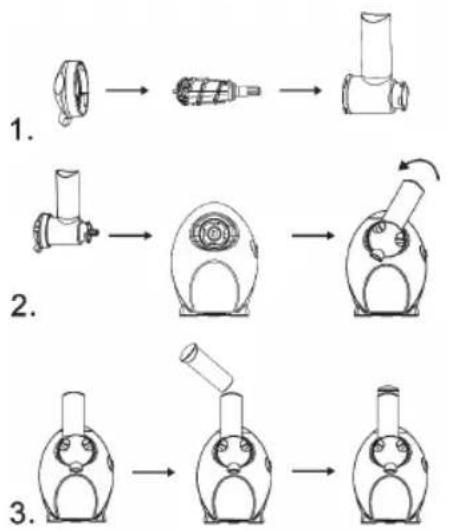
ASSEMBLY
flowchart
graph TD
    A["1. winding"] --> B["2. component"]
    B --> C["3. final assembly with cylindrical component"]
- Insert the Grinder into the Chute. Be sure the gasket is properly placed inside the Dispenser. Then, affix the Dispenser to the Chute by placing on the front and turning counterclockwise to lock.
- Insert the tip of the Grinder into the base of the unit. Turn counterclockwise to lock the Chute assembly in place.
- Insert the Plunger into the Chute.
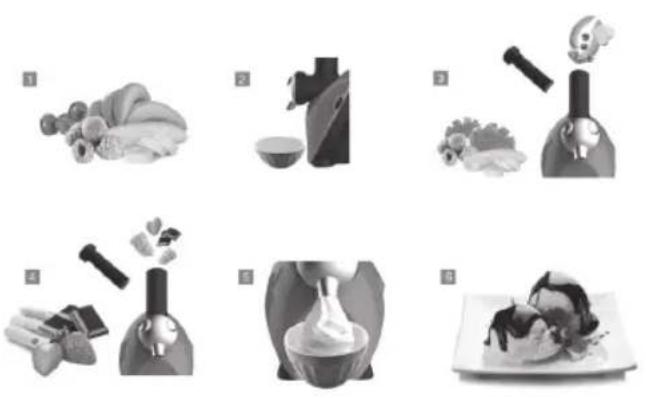
HOW TO OPERATE
- Freeze your desired fruit for 24 hours.
- Plug in the unit and place a small bowl below the dispenser.
- Remove the plunger from the Chute and insert frozen fruit, slowly into the top of the Chute. DO NOT overfill the Chute and turn the unit ON.
- Repeat frozen chocolate or ice cube milk or frozen creamy.
- Apply steady pressure on the Plunger to slowly press the contents down through the Chute. DO NOT apply too much force to the Plunger. Slowly and gently push the ingredients through.
- The creamy frozen fruit mixture will dispense into your bowl. You may also choose to stir the frozen fruit before serving to ensure it is evenly mixed
- For hard ice cream, please put into freezer for a period of time ( more than 1 hour). Then it will perfect to serve.
DO NOT operate the unit continuously for more than 15 minutes. Allow the motor to rest for 5 minutes before using again. After three cycles, allow the unit to cool completely before using again.
natural_image
Six-panel sequence showing food preparation steps: cooking, pouring, serving, using a spoon, adding sauce, and eating (no text or symbols)INGREDIENTS
Fruits should be frozen for a minimum of 12 - 18 hours. (Recommended 24 hrs) The following frozen fruits work best:
- Berries: strawberries, blueberries, blackberries, raspberries, cranberries
- Bananas: should be over-ripe and peeled before freezing; DO NOT freeze un-peeled bananas
- Melon: honeydew, cantaloupe, watermelon
- Pineapple: peeled, cored and cut into long, thin slices
- Peaches, Pears, Apples, Mango If using a variety of fruits or berries per batch, add the different fruits alternately to allow them to mix properly and ensure proper consistency.
DO NOT place fruit with pits in the FRUIT DESSERT MAKER.
RECIPES
MINT CHOCOLATE CHIP
Ingredients: 2 frozen ripe banana, 1 oz mint dark chocolate
- Insert one frozen banana
2.Add 1 oz dark mint chocolate - Insert second frozen banana
- Stir in bowl to combine
LEMON RASPBERRY
Ingredient: 2 frozen ripe bananas, 1 tbsp lemon (zest of one lemon), 1/2 cup frozen raspberries
- Insert one frozen banana
- Add 1 tbsp lemon zest
- Add 1/2 cup frozen raspberries
- Insert second frozen banana
- Stir in bowl to combine
PERFECTLY PEACH
Ingredients: 1/2 cup peaches, 1/4 cup frozen cantaloupe, 1/4 cup frozen cream
- Insert 1/4 cup frozen cantaloupe
- Add 1/8 frozen cream
- Insert 1/2 cup peaches
- Add 1/8 cup frozen cream
STRAWBERRY
Ingredient: 2 cups frozen strawberry, 1/2 cup frozen cream, 1/2 cup ice cube milk
- Insert one frozen strawberry
- Add frozen creamy
- Insert second strawberry
- Add ice cube milk
BLACKBERRY VANILLA BEAN
Ingredients: 2 vanilla beans, 3/4 cup frozen blackberries, 1/4 cup of pistachios (crushed), 1/4 cup frozen cream
- Split 2 vanilla bean lengthwise and scrape seeds from vanilla bean
- With a knife spread the vanilla seeds over blackberry
- Insert half frozen blackberry
- Add 1/4 cream
- Insert remaining half frozen blackberry
- Add 1/4 cup pistachios
TROPICAL TEASE
Ingredients: 1/2 cup frozen pineapple chunks, 1/2 cup frozen mango chunks, 1/4 cup shredded coconut, 1/4 cup frozen cream
- Add 1/2 cup frozen pineapple
- Add 1/8 cup frozen cream
- Add 1/2 cup frozen mango chunks
- Sprinkle shredded coconut on top of fruit dessert
CLEANING & MAINTENANCE
- Make sure the unit is unplugged before cleaning.
- Before first use and continuing after each use, wipe off unit with a damp cloth and dry thoroughly.
- Remove the Plunger and Chute.
- Turn the Chute clockwise to remove from the Base.
- Turn the Dispenser clockwise to disassemble from the Chute. Remove the Grinder.
- Wash Drip Tray, Chute, Grinder, Plunger and Dispenser in warm, soapy water with a non-abrasive moist sponge or cloth. Dry thoroughly with a non-abrasive towel.
-
Wipe the Base with a damp, non-abrasive cloth and dry thoroughly. DO NOT immerse the Base or cord in water or any other liquid.
-
To prolong the life for your FRUIT DESSERT MAKER, hand-washing parts is advised. Dishwasher use is not recommended. Never place the Base in a dishwasher.
- Reassemble the unit and insert the cord into the storage area in the Base
TROUBLE SHOOTING
| Problem Cause/Solution | |
| Soft-serve fruit mixture stops dispensing | The Chute may be clogged. Turn unit off IMMEDIATELY and unplug from electrical outlet. Remove the Dispenser by turning clockwise and take out the Grinder. Wipe clean and reassemble your fruit dessert maker |
| Fruit leak out of the Dispenser | Make sure the clear gasket is properly affixed inside the Dispenser |
| Ice cream come out is too soft | The fruit is not frozen enough, put in freezer for several hours |
TECHNICAL SPECIFICATIONS
Model: SS-5245
Voltage / Frequency: 220-240V\~ 50-60Hz
Power: 150W
ATTENTION
MONTAGE

flowchart
graph TD
    A["Initial Component"] --> B["Intermediate Component"]
    B --> C["Rotated Valve"]
    C --> D["Final Assembly"]
    subgraph Section 1
        A --> B --> C
    end
    subgraph Section 2
        B --> C
    end
    subgraph Section 3
        D --> E["Final Assembly"]
    end
natural_image
Six grayscale illustrations showing food preparation steps: serving, pouring, lifting, pouring with chopsticks, adding ingredients, and blending (no text or symbols)INGREDIENTS
MONTAGEM

flowchart
graph TD
    A["1. winding"] --> B["2. gear"]
    B --> C["3. cylindrical component with internal structure"]
natural_image
Six black-and-white illustrations showing food preparation steps: serving, pouring, lifting, pouring with chopsticks, adding ingredients, and adding sauce (no text or symbols)INGREDIENTES
flowchart
graph TD
    A["1. Wire connection"] --> B["2. Component insertion"]
    B --> C["3. Final assembly with cylindrical component"]
MONTAGGIO
natural_image
Six grayscale illustrations showing food preparation steps: cooking, pouring, serving, and eating (no text or symbols)INGREDIENTI
TEILE
- Spender
- Schleifer
- Schacht
- Kolben
- Basis

flowchart
graph TD
    A["Component 1"] --> B["Internal Component"]
    B --> C["Final Assembly"]

    D["Component 2"] --> E["Internal Component"]
    E --> F["Final Assembly"]

    G["Component 3"] --> H["Internal Component"]
    H --> I["Final Assembly"]
ZUSAMMENBAU
natural_image
Six grayscale illustrations showing food preparation steps: slicing vegetables, pouring sauce, using a bottle, adding ingredients, and serving a dessert (no text or symbols)ZUTATEN
DECLARATION OF CONFORMITY
This device complies with Low Voltage Directive 2014/35/EC, Electromagnetic Compatibility Directive 2014/30/EU, Directive 2015/863/EU on the restriction of the use of certain hazardous substances in electrical and electronic equipment and Directive 2009/125/EC on the eco-design requirements applicable to energy-related products.
DÉCLARATION DE CONFORMITÉ
This symbol means that in case you wish to dispose of the product once its working life has ended, take it to an authorised waste agent for the selective collection of waste electrical and electronic equipment (WEEE).

Imported by:
Sanysan Appliances S.L, NIF: B98753056, C/ Barcas 2, 2
46002 Valencia, Spain
Product made in P.R.C. – Designed by SOGO based on the European Quality Standards
Customer Service: www.sogosat.com / sogosat@sogosat.com / 0034 902 222 161

- MONTAJE
- INGREDIENTES
- USE ONLY.
- PARTS
- ASSEMBLY
- HOW TO OPERATE
- INGREDIENTS
- RECIPES
- MINT CHOCOLATE CHIP
- LEMON RASPBERRY
- PERFECTLY PEACH
- STRAWBERRY
- BLACKBERRY VANILLA BEAN
- TROPICAL TEASE
- CLEANING & MAINTENANCE
- TROUBLE SHOOTING
- TECHNICAL SPECIFICATIONS
- ATTENTION
- MONTAGE
- MONTAGEM
- MONTAGGIO
- INGREDIENTI
- TEILE
- ZUSAMMENBAU
- ZUTATEN
- DECLARATION OF CONFORMITY
- DÉCLARATION DE CONFORMITÉ
- Imported by:
Brand : Sogo
Model : SS-5245
Category : Frozen dessert machine