Realimove KM600 - Dash cam AGFAPHOTO - Free user manual and instructions
Find the device manual for free Realimove KM600 AGFAPHOTO in PDF.

| Product type | Dashcam (recording camera) |
| Brand | AgfaPhoto |
| Model | Realimove KM600 |
| Screen | 2-inch LCD |
| Video format | AVI |
| Video resolution | 1080P (1920x1080), 720P (1280x720), VGA (640x480) |
| Photo format | JPG |
| Photo resolution | 12M, 8M, 5M, 3M, 2M, 1M, VGA |
| Lens | f=3.0mm, F2.0 |
| Impact sensor (G-Sensor) | Yes |
| Storage | Micro SD card up to 32 GB (class 6 or higher recommended) |
| Microphone | Yes |
| Power supply | 12 V car charger (cigarette lighter); rechargeable internal battery (approximately 5 minutes of battery life) |
| Charging time | Approximately 90 minutes |
| Main functions | Loop recording (1/2/5 min), motion detection, parking mode, file protection |
| Modes | Video, Photo, Playback |
| Maintenance and cleaning | Regularly clean the lens with a soft cloth; clean the windshield before mounting |
| Safety | Do not obstruct the driver's view or airbag; do not insert/remove the SD card during recording |
| Spare parts and repairability | Suction cup mount included; USB cable; car charger; RESET button for reset |
| Dimensions (estimated) | Approximately 6 x 4 x 3 cm |
| Weight (estimated) | Approximately 80 g |
Frequently Asked Questions - Realimove KM600 AGFAPHOTO
User questions about Realimove KM600 AGFAPHOTO
0 question about this device. Answer the ones you know or ask your own.
Ask a new question about this device
Download the instructions for your Dash cam in PDF format for free! Find your manual Realimove KM600 - AGFAPHOTO and take your electronic device back in hand. On this page are published all the documents necessary for the use of your device. Realimove KM600 by AGFAPHOTO.
USER MANUAL Realimove KM600 AGFAPHOTO
natural_image
Close-up of a black digital camera with visible lens and side stripes (no text or symbols)
natural_image
Close-up of a black mechanical component with two red measurement labels (6 and 7) on its side, no readable text or symbols beyond labels.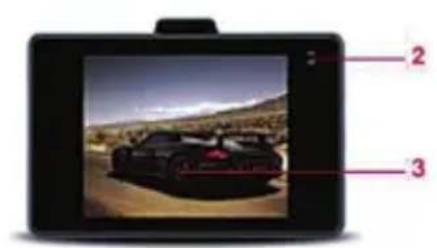
natural_image
Close-up of a black camera lens with three labeled buttons (8, 9, 10) and a top aperture (no text or symbols beyond labels)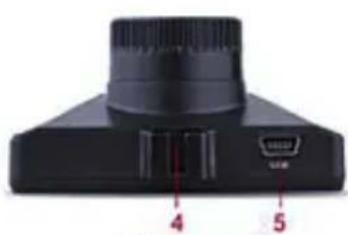
natural_image
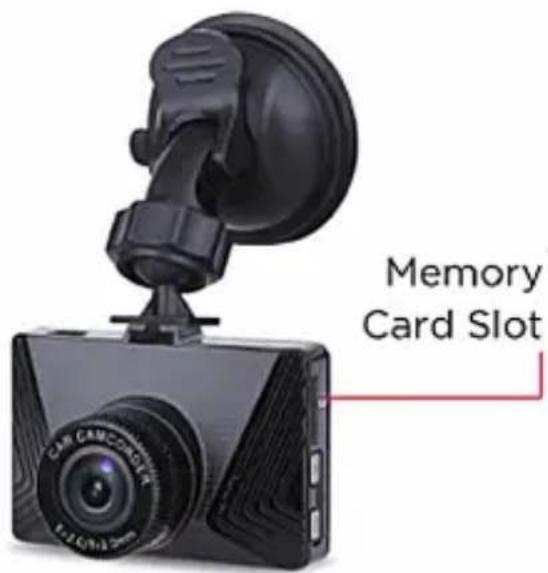
Close-up of a black electronic device with labeled ports (no text or symbols beyond numbers)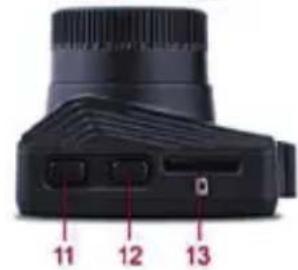
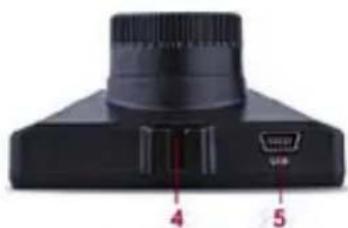
Object Function
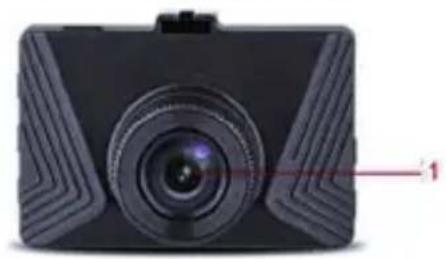
| 1 Lens The camera lens records video and shoots photos | |
| 2 Indicators | Status light (top): Turns red when ready to record, flashes when recording.Charging indicator (bottom): Turns blue when charging |
| 3 Display Previews recordings, displays menu options | |
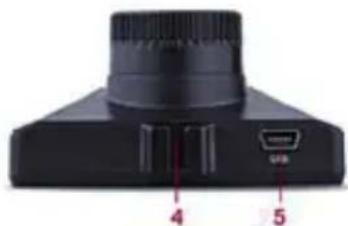
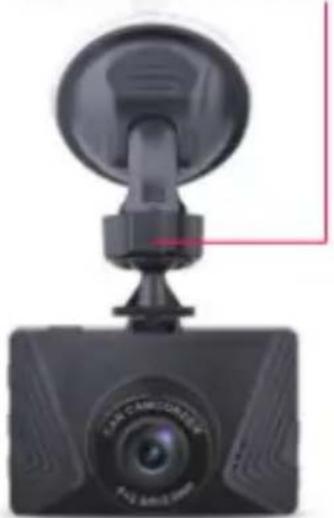
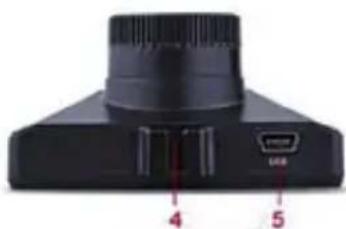
| 4 Bracket Slot Attach the included suction cup mount to your camera | |
| 5 USB port Use for charging | |
| 6 Microphone Records sound | |
| 7 RESET button Press and hold this button using a paper clip or pin to reset your camera | |
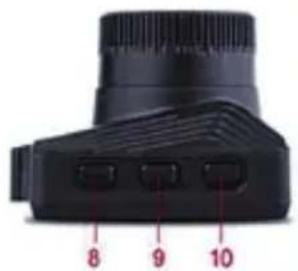
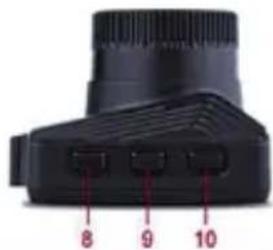
| 8 Up button Press to scroll up while in a settings menu | |
| 9 OK button Press to start/stop recording or snap a photo, press to confirm menu selection or changes | |
| 10 Down button Press to scroll down while in a settings menu | |
| 11 Power button Short Press to turn on. Press and hold to power off. When powered on, short press to open a setting menu. | |
| 12 Mode button Shift between video, photo & playback modes | |
| 13 Memory Card Slot Compatible with Micro SD memory cards (32GB max) | |
INsErtINg A MEMOry cArd INtO yOUr dAsHcAM
A Micro SD memory card is required in order to store recorded photos and videos.
Before using your dashcam, insert a Micro SD Memory Card into the Micro SD card slot.
Your dashcam supports Micro SD Memory Cards of up to 32GB in capacity. To ensure smooth performance it is recommended to use a memory card rated class 6 or above, with at least 8GB in capacity.
We do not guarantee compatibility with Micro SD cards from all manufacturers. Only use Micro SD cards from reliable sources.
It is recommended to use a new or a formatted card. Formatting, permanently deletes all data on the memory card, so be sure to copy the data, you want to keep, to another storage device before formatting.
To remove a Micro SD card from the memory card slot, push the edge of the card until it pops out.
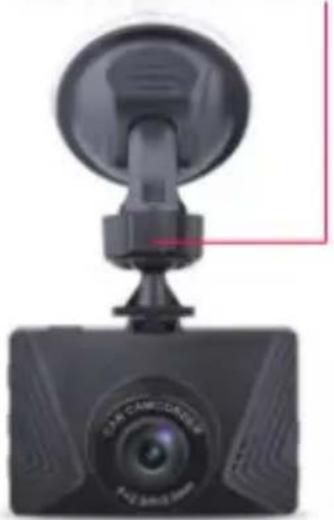
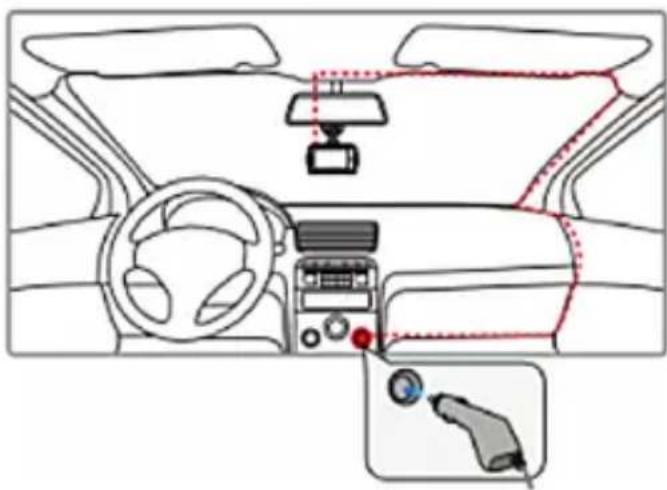
MOUNTING tHE dAsHcAM to A WINdsHIEId
Attach the dashcam to your vehicle's windshield with the included suction cup mount.
-
Slide the windshield mount bracket hook into the bracket slot on the top of the dashcam. Make sure it slides in place so that the suction cup mount is securely attached to your dashcam.
-
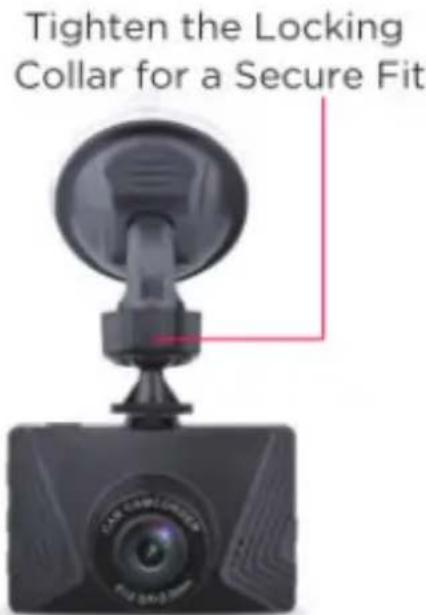
Remove the clear protective film from the suction cup and press the suction cup against the windshield, then flip the locking lever up so the suction mount is locked into place.
EN
NOTEs:
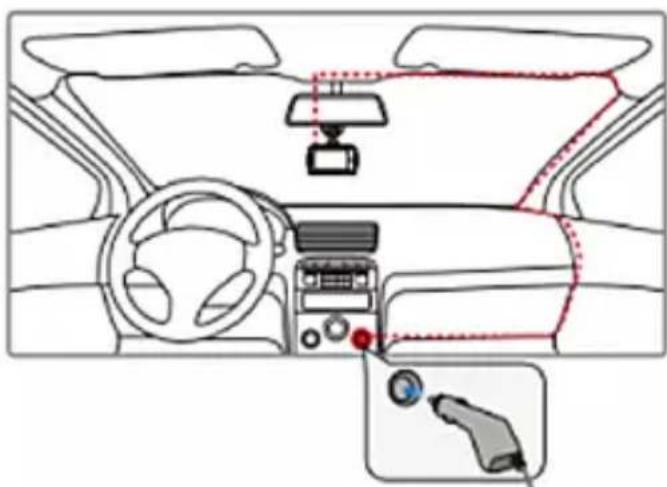
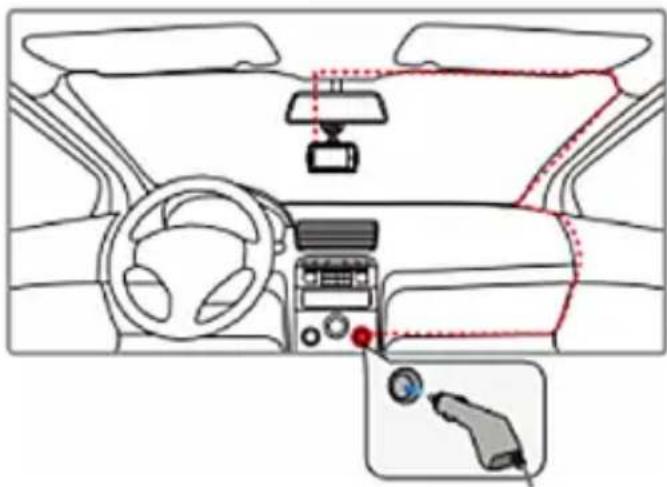
- Do not install the camera in a location that will block your view of the road, interfere with the mirror or controls, or obstruct the airbag.
- We recommend installing the camera above the center of the dashboard near the rear-view mirror.
- Clean the windshield area where you will be mounting the dashcam with an alcohol/cleaning wipe before attaching the suction cup mount.
- Clean the lens on a regular basis.
- When adjusting the viewing angle, aim the camera slightly towards the ground with less sky in view to reduce lens glare when your vehicle is facing the sun.
pOWErINg ON & cHArgINg yOUr dAsHcAM
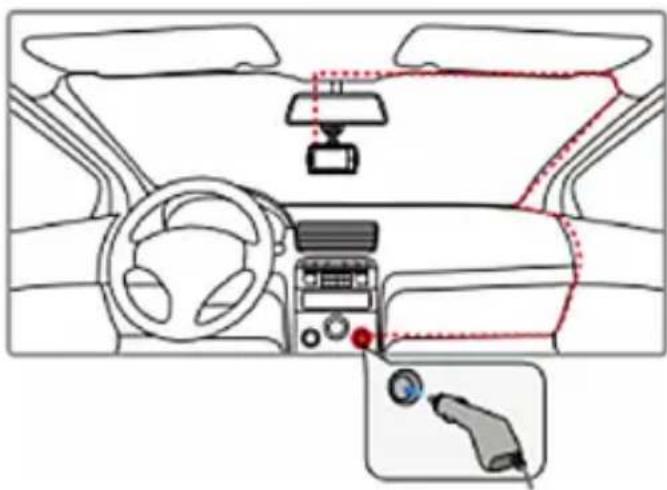
In order to power on your dashcam, you can plug one end of the supplied car charger into the cigarette lighter socket of your vehicle, and then connect the other end to the USB port on your dashcam.
Once plugged in, your dashcam turns on and starts recording automatically when the vehicle's engine is started. When the car's engine is turned off, the dashcam will turn off shortly afterwards.
You can also short press the power button to manually turn on or long press the power button to turn off your dash cam if you are using your dashcam independently of your vehicle.
When using your dashcam independently of your car, the internal rechargeable battery can keep the dashcam powered on for about 5 minutes depending on usage.
To recharge the internal battery, connect one of the included charging cables to your dashcam. While charging, the charging light will turn blue. The charging light will turn off when the battery is fully charged.
Charging typically takes approximately 90 minutes depending on how drained the battery is. The battery status icon will tell you how close the battery is to being fully charged.

Empty

Low

Half Full

Full
EXPLORING YOUR DASHCAM'S DIFFERENT MODES
Your dashcam has three separate modes. To switch between modes, press the Mode button repeatedly until you access the mode of your choice. Once you've reached the mode of your choosing, you can press the Power button to open the setting menu of that specific mode. For a quick description of each of the modes, see below.
Video Capture Mode
This icon appears on your dashcam's display screen when you are in video capture mode. Use this mode to capture videos.

Photo Capture Mode
This icon appears on your dashcam's display screen when you are in photo capture mode. Use this mode to take photos.

Playback Mode
This icon appears on your dashcam's display screen when you are in playback mode. Use this mode to view and manage photos and videos that you have already taken.
VIDEO CAPTURE MODE
In order to record video content, make sure that your dashcam is in video capture mode.
To enter video capture mode, press the Mode button repeatedly until the icon appears in the upper left-hand corner of the display screen.
EN
Preparing Your Dashcam for Video Recording
In order to record video with your dashcam, you must first make sure that a Micro SD memory card is inserted into the memory card slot.
IMPORTANT NOTE: Do not attempt to insert or remove a Micro SD card from the memory card slot while your dashcam is recording. Doing so will cause your device to shut down.
Recording Video Content
Once your dashcam is in video capture mode, and a Micro SD card is inserted in the memory card slot, you are ready to start recording.
When your dashcam is connected to the included car charger, and your vehicle's engine is started, your dashcam will start recording video.
The 📄 icon on the display screen will have a flashing red dot appear next to it to indicate that video recording is in process. Video recording will automatically stop shortly after your vehicle's engine is turned off.
If your dashcam does not automatically start recording when your vehicle's engine is started, or if you are operating your dashcam independently of your automobile, you can press the OK button to start recording video.
The 📐 icon on the display screen will have a flashing red dot appear next to it to indicate that video recording is in process. To stop recording, press the OK button again. The red dot will disappear to indicate that recording has concluded.
ACCESSING THE VIDEO CAPTURE MODE SETTINGS MENU
To make adjustments to how your dashcam records video you can access the video capture mode's settings menu. To do so, you must first make sure that you are in the video capture mode. Next, press the Power button once to access the video capture mode settings menu. Then press the Mode button to access the general settings menu.
Once you are in the settings menu, press the Up ▲ and Down ▼ buttons to scroll through the various settings options. Press the OK button to confirm any settings options that you have selected, and press the Power button again to exit the menu.
PHOTO CAPTURE MODE
When your dashcam is powered on, and not recording video, you can take photos by entering photo capture mode.
To enter photo capture mode, press the Mode button repeatedly until the icon appears in the upper left-hand corner of the display screen.
Press the OK button to take a photo.
Accessing the Photo Capture Mode Settings Menu
To make adjustments to how your dashcam shoots photos you can access the photo capture mode's settings menu. To do so, you must first make sure that you are in the photo capture mode. Next, press the Power button once to access the photo capture mode settings menu. Then press the Mode button to access the general settings menu.
Once you are in the settings menu, you can press the Up ▲ and Down ▼ buttons to scroll through the various settings options. Press the OK button to confirm any settings options that you have selected, and press the Power button again to exit the menu.
PLAYBACK MODE
If your dashcam is powered on, and not recording video, then you can view the photos or videos that you have already taken by entering playback mode.
To enter playback mode, press the Mode button repeatedly until the icon appears in the upper left-hand corner of the display screen.
Press the OK button to view the recorded video/photo, or ▲▼ to scroll through the recorded video/photo files.
Accessing the Playback Mode Settings Menu
Press the Power button once to access the playback mode settings menu.
You can press the Up ▲ and Down ▼ buttons to scroll through the various settings options.
Press the OK button to confirm any settings options that you have selected, and press the Power button again to exit the menu.
EN
Playback Mode Settings
Setting Description
| Lock Allows you to lock or unlock the current photo/video being displayed or to lock or unlock all files. Locked files cannot be deleted unless unlocked. |
Delete Allows you to delete the current photo/video being displayed or to delete all files.
GENERAL SETTINGS MENU
If your dashcam is powered on, and not recording video, then you can access the general settings menu from any mode. To do so, press the Power button once. Then press the Mode button to access the general settings menu.
The 📋 icon will appear in the upper left-hand corner of the screen when you are in the general settings menu.
DASH CAM FEATURES
Loop recording:
Stores video recordings of 1, 2 or 5 minutes in the SD card. When the SD card is full, the latest video overwrites the earliest video.
Motion detection:
With the motion detection function on, the dashcam automatically starts recording when it detects something move in front of it. If there is no movement for a while, the dash cam stops recording automatically.
G-Sensor:
When the gravity sensing function is turned on and a collision is detected, the dashcam will automatically protect the latest video to prevent it from being overwritten by the loop recording.
Parking mode:
In parking mode, the device will automatically turn on and start recording when a collision or impact is detected.
File protection :
Protected files cannot be deleted on the camera, but can be deleted manually on a computer or when the card is formatted.
SPECIFICATIONS
| Screen | 2.0 inch LCD |
| Video Format | AVI |
| Video resolution | 1080P 1920 x 1080,720P 1280 x 720 or VGA 640 x 480 |
| Image Format | JPG |
| Photo resolution | 12M/8M/5M/3M/2M/1M/VGA |
| G-SENSOR | Yes |
| Micro SD card | up to 32GB |
| Lens | f=3.0mm, F2.0 |
| Microphone | Yes |
FR
APPARENCE
natural_image
Close-up of a black digital camera with visible lens and side stripes (no text or symbols)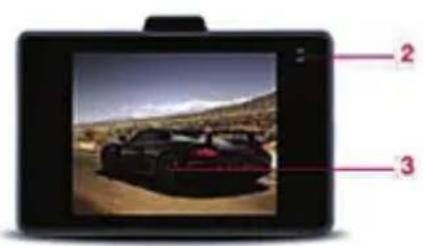
natural_image
Digital camera display showing a black sports car on a desert landscape with labeled parts (no text or symbols on the device itself)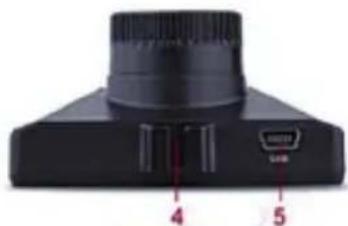
natural_image
Close-up of a black electronic device with labeled ports (no text or symbols beyond labels)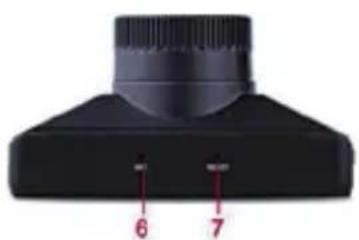
natural_image
Close-up of a black mechanical component with two red measurement indicators labeled 6 and 7 (no text or symbols on the component itself)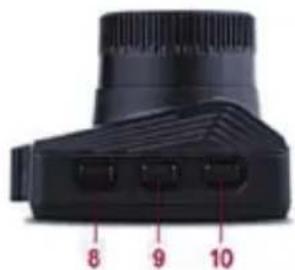
natural_image
Close-up of a black camera lens component with numbered ports (8, 9, 10) and no visible text or symbols beyond labels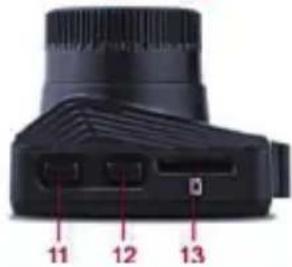
Partie Fonction
MONtEr IA cAMÉrA EMBArQUÉE sUr UN pArE-BrlsE
Tighten the Locking Collar for a Secure Fit
natural_image
Close-up of a black camera head with a circular head and camera lens (no visible text or symbols)AllUMEr Et
cHArgEr IA cAMÉrA
EMBArQUÉE
natural_image
Close-up of a black digital camera with visible lens and side stripes (no text or symbols)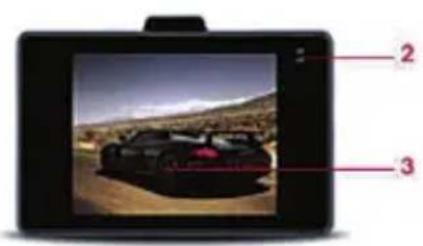
natural_image
Close-up of a black electronic device with labeled ports (no text or symbols beyond labels)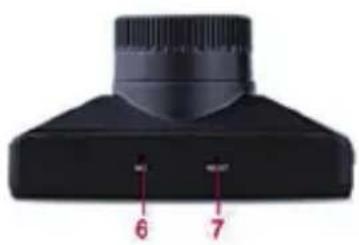
natural_image
Close-up of a black mechanical component with two red indicator lights labeled 6 and 7 (no text or symbols on the object itself)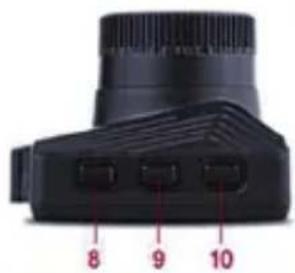
natural_image
Close-up of a black camera lens with three labeled buttons (8, 9, 10) on the side, no text or symbols beyond labels.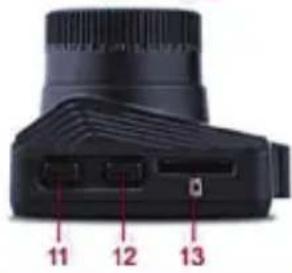
Objekt Funktion
MONtAgE dEr dAsHcAM AN dEr WINdscHUtZscHEIBE- dAsHcAM
Tighten the Locking Collar for a Secure Fit
natural_image
Close-up of a black camera head with a circular dial and sensor array (no visible text or symbols)EINscHAItEN & AUFIAdEN dEr dAsHcAM
natural_image
Interior view of a car dashboard and steering wheel (no text or symbols visible)natural_image
Close-up of a black camera with visible lens and side stripes (no text or symbols)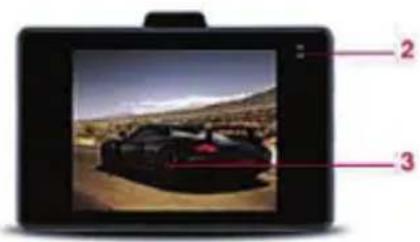
natural_image
Close-up of a black electronic device with ports and connectors (no visible text or symbols)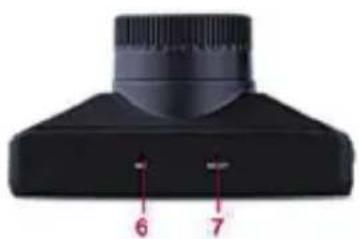
natural_image
Close-up of a black mechanical component with two red arrows pointing to features labeled 6 and 7 (no text or symbols beyond labels)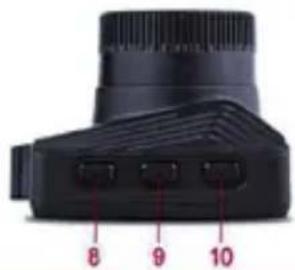
natural_image
Close-up of a black camera lens with three labeled ports (8, 9, 10) and no visible text or symbols beyond labels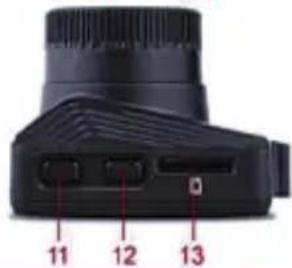
natural_image
Close-up of a black camera lens with labeled ports (no text or symbols beyond numbers)Alkotóelem Funkció
A FEDÉLZETI KAMERA FELSZERELÉSE A SZÉLVÉDŐRE
natural_image
Close-up of a black digital camera with visible lens and side stripes (no text or symbols)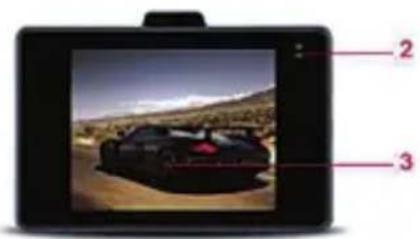
natural_image
Close-up of a black electronic device with labeled ports (4 and 5) and an USB port, no readable text or symbols beyond labels.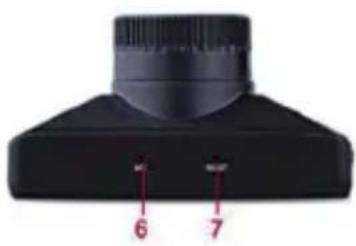
natural_image
Close-up of a black mechanical component with two red measurement labels (6 and 7) on its surface, no readable text or symbols beyond labels.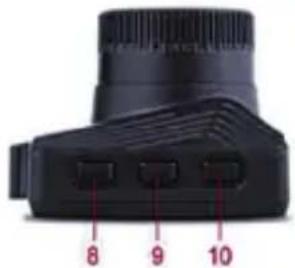
natural_image
Close-up of a black camera lens with three labeled buttons (8, 9, 10) pointing to the lens area (no text or symbols on body)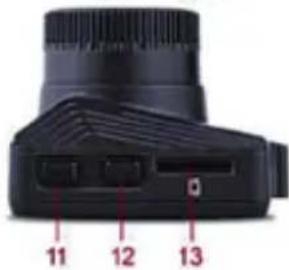
Element Funkcja
MONTAŻ WIDEOREJESTRATORA NA PRZEDNIEJ SZYBIE
WŁĄCZANIE ZASILANIA I ŁADOWANIE WIDEOREJESTRATORA
natural_image
Close-up of a black digital camera with visible lens and side stripes (no text or symbols)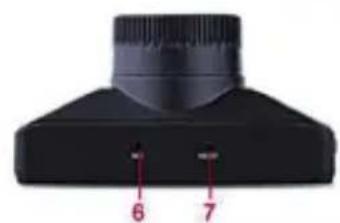
natural_image
Close-up of a black mechanical component with two red numbered parts (6 and 7) on its surface, no visible text or symbols.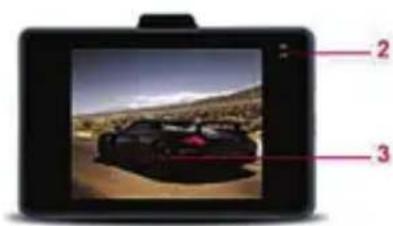
natural_image
Close-up of a black camera lens with three labeled buttons (8, 9, 10) pointing to the lens edge (no text or symbols on the lens body)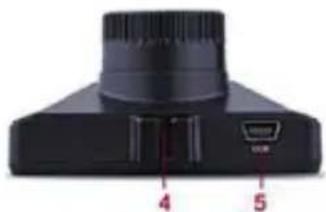
natural_image
Close-up of a black electronic device with labeled ports (no readable text or symbols)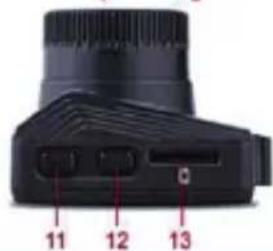
Componente Funzione
INstAllAZIONE dEIIA dAsHcAM sU UN pArABrEZZA
AccENsIONE E rlcArlcA dEIIA dAsHcAM

Notice of compliance for the European Union : products bearing the CE mark comply with the applicable European directives and associated harmonised European standards.
Disposal of waste equipment by users in the European Union: this symbol means that according to local laws and regulations, it is prohibited to dispose of this product with household waste. Instead, it is your responsibility to protect the environment and human health by handing over your used device to a designated collection point for the recycling of waste electrical and electronic equipment. For more information about where you can drop off your waste equipment for recycling, please contact your local city office, your household waste disposal service or the shop where you purchased the product.
After sales service / service après vente / Kundendienst / servicio postventa / servizio post vendita / serviço pós venda / dienst na verkoop / serwis posprzedażowy / értékesítés utáni szolgáltatás / poprodejní servis / послепродажное обслуживание :
@ : aftersaleservice@gtcompany.fr
Product manufactured for and distributed by :
GT COMPANY - 5 rue de la Galmy - 77700 Chessy - France - +33 (0) 1.61.10.09.25 - www.gtcompany.fr
AgfaPhoto is used under license of Agfa-Gevaert NV. For this product a sub-license has been granted by AgfaPhoto Holding GmbH (www.agfaphoto.com). Neither Agfa-Gevaert NV nor AgfaPhoto Holding GmbH manufacture this product or provide any product warranty or support. For service, support and warranty information, contact the distributor or manufacturer.