SS-14470 - Hand blender Sogo - Free user manual and instructions
Find the device manual for free SS-14470 Sogo in PDF.

User questions about SS-14470 Sogo
0 question about this device. Answer the ones you know or ask your own.
Ask a new question about this device
Download the instructions for your Hand blender in PDF format for free! Find your manual SS-14470 - Sogo and take your electronic device back in hand. On this page are published all the documents necessary for the use of your device. SS-14470 by Sogo.
USER MANUAL SS-14470 Sogo
natural_image
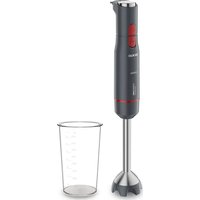
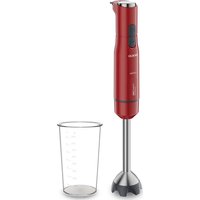
Product photo of a red SOGO brand blender with a glass bowl, whisk, and kitchen utensil (no visible text or symbols)
Batidora de mano / Hand Blender Batteur-Mixeur / Misturador da Mão Miscelatore a mano / Handmischer
Caution: please read and preserve these important instructions
Antes de cortar...
GUÍA DE PROCESAMIENTO
Instructions for use
Please read these instructions fully before use and preserve them for future reference.
IMPORTANT WARNING
A copy of this manual can also be downloaded from our website:
www.sogo.es
KEEP THIS MANUAL IN A SAFE PLACE FOR FUTURE USE
- Please read the instructions carefully and completely before using the appliance.
- Before plugging into a socket, check whether your voltage corresponds to the rating label of the appliance.
• These appliance is not to be used by children or persons with reduced physical, sensory or mental capabilities, or lack of experience and knowledge, unless they have been given supervision or instruction concerning use of the appliance by a person responsible for their safety. Children should be supervised to ensure that they do not play with the appliance.
• Always disconnect the blender from the supply if it is left unattended and before assembling, disassembling or cleaning; - Don’t let children play with this appliance. Do not allow children to use the blender without supervision
- Switch off the appliance and disconnect from supply before changing accessories
or approaching parts that move in use.
- Care shall be taken when handling the sharp cutting blades, emptying the bowl and during cleaning.
- Don’t plug the appliance into the power supply until it is fully assembled and always unplug before disassembling the appliance or handle the blade.
- Don't let the motor unit, cord, or plug get wet to protect against risk of electrical shock.
- Do not operate the appliance with a damaged cord or plug or after the appliance malfunctions, or is dropped or damaged in any manner. Return appliance to the nearest authorized service facility for examination, repair or electrical or mechanical adjustment.
- If the supply cord is damaged, it must be replaced by the manufacturer, its service agent or similarly qualified persons in order to avoid a hazard.
- Don’t let excess cord hang over the edge of the table or worktop or touch hot surface.
• The blades are very sharp! - Don’t place the appliance in the hot ingredients.
- The appliance is constructed to process normal household quantities.
- Neither the measuring beaker, nor the chopping bowl is microwave proof.
- Short-time operating. Use the appliance according to the table of Processing Guide.
- If you want to operate the unit for more
than one cycle, you should wait at least 3 minutes before the next working.
- Close supervision is necessary when any appliance is used by or near children. Keep children away from the appliance.
- Keep hands, hair, clothing, as well as spatulas and other utensils away from the beaters during operation to reduce the risk of injury to persons, and/or damaged to the mixer.
- Do not operate the hand mixer with wet hands.
- This appliance shall not be used by children
- This appliance is intended to be used in household and similar applications such as:
-Staff kitchen areas in shops, office and other working environments;
-Farm houses;
-By clients in hotels, motels and other residential type environments;
-Bed and breakfast type environments.
- This device must never be operated close to a bathtub, shower, fille hand basin or similar.
- The motor block, the power cable and the mains plug must not be immersed in water or any other liquids.
- Protect the motor block against moisture, drips and splashes.
- If liquid gets into the motor block, remove the mains plug immediately. Have the
device checked before reusing.
- If the device falls into water, disconnect the mains plug immediately.
Only then is it safe to retrieve the device.
- Only connect the mains plug to a properly installed and easily accessible wall socket whose voltage corresponds to the specification on the rating plate. The wall socket must continue to be easily accessible after the device is plugged in.
- The device is not fully disconnected from the power supply, even after it is switched off. In order to fully disconnect it, pull out the mains plug.
- When using the device, ensure that the power cable cannot be trapped or crushed.
- When removing the mains plug, always pull the plug and never the cable.
- Disconnect the mains plug from the wall socket ...
... if there is a fault,
... when the blender is not in operation,
... prior to each cleaning, and
... during thunderstorms.
PRODUCT PARTS DESCRIPTIONS
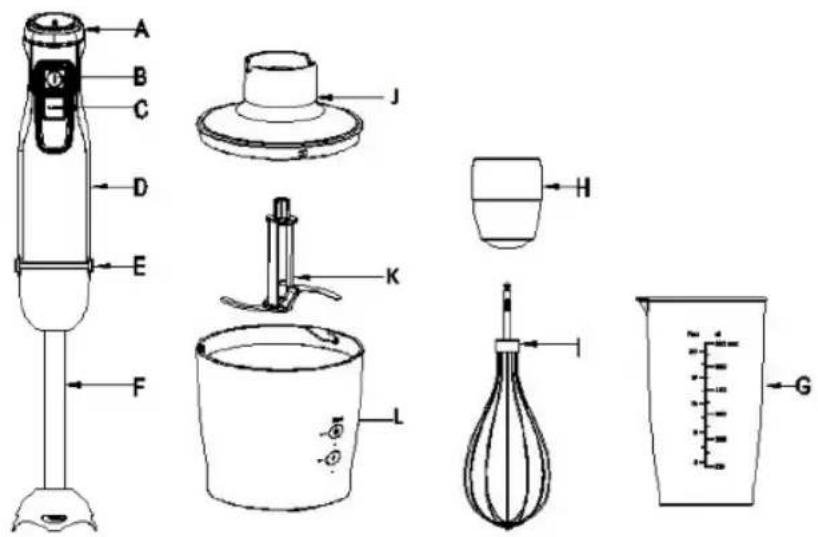
A. Inching switch
B. Switch I
C. Switch II
D. Motor Unit
E. Push out button
F. Blender stick
G. Beaker
H. Whisk holder
I. Whisk
J. Chopping bowl lid
K. "S" blade
L. Chopping bowl
HOW TO USE THE HAND BLENDER

The hand blender is perfectly suited for preparing dips, sauces, soups, mayonnaise and baby food as well as for mixing and milkshakes.
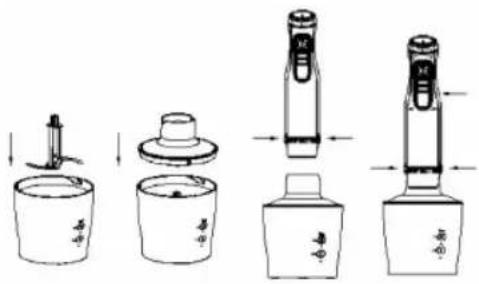
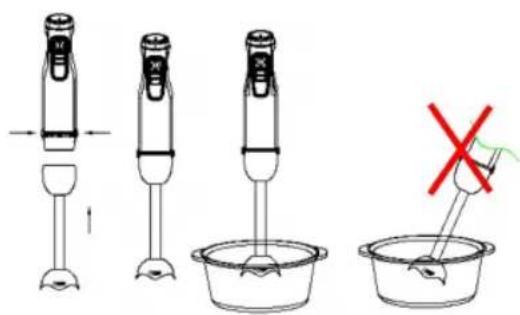
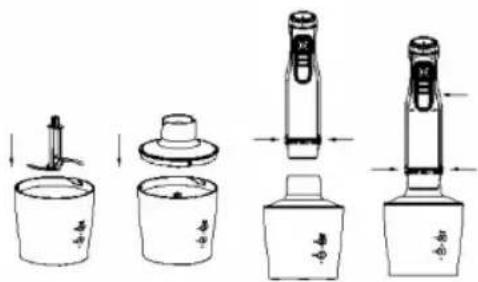
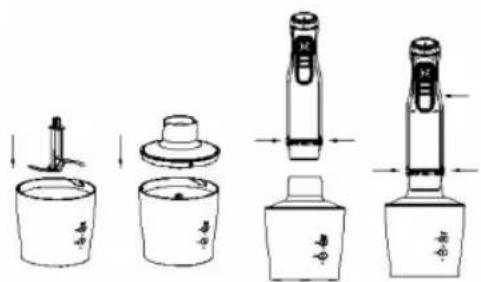
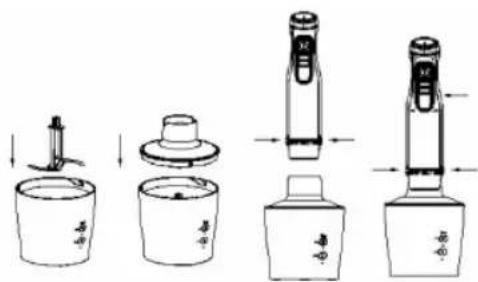
• Take the blender stick on the motor unit and push it until it locks.
- Introduce the hand blender in the measuring beaker. Press the switch. The more you press, the more speed you get.
• Take the blender stick out off the motor unit after use by pressing the eject button. You can use the hand blender in the measuring beaker and just as well in any other vessel.
HOW TO USE YOUR CHOPPER
- Chopper is perfectly suited for hard food, such as meat, cheese, onion, herbs, garlic, carrots, walnuts, almonds, prunes etc.
- Don't chop extremely hard food, such as ice cubes, nutmeg, coffee beans and grains.
Before chopping...
- Carefully remove the chopping bowl lid from the blade. Caution: the blade is very sharp! Always hold it by the upper plastic part.
- Place the blade on the center pin of the chopper bowl. Press down the blade and lock bowl.
- Place the food in the chopping bowl.
- Place the chopping bowl lid on the chopping bowl.
- Place and push the motor unit on the chopping bowl lid until it locks.
- Press the switch. The more you press, the more speed you get. During processing, hold the motor unit and the chopper bowl.
• After use, take the motor unit off the chopping bowl lid pressing the eject button. - Then remove the chopping bowl lid.
- Carefully take out the blade.
- Remove the processed food from the chopping bowl.
HOW TO USE YOUR WHISK
Use the whisk only for whipping cream, beating egg whites and mixing sponges and Ready-mix desserts.
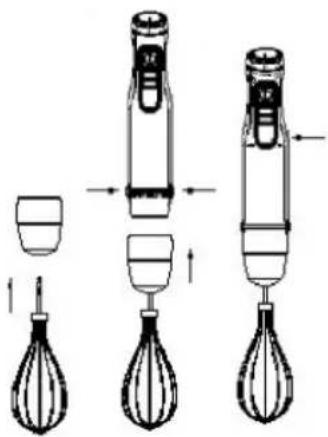
- Insert the whisk into the whisk holder, and then push the whisk holder onto unit until it locks.
- Introduce the whisk in a measuring and then press the switch. The more you press, the more speed you get.
- Push the whisk with whisk holder out off the motor unit after use. Then pull the whisk out of the whisk holder.
CLEANING
Cleaning the motor unit and chopping bowl lid only with a damp cloth only. Do not immerse the motor unit in water!
- All other parts can be cleaned in the dishwasher. However, after processing very salty food, you should rinse the blades right away.
- Also, be careful not to use an overdose of cleaner. When processing food with color, the plastic parts of the appliance may become discolored. Wipe these parts with vegetable oil before placing them in the dishwasher.
• The blades are very sharp, please pay attention. - Unplug the appliance before cleaning.
PROCESSING GUIDE
| Food Maximum Use | Operation time | ||
| Meat 250 | g Chopper | 15 sec | |
| Herbs | 50 g | Chopper | 10 sec |
| Nut, almonds | 150 g Chopper | 15 sec | |
| Cheese | 100 g Chopper | 10 sec | |
| Bread | 80 g | Chopper | 10 sec |
| Onions | 200 g Chopper | 10 sec | |
| Biscuits | 150 g Chopper | 10 sec | |
| Soft fruit | 200 g Chopper | 10 sec | |
| Carrot | 200 g Chopper | 10 sec | |
| Eggs | 4 pcs-200 g | Whisk | 15 sec |
TECHNICAL SPECIFICATIONS
Model: SS-14470
the Voltage / Frequency: 220-240V\~ 50/60Hz
Power Consumption: 1000W
beaker
Mode d'emploi

Antes de cortar...
Vor dem hacken ...
DECLARATION OF CONFORMITY
This device complies with Low Voltage Directive 2014/35/EC, Electromagnetic Compatibility Directive 2014/30/EU, Directive 2015/863/UE on the restriction of the use of certain hazardous substances in electrical and electronic equipment and Directive 2009/125/EC on the eco-design requirements applicable to energy-related products.
DÉCLARATION DE CONFORMITÉ
This symbol means that in case you wish to dispose of the product once its working life has ended, take it to an authorised waste agent for the selective collection of waste electrical and electronic equipment (WEEE).

Imported by:
Sanysan Appliances S.L, NIF: B98753056, C/ Barcas 2, 2 46002 Valencia, Spain Product made in P.R.C. – Designed by SOGO based on the European Quality Standards Customer Service: www.sogosat.com / sogosat@sogosat.com / 0034 902 222 161