
SS-11970 - Fondue, raclette and wok appliance Sogo - Free user manual and instructions
Find the device manual for free SS-11970 Sogo in PDF.

| Product type | Chocolate fountain |
| Brand | Sogo |
| Model | SS-11970 |
| Power supply | 220-240 V ~ 50/60 Hz |
| Power | 90 W |
| Intended use | Indoor household use only |
| Main functions | Preheating, chocolate circulation by auger, keep warm |
| Recommended capacity | 700 g of chocolate |
| Preheating time | 15 to 20 minutes before use |
| Included accessories | Base, umbrella tower, auger, stand, silicone seal |
| Care and cleaning | Wash accessories in warm soapy water; do not immerse the base |
| Safety | Do not leave unattended; do not touch hot element after use |
| Recommended chocolate type | Good quality chocolate, preferably dark with high cocoa content |
| Recommended oil | Canola oil, 125 to 250 ml depending on chocolate |
| Integrated protection | Ground conductor |
Frequently Asked Questions - SS-11970 Sogo
User questions about SS-11970 Sogo
0 question about this device. Answer the ones you know or ask your own.
Ask a new question about this device
Download the instructions for your Fondue, raclette and wok appliance in PDF format for free! Find your manual SS-11970 - Sogo and take your electronic device back in hand. On this page are published all the documents necessary for the use of your device. SS-11970 by Sogo.
USER MANUAL SS-11970 Sogo
natural_image
Red SOGO brand blender with stainless steel top and side arm (no visible text or symbols on body)
FUENTE DE CHOCOLATE RETRO CHOCOLATE FOUNTAIN RETRO FONTAINE DE CHOCOLAT RETRO FONTE DE CHOCOLATE RETRO RETRO SCHOKOLADENBRUNNEN FONTANA DI CIOCCOLATO RETRO
Caution: please read and preserve these important instructions
IMPORTANTE:
Figura 1 Figura 2

• Always read the instruction book carefully before using.
- This manual can be downloaded from our web page www.sogo.es
- Keep these instructions for future reference.
IMPORTANT WARNING:
This appliance is not a toy. We recommend that before using the appliance for the first time, you must read the safety and usage instructions provided in the instruction manual.
SAFETY INSTRUCTIONS FOR THE USER
- This product is intended for indoor, non-industrial, non-commercial; household use only. Do not use the item outdoors or for any other purpose. Misuse or improper handling may cause problems in the appliance and cause injury to the user.
- Ensure that the voltage indicated on the nameplate matches the mains voltage before plugging in the appliance.
- Do not use or store the appliance outdoors.
• Always remove the plug from the power socket when the appliance is not in use. Do not leave the appliance unattended when switched on. - Before cleaning or storing your appliance, always unplug the appliance from the power supply and let it cool down.
-
The appliances are not intended to be operated by means of an external timer or separate remote-control system.
-
Do not place or operate this appliance near water sources.
- Never immerse the appliance or the plug-in water or any other liquid. In the event of the appliance falling in water, disconnect immediately from the mains supply and take it to an authorized service agent for repair before reusing.
- Do not place or operate the appliance and its power cord on or near hot surfaces (e.g., stove plates) or open flames.
- Do not leave the power cord hanging from sharp edges and keep away from hot objects and flames. Do not wind the cord around the appliance and do not bend it.
- Do not use the appliance if the cable or plug is damaged. In case of the cord be damaged, it must be replaced only by the manufacturer, its service agent or similarly qualified persons in order to avoid Hazard.
- In case of appliance malfunction, or if it has been damaged in any manner, return the appliance to the nearest authorized service facility for examination, repair or adjustment.
- In case of hardware problems, do not attempt to repair the product yourself. Repairs should only be carried out by qualified technicians.
- Never use accessories that are not recommended by the manufacturer.
- The use of accessories not recommended or sold by the appliance manufacturer may result in fire, electric shock or injury to persons.
-
Always place the appliance on to the flat and even surface.
-
Do not use the appliance for any other purpose than described in this manual.
- Do not let the appliance operate unattended.
- When you want to remove the plug from the wall contact, please do this at the plug itself and not by pulling on the cable or the appliance itself.
- Make sure your hands are dry before plug or unplugging.
- The appliance is not to be used by persons (including children) with reduced physical, sensory or mental capabilities, or lack of experience and knowledge, unless they have been given supervision or instruction.
• Children should be supervised to ensure that they do not play with the appliance. - Cleaning and user maintenance shall not be made by children without supervision.
- Keep the appliance and its cord out of the reach of the children.
- Appliances can be used by persons with reduced physical, sensory or mental capabilities or lack of experience and knowledge, if they have been given supervision or instruction concerning use of the appliance in a safe way and understand the hazards.
- Children shall not play with the appliance.
- This appliance is intended to be used in household and similar applications such as
- Staff kitchen areas in shops, offices and other working environments;
- Farm houses and by clients in hotels, motels and other residential type environments;
- Bed and breakfast type environments;
Catering and similar non-retail applications.
Things to remember while using the appliance
- The device contains rotating parts. Don’t try to put the fingers or hands into the rotating cylinders during operation. You might get injured and damage the device.
- Do not let the cable hanging around to prevent people from tripping over it.
- The device must be operated by persons familiar with the dangers and special features of the device.
- Never expose the device to high temperatures (radiator, etc.) or weather impact (rain, etc.).
- The heating element surface is subject to residual heat after use, hence do not touch this part directly.
- Even after the unit has been unplugged from the wall socket, give sufficient time for the heating element to cool down before cleaning or storing it.
Intended use
- This device is intended to let melted chocolate flow over the umbrellas to create a decorative fountain-like effect.
- Other heat-resistant, pourable foods such as cheese, sauces or to refine the chocolate eg. with liquor, can also be used instead of chocolate.
- The device is not suitable for melting chocolate or other foods. the item is intended exclusively for household use and should not
be used in commercial applications.
- Any other use is considered as unintended and can cause property damages or even personal injury.
- The manufacturer assumes no liability for damages caused by unintended use.
COMPONENTS
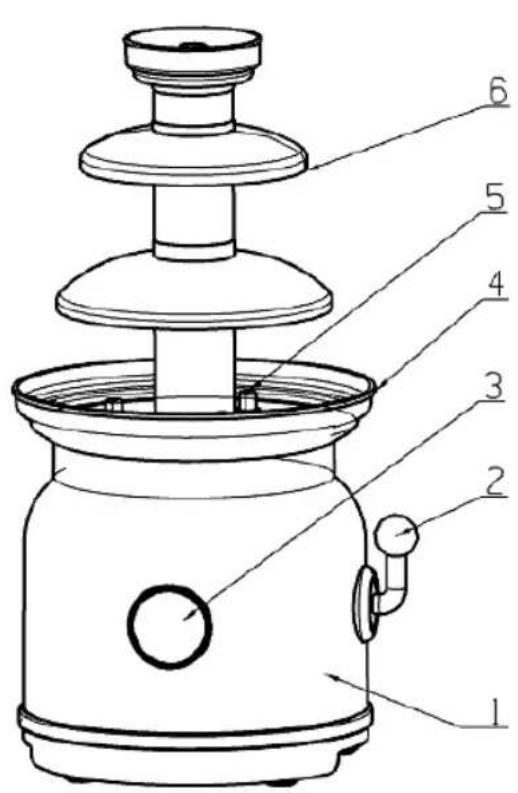
Figure 1 Figure 2

- Motor unit
- ON/OFF switch in the form the of the lever handle with dual heating function Position HEAT/MOTOR: heating with operation of the conveyor screw Position HEAT: preheating Position OFF: switch off
- LED light indicator
- Chocolate filling base
- Guide pins for the holder
- Chocolate tower with umbrella shape
- Holder
- Conveyor screw
- Retaining pin for the conveyor screw
- Silicone gasket
MOUNTING AND PREHEATING OF THE APPLIANCE
• See figures 1 and 2
- Place the Appliance on a heat-resistant and level surface.
- Push the holder 7 onto the cylinder 6.
- Position the conveyor screw 8 onto the retaining pin 9.
- Slide the cylinder with the holder over the conveyor screw 8 and push it against the stop on the guide pins 5.
- Plug the power cable into a readily accessible outlet.
- Set the ON/OFF switch 2 to position HEAT. The indicator lamp lights up. Preheat the device at least 15-20 Minutes prior to use.
OPERATING YOUR CHOCOLATE FOUNTAIN
- Note: Before using your Chocolate Fountain for the first time, check all packaging has been removed, then clean the unit following the instructions under CARE AND CLEANING.
- Place the Chocolate Fountain on a flat dry and level surface, so the Chocolate Fountain sits evenly on the bench or table's surface.
-
The Chocolate Fountain must be level to operate correctly.
-
Ensure the control switch is set to the OFF position
- Plug the chocolate fountain into a 220-240V AC outlet and switch the power on
- Turn the control switch to "Heat" position. This will warm the body of the chocolate fountain, ready for the melted chocolate. The chocolate fountain can only be operated with pre-melted chocolate
- Melt chocolate, following direction under Melting Chocolate
- Pour the melted chocolate mixture into the base of the fountain and turn the control switch to Heat / Motor to start the motor and turn the auger pump, allowing the chocolate to be drawn up the tower and filter out the top and over the sides of the fountain.
- Let the chocolate fountain operate for a minimum of 5 minutes, then check the consistency. Add extra oil if required.
NOTE: If the chocolate Fountain is not operating as expected, check the Troubleshooting section later in this booklet.
MELTING CHOCOLATE
- Chocolate can vary in quality; therefore, the suggested quantity of all may need to be adjusted to make the chocolate flow consistently. We recommended the use of good quality chocolate melts, the higher the cocoa content the better. Dark chocolate works best. The amount of oil used can vary between 125ml to 250ml depending on the type of chocolate used.
- Suggested measurements: Combine 700g of chocolate melts with 34 cup of canola oil. The quickest method to melt the chocolate is in the microwave, however you need to ensure the microwave does not get too hot and burn the chocolate, if your microwave does not have a medium heat setting or temperature control, we recommended the stove top melting method. Allow for extra chocolate top ups if preparing the fountain for use by lots of people.
Note: the quantity mentioned above are merely indicative and can be changed according to the quality of the chocolate. The quantity of oil used can also be varied depending on the type of chocolate - Microwave melting method: Combine 700g of chocolate melts with 34 cup of canola oil in microwave proof bowl. Heat on medium/low power setting for 3 minutes. Remove the mixture from the microwave, stir, and then heat for a further 1 minute. Repeat this process until the chocolate has completely melted and is smooth and consistent. Test the consistency using a large spoon to check whether the mixture drips evenly from the spoon. If the mixture is too thick add extra oil.
- Water bath method: The water bath method consists of the indirect heating concept, without the substance being in direct contact with fire.
Combine 700g of melted chocolate with 34 cup of canola oil in a heat-resistant container. Place the container over a saucepan with boiling water. Keep stirring the chocolate mixture until completely melted, smooth and consistent. Test the consistency with a large spoon to check if the mixture drips evenly from the spoon. If the mixture is too thick, add extra oil.
Note: It is necessary that the smaller container be in direct contact with the water for heat transfer, at the same time without touching the bottom of the larger container with the water.
Make sure that the water does not get into the chocolate at the time of the water bath, otherwise, lumps can form.
CARE AND CLEANING
- Ensure the chocolate fountain control switch is set to the OFF position, turn the power off at the outlet and unplug the unit from the power supply.
- When the unit has cooled enough to touch, lift the chocolate from the tower and plastic auger by letting it drip into the base.
- Wash the tower and auger attachments in warm soapy water. Avoid placing parts in the dishwasher.
- Do not dispose of leftover chocolate down the drain. Pour left over chocolate from the base of the fountain into plastic bag or dispose container then place in the rubbish.
- Pour as much chocolate out of the base of the fountain as possible. Wipe the base clean using a damp, non-abrasive cloth. Wipe dry with paper a towel or soft cloth.
- Do not immerse the base of the chocolate fountain in water or any other liquid.
- Do not use abrasive cleaning products or cloths on any part of your Chocolate Fountain.
TECHNICAL SPECIFICATIONS
Model: SS-11970
Voltage and Frequency: 220-240V\~50/60Hz
Power: 90W
With inbuilt
Protective conductor
TROUBLESHOOTING
| PROBLEM POSSIBLE CAUSE SOLUTION | ||
| The chocolate is not flowing over the fountain as expected | The chocolate is too thick Thin with canola oil | |
| The unit is not level Level the unit on the bench or table top | ||
| Not enough chocolate Ensure at least 700g of chocolate used | ||
| A draft is affecting the chocolate | Operate the fountain indoors close any windows or doors which may allow a draft in the room | |
| The chocolate flow is intermittent, interrupted or not flowing correctly. | Chocolate may be caught in the base of the fountain | Pour express chocolate into a bowl and check for any food caught in the fountain base, blocking the chocolate flow. Reassemble the unit and replace the chocolate. |
| Chocolate has gone hard during melting | Chocolate has got to hot and burn | Chocolate must be disposed of and fresh chocolate to be used. |
| There is a white film around the base chocolate | This is normal The white film caused by the churning process when the chocolate is turned trough the pump | |
IMPORTANT:
Figure 1 Figure 2
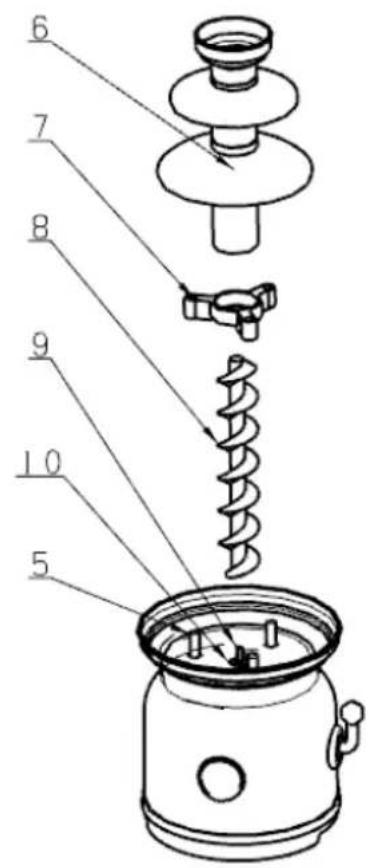
Figura 1 Figura 2
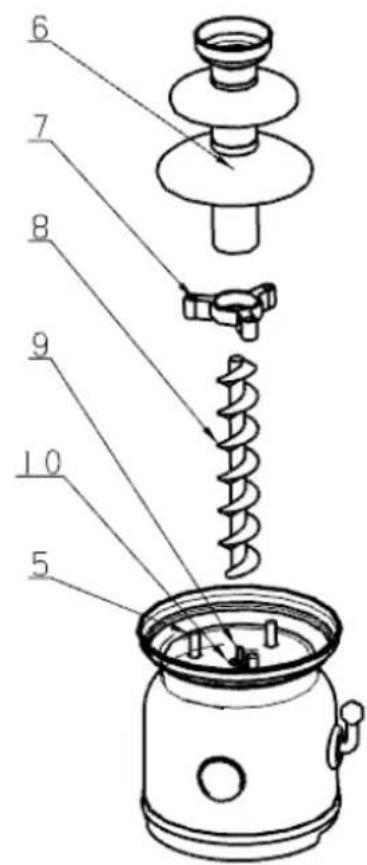
Figure 1 Figure 2

DECLARATION OF CONFORMITY
This device complies with Low Voltage Directive 2014/35/EC, Electromagnetic Compatibility Directive 2014/30/EU, Directive 2015/863/EU on the restriction of the use of certain hazardous substances in electrical and electronic equipment and Directive 2009/125/EC on the eco-design requirements applicable to energy-related products.
DÉCLARATION DE CONFORMITÉ
This symbol means that in case you wish to dispose of the product once its working life has ended, take it to an authorised waste agent for the selective collection of waste electrical and electronic equipment (WEEE).

Imported by:
Sanysan Appliances S.L, NIF: B98753056, C/ Barcas 2, 2
46002 Valencia, Spain Product made in P.R.C. – Designed by SOGO based on the European Quality Standards
Customer Service: www.sogosat.com / sogosat@sogosat.com / 0034 902 222 161