Lavazza A Modo Mio Piccina RI9585 - Coffee machine SAECO - Free user manual and instructions
Find the device manual for free Lavazza A Modo Mio Piccina RI9585 SAECO in PDF.

User questions about Lavazza A Modo Mio Piccina RI9585 SAECO
0 question about this device. Answer the ones you know or ask your own.
Ask a new question about this device
Download the instructions for your Coffee machine in PDF format for free! Find your manual Lavazza A Modo Mio Piccina RI9585 - SAECO and take your electronic device back in hand. On this page are published all the documents necessary for the use of your device. Lavazza A Modo Mio Piccina RI9585 by SAECO.
USER MANUAL Lavazza A Modo Mio Piccina RI9585 SAECO
natural_image
Exterior view of a white and black Mio coffee maker with a glass lid (no visible text or symbols)Ideas with Passion

AMODO


LEGGERE ATTENTAMENTE LE ISTRUZIONI
READ CAREFULLY THE INSTRUCTIONS
LIRE ATTENTIVEMENT LES INSTRUCTIONS
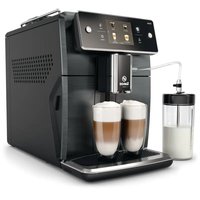
Dear Customer thank you for purchasing the Saeco Lavazza A MODO MIO espresso coffee machine and for your confidence in our company. Before operating the machine, we recommend carefully reading the operating instructions that explain how to use, clean and maintain it in perfect working order. We hope you enjoy brewing excellent coffee, thanks to Saeco and Lavazza!
Félicitations!
natural_image
Line drawing of a kitchen mixer with a hand holding a spoon (no text or symbols)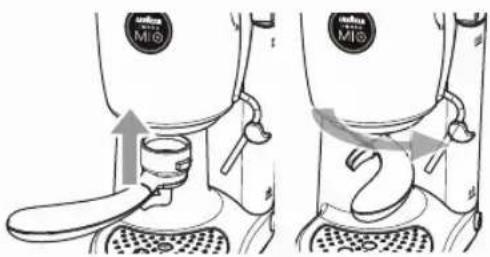
natural_image
Line drawing of a showerhead with two views showing different mechanical configurations (no text or symbols)natural_image
Line drawing of a kitchen mixer with a hand holding a spoon (no text or symbols)
natural_image
Line drawing of a kitchen mixer with an upward arrow indicating motion (no text or symbols)
natural_image
Line drawing of a microwave oven with a hand operating the lid (no text or symbols)
natural_image
Line drawing of a hand pressing down on a circular component with buttons (no text or symbols)
natural_image
Line drawing of a coffee maker with a spoon and lid, showing mechanical components without any text or symbols.
natural_image
Line drawing of a coffee maker's side profile showing grille and base (no text or symbols)
natural_image
Line drawing of a hand pouring liquid from a mixing machine into a cup (no text or symbols)natural_image
Line drawing of a hand pressing a button on a circular component (no text or symbols)natural_image
Illustration of a hand pressing down on a circular component with a downward arrow (no text or symbols)natural_image
Line drawing of a coffee maker using a stand mixer, showing the cup and whisk (no text or symbols)natural_image
Line drawing of a coffee maker using a cup and spoon, with no visible text or symbolsnatural_image
Line drawing of a showerhead with grating and perforated grille (no text or symbols)natural_image
Line drawing of a coffee maker with a grater and lid (no text or symbols)IT
DECALCIFICAZIONE
DECALCIFICAZIONE

natural_image
Line drawing of a coffee maker using a straw shaker to lift a cup (no text or symbols)
MACHINE SETTINGS
EN

No liability is held for damage caused by:
- Incorrect use not in accordance with the intended purposes;
• Repairs not carried out in authorised service centres;
• Tampering with the power cord;
• Tampering with any parts of the machine;
• The use of non-original spare parts and accessories; - Failure to descale;
• Storage at temperatures below 0°C (32°F); - Use at temperatures below 10^ or above 40^ ;
• Use at a relative humidity above 95%; - Use of pods other than those indicated. In these cases, the warranty is not valid.
STARTING THE MACHINE

Place the machine on a flat and stable surface, away from water and heat sources. Disconnect the power supply if connected. Damages to the machine resulting from the failure to follow these instructions will not be covered by the warranty.

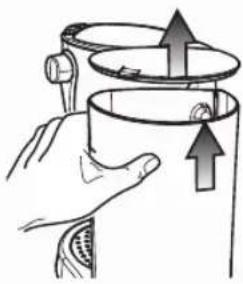
Lift and remove the water tank cover, then the water tank itself.
natural_image
Illustration of a hand holding a cup with upward arrows indicating motion or force (no text or symbols)
Fill the water tank up to the MAX level indicated, using only fresh, drinking, non-sparkling water.

Hot water or any other liquid may damage the tank. Do not operate the machine if water is not present: Make sure there is enough water in the tank.

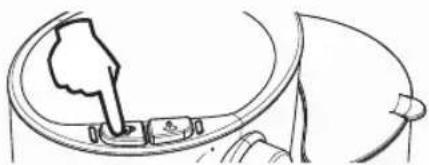
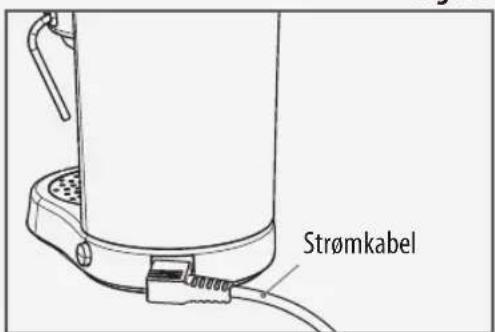
Connect the power cord and press the main switch (see MACHINE COMPONENTS - Picture B). When the coffee ready light is on, the machine is ready for brewing.
The use of a water fi Iter improves the quality of the water and increases the operational life of the machine by preventing lime-scale build-up. Saeco recommends using the INTENZA BRITA FILTER (optional accessory). To install the fi Iter follow the instructions provided with the accessory.

Upon the machine's first start up and after a long period of inactivity you need to rinse the water circuit as explained below.

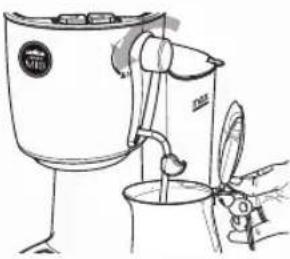
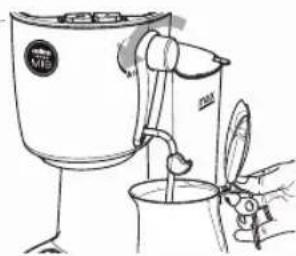
Place a container under the steam / hot water wand and open the knob by turning it counter-clockwise.
2 Press the coffee brew switch.
3 Dispense all the water in the tank from the steam / hot water wand. To stop dispensing, press the coffee brew switch again and close the knob.
4 Fill the water tank again.
natural_image
Line drawing of a hand pouring liquid into a container using a stand mixer (no text or symbols)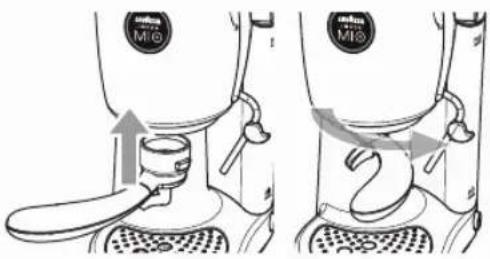
natural_image
Diagram of a coffee maker with two views showing mechanical components and motion arrows (no text or symbols)5 Insert the pod holder WITHOUT the pod, and rotate it from left to right until it locks firmly into place. Then place a container under the pod holder.
6 Press the coffee brew switch and dispense all the water in the tank. Once the tank is empty, stop dispensing by pressing the coffee brew switch again.
7 Fill the water tank again. When the coffee ready light is steady on, the machine is ready for use.
8 Remove the container used.
PRIMING THE WATER CIRCUIT

If the water in the tank is completely finished, you need to prime the water circuit as explained below.
2 Press the coffee brew switch.
3 Dispense water from the steam / hot water wand until a steady stream of water comes out. To stop the operation, press the coffee brew switch again and close the knob.
4 Remove the container used.
1 Place a container under the steam / hot water wand and open the knob by turning it counter-clockwise.
natural_image
Line drawing of a hand pouring liquid into a container using a stand mixer (no text or symbols)EN
PREPARING THE COFFEE

COFFEE BREWING
The machine is ready when the machine ready light is steadily on.

Only suitable Lavazza "A MODO MIO" pods should be placed in the pod holder. Do not put your fingers or any other object in the holder. The perforator in the pod holder might injure fingers.

Single-dose pods brew a single coffee/product. DO NOT use the pods more than once.

In order to perform the above listed operations the steam/water knob must be closed.

Preheat the pod holder. Insert it without the pod and press the brew button. Water will be dispensed from the pod holder (this operation has to be performed only for the first coffee). After 50cc of water has been dispensed, press the brew button again to stop dispensing.

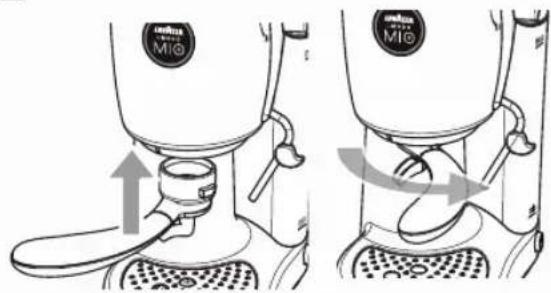
Place the pod in the pod holder. Make sure it is correctly placed.


Insert the pod holder into the brew unit matching the pod holder mark.
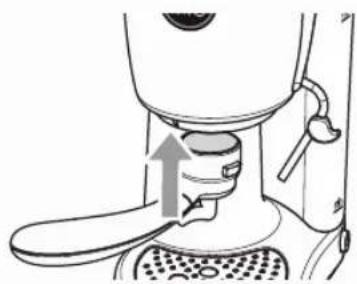
natural_image
Line drawing of a kitchen mixer with an upward arrow indicating motion (no text or symbols)
Turn the pod holder from left to right until it locks into place. Place a coffee cup under the dispensing spout.
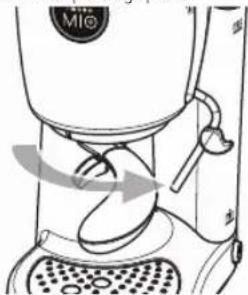
natural_image
Line drawing of a microwave oven with a hand operating the lid and a curved arrow indicating motion (no text or symbols)
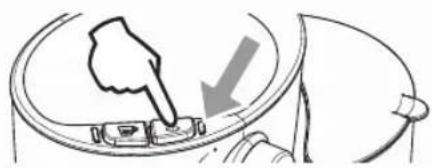
Press the coffee brew button and wait for the desired quantity to be brewed.
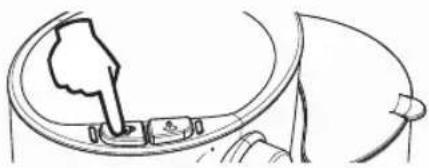
natural_image
Line drawing of a hand pressing down on a circular component with a small valve (no text or symbols)
Do not remove the pod holder whilst brewing.

Press the button again to stop brewing. Remove the cup with the coffee.

It is recommended not to brew coffee for longer than 60 seconds.

Turn the pod holder from right to left until it locks firmly into place.
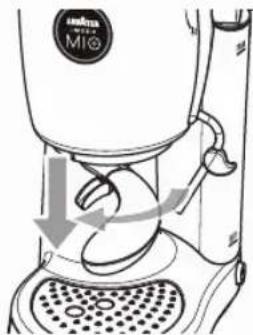
natural_image
Line drawing of a milkshake machine with a spoon and lid, showing motion arrows (no text or symbols)
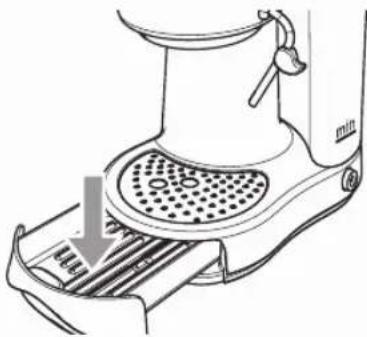
Take the pod drawer slightly out and empty the used pod there or dispose of.
natural_image
Line drawing of a coffee maker with a grater and lid, showing no text or symbols
The pod drawer can contain only 4 pods and it also contains the post-brewing liquids.

It is recommended to remove the used pod immediately after brewing in order to prevent unpleasant odours caused by pods left in the pod holder for a long time.

Danger of scalding! Brewing may be preceded by small jets of hot water. The steam / hot water wand can reach very high temperatures: Never touch it with bare hands. The steam / hot water wand should never be aimed towards people or animals. Always make sure that there is enough water in the water tank.
DISPENSING HOT WATER
When the machine is ready place an empty container under the steam / hot water wand and open the knob.
natural_image
Line drawing of a hand using a microwave oven to clean food, no text or symbols present2 Press the coffee brew button.
natural_image
Line drawing of a hand holding a device with a finger pointing at it (no text or symbols)3 Press the brew button again to stop dispensing and close the steam/hot water knob.

It is recommended not to brew hot water for longer than 60 seconds.
DISPENSING STEAM AND PREPARING A CAPPUCCINO
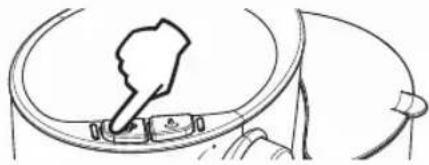
1 Press the steam button. When the indicator light is steady on, the machine is ready.
natural_image
Diagram showing a hand pointing at a button on a circular device, with a gray arrow indicating direction (no text or symbols present)2 Insert an empty container under the steam / hot water wand and open for a few seconds the knob to release the remaining water until
only steam comes out. Close the knob and remove the container.

natural_image
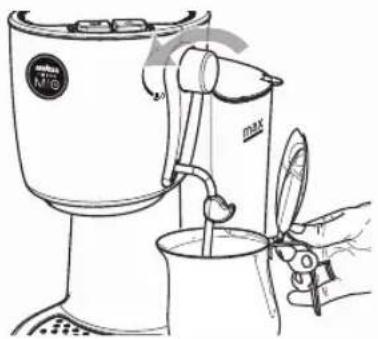
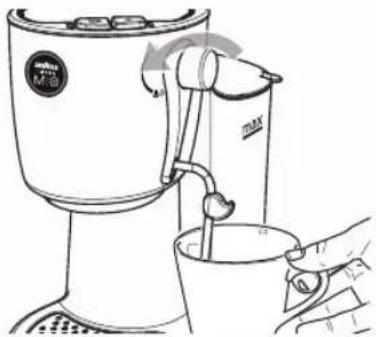
Line drawing of a coffee maker with a hand holding a cup, no text or symbols present3 Place the container with the milk so that the steam / hot water wand is close to its bottom and open the knob. The machine will start dispensing steam.
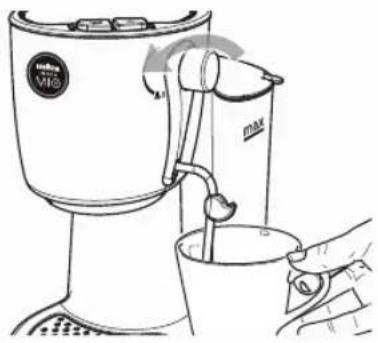
natural_image
Line drawing of a coffee maker using a cup with a straw, no text or symbols presentMove the container slowly downwards to produce a creamy and thick froth. We suggest that the milk quantity does not exceed one third of the container capacity.
4 Once the desired result has been achieved, close the knob and press the steam button again. Remove the container.

It is recommended not to brew steam for longer than 60 seconds.

If both lights are on, the temperature of the machine is too high for brewing coffee. Before performing other operations, dispense the equivalent of a hot water cup as explained in the previous section. This will prevent the next brewed coffee to taste as 'overbrewed' (an almost 'burnt' taste: strong, bitter, and woody).

We suggest using partially skimmed milk, at refrigerator temperature, in the desired quantity to obtain a thick cream.
EN
MAINTENANCE AND CLEANING

Always ensure that the power supply is disconnected and wait for the machine to cool down.

We suggest rinsing the tank every day. Never use alkaline detergents, solvents, alcohol, harsh substances, and never dry up any machine components in an oven. Wash the components (except the electrical ones) with cold/lukewarm water and non-abrasive cloths/sponges.
CLEANING THE STEAM / HOT WATER WAND
After using the steam / hot water wand, dispense steam for some seconds. Clean the wand externally with a damp cloth.
CLEANING THE POD HOLDER
Carry out the COFFEE BREWING procedure weekly without inserting the pod. Then wash the pod holder under running water.
BREW UNIT
Weekly clean the brew unit and eliminate traces of coffee by using a small cooking brush.

Warning: Pod perforators are situated inside the pod holder and the brew unit. Please, take care not to prick yourself when cleaning them.
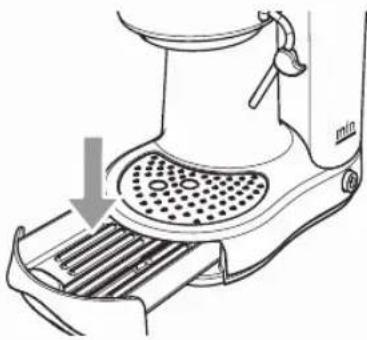
CLEANING THE POD DRAWER

Remove the used pod drawer and wash it.
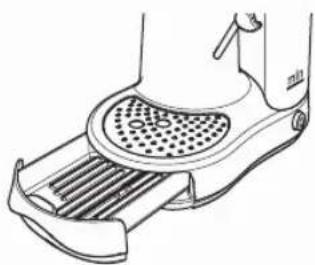
natural_image
Line drawing of a mechanical device with a perforated lid and side-mounted base (no text or symbols)
Remove the upper grill and rinse it with fresh running water.
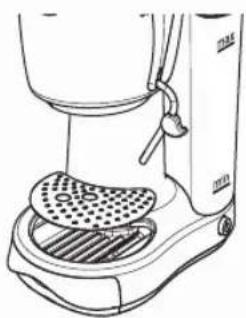
natural_image
Line drawing of a coffee maker with a grater and lid (no text or symbols)DESCALING
EN
DESCALING
Limescale builds up with the normal use of the appliance; the machine needs descaling every 1-2 months and/or whenever a reduction in water flow is noticed.

Use Saeco descaling product. Its formula has been designed to ensure better machine performance and operation for its whole operating life. If correctly used, it also avoids alterations in the brewed product. The descaling solution is to be disposed of according to the manufacturer's instructions and/or regulations in force in the country of use. Note: before starting a descaling cycle make sure that: THE WATER FILTER (if used) HAS BEEN REMOVED.

Never drink the descaling solution and any substances dispensed until the cycle has fi nished. Never use vinegar as a descaling solu-tion.

Before descaling, insert the pod holder in the machine.
natural_image
Diagram of two identical mixing machines with a valve and handle, showing internal components and motion arrows (no text or symbols)
Remove and empty the water tank.

Pour HALF the content of the Saeco concentrated descaling solution into the water tank, and then fill the tank with fresh water.

Switch on the machine by pressing the power button. Open the knob and dispense 2 cups (approx. 150 ml each) of water by using the steam / hot water wand.
natural_image
Line drawing of a coffee maker using a cup with a hand holding the cup (no text or symbols)
Then, close the knob and turn off the machine.

Allow the descaling solution to work for approx. 15-20 minutes with the machine turned off.
7 Turn the machine on by pressing the power button and dispense 2 cups (approx. 150 ml each) of water by using the steam / hot water wand. Then turn the machine off by means of the power button and leave it off for 3 minutes.
8 Repeat the operations as described from step 7 until the water tank is completely empty.
9 Rinse the water tank with clean drinking water and fill it again.
10 Switch on the machine by pressing the power button. Place one cup under the pod holder and then press the coffee brew button to dispense the whole content of the tank. To stop dispensing, press the button again.
11 Fill the tank again with fresh drinking water. Use a large enough container to dispense the whole content of the water tank by means of the steam / hot water wand.
12 After dispensing the water, close the knob to end the operation.
13 Remove the pod holder, and then rinse it under fresh drinking water. The descaling cycle is complete.
CAPPUCCINATORE (optional).
The CAPPUCCINO CUOR DI CREMA LAVAZZA A MODO MIO Cappuccinatore is sold as an accessory for the Lavazza A MODO MIO coffee machines. Visit our website www.lavazzamodomio.com to find the nearest store..
| Problem encountered Possible causes Solution | ||
| The machine does not turn on. » The machine is not connected to the electric network. | » Connect the machine to the electric network.» Contact after-sales service. | |
| The machine requires a lot of time to heat up. | » The appliance is full of limescale. | » Descale the machine. |
| The pump is very noisy. » No water in the tank. | » The tank has been filled without priming the water circuit. | » Refi II with fresh drinking water.» Carry out the priming of the water circuit (see section "Priming the water circuit"). |
| It is not possible to insert the pod holder » Pod holder in the wrong position.» Pod inserted incorrectly. | » Change the pod holder position.» Remove the pod and place it again. | |
| The coff ee is cold. » The indicator light was off when the coff eebrew button was pressed. | » Wait until the indicator light turns on. | |
| The coff ee is brewed too fast; the brewed coff ee is not creamy. | » Pod already used. » Remove the pod holder and place a new pod. | |
| Coff ee is not brewed or brewed in drips only. » Clogged pod holder.» The water circuit is empty. | » Carry out the dispensing spout wash cycle (see MAINTENANCE AND CLEANING).» Carry out the priming of the water circuit (see Section "Circuit Priming"). | |
| Hot water/steam not dispensed. | » Clogged steam wand. | » Clean the spout with a needle (the machine needs to be unplugged and the steam/hot water dispensing knob needs to be closed). |
| The milk does not froth. | » Not suitable milk.» The milk is too hot.» The indicator light was not steady on. | » Use fresh, partially skimmed milk.» Use milk at refrigerator temperature.» Press the steam button and wait for the indicator light to turn on. |
Please contact a Saeco service centre for any faults not covered in the above table or when the suggested solutions do not solve the problem.
TECHNICAL SPECIFICATIONS
- Nominal Voltage - Power Rating - Power Supply: See label on the appliance
- Size: Height Width Depth 318 mm 187 mm 276 mm
- Weight: about 5 kg
• Water tank: about 1.4 litres - Removable
• Materials used for the chassis: Thermoplastic material
• Power cord length 1.2 m
• Control panel: On the upper part
- Boiler: Aluminium
• Safety devices: Pressure safety valve.
- Double thermal fuse
SAFETY
EN

Intended Use:
The coffee machine is intended for domestic use only. It is prohibited to make any technical changes to the machine. Do not use the machine for unauthorised purposes since this would create serious hazards! The appliance is not to be used by persons (including children) with reduced physical, mental or sensory abilities or with limited experience and/or expertise, unless they are supervised by a person responsible for their safety, or they are instructed by this person on how to properly use the machine.

Location:
Place the coffee machine in a safe place, where nobody might overturn it or be injured by it. Do not keep the machine at a temperature below 0^ as freezing may damage it. Do not use the coffee machine outdoors. Do not place the machine on very hot surfaces or close to open flames. Do not cover the machine with cloths when it is on.

Power Supply:
Only connect the coffee machine to a suitable socket. The voltage must correspond to that indicated on the machine label. To save energy, it is recommended to turn the machine off when it is not going to be used for longer than 60 minutes.

Power Cord:
Do not use the coffee machine if the power cord is defective. If damaged, the power cord must be replaced by the manufacturer or an authorised service centre or in any case by a person with a similar qualification. Do not pass the power cord around corners, over sharp edges or over hot objects and keep it away from oil. Do not use the power cord to carry or pull the coffee machine. Do not pull out the plug by pulling on the power cord or touch it with wet hands. Do not let the power cord hang freely from tables or shelves.

Danger of Electrocution:
Never allow water to come into contact with any of the electrical parts of the machine.

Protection for Other People:
Prevent children from playing with the machine. Children are not aware of the risks related to electric household appliances. Do not leave the machine packaging materials within the reach of children.

Danger of Burns:
Never direct the jet of hot steam and/or hot water towards yourself or others. Brewing may be preceded by small jets of hot water. The steam / hot water wand can reach very high temperatures: Never touch it with bare hands, only use the appropriate knob. Do not remove the pod holder during coffee brewing.

Cleaning:
Before cleaning, unplug the machine and let it cool down. Do not put the machine under water! It is strictly forbidden to tamper with the internal parts of the machine. Do not use the water in the tank for food use.

Storing the Machine
If the machine is to remain inactive for a long time, unplug it and store it in a dry place out of reach of children. Keep it protected from dust and dirt.

Repairs / Maintenance:
In case of failure, problems or a suspected fault resulting from the falling of the machine, immediately remove the plug from the socket. Do not attempt to operate a faulty machine. Servicing and repairs may only be carried out by Saeco authorised service centres. All liability for damages resulting from work not carried out by professionals is declined.

Water Tank:
Fill the tank only with fresh, non-sparkling, drinking water. Do not operate the machine if the water is not at least above the minimum level indicated on the tank.

Pod Compartment:
Only Lavazza A MODO MIO pods can be placed the pod compartment. Do not put your fingers or any other object in. Use pods only once.

Machine Disposal at the End of Its Operational Life:
INFORMATION FOR THE USER: In compliance with art. 13 of the Italian Legislative Decree dated 25 July 2005, no. 151 "Implementation of the Directives 2002/95/EC, 2002/96/EC and 2003/108/EC on the restriction of the use of certain hazardous substances in electrical and electronic equipment, as well as waste disposal". The symbol of the crossed-out wheeled bin on the appliance or its packaging indicates that the product must be disposed of separately from other waste at the end of its operational life. The user must therefore take the appliance to be disposed of to an appropriate separate collection centre for electronic and electrotechnical equipment or take it to the dealer when buying a new appliance of the equivalent kind (one by one). Appropriate separate collection for the dismantled appliance being subsequently sent out for recycling, treatment and for environmentally friendly disposal, contribute to the prevention of possible negative effects on the environment and on human health, and encourage recycling of the materials the appliance is made of. Specific administrative sanctions provided for by current regulations will be applied for illicit disposal of the product by the user.
FR
COMPOSANTS DE LA MACHINE
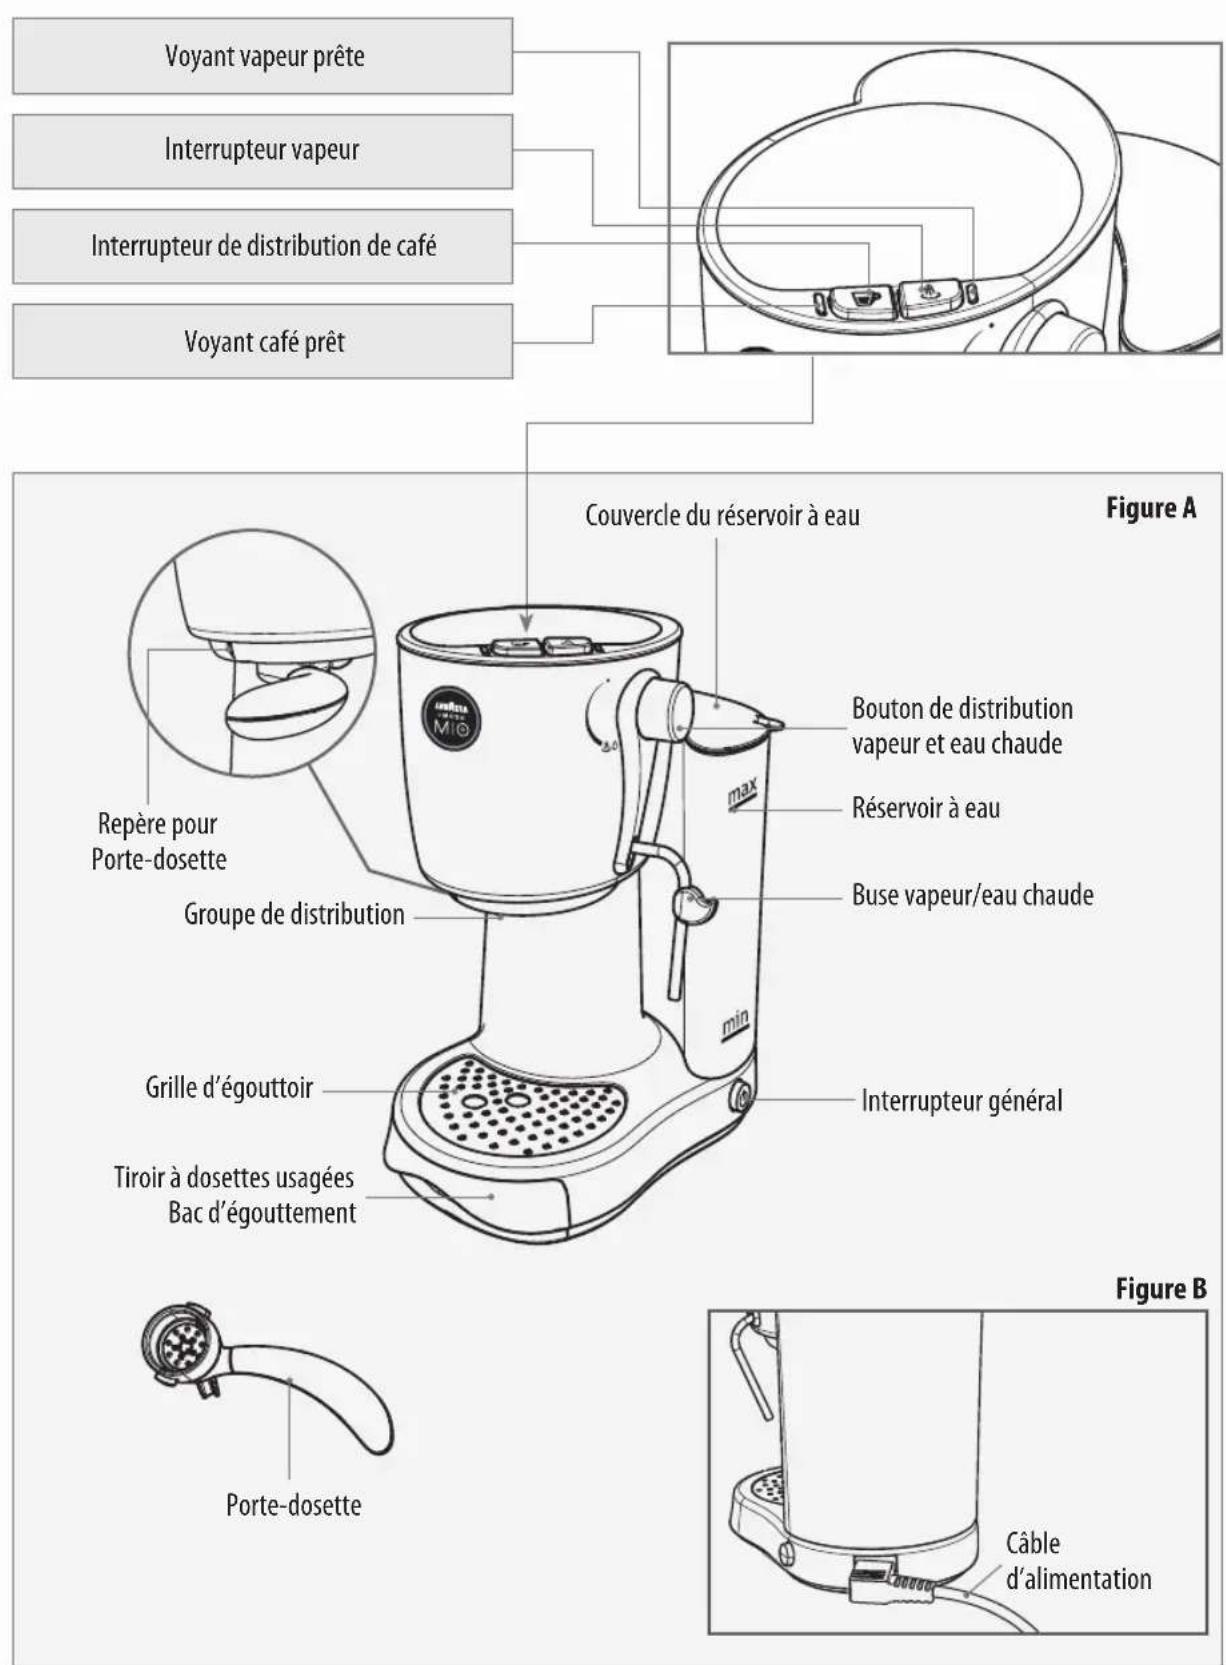
natural_image
Diagram of a coffee maker's side view showing two stages of lifting an object, with no text or symbols present.natural_image
Line drawing of a hand pouring liquid into a container using a stand mixer (no text or symbols)FR
PRÉPARATION DU CAFÉ

DISTRIBUTION DE CAFÉ
natural_image
Line drawing of a kitchen mixer with an arrow indicating the handle (no text or symbols present)
natural_image
Line drawing of a microwave oven with a rotating spoon and lid (no text or symbols)
natural_image
Line drawing of a hand pressing down on a circular component with buttons (no text or symbols)
natural_image
Line drawing of a coffee maker with a hand operating the cup (no text or symbols)
natural_image
Line drawing of a coffee maker's side panel with a downward arrow indicating compression (no text or symbols)
natural_image
Line drawing of a hand using a blender to lift a cup, no text or symbols presentnatural_image
Line drawing of a hand holding a small object inside a circular container (no text or symbols)natural_image
Illustration of a hand pressing down on a device component with an arrow indicating downward motion (no text or symbols)natural_image
Line drawing of a coffee maker using a stand mixer, with hands operating the cup (no text or symbols)natural_image
Line drawing of a coffee maker using a cup and spoon, with no visible text or symbolsnatural_image
Line drawing of a showerhead with grating and perforated grille (no text or symbols)natural_image
Line drawing of a coffee maker with a grater and lid (no text or symbols)DÉTARTRAGE
FR
DÉTARTRAGE
natural_image
Diagram of two identical coffee maker designs showing valve placement and rotation mechanism (no text or symbols)
natural_image
Line drawing of a coffee maker using a cup to lift a steamer (no text or symbols)
natural_image
Illustration of a hand holding a cup with upward arrows indicating motion or movement (no text or symbols)
natural_image
Line drawing of a hand pouring liquid into a container using a stand mixer (no text or symbols)natural_image
Diagram showing two views of a coffee maker's side view with a handle and arrow indicating motion (no text or symbols)natural_image
Line drawing of a hand pouring liquid into a container using a stand mixer (no text or symbols)natural_image
Line drawing of a kitchen mixer with an upward arrow indicating motion (no text or symbols)
natural_image
Line drawing of a Mali-MiC device with a spoon and handle, showing mechanical components without any text or symbols.
natural_image
Line drawing of a hand pressing down on a circular component with a small inset showing a small object (no text or symbols)
natural_image
Line drawing of a coffee maker with a spoon and lid, showing mechanical components without any text or symbols.
natural_image
Line drawing of a coffee maker's side profile showing mouth, grille, and lid (no text or symbols)
natural_image
Line drawing of a coffee maker with a hand operating the cup (no text or symbols)natural_image
Line drawing of a hand pressing a button on a circular device (no text or symbols)natural_image
Illustration of a hand pointing at a device component with an arrow indicating action (no text or symbols present)natural_image
Line drawing of a hand pouring liquid from a coffee maker into a cup, with no text or symbols present.natural_image
Line drawing of a coffee maker using a cup and spoon, with no visible text or symbolsnatural_image
Line drawing of a mechanical device with a perforated lid and ventilation slots (no text or symbols)natural_image
Line drawing of a coffee maker with a grater and lid (no text or symbols)ENTKALKUNG
DE
ENTKALKUNG
natural_image
Two-step diagram of a coffee maker's side arm and back cover, showing valve placement and motion arrows (no text or symbols)
natural_image
Line drawing of a hand pouring liquid from a white steamer into a cup (no text or symbols)
natural_image
Illustration of a hand holding a cup with upward arrows indicating motion or force (no text or symbols)
natural_image
Line drawing of a hand pouring liquid into a container using a stand mixer (no text or symbols)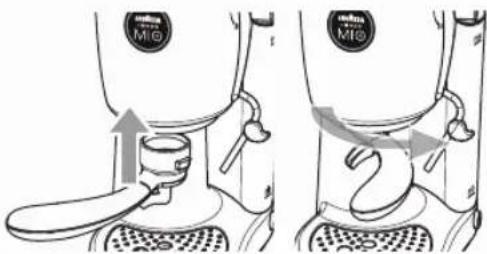
natural_image
Diagram of a coffee maker's side view showing two stages of lifting an object, with no text or symbols present.
natural_image
Line drawing of a hand pouring liquid into a container using a stand mixer (no text or symbols)ES
natural_image
Line drawing of a kitchen mixer with an upward arrow indicating motion (no text or symbols)
natural_image
Line drawing of a blender with a curved arrow indicating rotation (no text or symbols)
natural_image
Line drawing of a hand pressing down on a circular component with a small inset showing a small object (no text or symbols)
natural_image
Line drawing of a coffee maker with a grater and lid, showing no text or symbols
natural_image
Line drawing of a hand using a blender to lift a cup, no text or symbols presentnatural_image
Line drawing of a hand holding a switch inside a circular device (no text or symbols)natural_image
Illustration of a hand pressing down on a device with a downward arrow (no text or symbols)natural_image
Line drawing of a microwave oven with a hand pouring liquid into a cup (no text or symbols)natural_image
Line drawing of a mechanical device with a perforated lid and grating base (no text or symbols)natural_image
Line drawing of a coffee maker with a grater and lid (no text or symbols)DESCALCIFICACIÓN
ES
DESCALCIFICACIÓN
natural_image
Line drawing of a coffee maker with two views showing the base and side view of the cup (no text or symbols present)natural_image
Line drawing of a hand pouring liquid from a steamer into a cup (no text or symbols)natural_image
Illustration of a hand holding a cup with upward arrows indicating motion or force (no text or symbols)
natural_image
Illustration of a coffee maker's side view showing the lever mechanism (no text or symbols present)natural_image
Line drawing of a kitchen mixer with a hand holding a spoon (no text or symbols)PT
PREPARAÇÃO DE CAFÉ

natural_image
Line drawing of a kitchen sink with a handle and lid, showing mechanical components without any text or symbols.
natural_image
Line drawing of a Mio blender with handle and spout (no text or symbols)
natural_image
Line drawing of a hand pressing down on a circular component with a small valve (no text or symbols)
natural_image
Line drawing of a coffee maker with a handle and spout, showing mechanical components without any text or symbols.
Extraia levemente a gaveta do compartimento de cápsulas e deposite a cápsula usada.
natural_image
Line drawing of a microwave oven with a grater and lid, showing a downward arrow indicating cooling (no text or symbols present)
natural_image
Line drawing of a hand using a coffee maker to lift a cup, no text or symbols presentnatural_image
Line drawing of a hand pressing a button on a circular component (no text or symbols)natural_image
Illustration of a hand pointing at a circular component with a downward arrow, no text or symbols presentnatural_image
Line drawing of a blender with a hand holding a tool, no text or symbols presentnatural_image
Line drawing of a coffee maker using a cup and spoon, with no visible text or symbolsnatural_image
Line drawing of a showerhead with grating and perforated grille (no text or symbols)natural_image
Line drawing of a coffee maker with a grater and lid (no text or symbols)DESCALCIFICAÇÃO
PT
DESCALCIFICAÇÃO
natural_image
Diagram showing two views of a coffee maker's side view with arrows indicating motion or movement (no text or symbols present)
natural_image
Line drawing of a hand pouring liquid from a mixing machine into a cup (no text or symbols)
natural_image
Illustration of a hand holding a cup with upward arrows indicating motion or force (no text or symbols)
natural_image
Line drawing of a kitchen mixer with a hand holding a spoon (no text or symbols)
natural_image
Diagram of a coffee maker's side view showing two stages of lifting an object, with no text or symbols present.natural_image
Line drawing of a hand pouring liquid into a container using a stand mixer (no text or symbols)NL
KOFFIEBEREIDING

KOFFIEAFGIFTE
natural_image
Line drawing of a kitchen mixer with an upward arrow indicating motion (no text or symbols)
natural_image
Line drawing of a microwave oven with a spoon and lid, showing mechanical components without any text or symbols.
natural_image
Line drawing of a hand pressing down on a circular component with buttons (no text or symbols)
natural_image
Line drawing of a coffee maker's side panel with a downward arrow indicating compression or cooling (no text or symbols)
AFGIFTE VAN HEET WATER
natural_image
Line drawing of a hand using a blender to lift a cup, no text or symbols presentnatural_image
Line drawing of a hand pressing a button on a circular component (no text or symbols)natural_image
Illustration of a hand pressing down on a curved surface with a downward arrow (no text or symbols)natural_image
Line drawing of a coffee maker using a cup with a hand holding the cup (no text or symbols)natural_image
Line drawing of a mechanical device with a perforated lid and side-mounted base (no text or symbols)natural_image
Line drawing of a coffee maker with a grater and lid (no text or symbols)ONTKALKING
NL
ONTKALKING
natural_image
Diagram of two identical stations with Mio branding, showing mechanical components and directional arrows (no text or symbols)
natural_image
Line drawing of a coffee maker using a cup, showing the mixing process (no text or symbols)
natural_image
Illustration of a hand holding a cup with upward arrows indicating motion or force (no text or symbols)
natural_image
Line drawing of a coffee maker's side profile showing the handle and blade assembly (no text or symbols)natural_image
Line drawing of a hand pouring liquid into a cup using a stand mixer (no text or symbols)FIN
KAHVIN VALMISTUS

KAHVIN ANNOSTELU
natural_image
Line drawing of a coffee maker with an upward arrow indicating motion (no text or symbols)
natural_image
Line drawing of a microwave oven with a hand operating the lid (no text or symbols)
natural_image
Line drawing of a hand pressing down on a circular component with a small inset showing a small object (no text or symbols)
natural_image
Line drawing of a coffee maker with a spoon and lid, showing mechanical components without any text or symbols.
natural_image
Line drawing of a microwave oven with a grater and cooling fan (no text or symbols)
natural_image
Line drawing of a hand using a MIG blender to lift a cup, no text or symbols presentnatural_image
Line drawing of a hand holding a small object inside a circular container (no text or symbols)natural_image
Illustration of a hand pressing down on a circular device with a downward arrow (no text or symbols)natural_image
Line drawing of a coffee maker with a hand holding a cup, no text or symbols presentnatural_image
Line drawing of a coffee maker using a cup and a stand mixer, with no visible text or symbolsnatural_image
Line drawing of a showerhead with grating and perforated grille (no text or symbols)natural_image
Line drawing of a coffee maker with a grater and lid (no text or symbols)KALKINPOISTO
FIN
KALKINPOISTO
natural_image
Line drawing of two identical stations with Mio branding, showing mechanical components and a curved arrow indicating motion (no text or symbols)
natural_image
Line drawing of a coffee maker using a cup and straw, with no visible text or symbols
natural_image
Simple line drawing of a mechanical component inside a circular frame (no text or symbols)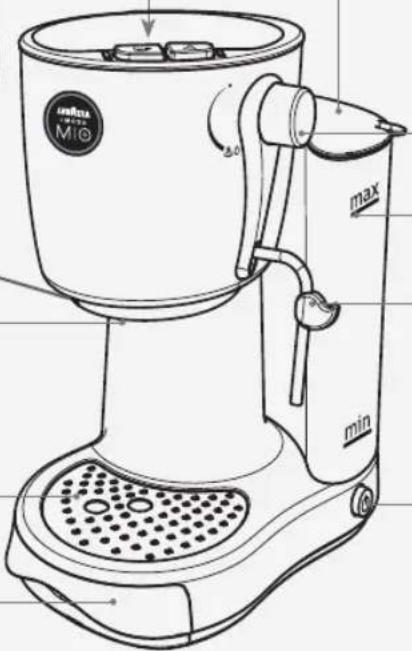
natural_image
Line drawing of a handheld showerhead with handle and circular dial (no text or symbols)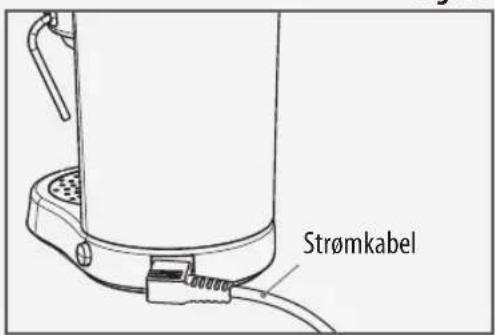
FORBEREDELSE AV MASKINEN
N

natural_image
Illustration of a hand holding a cup with upward arrows indicating motion or force (no text or symbols)
Varmt vann og andre væsker vil kunne skade beholderen. Ikke sett maskinen i gang uten vann: Pass alltid på at det er nok vann i beholderen.
natural_image
Line drawing of a hand pouring liquid into a container using a stand mixer (no text or symbols)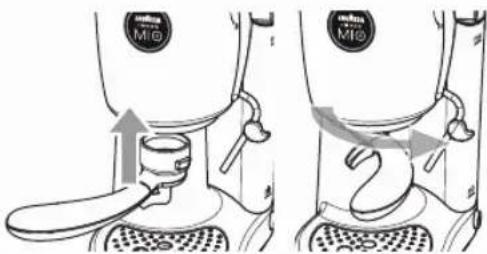
natural_image
Diagram showing two views of a coffee maker's side view with arrows indicating motion or movement (no text or symbols present)natural_image
Line drawing of a hand pouring liquid into a cup using a stand mixer (no text or symbols)N
TILBEREDING AV KAFFE

KAFFEUTTAK
Maskinen er klar när kontrollampen klar for kaffe lyser uten å blinke.

natural_image
Line drawing of a kitchen mixer with an upward arrow indicating motion (no text or symbols)
natural_image
Line drawing of a Mali-Mi steamer with a spoon and lid, showing mechanical components without any text or symbols.
Trykk på bryteren for kaff euttak og vent til ønsket mengde kaff e har rent ned i koppen.
natural_image
Line drawing of a hand pressing down on a circular component with a small inset showing a button (no text or symbols)
natural_image
Line drawing of a coffee maker with a spoon and lid, showing mechanical components and a downward arrow indicating motion (no text or symbols)
natural_image
Line drawing of a coffee maker with a grater and base tray (no text or symbols)
natural_image
Line drawing of a coffee maker with a hand holding a spoon, no text or symbols present2 Trykk på bryteren for kaff euttak.

natural_image
Line drawing of a hand holding a device with a finger pointing to it (no text or symbols)natural_image
Illustration of a hand pressing down on a circular device with buttons, no text or symbols presentnatural_image
Line drawing of a microwave oven with a hand pouring liquid into a cup (no text or symbols)Beveg beholderen langsomt nedover slik at du oppnår et kompakt og kremet melkeskum. Vi anbefaler at melken ikke overstiger mer enn en tredjedel av beholderen.
4 Når du har oppnådd ønsket resultat stenger du velgeren og trykker på dampbryteren en gang til. Fjern beholderen.

Vi fraråder et uttak på over 60 sekunder.

Dersom begge kontrollampene er tent, har maskinen for høy temperatur for kaff euttak. Før du foretar andre operasjoner, må du ta ut en kopp med varmt vann som beskrevet i forrige kapittel. På den måten unngår du at den neste kaff en blir for sterk (Nesten "brent" smak: sterk, bitter og treaktig).

natural_image
Line drawing of a foot with a perforated seat and grille (no text or symbols)natural_image
Line drawing of a coffee maker with a grater and lid (no text or symbols)AVKALKING
N
AVKALKING
natural_image
Diagram of two identical Mio coffee maker designs showing valve placement and usage (no text or symbols)
Ta ut og tøm vannbeholderen.

Tøm HALVPARTEN av innholdet i fl asken med det konsentrerte Saeco avkalkingsmiddelet i vannbeholderen og fyll opp med friskt vann.

natural_image
Line drawing of a coffee maker using a cup with a hand holding the cup (no text or symbols)
natural_image
Illustration of a hand holding a cup with upward arrows indicating motion or force (no text or symbols)
natural_image
Line drawing of a hand pouring liquid into a container using a stand mixer (no text or symbols)natural_image
Diagram showing two views of a coffee maker's side profile with a handle and arrow indicating motion (no text or symbols)natural_image
Line drawing of a hand pouring liquid into a container using a stand mixer (no text or symbols)FÖRBEREDELSE AV KAFFE

BRYGGNING AV KAFFET
natural_image
Line drawing of a kitchen sink with an upward arrow indicating motion (no text or symbols)
natural_image
Line drawing of a microwave oven with a hand operating the lid (no text or symbols)
natural_image
Line drawing of a hand pressing down on a circular component with a small inset showing a button (no text or symbols)
natural_image
Line drawing of a coffee maker with a spoon and lid, showing mechanical components and motion arrows (no text or symbols)
natural_image
Line drawing of a coffee maker with a grater and base tray (no text or symbols)
natural_image
Line drawing of a hand using a microwave oven to handle a cup, with no text or symbols present.natural_image
Line drawing of a hand holding a finger on a circular component (no text or symbols)natural_image
Illustration of a hand pressing down on a circular object with a downward arrow (no text or symbols)natural_image
Line drawing of a blender being fed with a cup, no text or symbols presentnatural_image
Line drawing of a hand pouring liquid from a MIG blender into a cup (no text or symbols)natural_image
Line drawing of a foot with a perforated seat and lever mechanism (no text or symbols)
natural_image
Line drawing of a coffee maker with a grater and lid (no text or symbols)AVKALKNING
S
AVKALKNING
natural_image
Two-step diagram of a coffee maker's side view showing valve placement and rotation (no text or symbols)
natural_image
Line drawing of a hand pouring milk from a steamer into a cup (no text or symbols)
KLARG∅RING AF MASKINEN
DK

natural_image
Illustration of a hand holding a cup with upward arrows indicating motion or force (no text or symbols)
natural_image
Diagram of a coffee maker with two views showing the base and side view (no text or symbols)natural_image
Line drawing of a hand pouring liquid into a mixing bowl (no text or symbols)DK
TILBEREDNING AF KAFFE

TILBEREDNING AF KAFFE
natural_image
Line drawing of a kitchen mixer with an upward arrow indicating motion (no text or symbols)
natural_image
Illustration of a kitchen mixer with a curved handle and rotating knob (no text or symbols)
natural_image
Line drawing of a hand pressing down on a circular component with a small valve (no text or symbols)
natural_image
Line drawing of a coffee maker with a spoon and lid, showing mechanical components and motion arrows (no text or symbols)
natural_image
Line drawing of a coffee maker with a drain and lid, showing mechanical components without any text or symbols.
natural_image
Line drawing of a hand using a manual mixer machine to handle a cup (no text or symbols present)natural_image
Line drawing of a hand holding a circular device with a finger pointing at it (no text or symbols)natural_image
Illustration of a hand pointing at a device component with an arrow indicating action (no text or symbols present)natural_image
Line drawing of a coffee maker using a stand mixer, showing the cup and whisk (no text or symbols)natural_image
Line drawing of a coffee maker using a cup, with hands adding a cup to the cup (no text or symbols)natural_image
Line drawing of a mechanical device with a perforated lid and side-mounted base (no text or symbols)
natural_image
Line drawing of a coffee maker with a grater and lid (no text or symbols)AFKALKNING
DK
AFKALKNING
natural_image
Diagram of two identical stations with Mio branding, showing mechanical components and directional arrows (no text or symbols)
natural_image
Line drawing of a hand pouring liquid from a steamer into a cup (no text or symbols)
EC DECLARATION OF CONFORMITY
YEAR 09
EC 2006/95, EC 2004/108
Saeco International Group S.p.A.
Via Torretta, 240
40041 GAGGIO MONTANO (BO) ITALY
declare under our responsibility that the product :
COFFEE MAKER
SIN032L (LM850)
to which this declaration relates is in conformity with the following standards or other normative documents :
• Safety of household and electrical appliances - General requirements
EN 60335-1(2002) + A1(2004) + A2(2006) + A11(2004) + A12(2006) + A13(2008).
- Safety of household and electrical appliances - Part 2-15 - Particular requirements for appliances for heating liquids EN 60335-2-15(2002) + A1(2005) + A2(2008)
- Household and similar electrical appliances - Electromagnetic fields - methods for evaluation and measurement - EN 62233 (2008).
- Electromagnetic compatibility (EMC) - Requirements for household appliances, electric tools and similar apparatus - Part 1 Emission EN 55014-1 (2006).
• Electromagnetic compatibility (EMC)
Part. 3^ Limits - Section 2 : Limits for harmonic current emissions (equipment input current ≤ 16A for phase) - EN 61000-3-2 (2006).
• Electromagnetic compatibility (EMC)
Part 3^: Limits - Section 3 : Limitation of voltage changes, voltage fluctuations and flicker in public low - voltage supply systems, for equipment with rated current ≤ 16 A for phase and not subject to conditional connection EN 61000-3-3 (1995) + corr.(1997) + A1 (2001) + A2 (2005).
- Electromagnetic compatibility - Requirements for household appliances, electric tools and similar apparatus - Part 2.
Immunity - Product family standard EN 55014-2 (1997) + A1 (2001)
following the provisions of the Directives : EC 2006/95, EC 2004/108.
The manufacturer reserves the right to make changes without prior notice.
© Saeco International Group S.p.A.