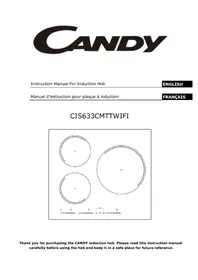
CH630 C - Hob CANDY - Free user manual and instructions
Find the device manual for free CH630 C CANDY in PDF.
User questions about CH630 C CANDY
0 question about this device. Answer the ones you know or ask your own.
Ask a new question about this device
Download the instructions for your Hob in PDF format for free! Find your manual CH630 C - CANDY and take your electronic device back in hand. On this page are published all the documents necessary for the use of your device. CH630 C by CANDY.
USER MANUAL CH630 C CANDY
BCTPAINBAEMbIE BAPOUHbIE NOBEPXHOCTN
HCTPYKLIMN IIO 3KCIYATAUIN N YCTAHOBKE RU
PLYTY
INSTUKCJE DLA UZYTKOWNIKA PL
KOOKPLAATS
INSTALLATIE-EN GEBRUKSINSTRUCTIES NL
HOBS
INSTUKTIONER FÖR ANVÄNDNING OCH INSTALLATION
HOBS
KÄYTTÖ - JA ASENNUSOHJEET FI
HOBS
BRUGSANVISNING OG INSTALLATION DK
HOBS
BRUKS - OG MONTERINGSVEILEDNING NO
CONTENT
GB-IE
SAFETYINSTRUCTIONS 06
1. GeneralWarnings.. 07
2.Installation .07
3. Built-in .07
4. Electrical connexion .07-08
5. Presentation 08
6.Hob cookware advice .08
7.Use 09-10
8. Cleaning and maintenance 10
9. Problem solving 11
10. Aftercare 11
11. Protection of the environment 11
INDICE
IT
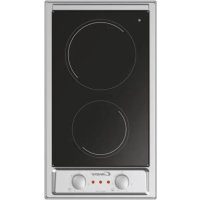
Identification Plate (located under the hob's bottom casing)
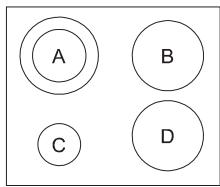
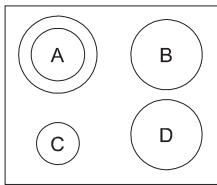
| A | B | C | D | |
| LAYOUT 1 | 2300 W | 1200 W | 1200 W | 1800 W |
| LAYOUT 2 | 1200 + 1000 W | 1800 W | 1200 W | 1800 W |
| LAYOUT 3 | 1200 W | 2500 W | 1800 W | —— |
D
Seal-Guarnizione-Joint-Dichtungsstreifen- Junta-Uszcelka-Junta-Teayatb-Afdicht strip-Tätning-Tiiviste-Forsegling-Pakning

GB- It is forbidden to fit the hob above a non-ventilated oven.
IT- É vietato installare il piano su un forno non raffreddato.
FR- Il est interdit d'enchâsser un four non ventilé sous la plaque de cuisson.
DE- Der Einbau in Kombination mit einem Backofen ohne Abkuhlventilator ist nicht gestattet.
ES- Se prohibe el empotramiento de un hora sin ventilacion por debajo la encimera.
PT- Não é permitida a instalação da placar por cima de umorno que não sera ventilado.
CZ - Je zakázán, aby se vešly na varnou desku nad non-susárne.
SL - Prepovedano je, da se prilega kuhalno plošćo zgoraj brez peči z napo.
RU-3to 3aPpeSeHOB COOTBETCTBnC PJIInTO BbIe HeBeHTnIpyEmbIX NeH.
PL - Zabrania sie instalowania plyty nad piekarnikiem nie majacym wentylacji
NL-Het is verboden een Nietgen-ventileerde oven onder het werkbald in te bouwen.
SE- Spishallen fár inte monteras ovenfor en oventilerad ugn.
Fl-Liettä ei saa asentaa sellaisen uunin paälle, Jonka ilmanvaihdosta ei ole huolehdittu.
DK- Det er forbudt at montere kogepladen oven pa en ovn uten ventilation.
NO- Platetoppen må ikke monteres over en stekéovn som ikke er ventiliert.
According to model - Secondo modello - Selon modele - Je nach Modell - Según el modelos - Dependendo do modelos - v závislosti na modelu - v skladu z vzorcem - в завиимости от мodyел - Zaleznie od modelu - Volgens model - Beroende på model - Mallikohtainen - Afhænger af modellen - I samsvar med modell -
1.ON/OFF
- " + "
-
" - "
-
TIMER - MINUTENZÄHLER - RELOJ - CONTA-MINUTOS - CASOVY SPÍNAC - CASOVNIK - REGULATOR CZASOWY - TIMER-AJASTIN-TIMER-TIDTAKER
- Additional cooking zone led - Spia della zona di cottura estesa - Diode de fonctionnement du foyer complémentaire - LED für die zusätzliche Kochzone - Piloto de functiomento de la zona complementaria - Indicador luminoso da zona de cozedura adiconcial - Dalí varné zony vedlo - Dodatna kuhalno polje pod vodstvom- Довипельна плочаь рiguотовлия пиши príвello - Dodatkowa strefa gotowania doprowadziä - Symbol van uitgebreide kookzone - Lampa für extra tillagningszon-Kuumennusalueen led-merkkivalo - LED-Indikator for udvidet kogezone - Lampe for tilleggssone
- Cooking zone programming indicator - Spia programmazione zona di cottura - Repère de programmation du foyer - Anzeiger der Kochzonenprogrammierung - Piloto de la zona programada - Indicador luminoso de programação - Varna zona programováníukazatel - kuhalno polje programiranje kazalnik -Приговлене oblaçten programmmopobaný Иndikatop - Stefa wskáznikgotowania programowania - Programmatie-icoon van kookzone - Indikator für programmierung av tillagningszoner - Kuumennusalueen ohjelmoinnin merkkivalo - Indikator for programmering af kogezone - Programmeringsindikator für kokesone
- Selection of the zone - Selezione della zona - Sélection de la zone - Auswahl des Bereichs - SeLECTION de la zone - Selecção da area - Vyber zony - Izbor obmoça - Bíbop obnactu - Wybór strefy - Selectie van de zone- val av zone- valinta vyöhykkeen-Udvælgelse af zone- Utvalg av sonen
READ THE INSTRUCTIONS BOOKLET CAREFULLY TO MAKE THE MOST OF YOUR HOB.
We recommend you keep the instructions for installation and use for later reference, and before installing the hob, note its serial number in case you need to get help from the after sales service.
Warning : the appliance and its accessible parts become hot during use. Care should be taken to avoid touching heating elements.
- Children under 8 Year of age must be kept away from the appliance unless they are continuously supervised.
- This appliance can be used by children aged from 8 years and above and persons with reduced physical, sensory or mental capabilities or lack of experience and knowledge if they have been given supervision or instruction concerning use of the appliance in a safe way and understand the hazards involved.
- Children should be supervised to ensure that they do not play with the appliance.
- Cleaning and user maintenance shall not be made by children without supervision.
Warning: unattended cooking on a hob with fat or oil can be dangerous and may result in fire.
- Never try to extinguish a fire with water, but switch off the appliance and then cover flame e.g. with a lid or a fire blanket.
- Warning : danger of fire: do not store items on the cooking surfaces.
- Warning : if the surface is cracked, switch off the appliance to avoid the possibility of electric shock.
- Never use a steam or high pressure spray to clean the appliance.
- This appliance is not intended to be operated by means of an external timer or separate remote-control system.
- If present do not to stare into halogen lamp hob elements.
- The means for disconnection must be incorporated in the fixed wiring in accordance with the wiring rules.
- The instructions state the type of cord to be used, taking into account the temperature of the rear surface of the appliance.
- If the supply cord is damaged, it must be replaced by manufacturer, its service agent or similarly qualified persons in order to avoid a hazard.
- It is strongly recommended to keep children away from the cooking zones while they are in operation or when they are switched off, so long as the residual heat indicator is on, in order to prevent the risks of serious burns.
- Aluminium foil and plastic pans must not be placed on heating zones.
- After every use, some cleaning of the hob is necessary to prevent the build up of dirt and grease. If left, this is recooked when the hob is used and burns giving off smoke and unpleasant smells, not to mention the risks of fire propagation.
- Do not touch the heat zones during operation or for a while after use.
- Never cook food directly on the glass ceramic hob. Always use the appropriate cookware.
- Always place the pan in the centre of the unit that you are cooking on.
- Do not use the surface as a cutting board.
- Do not slide cookware across the hob.
- Do not store heavy items above the hob. If they drop onto the hob, they may cause damage.
- Do not use the hob as a working surface.
- Do not use the hob for storage of any items.
1. GENERAL WARNINGS
We are constantly striving to improve product quality and as such may modify appliances to incorporate the latest technical
CE improvements. Appliance complies with European Directives 73/23/EEC and 89/336/EEC, replaced by 2006/95/EC and 2004/108/EC, and subsequent amendments.
2. INSTALLATION
Installing a domestic appliance can be a complicated operation which if not carried out correctly, can seriously affect consumer safety. It is for this reason that the task should be undertaken by a professionally qualified person who will carry it out in accordance with the technical regulations in force. In the event that this advice is ignored and the installation is carried out by an unqualified person, the manufacturer declines all responsibility for any technical failure of the product whether or not it results in damage to goods or injury to individuals.
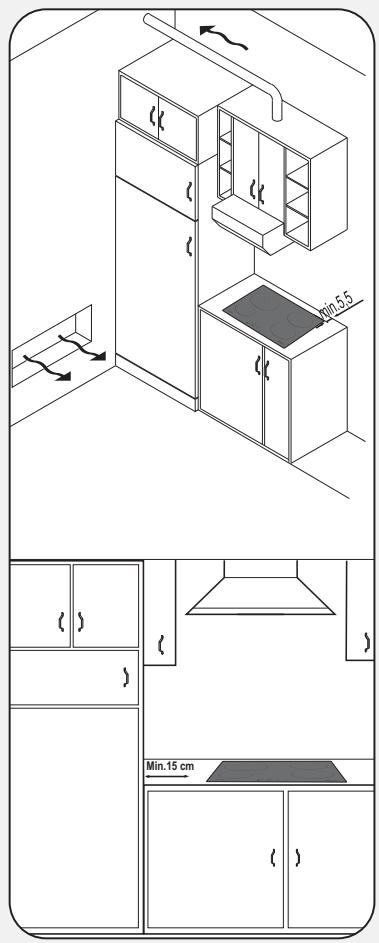
3. BUILT-IN
The furniture in which your hob will be installed and all adjacent furniture, should be made from materials that can withstand high temperatures. In addition, all decorative laminates should be fixed with heat-resistant glue.
Installation (Fig. B/D):
. A watertight seal is supplied with the hob.
Before fitting:
- turn the hob upside down, with the glass surface facing downwards.
Make sure the glass is protected.
- fit the seal round the hob.
- make sure that it is correctly fitted to avoid any leakage into the supporting cabinet.
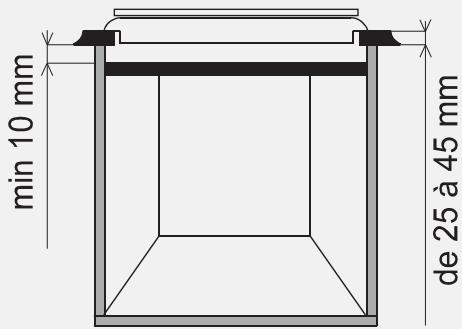
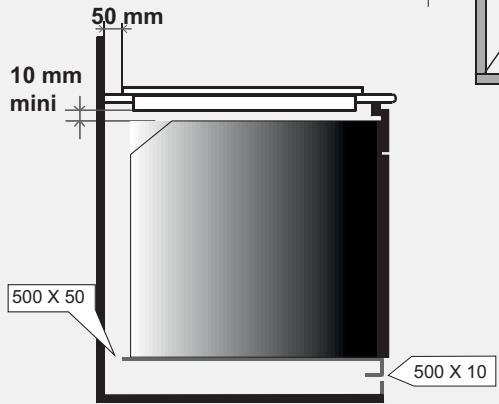
. Leave a gap of at least 5cm between the appliance and the vertical sides of the adjacent furniture.
. If, when installing the hob, the lower hob face is adjacent to an area normally accessible when handling or cleaning, fit a partition 1 cm below the base of the hob to avoid any risk of scorching or damage.
When installing the hood above a cooker top, please consult the installation instructions advising on the correct distance required from the cooker top.
If it is installed on a cabinet above a cooker top, the minimum distance requires is 70cm .
4. ELECTRICAL CONNECTION
"The installation must conform to the standard directives." The manufacturer declines all responsibility for any damage that may be caused by unsuitable or unreasonable use.
Warning:
we cannot be held responsible for any incident or its consequences that may arise during the use of an appliance not linked to the earth, or linked to an earth whose continuity is defective.
Always check before any electrical operation, the supply tension shown on the electricity meter, the adjustment of the circuit-breaker, the continuity of the connection to earth to the installation and that the fuse is suitable.
. The electrical connection to the installation should be made via a socket with a plug with earth, or via an omnipole cut-out switch.
If the appliance has a socket outlet, it must be installed so that the socket outlet is accessible.
. The yellow/green wire of the power supply cable must be connected to the earth of both power supply and appliance terminals.
. Any queries regarding the power supply cord should be referred to After Sales Service or a qualified technician.
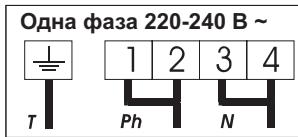
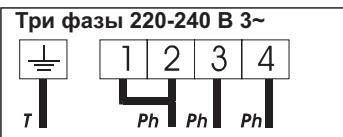
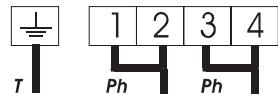
The hob is fitted with a power supply cord which allows it to be connected only to a power supply of 220-240 V between phases or between phase and neutral.
Connect to a socket.
It is however possible to connect the hob to :
. Three phase 220-240 V3~
. Three phase 380-415 V2N~
To proceed to the new connection, you must adhere the following instructions.
- Before making the connection, make sure that the installation is protected by a suitable fuse, and that it is fitted with wires of a large enough section to supply the appliance normally.
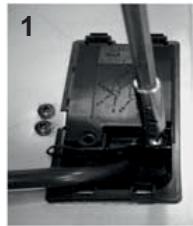
- Turn over the hob, glass side against the work top, taking care to protect the glass.
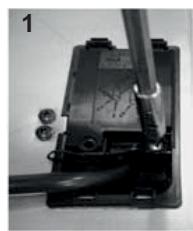
Open the cover in the following sequence:
. unscrew the cable clamp "1",
. find the two tabs located on the sides,
. put the blade of a flat screw-driver in front of each tab "2" e "3", push in and press,
remove the cover.
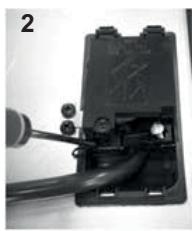
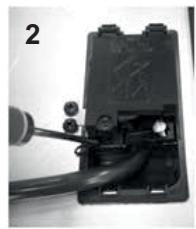
To release the power supplying cord.
remove the screws retaining the terminal block which contains the shunt bars and the conductors of the supply cord,
Pull out the supply cord.
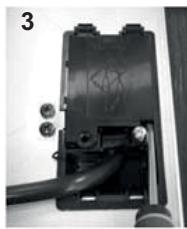
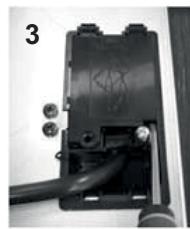
Operations to be carried out to make a new connection :
- Choose the power supply cable in accordance with the recommendations in the table.
- Pass the power supply cable into the clamp.
- Strip the end of each conductor of the supply cord on a 10mm length, by taking in account the requested length of the cord for the connection to the terminal block.
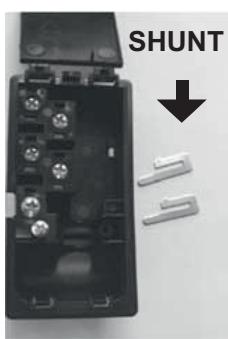
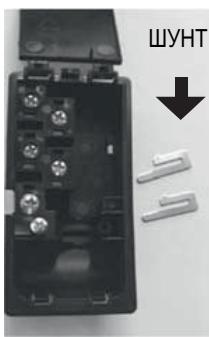
-
According to the installation and with the help of shunt bars which you should have recovered in the first operation, fix the conductor as shown on the chart.
-Fix the cover. -
Screw the cable clamp.
Note: make sure the terminal board screws are tight.
ATTENTION:
should it be necessary to replace the supply cord, connect the wire in accordance with the following colours/ codes:
BLUE
-NEUTRAL(N)
BROWN
-LIVE (L)
YELLOW-GREEN
-EARTH(
Connection to the terminals on the terminal block
| LAY OUT“1” | LAY OUT“2” | LAY OUT“3” | |
| MONOPHASE or TWO PHASES 220-240 V~ | |||
| Cable HO5V2V2F | 3x2,5 mm² | 3x2,5 mm² | 3x2,5 mm² |
| THREE PHASES 220-240 V3~ | |||
| Cable HO5V2V2F | 4x1,5 mm² | 4x1,5 mm² | 4x1,5 mm² |
| THREE PHASES 380-415 V2N~ | |||
| Cable HO5V2V2F | 4x1,5 mm² | 4x1,5 mm² | 4x1,5 mm² |
Monophase 220-240 V~


Two phases 220-240 V2~


Three phases 220-240 V3~


Three phases 380-415 V2N~


T = Earth
Ph = Phase
N = Neutral
T = Earth
5. PRESENTATION
- hilight zone :
a metallic conductor strip is spread uniformly over the whole surface unit. It is effective within 3 seconds and is suitable for steady, homogeneous and also sustained cooking.
The glass-ceramic hob benefits from greater heat output which is generated by the hilight cooking zones thereby accelerating the cooking process. Modifications to the design of the hob have not affected the capacity of the glass to withstand high temperatures, but they have improved controllability.
With the "Sprinter" facility, reduced cooking times of up to 15% can be achieved, depending upon the method of cooking and the type of saucepans being used.
6. HOB COOKWARE ADVICE
Using good quality cookware is critical for setting the best performance from your hob.

Always use good quality cookware with perfectly flat and thick bases :
using this type of cookware will prevent hot spots that cause food to stick. Thick metal pots and pans will provide an even distribution of heat.
Ensure that the base of the pot or pan is dry : when filling pans with liquid or using one that has been stored in the
refrigerator, ensure that the base of the pan is completely dry before placing it on the hob. This will help to avoid staining the hob.
Use pans whose diameter is wide enough to completely
cover the surface unit : the size of the pan should be no smaller than the heating area.
If it is slightly wider the energy will be used at its maximum efficiency.
THE CHOICE OF COOKWARE - The following information will help you to choose cookware which will give good performance.
Stainless Steel : highly recommended. Especially good with a sandwich clad base. The sandwich base combines the benefits of stainless steel (appearance, durability and stability) with the advantages of aluminium or copper (heat conduction, even heat distribution).
Aluminium : heavy weight recommended. Good conductivity. Aluminium residues sometimes appear as scratches on the hob, but can be removed if cleaned immediately.
Because of its low melting point, thin aluminium should not be used.
Cast Iron : usable, but not recommended. Poor performance. May scratch the surface.
Copper Bottom / stoneware: heavy weight recommended. Good performance, but copper may leave residues which can appear as scratches. The residues can be removed, as long as the hob is cleaned immediately. However, do not let these pots boil
dry. Overheated metal can bond to glass hobs. An overheated copper pot will leave a residue that will permanently stain the hob.
Porcelain/enamel : Good performance only with a thiny smooth, flat base.
Glass-ceramic : not recommended. Poor performance. May scratch the surface.
7. USE
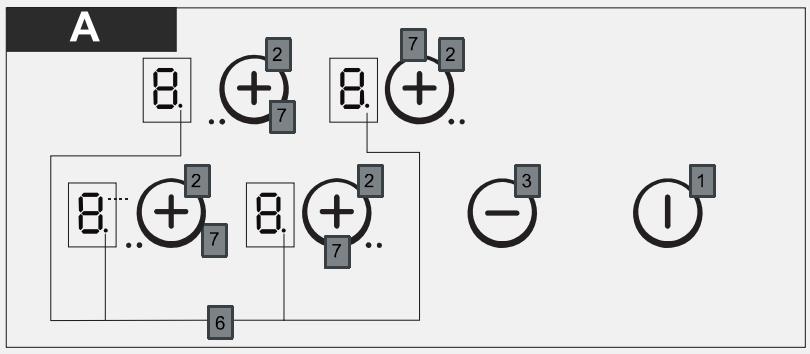
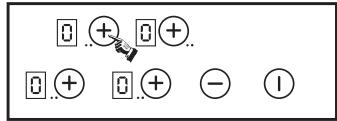
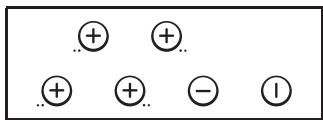
- After powering up the hob, wait some seconds to activate the electronic controls.
- Press the button ① . The corresponding indicator lights. Electronic control of the hob is activated : in each display zone, the heat level shows ① .
- After 20 seconds without use, the electronic control goes off and the starting operation has to be repeated.
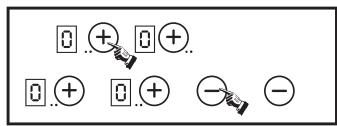
. STARTING A COOKING ZONE
- Press the selection button of the required cooking zone.
The "0" of the corresponding zone stays lighted when the light of the others "0" is reduced.
- Press the - or + button to select a heat level between 1 and 9. Hold down the + or - button and the heat level increases or decreases gradually.
The following examples are for information only. Personal experience should then let you adapt these settings to your taste and habits.
| 0 | : | Off |
| U-1 | : | Dissolving |
| 2 | : | Melting |
| 3 | : | Keeping hot |
| 4 | : | Heating up |
| 5 | : | Thawing, stewing, full cooking, low temperature cooking |
| 6 | : | Cooking without lid |
| 7 | : | Frying, meat browning and roasting |
| 8 | : | High temperature cooking and roasting, seizing |
| 9 | : | Frying, boiling large quantities of water...... |
. STOPPING A COOKING ZONE
- Press the selection button of the required cooking zone.
- Press the "-" button to display heat level 0. Now the zone goes off, the indicator 0 goes off after 10 seconds.
- To stop rapidly, press simultaneously the "--" and the respective cooking zone selection.
The heat level automatically goes down to . The cooking zone goes off.
. GENERAL STOP
The cooking zones and the timer can be stopped at any moment by pressing the On-Off button.

. RESIDUAL HEAT INDICATOR H
The control panel tells the user when the surface temperature of the cooking zones exceeds about 60^ , by the following displaying: H. When the temperature goes back below 60^ , the display goes off.
For ending the cooking, we advise switching off the cooking zone and using the residual heat of the zone to finish cooking gently.
N.B. After a cut in the current, the residual heat indicator disappears completely, even if the surface temperature exceeds 60^ .
The cooking zone with two zones is fitted certain models
It is active in totality when the cooking zone is in function ; the control led of the additional cooking is displayed.
To desactivate the additional cooking zone :
- Press again on the additional cooking zone touch. The Led goes off when it is deactivated.
To re-activate the additional cooking zone :
- Press on the cooking zone button. The Led is active again.
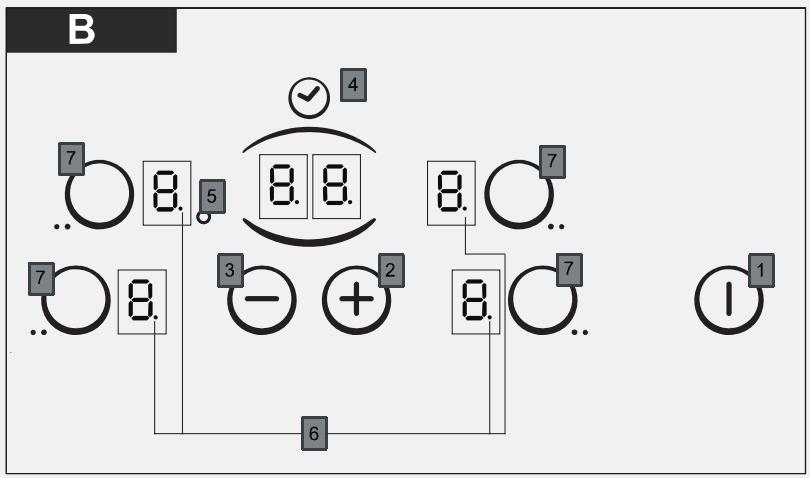
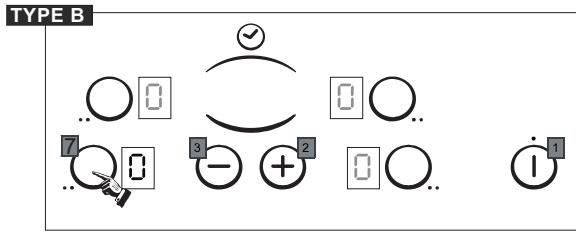
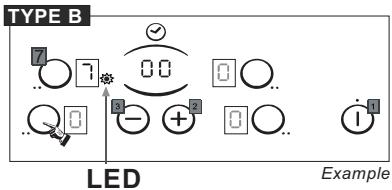
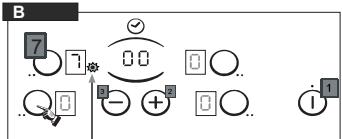
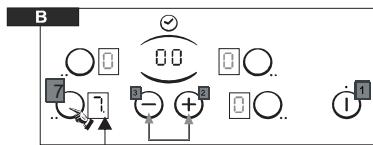
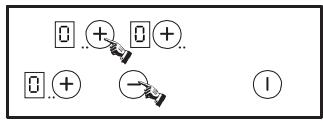
. PROGRAMMING A COOKING ZONE (according to the model)
Every cooking zone can be programmed for a maximum time of 99 minutes.
-
Start the required zone by following the previous instructions.
-
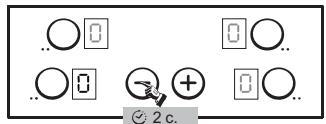
Press on simultaneously the touch "-" and "+" to activate the timer," 0 is displayed.
LED
- Press again on the "+" button to select a time in minutes between 0 and 99 minutes or press on the "-" button to decrease the time between 30 minutes and 0. The timer control led near the level is displayed.
--> the programmed time can be modified at any moment.
When the time is run, the cooking zone goes off automatically and an audible beep sounds for 1 minute, press a button to stop it.
--> If any zone is activated, the timer can be used alone, as reminder, it will ring at the end of the programmed time.
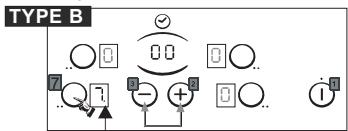
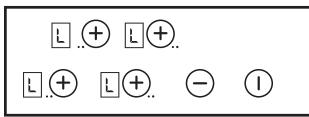
The locking function prevents the children from starting the hob. It is also used for cleaning the hob.
To lock the hob :
- Press the Esc:
- Press the on/off button ①.
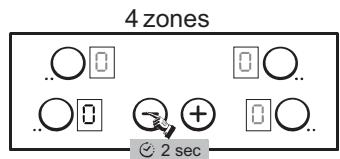
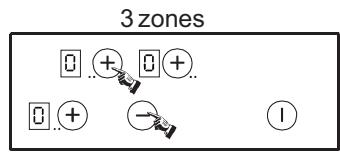
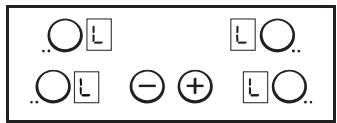
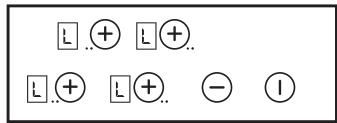
. The hob is locked, the locking indicator " L " is displayed on all zones for 20 seconds.
If a cooking zone is at stage "hot", "L" and "H" appear alternately.
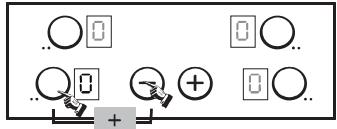
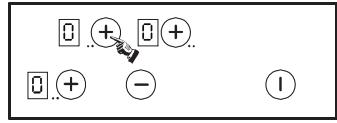
To unlock the hob :
. For the hob with 4 zones, to unlock follow the same procedure.
. For the hob with 3 zones, follow the same procedure but in the last stage you must to press the "-" touch instead the "+" touch.
The indication "L" disappears. The hob is unlocked and returns on stand-by mode.
The locking function prevents the children from starting the hob. It is also used for cleaning the hob.
To lock the hob :
- Press the on/off button and then:
. The hob is locked, the locking indicator " L " is displayed on all zones for 20 seconds.
If a cooking zone is at stage "hot", "L" and "H" appear alternately.
To unlock the hob :
. For the hob, follow the same procedure but in the last stage you must to press the "-" touch instead the "+" touch.
The indication "L" disappears. The hob is unlocked and returns on stand-by mode.
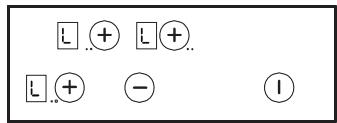
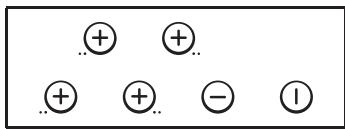
Every cooking zone on the hob is equipped with a fast heater for raising the cooking zone's temperature faster.
Starting the fast heater
- Press the on/off button (1).
- Start the required zone, press the "+" button to obtain position "9", release the button briefly and press again the "+" button; the display alternates showing "A" "fast heater" and "9" heat level.
- If necessary reduce to the required heat position, the display alternates showing "A" "fast heater" and the new heat position.
| Cooking position | Power released (%) | Time of fast heater (minutes) | Maximum operating time before automatic cut off* |
| 0 | 0 % | 0 | 0 H |
| U | 2.5 % | 0 | 2 H |
| 1 | 3 % | 1 | 6 H |
| 2 | 6 % | 3 | 6 H |
| 3 | 11 % | 5 | 5 H |
| 4 | 16 % | 6,5 | 5 H |
| 5 | 19 % | 8,5 | 4 H |
| 6 | 32 % | 2,5 | 1,5 H |
| 7 | 45 % | 3,5 | 1,5 H |
| 8 | 65 % | 4,5 | 1,5 H |
| 9 | 100 % | 0 | 1,5 H |
E.g. 1800 W zone at position 6 = 32% of 1800 W power released When the "Fast heater" is on, the zone supplies 1800 W power for 2.5 minutes, and adjusts to 576 W after this time.
- For increased safety, the cooking zones cut off automatically if they are left on too long. The cut off depends on the heat level used.
To desactivate the fast heater
- Switch on the cooking zone, press the " - " button to come back to a normal heat level, decrease to the heat level required or to " 0 " to stop the cooking zone.
8. CLEANING AND MAINTENANCE
. Before carrying out any maintenance work on the hob, allow it to cool down.
. Only products, (creams and scrapers) specifically designed for glass ceramic surfaces should be used. They are obtainable from hardware stores.
. Avoid spillages, as anything which falls on to the hob surface will quickly burn and will make cleaning more difficult.
It is advisable to keep away from the hob all substances which are liable to melt, such as plastic items, sugar, or sugar-based products.
MAINTENANCE:
- Place a few drops of the specialised cleaning product on the hob surface.
- Rub any stubborn stains with a soft cloth or with slightly damp kitchen paper.
- Wipe with a soft cloth or dry kitchen paper until the surface is clean.
If there are still some stubborn stains:
- Place a few more drops of specialised cleaning fluid on the surface.
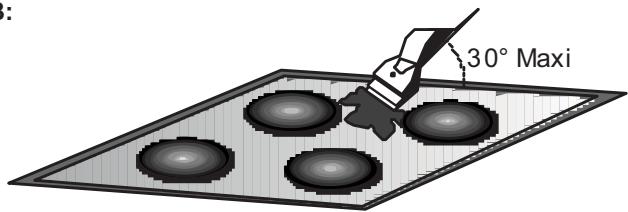
- Scrape with a scraper, holding it at an angle of 30^ to the hob, until the stains disappear.
- Wipe with a soft cloth or dry kitchen paper until the surface is clean.
- Repeat the operation if necessary.
AFEWHINTS:
Frequent cleaning leaves a protective layer which is essential to prevent scratches and wear. Make sure that the surface is clean before using the hob again. To remove marks left by water, use a few drops of white vinegar or lemon juice. Then wipe with absorbent paper and a few drops of specialised cleaning fluid.
The glass ceramic surface will withstand scraping from flat-bottomed cooking vessels, however, it is always better to lift them when moving them from one zone to another.
NB:
Do not use a sponge which is too wet.
Never use a knife or a screwdriver.
A scraper with a razor blade will not damage the surface, as long as it is kept at an angle of 30^ .
Never leave a scraper with a razor blade within the reach of children.
Never use abrasive products or scouring powders.
. The metal surround : to safely clean the metal surround wash with soap and water, rinse, then dry with a soft cloth.
9. PROBLEM SOLVING
The cooking zones do not simmer or only fry gently
Only use flat-bottomed pans. If light is visible between the pan and the hob, the zone is not transmitting heat correctly. The pan bottom should fully cover the diameter of the selected zone.
The cooking is too slow
Unsuitable pans are being used. Only use flatbottomed utensils, that are heavy and have a diameter at least the same as the cooking zone.
Small scratches or abrasions on the hob's glass surface
Incorrect cleaning or rough-bottomed pans are used; particles like grains of sand or salt get between the hob and the bottom of the pan. Refer to the "CLEANING" section; make sure that pan bottoms are clean before use and only use smooth bottomed pans. Scratches can be lessened only the cleaning is done correctly.
Metal marks
Do not slide aluminium pans on the hob. Refer to the cleaning recommendations.
You use the correct materials, but the stains persist.
Use a razor blade and follow the "CLEANING" section.
Dark stains
Use a razor blade and follow the "CLEANING" section.
Light surfaces on the hob
Marks from an aluminium or copper pan, but also mineral, water or food deposits; they can be removed using the cream cleaner.
Caramelisation or melted plastic on the hob.
Refer to the "CLEANING" section.
The hob does not operate or certain zones don't work
The shunts are not positioned correctly on the terminal board. Have a check made that the connection is done he control panel is locked. Unlock the hob.
The hob does not cut off.
The control panel is locked. Unlock the hob.
The hob stops automatically
A spill covers at least two buttons for more than 10 seconds; the hob switches to safety, and an audible beep sounds. Clean up the spill or remove the object.
The cooking zones stop automatically if they are left on for too long. Refer to the section, "operating time".
Frequency of on/off operations for cooking zones
The on-off cycles vary according to the required heat level:
- low level: short operating time,
- high level: long operating time.
"H" display, residual heat indicator, blinking.
The electronic temperature is too high. A technician should verify the fitting in compliance with the recommendations.
10. AFTERCARE
Before calling out a Service Engineer please check the following:
that the plug is correctly inserted and fused;
If the fault cannot be identified switch off the appliance — do not tamper with it — call the Aftercare Service Centre. The appliance is supplied with a guarantee certificate that ensures that it will be repaired free of charge at the Service Centre.
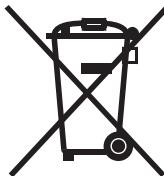
11. PROTECTION OF THE ENVIRONMENT
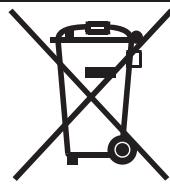
This appliance is marked according to the European directive 2002/96/EC on Waste Electrical and Electronic Equipment (WEEE).
By ensuring this product is disposed of correctly, you will help prevent potential negative consequences for the environment and human health, which could otherwise be caused by inappropriate waste handling of this product.
The symbol on the product indicates that this product may not be treated as household waste. Instead it shall be handed over to the applicable collection point for the recycling of electrical and electronic equipment Disposal must be carried out in accordance with local environmental regulations for waste disposal.
For more detailed information about treatment, recovery and recycling of this product, please contact your local city office, your household waste disposal service or the shop where you purchased the product.
Installation (fig.B/D):
MODRy - NEUTRALNI (N)
HNEDY-ZIVY(L)
ZLUTOZELY- UZEMNENI (
Uvolnéni privodniho the terminal block which contains the shunt bars and the cokabelu.
YcTaHOBka (pnc. B/D):
B KOMPJIeKTe C BapOCHoN IOBepxHocTbIO NOCTaBJIeTcRepeMTe3npyUOaI npOKlaJaKa.
IpeelvctaHOBKO:
.ПОЛЖNTe BapouHyIO NOBepXHocTb TAK,ЧТБСТЕКLOKEpAMUYeCKA NOBEPXHocTb 6blJa HAnpaBJIeHa BHIM3. Поверьт YeTo CTeKNoKepeAMuYeCKa NOBepXHocTb 3aunuSha.
.uctaHOBnTE npoklaKy no nepmMeTy BapOCHo NOBepxHOCTN. U6eIeNTcB To TOM, YTO pOKlaKJa IpaBnIbHO yCTaHOBJHa IJrTO, YTO6bl N36ExkaTb IpOTeueK E b KKaΦ, Ha KOtOpbl OnpaETcB BApOchau NOBepxHOCTb.
PacctoHnE MExdy BapoyHOJ NOBepxHoCTbO IM BepTKaJIbHbIMN CTeHKAMn PACNOJKeHHO PdOM C HeK KyXOHHO Me6eHbTO DOnJIKeH 6bITbHE MeHbIe 5 CM.
- Ecnn HxnnrA CTOpHa yCTaHOBHeHOB BapOCHIOBepXHOCTn pacNoIaraeTcB ObIaTn, K KOtopoN OcyuIeCTBnIeTcI DoCTyn BO BpEmy BbINoJIHeHMybOpKn nn DpyInx OpeauN, TO yCTaHOBNTe Hxke BapOCHIOBepXHOCTn NpeEROPoDKy. PeropOdka DOJxHa 6bITb YCTaHOBJeHa Ha pacCToHm1 Cm OT BapOCHIOBepXHOCTn IJRA TORO, YTObI N36ExKaTb OXKOrOB INn NOBPEXDeHn.
B cnyuae yctahOBKn BbITJxKn HAD NOBepxHOCTbIO IJIa rTOOBKn ebl, NoXaJIyNCTa pyKOBOIcTBYtceB MHNMaIbHbIM pACCTOHHEM MOHTaka,Yka3aHbIM B INHCTDyKUKN K BbITJXKe.
B cnyuae yctaHOBKn BbITXKN B uKaΦ HAd PnIToM MInHMaJIbHOe paCtOraHne Do IOBepxHOCTN rOTOBKn DOnJXHO 6bItb70 CM.
4. 3NEKTPNUECKNE NOKJIQUEHENIA
YctaHObKa DOJIxHa BbIIOHHTbc C CO6JIOpHeHnEM Tpe6OBAHn CTaHApTbIX DInpeKTHB. PpOn3BODInTeNb He npNHMaet HNKaNX pPeTeH3N OTHOCInTeHbNOBpeJcEHN, BO3HNUX B pe3yNbTaTe HEnpaBnblHO NcONb3OBAHn N3dJIy.
PpeDynpexJeHnA:
- Параь Вынолпенем Рдклочени Зелкtronрпбoga К 3лелкtronрсети 6обастьно пpoВерьт Нанражени в 3лелкtronрсети, рergyларову abTomatческого Bвikлоча,则 OTCYTCTBVE обрьва в Лини заимлени Zелкtronрпбoga, И HOMHaI ПлавКOrO пpedoхрази。
- Θnéктponрьор Должен подлючысь с Знкгческог розпс сnomоью Вилки, сахженишърьkom 3aцntHoro 3aemJIeHnI, ИИЧЕЗ DBYXПОЛСьИ pa3beДИНТeьc paCCTOЯнEM мжду KOHTAKTAMN He MeHee 3 MM.
Ecnn 3JIeKtponpnp6op cHa6KeH 7TeNceBHO pO3eTKo,TO OH DOJXeH 6bITb yCTaHOBHeN TAK, YTObI K 7TeNceBHO pO3eTKe OCyUeCTBJIaNCy yOObHbI DoCTyn.
- JeITO-3eIeHbI npOBoHNK shHypa nITaHnA doJIxHe NODcoEINHЯTbcra K KOHTaKTy 3a3eMJIeHnA 3JIeKTpUcECKO pO3ETKn IJIeKTpOpnpnbopa.
- Пюизвордenteь He Heceet OTBETCTBeHHOCt 3a HechacThbIe Clyuан,ЯВляЮшпесс СледCTBnEMTOrTO,чTo 3JIeKTpOpiPn6Op He 6bl 3a3emIeH,ИПИЯВЛЮшпесс CSeIcTBAmE TOrO,чTo npOn3oWeJ O6pbI B LInHIN 3a3eMJIeHnY.
-ПивОЗнИКНOBЕHINВОПСОВ,CБЯЗаньIX C NCSNoIb3OBAHHeM шнуразптуг,在слдуетобразиьсьВслжбу послелюдажно оьслужиВаняи KBaJIINФИЦИРОВАHHOMУЗLEKТРИКУ.
B cnyuae noBpeKdHnna shypa nntaHna ero 3aMeHa DOnJXHa BblnoJIHrTbcra COTpydHnKOM cepBnCHOn Cnyk6bl CnCNOJb3OBAHHem CneuNaIbHbIX INHCTpyMeHTOB.
BHIMAHHE: EcIn BO3HKnHeT Heo6XoDnMoCTb BbIOnHnTb 3aMeHy shypa nHTaHn, NOCoEHNHTe pNOBdNkN Shypa nHTaHn B COOTBeTCTBn C yKa3aHHbIMn HnKe ZBeTOBbIMN KoJaMn.
CINHIN - HEITPAJIb (N)
KOPNUHEBBI - ΦA3A (L
JXELTO-3EJIENbIy - 3EMJIa
Bapouhna NOBepxHocb Cha6KeHa UHypom NHTAHn, KOTOpbI IO3BOJAre TIOKJIUOaTb 3TOT 3JeKTPoPnp6Op TOJIbKO K 3JeKTPocEt n HApJxKeHem 220-240 B MExy DBymЯФa3Amn ININ MeJdy Fa3OHy HeITpaJIbI.
- noJKNIOHTe 3JIeKTPoPnp6Op K 3JIeKTPnueckO Ko pO3eTKe, 3aunuHHO nnBaBKM npedoxpaHNTeMe
OHaKo TaKKe IMeETcB BO3MOXHOCTb IOpKlHouHTb BApOHyIOBOpBXHOCTb K CJIeDyUOUM JINHHM 3JIeKTpOCETN:
- Tpr Φa3b1 220-240 B 3~илг - Tpr Φa3b1 380-415 B 3N~
IЯ nepexoHa HOBoe NOKNoeHne BbInOJIHnTe CneDyUOuNE INHcTpkyu:
- Перед Вьлолинем-coeнн,在yбдься,чTo 3NeKtpponp6bop 3aunuHc N NOMOsbIO NOxOJaero PnabKOro npeOxApanTeJI,NTO NLOaIb ceHINRA NOBDAux INPobODHnKOB YBnAETc DOCTaTOUHO,YTObl OBeCneHBAIOcb HOpMaIbHoe NITaHne 3NeKtpponp6opa.
- Плоскite Варочую NOBepxHocTь на NOBepxHocTь CTonaCTeКЛоКЕрamMчecKо CTOPOHОВиЗ. (Стеслореразсяпая NOBepxHocTь ДолЖна 6ыТь 3aшицeha!).
- CHIMITE KpbIshky KJIeMMHOJ KOJOdKn, BbINOHNB CLEdyOuNne Opeaun:
- NaДиTe ДeВе Лanki, pacNoJoxeHHbIe c6Oky,
-HaXMMTE Ha JIANKY Ie3BnEM PIIOCKO ITBepTKN (BbIIOJHNTE 3TOДЯ KAKDOI JIANKI),
*CHIMNTE KpbIILKy.
YtO6bI ChrTb HHyp NHTaHn
OTBepHnTe BnHTbI, KOTOpbIMN KpeINTCKJIeMMHaJ KOLOKa, B KOTOpO HaxoJaTcIyHTbI INPOBOdHKn IhUpa NITaHIn,
- BbITaHHTe WHyp NtTaHn.
Iopraok BbINOpHeHnHOBOro nOdkJIoueHn:
- BbIbepnTe 5Hyp nITaHnB B COOTBeTCTBm C peKOMeHaZnAaZnMn, npEcdTaBJIeHHbIMN B Ta6nIe.
-Порустпшур питаня черз зжимшуразпитаня.
3aYnCTIte KOHcI BCEx NpOBoDnKOB
hHypa NiTaHnHa Na DInHe 10 MM,
npINHMaB paCayET dInHy shHpy
PiTaNHaHn, Heo6XoHDmUy Dlan BbINOJIHeHn
CoeINHeHn Ha KJIeMMHO KJIoDKe.
- BылолнITE поДКЛЮЧЕнЯ npOBODHKNOBи УHTOB (былснТыВпрдыДушейОпераши)В COOTBETCTBИС TПНOM LINHIЗэ Лжтponптуни, Кak пokаЗано Вп徳сtablenhoи Нжжетабице.
- YCTaHOBNTe KpbIiKy.
- 3aTaNHe BnHTbI 3aXmMa UHypa nITaHn.
PpmeaHHe: PpOBepbTe, YTO BnHTbHa KJIeMMHOI KOIOdKe HaJeXHO 3aTMyTbI.
3JEKTPNueCKNE COEINHEHNA
| LAY OUT “1” | LAY OUT “2” | LAY OUT “3” | |
| Одna phаза 220-240 В Или Дve phазы 220-240 В 2~ | |||
| шнYP ПИТАпЯ HO5V2V2F | 3x2,5 mm² | 3x2,5 mm² | 3x2,5 mm² |
| Три phазы 220-240 В 3~ | |||
| шнYP ПИТАпЯ HO5V2V2F | 4x1,5 mm² | 4x1,5 mm² | 4x1,5 mm² |
| Три phазы 380-415 В 3N~ | |||
| шнYP ПИТАпЯ HO5V2V2F | 4x1,5 mm² | 4x1,5 mm² | 4x1,5 mm² |
DBe fa3bl 220-240 B 2~
PH = Φa3a N = Heɪtpaɪb T = 3eɪmɪər
5. ONICAHNE
30Ha HarpBa "xaJnAaT":MeTaJIHuecka TOKOpBOOJaUaI
PONOCKa pacnpedeHea OndopOHO NO BcEi BapOuHoi
NoBepxHoCTn. OHa pa3OrpeBaetc B TeueHne 3 cN MoKeT
NCOnb3OBaTcBdIpaNBHomepHoro,ODHOpOHO r
IOCTaTOUHO npOdoJIKHTeJIbHOrO npOcecca nprirotobJeHna
Piun. CTeKnOkepaMnuecka BapOuaHaa NoBepxHoCTb 6bNaJaET
6oJIbWo TEPNOBO MOuHocTbO,ReHepnPyeMo3OH HoHarpeBa
"xaJnAaT", YTO obecneuHbaET 6bICTpoe nprirotobJeHne Piun.
IV3MeHEnHn, BHeceHHbIe B KOHCTpyKcUNo BapOuHoi
NoBepxHoCTn, He CHNuIN CNOC6HOCTb CTeKnOkepaMnIK
BblDePxAIBaTB BbICOKHe TEMnepaTpybl, HO OHN IOBbICINI
r6KoCTb peryInpOBAHnra HarpeBa.IcNol3OBaHne yCTpoiCTBa
"CnpInTep" P03BOJLaET ChN3NTb BpEm nprirotobJeHna Piun Ha
15% B 3abIncMocTn OT cnOCo6a nprirotobJeHna Piun n
ncPOnlb3YeMoN KxOHHO Nocdybl.
6. COBETbI OTHOCHTJIbHO BbIBOPA KUYOHNoIocydbI IJRA NcPOnJIb3OBAHnC BAPOUHOI NOBEPXHOCTbIO
Дя obecneueHЯ BbICOKO 3ΦΦeKTHBHOCTn BAPoHNo NOBepxHOCTN DOJIXHa NCONb3OBaTbCBA BcICOKKaYeCTBeHHa KxOHHa NOCyJa.

- Плььтугсь Толбков Всокочаецьнй Кухонов
пocудом С совершени плockим и толстов м:
Испалыогане тakою посны рпедотваает образоване
�рячх точек, в которьх удает подropать пица. Кастоюи
СКВОБОДС TOLТСМ Oсвоганem уdUT obecneунbatь
paBHomephoe paCnpeDeJIeHNe TEJIЯ.
OchOBaHne KaCTpOJIH Nn CKOBOpOdbI DOJXHO 6bITb cyxHM: nocne TOrO, KaB B Nocdy 6ydet 3aJInta XnDKoCTb, INN pRi NcONb3OBaHnK KAcTpOJIH, KOtopa D0 3TOrO HAXODINacb B XOJODINbHKe, NepeD TEM KaK NOCTaBtB KAcTpOJIH Ha BapOCHY IOBepxHOCbT IPOBepbTe, YTO OCHOBaHne KAcTpOJIH JABIIeTcSOBepUWeHcO xCyHM. 3To npedOTbPaTIT o6pa3OBaHne Ha BapOCHNIOBepxHOCTN PAnTeH. - Плььтугсь Тольков Всокочахьнй Кухони
пocудом с COBERSEHNO ПLOCKIM И TOJCTbIM OCHOBAHneM:Диametр NOcYdBi ДОлжен 6ытБ He MeHbSe Диametpa 3ObIb
harpeBa.ЕспДиametр NOcYdBi HEMHORO 6Oblwe Диametpa
3Obli HarpeBa,TO энерия 6byet NcPONlb3OBaTbCS MAKCImaJIbHOH 3ФФeKTINBHOCTbIO.
BbIbOP IOXODJUeK KXYOHHO NOCyDbI -PpeIcTaBHeHnA HnKe INHOpMaunn POMoKet Bam BblpaTb Nocdy IaI npuROToBHeHnNn C MaKcMnJIbHOH 3ΦΦeKTHBHOCTbHO.
Nocya n3 Hepxabeoce cTaN: HactoTeJbHo peKomeHdyetc nCnoJIb3ObaTb. Oco6eHNO xopoIo NOxOINT KxOHnA Hocya c TpexcIIOHO CTpykTpyo OCHOBAHnA. OCHOBaHne C TpexcIIOHO CTpykTpyo OBeHNReB Cbe6e npEnMyUeCTBa HepXaBeIOSeI CTaN (PnBNeKaTeJbHbI BHeuHnBvD, DOnIOBeeHuOCTb I pOChOtB) IN PpeMUsECTBa aIOMHHa Nm Mei (BbICOKa TeNlONpOBoDHOCTb, paBHomepHoe pacnpedeJeHne TempepaTybl).
AIIOMHnHeBa nocya: peKOMeHnyeTcNcNoIb3OBaTb TReKeNyIO
nocydy. BbICOKa TeIIOIpOBoIDHocTb. AJIOMMHueBa nocyda HNOrDa ocTabIeT Ha BapOChNo nobepxHOCTc CJeIbI, NOXOXHe Ha capanHHbI. Ho 3tN CneIbI IerKO ydaJIyOTcR, ecNI YnCTka BapOCHNo NobepxHOCTn BblONHReTCr HEmeJleHNO nOCJte O6pa3OBAHn 3tNX CneoB. N3-3a Hn3KoN Tempeatypbl PIIaBLeHnAJIOMMHn, TOHKa aJIOMMHueBa nocyda He DOnkHa NCIOJIb3OBAtbcra.
UryHHa nocyda: MOxHO NcNoJb3OBaTb, Ho He peKOMeHdyTe. IIOXHe 3KcNJIyatauONHbIe XapaKTepnCTnK. MoKeT capanaTb NOBepxHOCTb.
Nocya c MeHbIM dHom / KameHHaepamka: peKOMeHdyETcNcNoB3ObaTb TjXKeYIO nocydu. XopoUne 3KcJIpyatauOnHHbIe XapakTePnCTnKn, HO MeIb MoKeT OCTabnTb Ha NOBepxHOCTn Cnebl, NOXOXHe Ha zapaHnbl. 3TN CNEy MOrYT 6bITb ydaJIeHbI, ecIn YnCTKa BApOCHo NOBepxHOCTn BbINOJHReTcR HeMeJeHNO nocIe O6pa3OBAHnA 3tNx CneDoB. Ondako He CTaBbTe Ha BapOCHyIO NOBepxHOCTb TakyIO nocdy 6e3 HaNtOi B Hee JnKDcoTn. IpeperpTBmMetaJIIM MoKeT npriOpetb K CTekJIOkepAMueCKo NOBepxHOCTn. Ipeperpeta Nocya c MeDhBIM dHOM MOKeT OCTaBnTb Ha CTekJIOkepAMueCKo NOBepxHOCTn Cnebl, KOTOpBIE HeBO3MOXHO 6yDet UdaJIHTb.
BbIKJIIOUeHHe 3OHbI HArPEBA
-HaXmnte KHOnKy BbIbopa COOTBeTCTBHyIOUeN 3ObHHaRpeBa.
-HaxmajTe"-"KhONkyTexnop,nKaHaDncnpeeHe6ydet OTo6paKaTbCyaPObHbHarpeBaO,yepe310cnNkaTop yPoBnHaPepBa NoracHet.
-ДябьICTPOrO BbIKJIIOHHeHnHaXKMITE KHOPIK"-"I COOTBETCTByIOUeI 30HbI HArpeBa OJHOBPeMeHNo. YpOBeHb HArpeBa aBTOMaTNUeCKN yCTaHOBNTcR Ha IOn3uNIO. 3oHa HArpeBa BbIKJIIOUeHa.
OBUEBbIKJIOUOHEHNE
30ha HarpeBa N TaMep MOryT 6bITb BbIKIIOHeHbB IIO6oe Bpemc C NOMOuBu HaxaTnK HonKnBKn./BbIKn.

IHHIKATOP OCTATOUHOrO HArPEBA H
Korda temnepaTpa 30HbI HarpBa NOBbIaetcdo 60^ ,Ha IINCNIIe NOBBIAETcN HNDIKaTO .Korda temnepaTpa NaadaHTHKe 60^ ,3OTNHNIKaTOPNCHe3aeT.
B konuche npriroTOBneHnna pIu npeKOMeHdyeTcBbIKIOHTb 3OHy HArpeBa N 3aKoHnTB npriROToBneHnne PIIu, INCNoJIb3yR OCTaTOUHOe TEnJIO 3OHBi HArpeBa.
Baxkhoe 3aMeuahne. nocJe oTKJIoueHnI NITAHN IINDKaTOp OCTaTOUHoro HArpeBa rachET, daxe ecNI TemnepaTypa 3OnbI HarpeBa npebblsaeT 60^
.YPNABJIENHE PABOTOI IONOJHNTBHOI 3OHbl HAFPEBA (IDBE 3OHbl)
B HeKOTopbIX MoDEJIaX IMeHTcO hbl HargpeBa, COCToAuzneH3 DByX oBnaCTei.
Ppu 6KluoyeHuu 30HbI Haapeea 6KluoyaIomcKaK OchoBHa, mak u doonlHumeIbHa 3OHa Haapeea.
LED
ДяВыкluуеняДОпЛHNTeьн 3ОнblHarpeBa. HaxmTe KONky DOnONHNTeьн 3Oнbl HarpeBa.Пи Bыкluуен IN DOnONHNTeьн 3Oнbl HarpeBa CBetODnOd DOnONHNTeьн 3Oнbl HarpeBa rachet.
Дя NOВTOPHOrO BKNIOUeHnI DOnONHInTeJbHO 3OHbI HarpeBa: Haxmnte KhoNky DoONHInTeJbHO 3OHbI HarpeBa. IprB KBNIOUeHnI DOnONHInTeJbHO 3OHbI HarpeBa 3aropaetcCBeToNDoONHInTeJbHO 3OHbI HarpeBa.
. ПОГРAMMПОВАнUE 3OHы HAFPEBA
Kajda 30Ha Haraeba MoKeT 6bItb 3anporpamMnpoBaHa MaKcMym Ha 99 MmHyT.
- BkHouHTe HxKHyU BAM 3OHy HaPeBa, KaK OINcaHO BblIe.
- Haxmnte OndHOBpeMeHHo KJIaBnIi "-" n "+" ДЯ BKNIOUeHnra TaHmepa,Ha DCNcPHee OTo6pa3ntbca "00"
LED
- Choba haxmnte kHONky "+" ,чTo6bl 3aJaTb BpeMBA mHyTaX BДиana3OHe ot 0do 99 mHyT, nIIN haxmnte KHONky "-" ,чTo6bl yMeHbUnTb BpeMBAДиana3OHe ot 30 mHyTdo 0.
-->BpemrIporpaMMbIMOKeTn3MeHraTbCBAJIIO6oMOMeHT
Korda nCTeueY cTaHOBnEHHoe Ha TaMepe Bpem, 3OHa HArpeBa ABTomaTnueckn BbIKHouNTcR, Na 1 MmHyTu BkHouNTcR 3ByKOBO CnHaJI.ДЯ BbIKNIOUeHnR 3ByKOBOr CnHaJIa HaxMnte KhONKy.
-> TaImeP MoXeT NcNoJIb3OBAtbcra 6e3 BkJIIOUeHnra 3OHbHaIrpeBa dIy HAnOMINAHnra, nO nCTeueHn yCTaHOBJIeHHORo HaTaImepe BpemEni BKJIIOuHaeTc 3ByKOBOc CnIHaI.
.KHONKA BLOKINPOBKN L
fYHKZJ6IbOKnOBKn IcNOb3yETcI JIJI pIpeDtBpaUeHnHEcaHKzIOHNPoBaHHOrO NcNOb3OBAHnBapOHyON IOBePxAocTN.3Ta fYHKZJraKKe IcNOb3yETcI Pn BblIOJIHeHN YIcTKNCEHCOPHOI NaHEn, TaK KAK KHOpKN ynpaBNeHn MOrYT 6bITb3a6IOKpOBaHbI 6e3 BkIIOueHn BapOHyON IOBePxAocTN.
Ym06bI 3a6Jokupoeamb bapouhyo noeepxHocmb:
-HaXmnte KhoNkY BKn./BbIKI.
yetbipe 30Hbl
TpN 30Hbl
-Варочна NOBepxHocTb 3a6JOKnPOBaHa,ДЯ BCex 3OH HaДиСплee B TeueHne 20 c OTo6paXaEТС ИнДИКaTOp 6JOKnPOBKn "L".
EcnKoHΦopKa eue ropea, To Ha dncJIee nonepeMeHHO oTo6paKaIOrca "L" u"H".
Ymo6bpa36nokupoambbapouhynoeepxHocmb
Дя Варочи NOBepxHoctn C 4-Mя KOHΦOPkAmN,Дя pa36bOKINPOBKN NOBTopNTe TUxge pOSeDpy,чTOИДЯ bOKINPOBKN UnpaBNeHnRA BAPoCHNoI NOBepxHoctn.ДяВарочи NOBepxHoctn C 3-MЯ KOHΦOPkAmN,Дя pa36bOKINPOBKN NOBtopNTe TUxke npOSeDpy,чTOИДЯ bOKINPOBKN UnpaBNeHnRA BAPoCHNoI NOBepxHoctn, HOnHa NocJIeHem 3Tane HaxMITE"-"BMecTeo"+".
Инданацnia "L" Исучен.Варочна панел pa3бпокрова и нахODNTСВ ржIMе OкДан.
KHONKA BJOKIPOBKN / MojeNB CH64
fynkui 6bnokpOBKn nCnObl3yeTc DnI nI npedotBpaueHn HecAHKUNOHINPOBAHNO nCnObl3OBAHn BApOHO NOBepxHOCTN. 3Ta fynkui TAKKe nCnObl3yeTc PnBbINOHeHn YnCTKn ceHCOPHO NaHEn, TAK KKn HONKn ynpaBHeHn MOryT 6blTb 3abNOKpOBaHb6e3 BKNIOHeHn BApOHO NOBepxHOCTN.
Umo6bI 3a6IokupoabmbapouhyIOoeepxHocmb:
-HaXMMTe KhoNkU BKn./BbIKn.

- Bapouhaj noBepxHoctb 3a6noknpoBaHa,ДЯ BCex 30H HaДиCpIeB TeueHne 20 c OTo6paKaetc HndNkatop 6JOKnOBKn"L".
EcnKoHΦopKa eue ropeyra,ToHa nCnIe ne npenepeMeHHo 0To6paKaHTcR"L"u"H".
4mo6bIpa36nokupoambeapouhyo noeepxHocmb
ДяВарочиоьерхости Онфоркам,在рблOKИРOBК NOBTOPITe TPyke IpoUeDpy,чTo IN ДЯ 6LOKIPOBK ynpaBJIeHnA
Варочи NOBepxHocTN, HO Na ПОслдем 3ТапЕ НжмITE "-" BmecTo "+.
BbIMOnTe MeTaJIInueCKyU pAMKyMbIbHOB BODo,3aTeM UCTO BDOi, IN PpToPiTe HacyXo TkaHbIO.
9. BO3MOXHbIE IPO6JIEMbl IN IX YCTPAHEHNE
HeoctaToHybI HarpeB
Bapouhna NOBepxHocTb He pa6oTaet, HIn He pa6oTaHT HeKOTOpbIe 30HbI HarpeBa BapOuHOINOBepxHOCTH
- HenpaBnIbHo yCTaHOBJIeHbI uHTbI (3akopauNBAIOUne nepMbIcKn) Ha KJIeMMHOn KOJIoDKe. IpoBepbTe, YTOIOKJIIOUeHHe BblONHeHO B COOTBeTCTBmC peKOMHeDaIcMn.
Bapouhble IOBepxHocTn CceHCOPbIM ynpaBneHneM: npOJIHTaHa 6oJbWOM yUacTke KJNDKoCTb IInI 6oJbWoN ObBeKT, POKpbBaIOUe, NO KpaHHe Mpe, DBe KHOKN B TeueHne HMeHee 10c. YdaJInte npOJIHTyO JxNDKoCTb IInI ObBeKT.
PanaHb ynpaBneHnBaOpuHoi nOBepxHocTn 3a6nOKnPOBaHa. Pa36nOKnpyiTe ee.
Bapouhna noeepxHocmb He ebikIouaemc
3a6JIOKIpObaHa nAHeB ynpabIeHn. Pa36JIOKpUyTe ee.
Bapouha noeepxHocmb camonpou3eOJbHo 6bluoyaemc
- PpOJNTaHa 60JIbWOM UyAcTKe JxNIOKcTb IIN 60JIbWo OBeKT, NOKpbIbAIOUHne, NO KpaIHe Mepe, IBe KHONKn B TeueHne He MeHee 10 C; B cIJIax 63oJnACHOCTn BApOuHar IOBepXHOCTb ABOTMAtuNeCKn BblKIOuAeTcN, IN BkIIIOuAeTcR 3ByKOBo CNrHaJI. YdaJInte pOJNTyHO XNIOKcTb IIN OSeBKT.
30hbl HargpeBa aBtOMaTnueeKn BbIKJIouaIOTc, ecn OH npabotaoT cInuKoM dOnrO. Cm. nyHKT "Bpempa60TbI".
Yactota uKJIOB BkIooHne/BbIKIOOeHne IIN 3OH HArpeBa
- Yactota LUKIOB BKJIOUeHne/BbIKJIOUeHne 3aBNCIT OT yCTaHOBKn UPOBH MOUHOCTN:
Hn3KynyPOBeHbMOUHOCTN:KOpOTKeBVPemzIKla,
. BbICOKn yPoBeHb MOUHCTN:ДЛNTeJIbHOe BpeM YKJa.
Miraet INdkaTOP "H", INdkaTOP octaTOHORo HarpeBa
CJINUKOM BbICOKa TeMnepaTpya 6Noka 3JIeKTPoHnKn. CneuaJIInCT NO TexHnueCKomy 06cIyXnBaHNIO DOJIxKeH npOBepNTb, yTO yCTaHOBkA BblIOJHeHa B COOTBETCTBnC peKOMeHdaUmaMn
10. ПОСЛЕПОНДАЖНОЕ ОБСЛУЖИBAHAÑE
peTem KaB Bb3BaTcneuaJncta no TexHueckomy 6cbnyKbHaHIO, BbIOnJIHnTe cNeduOuJe npOBepkn:
- pOBoBpIe, yTo BnIka 7Hypa nITaN HnPabNlBHO BCTaBHeBa B 3JIeKTPnueckyU PO3ETKy, U YTO He Npeperopei PnAxBKn InpEoXpaHnTeIb. Ecnn Bbl He MoKeTe CaMOCTOarTeBHO ONPeJeINrB npuHny HeNCnPABHOCHT, BbIKJIOHnTE 3JIeKTPoPnIP6Op H He NtTaTneCB OTpeMOHTPOBaTb erO CaMOCTOarTeBHO. NO3BOHnTE B cHTp NocIePnoJodAnHO OcbNyKbAHn. 3JIeKTPoPnIP6Op IMeet rapaTnHo, n 6ydtOTpeMOHTPOBaH B cepBnCHOM ZeHTpe 6ecnIaTHo.
11. 3AùNTA OKPYXAIOUI CPEIbI
Данныэлктponриборпомарк npOBaH B COOTBETCTBUN C Tpe6OBAHIMM, n3IOXeHHbIMN B DnpeKtNBe 2002/96/EC OTHOCITENbHO yTmIIN3aCIN 3ЛeKtpuYeCKOrO n 3JIeKTPoHrO GoOpYobAHnA (WEEE).
IpaBnIbHO BbIOnHJyTnIIN3aCNUO daHNOrO n3JeNIA, Bbl NOMOKeTe IpeDOrBpAtpNTb 3aqr3HeHne OkpyKaIOUeI CpeDbI HaHeceHne BpeDa 3dOpOBbIO JIoDei.

3TOT CMMBOJ yka3bIbaeT Ha To, YTO DaHHoe N3dJIne He DoJXHO BbIbpaBbTaBcR, KaK O6bIyHb 6bITOBoM MyCOp. BMeCTO 3tOrO OHO DoJXHO 6bITb OTnpaBHeNo HA NyHK TcOpa OTCnyKbUWeO CBOI cPOK 3NeKTPnueCKoro N 3NeKTPoHORO O6bOpYOBaHnI DnRA BbIOJIHEnH Iero NOcNeDyUoSeI YTuIN3aunI N NOBtOPHORO NCONLb3OBAHnA MtePmaNob. YTuIN3aunI DaHHORO N3dENIA DoJXHa BblIOJIHnTbCB A COOTBETCTBUN C MeCThBiIMN 3aKOHAMn IO OXPaHE OKpyKaUoSeI CpeDbI.
Дя пооченя 60one noDpo6hoN INHΦopMaunn OTHOCINTEbHO 6bpa6OtKn, BOCCTaHOBNeHnI NIOBTOPHO NcNoJIb3OBAHnI MaTePnaIaON DaHHORO 3dEeHnC BcRyNTecB C oprAHAMMeCTHOB bNactn, cNjX6oBbVbBO3a 6bITOBbIX OTXODOB, INI TOpROBOgOrpAHH3aueH, B KOTOPoB bY npno6peHn DaHHoe 3dEne.
INSTRUKCJE BEZPIECZENSTWA
. WERKING VAN DE VERGRENDELTOETS L
. LÅSA KNAPPARNA / MODELL CH64
- NOLLAJOHTO (N)
-JANNITEJOHTO(L)
-MAADOITUSJOHTO
- Skub/DD: Skub, Skub, Skub, Skub, Skub, Skub, Skub, Skub, Skub, Skub, Skub, Skub, Skub, Skub, Skub, Skub, Skub, Skub, Skub, Skub, Skub, Skub, Skub, Skub, Skub, Skub, Skub, Skub, Skub, Skub, Skub, Skub, Skub, Skub, SKUB, SKUB, SKUB, SKUB, SKUB, SKUB, SKUB, SKUB, SKUB, SKUB, SKUB, SKUB, SKUB, SKUB, SKUB, SKUB, SKUB, SKUB, SKUB, SKUB, SKUB, SKUB, SKUB, SKUB, SKUB, SKUB, SKUB, SKUB, SKUB, SKUB, SKUB, SKUB, SKUB, SKUB
- Der er anvendt forskerte materialer til rengøring. Spild eller fedtpletter bliver siddende på overfladen, brug en skraber (med barberblad) og det anbefalede rengøringsprodukkt.
Mørke striber eller pletter.
Starte hurtigoppvarming
Deaktivere hurtigoppvarming
The manufacturer will not be responsible for any inaccuracy resulting from printing or transcript errors contained in this brochure. We reserve the right to carry out modifications to products as required, including the interests of con sumption, without prejudice to the characteri stics relating to safety or function.