SHXPIRP1200 - Heating SHX - Free user manual and instructions
Find the device manual for free SHXPIRP1200 SHX in PDF.

| Product Type | Infrared heating panel |
| Brand | SHX |
| Model | SHXPIRP1200 |
| Nominal Power | 1200 W |
| Supply Voltage | 220-240 V ~ 50/60 Hz |
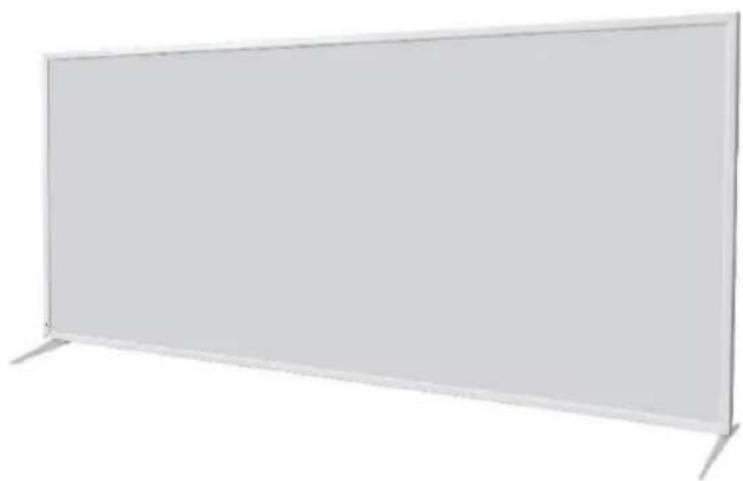
| Dimensions (H x W x D) | 84 x 120 x 45 cm |
| Weight | 9 kg |
| Temperature Range | 5 °C to 45 °C |
| Installation Type | Wall, ceiling or on feet |
| Controls | Remote control provided + Smart Life app (WiFi) |
| WiFi | 2.4 GHz, compatible with Smart Life app |
| Special Functions | Window open detection, timer 0-24h, ambient LED lighting (white, neutral, yellow) |
| Display | Digital, switchable °C/°F |
| Protection Class | I (earthing required) |
| Maximum Surface Temperature | Approximately 95 °C |
| Safety Distances | 40 cm front, 20 cm sides, 1 m from flammable objects |
| Maintenance and Cleaning | Unplug and let cool, clean with soft damp cloth, do not immerse |
| Warranty | 2 years (valid in Austria and Germany) |
| Package Contents | Panel, 2 feet, thermostat, remote control, screws, mounting hardware, instruction manual |
| Spare Parts Available | Remote control, thermostat, brackets (contact customer service) |
| Remote Control Batteries | 2 x AAA 1.5 V (not included) |
| Manufacturer | Schuss Home Electronic GmbH, Scheringgasse 3, A-1140 Vienna, Austria |
Frequently Asked Questions - SHXPIRP1200 SHX
User questions about SHXPIRP1200 SHX
0 question about this device. Answer the ones you know or ask your own.
Ask a new question about this device
Download the instructions for your Heating in PDF format for free! Find your manual SHXPIRP1200 - SHX and take your electronic device back in hand. On this page are published all the documents necessary for the use of your device. SHXPIRP1200 by SHX.
USER MANUAL SHXPIRP1200 SHX
Current operating instructions and other languages
Download the latest operating instructions in various languages via the link www.becool.at/downloads or scan the QR code shown. Follow the instructions on the website.

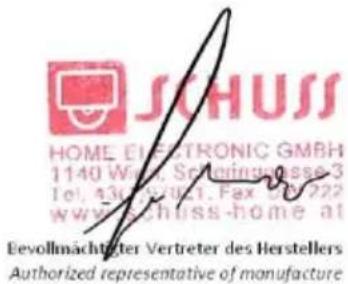
EU-DECLARATION OF CONFORMITY
This declaration of conformity is issued under the sole responsibility of the manufacturer.
Schuss Home Electronic GmbH
Scheringgasse 3
1140 Wien, AUSTRIA
Declaresthat the product
Manufacturer
Hersteller
Infrared Panel Heater
Model No.:
Modelnummer
SHXPIRP500, SHXPIRP850, SHXPIRP1200
is conformity with following directives, norms and/or regulations:
of 16 April 2014 amending Directives 2003/71/EC and 2009/138/EC and Regulations (EC) No 1060/2009, (EU) No 1094/2010
and (EU) No 1095/2010 in respect of the powers of the European Supervisory Authority (European Insurance and
Occupational Pensions Authority) and the European Supervisory Authority (European Securities and Markets Authority)
Article 3.1(a) Safety:
EN IEC 62368-1:2020+A11:2020
Article 3.1(a) Health:
EN IEC 62311:2020
Article 3.1(b) EMC:
ETSI EN 301 489-1 V2.2.3 (2019-11)
ETSI EN 301 489-17 V3.2.6 (2023-06)
EN IEC 55014-1:2021
EN IEC 61000-3-2:2019/A1:2021
EN 61000-3-3:2013/A2:2021
EN IEC 55014-2:2021
Article 3.2 Radio:
EMC Directive (EMC): 2014/30/EU Directive of the European Parliament and of the Council of 26 February 2014 on the harmonisation of the laws of the Member States relating to electromagnetic compatibility; Official Journal of the EU L96, 29/03/2014, p. 79-106
EN IEC 55014-1:2021
EN IEC 55014-2:2021
EN IEC 61000-3-2:2019/A1:2021 EN 61000-3-3:2013/A2:2021
Low Voltage Directive (LVD):2014/35/EU Directive of the European Parliament and of the Council of 26 February 2014 on the harmonisation of the laws of the Member States relating to the making available on the market of electrical equipment designed for use within certain voltage limits; Official Journal of the EU L96, 29/03/2014, p. 357-374
EN 60335-1: 2012+A11: 2014+A13: 2017+A1: 2019+A14: 2019+A2: 2019+A15: 2021;
EN 60335-2-30:2009+A11:2012+
A1:2020+A12:2020+A2:2022+A13:2022;
EN 62233: 2008
Ökodesign-Richtlinie Energy-Related-Products-Directive (ErP)2009/125/EC;
Official Journal EU L285/10-35 (31.10.2009) and associated regulation 2015/1188
RoHS Directive: 2011/65/EU Directive of the European Parliament and of the Council of 8 June 2011 on the restriction of the use of certain hazardous substances in electrical and electronic equipment; Official Journal of the EU L174, 1/07/2011, p. 88-110
Reach SVHC(EC)NO. 1907/2006 Schuss Home Electronic GmbH hereby confirms that in the products we supply, there are no substances of very high concern (SVHC) in the candidate list (last ECHA update from June 14, 2023, 235 substances) above 0.1% in accordance with Article 33 of the REACH Regulation (EC) No .1907/2006 are included.
Place and date of issue:
Vienna, 2023-07-19
Scharl, Alexander
Senior product and purchasing manager i.V...
Name, Funktion / name, function
Declaration reference:
SCHUSS HOME ELECTRONIC GMBH
Scheringgasse 3, 1140 Wien, AUSTRIA
EN IEC 62368-1:2020+A11:2020
EN IEC 62368-1:2020+A11:2020
Articolo 3.1(a) Salute:
EN IEC 62311:2020
Articolo 3.1(b) CEM:
ETSI EN 301 489-1 V2.2.3 (2019-11)
ETSI EN 301 489-17 V3.2.6 (2023-06)
EN IEC 55014-1:2021
EN IEC 61000-3-2:2019/A1:2021
EN 61000-3-3:2013/A2:2021
EN IEC 55014-2:2021
Articolo 3.2 Radio:
https://www.schuss-home.at/downloads
Smartlife APP downloaden
EN IEC 62368-1:2020+A11:2020
Article 3.1(a) Gezondheid:
EN IEC 62311:2020
Article 3.1(b) EMC:
ETSI EN 301 489-1 V2.2.3 (2019-11)
ETSI EN 301 489-17 V3.2.6 (2023-06)
EN IEC 55014-1:2021
EN IEC 61000-3-2:2019/A1:2021
EN 61000-3-3:2013/A2:2021
EN IEC 55014-2:2021
Article 3.2 Radio:
EN IEC 62368-1:2020+A11:2020
EN IEC 62368-1:2020+A11:2020
Clanek 3.1 a) Zdravic:
EN IEC 62311:2020
Clanek 3.1 pism.b) EMC:
ETSI EN 301 489-1 V2.2.3 (2019-11)
ETSI EN 301 489-17 V3.2.6 (2023-06)
EN IEC 55014-1:2021
EN IEC 61000-3-2:2019/A1:2021
EN 61000-3-3:2013/A2:2021
EN IEC 55014-2:2021
Clanek 3.2 Radio:
EN IEC 62368-1:2020+A11:2020
EN IEC 62368-1:2020+A11:2020
Articolul 3.1 litera (a) Sanatate:
EN IEC 62311:2020
Articolul 3.1 litera (b) CEM:
ETSI EN 301 489-1 V2.2.3 (2019-11)
ETSI EN 301 489-17 V3.2.6 (2023-06)
EN IEC 55014-1:2021
EN IEC 61000-3-2:2019/A1:2021
EN 61000-3-3:2013/A2:2021
EN IEC 55014-2:2021
THANK YOU FOR CHOOSING THIS PRODUCT FROM SHX.
This product is only suitable for well-insulated rooms or for occasional use.
Current operating instructions and other languages
Download the latest operating instructions in various languages via the link www.becool.at/downloads or scan the QR code shown. Follow the instructions on the website.

Current operating instructions and other languages
Download the latest operating instructions in various languages via the link www.becool.at/downloads or scan the QR code shown. Follow the instructions on the website.

PLEASE READ THE OPERATING INSTRUCTIONS
CAREFULLY BEFORE STARTING ASSEMBLY,
INSTALLATION, OPERATION OR MAINTENANCE.
PROTECT YOURSELF AND OTHERS BY FOLLOWING
THE SAFETY INSTRUCTIONS. FAILURE TO FOLLOW
INSTRUCTIONS COULD RESULT IN PERSONAL INJURY
AND/OR PROPERTY DAMAGE AND/OR VOID THE
WARRANTY!
Intended use
This appliance is intended exclusively for heating living spaces in households and must not be used for any other purpose.
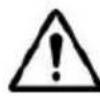
IMPORTANT INFORMATION ON SAFETY, STANDARD AND ELECTRICAL CONNECTION

1. safety instructions
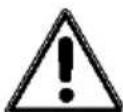
TO REDUCE THE RISK OF FIRE, ELECTRIC SHOCK OR INJURY:
1.1 Product safety
-
SHX infrared heaters reach approximately 95^ during operation when mounted on the wall. Do NOT touch the heater during operation.
-
Prolonged contact could lead to burns or injuries.
-
DO NOT cover the heater as this could cause overheating and fire.
-
The heater is not suitable for drying textiles. Avoid direct contact with other objects.
-
Place the heater at a minimum distance of 40~cm from the front and 20~cm from the sides of other objects and walls. Failure to maintain the minimum distance can result in heat building up behind the infrared panel and could invalidate the warranty.
-
This heater can easily be operated with your smartphone, via the same WLAN, via another WLAN or via a mobile network. This makes it possible to control your heater remotely without your direct supervision. However, please ensure that all safety precautions listed in this manual must also be taken with remote control.
1.2 Hazard warnings for children and people with disabilities
-
This appliance can be used by children aged from 8 years and above and persons with reduced physical, sensory or mental capabilities or lack of experience and knowledge if they have been given supervision or instruction concerning use of the appliance in a safe way and understand the hazards involved. Children must not play with the appliance. Cleaning and maintenance must not be carried out by children without supervision.
-
Children from 3 to 8 years: This age group may only switch the appliance on and off under supervision if it has been set
up or installed correctly and they have been informed about its safe use. Children must not connect, adjust, clean or maintain the appliance.
-
WARNING - Some parts of this appliance can become very hot and cause burns. Special care must be taken when children or vulnerable persons are present.
-
If the mains cable is damaged, it must be replaced by the manufacturer, customer service or a similarly qualified person in order to avoid danger.
-
DO NOT operate the heater in small rooms where there are people who may not be able to leave the room independently. The surface of the heater can reach temperatures of up to 95^ . Keep the appliance out of the reach of children and disabled persons.
-
Keep babies and children away from packaging material such as plastic bags to avoid the risk of suffocation.
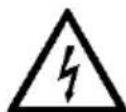
1.3 Electrical safety
-
Disconnect the heater from the power supply before carrying out any installation or cleaning work on the appliance or in its immediate vicinity. The appliance should be checked for any damage before commissioning.
-
DO NOT use the appliance or the power cable if it is damaged. Contact an authorized SHX dealer immediately for repair or replacement. Repairs, maintenance or modifications to the device may only be carried out by authorized SHX dealers in order to maintain the warranty.
-
DO NOT carry out repairs yourself, failure to do so may invalidate the warranty.
-
If the device has been dropped, do not use it and contact a SHX dealer to ensure that it is free of damage.
-
SHX infrared heaters are designed for 220-240V, 50Hz AC. Do not use the appliance with a different power supply.
-
The heater must not be installed directly under a socket outlet.
-
WARNING: Do not use the heater in small rooms where there are people who may not be able to leave the room on their own, unless they are constantly supervised.
2. maintenance of your SHX heater
2.1 Cleaning
Always disconnect the appliance from the power supply and allow it to cool down before cleaning. Never immerse the appliance in water or other liquids or pour them over it. Only clean the appliance with a soft, damp cloth. Make sure that the appliance is completely dry before using it and wipe it with a dry cloth after cleaning. Avoid using abrasive materials, solutions or hard sponges to prevent scratches or damage to the surface.
2.2 Operation
Please note that the surface of the device may become slightly discolored over time due to air pollution. This does not constitute a defect. If you are interested in a printed version, please contact your local dealer. Never cover the
appliance with adhesive foil or paint/label it yourself. This could damage the heating element and invalidate the warranty. If you notice any unusual noises, odors or visible changes to the appliance, please disconnect it from the power supply immediately and contact your SHX dealer.
2.3 Repair
Repairs may only be carried out by SHX or a certified dealer. Any infringement will result in immediate loss of the warranty.
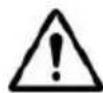
| ATTENTION | RISK OF INJURY The appliance becomes hot during operation! Never touch the appliance during operation→ this could lead to serious BURNS. |
| WARNING | FIRE HAZARD WARNING: To prevent the heater from overheating, the heater must not be covered. |
| ATTENTION | SAFETY DISTANCE Keep a safe distance of at least 1 meter from easily flammable objects such as furniture, curtains, paper, etc.!LOCATION Always position the appliance so that the air can flow in and out unhindered. RISK OF BURNS The appliance becomes very hot during use and can cause burns. Special care must be taken when children and vulnerable persons are present. |
RISK OF OVERHEATING
Do not heat rooms with a volume of less than 4m^3
Symbols on the device
Symbol:
Significance:
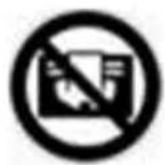
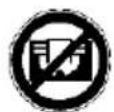
Caution! Do not cover!
The symbol on the appliance indicates that it is not permitted to hang objects (e.g. towels, clothing, etc.) above the appliance or directly in front of it. The heater must not be covered in order to
Recycling, disposal, declaration of conformity
| RECYCLING The packaging materials can be recycled. It is therefore recommended to dispose of them in sorted waste | |
| DISPOSAL The "crossed-out dustbin" symbol requires the separate disposal of waste electrical and electronic equipment (WEEE). Electrical and electronic equipment may contain hazardous and environmentally harmful substances. Therefore, do not dispose of them in unsorted residual waste, but at a designated collection point for waste electrical and electronic equipment. This will help to protect resources and the environment. For further information, please contact your dealer or the local authorities. Directive 2012/19/EU | |
| BATTERY DISPOSAL In accordance with Legislative Decree 188 of November 20, 2008 on the implementation of Directive 2006/66/EC on batteries, accumulators and related waste, the crossed-out wheeled garbage can symbol on the battery indicates that it is forbidden to dispose of used batteries in household waste.batteries and accumulators contain highly polluting substances. The user is | |
| obliged to dispose of used batteries at the collection points in the municipality or in the appropriate containers. The service is free of charge. In this way, the legal requirements are complied with and the environment is protected. These symbols can be found on batteries: Li = battery contains lithium Al = battery contains alkali Mn = battery contains manganese CR 2025 (Li); AA (Al, Mn); AAA (Al, Mn) | |
| CE | DECLARATION OF CONFORMITY We hereby confirm that this product complies with the essential requirements, regulations and directives of the EU. You can view the detailed declaration of conformity at any time under the following link: https://www.schuss-home.at/downloads |
Errors and technical changes excepted.
Scope of delivery
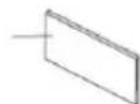
Heating panel
- 2x feet
Thermostat
- Operating instructions
- Screws for the feet
- Screws for Thermostat
- Mounting material (for wall and ceiling)
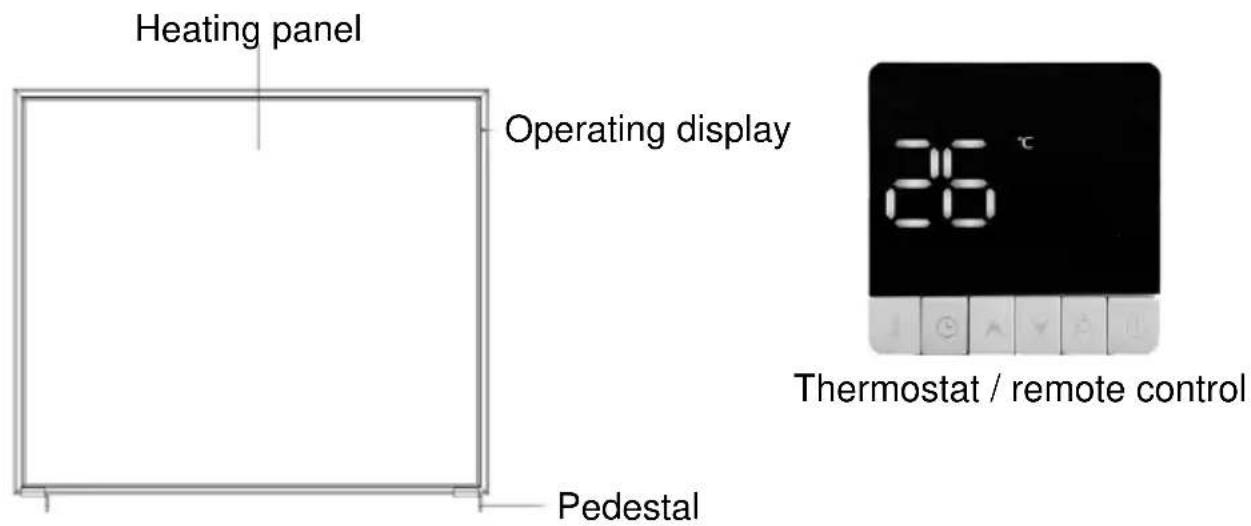
Product overview
Preparation
- Open the box and remove the appliance.
- Remove the packaging completely from the device.
- Then check the appliance for damage.
- Carefully unwind the mains cable and check it for any damage.
If the power cable is damaged, please contact a qualified electrician or service technician.
Installation and assembly
Installation note:
Attach the heating panel securely to the wall or ceiling or place it in the correct position.
The heating panel must be installed so that the controls cannot be touched by people who are bathing or showering.
Make sure that the heating panel is not installed under a power socket.
NOTE
To prevent damage to the heating panel, we recommend that two people carry out the installation.
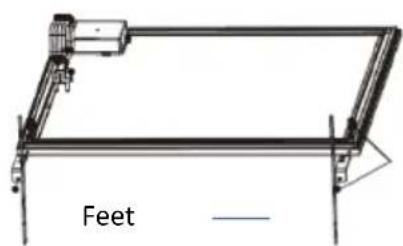
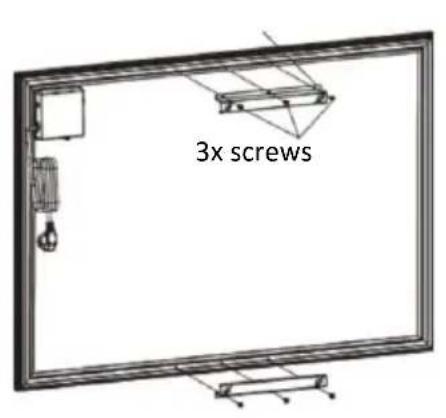
Installing the feet
Align one side of the feet with three screws and tighten them in the holes while repeating the same procedure on the other side, as shown in the following illustrations:
3x screws

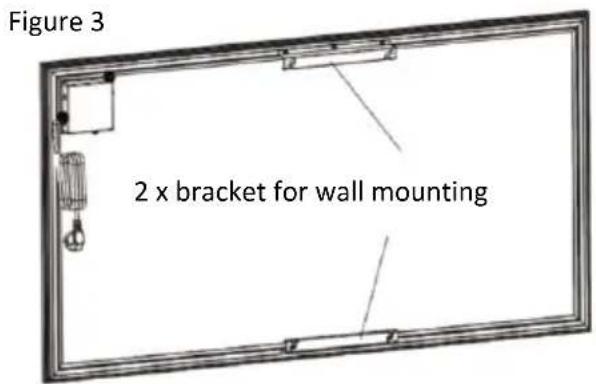
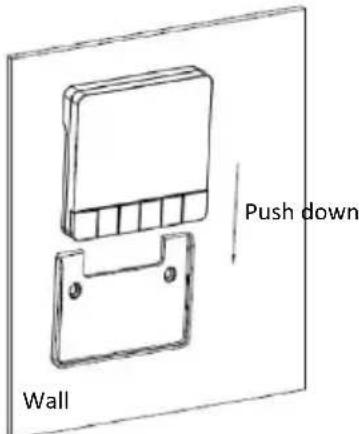
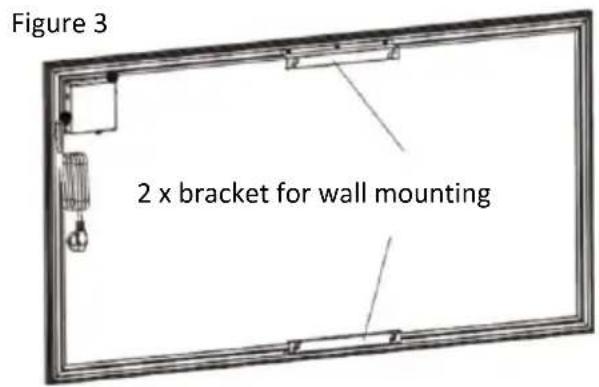
Wall mounting
a. Align the brackets with the screw holes and tighten the screws.
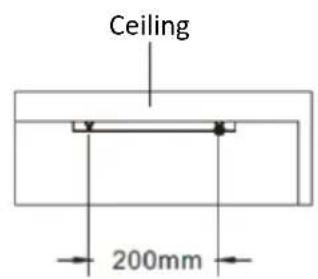
b. Drill two holes 200mm apart in the wall. Use a spirit level to ensure that they are straight and insert the plastic plugs.
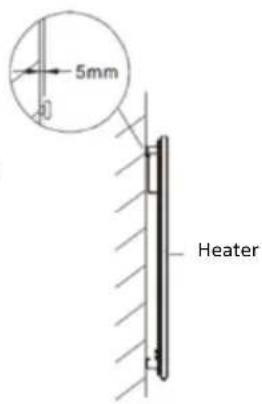
c. Screw in the screws, leaving a gap of 5mm between the screw head and the wall.
d. Align the screw heads and hang up the heating panel.
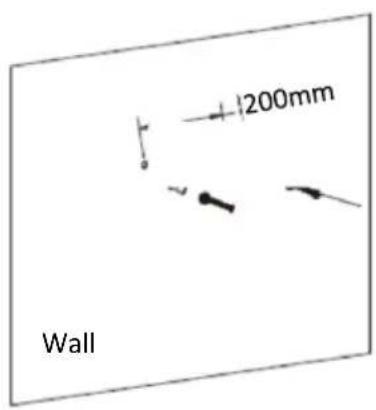
2 x plastic dowels (long)
2x screws 5x35
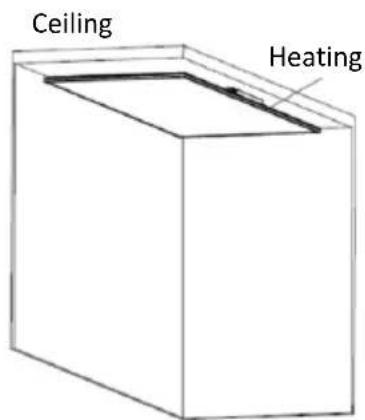
Ceiling mounting
When installing the ceiling mount, please note that you either need a suitable socket on the ceiling of the room or, if there is no socket, a certified specialist to install the product for you. Do not carry out any electrical work yourself and do not modify the product without authorisation!
a. Mount the brackets as described in the chapter "Wall mounting" (Figure 3).
b. Drill four holes in the ceiling and then insert the expansion screws (see Figure 4).

| Model | Performance | Four holes at a distance of Lx200 mm |
| SHXPRIP500 | 500 W | 460 mm x 200 mm |
| SHXPRIP850 | 850 W | 460 mm x 200 mm |
| SHXPRIP1200 | 1200 W | 700 mm x 200 mm |
c. Install the bracket on the ceiling with nuts. Ensure that the brackets are aligned and symmetrical.
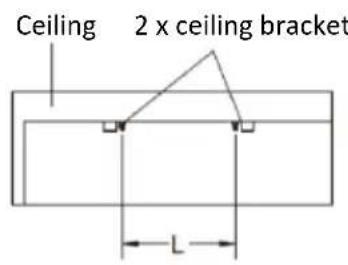
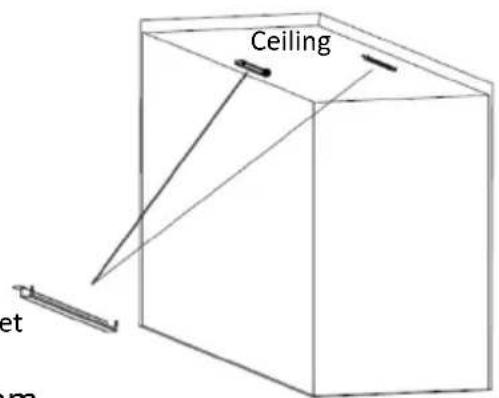
2 x ceiling bracket
d. Install the heating panel according to the diagram.
Mounting the thermostat
There are two ways to install the thermostat:
1. Self-adhesive tape
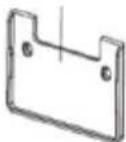
Stick the self-adhesive pad to the back of the thermostat and then to the wall (see figure 1).
Self-adhesive pad
Front of the bracket
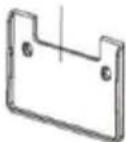
Back of the bracket
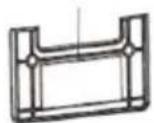

Figure 1
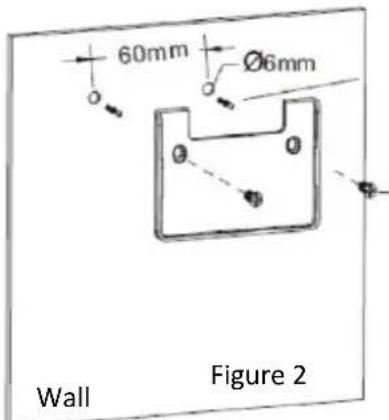
2. fastening with screws
Insert a plastic plug into the wall, align the screw holes and tighten the screws (see figure 2).

2 x plastic dowels (short)
2 x countersunk screw
The thermostat holder is installed as shown in the following illustration:
Note:
- The thermostat is used to remotely detect and control the temperature of the heating panel.
- Before use after installation, make sure that the distance between the thermostat and the appliance is less than 3m from the heating panel.
- The thermostat can be operated by moving it or by mounting it permanently on the wall to control the appliance.
Preparing the remote control
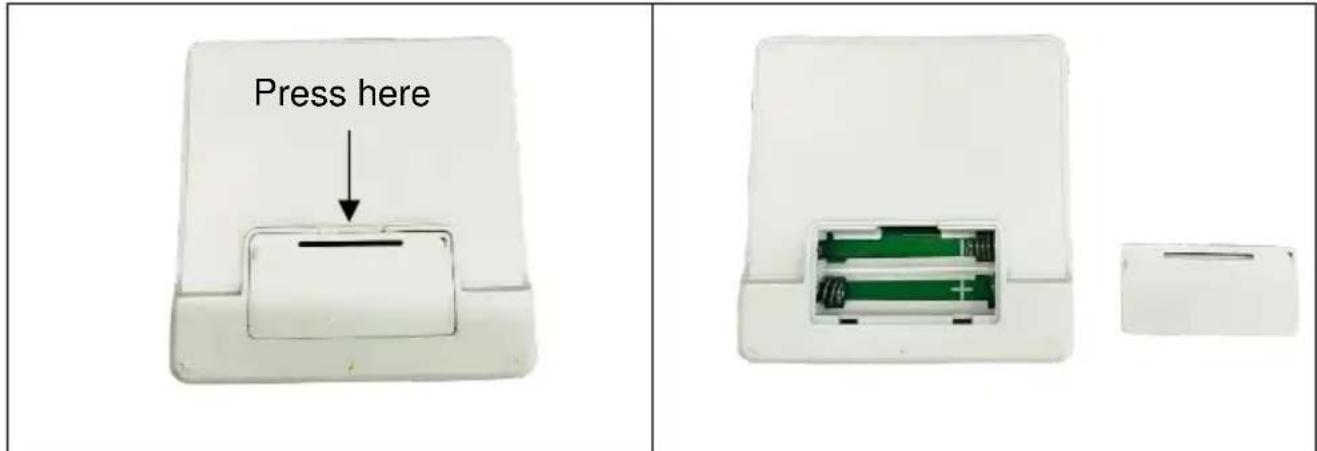
Please note the following instructions:
- To operate the remote control, open the battery compartment on the back as shown in the picture and insert 2xAAA batteries.
- To change the battery, proceed as follows: Open the battery holder on the back of the remote control, remove the old battery and then insert a new one:
- Please always pay attention to the polarity markings (+/-) on the battery and the battery holder:
- Then close the battery holder again completely into the remote control.
Matching for remote control and the heating
In the startup state, press and hold the temperature setting button (1) and the switch button (6) simultaneously, plug the heater into the socket and power it on within 5 seconds. Release the buttons when the heating device buzzer rings for a long time. The matching is successful.
Description of the remote control:

| 1. temperature button | 2. timer button |
| 3. up button | 4. down button |
| 5. LED button | 6. on/off button |
| 7. display for temperature, timer,... | 8. unit °C display |
| 9. unit °F display | 10. timer setting display |
| 11. timer display | 12. display for brightness setting of the ambient lighting |
| 13. window-open display | 14. wifi display |
| 15. display for color setting of the ambient lighting |
Commissioning
Switch on/off:
Press the button (6) to switch the heating panel on or off.
Set the temperature:
In the start state, press the temperature setting button (1) to activate the temperature setting mode. Use the up button (3) and the down button (4) to set the target temperature. Press and hold one of the buttons to increase or decrease the value more quickly. The temperature range is 5 - 45^ (41 - 113^) with a default starting temperature of 35^ .
Timer
In the start state, press the timer setting button (2) to access the timer settings menu. Use the up button (3) and the down button (4) to set the desired time. Press and hold one of the buttons to increase or decrease the value more quickly. The setting range is 0 to 24 hours (0H-24H).
Switch the display between Celsius and Fahrenheit
Press and hold temperature button (1) for 10 seconds to switch the display between Celsius and Fahrenheit. The factory default temperature is Celsius.
Window opening detection function
In the heating state, when the device detects that the ambient temperature has decreased by 5 degrees or more within 2 minutes (after reaching 2 minutes), it is deemed that the user has opened the window. The device has turned off the heating function, and E4 is displayed with a buzzer alarm sound for 1 minute. Factory default sets window opening detection to off state. Long press the up
button (3) on the panel for 5 seconds to turn on and off the window opening detection function. When the window opening test is closed, the display CL flashes for 2 seconds and then returns to normal display. When the window opening test is opened, the display OP flashes for 2 seconds and then returns to normal display.
Brightness setting for ambient lighting
Switch on the light with standard white light (brightness 100% ). Press the LED button (5) to enter the ambient light brightness setting mode. Use the up button (3) and the down button (4) to set the desired brightness: 100% , 75% , 50% , 25% or to switch off the ambient light.
- Briefly pressing the up button increases the brightness by 25% up to a maximum of 100% .
- Briefly pressing the down button reduces the brightness by 25% until the ambient light is switched off.
Setting the ambient light color:
The ambient light is set to white by default when turned on (brightness 100% ). Press the LED setting button (5) twice to enter the light color mode. Briefly press the up button (3) to set the target light color to white light, neutral light, or yellow light.
Pairing the remote control with the panel
Press and hold the temperature setting button (1) and the on/off button (6) at the same time when starting up. Release them when the heater beeps for a long time. The pairing is complete.
WiFi
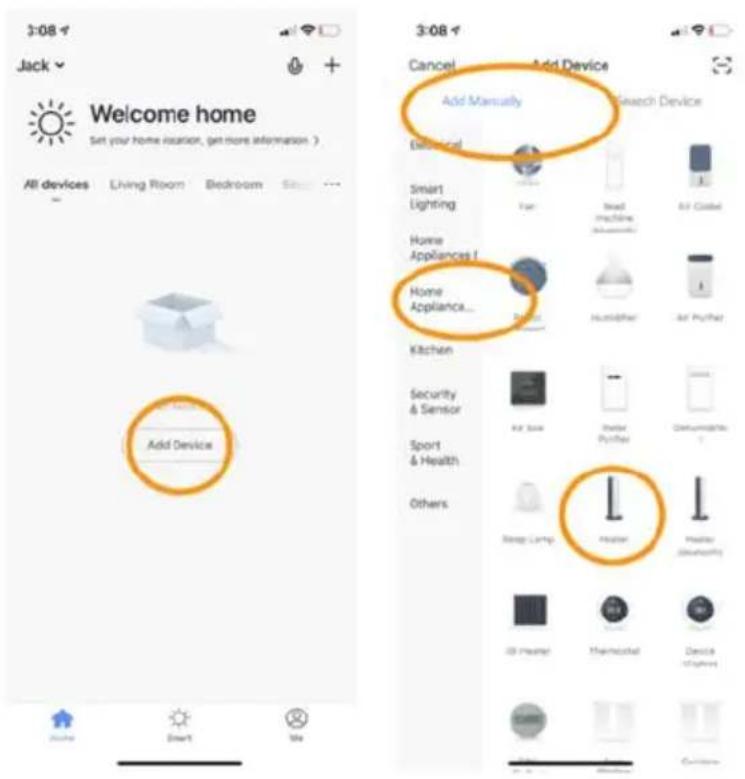
a. Scan the QR code below to download it easily with your smart device. Alternatively, search for 'Smart Life' in your device's app store to download the app.
b. Make sure you are using the same network and turn on Bluetooth and location functions on your phone at the same time.
c. Open the 'Tuya Smart' app on your phone and turn on Bluetooth on your phone. After entering the app, click on the +^ icon in the upper right corner to search for the device.
Resetting WiFi
In the start state, press and hold the temperature button (1) and the timer button (2) for 5 seconds and release them until the WiFi icon on the display flashes. When the heater receives the reset command, the buzzer will sound for a long time. After a while, the buzzer will sound three times, indicating that the WiFi reset is complete and the network can be distributed.
IMPORTANT
Please note that only 2.4 GHz networks are supported! Transmitting power: max. 100mW
WLAN and APP operation:
Download Smartlife APP
Scan the following QR code to download the "Smartlife" app or search for the "Smartlife" app in the App Store or Google Play Store to start the app download process. Open the app and register with your phone number or email address.

Connection with WLAN:
Step 1:
Activate the On / Off switch, press the On / Off button. The WLAN symbol starts to flash quickly. Open the app on your smartphone and add your device. Select "Add device", then "Add manually", "Household appliances (small)" and then "Heating" to add the device
Step 2:
Enter the Wi-Fi password for your home network. Please make sure that your home Wi-Fi is working and bring the heater and the smartphone as close as possible to the Wi-Fi router. Please note that this heater only works with 2.4 GHz Wi-Fi networks. 5 GHz networks are currently not supported. Also make sure that your internet router has enough capacity to add a new device.
Step 3:
Wait until the connection status shows 100% to complete the settings and the WLAN signal on the control unit stops flashing. If you were unable to establish a connection, switch the heating off and then on again after a few seconds. Press and hold the Wi-Fi button on the control box until the Wi-Fi symbol on the screen flashes slowly and repeat the connection process.
Note:
The app developers are constantly striving to improve the app, which is why there may be changes to its operation. You can download the latest version of the WIFI app operating instructions using the QR code below.

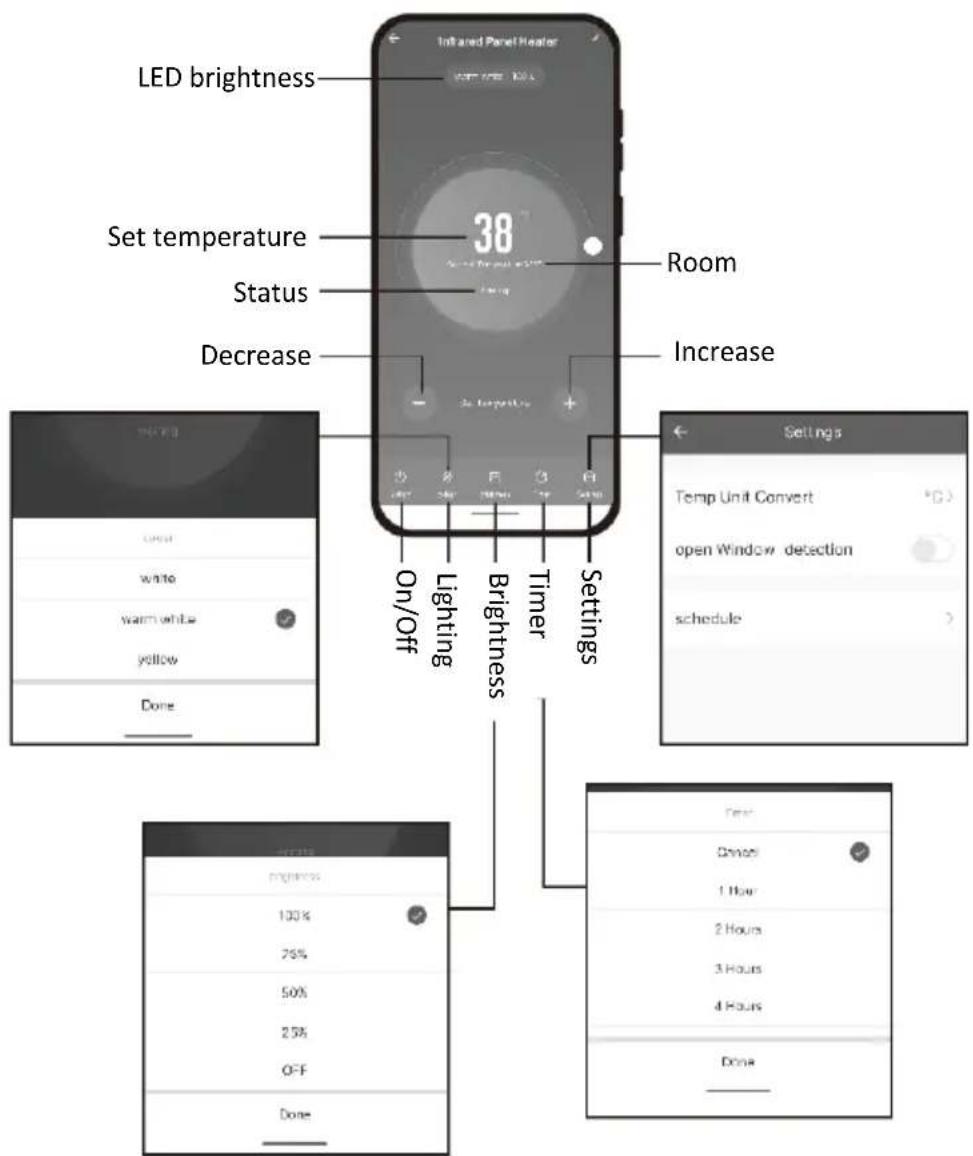
Function overview app
Technical specifications
The panels covered by these instructions are listed in the following table
| Model | Weight | Temperature setting: | Performance | Size H x W x D | Assembly |
| SHXPRIP500 | 4.6 kg | 5-45 °C | 500W | 60 x 70 x 45 cm | Wall, ceiling or stand |
| SHXPRIP850 | 6.8 kg | 5-45 °C | 850W | 60 x 120 x 45 cm | Wall, ceiling or stand |
| SHXPIRP1200 | 9 kg | 5-45 °C | 1200W | 84 x 120 x 45 cm | Wall, ceiling or stand |
| Item number: | SHXPRIP500 SHXPRIP850 SHXPRIP1200 |
| Input voltage: | 220-240V |
| Frequency: | 50/60Hz |
| Remote control: | 2x AAA battery 1.5V (not included) |
| WIFI transmission frequency: | 2.4GHz |
| Transmitting power: | max. 100mW |
| Protection class: | I |
| Contact address for further information: | Schuss Home Electronic GmbH Scheringgasse 3, A-1140 Vienna Service line: +43 (1) 97 0 21 www.schuss-home.at FB-No.: 236974 t / FB-Court: Vienna |
Required information on electric single-room heaters
| Item number SHXPRIP500 | |||||
| Specification | Icon | Value | Unit | Specification Unit | |
| Heat output | Only for electric storage single-room heaters:Type of heat supply control | ||||
| Nominal heat output | P nom | 0.5 | kW | Manual control of the heat supply with integrated thermostat No | |
| Minimum heat output (guide value) | P min | N/A | kW | Manual control of the heat supply with feedback of the room and/or outside temperature No | |
| Auxiliary power consumption | Heat output with fan support No | ||||
| With Nominal heat output | el max | N/A | kW | Type of heat output/room temperature control | |
| With Minimum heat output | el min | N/A | kW | Single-stage heat output, no room temperature control No | |
| In the Ready state | elsB | 0.00091 | kW | Two or more manually adjustable levels, no room temperature control No | |
| Room temperature control with mechanical thermostat No | |||||
| With electronic room temperature control No | |||||
| Electronic room temperature control and time-of-day control No | |||||
| Electronic room temperature control and weekday control Yes | |||||
| Other control options | |||||
| Room temperature control with presence detection No | |||||
| Room temperature control with open window detection Yes | |||||
| With remote control option (WiFi) Yes | |||||
| With adaptive control of the heating start No | |||||
| With operating time limit No | |||||
| With black ball sensor No | |||||
| Contact details: | Schuss Home Electronic GmbH Scheringgasse 3 - 1140 Vienna - Austria Tel.: +43 (0)1/ 970 21 www.shx.at | ||||
Required information on electric individual room heaters
| Item number SHXPRIP850 | |||||
| Specification | Icon | Value | Unit | Specification Unit | |
| Heat output | Only for electric storage single-room heaters:Type of heat supply control | ||||
| Nominal heat output | P nom | 0.85 | No | Manual control of the heat supply with integrated thermostat No | |
| Minimum heat output (guide value) | P min | N/A | No | Manual control of the heat supply with feedback of the room and/or outside temperature No | |
| Auxiliary power consumption | Heat output with fan support No | ||||
| With Nominal heat output | el max | N/A | kW | Type of heat output/room temperature control | |
| With Minimum heat output | el min | N/A | kW | Single-stage heat output, no room temperature control No | |
| In the Ready state | elsB | 0.00091 | kW | Two or more manually adjustable levels, no room temperature control No | |
| Room temperature control with mechanical thermostat No | |||||
| With electronic room temperature control No | |||||
| Electronic room temperature control and time-of-day control No | |||||
| Electronic room temperature control and weekday control Yes | |||||
| Other control options | |||||
| Room temperature control with presence detection No | |||||
| Room temperature control with open window detection Yes | |||||
| With remote control option (WiFi) Yes | |||||
| With adaptive control of the heating start No | |||||
| With operating time limit No | |||||
| With black ball sensor No | |||||
| Contact details: | Schuss Home Electronic GmbH Scheringgasse 3 - 1140 Vienna - Austria Tel.: +43 (0)1/ 970 21 www.shx.at | ||||
Required information on electric individual room heaters
| Item number SHXPRIP1200 | |||||
| Specification | Icon | Value | Unit | Specification Unit | |
| Heat output | Only for electric storage single-room heaters:Type of heat supply control | ||||
| Nominal heat output | P nom | 1.2 | kW | Manual control of the heat supply with integrated thermostat No | |
| Minimum heat output (guide value) | P min | N/A | kW | Manual control of the heat supply with feedback of the room and/or outside temperature No | |
| Auxiliary power consumption | Heat output with fan support No | ||||
| With Nominal heat output | eI max | N/A | kW | Type of heat output/room temperature control | |
| With Minimum heat output | eI min | N/A | kW | Single-stage heat output, no room temperature control No | |
| In the Ready state | eI sB | 0.00091 | kW | Two or more manually adjustable levels, no room temperature control No | |
| Room temperature control with mechanical thermostat No | |||||
| With electronic room temperature control No | |||||
| Electronic room temperature control and time-of-day control No | |||||
| Electronic room temperature control and weekday control Yes | |||||
| Other control options | |||||
| Room temperature control with presence detection No | |||||
| Room temperature control with open window detection Yes | |||||
| With remote control option (WiFi) Yes | |||||
| With adaptive control of the heating start No | |||||
| With operating time limit No | |||||
| With black ball sensor No | |||||
| Contact details: | Schuss Home Electronic GmbH Scheringgasse 3 - 1140 Vienna - Austria Tel.: +43 (0)1/ 970 21 www.shx.at | ||||
WARRANTY
With this quality product from SHX, you have made a decision for innovation, durability and reliability.
For this SHX device we grant a warranty period of 2 years from the date of purchase valid in Austria and Germany! If, contrary to expectations, service work on your device should nevertheless be necessary during this period, we hereby guarantee you a free repair (spare parts and labor) or (at Schuss's discretion) replacement of the product. If neither repair nor replacement is possible for economic reasons, we reserve the right to issue a time value credit note.
In any case, please contact the customer hotline as a first step (see instructions for use - "Contact addresses for further information and service line").
We would like to point out that repair work that has not been carried out by authorized workshops immediately terminates the validity of this guarantee.
This guarantee does not cover
- Damage due to non-compliance with the operating instructions
Repair or replacement of parts due to normal wear and tear
Devices that are used - even partially - for commercial purposes
Devices mechanically damaged by external influences (fall, impact, breakage, improper use, etc.) and signs of aesthetic wear and tear
Devices that have been handled improperly - Devices that have not been opened by our authorized service workshop
- Unfulfilled consumer expectations
- Damage caused by force majeure, water, lightning, overvoltage
Devices for which the type designation and/or serial number on the device has been changed, deleted, made illegible or removed - Defects due to extraordinary soiling
services outside our authorized workshops, the transport costs to an authorized workshop or to us and back and the associated risks
We would like to emphasize that within the warranty period, a lump sum of € 60 (indexed based on CPI 2015, June 2020) will be charged in the event of operating errors or if no error is detected. By providing a warranty service (repair or replacement of the device), the absolute<
Warranty period of 2 years from date of purchase not extended.
The 2-year guarantee is only valid on presentation of the proof of purchase (must include the name and address of the dealer and the full name of the appliance) and the corresponding guarantee certificate, on which the appliance type and the serial number (visible on the box and on the back or bottom of the appliance) must be noted! Without presentation of the warranty certificate, only the statutory warranty applies!
We expressly point out that the statutory warranty rights are not affected by this guarantee and remain unaffected.
Schuss Home Electronic GmbH and its vicarious agents shall only be liable for damages in the event of gross negligence or intent. Liability for loss of profit, expected but unrealized savings, consequential damages and damages arising from third-party claims is excluded.
The contact address of the respective service workshop can be found on our homepage www.schuss-home.at.
Congratulations on your choice. We hope you enjoy using your SHX device!
ADDRESS
SHX Distribution
Schuss Home Electronic GmbH
A-1140 Vienna, Scheringgasse 3
Tel.: +43 (0)1/ 970 21
Type designation:
Serial number:
EU DECLARATION OF CONFORMITY
EU DECLARATION OF CONFORMITY
The manufacturer bears sole responsibility for issuing this declaration of conformity.
This declaration of conformity is issued under the sole responsibility of the manufacturer.
Schuss Home Electronic GmbH
Scheringgasse 3
1140 Vienna, AUSTRIA
Declaresthattheproduct
Manufacturer
Manufacturer
Infrared Panel Heater
Model No.:
Model number
SHXPIRP500, SHXPIRP850, SHXPIRP1200
is compliant with the following directives, standards and/or regulations:
is conformity with following directives, norms and/or regulations:
DIRECTIVE 2014/51/EU OF THE EUROPEAN PARLIAMENT AND OF THE COUNCIL
of 16 April 2014 amending Directives 2003/71/EC and 2009/138/EC and Regulations (EC) No 1060/2009, (EU) No 1094/2010
and (EU) No 1095/2010 in respect of the powers of the European Supervisory Authority (European Insurance and
Occupational Pensions Authority) and the European Supervisory Authority (European Securities and Markets Authority)
Article 3.1(a) Safety:
EN IEC 62368-1:2020+A11:2020
Article 3.1(a) Health:
EN IEC 62311:2020
Article 3.1(b) EMC:
ETSI EN 301 489-1 V2.2.3 (2019-11)
ETSI EN 301 489-17 V3.2.6 (2023-06)
EN IEC 55014-1:2021
EN IEC 61000-3-2:2019/A1:2021
EN 61000-3-3:2013/A2:2021
EN IEC 55014-2:2021
Article 3.2 Radio:
EMC Directive (EMC): 2014/30/EU Directive of the European Parliament and of the Council of 26 February 2014 on the harmonization of the laws of the Member States relating to electromagnetic compatibility; Official Journal of the EU L96, 29/03/2014, p. 79-106
EN IEC 55014-1:2021
EN IEC 55014-2:2021
EN IEC 61000-3-2:2019/A1:2021 EN 61000-3-3:2013/A2:2021
Low Voltage Directive (LVD):2014/35/EU Directive of the European Parliament and of the Council of 26 February 2014 on the harmonization of the laws of the Member States relating to the making available on the market of electrical equipment designed for use within certain voltage limits; Official Journal of the EU L96, 29/03/2014, p. 357-374
EN 60335-1: 2012+A11: 2014+A13: 2017+A1: 2019+A14: 2019+A2: 2019+A15: 2021;
EN 60335-2-30:2009+A11:2012+
A1:2020+A12:2020+A2:2022+A13:2022;
EN 62233: 2008
Energy-Related Products Directive (ErP)2009/125/EC;
Official Journal EU L285/10-35 (31.10.2009) and associated regulation 2015/1188
RoHS Directive: 2011/65/EU Directive of the European Parliament and of the Council of 8 June 2011 on the restriction of the use of certain hazardous substances in electrical and electronic equipment; Official Journal of the EU L174, 1/07/2011, p. 88-110
Reach SVHC(EC)NO. 1907/2006 Schuss Home Electronic GmbH hereby confirms that in the products we supply, there are no substances of very high concern (SVHC) in the candidate list (last ECHA update from June 14, 2023, 235 substances) above 0.1% in accordance with Article 33 of the REACH Regulation (EC) No .1907/2006 are included.
Signed for and on behalf of:/ Signed for and on behalf of: SCHUSS HOME ELECTRONIS GMBH
Place and date of the exhibition: Place and date of issue: Vienna, 2023-07-19
Scharl, Alexander Senior product and purchasing manager i.V.
Name, Funktion / name, function Unterschrift / signature
Declaration reference:
Declaration reference:
SCHUSS HOME ELECTRONIC GMBH
Scheringgasse 3, 1140 Vienna, AUSTRIA
Subject to changes and printing errors, the current version is available for download: www.schuss-home.at/de/downloads/

INSTRUKCJA OBSŁUGI
panel grzewczy WiFi
SHXPRIP500 - SHXPRIP850 - SHXPRIP1200
GRATULACJE!
DZIEKUJEMY ZA WYBRANIE TEGO PRODUKTU FIRMY SHX.

EN IEC 62368-1:2020+A11:2020
EN IEC 62368-1:2020+A11:2020
Clen 3.1(a) Zdravje:
EN IEC 62311:2020
Clen 3.1(b) EMC:
ETSI EN 301 489-1 V2.2.3 (2019-11)
ETSI EN 301 489-17 V3.2.6 (2023-06)
EN IEC 55014-1:2021
EN IEC 61000-3-2:2019/A1:2021
EN 61000-3-3:2013/A2:2021
EN IEC 55014-2:2021
Clen 3.2 Radio:
Current operating instructions and other languages
Preuzmite najnovije upute za uporabu na raznim jezicima putem poveznice www.becool.at/downloads ili skenirajte prikazani QR kod. Slijedite upute na web stranici.

Current operating instructions and other languages
Preuzmite najnovije upute za uporabu na raznim jezicima putem poveznice www.becool.at/downloads ili skenirajte prikazani QR kod. Slijedite upute na web stranici.

MOLIMO VAS, PAŽLJIVO PROČITAJTE UPUTE ZA
UPOTREBU PRIJE POČETKA SASTAVLJANJA,
INSTALACIJE, RADA ILI ODRžAVANJA. ZASTITITE SEBE I
DRUGE PRIDRžAVANJEM SIGURNOSNIH UPUTA.
NEPRIDRžAVANJE UPUTA MOZJE DOVESTI DO OSOBNIH
OZLJEDA I/ILI ŠETE IMOVINE I/ILI PONISTENJE
JAMSTVA!
Namjena
Installation diagram
Montaža na zid
a. Poravnajte nosace s otvorima za vrijke i zategnite vrijke.
b. Izbušite dvije rupe na udaljenosti od 200 mm u zidu. Libelom provjerite jesu li ravne i umetnite plastične Čepove.
c. Uvrnite vijke, ostavljajuci razmak od 5 mm izmedu glave vijka i zida.
d. Poravnajte glave vijaka i objesite grijacu plocu.

Montaža na strop
Molimo obratite pažnju da za montažu na strop trebate odgovarajuću uticnicu na stropu prostorije ili, aka uticnica nodsupna, certificiranog stručnjaka kojiće pravilno instalirati proizvod. Ne provodite sami elektrICIne radove i ne mistranjte proizvod na svoju ruku!
a. Montirajte nosace kao sto je opisano u poglavlju "Zidna montaza" (Slika 3).
b. Izbušite Četiri rupe u stropu i zatim umetnite ekspanzijskiše vijke (vidi sliku 4).

| Model | Izvoedenje | Četiri rupe na udaljenosti Lx200 mm |
| SHXPRIP500 | 500 W | 460 mm x 200 mm |
| SHXPRIP850 | 850 W | 460 mm x 200 mm |
| SHXPRIP1200 | 1200 W | 700 mm x 200 mm |
Front of the bracket
Back of the bracket
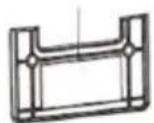
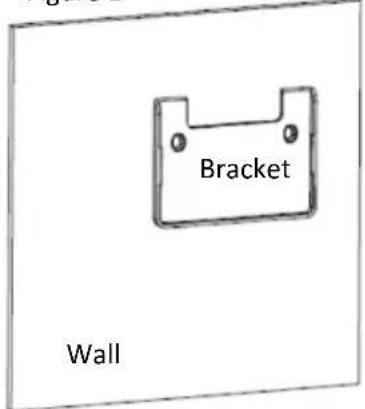
Figure 1
2 x plastic dowels (short)
2 x countersunk screw
EN IEC 62368-1:2020+A11:2020
Clanak 3.1(a) Zdravlje:
EN IEC 62311:2020
Clanak 3.1(b) EMC:
ETSI EN 301 489-1 V2.2.3 (2019-11)
ETSI EN 301 489-17 V3.2.6 (2023-06)
EN IEC 55014-1:2021
EN IEC 61000-3-2:2019/A1:2021
EN 61000-3-3:2013/A2:2021
EN IEC 55014-2:2021
Clanak 3.2 Radio:
Senior product and purchasing manager
i.V.
Name, Funktion / name, function Unterschrift / signature
Referenca deklaracione:
Referenca deklaracione:
SCHUSS HOME ELECTRONIC GMBH
Scheringgasse 3, 1140 Bec,AUSTRIJA