Newton 55 - Coffee grinder LX Italia - Free user manual and instructions
Find the device manual for free Newton 55 LX Italia in PDF.


| Product Type | Professional Coffee Grinder |
| Brand | LX Italia |
| Model | Newton 55 |
| Dimensions (H x W x D) | 355 x 127 x 205 mm |
| Weight | 6.6 kg |
| Electrical Supply | 220-240 V ~ 50/60 Hz or 110-120 V ~ 60 Hz |
| Power Consumption | 310 W |
| Rotation Speed | 1350 rpm (50 Hz) / 1630 rpm (60 Hz) |
| Productivity | 1.4 - 1.8 g/s (espresso) / 1.9 - 2.5 g/s (filter) |
| Hopper Capacity | 350 g |
| Burr Type | Flat steel burrs |
| Grind Adjustment | Manual, stepless, continuous |
| Display | Touchscreen with dose counter |
| Distribution | Single dose, double dose, continuous |
| Portafilter Fork | Height adjustable, suitable for all types of portafilters |
| Duty Cycle | 60 s ON / 120 s OFF |
| Maintenance and Cleaning | Weekly cleaning of the hopper with a damp cloth; cleaning the burrs with a brush or compressed air |
| Safety | Automatic shutdown after inactivity; standby mode; overload protection |
| Spare Parts and Repairability | Burrs replaceable after 500-600 kg; maintenance by authorized personnel |
| General Information | Professional and domestic use; manufacturer: CONTI VALERIO, Italy |
Frequently Asked Questions - Newton 55 LX Italia
User questions about Newton 55 LX Italia
0 question about this device. Answer the ones you know or ask your own.
Ask a new question about this device
Download the instructions for your Coffee grinder in PDF format for free! Find your manual Newton 55 - LX Italia and take your electronic device back in hand. On this page are published all the documents necessary for the use of your device. Newton 55 by LX Italia.
USER MANUAL Newton 55 LX Italia
text_image
LX ITALIANEWTON 55
natural_image
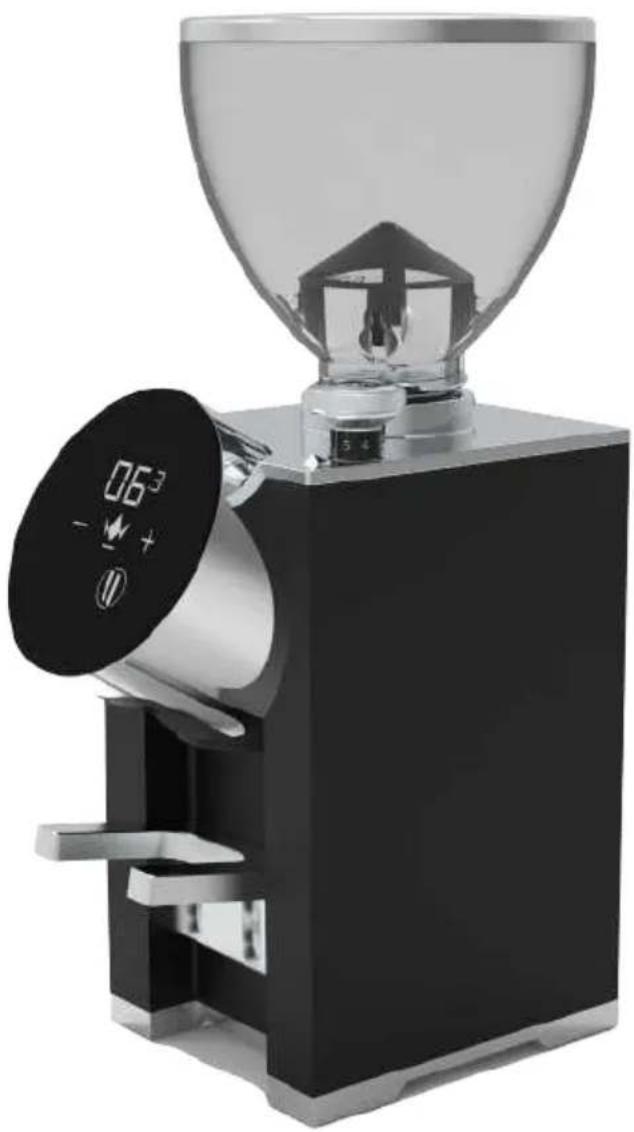
Exterior view of a modern coffee mill with a glass coffeepan and digital display (no text or symbols visible)LIBRETTO ISTRUZIONI USER HANDBOOK - GEBRAUCHANWEISUNGEN MANUEL D'INSTRUCTIONS - INSTRUCCIONES DE MANEJO
Istruzioni Originali - Translation of the Original Instructions - Übersetzung der Originalanleitungen - Traduction des Instructions Originales - Traducción de las Instrucciones Originales
The producer has reasonably considered every precaution possible, so to assure user's safety. Anyway, in installing and using the grinder, various conditions may create uncontrollable and unpredictable events; so, it's always necessary to evaluate any risks and consider what follows:
- Read all instructions.
- To protect against risk of electrical shock do not put the grinder in water or other liquid.
- This appliance is not intended for use by persons (including children) with reduced physical, sensory, or mental capabilities, or lack of experience and knowledge, unless they are closely supervised and instructed concerning use of the appliance by a person responsible for their safety. Close supervision is necessary when any appliance is used by or near children. Children should be supervised to ensure that they do not play with the appliance.
- Turn the appliance OFF, then unplug from the outlet when not in use, before assembling or disassembling parts and before cleaning. To unplug, grasp the plug and pull from the outlet. Never pull from the power cord. Permanently Installed – Make sure appliance is OFF when not in use, before putting on or taking off parts, and before cleaning.
- Avoid contacting moving parts.
- Do not operate any appliance with a damaged cord or plug or after the appliance malfunctions, or is dropped or damaged in any manner. Contact the manufacturer at their customer service telephone number for information on examination repair, or
adjustment.
- The use of attachments not recommended or sold by the manufacturer may cause fire, electric shock or injury.
- Do not use outdoors.
- Do not let cord hang over edge of table or counter.
- Do not let cord contact hot surface, including the stove.

SAVE THESE INSTRUCTIONS
EN
EN
SAFETY INSTRUCTIONS
- Before connecting the grinder, it's necessary to verify that plate data match with electric net ones.
- Both installation and repair must respect safety instructions and the inforce rules of the country in which the grinder is installed.
- The grounding wire is necessary, like the installation. Both must respect the inforce rules of the country in which the grinder is installed.
- Adaptors, multiple outlets and extension cables are not suggested.
- Do not use any water jets, unsuitable detergents or steam-cleaners to clean.
- During its use, install the grinder on a flat and stable surface being able to sustain the weight of the grinder.
- The grinder is intended to be used only to grind roasted coffee beans. A different use is considered unsuitable and dangerous. The producer cannot be considered responsible for possible damages related to misuse or erroneous and unreasonable actions.
- The grinder cannot be used in extreme environmental conditions. In any case, use the grinder just between -5^ ÷ +30^ degrees.
- This grinder has been conceived for commercial use, like restaurant kitchen, cantines, hospitals and shops, like bakeries and butchers. It is not suitable for continuous food production.
- For home-use, it is necessary to switch off the grinder and to unplug it before changing any accessory or coming clode to any parts that is working.
- This appliance is intended to be used only in household and similar applications.
UNPACKING THE GRINDER
-
It's necessary to check out that there is not any damage on the grinder, looking at the external packaging
• After having removed the packing, check out there are no damages on the grinder. -
Check out the entirety of all components. In case of defects or damages, inform immediately the authorised reseller.
- The packing (box, cellophane, metallic parts, styrofoam, etc.) can cut, wound or be dangerous if mismanaged. Prevent children or non-responsible people entering in contact with the packing.
- This symbol on the grinder or on the packing informs that the grinder cannot be

considered like a usual home waste; it must be delivered to a suitable waste collection facility that recycle electric and electronic devices. If this grinder is correctly disposed of, you will prevent potential damages to both environment and health; these damages may occur in case the grinder is not correctly disposed of. Waste recycling protects natural sources. For further information on the recycling of this product, you can contact your local authority, local recycling center or the reseller you purchased the grinder from.
IMPORTANCE OF THE MANUAL
This manual is addressed to the user of the grinder and it is considered part of this product. It shares information on its correct use and maintenance, including information on user's safety. This manual must be held during all the grinder's lifespan and must be transmitted to any user or future owner. All information in this manual do not replace safety rules and technical data on the installation and functioning of the grinder and its packing. This manual reflects the nowadays state of the art and it cannot be considered inadequate just because revised on the base of new technologies. The producer may modify the manual without revising previous editions, except in special cases. A misuse of the grinder, or a different use than the one described on the manual, will invalidate any warranty or responsibility of the producer. The grinder can be used just by a responsible adult. It's necessary to preserve the manual, as the producer cannot be held responsible for any damage on people or things, or any damage on the grinder in case it is misused or in case safety and maintenance rules are not respected.
DE
DE
IMPORTANCE DU MANUEL
natural_image
Diagram of a funnel-shaped device with a mechanical base and a separate view showing internal components (no text or symbols)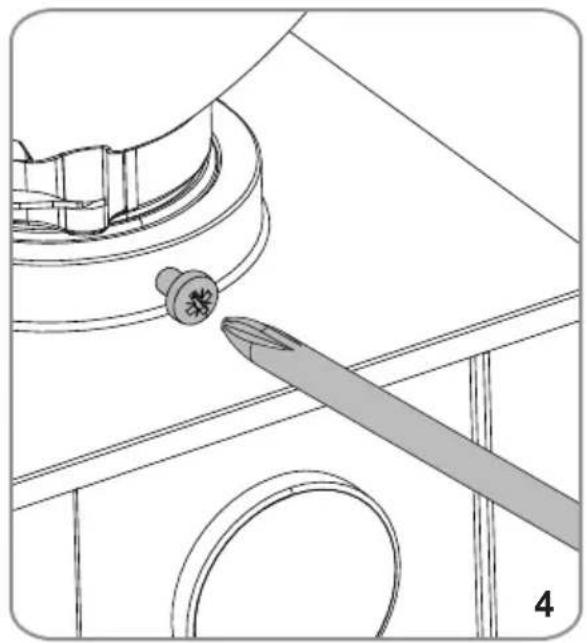
natural_image
Technical line drawing of a mechanical component with a tool interacting with it (no text or symbols)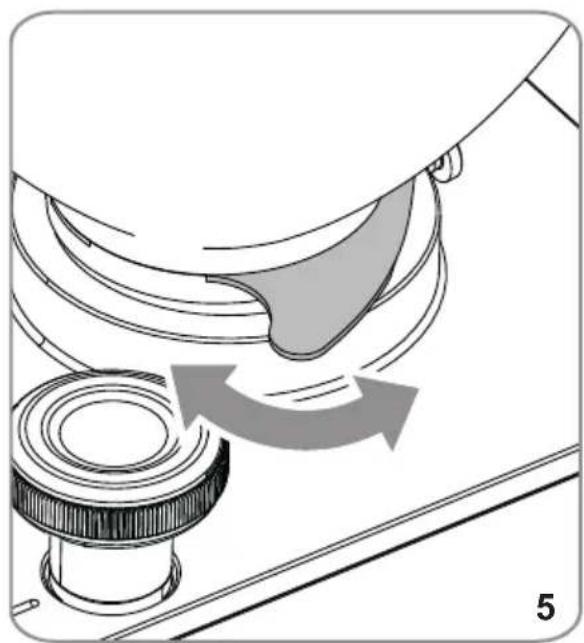
natural_image
Mechanical diagram showing a rotating component with a curved arrow indicating motion (no text or symbols)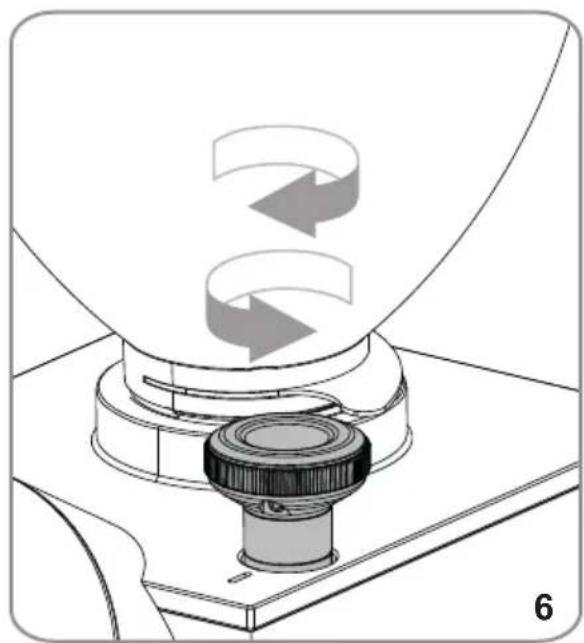
natural_image
Diagram of a mechanical device with a rotating component and curved arrows indicating motion (no text or symbols)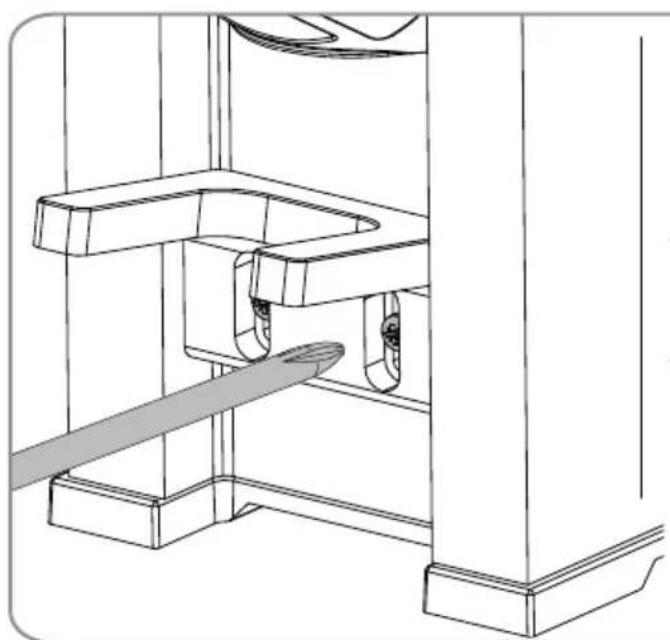
natural_image
Technical line drawing of a mechanical assembly with no visible text or symbols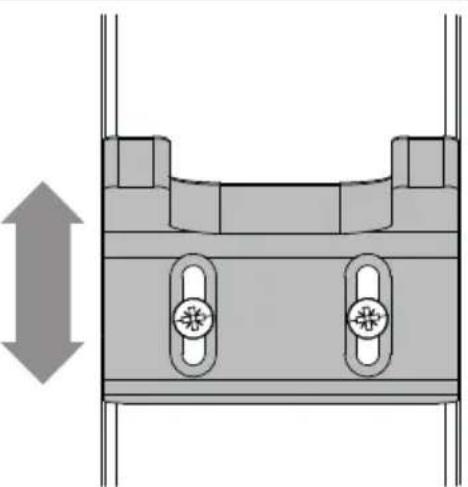
natural_image
Mechanical component diagram showing a U-shaped housing with two side oval ports and a vertical arrow indicating upward motion (no text or symbols)7
natural_image
Line drawing of a kitchen appliance with a lid and circular components, no text or symbols present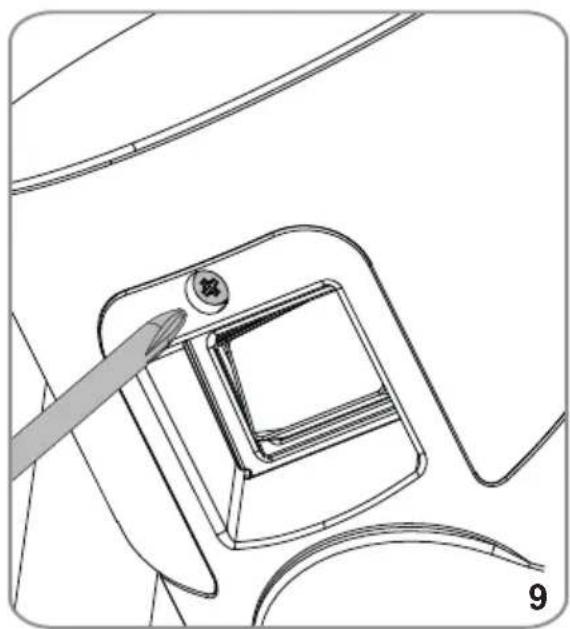
natural_image
Line drawing of a mechanical component with a tool inserted, showing a square opening and curved base (no text or symbols)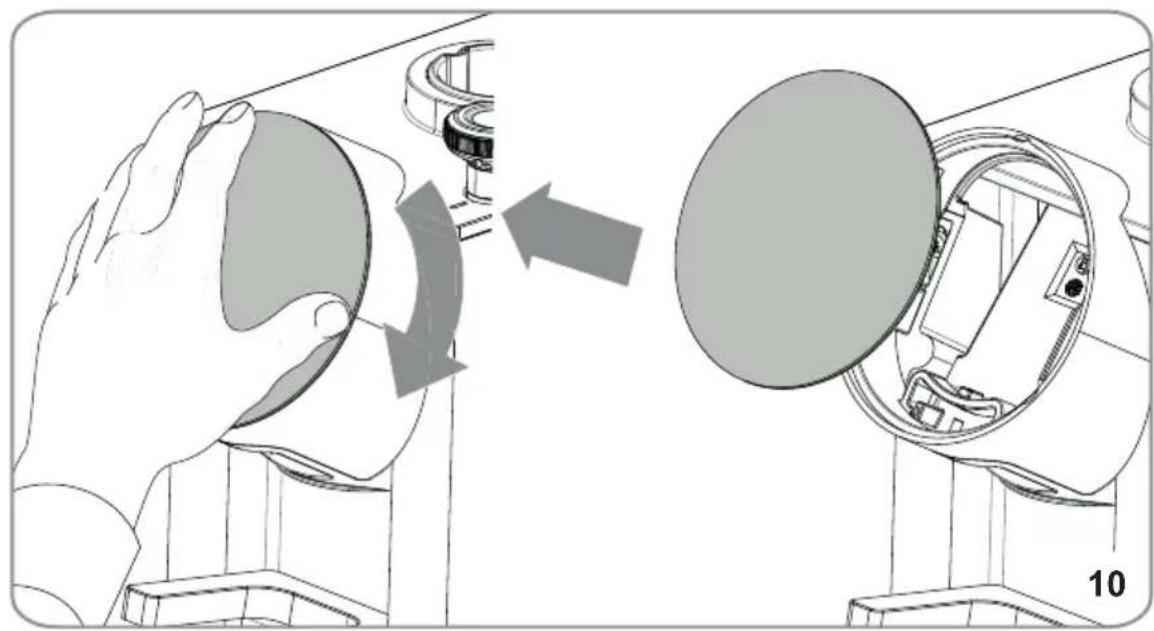
natural_image
Illustration of a hand adjusting a circular component with an arrow indicating rotation (no text or symbols present)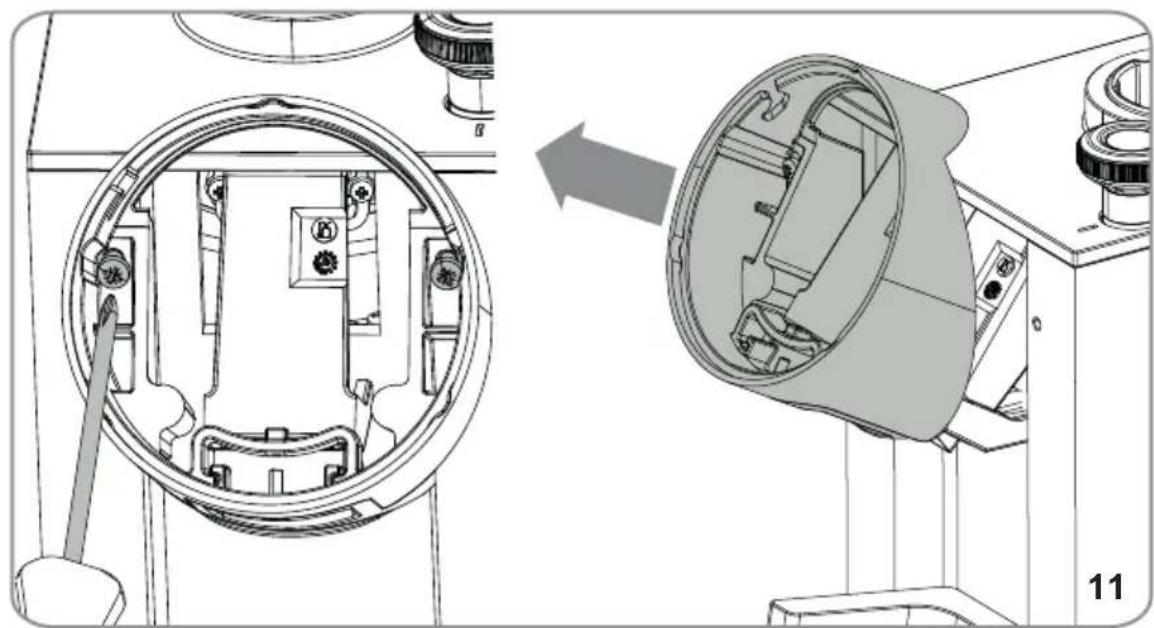
natural_image
Technical illustration of a mechanical assembly showing internal components and a close-up view of a cylindrical component (no text or symbols present)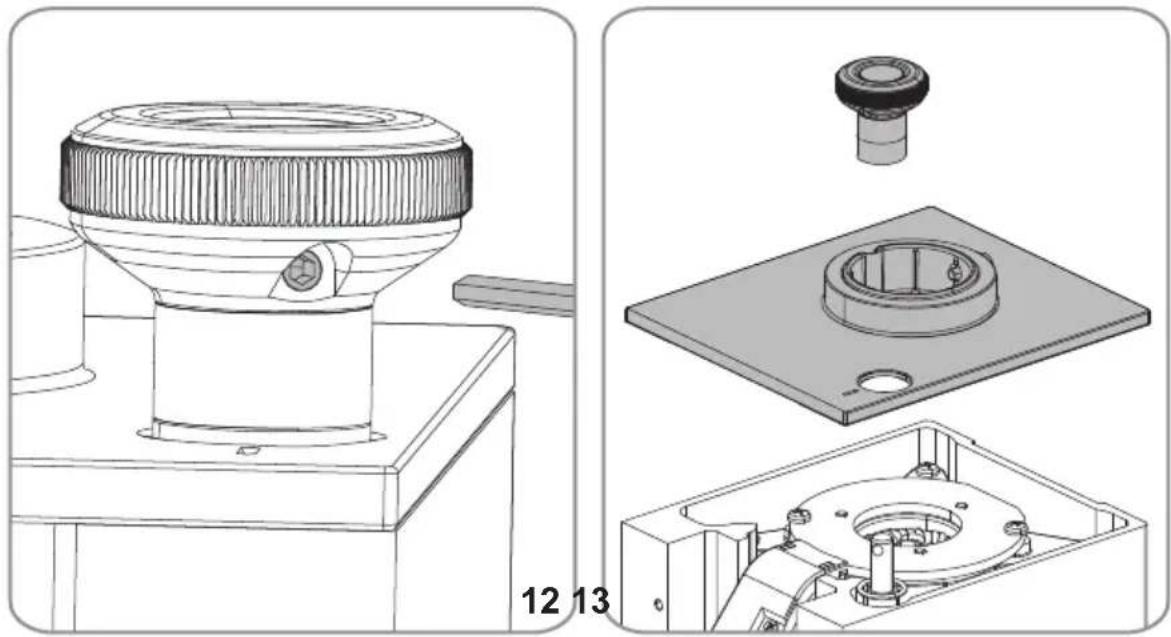
natural_image
Technical line drawing of a mechanical assembly with exploded and assembled views (no text or symbols)• ITALIANO 22
- ENGLISH 28
• DEUTSCH 34
• FRANÇAIS 40
- ESPAÑOL 46
4.4 ACCENSIONE MACCHINA
3 DESCRIPTION OF THE APPLIANCE
- Container lid
- Container for coffee beans
- Coffee bean container opening/closing tab
- Grinding adjustment knob
- Touch screen display
- Dispensing nozzle
-
Filter holder fork
-
Power switch
- Dispensing time / dose count display
- Decrease button
- Dose 1 button
- Continuous dispensing active
- Increase button
- Exit standby / hidden menu button
- Dose 2 button
4 ADJUSTMENTS AND USE
4.1 PRELIMINARY OPERATIONS
Before starting work, the machine must be set up according to the type of coffee blend (roasting level) and grinding degree.
- Insert the container for coffee beans (2)(Fig.3) positioning it with the hole aligned to the back screw and lock it by tightening the screw (Fig.4).
- Rotate the tab (3) to prevent the passage of the coffee beans (Fig.5).
- Remove the lid (1) from the container (2) and fill it with coffee beans.
- Reinsert the lid (1) rotate the tab toward the outside (3) allowing the passage of the coffee beans.
4.2 GRINDING ADJUSTMENT
To adjust the grinding degree, use the adjustment knob (4), turning it clockwise to make the powder finer or counter-clockwise to increase the grain size as indicated on the knob (Fig.6). The adjustment is without stops; it must be carried out gradually, grinding a little coffee every 2 notches at the most.

ATTENTION
If the knob is turned by one full turn with the motor stopped, the machine may stop.
4.3 FILTER-HOLDER FORK ADJUSTMENT
- With a screwdriver loosen the fixing screws of the filter holder fork (7)(Fig.7). Do not completely unscrew the screws.
- Raise or lower the fork in order to adjust it to the size of the filter holder.
- Once you have found the correct position, tighten the fork fixing screw (7).
- The fork is suitable for any type of filter holder on the market.
4.4 SWITCHING ON THE APPLIANCE
Turn the switch (8) to the on position.
When the appliance is switched on for the first time, it will be set to the mode set at the time it left the factory and, in any case, during subsequent starts, it will
always be set to the last mode before it was switched off.
4.5 OPERATION
Select the dose to be dispensed by pressing the related buttons (11) oR (15) the selected button lights up. Place the filter holder cup on the fork (7), making sure that it is precisely under the dispensing spout (6) and press the selected dose key. Dispensing ends when the time set in programming has elapsed. Then the grinding time returns to the set value and the grinder is ready for a new cycle. To activate
continuous grinding, simultaneously press the keys (11) and (15) following
symbol will appear on the display (12) 📄. Dispensing will last as long as the buttons are pressed.

ATTENTION
Automatic dispensing can be stopped before the grinding time has elapsed. During dispensing, press the button of the selected dose to stop dispensing:
- Press the button again to resume dispensing for the remaining time;
- Press and hold the dose button for a few seconds to end dispensing. The grinding time will return to the set value.
4.6 DOSE ADJUSTMENT
- Keep the dose button (11) ☐ or (15) ☑ pressed down. Then press the buttons
(10) — or (13) + to decrease or increase the dispensing time of the selected dose by 1 tenth of a second more or less. If pressed for a long time, the time is increased or decreased by however long the key is pressed.
4.7 DOSE ADJUSTMENT LOCK
Press keys (10) — and (13) + simultaneously for a few seconds to lock the dose dispensing time adjustment. On the display, the symbols inside the two buttons will darken. Press once again the area on the display previously occupied by the buttons
(10) — and (13) + to unlock the adjustment.
4.8 DOSE COUNTER DISPLAY
Press and hold the central button (14) for 5 seconds, then select one of the two counters:
- Dose 1 button (11) Access to the counter of the 1 doses.
- Dose 1 button (15) Process to the counter of the 2 doses.
Only the selected keys remain lit on the display or the numbers of the doses are shown two by two in succession. For example, if the total number of doses is 142536, the display shows 14, 25 and 36 for two seconds each. After the last pair of digits, there is a pause for a few seconds and then the sequence starts again. To exit the dose
counters, press the central button again (14)
4.9 DISPLAY BRIGHTNESS SETTINGS
Press and hold the central button (14) 🎨 for 5 seconds, then press the buttons (10) — or (13) + decrease or increase the brightness of the display. To exit the brightness settings, press the central button again (14) 🎨.
4.10 STANDBY
After 1 minute of inactivity, the display will enter standby mode. To exit standby mode,
press the central button (14); the home page will reappear on the display.
5 CLEANING AND MAINTENANCE

ATTENTION
Disconnect the appliance from the power supply before carrying out any cleaning and maintenance operations.
Do not pull the power cord or the appliance itself to disconnect the plug from the power supply socket.

ATTENTION
Cleaning and maintenance operations must be carried out by specialized personnel authorized by the manufacturer.

ATTENTION
Do not carry out makeshift or precarious repairs, much less use non-original spare parts.
5.1 CLEANING
Cleaning is a critical aspect for the correct operation of the coffee grinder. A neglected coffee grinder can have a negative impact on coffee brewing and on the accuracy of dosing and grinding. Before cleaning, make sure that the appliance is disconnected from the electrical power supply.
5.2 CLEANING THE HOPPER
Clean the inside of the hopper with a damp soapy cloth, removing the oily layer left by the coffee beans. Rinse it and dry it thoroughly. Repeat the process for the plastic lid. Do not wash in the dishwasher. Cleaning is recommended at least once a week.
5.3 CLEANING THE GRINDING SYSTEM
Remove the hopper, then clean the grinders and the other internal parts using a brush or a dry cloth. If necessary, use a vacuum cleaner or a jet of compressed air. After cleaning, put the hopper back in place.
For complete sanitation, use commercially available detergent tablets for coffee grinders.

ATTENTION
All cleaning and sanitising operations must be carried out with products approved for use with food.
5.4 MAINTENANCE
To ensure the correct operation of the appliance, check and, if necessary, replace the grinders every 500/600 kg of coffee. For the maintenance of the grinders:
- Disconnect the appliance from the mains and remove the coffee bean container.
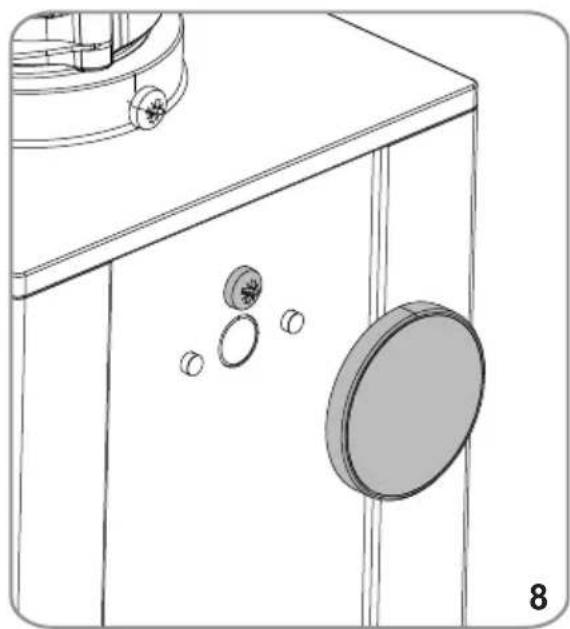
- Remove the magnetic back emblem and unscrew the underlying screw to remove the lid (Fig.8).
- Unscrew the hidden screw just above the nozzle (6) (Fig.9).
- Rotate the screen, with the whole palm of your hand, clockwise, taking care to detach the connector inside and remove the display (Fig.10).
- Unscrew the 2 locking screws so that the display housing can be removed (Fig.11).
- Unscrew the grain of the knob and remove it (Fig.12), at this point you can remove the lid (Fig.13).
Then, unscrew the underlying screws that fix the top grinder holder to the grinding chamber. To clean the grinders, use a brush or a dry cloth; if necessary use a vacuum cleaner or a jet of compressed air.

ATTENTION
Maintenance must only be carried out by specialized personnel authorized by the manufacturer.

ATTENTION
Do not carry out makeshift or precarious repairs, much less use non-original spare parts.
6 TROUBLESHOOTING
Contact specialized personnel.
1 ALLGEMEINE INFORMATIONEN
HERSTELLER:
CONTI VALERIO - Via Luigi Longo 39/41 - 50019 Sesto Fiorentino (FI) - ITALIA
MODELL: NE