
DEEBOT X8 PRO OMNI - Vacuum Cleaner ECOVACS - Free user manual and instructions
Find the device manual for free DEEBOT X8 PRO OMNI ECOVACS in PDF.

| Product Type | Robot Vacuum and Mop |
| Brand | ECOVACS |
| Model | DEEBOT X8 PRO OMNI |
| Power Supply | Docking Station: 110-120 V ~ 50-60 Hz, output 20 V 2 A |
| Charging Time | Approximately 4.5 hours |
| Battery | Built-in rechargeable lithium-ion |
| Navigation System | d-ToF Laser (range 12 m), 3D TrueDetect sensor, AIVI camera |
| Obstacle Avoidance | Infrared and ultrasonic sensors |
| Mopping Function | Roller mop with automatic fill and wash |
| Automatic Dust Emptying | Yes, with disposable dust bag (up to 2-3 months) |
| Automatic Recharging | Yes, returns to OMNI station |
| Carpet Detection | 300 kHz ultrasonic sensor, automatic mop lifting |
| Safety Sensors | Anti-drop (detection of >55 mm light floor, >30 mm dark floor steps), anti-collision |
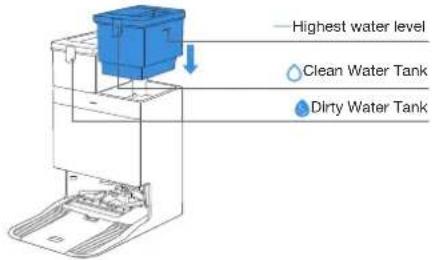
| Clean Water Tank Capacity | Yes (manual or automatic fill depending on version) |
| Dirty Water Tank Capacity | Yes |
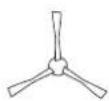
| Included Accessories | OMNI station, main brush, side brush, roller mop, filter, dust bag, manual |
| Maintenance | Main brush: every week; side brush: every 2 weeks; filter: every week; mop: every week; dust bag: every 2-3 months |
| Connectivity | Wi-Fi 2.4 GHz, Bluetooth, ECOVACS HOME app |
| Voice Control | Yes (via app or voice assistant) |
Frequently Asked Questions - DEEBOT X8 PRO OMNI ECOVACS
User questions about DEEBOT X8 PRO OMNI ECOVACS
0 question about this device. Answer the ones you know or ask your own.
Ask a new question about this device
Download the instructions for your Vacuum Cleaner in PDF format for free! Find your manual DEEBOT X8 PRO OMNI - ECOVACS and take your electronic device back in hand. On this page are published all the documents necessary for the use of your device. DEEBOT X8 PRO OMNI by ECOVACS.
USER MANUAL DEEBOT X8 PRO OMNI ECOVACS
IMPORTANT SAFETY INSTRUCTIONS
IMPORTANT SAFETY INSTRUCTIONS READ ALL INSTRUCTIONS BEFORE USING THIS APPLIANCE.
When using an electrical appliance, basic precautions should always be followed, including the following:
WARNING: Read all safety warnings and instructions.
Failure to follow the warnings and instructions may result in electric shock, fire, or serious injury.
- Do not allow to be used as a toy. Close attention is necessary when used by or near children.
- Clear the area to be cleaned. Remove power cords and small objects from the floor that could entangle the Appliance. Tuck rug fringe under the rug base, and lift items such as curtains and tablecloths off the floor.
- If there is a drop off in the cleaning area due to a step or stairs, you should operate the Appliance to ensure that it can detect the step without falling over the edge. It may become necessary to place a physical barrier at the edge to keep the unit from falling. Make sure the physical barrier is not a trip hazard.
- Only use as described in this manual. Only
use attachments recommended or sold by the manufacturer.
- Do not handle plug or appliance with wet hands.
- Non-rechargeable batteries are prohibited.
- Do not use without dust bin and/or filters in place.
- Do not operate the vacuum in an area where there are lit candles or fragile objects on the floor to be cleaned.
- Do not use and store in extremely hot or cold environments (below -5^/23^ or above 40^/104^ ). Please charge the robot in temperature above 0^/32^ and below 40^/104^ .
- Keep hair, loose clothing, fingers, and all parts of body away from any openings and moving parts.
- Do not operate the Appliance in a room where an infant or child is sleeping.
- For INDOOR use ONLY. Do not use the Appliance in outdoor, commercial or industrial environments. Do not use Appliance on wet surfaces or surfaces with standing water.
- Do not allow the Appliance to pick up large objects like stones, large pieces of paper, or any item that may clog the Appliance.
- Do not use to pick up flammable or combustible
materials such as gasoline, printer, or copier toner, or use in areas where they may be present.
- Do not pick up anything that is burning or smoking, such as cigarettes, matches, hot ashes, or anything that could cause a fire.
- Do not put any object into openings. Do not use with any opening blocked; keep free of dust, lint, hair, and anything that may reduce air flow.
- Take care not to damage the power cord. Do not pull on or carry the Appliance or Docking Station by the power cord, use the power cord as a handle, close a door on the power cord, or pull power cord around sharp edges or corners. Do not run Appliance and Docking station over the power cord. Keep power cord away from hot surfaces. Do not unplug by pulling on cord. To unplug, grasp the plug, not the cord.
- If the power cord is damaged, it must be replaced by the manufacturer or its service agent in order to avoid a hazard.
-
Do not use with a damaged power cord or plug. Do not use the Appliance or Docking Station if it is not working properly, has been dropped, damaged, left outdoors, or come in contact with water. It must be repaired by the manufacturer or its service agent in order to avoid a hazard.
-
Turn OFF the power switch before cleaning or maintaining the Appliance. Turn off all controls before unplugging. Always turn off this appliance before connecting or disconnecting motorized nozzle.
- Turn OFF the Power Switch before removing the Dust Bin.
- Remove the Appliance from the Docking Station, and turn OFF the power switch to the Appliance before removing the battery for disposal of the Appliance.
- The battery must be removed and discarded according to local laws and regulations before disposal of the Appliance.
- Please dispose of used batteries according to local laws and regulations.
- Do not incinerate the Appliance even if it is severely damaged. The batteries can explode in a fire.
- When not using the Docking Station, unplug from outlet when not in use and before servicing.
-
The Appliance must be used in accordance with the directions in this Instruction Manual.Ecovacs Home Service Robotics cannot be held liable or responsible for any damages or injuries caused by improper use.
-
Prevent unintentional starting. Ensure the switch is in the off position before connecting to battery pack, picking up or carrying the appliance.
- When battery pack is not in use, keep it away from other metal objects, like paper clips, coins, keys, nails, screws, or other small metal objects, that can make a connection from one terminal to another. Shorting the battery terminals together may cause burns or a fire.
- Under abusive conditions, liquid may be ejected from the battery; avoid contact. If contact accidentally occurs, flush with water. If liquid contacts eyes, additionally seek medical help. Liquid ejected from the battery may cause irritation or burns.
- Do not use a battery pack or appliance that is damaged or modified. Damaged or modified batteries may exhibit unpredictable behavior resulting in fire, explosion, or risk of injury.
- Do not expose a battery pack or appliance to fire or excessive temperature. Exposure to fire or temperature above 130^ C may cause explosion. The temperature of 130^ C can be replaced by the temperature of 265^ F.
- Follow all charging instructions and do not charge the battery pack or appliance outside of the
temperature range specified in the instructions. Charging improperly or at temperatures outside of the specified range may damage the battery and increase the risk of fire.
- Have servicing performed by a qualified repair person using only identical replacement parts. This will ensure that the safety of the product is maintained.
- Do not modify or attempt to repair the appliance or the battery pack (as applicable) except as indicated in the instructions for use and care.
- Place the cords from other appliances out of the area to be cleaned.
- Do not operate the vacuum in a room that has lit candles on furniture that the vacuum may accidentally hit or bump into.
- Do not allow children to sit on the vacuum.
- Use only as described in this manual. Use only manufacturer's recommended attachments.
- Recharge only with the charger specified by the manufacturer. A charger that is suitable for one type of battery pack may create a risk of fire when used with another battery pack.
-
Use appliances only with specifically designated battery packs. Use of any other battery packs may create a risk of injury and fire.
-
The robot contains batteries that are only replaceable by skilled persons. To replace the robot's battery, please contact Customer Service.
- If the robot will not be used for a long time, fully charge the robot and power OFF for storage and unplug the Docking Station.
- To Reduce The Risk Of Electric Shock – Do not use on wet surfaces. Do not expose to rain. Store indoors.
- To Reduce The Risk Of Injury From Moving Parts – Unplug Before Servicing.
- Risk Of Injury. Brush May Start Unexpectedly. Unplug Before Cleaning or Servicing.
- To reduce the risk of injury, user must read the Instruction Manual.
- To Reduce The Risk Of Electric Shock – Do not use outdoors or on wet surfaces.
- Please make sure your power supply voltage matches the power voltage marked on the Docking Station.
- Do not use the Docking Station if it is damaged.
- The plug must be removed from the receptacle before cleaning or maintaining the Docking Station.
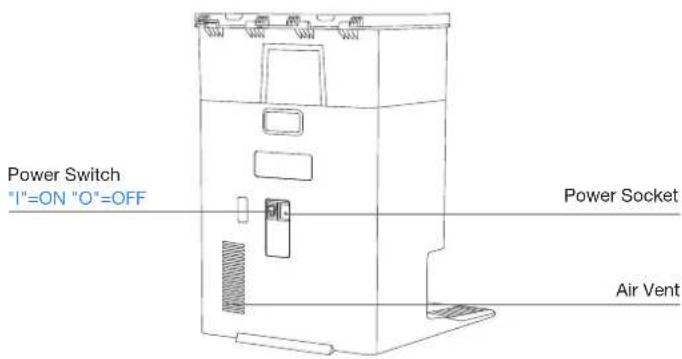
- Power Switch: "I" = ON, "O" = OFF.
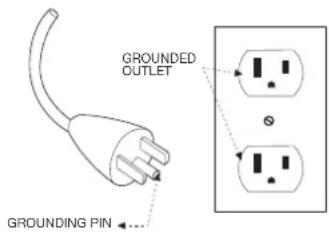
- Connect to a properly grounded outlet only. See Grounding Instructions.
| == | Direct current |
| ~ | Alternating current |
This Device Complies with DHHS Radiation Rules, 21CFR Chapter 1, Subchapter J.
Federal Communications Commission (FCC) Interference Statement
NOTE: This equipment has been tested and found to comply with the limits for a Class B digital device, pursuant to Part 15 of the FCC Rules.
These limits are designed to provide reasonable protection against harmful interference in a residential installation. This equipment generates, uses, and can radiate radio frequency energy and, if not installed and used in accordance with the instructions, may cause harmful interference to radio communications.
However, there is no guarantee that interference will not occur in a particular installation. If this equipment does cause harmful interference to radio or television reception, which can be determined by turning the equipment off and on, the user is encouraged to try to correct the interference by one or more of the following measures:
- Reorient or relocate the receiving antenna.
- Increase the separation between the equipment and receiver.
- Connect the equipment into an outlet on a circuit different from that to which the receiver is connected.
- Consult the dealer or an experienced radio/TV technician for help.
This device complies with Part 15 of the FCC Rules. Operation is subject to the following two conditions:
(1) This device may not cause harmful interference, and (2) this device must accept any interference received, including interference that may cause undesired operation.
Caution: Changes or modifications to this unit not expressly approved by the party responsible for compliance could void the user's authority to operate the equipment.
This device contains licence-exempt transmitter(s)/receiver(s) that comply with Innovation, Science and Economic Development Canada's licence-exempt RSS(s). Operation is subject to the following two conditions:
(1) This device may not cause interference.
(2) This device must accept any interference, including interference that may cause undesired operation of the device.
RF exposure warning
This equipment complies with FCC radiation exposure limits set forth for an uncontrolled environment.
This equipment must be installed and operated in accordance with provided instructions and the antenna(s) used for this transmitter must be installed to provide a separation distance of at least 20 cm from all persons and must not be collocated or operating in conjunction with any other antenna or transmitter.
MPE caution (for mobile device under Part 15.247 & 15.407 device)
To satisfy FCC & IC RF exposure requirements, a separation distance of 20 cm or moreshould be maintained between the antenna of this device and persons during device operation.
To ensure compliance, operations at closer than this distance is not recommended.
To disable the Wi-Fi module on DEEBOT, follow these steps: power on the robot, then place it on the OMNI Station, ensuring that the Charging Contacts on DEEBOT and the Station are properly connected, and press and hold the ⏻ for 30 s until you hear beeps.
To enable the Wi-Fi module on DEEBOT, please restart the robot. Additionally, unplug and plug in the Station.
SAVE THESE INSTRUCTIONS
GROUNDING INSTRUCTIONS
This appliance must be grounded. If it should malfunction or breakdown, grounding provides a path of least resistance for electric current to reduce the risk of electric shock. This appliance is equipped with a cord having an equipment-grounding conductor and grounding plug. The plug must be inserted into an appropriate outlet that is properly installed and grounded in accordance with all local codes and ordinances.
WARNING – Improper connection of the equipment-grounding conductor can result in a risk of electric shock. Check with a qualified electrician or service person if you are in doubt as to whether the outlet is properly grounded. Do not modify the plug provided with the appliance – if it will not fit the outlet, have a proper outlet installed by a qualified electrician.
This appliance is for use on a nominal 120 V circuit and has a grounding attachment plug that looks like the plug illustrated as the following photo. Make sure that the appliance is connected to an outlet having the same configuration as the plug. No adaptor should be used with this appliance.
For INDOOR household use ONLY.
This device contains licence-exempt transmitter(s)/receiver(s) that comply with Innovation, Science and Economic Development Canada's licence-exempt RSS(s). Operation is subject to the following two conditions:
(1) This device may not cause interference.
(2) This device must accept any interference, including interference that may cause undesired operation of the device.
To satisfy FCC&IC RF exposure requirements, a separation distance of 20 cm or more should be maintained between the antenna of this device and persons during device operation.
To ensure compliance, operations at closer than this distance is not recommended.
Device Update
Typically, some devices are updated bi-monthly, but not always so specific.
Some devices, especially those that went on sale more than three years ago, will only be updated if a critical vulnerability is found and fixed.
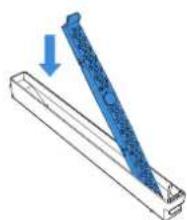
PACKAGE CONTENTS
1 PACKAGE CONTENTS
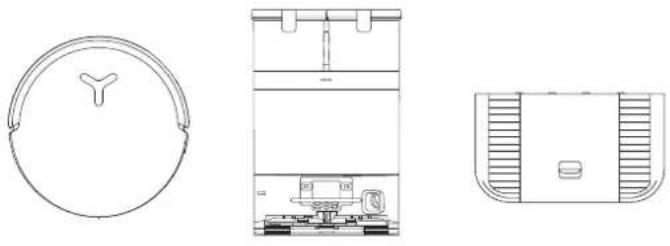
Robot OMNI Station Base
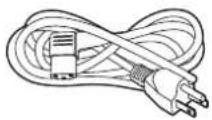
Power Cord
Instruction ManualSide Brush
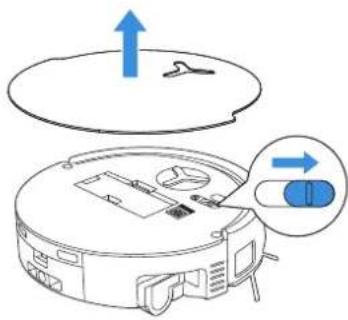
② Product Diagram
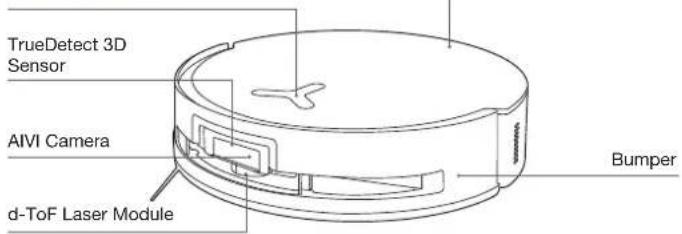
1. Robot Front View
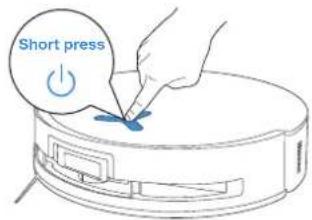
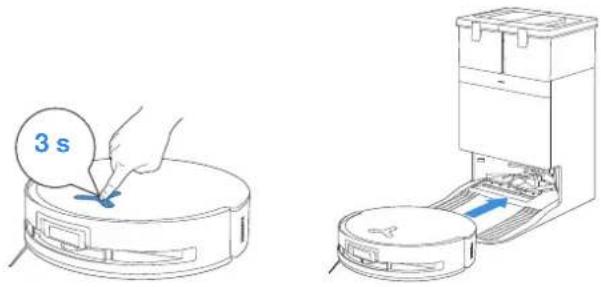
Button on the robot
Short Press: Toggle Start/Pause
Press 3 Sec: Return to station
Double tap: Release/Retract Mop
(Robot not in the station)
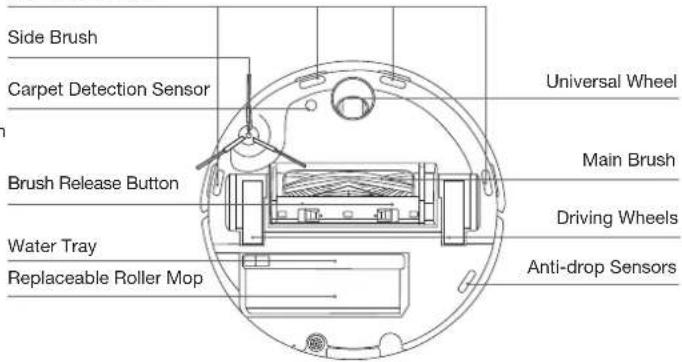
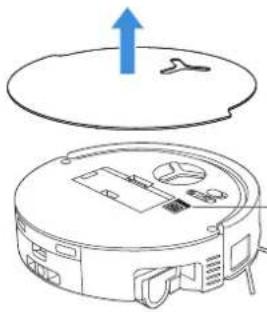
2. Robot Bottom View
Anti-drop Sensors
Note:
* Figures and illustrations are for reference only and may differ from actual product appearance. Product design and specifications are subject to changes without notice.
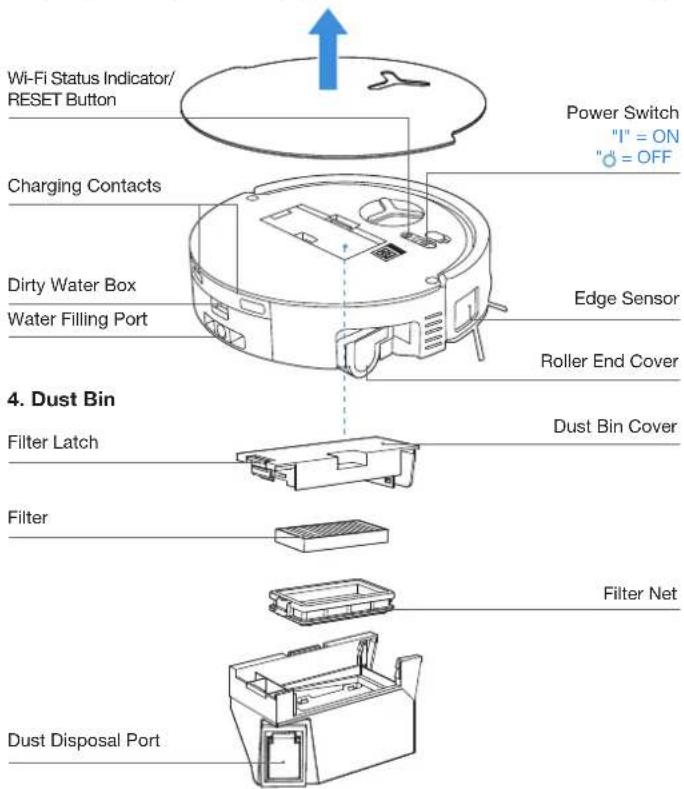
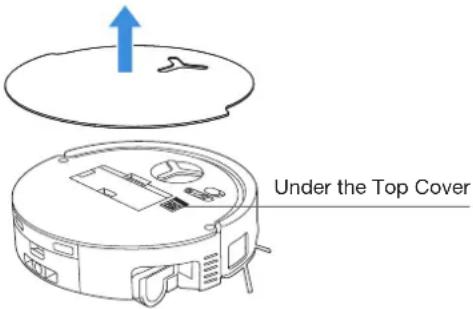
3. Internal View (Under the Cover)
RESET Button
Network Setup: Press the RESET Button and follow the voice prompt to set up the network. Restore to default settings: Long press the RESET Button for 5 seconds. After you hear the voice prompt, the startup music will be played and the robot will be restored to default settings.
5. OMNI Station Front View
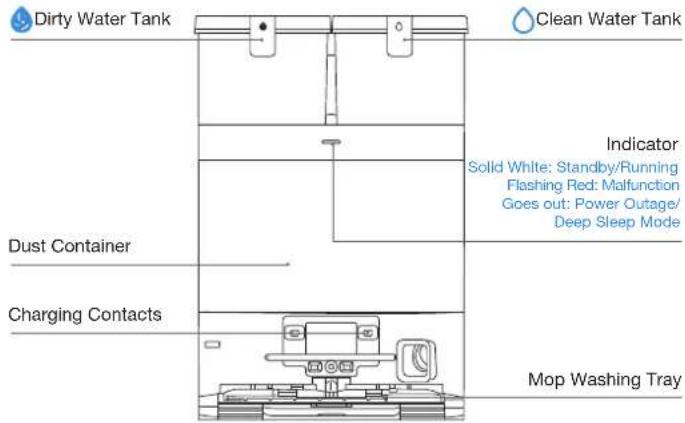
Note:
- If the Indicator flashes red, go to the ECOVACS HOME App for details about the malfunction. - If the robot cannot charge, wipe the corresponding charging contacts on the OMNI station with a dry cloth.
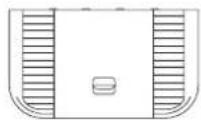
6. Dust Bag
Dust Bag Handle
natural_image
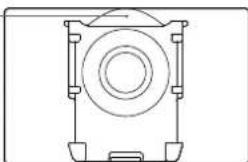
Technical line drawing of a mechanical component with no visible text or symbols- OMNI Station Back View
- Sensors
| Product Diagram Functional Description | |
| d-ToFLaser Module | Laser ranging is applied to measure the distance between the robot and surrounding objects based on the time difference of reflection, allowing the module to map against the objects around while the robot is moving. The detection range is 12 m. |
| TrueDetect 3DSensor | With infrared ranging-detection and the concept of similar triangles, the sensor emits infrared rays and receives the light from the objects ahead to calculate the distance between the object and the robot. When the sensor detects an object nearby, the robot will automatically take a turn to avoid bumping into the object. The detection range is 0.3 m. |
| Anti-drop Sensors | Infrared ranging is applied by the sensor at the bottom of the robot to measure the height between the bottom of the robot and the ground. When at the top of the stairs, for example, with a height above 55mm on white-colored ground or a height above 30mm on black-colored ground, the robot will stop advancing, fulfilling the feature of Anti-drop. |
| Carpet Detection Sensor | The ultrasound probe can emit ultrasonic waves with a frequency of 300KHZ. The energy of the ultrasonic waves can be absorbed by carpets. If the reflected energy is below the threshold, the robot will recognize the presence of a carpet. According to ECOVACS lab tests, currently, over 50 types of carpets available on the market can be identified. |
| Anti-collision Sensor | When the transmitted signal is blocked by an object, the signal receiver will not be able to receive it. With this principle, the robot will avoid obstacles when encountering them. |
| Edge Sensor | With ToF distance measurement, the robot can detect the distance between itself and objects on its right side. When there is a wall or obstacle on the right side, the robot will perform edge cleaning to avoid missing spots or collisions. |
| AIVI Camera | Use AI cameras to collect images of the surrounding environment. 'Realize video recording. Through interaction with MIC, remote video call can be realized(For some models). |
| Microphone | Human voices cause vibrations in the diaphragm of the microphone through air. As a result, the microphone utilizes the collection and algorithms of sound models to achieve sound recording and voice control of the robot to complete specific tasks. The effective wake-up distance is 5 m. |
NOTES BEFORE CLEANING
1 Warnings
natural_image
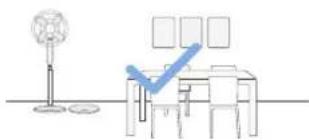
Simple line drawing of a desk with a checkmark and a stand, no text or symbols presentPrepare the Area
Tidy up the area to be cleaned by putting furniture, such as chairs, in their proper place.
natural_image
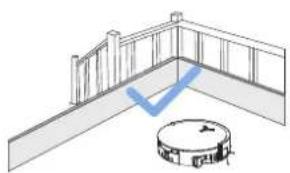
Simple line drawing of a balcony with railing and circular base (no text or symbols)Set up Protective Barriers
It may be necessary to place a physical barrier at the edge of a steep drop to stop the robot from falling over the edge.
natural_image
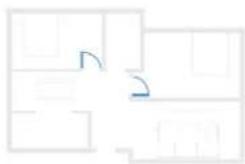
Pure architectural floor plan lines without any text, numbers, or symbolsKeep Your Doors Open
During the first use, make sure each room door is open to help the robot fully explore your house.
natural_image
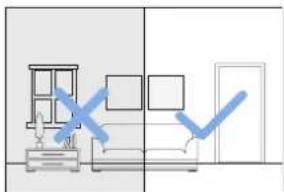
Interior view of a room with furniture and a door, showing a blue checkmark overlay (no text or symbols)Provide Sufficient Lighting
The robot can avoid shoes, sockets and cords etc., and make sure all areas to be cleaned are well illuminated, which can improve obstacle avoidance.

Put away objects including cables, cloths and slippers, etc. on the floor to improve the cleaning efficiency.
Before using the product on a rug or carpet with tasseled edges, please fold the rug and tuck the tassles under the rug.

Please do not stand in tight spaces such as doorways and hallways, and make sure not to block the robot's path when it's identifying areas.
Ensure the clarity of the robot's vision and avoid scratching or smudging the AI camera lens with fingerprints or oily stains. Use a clean, soft cloth to wipe the camera, instead of cleaning agents, detergents, or sprays.
② Quick Start
Before using, please remove all protective materials from the robot and OMNI station.
1. Installation
The sound of "Click" indicates proper installation.
2. Power Cord Connection and Station Placement
Place the station against a wall on a level, hard ground. Ensure there are no objects within 0.05 m on either side and 0.8 m in front of it.
Note:
- If there are reflective objects such as mirrors and skirting lines near the OMNI station, the bottom 14 cm of them should be covered.
- Do not place the OMNI station under direct sunlight.
- Place the Station in a location with a strong Wi-Fi signal.
③ Power ON and Charge the Robot
Turn on the power switch under the robot's cover ('I' indicates power on, and 'Indicates power off'). Place the robot in front of the station, ensuring the station is connected to a power supply. Use the ECOVACS HOME App or voice command to recall the robot to start charging at the OMNI station, or long press the robot button (for 3 seconds, and it will return to the station to charge.
Note:
• The robot can't be charged when the power is turned off.
- After the robot finishes its cleaning task, it is recommended not to power it off but to keep it charging, to better prepare for the next cleaning session.
- It is recommended that the robot start cleaning from the OMNI station. Do not move the OMNI station while cleaning.
4 Download the ECOVACS HOME App
Download the ECOVACS HOME App to enjoy more features.
You may scan the QR Code on the robot to download the App.
Or search for the ECOVACS HOME in your mobile app store to download the App.


ECOVACS HOME
Note: Follow the guide of the App to register, log in, and connect the product with the App.
5 Connect Robot with App
Via Bluetooth: Tum on the robot and mobile phone bluetooth. Allow the App to obtain mobile phone bluetooth permission. Tap to scan the QR Code on the robot or tap for Add in the App to find the nearby robot.
Via Wi-Fi: You can also choose to connect the robot with the App through other methods according to the prompts on the App's page.
Note: Please connect via bluetooth for a better experience.
Wi-Fi Network Requirements:
- You are using a 2.4GHz or 2.4/5 GHz mixed network.
- Your router supports 802.11b/g/n and IPv4 protocol.
- Do not use a VPN (Virtual Private Network) or Proxy Server.
- Do not use a hidden network.
- WPA and WPA2 using TKIP, PSK, AES/CCMP encryption.
- WEP EAP (Enterprise Authentication Protocol) is not supported.
- Use Wi-Fi channels 1-11 in North America and channels 1-13 outside North America (refer to local regulatory agency).
- If you are using a network extender/repeater, the network name (SSID) and password are the same as your primary network.
- Please enable the WPA2 on your router.
Wi-Fi Indicator Light
| White Flashing Slow Disconnected to Wi-Fi | |
| White Flashing Fast Connecting | |
| Solid White Connected to Wi-Fi |
Please note that to access smart features such as remote startup, voice interaction, 2D/3D map display and control settings, and personalized cleaning (features may vary depending on the product), you'll need to download and use the ECOVACS HOME App, which receives constant updates. You must agree to our privacy policy and user agreement before we can process some of your basic and necessary information and enable you to operate the product via the ECOVACS HOME App. Without your agreement, some of the aforementioned smart features cannot be accessed through the ECOVACS HOME App. Nevertheless, you can still use the products' basic functions for manual operation.
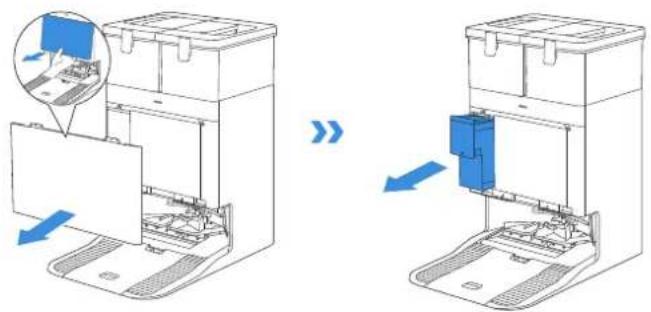
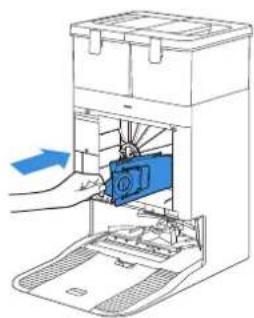
⑥ Add Cleaning Solution (sold separately)
For the Station with Solution Auto-refill Module, please follow the steps below:
- Take off the dust container cover, pull out the cleaning solution unit, and place it on a level, hard surface.
natural_image
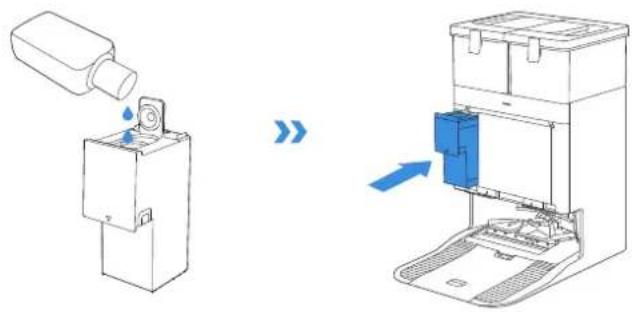
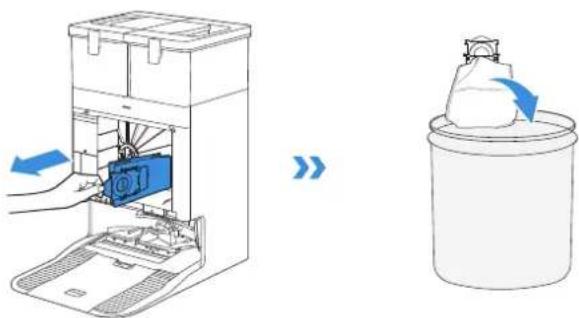
Diagram showing two views of a device with blue arrows indicating process, no text or symbols present- Unlid the cleaning solution unit and fill it with ECOVACS cleaning solution. Put the lid on and the unit back to the station.
natural_image
Diagram showing a device being processed from a bottle onto a machine, with no visible text or symbols.Note: Cleaning solution is pumped automatically from the cleaning solution unit. Do not add cleaning solution to the water tanks.
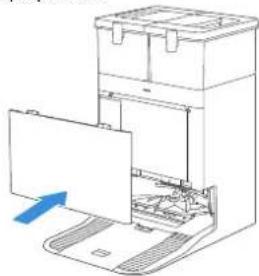
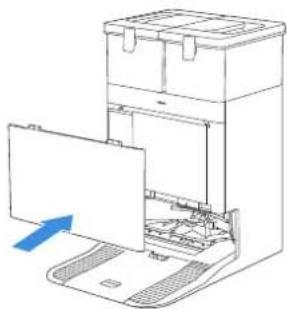
- Insert the top latch of the dust container cover into the slot, and then press downward to ensure a proper seal.
natural_image
Diagram of a computer tower with an open base and a blue arrow indicating a component (no text or symbols present)Note:
- Please use ECOVACS cleaning solution in case of malfunction.
- Please make sure that no foreign objects fall into the cleaning solution unit.
⑦ Clean Water Tank Refill and Cleaning Solution (sold separately)
For the Station without Solution Auto-refill Module, please follow the steps below:
Fill the clean water tank with water up to the maximum water level line. Then, using a 1:200 dilution ratio, pour an appropriate amount of cleaning solution into the tank with the bottle cap. Secure the tank cover, gently shake to mix, and then use.
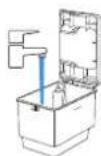
Note:
- Use a clean, dry cloth to wipe off the water on the surface of the tank before putting it in place.
- Please lock the top covers of water tanks tightly before use.
- The water drops in the Water Tank are left over from the function test, please rest assured to use.
- If the product has a solution Auto-refill feature, please follow the steps 6 to fill.
8 Start Cleaning
1. Start Mapping
Order the main the robot to start mapping by the ECOVACS HOME App or voice control.
When creating a map for the first time, please follow the robot to help eliminate some minor issues. For example, the robot may get stuck under the furniture. Please refer to the following solutions:
- Raise the low sitting furniture if possible;
2.Cover the bottom of the furniture;
- Set up virtual boundary via the App.
When mapping, the robot will explore the house environment automatically. The exploration path may be different from cleaning path.
2. Start Cleaning
- The robot's water tank is automatically refilled through the OMNI station. Manual refilling is not needed.
- When mopping, the robot will recognize floor types and is able to lift mops automatically when encountering carpets. Please do not use the robot on shaggy rugs or carpets with fibres longer than 10 mm. It is recommended to fold up the shaggy rugs with fibres longer than 10 mm during the cleaning process, or go to Map > Carpet Cleaning Strategy in the ECOVACS HOME App to set the shaggy carpeted area as a No-Entry Zone.
Before cleaning for the first time, please make sure the robot is in the OMNI station and fully charged. Tap button on the robot to start cleaning. You can also use the ECOVACS HOME App or voice control to start cleaning.
3. Pause
Tap ⏻ on the robot to pause while it is working. You can also use the ECOVACS HOME App or voice control to pause the robot.
4. Wake up
After pausing for a while, all indicator lights on the robot will go out. To wake up the robot, short press (↓) After stopping working for about 1h, the robot may enter standby mode.
5. Return to OMNI Station
Use the ECOVACS HOME App or long press the robot button (for 3 seconds to recall the robot back to the station for charging.
6. Deep Sleep Mode
The robot will enter deep sleep Mode to protect the battery if it stays outside the OMNI station for about 10h. Please switch OFF and ON to wake up the robot.

REGULAR MAINTENANCE
1 Maintenance Frequency
To ensure optimal performance, perform maintenance tasks and replace parts at the following frequencies:
| Part Maintenance Frequency | Replacement Frequency | |
| Replaceable Roller Mop Every week Every 1-2 months | ||
| Water Tray Every week / | ||
| Dirty Water Box Every week / | ||
| Solution Auto-refill Module Every month / | ||
| Dust Bag / Every 2-3 months | ||
| Side Brush Every 2 weeks Every 3-6 months | ||
| Main Brush Every week | Every 6-12 months | |
| Filter | Every week Every 3-6 months | |
| Edge SensorUniversal WheelAnti-drop SensorsBumperCharging Contacts on RobotCharging Contacts on OMNI Stationd-ToF Laser ModuleAIVI Camera | Approx. every month | / |
| Clean Water Tank | Every 3 months | / |
| Dirty Water Tank | Every month / | |
| Dust Container Inside | Every month / | |
| Body and Bottom of Station | Every month / | |
| Detachable Tray | Every 5 months | / |
Note: Explore more accessories at the ECOVACS HOME App or at https://www.ecovacs.com.

Dust Bin
- Remove the dust bin and then open its cover to empty the bin.
- Open the dust bin cover to remove the filter and filter net.
flowchart
graph TD
    A["Top-Down"] --> B["Middle-Down"]
    B --> C["Bottom-Down"]
- You can rinse the components. Afterwards, give them a good shake to remove leftover water droplets.
natural_image
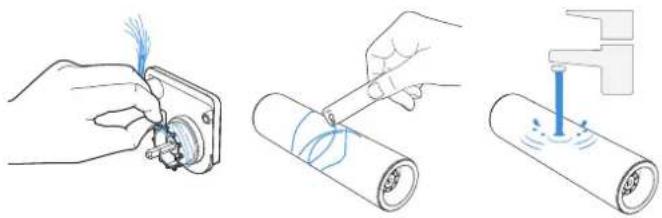
Three technical diagrams showing a mechanical assembly with blue rods inserted into a base, one with blue arrows indicating force or movement (no text or symbols present)Note:
- Please rinse the filter with water as shown above.
-
Do not use finger or brush to clean the filter.
-
Air-dry the dust bin and filter.
natural_image
Illustration of three electronic devices under a sun, no text or symbols presentNote: Completely dry the filter before use.
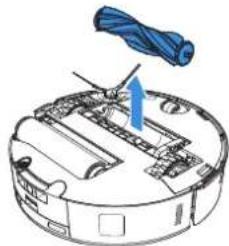
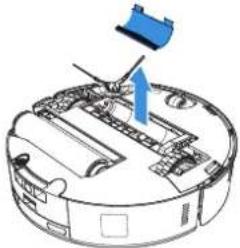
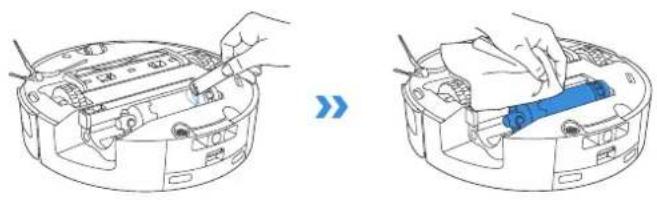
③ Maintain Main Brush and Side Brush
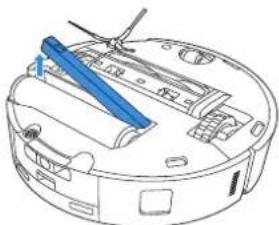
Clean the Main Brush.
- Remove the cover on the main brush.
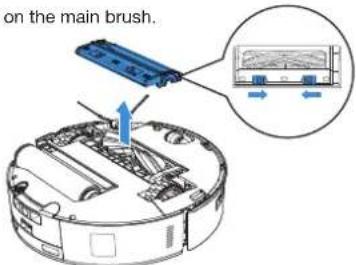
- Remove and clean the main brush.
natural_image
Diagram of a robotic arm with a blue arrow indicating the handle (no text or symbols present)
natural_image
Hand holding a pen over a rolled-up cable or wire (no text or symbols visible)- Remove and clean the main brush.
natural_image
Diagram of a robotic vacuum cleaner with blue component and arrow indicating assembly (no text or symbols)
- Install Gear, Main brush and main brush cover.
natural_image
Diagram of a robotic arm with a blue tool inserted, showing internal components and a blue arrow indicating motion (no text or symbols present)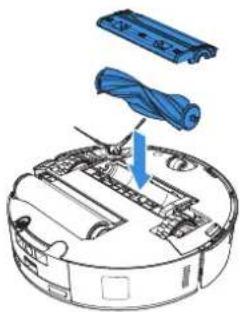
natural_image
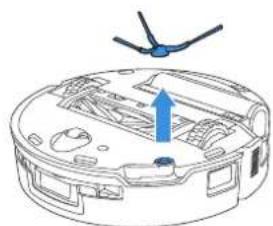
Diagram of a robotic vacuum cleaner with blue cable being inserted (no text or symbols)Clean the Side Brush.
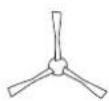
Remove and clean the side brush.
natural_image
Diagram of a robotic arm with a blue arrow indicating motion or force (no text or symbols present)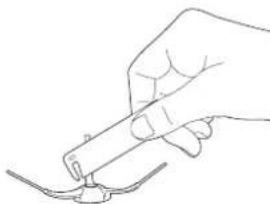
natural_image
Line drawing of a hand holding a pen or tool with a curved line below (no text or symbols)Note: Explore more accessories in the ECOVACS HOME App or at https://www.ecovacs.com.
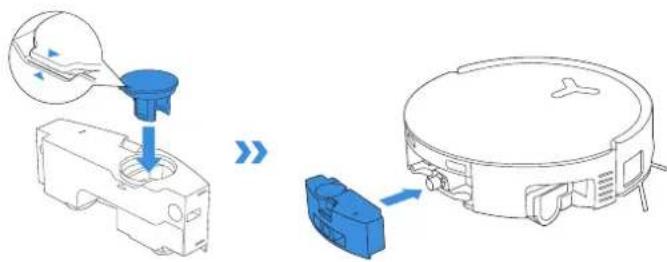
4 Roller Mop, Water Tray and Dirty Water Box.
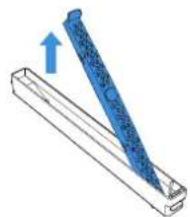
Clean the Roller Mop.
- Double click button to release roller mop component.
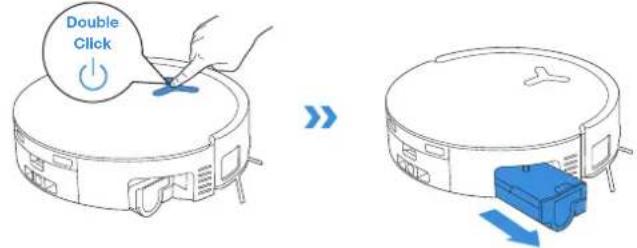
Note: Please avoid excessive force when handling the roller; it should be removed and placed with care.
- Press the latch to remove the roller mop.
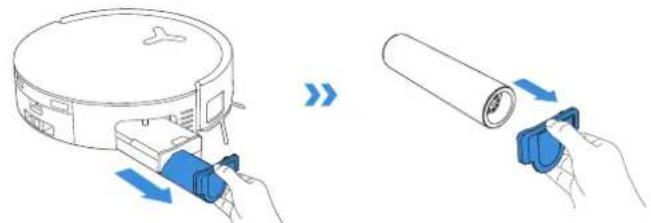
- Clean the roller mop.
natural_image
Three-step diagram showing hands using a tool to adjust a component, then applying a cable to a cylindrical device (no text or symbols present)- Clean the inside of roller mop.
natural_image
Two-step diagram showing hand operating a device in a circular housing, with no visible text or symbols.Note: Do not use water to clean the main body.
- Push roller mop into roller end cover and double click button to retract.
Clean Water Tray Clean Dirty Water Box
- Remove water tray.
natural_image
Technical line drawing of a robotic device with blue internal components and no visible text or symbolsNote: A small amount of residual water may leak out when flipping the robot if it's not in drying mode.
- Remove and clean water tray components.
natural_image
Diagram of a blue tool with a blue handle inserted into a rectangular base, showing an upward arrow (no text or symbols present)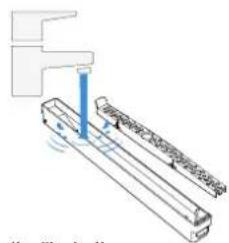
- Please install water rray components as shown in the illustration.
natural_image
Diagram of a blue tool being inserted into a rectangular block, with an arrow indicating the direction (no text or symbols present)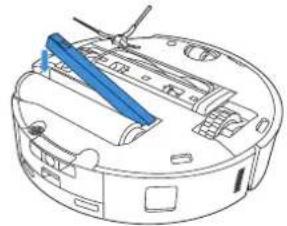
natural_image
Technical line drawing of a robotic vacuum cleaner with blue tool handle (no text or symbols)- Remove and clean dirty water box.

natural_image
Technical illustration of a vacuum cleaner assembly with blue component and mechanical parts (no text or symbols)- Press the dirty water box cover firmly in the guided direction until its plane is completely flush with the upper edge of the box to ensure a tight seal.
⑤ Maintain Other Components
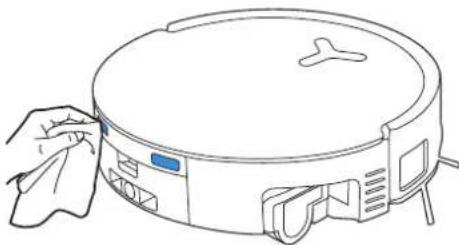
Clean the Sensor Lens

natural_image
Line drawing of a cleaning device with a hand cleaning the lid (no text or symbols)Clean the Bumper

natural_image
Line drawing of a hand cleaning a blue circular device with a cloth (no text or symbols)Note: Use a dry cloth when cleaning the anti-drop sensors and bumper to prevent water damage.
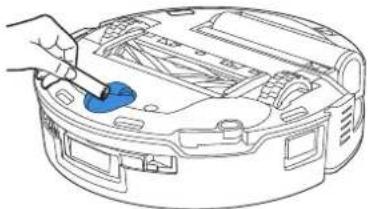
Clean d-ToF Laser Module
natural_image
Line drawing of a hand using a tool to adjust or install a circular device with a blue component (no text or symbols)Note: Rotate the module lens to the front and clean it gently with a brush when cleaning the laser module.
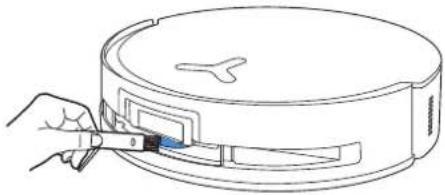
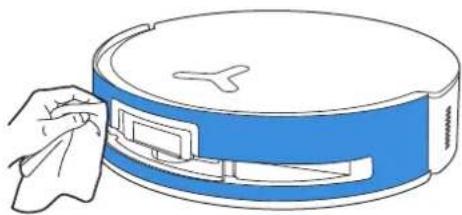
Clean Charging Contacts
natural_image
Line drawing of a robotic vacuum cleaner with a hand cleaning it (no text or symbols)Note: Wipe the contacts with a dry cloth. Avoid using a wet cloth to prevent water damage.
Clean Edge Sensor

natural_image
Line drawing of a circular device with a blue indicator light and a hand holding a paper (no text or symbols)Clean Anti-drop Sensors
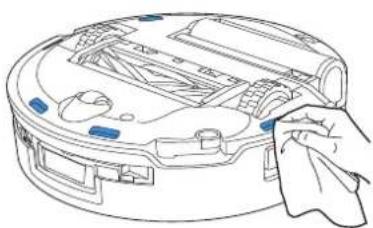
natural_image
Line drawing of a robotic vacuum cleaner with handle and control panel (no text or symbols)Clean Universal Wheel
natural_image
Line drawing of a device with a blue tool inserted into the top panel (no text or symbols)Clean Driving Wheels

natural_image
Line drawing of a robotic vacuum cleaner with blue tool applied, showing internal components and handle (no text or symbols)Note: Use a dry cloth when cleaning the charging contacts to prevent water damage.
⑥ Mop Washing Tray
- Remove and clean detachable tray and base.
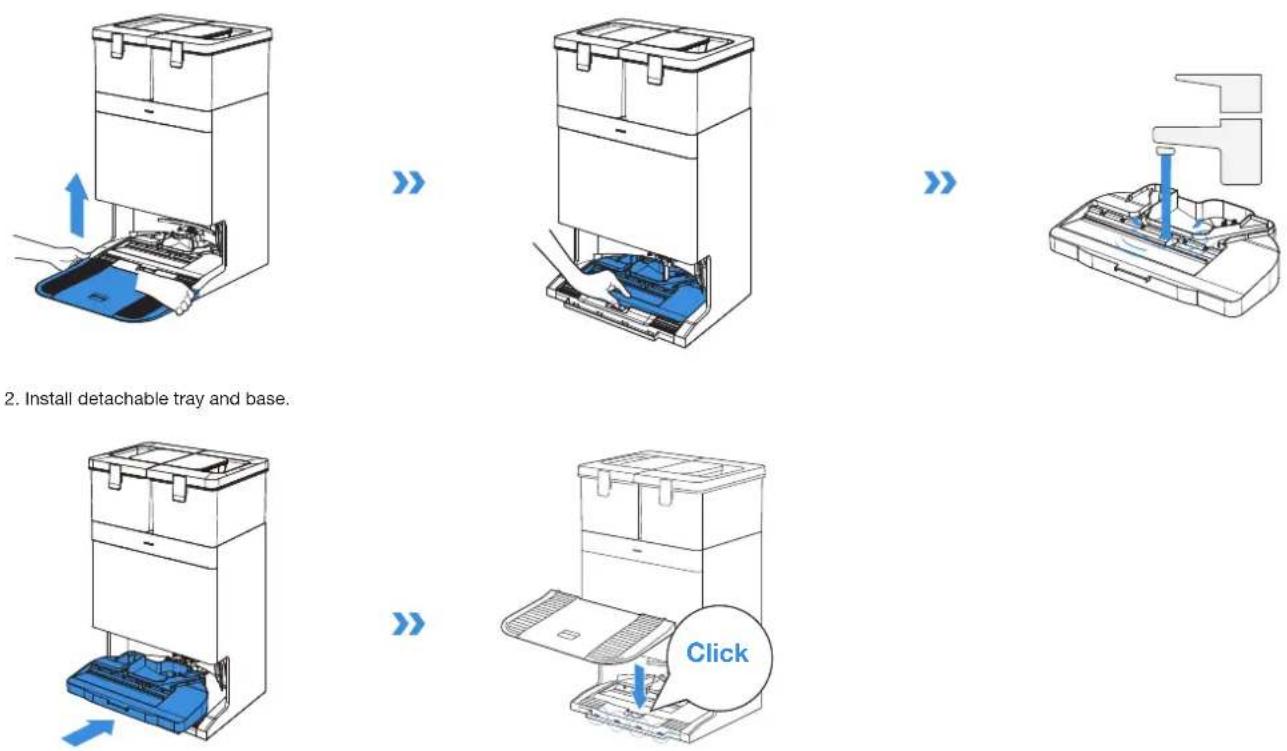
- Install detachable tray and base.
Note: Please install the detachable tray and base properly to prevent malfunction.
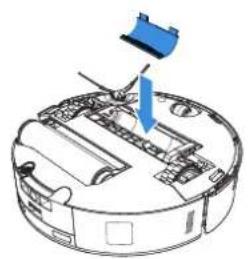
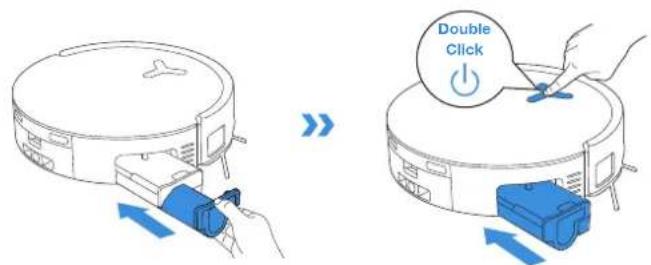
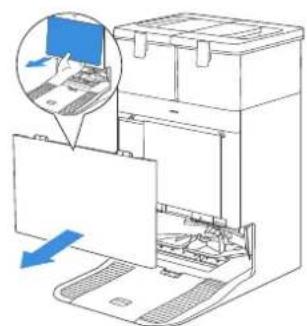
7 Dust Bag
- Remove dust container cover. 3. Clean the dust container with a dry cloth and install a new dust bin.
natural_image
Diagram of a computer setup with an open laptop and a close-up of the screen, showing internal components (no text or symbols)- Remove the disposable dust bag in the direction of the arrow and discard it.
natural_image
Diagram of a device with a blue cover and arrow indicating rotation or movement (no text or symbols present)- Insert the top latch of the dust container cover into the slot, and then press downward to ensure a proper seal.
Note: Hold the Handle to lift out the dust bag, which can effectively prevent dust leakage.
natural_image
Diagram of a computer setup with an open device and a blue arrow indicating direction (no text or symbols present)8 Storage
Please fully charge and switch OFF the robot before storage. Please recharge it every 1.5 months to prevent the battery from over-discharge.
Please note that the robot cannot charge when powered OFF.
Note:
- After the robot finishes its cleaning task, it is recommended not to power it off but to keep it charging, to better prepare for the next cleaning session.
- If the battery is over-discharged or not used for a long time, the robot may not be charged. Please contact ECOVACS for help. Do not disassemble battery by yourself.
- If you do not use the product for a long time, keep the dirty water box, water tanks empty and the mop dry.
TROUBLESHOOTING
For the following possible issue, refer to the corresponding solutions.
| No. | Malfunction Possible Cause Solution | ||
| 1 | The robot is not able to connect to the ECOVACS HOME App. | Incorrect Wi-Fi username or password entered. Enter the correct Wi-Fi username and password. | |
| The robot is not within range of your home Wi-Fi signal. | Make sure the robot is within range of your home Wi-Fi signal. Try to stay as close to the Wi-Fi signal as possible. | ||
| The robot is not in the configuration state. | Press the reset button to connect the robot to your phone by Bluetooth. If failed, please press the reset button + and to connect via the ECOVACS HOME App. | ||
| There is no home Wi-Fi on the Wi-Fi list. | 1. Check if the Wi-Fi name contains special characters. Please do not use special characters like !@#& ¥%^.2. Do not use a 5 Ghz network. | ||
| Incorrect app installed. Please download and install the ECOVACS HOME App. | |||
| 2 | Unable to create the furniture map in the App. | Move the robot when cleaning might cause the map to be lost. | During cleaning, do not move the robot. |
| Auto cleaning is not finished. | Make sure the robot automatically return to the OMNI station after cleaning. | ||
| 3 | The side brush drops out of place during use. | The side brush is not properly installed. Make sure the side brush clicks into place. | |
| 4 | No signal found. Unable to return to the OMNI station. | The OMNI station is incorrectly placed. | Please place the OMNI station correctly according to the instructions in the [Quick Start] section. |
| The OMNI station is out of power or moved. | Check whether the OMNI station is connected to the power supply. Do not move the OMNI station. | ||
| The robot does not start cleaning from the OMNI station. | It is recommended that the robot starts cleaning from the OMNI station. | ||
| The charging route is blocked. For example, the door of the room with the OMNI station is closed. | Keep the charging route clear. | ||
| 5 | The robot returns to the station before it has finished cleaning. | The room is so large that the robot needs to return to recharge. | Please enable Auto Resume. For more details, please follow the App instructions. |
| In highly complex home layouts, cleaning efficiency may decrease, possibly resulting in incomplete cleaning. | Tidy up the area to be cleaned by putting furniture and small objects in their proper place. | ||
| 6 | The robot is unable to charge. | The robot is not switched ON. Switch ON the robot. | |
| The robot's charging contacts are not connected to the OMNI station's charging contacts. | Make sure that the robot's charging contacts have connected to the station's charging contacts and (flashes. Check whether the robot's and OMNI station's charging contacts are dirty. Please clean these parts according to the instructions in the [REGULAR MAINTENANCE] section. | ||
| The OMNI station is not connected to the power supply. Make sure the OMNI station is connected to the power supply. | |||
| Base has not been installed in place. Refer to the | [Quick Start] for correct installation. | ||
| 7 | The robot is very loud during cleaning. | The main brush/side brush is tangled, or the sust bin/roller mop/filter is blocked. | It is recommended to clean the main brush, side brush, dust bin, roller mop, filter, etc. regularly. |
| The robot is in Strong or Max Mode. Switch to standard mode. | |||
| 8 | The robot gets stuck while working and stops. | The robot is tangled with objects on the floor (electrical wires, curtains, carpet fringing, etc.) | The robot will try various ways to free itself. If it is unsuccessful, manually remove the obstacles and restart. |
| The robot might be stuck under furniture with an entrance of similar height. | Please raise the furniture, set a physical barrier, or set a virtual boundary via the ECOVACS HOME App. | ||
| The robot is stuck in a narrow area. | Tidy up your home, set a physical barrier, or set a virtual boundary via the ECOVACS HOME App. | ||
| 9 | The following problems appear when the robot is working: disordered cleaning route, deviation from the cleaning route, repeated cleaning, or missing of small areas to be cleaned. (If there is a large area that has not been cleaned temporarily, the robot will automatically clean the missed area. Sometimes the robot will re-enter a cleaned room, which may not be a repeated cleaning, but the robot finding any missed area.) | Objects such as wires and slippers placed on the ground block the robot. | Before cleaning, please tidy up scattered wires, slippers, and other objects on the ground as much as possible. If there are any missed areas, the robot will clean them by itself, please do not interfere (such as moving the robot or blocking the route). |
| The off-road wheels may slip on the ground when the robot climbs steps, thresholds, and door bars, which can affect its judgement of the entire home environment. | It is recommended to close the door of the affected area and cleaning it separately. After cleaning, the robot will return to its starting location. Please feel confident in using this method. | ||
| On freshly waxed or polished floors, as well as smooth tiles, there may be less friction between the off-road wheels and the floor. | Please wait for the wax to dry before cleaning. | ||
| Due to different home environments, some areas cannot be cleaned. | Tidy up your home to ensure that the robot can enter the areas to be cleaned. | ||
| 10 | Delay in remote control. | The Wi-Fi signal is poor, causing the video loading to be slow. | Use the robot in areas with good Wi-Fi signal. |
| 11 | After returning to the OMNI station, the robot does not empty its dust bin. | The Auto-Empty function has not been turned on in the ECOVACS HOME App. | Turn on the Auto-Empty function in the ECOVACS HOME App. |
| Manually moving the robot back to the OMNI station may not trigger the Auto-Empty function. | It is recommended to allow the robot return to the OMNI station on its own. Please do not manually move it. | ||
| In Do Not Disturb mode, the robot will not empty the dust after returning back to the OMNI station. | Turn off do not disturb in the ECOVACS HOME App or manually start dust-emptying. | ||
| OMNI station detects a decrease in empty efficiency. | Replace the dust bag according to the [REGULAR MAINTENANCE] section and close the dust container. If the dust bag is not full when prompted by the App, you can put it back again. | ||
| If the above possible causes have been ruled out, components of the OMNI station may be abnormal. | Please contact customer service for assistance. | ||
| 12 | Auto-Empty unsuccessful. | OMNI Station detects a decrease in empty efficiency. | Replace the dust bag according to the [REGULAR MAINTENANCE] section and close the dust container. If the dust bag is not full when prompted by the App, you can put it back again. |
| The outlet of the dust bin is blocked by foreign objects. | Remove the dust bin and clear the foreign objects on the outlet. | ||
| 13 | The inner side of the dust container is dirty. | Fine particles pass through the dust bag and accumulate on the inner side of the dust container. | Clean the inner side of the dust container. |
| The dust bag is broken. Check and replace the dust bag. | |||
| The dust bag is not properly installed. Please install the dust bag properly. | |||
| The dust container cover is not closed. Please check if the dust container cover is closed properly. | |||
| 14 | Dust leakage occurs while the robot is working. | The outlet of the dust bin is blocked by foreign objects. | Remove the dust bin and clear the foreign objects on the outlet. |
| 15 | Roller mop can not rotate. | Roller mop is not properly installed. | Install the roller mop properly according to the [REGULAR MAINTENANCE] section. |
| Roller mop gets stuck by foreign objects. | Clean the roller mop properly according to the [REGULAR MAINTENANCE] section. | ||
| 16 | Driving wheels are stuck. | The driving wheels are entangled or stuck due to foreign objects. | Rotate and press the driving wheels to check for any wrapping or obstruction by foreign objects. If any foreign objects are found, please clean them promptly. If this issue persists, please contact customer service for assistance. |
| 17 | When mop washing tray is full of water that cannot be drained out, the voice reports that the mop washing Tray malfunction. | The dirty water tank is not properly installed. Tap down on the | dirty water tank to ensure it is properly installed. |
| The sealing plugs in the dirty water tank are not installed properly. | Make sure that the two sealing plugs are properly installed. | ||
| Mop washing tray is not properly installed. Make sure the mop | washing tray is properly installed. | ||
| Mop washing tray base gets dirty. Rinse the mop washing tray | base with clean water. | ||
| Check if the floating ball gets stuck when there is no water in the mop washing tray base. | Remove the mop washing Tray to put the floating ball back in its original place. | ||
| The OMNI station cannot drain water normally. | Put the robot into the station and double tap ⏻, if the issue persists, please contact our customer service for help. | ||
| The suction port of the mop washing tray is blocked by foreign objects. | Ensure that there is no foreign object in the suction port of the mop washing tray. | ||
| The voice prompt still exists after trying the above solutions. | Plug and unplug the OMNI station. If this issue persists, please contact customer service for assistance. | ||
| 18 | Dirty water box malfunction. | The draining mouth of dirty water box gets blocked and the draining pole can't work normally. | Remove and empty the dirty water box, and then rinse it and reinstall. If this issue persists, please contact customer service for assistance. |
Please contact our customer service for assistance if the problem persists despite the recommended solutions.
TECHNICAL SPECIFICATIONS
| Model DEX56 | |||
| Rated Input 20 V 2 A Charging Time about 4.5 h | --- | ||
| Station Model CH2453F/CH2453H | |||
| Rated Input 110-120 V | ~ 50-60 Hz Rated Output 20 V 2 A | --- | |
| Rated Input Current (Charging) 1 A Power (Emptying) | 4.5 A | ||
| Power (Hot Water Washing Mop) 12 A | |||
Output power of the wireless module is less than 100 mW.
Note: Technical and design specifications may be changed for continuous product improvement.
Explore more accessories at https://www.ecovacs.com.
natural_image
Line drawing of a robotic vacuum cleaner with an upward arrow indicating motion (no text or symbols)Please use the mobile camera to scan the QR code and obtain the user guide.
INSTRUCTIONS IMPORTANTES DE SÉCURITÉ
INSTRUCTIONS IMPORTANTES DE SÉCURITÉ
LIRE TOUTES LES INSTRUCTIONS AVANT D'UTILISER L'APPAREIL.
natural_image
Simple line drawing of a circular object with a Y-shaped cutout at the top center (no text or symbols)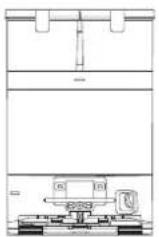
Robot Station OMNI Base
natural_image
Technical line drawing of a mechanical component with no visible text or symbolsnatural_image
Simple line drawing of a desk with a checkmark and a stand, no text or symbols presentPréparez la zone
natural_image
Simple line drawing of a balcony with railing and a circular base, no text or symbols presentnatural_image
Pure architectural floor plan lines without any text, numbers, or symbolsnatural_image
Interior view of a room with furniture and a door, showing a blue checkmark overlay (no text or symbols)Remarque :
Remarque :
natural_image
Diagram of a printer or printer with an open lid and internal circuitry, showing no text or symbols.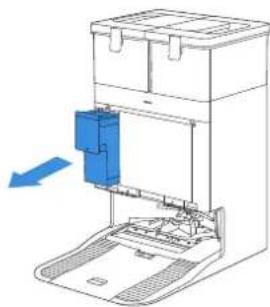
natural_image
Diagram of a laboratory device with a blue component inserted into a chamber, showing internal components and flow direction (no text or labels)natural_image
Simple line drawing of a bottle pouring liquid into a container with a droplet (no text or symbols)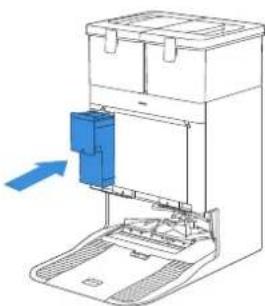
natural_image
Diagram of a device with a blue component inserted into a container, showing internal structure without any text or symbols.natural_image
Diagram of a mechanical device with internal components and an arrow indicating direction (no text or symbols)Remarque :
ENTRETIEN RÉGULIER
flowchart
graph TD
    A["Top-Down"] --> B["Middle-Down"]
    B --> C["Bottom-Down"]
natural_image
Three technical diagrams showing a mechanical assembly with blue rods inserted into a base, one with a spring, another with a spring-loaded component, and the third with a piston-like component (no text or symbols present)Remarque :
natural_image
Illustration of three household appliances under a sun, no text or symbols presentnatural_image
Diagram of a robotic vacuum cleaner with a blue tool inserted, showing internal components and a blue arrow indicating motion (no text or symbols present)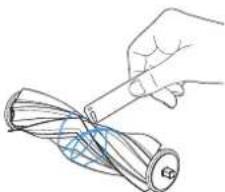
natural_image
Hand holding a pen over a rolled-up cable or wire (no text or symbols visible)natural_image
Diagram of a robotic vacuum cleaner with blue component and arrow indicating assembly (no text or symbols)
natural_image
Diagram of a robotic arm with a blue tool inserted, showing internal components and a blue arrow indicating motion (no text or symbols present)
natural_image
Diagram of a robotic vacuum cleaner with blue cable being inserted (no text or symbols)natural_image
Diagram of a robotic arm with a blue arrow indicating motion or force (no text or symbols present)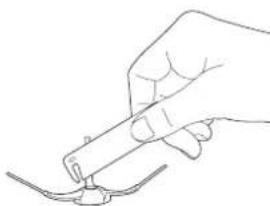
natural_image
Line drawing of a hand holding a pen or tool with a curved line below (no text or symbols)natural_image
Three-step diagram showing hands using a tool to adjust a component, rolling a cylindrical object, and adjusting a mechanical component (no text or symbols present)50FR-CA
natural_image
Illustration of a device being processed with tools, showing front and side views (no text or symbols)natural_image
Technical line drawing of a robotic vacuum cleaner with blue tool handle (no text or symbols)natural_image
3D diagram of a blue pen-like object on a rectangular base with an upward arrow, no text or symbols present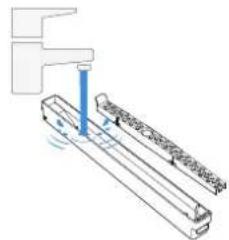
natural_image
Pure technical diagram of a mechanical assembly without any text, numbers, or symbolsnatural_image
Diagram of a blue tool being lowered into a wooden block, showing force direction (no text or symbols)
natural_image
Line drawing of a robotic vacuum cleaner with blue tool handle (no text or symbols)natural_image
Technical illustration of a robotic vacuum cleaner with blue component and mechanical assembly (no text or symbols)natural_image
Line drawing of a robotic vacuum cleaner with a hand cleaning the air (no text or symbols)natural_image
Illustration of a hand cleaning a circular device with a cloth (no text or symbols)natural_image
Line drawing of a hand using a tool to adjust or install a circular device with a blue component (no text or symbols)natural_image
Line drawing of a robotic vacuum cleaner with a cloth cleaning the air (no text or symbols)natural_image
Line drawing of a circular device with a blue indicator light and a hand holding a paper (no text or symbols)natural_image
Line drawing of a robotic vacuum cleaner with handle and control panel (no text or symbols)natural_image
Line drawing of a hand inserting a blue plastic into a device casing (no text or symbols)natural_image
Line drawing of a hand inserting a blue component into a circular device (no text or symbols)natural_image
Diagram of a computer setup with an open laptop and a close-up of a keyboard, showing no text or symbols.natural_image
Diagram of a device with a blue cover and arrow indicating rotation or movement (no text or symbols present)natural_image
Diagram of a computer setup with an open device and a blue arrow indicating direction (no text or symbols present)8 Rangement
natural_image
Line drawing of a robotic vacuum cleaner with an airplane above it (no text or symbols)natural_image
Technical line drawings of a three-view mechanical assembly: top view, front view, and side view (no text or symbols)natural_image
Line drawings of a propeller, cable, and plug (no text or symbols)natural_image
Technical line drawing of a mechanical component with no visible text or symbolsnatural_image
Simple line drawing of a desk with a checkmark and a stand, no text or symbols presentPrepare el área
natural_image
Simple line drawing of a balcony with railing and a circular object below (no text or symbols)natural_image
Abstract geometric layout with intersecting lines and shapes (no text or symbols)natural_image
Interior view of a room with furniture and a checkmark overlay (no text or symbols)Nota:
natural_image
Diagram showing two views of a device with an open lid and internal components, no text or symbols present.natural_image
Diagram showing a device being processed from a bottle into a multi-tiered container, with no visible text or symbols.natural_image
Diagram of a computer tower with an open base and internal components, showing no text or symbols.Nota:
MANTENIMIENTO REGULAR
flowchart
graph TD
    A["Top-Down"] --> B["Middle-Down"]
    B --> C["Bottom-Down"]
natural_image
Three technical line drawings showing mechanical assembly steps: top view, side view, and bottom view (no text or symbols)Nota:
natural_image
Illustration of three household appliances under a sun, no text or symbols presentNota: Seque completamente el filtro antes de usarlo.
natural_image
Diagram of a robotic arm with a blue tool inserted, showing internal components and a blue arrow indicating the direction (no text or symbols present)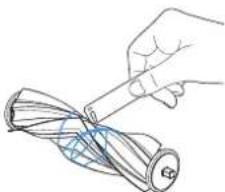
natural_image
Hand holding a pen over a rolled-up cable or cable (no text or symbols visible)natural_image
Diagram of a robotic vacuum cleaner with blue component and arrow indicating assembly (no text or symbols)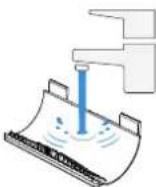
80ES-LA
natural_image
Diagram of a robotic arm with a blue tool inserted, showing internal components and a blue arrow indicating motion (no text or symbols present)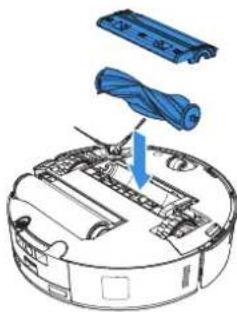
natural_image
Diagram of a robotic vacuum cleaner with blue components and a blue arrow indicating the component (no text or symbols present)natural_image
Diagram of a robotic arm with a blue arrow indicating motion or force (no text or symbols present)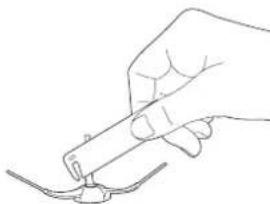
natural_image
Line drawing of a hand holding a pen or stylus above a curved line (no text or symbols)natural_image
Illustration showing a robotic vacuum cleaner being processed with blue components, alongside a rolled-up cylindrical device (no text or symbols)natural_image
Three-step diagram showing hands using a tool to adjust a component, rolling a cylindrical object, and adjusting a vertical tube (no text or symbols present)natural_image
Two-step diagram showing a hand inserting a component into a device, with no visible text or symbols.natural_image
Line drawing of a robotic vacuum cleaner with blue tool handle (no text or symbols)natural_image
Illustration of a blue pen inserted into a rectangular container with an upward arrow (no text or symbols)
natural_image
Pure mechanical diagram showing a lever and shaft assembly without any text, numbers, or symbolsnatural_image
Diagram of a blue-handled tool or plunger with a downward arrow indicating compression (no text or symbols present)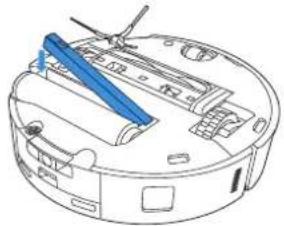
natural_image
Technical line drawing of a robotic vacuum cleaner with blue tool handle (no text or symbols)82ES-LA
natural_image
Technical illustration of a robotic vacuum cleaner with blue component and mechanical assembly (no text or symbols)natural_image
Line drawing of a robotic vacuum cleaner with a hand cleaning the air (no text or symbols)Limpie el parachoques
natural_image
Illustration of a hand cleaning a circular device with a cloth (no text or symbols)natural_image
Line drawing of a hand using a tool to adjust or install a circular device with a blue component (no text or symbols)natural_image
Line drawing of a robotic vacuum cleaner with a cloth cleaning the air (no text or symbols)natural_image
Line drawing of a circular device with a blue indicator light and a hand holding a paper (no text or symbols)natural_image
Line drawing of a robotic vacuum cleaner with handle and control panel (no text or symbols)natural_image
Line drawing of a device with a blue tool inserted into the top panel (no text or symbols)natural_image
Line drawing of a robotic vacuum cleaner with blue tool applied, showing internal components and handle (no text or symbols)natural_image
Diagram of a computer setup with an open laptop and a close-up of a keyboard, showing no text or symbols.natural_image
Diagram showing a device being processed with blue arrows, next to a labeled container (no text or symbols present)natural_image
Diagram of a device with a blue internal component and an arrow indicating rotation (no text or symbols present)natural_image
Diagram of a device with an open lid and internal components, showing no text or symbols.8 Almacenamiento
natural_image
Line drawing of a circular vacuum cleaner with control panel and ventilation slots (no text or symbols)No.518 Songwei Road, Wusongjiang Industry Park, Guoxiang Street,
Wuzhong District, Suzhou, Jiangsu, China.
451-2417-0614

- IMPORTANT SAFETY INSTRUCTIONS
- IMPORTANT SAFETY INSTRUCTIONS READ ALL INSTRUCTIONS BEFORE USING THIS APPLIANCE.
- Federal Communications Commission (FCC) Interference Statement
- RF exposure warning
- SAVE THESE INSTRUCTIONS
- GROUNDING INSTRUCTIONS
- Device Update
- PACKAGE CONTENTS
- PACKAGE CONTENTS
- ② Product Diagram
- Robot Front View
- Robot Bottom View
- Internal View (Under the Cover)
- OMNI Station Front View
- Dust Bag
- NOTES BEFORE CLEANING
- Warnings
- Prepare the Area
- Set up Protective Barriers
- Keep Your Doors Open
- Provide Sufficient Lighting
- ② Quick Start
- Installation
- Power Cord Connection and Station Placement
- Note:
- ③ Power ON and Charge the Robot
- Download the ECOVACS HOME App
- Download the ECOVACS HOME App to enjoy more features.
- Connect Robot with App
- Wi-Fi Network Requirements:
- ⑥ Add Cleaning Solution (sold separately)
- ⑦ Clean Water Tank Refill and Cleaning Solution (sold separately)
- Start Cleaning
- Start Mapping
- Start Cleaning
- Pause
- Wake up
- Return to OMNI Station
- Deep Sleep Mode
- REGULAR MAINTENANCE
- Maintenance Frequency
- Dust Bin
- ③ Maintain Main Brush and Side Brush
- Clean the Main Brush.
- Clean the Side Brush.
- Roller Mop, Water Tray and Dirty Water Box.
- Clean the Roller Mop.
- Clean Water Tray Clean Dirty Water Box
- ⑤ Maintain Other Components
- Clean Edge Sensor
- Clean Anti-drop Sensors
- Clean Universal Wheel
- Clean Driving Wheels
- ⑥ Mop Washing Tray
- Dust Bag
- Storage
- Please note that the robot cannot charge when powered OFF.
- TROUBLESHOOTING
- INSTRUCTIONS IMPORTANTES DE SÉCURITÉ
- LIRE TOUTES LES INSTRUCTIONS AVANT D'UTILISER L'APPAREIL.
- Préparez la zone
- Remarque :
- ENTRETIEN RÉGULIER
- Rangement
- Prepare el área
- Nota:
- MANTENIMIENTO REGULAR
- Almacenamiento
Brand : ECOVACS
Model : DEEBOT X8 PRO OMNI
Category : Vacuum Cleaner