Live290 - Loudspeaker Fenton - Free user manual and instructions
Find the device manual for free Live290 Fenton in PDF.


| Product type | Portable speaker |
| Brand | Fenton |
| Model | Live290 |
| Mains power | 220-240 V~, 50 Hz |
| Built-in battery | Rechargeable (lead-acid), recharge every 3 months if unused |
| Wireless connectivity | Bluetooth, 10 m range without obstacles |
| Audio inputs | AUX IN (3.5 mm), Microphone (6.35 mm) |
| Playback media | USB, Micro SD card (max 64 GB), Bluetooth |
| Functions | MP3 playback, wireless microphone, adjustable echo, equalizer, repeat, festive lighting |
| Stereo pairing (TWS) | Wireless connection between two Live290 speakers |
| Controls | On/off, mode, volume, play/pause, tracks, mute, TWS link, lighting |
| Operating temperature | 5 °C to 35 °C (indoor) |
| Maintenance | Clean with a dry cloth, no chemicals |
| Safety | Do not open, avoid moisture, unplug during storms |
| Spare parts | Use original parts for repairs |
| Warranty | See manual, warranty void if modified or improperly used |
Frequently Asked Questions - Live290 Fenton
User questions about Live290 Fenton
0 question about this device. Answer the ones you know or ask your own.
Ask a new question about this device
Download the instructions for your Loudspeaker in PDF format for free! Find your manual Live290 - Fenton and take your electronic device back in hand. On this page are published all the documents necessary for the use of your device. Live290 by Fenton.
USER MANUAL Live290 Fenton
natural_image
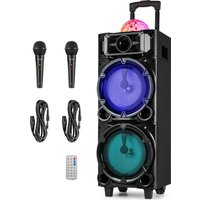
Black portable electronic device with two large blue-lit speaker units and two black-and-white microphones, accompanied by three cables (no visible text or symbols)INSTRUCTION MANUAL GEBRUIKSAANWIJZING BEDIENUNGSANLEITUNG MANUAL DE INSTRUCCIONES MANUEL D'INSTRUCTIONS INSTRUKCJA OBSŁUGI NÁVOD K POUŽITÍ
V1.2
ENGLISH
Congratulations to the purchase of this Fenton product. Please read this manual thoroughly prior to using the unit in order to benefit fully from all features.
Read the manual prior to using the unit. Follow the instructions in order not to invalidate the warranty. Take all precautions to avoid fire and/or electrical shock. Repairs must only be carried out by a qualified technician in order to avoid electrical shock. Keep the manual for future reference.
- Prior to using the unit, please ask advice from a specialist. When the unit is switched on for the first time, some smell may occur. This is normal and will disappear after a while.
- The unit contains voltage carrying parts. Therefore do NOT open the housing.
- Do not place metal objects or pour liquids into the unit This may cause electrical shock and malfunction.
- Do not place the unit near heat sources such as radiators, etc. Do not place the unit on a vibrating surface. Do not cover the ventilation holes.
- The unit is not suitable for continuous use.
- Be careful with the mains lead and do not damage it. A faulty or damaged mains lead can cause electrical shock and malfunction.
- When unplugging the unit from a mains outlet, always pull the plug, never the lead.
- Do not plug or unplug the unit with wet hands.
- If the plug and/or the mains lead are damaged, they need to be replaced by a qualified technician.
- If the unit is damaged to such an extent that internal parts are visible, do NOT plug the unit into a mains outlet and DO NOT switch the unit on. Contact your dealer. Do NOT connect the unit to a rheostat or dimmer.
- To avoid fire and shock hazard, do not expose the unit to rain and moisture.
- All repairs should be carried out by a qualified technician only.
- Connect the unit to an earthed mains outlet (220-240Vac/50Hz) protected by a 10-16A fuse.
- During a thunderstorm or if the unit will not be used for a longer period of time, unplug it from the mains. The rule is: Unplug it from the mains when not in use.
- If the unit has not been used for a longer period of time, condensation may occur. Let the unit reach room temperature before you switch it on. Never use the unit in humid rooms or outdoors.
-
To prevent accidents in companies, you must follow the applicable guide lines and follow the instructions.
-
Do not repeatedly switch the fixture on and off. This shortens the life time.
- Keep the unit out of the reach of children. Do not leave the unit unattended.
- Do not use cleaning sprays to clean switches. The residues of these sprays cause deposits of dust and grease. In case of malfunction, always seek advice from a specialist.
- Do not force the controls.
- This unit is with speaker inside which can cause magnetic field. Keep this unit at least 60cm away from computer or TV.
- If this product have a built-in lead-acid rechargeable battery. Please recharge the battery every 3 months if you are not going to use the product for a long period of time. Otherwise the battery may be permanently damaged.
- If the battery is damaged please replace with same specifications battery. And dispose the damaged battery environment friendly.
- If the unit has fallen, always have it checked by a qualified technician before you switch the unit on again.
- Do not use chemicals to clean the unit. They damage the varnish. Only clean the unit with a dry cloth.
- Keep away from electronic equipment that may cause interference.
- Only use original spares for repairs, otherwise serious damage and/or dangerous radiation may occur.
- Switch the unit off prior to unplugging it from the mains and/or other equipment. Unplug all leads and cables prior to moving the unit.
- Make sure that the mains lead cannot be damaged when people walk on it. Check the mains lead before every use for damages and faults!
- The mains voltage is 220-240Vac/50Hz. Check if power outlet match. If you travel, make sure that the mains voltage of the country is suitable for this unit.
- Keep the original packing material so that you can transport the unit in safe conditions

This mark attracts the attention of the user to high voltages that are present inside the housing and that are of sufficient magnitude to cause a shock hazard.

This mark attracts the attention of the user to important instructions that are contained in the manual and that he should read and adhere to.
The unit has been certified CE. It is prohibited to make any changes to the unit. They would invalidate the CE certificate and their guarantee!
NOTE: To make sure that the unit will function normally, it must be used in rooms with a temperature between 5^ C/41°F and 35^ C/95°F.

Electric products must not be put into household waste. Please bring them to a recycling centre. Ask your local authorities or your dealer about the way to proceed. The specifications are typical. The actual values can slightly change from one unit to the other. Specifications can be changed without prior notice.
Do not attempt to make any repairs yourself. This would invalid your warranty. Do not make any changes to the unit. This would also invalid your warranty. The warranty is not applicable in case of accidents or damages caused by inappropriate use or disrespect of the warnings contained in this manual. Fenton cannot be held responsible for personal injuries cauy a disrespect of the safety recommendations and warnings. This is also applicable to all damages in whatever form.
UNPACKING INSTRUCTION
CAUTION! Carefully unpack the box upon receipt. Check the contents to ensure that all parts are present and have been received in good condition. Notify the shipper immediately and retain packaging material if any parts appear damaged from shipping or the package itself shows signs of mishandling. Save the package and all packaging materials. If the product must be returned, it is important that the product is returned in the original factory box and packaging. If the device has been exposed to drastic temperature fluctuation (e.g. after transportation), do not switch it on immediately. The arising condensation water might damage your device. Leave the device switched off until it has reached room temperature.
POWERSUPPLY
The label on the back/under side of the product indicates the mains voltage to which it must be connected. Check that the mains voltage corresponds to this. Any other voltage than the one indicated may cause irreparable damage to the unit. The unit must also be connected directly to the mains voltage and no dimmer or adjustable power supply may be used.

Always connect the device to a protected circuit (circuit breaker or fuse). Make sure the device has an appropriate electrical ground to avoid the risk of electrocution or fire.
CONTROLS AND CONNECTIONS
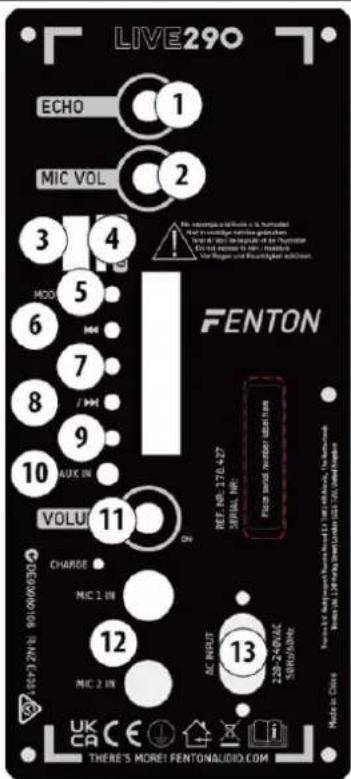
- Echo
Press to adjust the echo level - Mic Vol
Press to adjust the microphone level - USB
Slot to insert USB - Micro
Slot to insert Micro SD - Mode/Light
Press to change to a different mode. (BT/AUX IN)
Press and hold to turn party light on/off - Press for previous track in BT/USB/TF mode
- ▶ II /Link
Press to play or pause in BT/USB/TF mode
Press and hold to initiate stereo pair (link) function. (in BT mode) - ▶▶▶
Press for next track in BT/USB/TF mode - Rec
Press to start/stop recording - Aux in
3.5mm auxiliary line input jack - Power/Volume
Rotate this knob for power on/off the device and adjust the volume - Mic in
6.3mm microphone jack to insert microphone - AC input
Connector for inserting the supplied power adapter to charge battery or to use mains power to power the device
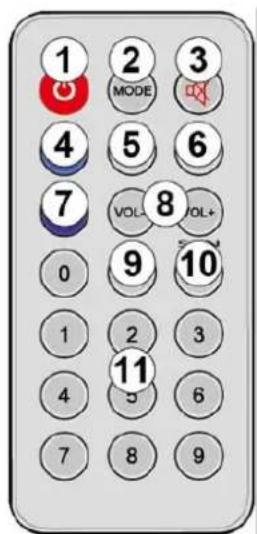
REMOTE CONTROL
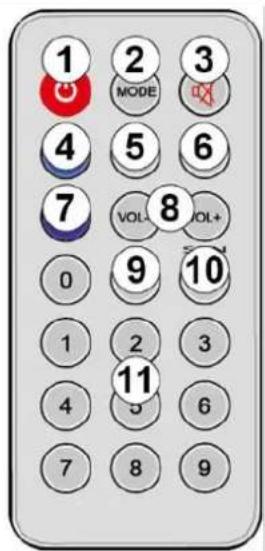
- ⏻
Press to turn the power on/off - MODE
Press to change between different modes. (BT/AUX-IN) Press and hold to turn the light off - Press to (un)mute the volume
- ▶ II
Press for Play/Pause - Press for previous track
- ▶▶▶
Press for next track - EQ
Press to change for a different present equalizer - VOL-/+
Press to increase/decrease the volume - RPT (Repeat)
Press to repeat the track - Switch between USB/SD
- Num pad
Numbers keypad selection
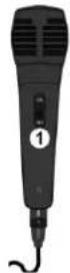
1- Plug the 6.35 mm jack in MIC input 6.35 of the device.
2- Turn on the microphone by switching the ON/OFF button, on ON.
3- Use the button mic volume to adjust mic volume and button echo to adjust echo.
4- After use, turn off the microphone by setting the switch to OFF.
Notes:
- For optimal use, use the microphone at a distance of 5 to 10 cm from the mouth.
- Move the microphone away from the speakers.
- Do not store the microphone at high temperatures or in a humid environment.
LINK/STEREO (TWS) PAIRING FUNCTION
When having two "Fenton Live290" speaker systems, it's possible to initiate a link (pairing) between the two. Both portable systems will be emitting the same signal from the streaming audio function. To set up this stereo pairing, please follow the below steps:
- Turn on the power on both "Fenton Live290" speaker systems.
- Change the operating mode to BT streaming on both "Fenton Live290" speaker systems.
- Press [LINK] on any speaker to pair with another speaker to connect. The speaker will give a sound when connection is completed.
- Press and hold [LINK] to disconnect.
The optimal connection distance is about 5 meters.
When re-pairing after shutdown or power down of both speaker systems, the pairing will be “remembered”. When setting both speaker systems to BT streaming mode, they will automatically pair after about 5 seconds.
BT CONNECTION
- Activate the BT on your device (Mobile phone, tablet etc.) from which you want to play the music.
- See the operating instructions for that device.
- Press the [Mode] button and activate the BT-function.
- Select "Fenton Live290" on your BT device and pair.
Attention: BT distance is approx. 10 meter without any barrier.
AUX IN
AUX IN mode plays audio from an external source such as MP3 players. To avoid sudden loud volume, turn the volume down on both this device and, if adjustable, the source device.
To enter AUX IN mode, press [Mode] to activate AUX IN. Adjust the volume of this device (and, if necessary, the audio source device) as required.
USB/MICRO-SD(TF)/U DISK
For playing MP3 music, insert the USB stick/TF card or U disk in the correct slot. The device will start playing. Press [◀◀] or [▶▶] for next/previous track, press and hold to fast forward or rewind. Press [▶▶] to start/resume or pause play.
NOTE: USE A USB STICK OR TF CARD WITH A MAXIMUM OF 64GB.
NEDERLANDS
AFSTANDSBEDIENING
- ⏻
-
Switch between USB/SD
-
Num pad
TÉLÉCOMMANDE
DÁLKOVÉ OVLÁDÁNÍ
- ⏻
7602KR Almelo, The Netherlands
2014/35/EU
2014/30/EU
2011/65/EC
2014/53/EU

United Kingdom
Tronios Ltd.
130 Harley Street,
London W1G 7JU, United Kingdom
S.I. 2016:1101
S.I. 2016:1091
S.I. 2012:3032
S.I. 2017:1206

Specifications and design are subject to change without prior notice.
www.tronios.com
Copyright © 2024 by Tronios The Netherlands


Brand : Fenton
Model : Live290
Category : Loudspeaker