
Realimove CC4000W - Video camera AGFAPHOTO - Free user manual and instructions
Find the device manual for free Realimove CC4000W AGFAPHOTO in PDF.

| Product Type | Compact video camera |
| Brand | AgfaPhoto |
| Model | Realimove CC4000W |
| Dimensions (L x W x H) | 135 x 63 x 67 mm |
| Weight (battery included) | Approximately 400 g |
| Power | Rechargeable lithium-polymer battery 3.8V, 3400mAh, 12.92Wh |
| Image Sensor | Sony CMOS |
| Maximum Video Resolution | 4K (30 fps) |
| Maximum Photo Resolution | 56 M (JPG) |
| Digital Zoom | x 18 |
| Screen | IPS 3 inches |
| Storage | Micro-SD/SDHC card up to 128GB (Class 10 or faster) |
| Water and Dust Resistance | IPX8 (1 hour, 5m) and IP6X |
| Connectivity | USB, HDMI |
| Main Functions | Continuous video recording, photo, loop recording, motion detection, time lapse, playback, zoom |
| Maintenance and Cleaning | Wipe the protective glass with a cleaning cloth; store the device in its case |
| Safety | Do not open the housing; do not expose to excessive heat; use between -10°C and 40°C |
| Spare Parts and Repairability | Removable battery; no user-repairable internal parts |
| General Information | 2-year limited warranty; after-sales service: aftersales@agfaphoto-gtc.com |
Frequently Asked Questions - Realimove CC4000W AGFAPHOTO
User questions about Realimove CC4000W AGFAPHOTO
0 question about this device. Answer the ones you know or ask your own.
Ask a new question about this device
Download the instructions for your Video camera in PDF format for free! Find your manual Realimove CC4000W - AGFAPHOTO and take your electronic device back in hand. On this page are published all the documents necessary for the use of your device. Realimove CC4000W by AGFAPHOTO.
USER MANUAL Realimove CC4000W AGFAPHOTO
Camcorder
Realimove CC4000W
User Manual
• To prevent shock, do not open the casing. No user serviceable parts inside. Servicing must be performed by a qualified technician.
- Do not expose the lens directly to the sun. This can cause sensor damage, as well as malfunctioning of internal circuitry. There is also a risk of fire or electric shock.
CAUTION
- Carrying or holding this unit by the LCD monitor increases risk of dropping the unit and/or malfunction.
- Do not use a tripod on unsteady or unlevel surfaces. It could tip over causing serious damage to the unit
- Connecting cables (HDMI etc.) to this unit and leaving it on top of the TV is not recommended, as tripping on the cables will cause this unit
to fall, resulting in damage.
- While battery is installed, the camcorder should not be exposed to excessive heat, e.g from direct sunlight or fire.
- The unit contains a lithium-ion battery. When discarding the battery, environmental problems must be considered and the local rules or laws governing the disposal of these batteries must be followed strictly
Make a backup of important recorded Data
It is recommended to copy your important recorded data to other memory cards or a PC.
BATTERY
The lithium battery is rechargeable and removeable. Please read the following advice before use.
To avoid hazards:
• do not modify or disassemble.
- do not expose this unit to temperatures exceeding 60°C, as this may cause the battery to overheat, explode or catch fire.
To prevent damage and prolong service life
do not subject to unnecessary shock.
- charge within the temperature range of 10°C to 35°C; otherwise longer charging times or charging malfunction can occur.
- store in a cool, dry place. Extended exposure to high temperature will shorten service life.
• do not drop intentionally or subject to strong impact.
MICRO SD CARD STORAGE
Be sure to follow the guidelines below to prevent corruption or damage to your recorded data.
- Do not bend or drop the microSD card
- Do not expose the card to water
- Do not use, replace, or store the card in locations that are exposed to strong static electricity or electrical noise.
Do not turn off the camcorder power during shooting,
playback, or when otherwise accessing the micro-SD card.
Do not store the card in locations with high temperature or high humidity.
SCREEN
To prevent damage to the screen, DO NOT:
Submit extreme force/shock to the monitor.
Place camcorder with the screen on the bottom.
While the screen has more than 99.99% effective pixels, 0.01% of the pixels may be bright spots (red, blue, green) or dark spots. This is not a malfunction. The spots will not be produced in the output.
EN
MAIN UNIT
DO NOT:
disassemble or modify the device.
- allow flammable substances, water or metallic objects to enter the device.
- disconnect the powerwhile the device is on.
- place the unit near an open flame, e.g near a lit candle.
Avoid using the unit:
- in places subject to soot or steam such as near a cooking stove.
• in places subject to excessive shock or vibration. - near appliances generating strong magnetic or electric fields.
- in places subject to extremely high (over 40°C) or extremely low (under - 10°C) temperature.
To protect the unit, DO NOT:
- drop the unit or strike it against hard objects.
- subject it to shock or excessive vibration during transportation.
- keep the lens directed at extremely bright objects for long periods.
- swing the soft camcorder case excessively when the camcorder is inside it.
FOGGING INSIDE THE LENS
Models with waterproof functionality are airtight. When the temperature rises during recording, condensation can occur inside the lens due to the internal humidity.
DURING RECORDING
To prevent the temperature of this unit from rising, we recommend that you use the unit in the following ways.
- Avoid frequent exposure to direct sunlight. Record under umbrella shade. Use a wet towel to cover and cool the unit.
DURING CHARGING
It is recommended to charge the unit in a low humidity environment. The moist air inside the unit can cause condensation. We recommend that you charge the unit in a room where a humidifier is not in use, and in an airconditioned room during summer.
WHEN FOGGING OCCURS INSIDE THE LENS
Open the battery cover to reduce the humidity, close the monitor and leave the camera for a short period of time.
PROTECTING THE LENS
Protective glass is used in front, to protect the lens.
- If the protective glass is dirty, wipe with a cleaning cloth.
- It is recommended to store the device in camera bag when carrying it around.
WATER & DUST PROOF
This unit is equipped with waterproof and dust proof capabilities.
Waterproof: Equivalent to IEC standard publication 529 IPX8 and IPX6 (1 hour at depth up to 5m)
Dust proof: Equivalent to IEC standard publication 529 IP6X
Precautions for waterproof function
- Malfunction due to misuse by the customer is not covered by warranty
- Close the battery cover firmly until it locks
- Make sure that there is no damage to and no foreign material adhered to the packing inside the cover
- Do not use the camcorder in marine water and fresh water deeper than 5 meters of for more than 1 hour
EN
- The waterproof functionality cannot be guaranteed if the camcorder is subject to impact such as dropping.
- Do not use the camcorder in strong water flow such as in rapids or under waterfalls. The strong water pressure may impair the waterproof performance.
- The inner portion of this camcorder is not waterproof. Water seeping inside the camcorder cold cause the components to rust, resulting in high repair costs or irreparable damage.
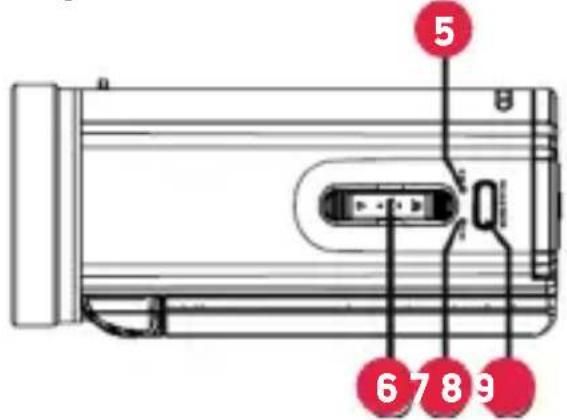
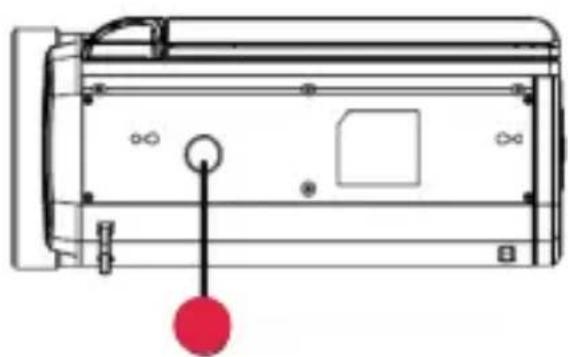
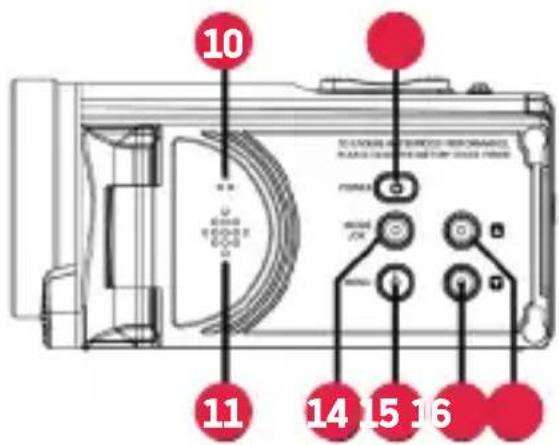
NAMES OF PARTS AND FUNCTIONS
Front side view Back side view
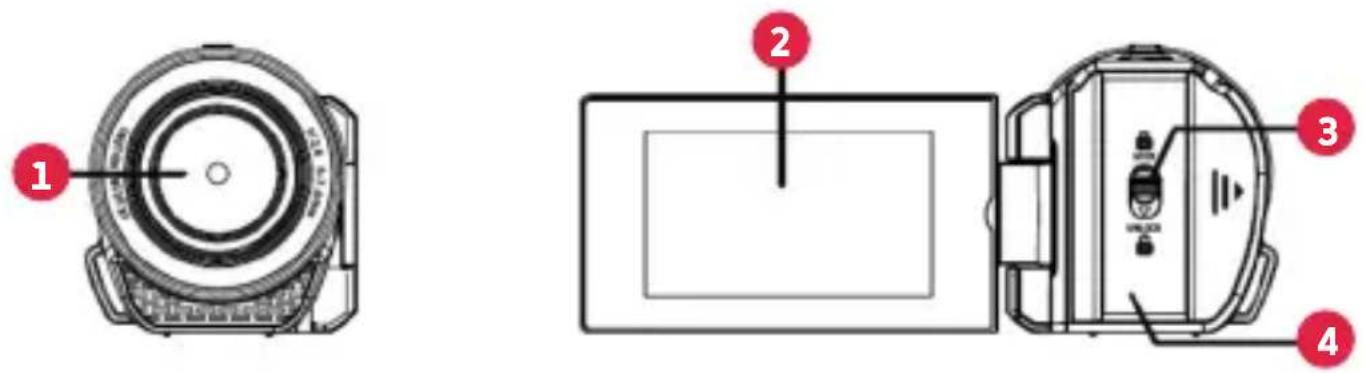
Top side view Bottom Side View
natural_image
Technical line drawing of a mechanical component with a red circular indicator and mounting holes (no text or symbols)Left Side View Right Side View
1 Lens Protective Glass
2 LCD Monitor
3 Cover Lock
4 Terminal cover
5 Power/Access/Busy indicator
6 Zoom/Volume Lever
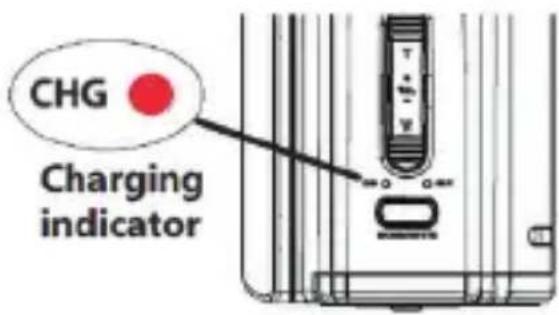
7 Charging Indicator
8 Record/Shutter
9 Tripod Mounting Hole
10 Microphone
11 Speaker
12 Power Button
13 Mode/OK Button
14 Menu Button
15 UP Button
16 DOWN Button
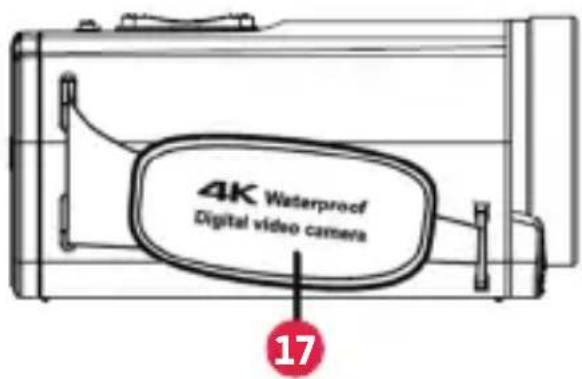
17 Grip Belt
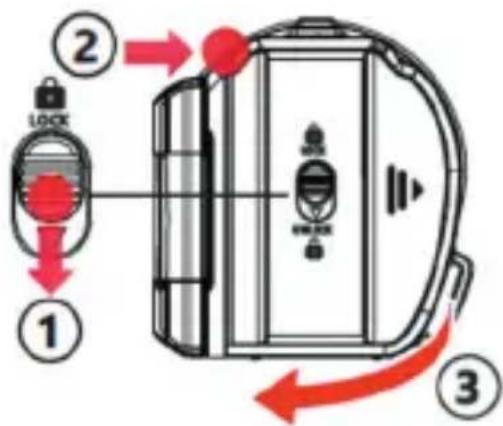
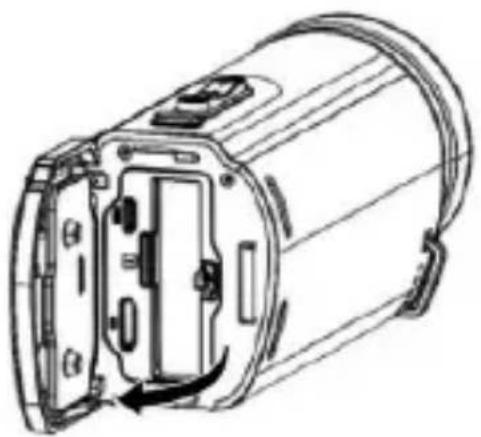
OPENING THE BATTERY COVER
Step 1
Slide the cover lock downward and hold until step 2.
Step 2
Push the battery cover to the right. (pushing the corner marked in right picture)
Step 3
Lift the cover slowly.
TO CLOSE
Step 1
Close the cover slowly while making sure the waterproof seal fits into the opening.
Step 2
Press the entire cover against the camcorder with equal force and firmly attach the cover completely.
Step 3
Slide the cover until it clicks into place. (The cover is not properly closed if the security lock is on UNLOCK position.)
natural_image
Technical line drawing of a mechanical device with internal components and a red arrow indicating a motion or force (no text or symbols present)CAUTION
Do not apply excessive force when opening or closing the terminal cover.
Do not open or close the battery cover with wet or dirt/sand-covered hands
Do no allow any dirt, lint, hair, sand or other foreign substances to accumulate between the waterproof seal and the case.
Never damage or scratch the waterproof seal and terminal cover. Doing so can result in leaks
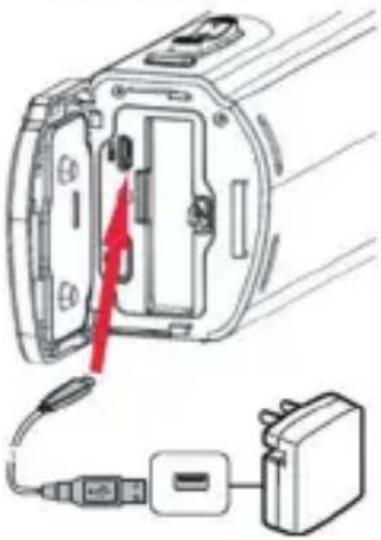
CHARGING THE BATTERY
- Open the battery cover.
- Insert the battery into the battery slot.
- Connect the camcorder to the AC Adapter, using the dedicated USB cable (supplied)
- Connect the AC adapter to the wall outlet.
natural_image
Diagram of a device interior with cable and connector, no text or symbols present- When the battery starts charging, the CHG (charge) indicator turns on.
- When the battery is fully charged, the CHG indicator turns off.
- Disconnect the charging AC adapter from the electric outlet and then disconnect the cable.
CAUTION
- The battery is not fully charged at the time of purchase.
- At the time of purchase or in case the battery is not used for a long period of time, the initial charging time will be longer than usual.
- Battery can be charged during recording and video playback (however the charging time may be longer than usual or the battery may stop charging). If the internal temperature rises when using the unit, stop charging temporarily.
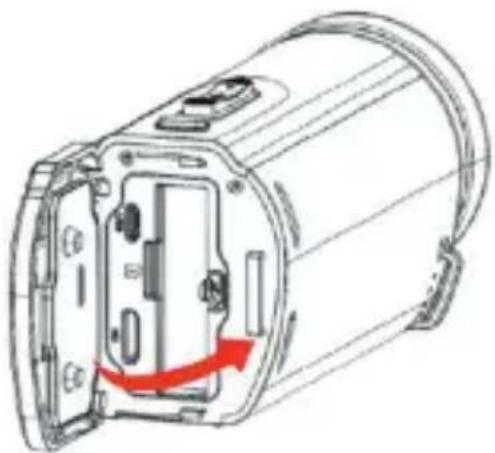
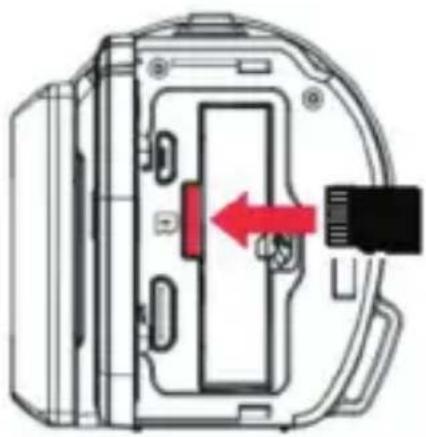
INSERTING A MICRO SD CARD
- Insert a Micro SD card (up to 128GB, read/write speed : class 10 or faster) into memory slot before recording.
EN
TO INSERT A MICRO SD CARD
1 Close the monitor to turn off the device.
2 Open the cover.
natural_image
Technical line drawing of a cylindrical device with internal components and mounting holes (no text or symbols)3 Insert a Micro SD card.
natural_image
Diagram of a device interior showing a red directional arrow pointing to a component (no text or symbols present)TO REMOVE THE MICRO SD CARD
Push the Micro SD card inward once, then pull it out straight.
FORMAT MICRO SD CARD
It is recommended to format the memory card in this camcorder before the first use.
The Micro SD card file system needs to be formatted to FAT/exFAT.
To format the memory card, press the MENU button to open the
[ video /photo menu then press MENU button or ZOOM LEVER to open [ Setup ]
In Setup menu, press UP/DOWN and OK button to choose (Format) - (OK)
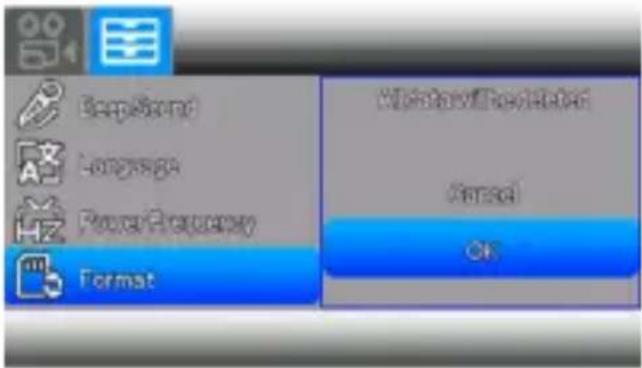
Note: Formatting the memory card will erase all the data stored on it and the data will be unrecoverable. Save your important data on PC before formatting.
VIDEO RECORDING
This camcorder records movies on a memory card. Pressing "MODE" will switch to recording/photography/playback mode in sequence. The factory setting for movie recording is 4K(30fps). Perform the following steps to record videos.
Before recording an important scene, it is recommended to conduct a trial recording.
- Check if a writable SD card is inserted.

:SD card is already inserted.

:SD card is not inserted.
- Check the camcorder is set to video mode. Press MODE button to switch.
-
Start recording.
-
Press RECORD/SHUTTER button to start recording.
- Press again to stop.
- Zoom : Press ZOOM LEVER to zoom in or zoom out.
Indicators during Video recording
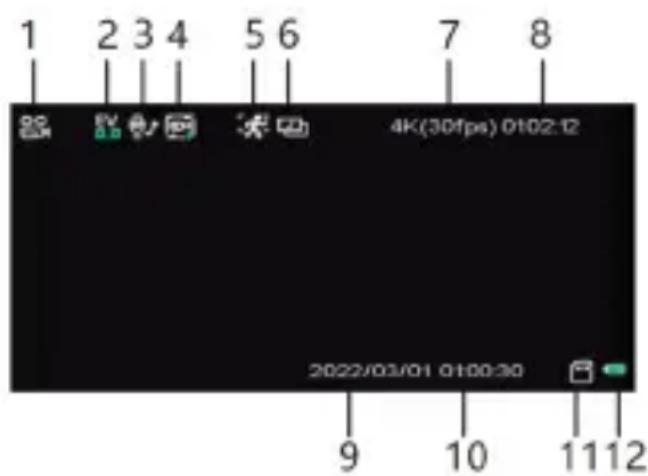
- Video mode
- EV
- Audio record
- Loop record
- Motion detection
- Time lapse
- Resolution
- Recordable time
- Date
- Time
- Memory card
- Battery level
NOTE
- When the camcorder battery is fully charged, the estimated recording time is approximately 90 minutes (of actual recording in 4K).
EN
- Do not remove SD card when the BUSY lamp is lit. The recorded data may become corrupt.
- With [Auto Power Off] operation, the camera automatically turns off if no operation is performed for 3 minutes, in order to conserve power.
- A recorded video file that exceeds 4GB is divided and recorded into multiple files.
CAPTURING STILL IMAGES
- Press Mode button to switch to Photo mode.
- Hold the camcorder steady and aim the camera so that you can see your subject on the screen.
- Press the SHUTTER button to capture an image.
USING THE ZOOM

T: Capture a bigger subject
W: Capture a wider view
INDICATIONS OF PHOTO MODE
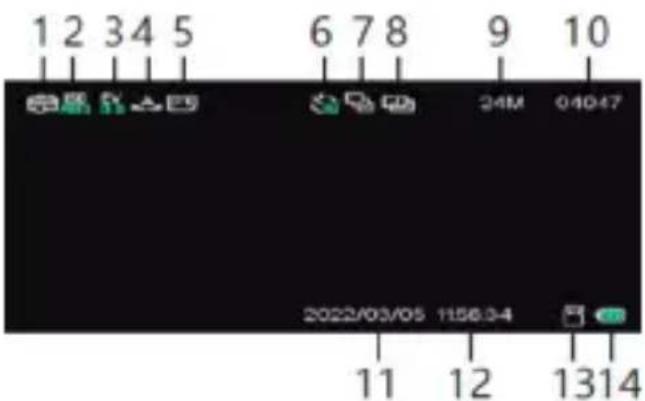
- Photo mode
2.ISO - EV
- White balance
- Quality
- Self-timer 11. Date
- Burst
- Time-lapse capture
- Resolution
- Shots remaining
- Time
- Memory card
- Battery
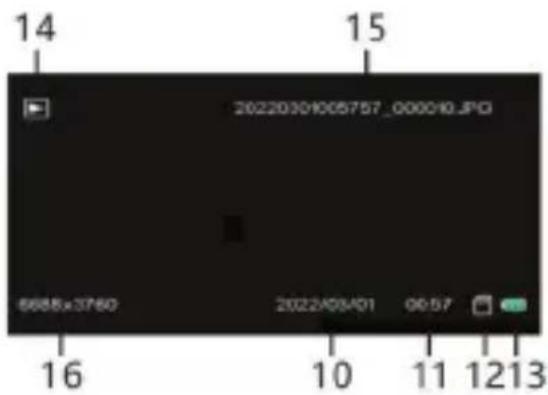
PLAYBACK DELETING FILES ON THIS DEVICE
Select and playback the recorded videos or still images in playback mode.
- Press Mode button to switch to Playback mode.
- Select file and press RECORD/SHUTTER to play video. (The volume of the video being played can be adjusted using the zoom lever.
- To delete unwanted files. 1-Select an unwanted file and press MENU button to open the menu. 2-Select -[Delete] - [Delete this file] - [Yes/No].
INDICATIONS OF PLAYBACK MODE
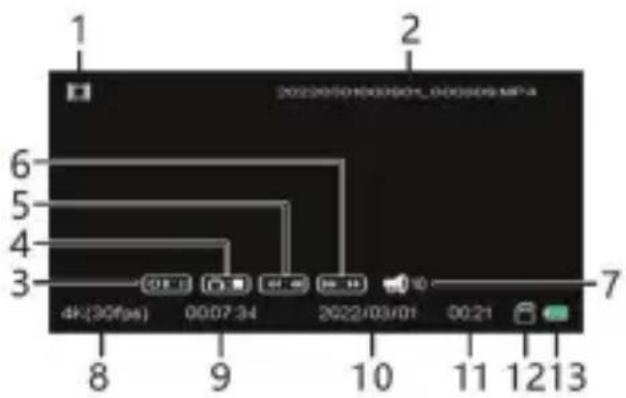
- Video file
- Video file name
- Pause
- Stop
- Fast rewind
- Fast forward
- Video Volume
- Video resolution
- Current time display
- Date of recording
- Time of recording
- Memory card
- Battery level
- Photo file
- Photo file name
- Photo resolution
The table below shows approximate maximum recording times.
These are the total times for all movie files. recording times may vary depending on shooting conditions and memory card size.
Time* (Recordable time of movies)
Notes
If the movie file size exceeds 3.5-4GB while recording, the camcorder automatically divides the file and creates a new one. This is a fundamental limit of all FAT file systems, due to the maximum allowed file size on a FAT system.
CONNECTING TO A COMPUTER
1 Connect the USB port of the camcorder and the USB port of the computer with a USB cable
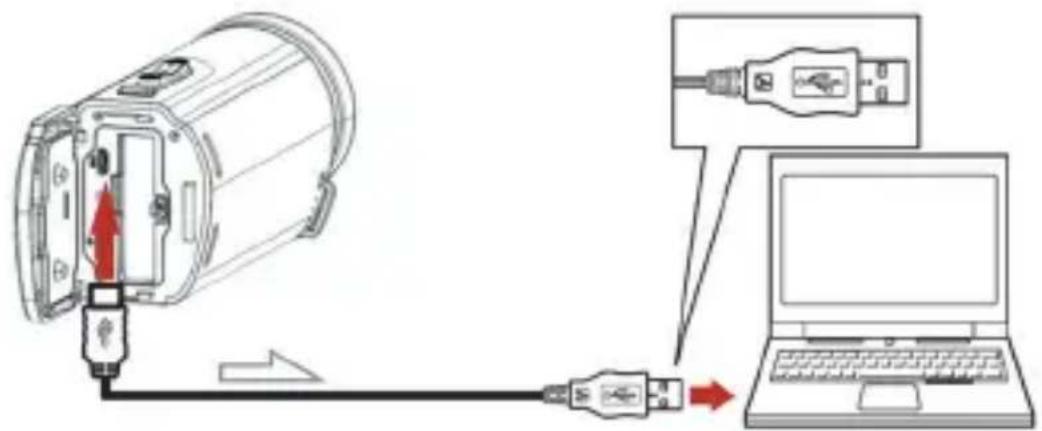
2 Open the display screen. The device will automatically start up, and the screen will show the following information:

Press


to select Mass
Storage or PC Camera,
press to confirm
File transfer:
Select Mass Storage, the computer will display the memory card inside the camera and can facilitate transfer of files from the memory card.
PC Camera:
Select PC Camera, and the real-time images captured by the camera will be displayed on the computer. Please open the computer's camera program and select USB Camera.
Note
To avoid connection to the computer's built-in camera please disable the computers camera and choose "Domo" in the device menu
VIEWING IMAGES ON A TV
PLAYING BACK IMAGES
playable images may be restricted depending on the image format at the time of recording, the type of images selected on the Event View screen, and the HDMI output settings.
1 Connect the HDMI OUT of the computer to the HDMI IN port of a TV using the HDMI cable.
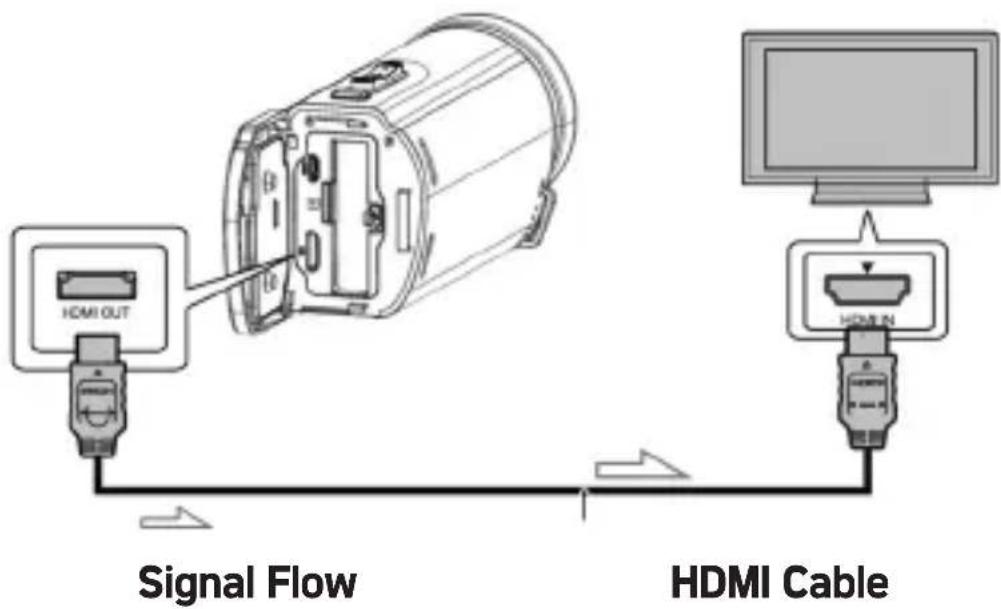
2 Set the input of the TV to HDMI IN.
3 Play back images on the camcorder
SPECIFICATIONS
| Image Sensor | Sony CMOS |
| ISO | Auto, 100, 200, 400, 800, 1600 |
| Storage | Supports Micro SD/SDHC card (up to 128GB, class 10 or faster) |
| Lens | Fixed, F/2.6, f=7.0mm |
| Focus Range | 0.5M - infinity |
| Photo | JPG 56M/48M/30M/24M/20M/16M/12M/8M/5M |
| Video | MP4 4K(30fps), 2.7K(30fps), 1080P(60fps & 30fps), 720P(60fps & 30fps) |
| Zoom | 18X digital zoom |
| Loop Recording | Supported |
| Screen | 3.0 inch IPS screen |
| Time-Lapse | Supported |
| White balance | Auto/Daylight/Cloudy/Tungsten/Fluorescent |
| Exposure | -3.0EV - +3.0EV |
| Self time | Off, 2s, 5s, 10s |
| Frequency | 50Hz, 60Hz |
| Microphone | Built-in microphone |
| Screen save | Off, 5 mins, 10 mins |
| Auto power off | Off, 1min, 2mins, 3mins, 5mins, 10 mins |
| Battery | P16 Li-polymer battery 3400mAh 3.8V 12.92Wh |
| Camcorder size | 135(L)x 63(W)x 67(H) mm |
| Weight | About 400g (including battery) |
4.2 Common problems and solutions
Problems Possible Causes Solutions
| Unbootable Battery not properly installed | Properly install the battery according to the manual Charge the battery | |
| Suddenly Opened power saving function No power for the battery | Repeatedly open the power supply Change battery | |
| The photos or videos cannot be saved | Interrupted power before saving | When the battery indicator becomes red, charge the battery or put a new one |
| Automatically turned off when shooting | No power for the battery charge the battery or put a new one | |
| Not focusing correctly Out of focus range Shooting in focus range | ||
| Memory card cannot be used | Protected memory card Error document format Damaged memory card | Disable memory card protection Format memory card Change to a compatible memory card |
| Inaction of all buttons Short circuit in connection of the machine and the other device | Check the connecting circuit, take out the battery and open the machine | |
MESURES DE SÉCURITÉ
Avertissement
natural_image
Technical line drawing of a mechanical component with a red circular indicator and mounting holes (no text or symbols)POUR FERMER
Étape 1
natural_image
Technical line drawing of a cylindrical device with internal components and a red directional arrow indicating rotation (no text or symbols)ATTENTION
natural_image
Diagram of a device interior with cable and connector, showing no text or symbolsATTENTION
natural_image
Technical line drawing of a cylindrical device with internal components and mounting holes (no text or symbols)natural_image
Diagram of a device interior showing a red arrow pointing to a component, with no visible text or symbols.POUR ENLEVER UNE CARTE MICRO-SD
Appuyez sur

natural_image
Close-up of a mechanical component with concentric rings and a circular feature, labeled with number 1 (no text or symbols on the object itself)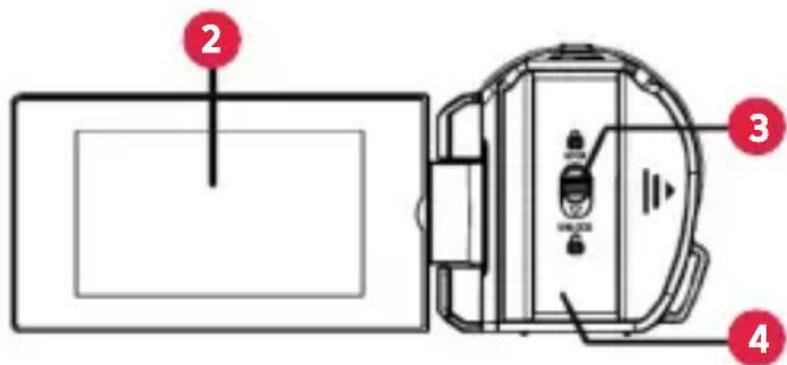
natural_image
Technical line drawing of a mechanical component with a red circular indicator and dimension lines (no text or symbols)SCHLIESSEN
Schritt 1
natural_image
Technical line drawing of a mechanical component with internal components and a red arrow indicating rotation (no text or symbols)VORSICHT
natural_image
Diagram of a device interior with cable and connector, no visible text or symbolsVORSICHT
natural_image
Technical line drawing of a cylindrical device with internal components and mounting holes (no text or symbols)natural_image
Diagram of a device interior showing a red arrow pointing to a component, with no visible text or symbols.Drücken Sie


natural_image
Technical line drawing of a mechanical component with a red circular indicator and mounting holes (no text or symbols)PER CHIUDERE
Passo 1
natural_image
Technical line drawing of a cylindrical device with internal components and a red arrow indicating rotation (no text or symbols)ATTENZIONE
natural_image
Diagram of a device interior with cable and power plug, no text or symbols presentATTENZIONE
natural_image
Technical line drawing of a cylindrical device with internal components and a curved handle (no text or symbols)natural_image
Diagram of a device interior showing a red arrow pointing to a component, with no visible text or symbols.PER RIMUOVERE LA SCHEDA MICRO SD
Notice of compliance for the European Union
Products bearing the CE mark comply with the applicable European directives and associated harmonised European standards.
Disposal of waste equipment by users in the European Union
This symbol means that according to local laws and regulations it is prohibited to dispose of this product with household waste Instead it is your responsibility to protect the environment and human health by handing over your used device to a designated collection point for the recycling of waste electrical and electronic equipment. For more information about where you can drop off your waste equipment for recycling please contact your local city office, your household waste disposal service or the shop where you purchased the product.
This device complies with part 15 of the FCC Rules. Operation is subject to the following two conditions:
- This device may not cause harmful interference, and
- This device must accept any interference received, including interference that may cause undesired operation.
FR
Product manufactured for and distributed by :
AgfaPhoto is used under license of Agfa-Gevaert NV. For this product a sub-license has been granted by AgfaPhoto Holding GmbH (www.agfaphoto.com). Neither Agfa-Gevaert NV nor AgfaPhoto Holding GmbH manufacture this product or provide any product warranty or support. For service, support and warranty information, contact the distributor or manufacturer.