ÖRMINGE 205.910.92 - Cooker IKEA - Free user manual and instructions
Find the device manual for free ÖRMINGE 205.910.92 IKEA in PDF.

User questions about ÖRMINGE 205.910.92 IKEA
0 question about this device. Answer the ones you know or ask your own.
Ask a new question about this device
Download the instructions for your Cooker in PDF format for free! Find your manual ÖRMINGE 205.910.92 - IKEA and take your electronic device back in hand. On this page are published all the documents necessary for the use of your device. ÖRMINGE 205.910.92 by IKEA.
USER MANUAL ÖRMINGE 205.910.92 IKEA
Installer should leave these instructions with appliance. Consumer should read these instructions before using the appliance and should retain them for future reference.
IMPORTANT
IMPORTANT SAFETY INSTRUCTIONS READ AND SAVE THESE INSTRUCTIONS

WARNING: Read all safety instructions before using the product.

WARNING: If the information in this manual is not
followed exactly, a fire or explosion may result causing property damage, personal injury or death.
natural_image
Silhouette of a person pushing a large block on a pole (no text or symbols)
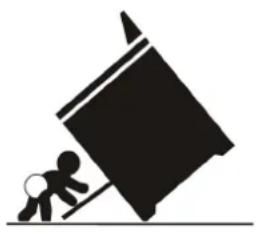
WARNING
Tip-Over Hazard
- A child or adult can tip the range and be killed.
- Install the anti-tip bracket packed with range to the structure wall or floor.
- Ensure the anti-tip bracket is re-engaged when the range is moved to floor or wall.
- Re-engage the anti-tip bracket if the range is moved.
• See installation instructions for details. - Do not operate the range without anti-tip bracket in place and engaged.
- Failure to follow these instructions can result in death or serious burns to children or adults.
natural_image
Silhouette of a person bending over a box with an arrow indicating motion (no text or symbols)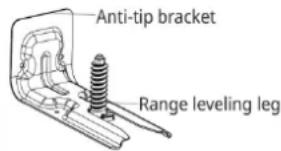
text_image
Anti-tip bracket Range leveling leg
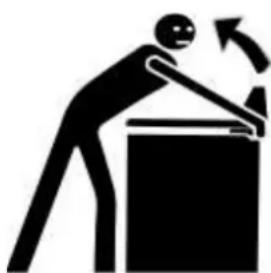
WARNING
"After installation cautiously grip the rear of the range t ensure the anti-tip bracket is engaging the rear foot of range." Check for proper installation and use of the anti-tip bracket. Carefully tip the range forward pulling from the back to ensure that the anti-tip bracket engages the range leg and prevents tip-over. Range should not move more than 1" (25 mm).

IMPORTANT: This appliance is intended for normal household
use only. It is not approved for outdoor or other non-household uses (including sea or air-going vessels). See the Statement of Limited Warranty. If you have any questions, contact the manufacturer.
Do not repair or replace any part of the appliance unless specifically recommended in this manual. Refer all servicing to a factory authorized service center.
Explanation of symbols
Throughout this User Manual the following symbols are used:

Important information or useful hints about usage.

Warning for hazardous situations with regard to life and property.

Warning for electric shock.

Warning for risk of fire.

Warning for hot surfaces.
DANGER indicates a hazardous situation which, if not avoided, will result in death or serious injury.
WARNING indicates a hazardous situation which, if not avoided, could result in death or serious injury.
CAUTION indicates a hazardous situation which, if not avoided, could result in minor or moderate injury.
NOTICE is used to address practices not related to physical injury.
Please read these instructions before installation or using your appliance!
We would like you to obtain best performance with your product that has been manufactured in modern facilities and passed through strict quality control procedures.
Therefore, we advise you to read through this user manual carefully before using your product and keep it for future reference. If you hand over the product to someone else, deliver the user manual as well.
The user manual will help you use the product in a fast and safe way.

WARNING: Save these instructions for the local electrical inspectors use.
Your product has been manufactured in modern facilities and has passed strict quality control procedures.
To obtain the best performance, we request that you read through this user manual carefully, especially the safety instructions, before using your product and that you keep it for future reference. If this product is given to another consumer, please give them this manual for their reference.
The instructions will help you to operate the appliance quickly and safely.
- Upon delivery, please check that the appliance is not damaged. If you note any transport damage, please contact your point of sale immediately and do not connect and operate the appliance!
- Before you connect and start using the appliance, please read this manual and all enclosed documents. Please note in particular the safety instructions.
- Keep all documents so that you can refer to the information again later on. Please keep your receipt for any repairs which may be required under warranty.
- When you pass on the appliance to another person, please provide all documents with it including original date of purchasing. (The warranty does not convey if the unit is sold).
- If you should decide not to use this appliance any longer (or decide to substitute an older model), before disposing of it, it is recommended that it be made inoperative in an appropriate manner in accordance to health and environmental protection regulations, ensuring in particular that all potentially hazardous parts be made harmless, especially in relation to children who could play with old appliances.
text_image
IKEAPlease refer to the www.IKEA.com for the full list of IKEA appointed
After Sales Service Provider and relative national phone numbers.
Please record your model and serial numbers below for reference.
For S/N please go to TECHNICAL DATA chapter.
Purchase Date
Model Number
Serial Number

Please attach sales receipt here for future reference.
English 2
Français 47
TABLE OF CONTENT
Safety Information 8
Basic safety instructions ....8
Safety for children 11
Safety when working with electricity ...... 12
Intended use 12
Disposal 13
Packaging material 13
Future transportation 13
Product description 14
Product introduction 15
Control panel 15
Rating Plate Location 16
Package contents 16
Preparation 18
Tips for saving energy 18
First use 19
Time setting 19
First cleaning.... 19
Initial heating 19
How to use the hob 21
Using the burners/plates 25
Control panel 26
How the operate the oven 32
General information on baking, roasting and broiling 32
How to use the electric oven 32
Operating modes 33
Using the oven clock 34
Cooking times table.... 37
How to operate the broil 38
Care and cleaning 39
General information 39
Cleaning the burner/plate 39
Cleaning the control panel 39
Cleaning the oven 39
Removing the oven door 40
Replacing the oven lamp 41
Troubleshooting 42
Technical data 44
IKEA limited guarantee 45
Safety Information
This section contains safety instructions that will help you avoid risk of injury and damage. All warranties will become void if you do not follow these instructions.

Basic safety instructions
- This appliance is not intended for use by persons (including children) with reduced physical, sensory or mental capabilities, or lack of experience and knowledge, unless they have been given supervision or instruction concerning use of appliance by a person responsible for their safety.
• Children should be supervised to ensure that they do not play with the appliance. - Proper installation - Be sure your appliance is properly installed and grounded by a qualified technician
- Never use your appliance for warming or heating the room.
- Wear proper apparel - loose-fitting or hanging garments should never be word while using the appliance.
- User servicing - Do not repair or replace any part of the appliance unless specifically recommended in the manual. All other servicing should be referred to a qualified technician.
- Use proper pan size - this appliance is equipped with one or more surface units of different size. Select utensils having flat
bottoms large enough to cover the surface unit heating element. The use of undersized utensils will expose a portion of the heating element to direct contact and may result in ignition of clothing. Proper relationship of utensil to burner will also improve efficiency.
- Never leave surface units unattended at high heat settings - boilover causes smoking and greasy spillovers that may ignite.
- Protective liners- do not use aluminum foil to line oven bottoms, except as suggested in the manual. Improper installation of these liners may result in a risk of electric shock, or fire.
- Glazed cooking utensils - only certain types of glass, glass/ceramic, ceramic, earthenware, or other glazed utensils are suitable for range-top service without breaking due to the sudden change in temperature.
- Utensil handles should be turned inward and not extend over adjacent surface units - to reduce the risk of burns, ignition of flammable materials, and spillage due to unintentional contact with the utensil, the handle of a utensil should be positioned so that it is turned inward, and does not extend over adjacent surface units.
- Use care when opening door- let hot air or steam escape before removing or replacing food.
- Placement of oven racks -always place oven racks in desired location while oven is cool. If rack must be moved while oven is hot, do not let potholder contact hot heating element in oven.
- Use only dry potholders- moist or damp potholders on hot surfaces may result in burns from steam. Do not let potholder touch hot heating elements. Do not use a towel or other bulky cloth.
- Do not cook on broken cook-top - if cook-top should break, cleaning solutions and spillovers may penetrate the broken cook-top and create a risk of electric shock. Contact a qualified technician immediately.
- Clean cook-top with caution - if a wet sponge or cloth is used to wipe spills on a hot cooking area, be careful to avoid steam burn. Some cleaners can produce noxious fumes if applied to a hot surface.
- DO NOT TOUCH SURFACE UNITS OR AREAS NEAR UNITS –Surface units may be hot even though they are dark in color. Areas near surface units may become hot enough to cause burns. During and after use, do not touch, or let clothing or other flammable materials contact surface units or areas near units until they have had sufficient time to cool. Among
these areas are the cook-top and surfaces facing the cook-top.
- DO NOT TOUCH HEATING ELEMENTS OR INTERIOR SURFACES OF OVEN – Heating elements may be hot even though they are dark in color. Interior surfaces of an oven become hot enough to cause burns. During and after use, do not touch, or let clothing or other flammable materials contact heating elements or interior surfaces of oven until they have had sufficient time to cool. Other surfaces of the appliance may become hot enough to cause burns – among these surfaces are (identification of surfaces – for example, oven vent openings and surfaces near these openings, oven doors, and windows of oven doors).
- Never use when judgment or coordination is impaired by the use of alcohol and/or drugs.
- Do not operate the appliance if it is defective or shows any visible damage.
- Be careful when using alcoholic drinks in your dishes. Alcohol evaporates in high temperatures and may cause fire since it will catch fire when it gets in contact with hot surfaces.
- Do not heat closed food containers and glass jars. Pressure that may build-up in the jar can cause it to burst.
- Do not use the oven for a storage area. Items stored in an oven can ignite.
- Storage in or on Appliance-Flammable materials should not be stored in an oven or near surface units.
- Fire risk! Do not store flammable material in the oven and/or in the warming drawer.
- Keep appliance area clear and free from combustible materials, gasoline, and other flammable vapors.
- Do not use water on grease fires. Smother fire or flame or use dry chemical or foam type extinguisher.
- Do not use the oven to dry newspapers. If overheated, they can cath on fire.
- Do not leave paper products, cooking utensils or food in the oven when not in use.
- Do not leave empty pots or pans on plates that are switched on. They might get damaged.
- Since it may be hot, do not leave plastic or aluminum dishes on the surface of appliance. These kind of dishes should not be used to keep food either.
- Do not place baking trays, dishes or aluminium foil directly onto the bottom of the oven. The heat accumulation might damage the bottom of the oven.
- Keep all ventilation slots clear of obstructions.
-
The manufacturer declines all liability for injury to persons or damage to property caused by incorrect or improper use of the appliance.
-
Do not use the oven with front door glass removed or broken.
- Metallic objects such as knives, forks, spoons and lids should not be placed on the hob surface since they can get hot.
- The appliance is not intended to be operated by means of an external timer or separate remote-control system.
- Vapour pressure that build up due to the moisture on the hob surface or at the bottom of the pot can cause the pot to move. Therefore, make sure that the oven surface and bottom of the pots are always dry.
- Hotplates are equipped with "Induction" technology. Your induction hob that provides both time and money savings must be used with pots suitable for induction cooking; otherwise hotplates will not operate.
- As induction hobs create a magnetic field, they may cause harmful impacts for people who use devices such as insulin pump or pacemaker.
- ⓚ IMPORTANT: This device has been tested and found to meet the standards for a Class B digital device according to Part 18 of the FCC regulations (United States) and ICES-001 (Canada). These standards are established to provide reasonable protection from harmful interference in residential installations. The device generates and can emit radio frequency energy, and if not
installed and operated according to the instructions, it may cause harmful interference to radio communications. However, there is no guarantee that interference will not occur in a specific installation. If interference with radio or television signals occurs (which can be determined by turning the unit off and on), the user is encouraged to try one or more of the following actions:
* Adjust or relocate the receiving antenna.
* Increase the separation between the device and the receiver.
* Plug the device into a different outlet or circuit than the one connected to the receiver.
This revision retains the meaning and core information of the original text while presenting it in a slightly different structure.
- Use only hob guards designed by the manufacturer of the cooking appliance or indicated by the manufacturer of the appliance in the instructions for use as suitable or hob guards incorporated in the appliance. The use of inappropriate guards can cause accidents.
- Check that all controls on the appliance are switched off after use.
-
ⓚ IMPORTANT: Call the authorized service for installation of the appliance to be used. After this procedure, guarantee period will be started.
-
Make sure reflector pans or drip bowls are in place. Absence of these pans or bowls during cooking may subject wiring or components underneath to damage.
- Placement of Oven Racks – Always place oven racks in desired location while oven is cool. If rack must be moved while oven is hot, do not let potholder contact hot heating element in oven.
Safety for children
- WARNING: Stepping, leaning or sitting on the door or drawers of this range can result in serious injuries and also cause damage to the range. Do not allow children to climb or play around the range. The weight of a child on an open door may cause the range to tip, resulting in serious burns or other injury.
- Accessible parts may be hot when the broil is in use. Young children should be kept away.
- Do not leave children alone - children should not be left alone or unattended in area where appliance is in use. They should never be allowed to sit or stand on any part of the appliance.
- Surface units may be hot even though they are dark in color. Areas near surface units may become hot enough to cause burns. During and after use, do not touch or let clothing or other flammable materials contact surface units until they have had
sufficient time to cool. Among these areas are (identification of areas) for example, the cook-top and surfaces facing the cook-top.
- CAUTION: Do not store items of interest to children in the cabinets above the range or on back guard of a range. Children climbing on the range to reach items could be seriously injured.
- The packaging materials will be dangerous for children. Keep the packaging materials away from children. Please dispose of all parts of the packaging according to environmental standards.
- WARNING: A child or adult can tip the range and be killed. Verify the anti-tip bracket has been properly installed to the floor or wall and that the rear foot of the range is engaged to bracket as shown in illustration instructions.
Ensure the anti-tip bracket is re-engaged when the range is moved by ensuring the foot of the is engaged into the anti-tip bracket. Do not operate the range without the anti-tip bracket in place and engaged.
⚠️ Safety when working with electricity
- Any work on electric equipment and systems may only be carried out by authorized qualified persons.
- WARNING: Before installing, turn power OFF at the service panel. Lock service panel to
prevent power from being turned ON accidentally.
- WARNING: Personal injury or death from electrical shock may occur if the range is not installed by a qualified installer or electrician.
- Any additions, changes or conversions required in order for this appliance to satisfactorily meet the application needs must be made by a qualified technician.
- In case of any damage, switch off the appliance and disconnect it from the main supply by removing the fuse or switching off the circuit breaker.
- Ensure that the fuse rating is correct.
- Do not operate the appliance barefooted.
- Never touch the appliance with wet hands or feet.
- Do not soak removable heating elements. Heating elements should never be immersed in water.
Intended use
- The appliance is designed for domestic use only. Commercial use is not admissible.
- This appliance should not be used for warming the plates under the broil, hanging towels and dish cloths on the handles, for drying and the space heating purposes.
-
All openings in the wall behind the appliance and in the floor under the appliance shall be sealed.
-
This appliance is not intended to use at mobile homes, recreational vehicles.
- The manufacturer shall not be held liable for any damage caused by improper use or handling errors.
- The appliance can be used for defrosting, baking, roasting and broiling food.
Disposal
Packaging material

DANGER: Risk of suffocation by the packaging materials!
Packing elements (i.e. plastic bags, polystyrene foam, nails, packing straps, etc.) should not be left around within easy reach of children, as these may cause serious injuries.
The packaging material and transport locks are made from materials that are not harmful to the environment. Please dispose of all parts of the packaging according to environmental standards. This is beneficial to the environment.

CAUTION: If product will be given to someone for personal use or given to someone second hand use, User manual, products, other related documents, mounting parts should be given with product.
Future transportation
Do not carry out cleaning or maintenance operations on the appliance without having previously disconnected it from the electric power supply.
i NOTICE: Do not place other items on the top of the appliance. The appliance must be transported upright.
Store the appliance's original box and transport the appliance in its original carton. Follow the guidance marks that are printed on the carton.

IMPORTANT: Verify the general appearance of our equipment by identifying possible image during the transportation.
To prevent the wire shelf and tray inside the oven from damaging the oven door, place a strip of cardboard onto the inside of the oven door that lines up with the position of the trays. Tape the oven door to the side walls.
If you do not have the original carton.
Pack the appliance in bubble wrap or thick cardboard and tape it securely in order to prevent damage during transportation.

WARNING: This product can expose you to chemicals including Nickel (Metallic) which is known to the State of California to cause cancer. For more information go to www.P65Warnings.ca.gov
Note: Nickel is a component in all stainless steel and some other metal components.
Product description
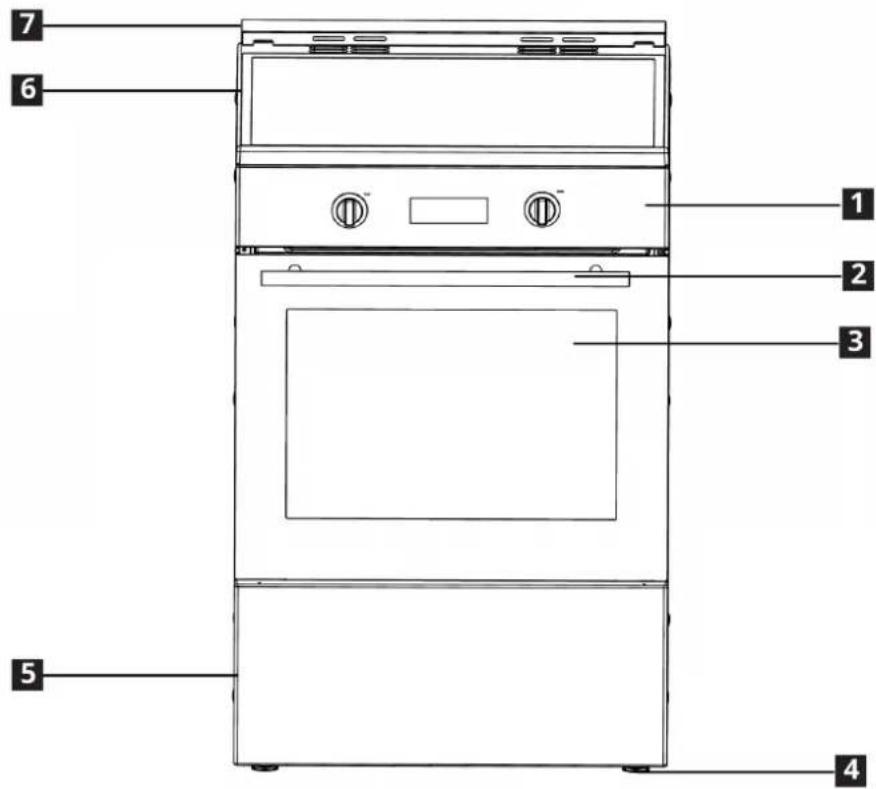
text_image
7 6 1 2 3 5 41 Control panel
2 Handle
3 Front door
4 Foot
5 Bottom part
6 Glass cooking surface
7 Island trim
Product introduction
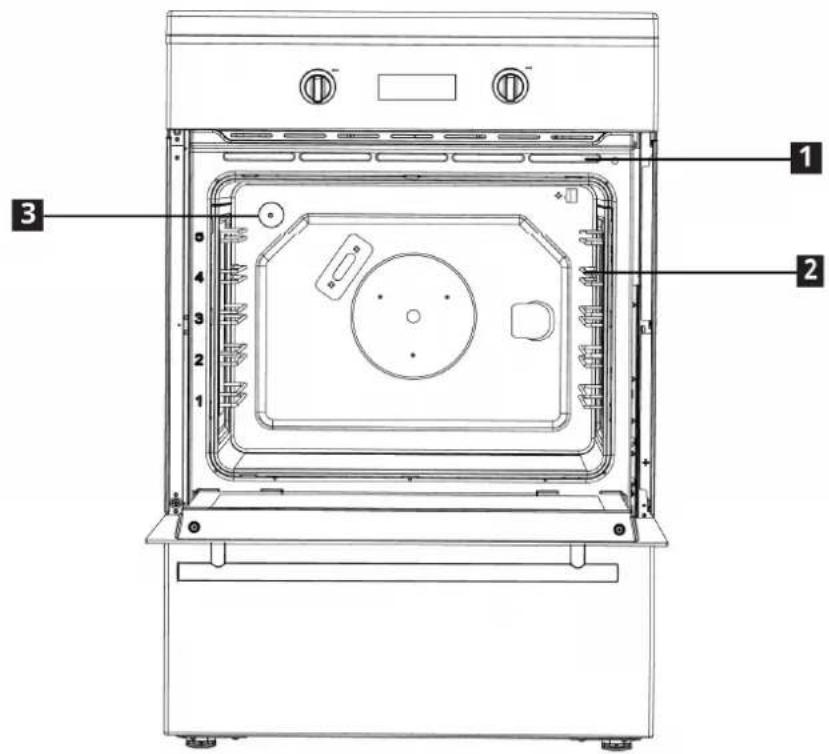
text_image
Technical diagram of an oven with numbered parts labeled 1, 2, and 3 for identification.1 Ventilation holes
3 Lamp
2 Wire shelves
Control panel
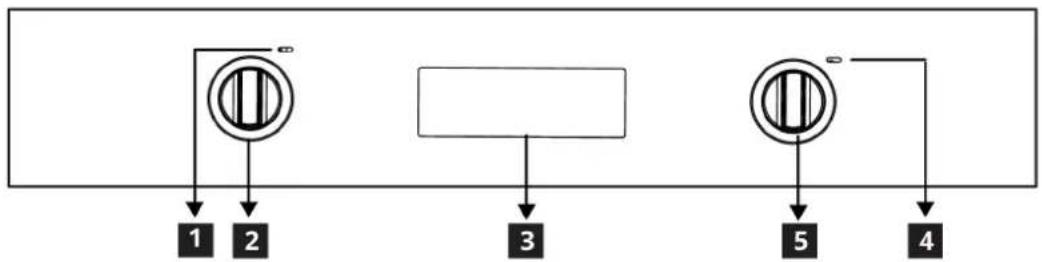
flowchart
graph TD
    A["Circle with vertical stripes"] --> B["1"]
    A --> C["2"]
    D["Rectangle"] --> E["3"]
    F["Circle with vertical stripes"] --> G["5"]
    F --> H["4"]
1 Function lamp
4 Thermostat lamp
2 Function knob
5 Thermostat knob
3 Digital timer
Rating Plate Location
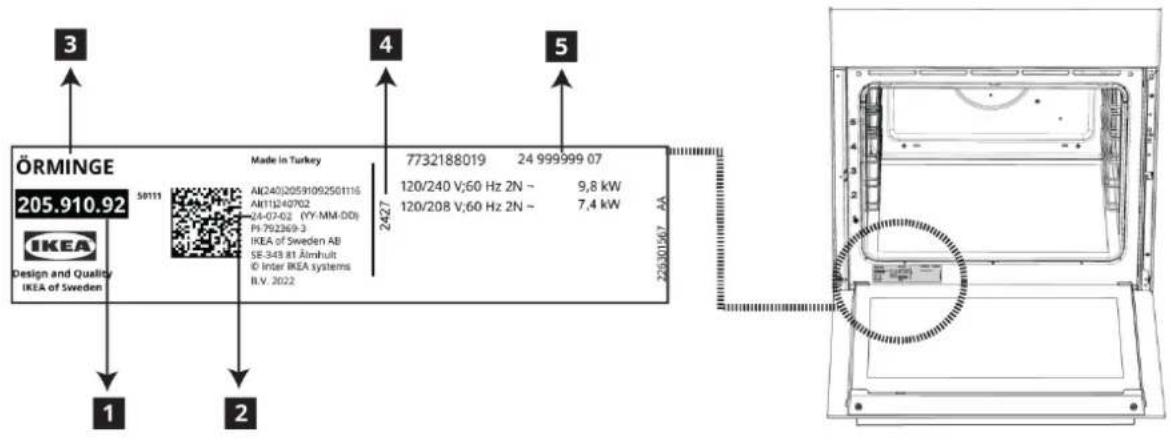
text_image
ÖRMINGE 205.910.92 Made in Turkey AK240J2059109250116 AH11240702 24-07-02 (YY-MM-DD) PI:792369-3 IKEA of Sweden AB SE-343 81 Almhult © Inter IKEA systems B.V. 2022 7732188019 24 999999 07 120/240 V;60 Hz 2N - 9,8 kW 120/208 V;60 Hz 2N - 7,4 kW 225301567 AA 1 2 3 4 51 Arcticle number
2 Production date (Year-Month-Day)
3 Arcticle name
4 Production date (Year-Week)
5 Serial number
The rating plate is the official representation. Please pay attention to the label on the product.
Package contents
i Accessories supplied can vary depending on the product model. Not every accessory described in the user manual may exist on your product.
1. Assembly instruction
Product installation instructions guide.
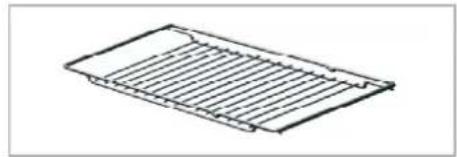
2. Wire Shelf
Used for roasting and for placing the food to be baked, roasted or cooked in casserole dishes to the desired rack.
natural_image
Isometric line drawing of a rectangular grid structure with parallel lines (no text or symbols)3. Proper positioning of the wire shelf on sliding shelves
It is important to position the broil and/or dripping pan on the wire shelves correctly. Slide the broil or the dripping pan completely between the 2 rails and make sure it is stable before putting a dish on it (Please see the following figure).
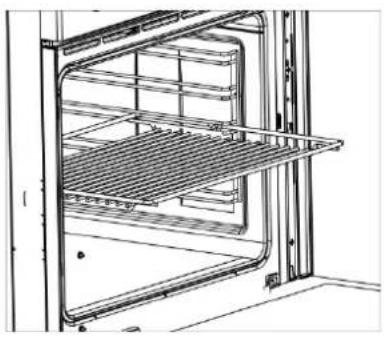
natural_image
Technical line drawing of an oven with shelves and grilles (no text or symbols)ENGLISH
4. Island trim
To secure the island frame to the product, remove the island frame assembly from the packaging.
Position the island trim assembly as indicated. Secure the island trim assembly to the device with the screw provided. Do not overtighten to avoid damaging the product or the island covering.

natural_image
Technical line drawing of a mechanical assembly with no visible text or symbols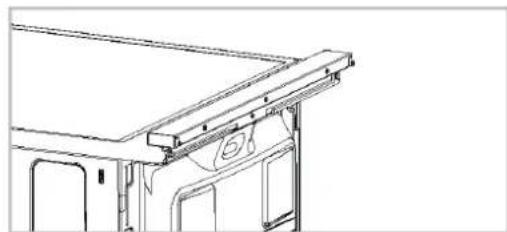
natural_image
Technical line drawing of a vehicle roof structure with no visible text or symbols
CAUTION: You can download the user
manual and installation guide from
www.ikea.com
Preparation
Tips for saving energy
The following information will help you to use your appliance in an ecological way, and to save energy:
- Use dark colored or enamel coated cookware in the oven since the heat transmission will be better.
- While cooking your dishes, perform a preheating operation if it is advised in the user manual or cooking instructions.
- Do not open the door of the oven frequently during cooking.
- Try to cook more than one dish in the oven at the same time whenever possible. You can cook by placing two cooking vessels onto the wire shelf.
- Defrost frozen dishes before cooking them.
- You can save energy by switching off your oven a few minutes before the end of the cooking time (The oven door should not be opened).
- Use pots/pans with cover for cooking. If there is no cover, energy consumption may increase 4 times.
- Select the burner which is suitable for the bottom size of the pot to be used. Always select the correct pot size for your dishes. Larger pots require more energy.
• Take care to use flat base saucepans while cooking on electrical cookers. - Pots with an even and thick bottom provide better thermal conduction. You can save up to 1/3 of electricity.
- Pots and pans should match the size of plates. The bottom of the pot or pan should not be smaller than the plate.
- Keep plates and pan bottoms clean. Dirt will reduce the heat transmission between plate and pan bottoms.
- In case of longer cooking times, switch off the plate 5 to 10 minutes before the end of the cooking time. When you use the residual heat, you can save up to 20% of electricity.
Cooling Fan
Your product has a cooling fan. The cooling fan is activated automatically when necessary and cools both the front of the product and the furniture. It is automatically deactivated when the cooling process is finished. Hot air comes out over the oven door. Do not cover these ventilation openings with anything. Otherwise, the oven may overheat. The cooling fan continues to operate during oven operation or after the oven is turned off (approximately 20-30 minutes). If you cook by programming the oven timer, at the end of the baking time, the cooling fan turns off with all functions. The cooling fan running time cannot be determined by the user. It turns on and off automatically. This is not an error.
First use
Before you start using your product, it is recommended to do the following in the following sections.
Time setting
i While making any adjustment, related symbols will flash on the display.
Press + keys to set the time of the day after the oven is energized for the first time.
i For touch control models, touch : first and then use + to set the time of the day.
Confirm the setting by touching symbol and wait for 4 seconds without touching any keys to confirm.
text_image
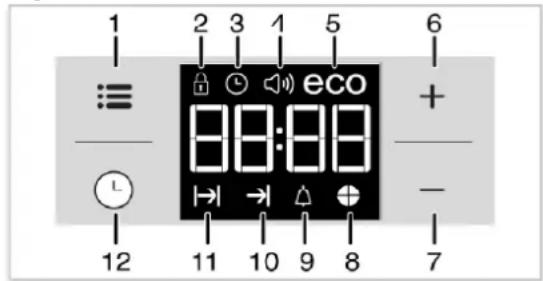
1 2 3 1 5 6 ≡ eco + - 12 11 10 9 8 71 Adjustment key
2 Keylock symbol
3 Clock symbol
4 Alarm volume symbol
5 Eco mode symbol
6 Plus key
7 Minus key
8 Time pie symbol
9 Alarm symbol
10 End of Cooking Time symbol
11 Cooking Time symbol
12 Program key
If the initial time is not set, clock will run starting from 12:00 and ⏻ symbol will be displayed. The symbol will disappear once the time is set.
i Current time settings are canceled in case of power failure. It needs to be readjusted.
First cleaning
- Remove all packaging materials.
- Wipe the surfaces of the product with a wet cloth or sponge and dry with a cloth.
NOTICE When removing appliance for cleaning and/or service; Disconnect AC power supply. Carefully remove the range by pulling outward. Range is heavy, use care in handling.
NOTICE The surface might get damaged by some detergents or cleaning materials. Do not use aggressive detergents, cleaning powders/creams or any sharp objects during cleaning. Do not use harsh abrasive cleaners or sharp metal scrapers to clean the oven door glass since they can scratch the surface, which may result in shattering of the glass.
NOTICE Smoke and smell may emit for a couple of hours during the initial operation. This is quite normal. Ensure that the room is well ventilated to remove the smoke and smell. Avoid directly inhaling the smoke and the smell that emits.
Initial heating
Heat up the product for about 30 minutes and then switch it off. Thus, any production residues or layers will be burnt off and removed.
WARNING
Hot surfaces cause burns! Product may be hot when it is in use. Never touch the hot burners, inner sections of the oven, heaters and etc. Keep children away.
Always use heat resistant oven gloves when putting in or removing dishes into/from the hot oven.
Electric oven
- Take all baking trays and racks from the oven.
- Close the oven door.
- Select top and bottom heat with the function knob.
- Select the highest temperature with the thermostat knob; see How to use the electric oven.
- Heat approximately 30 minutes.
- Switch off oven.
Broil
- Take all baking trays and wire shelf from the oven.
- Close oven door.
- Select highest power of the broil.
- Heat approximately 30 minutes.
- Switch off broil.
How to use the hob
General information about cooking
- DANGER: Risk of fire over by overheated oil! When you heat oil, do not leave it unattended.
- WARNING: Never pick up a flaming pan. Turn the controls off. Smother a flaming pan on a surface unit by covering the pan completely with a well-fitting lid or a fire blanket, cookie sheet or flat tray. Use a multi-purpose dry chemical or foam-type fire extinguisher.
- WARNING: Do not place or store items that can melt or catch fire on the glass cook top, even when it is not being used. If the cook top is inadvertently turned on, they may ignite. Heat from the cook top or oven vent after it is turned off may cause them to ignite also.
- Always position pans centrally over the heating element. When transferring pans from one heating element to another always lift the pans do not slide them.
- Before frying foods, always dry them well and gently place into the hot oil. Ensure complete thawing of frozen foods before frying.
- Do not cover the vessel you use when heating oil.
- Place the pans and saucepans in a manner so that their handles are not over the hob to prevent heating of the handles. Do not place unbalanced and easily tilting vessels on the hob.
- Do not place empty vessels and saucepans on cooking zones that are switched on. They might get damaged.
- Operating a cooking zone without a vessel or saucepan on it will cause damage to the product. Turn off the cooking zones after the cooking is complete.
- As the surface of the product can be hot, do not put plastic and aluminum vessels on it. Clean any melted such materials on the surface immediately.
Such vessels should not be used to keep foods either.
- Use flat bottomed saucepans or vessels only.
- Put appropriate amount of food in saucepans and pans. Thus, you will not have to make any unnecessary cleaning by preventing the dishes from overflowing. Do not put covers of saucepans or pans on cooking zones.
- Place the saucepans in a manner so that they are centered on the cooking zone. When you want to move the saucepan onto another cooking zone, lift and place it onto the cooking zone you want instead of sliding it.
- WARNING: Never leave surface units unattended at high heat settings. Boil over causes smoking and greasy spillovers that may ignite.
- Make sure reflector pans or drip bowls are in place. Absence of these pans or bowls during cooking may subject wiring or components underneath to damage.
• Always turn off the hob's burners after each use.
• After each use the cooking surface will be hot, so do not put the plastic pots/pans on the cooking surface. Clean such material on the surface immediately. - Sudden temperature changes on the glass cooking surface may cause damage, be careful not to spill cold liquids during cooking.
- Put a sufficient amount of food in pots and pans. Thus, you can prevent food from pouring forth out of the pots/pans and will not need to clean unnecessarily.
Operating principle of the induction hob
Induction hob is like an open circuit. The circuit completes when a cooking pots/pans suitable for induction cooking is placed on it and an electronic system below the glass surface generates a magnetic field. The metal base of the pots/pans is heated by taking energy from this magnetic field. Thus, the heat is not generated on the surface of the hob, but
ENGLISH
directly on the pots/pans above it. Glass surface is heated with the heat of the cooking pots/pans.
Advantages of cooking with induction
Induction hobs offer some advantages as the heat is transferred directly to the cooking pots/pans.
- Foods that overflow during cooking do not burn rapidly as the glass cooking surface is not heated directly. It is cleaned more easily.
- Cooking shall be faster as the heat is generated directly on the cooking pots/pans. Thus, it saves time and energy with respect to other hob types.
- As the heat is given directly to the cooking pots/pans, there is no heat loss, and it provides a more efficient cooking.
- The fact that the heat transfer stops and the cooking surface is not heated directly when the cooking pots/pans is removed from the cooking surface provides a safer use against possible accidents while cooking.
For a safe operation
- Do not select high heating levels when using non-sticking cooking pots/pans coated with little amount of oil or used without oil (teflon type).
- Do not use glass cooking surface as a surface where you can place something on it or as a cutting surface.
- Do not place metal objects such as cutlery or pot lids on your hob as they may get hot.
- Never use aluminium foil for cooking. Never place food wrapped in aluminium foil on the induction zone.
- Keep magnetic objects such as credit cards or tapes away from the hob while it is operating.
- If there is an oven under your hob and it is being operated, the sensors on the hob may reduce the cooking level or turn off the hob
- Your hob has an automatic shut-off system. Detailed information about this system is provided in the following sections. However, if you use thin based pots for your cooking, these pots shall heat up very quickly and the
bottom of the pan may melt and damage the cooking surface and the appliance before the automatic shut-off system is activated.
Cooking pots /pans
You shall use ferromagnetic, quality cooking pots/pans which bear a label or warning that it is compatible for induction cooking only with your induction hob. Generally, the higher the iron content, the better the cooking pots/pans shall perform. The base diameter of the cooking pots/pans shall match the induction zone. Suggested dimensions are listed below.
Suitable pots/pans:
• Cast iron pots/pans
• Enamelled steel pots/pans
- Steel and stainless steel pots/pans (with label or warning indicating that it is induction compatible)
Unsuitable pots/pans:
• Aluminium pots/pans
• Copper pots/pans
- Glass pots/pans
- Pottery
• Ceramic and porcelain
Recommendations
- Use flat bottomed cooking pots/pans only. Do not use pots/pans with convex or concave bases.
- Use cooking pots/pans with thick, processed bases only. If you use thin based pots, these pots shall heat up very quickly and the bottom of the pan may melt and damage the cooking surface and the appliance before the automatic shut-off system is activated. Sharp edges may cause scratches on the surface.
- The bases of some cooking pots/pans have a smaller ferromagnetic field than its true diameter. Only this area is heated by the hob. Therefore, the heat is not evenly distributed and the cooking performance is decreased. Moreover, such cooking pots/pans may not be detected by large induction hobs. Thus, the cooking hob shall be selected according to the size of the ferromagnetic field.
ENGLISH
- Some cooking pots/pans have a base that contains non-ferromagnetic materials such as aluminium. These types of cooking pots/pans may not heat adequately or may not be detected by the induction hob at all. In some cases, a bad pots/pans warning may appear.
- Equal distribution of the cookware on the right and left and center hobs for the selection of hobs affects the cooking performance positively while cooking multiple meals on the induction hobs.
Pan detection
- The pan detection ensures a perfect safety. The induction doesn't work:
- If there is no pan on the heating zone or if this pan is not adapted to the induction. In this case it is impossible to increase the power and the display shows [U]. This symbol disappears when a pan is put on the heating zone.
- If the pan is removed from the heating zone the operation is stopped. The display shows [U]. The symbol [U] disappears when the pan is put back to the heating zone. The cooking continues with the power level set before.
- After use, switch the heat element off: don't let the pan detection [U] active.
Recommended cooking pots/pans sizes
| Diameter of cooking zone - mm | Pot diameter - mm |
| 145 min. 100 - max 145 | |
| 260 min. 140 - max 260 | |
| 210 min. 140 - max 210 |
The detection of cooking pots/pans by the induction hobs depend on the diameter and material of the ferromagnetic in the base of the pots/pans. To ensure detection of the cooking pots/pans and achieve an efficient cooking, the cooking pots/pans shall be selected as per the size of your hob. The cooking pots/pans sizes recommended for hob sizes are given above.
Boiling behavior may vary depending on the pot types, size of the pot and size of the
cooking zone. For a more homogenous boiling behavior, a one step larger cooking zone might be used. To use a larger cooking zone does not cause wasting of energy at induction hobs, because the heat is only created in the relevant pot area.
Tips for glass ceramic plate
- The glass ceramic surface is heat-resistant and insensitive to large temperature deviations.
- Do not use the glass ceramic plate for keeping objects or as cutting surface.
- WARNING: Do not cook popcorn in prepackaged aluminum containers on the cook top. They could leave aluminum marks that cannot be removed completely.
- Use pot and pans with ground bottoms. Sharp edges cause scratches on the sur-face.
- Do not use aluminum pots and pans. Aluminum damages the glass ceramic surface.
- WARNING: Glazed cooking utensils - only certain types of glass, glass/ceramic, ceramic, earthenware, or other glazed utensils are suitable for range-top service without breaking due to the sudden change in temperature.
- For foods containing sugar in any form, clean up all spills and soils as soon as possible. Allow the cook-top to cool down slightly. Then, while wearing oven mitts, remove the spills while the surface is still warm. If sug-ary spills are allowed to cool down, they can adhere to the cook-top and can cause pitting and permanent marks.
- WARNING: Use pot and pans with ground bottoms. Sharp edges cause scratches on the surface.
- WARNING: Avoid scratching the glass cook top. The cook top can be scratched with items such as knives, sharp instruments, rings or other jewelry and rivets on clothing.
- WARNING: If a wet sponge or cloth is used to wipe spills on a hot cooking area, be careful to avoid steam burn. Some cleaners can produce noxious fumes if applied to a hot surface.
Utensil handles should be turned inward and not extend over adjacent Face units. To reduce the risk of burns, ignition of flammable materials, and spillage due to unintentional contact with the utensil, the handle of a utensil should be positioned so that it is turned inward, and does not extend over adjacent surface units.

text_image
DANGERTipping of pan
Make sure that the handles of cookware do not stick out over the edge of the appliance, to avoid them being knocked over by accident. This also makes it more difficult for children to reach the cooking pans.
- Ensure handles of pans cannot accidentally be caught or knocked and do not get hot by adjacent heating zones. Avoid pans that are unstable and easily tipped. Pans that are too heavy to move easily when filled can also be a hazard.
- WARNING: Do not store items of interest to children in cabinets above a range or on the back guard of a range - children climbing on the range to reach items could be seriously injured.
Saucepan selection
- Glass ceramic surface is heatproof and is not affected by big temperature differences.
- Do not use the glass ceramic surface as a place of storage or as a cutting board.
- Use only the saucepans and pans with machined bottoms. Sharp edges create scratches on the surface.
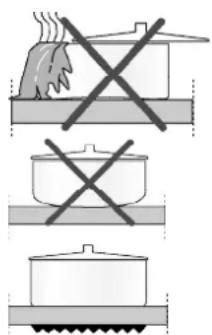
text_image
Diagram showing three cooking methods: boiling pan, cooking pot, and boiling pan with crossed-out X marks.Spills may damage the glass ceramic surface and cause fire.
Do not use vessels with concave or convex bottoms.
Use only the saucepans and pans with flat bottoms. They ensure easier heat transfer.
For induction hobs, use only vessels suitable for induction cooking.
Saucepan test
Use following methods to test whether your saucepan is compatible with the induction hob or not.
- Your saucepan is compatible if its bottom holds magnet.
- Your saucepan is compatible if " ∥" does not flash when you place your saucepan on cooking zone and start the hob.
You can use steel, teflon or aluminium saucepans with special magnetic bottom that contains labels or warnings indicating that the saucepan is compatible with induction cooking. Glass and ceramic vessels, pots and the stainless steel vessels with non-magnetic aluminium bottom should not be used.
Saucepan recognition-focusing system
In induction cooking, only the area covered by the vessel on the relevant cooking zone is energised. The vessel's bottom is recognised by the system and only this area is heated automatically. Cooking stops if the cooking vessel is lifted from the cooking zone during cooking. Selected cooking zone and "I" symbol flashes alternately.
Safe use
Do not select high heating levels when you will use a non-sticking (teflon) saucepan with no oil or with very little oil.
Do not put metal items such as forks, knives or saucepan covers onto your hob since they can get heated.
Never use aluminium folio for cooking. Never place food items wrapped with aluminium folio onto the cooking zone.
If there is an oven under your hob and if it is running, sensors of the hob can decrease the cooking level or turn off the oven.
When the hob is running, keep items with magnetic properties such as credit cards or cassettes away from the hob.
Selecting cooking zone suitable to the vessel.
The cooking zones are, until a certain limit, automatically adapted to the diameter of the pan.
However the bottom of this pan must have a minimum of diameter according to the corresponding cooking zone.
To obtain the best efficiency of your hob, please place the pan well in the centre of the cooking zone.
| Large cooking zone | Normal cooking zone | Small cooking zone |
| 10,3 inch (260 mm) | 8,3 inch (210 mm) | 5,7 inch (145 mm) |
| • Automatically fits to the saucepan.• Distributes the power ideally.• Provides perfect heat distribution. Used to cook dishes such as large crepes or large fishes rare or very rare. | • Automatically fits to the saucepan.• Distributes the power ideally.• Provides perfect heat distribution. Used for all kinds of cookings. | • Used for slow cookings (sauces, creams)• Used to prepare small portions or portions based on number of persons. |
Using the burners/plates
- DANGER: Avoid scratching or impacting glass doors, cook tops or control panels. Doing so may lead to glass breakage. Do not cook on a product with broken glass. Shock, fire or cuts may occur.
- DANGER: Do not use glass ceramic plates with cracks. Water may enter into the cracks and cause a short circuit.
- DANGER: If the surface is damaged in any way (e. g. visible cracks), switch off the device immediately to reduce the risk of an electric shock. If cooktop should break, cleaning solutions and spillovers may penetrate the broken cook-top and create a risk of electric shock. Contact a qualified technician immediately.
Control panel
text_image
ON ON/OFF 100 9 A B C D ON ON/OFF 100 9 - +A Front left induction cooking zone control display
B Rear left induction cooking zone control
C Right induction cooking zone control display
D General function control display
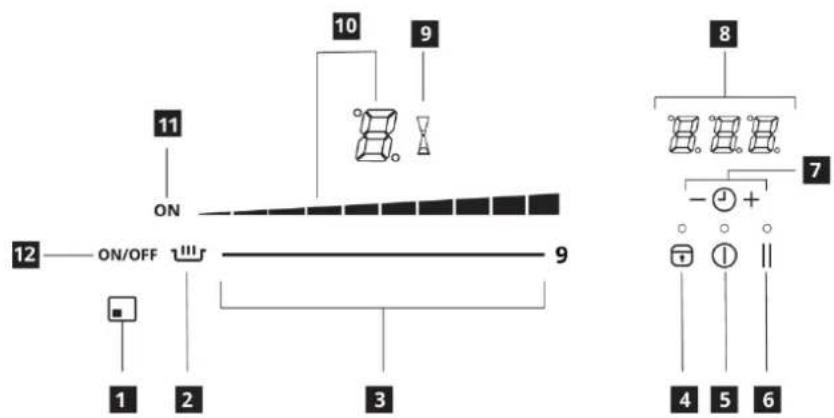
text_image
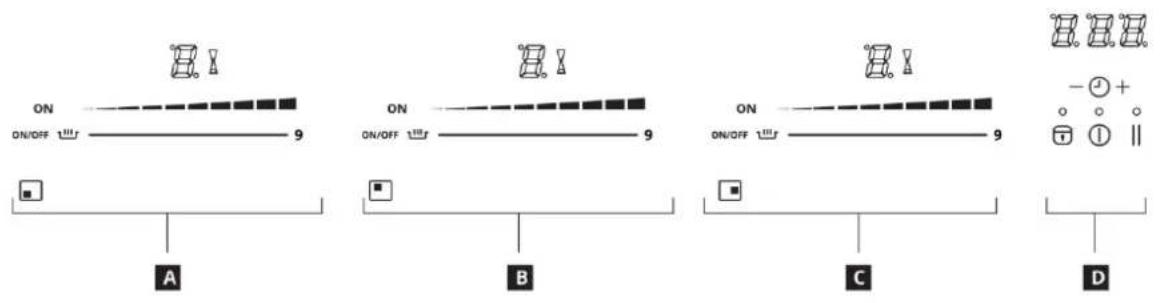
11 ON 10 9 12 —— ON/OFF ———— 9 1 2 3 8 7 - + 4 5 61 Location information from cooking zone
2 Keep warm key
3 Power selection zone "Slider"
4 Locking key
5 Main On/Off key
6 Pause/Recall key
7 Timer keys
8 Timer display
9 Timer symbol
10 Power display
11 Cooking zone ON display
12 Cooking zone "On/Off" key

DANGER: Broken glass!
Do not let any objects fall onto the hob. Even small objects (e.g. salt shaker) may damage the hob.
Do not use glass ceramic hobs with cracks. Water may enter into the cracks and cause a short circuit.
If the surface is damaged in any way (e. g. visible cracks), switch off the device immediately to reduce the risk of an electric shock.

Graphics and figures are for informational purposes only. Actual appearances or functions may vary according to the model of your hob.
| Display | Designation | Description |
| 0 | Zero | The heating zone is activated. |
| 1...9 | Power level | Selection of the cooking level. |
| U | No pan detection | No pan or inadequate pan. |
| A | Heat accelerator | Automatic cooking. |
| E | Error message | Electronic failure. |
| H | Residual heat | The heating zone is hot. |
| P | Booster level | The booster level is activated. |
| Keep warm | Maintain automatically of 107.6, 158 or 201.2°F | |
| II | Pause&Play | The hob is in pause. |
Ventilation
The cooling system is fully automatic. The cooling fan starts with a low speed when the calories brought out by the electronic system reach a certain level. The ventilation starts his high speed when the hob is intensively used. The cooling fan reduces his speed and stops automatically when the electronic circuit is cooled enough.
Sensitive touch
Your ceramic hob is equipped with electronic controls with sensitive touch keys. When your finger presses the key, the corresponding command is activated. This activation is validated by a control light, a letter or a number in the display and/or a "beep" sound. In the case of a general use press only one key at the same time.
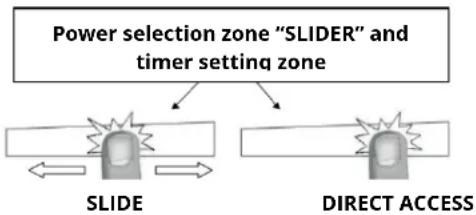
Power selection zone "SLIDER" and timer setting zone
To select the power with the slider, slide your finger on the "SLIDER" zone. You can already have a direct access if you put your finger directly on the chosen level.
flowchart
graph TD
    A["Power selection zone "SLIDER" and timer setting zone"] --> B["SLIDE"]
    A --> C["DIRECT ACCESS"]
Starting-up
Start up / switch off the hob:
| Action | Control panel | Display |
| To start | press[ main On/Off ] key | [ ON ] |
| To stop | press[ main On/Off ] key | nothing or [ H ] |
Start up / switch off a heating zone:
| Action | Control panel | Display |
| Switch on cooking zone | Press cooking zone “On/Off” key | [ON] |
| To set (adjust the power) | slide on the “SLIDER” to the right or to the left | [1] to [P] |
| To stop | slide to [0] on “SLIDER” | [0] or [H] |
If no action is made within 20 second the electronics returns in waiting position.
Residual heat indication
After the switch off of a heating zone or the complete stop of the hob, the heating zones are still hot and indicates [H] on the display.
The symbol [H] disappears when the heating zones may be touched without danger.
As far as the residual heat indicators are on light, don't touch the heating zones and don't put any heat sensitive object on them. There are risks of burn and fire.
Booster function
Booster [P] grant a boost of Power to the selected heating zone.
If this function is activated the heating zones work during 10 minutes with an ultra high Power. This is foreseen for example to heat up rapidly big quantities of water, like nuddles.
Start up / Stop the Booster:
| Action | Control panel | Display |
| Switch on cooking zone | Press cooking zone "On/Off" key | [ON] |
| Start up the Booster | Slide to the end of the "SLIDER" or press directly on the end of the "SLIDER" | [P] |
| Stop the Booster | Slide on the "SLIDER" | [9] to [0] |
Power management:
The hole cooking hob is equipped with a maximum of Power. When the Power function is activated, and in order to exceed the maximum Booster, the electronic system orders to reduce automatically the power level of an other heating zone. The display is blinking on [9] during a few seconds and then shows the maximum of power allowed:
| Heating zone selected | The other heating zone: (example: Booster level 9) |
| [P] is displayed | [9] goes to [6] or [8] depend-ing the type of zone |
Timer
The timer is able to be used simultaneous with all heating zones and this with different time settings (from 0 to 159 minutes) for each heating zone.
Setting and modification of the cooking time:
| Action | Control panel | Display |
| Switch on cooking zone | Press cooking zone “On/Off” key | [ON] |
| Select the power level | Slide on the “SLIDER” | [1] to [P] |
| Select the Timer | Press simultaneously key [-] and [+] from the timer until the desired display is on | Timer display on |
| Decrease the time | Press key [-] from the timer | [60] to 59, 58... |
| Increase the time | Press key [+] from the timer | Time increase |
After a few seconds, the [min] display stops with blinking.
The time is confirmed and the timer starts.
To stop the cooking time:
| Action | Control panel | Display |
| Select the Timer | Press simultaneously key [- ] and[ + ] from the timer until the desired display is on | Timer display on |
| Stop the time | Press key [- ] from the timer | [ 000 ] |
If several timers are activated, repeat the process.
Egg timer function:
Egg timer is an independent function. It stops as soon as a heating zone starts up. If the egg timer is on and the hob is switched off, the timer continues until time runs out.
| Action | Control panel | Display |
| Activate the hob | Press[ main On/Off] key | [0] |
| Select the Timer | Press simultaneously key [- ] and [ + ] from the timer | [000] |
| Decrease the time | Press key [- ] from the timer | [60] to 59, 58... |
| Increase the time | Press key [ + ] from the timer | Time increase |
After a few seconds, the [min] display stops with blinking.
The time is confirmed and the timer starts.
Automatic stop at the end of the cooking time:
As soon as the selected cooking time is finished the timer displays blinking [000] and a sound rings. To stop the sound and the blinking, press the key [-] and [+].
Automatic cooking
All the cooking zones are equipped with an automatic cooking device. The cooking zone starts at full power during a certain time, and then reduces automatically its power on the pre-selected level.
Start-up:
| Action | Control panel | Display |
| Switch on cooking zone | Press cooking zone “On/Off” key | [ON] |
| Power level selection (for example «7 ») | Slide on the “SLIDER” to [7] and stay 3s | [7] is blinking with [A] |
Switching off the automatic cooking:
| Action | Control panel | Display |
| Power level selection | Slide on the “SLIDER” | [9] to [0] |
Stop&Go function
This function brakes all the hob's cooking activity temporarily and allows restarting with the same settings.
Start up/stop the pause function:
| Action | Control panel | Display |
| Engage pause | Press [ II ] | [ II ] and control light on |
| Stop the pause | Press [ II ]Press on the animated "slider" | "Slider"animated previous settings |
Recall Function
After switching off the hob (press main On/Off key), it is possible to recall the last settings.
- Cooking stages of all cooking zones (Booster)
• minutes and seconds of programmed cooking zone-related timers - Keep warm function
The recall procedure is following:
- Press [main On/Off] key
- Then press [II] before the light stops blinking. The previous settings are again active.
"Keep warm" Function
This function allows the reach and automatically-ly maintains at the temperature of 107.6, 158 or 201.2°F.
This will avoid liquids overflowing and fast burning at the bottom of the pan.
To engage, to start the function « Keep warm »:
| Action | Control panel | Display |
| Switch on cooking zone | Press cooking zone “On/Off” key | [ON] |
| 107.6°F to engage | Press on key [Keep warm] | |
| 158°F to engage | Press and hold key [Keep warm] 2s | |
| 201.2°F to engage | Press and hold key [Keep warm] 4s | |
| To stop | Slide on the "SLIDER" or press key [Keep warm] until [0] | [0] to [9] |
| [0] |
The maximum duration of keeping warm is 2 hours.
Control panel locking
To avoid modification of the setting of the cooking zones, in particular during cleaning, the control panel can be locked (with exception to the main On/Off key).
| Action | Control panel | Display |
| Locking the hob | Press [ ] during 6s | locking light on |
| Unlock the hob | Press [ ] during 6s | locking light off |
Automatic turning off system
The hob control has an automatic turn off system. If one or more hob zone(s) are left on, the hob zone turns off automatically after a while (See Table-1). In case of a timer assigned to the hob, the timer screen is turned off then, too.
The time limit for automatic turn off de-pends on the selected temperature level. Maximum operating period is applied for this temperature level.
The hob zone may be operated by the user again after it is turned off automatically as described above.
| Temperature level | Operating time limit - hours |
| 0 | -- |
| low | 2.0 |
| 1 | 8.7 |
| 2 | 6.7 |
| 3 | 5.3 |
| 4 | 4.3 |
| 5 | 3.5 |
| 6 | 2.8 |
| 7 | 2.3 |
| 8 | 1.9 |
| 9 | 1.5 |
| P | 10 minutes |
This section describes tips on preparing and cooking your food.
- Never fill the pan with oil more than one third of it. Do not leave the hob unattended when heating oil. Overheated oils bring risk of fire. Never attempt to extinguish a possible fire with water! When oil catches fire, cover it with a fire blanket or damp cloth. Turn off the hob if it is safe to do so and call the fire department.
- Before frying foods, always remove their excess water and put them inside the heated oil slowly. Make sure that frozen foods are defrosted before frying.
- The cooking temperature and time values given for foods may vary depending on the recipe and amount.
Examples of cooking power setting
The values below are indicative.
| Keep warm to 2 | Melting, Reheating | Sauces, butter, chocolate, gelatine Dishes prepared beforehand |
| 2 to 3 | Simmering, Defrosting | Rice, pudding, sugar syrupDried vegetables, fish, frozen products |
| 3 to 4 | Steam | Vegetables, fish, meat |
| 4 to 5 | Water | Steamed potatoes, soups, pasta, fresh vegetables |
| 6 to 7 | Medium cooking, Simmering | Meat, lever, eggs, sausages Goulash, roulade, tripe |
| 7 to 8 | Cooking | Potatoes, fritters, wafers |
| 9 | Frying, roosting,Boiling water | Steaks, omelettes, fried dishes Water |
| P | Frying, roosting,Boiling water | scallops, steaksBoiling significant quantities of water |
How the operate the oven
General information on baking, roasting and broiling
WARNING: Hot surfaces cause burns! Product may be hot when it is in use. Never touch the hot burners, inner sections of the oven, heaters and etc. Keep children away. Always use heat resistant oven gloves when putting in or removing dishes into/from the hot oven.
⚠️ DANGER: Hot surfaces may cause burns! Be careful when opening the oven door as steam may escape. Exiting steam can scald your hands, face and/or eyes.
Tips for baking
- Use non-sticky coated appropriate metal plates or aluminum vessels or heat-resistant silicone moulds.
- Make best use of the space on the rack.
- Place the baking mould in the middle of the shelf.
- Select the correct rack position before turning the oven or Broil on. Do not change the rack position when the oven is hot.
- Always place oven racks in desired location while oven is cool. If rack must be moved while oven is hot, do not let potholder contact hot heating element in oven.
- Keep the oven door closed.
Tips for roasting
- Seasoning with lemon juice and black pepper will improve the cooking performance when cooking a whole chicken, turkey or a large piece of meat.
- Meat with bones takes about 15 to 30 minutes longer before it is cooked than a roast of the same size without bones.
- You should calculate about 4 to 5 minutes cooking time per centimeter height of the meat.
- Let meat rest in the oven for about 10 minutes after the cooking time. The juice is better distributed all over the roast and does not run out when the meat is cut.
- Fish in a fire-resistant dish should be placed on the rack at the medium or lower level.
Tips for broiling
Broiling is ideal for cooking meat, fish and poultry and will achieve a nice brown surface without it drying out to much. Flat pieces, meat skewers and sausages are particularly suited for broiling as are vegetables with a high water content such as tomatoes and onions.
- Distribute the pieces to be broiled on the wire shelf.
- If the broiling is on the wire shelf, locate a dripping pan under it in order to collect the fat.
- Add some water in dripping pan for easy cleaning.
How to use the electric oven
iFood Poisoning Hazard
Do not let food sit in oven more than one hour before or after cooking. Doing so can result in food poisoning or sickness.
WARNING
Never cover any slots, holes or passages in the oven bottom or cover an entire rack with materials such as aluminium foil. Doing so blocks airflow through the oven and may cause carbon monoxide poisoning. Aluminium foil linings may also trap heat, causing a fire hazard.
Select temperature and operating mode
The operating modes of the electric oven are selected with the function knob. The temperature is adjusted with the thermostat knob.
All oven functions are turned off by turning the relevant knob to off (upper) position.
- Set thermostat knob to the desired temperature.
- Set function knob to the required operating mode.
» The oven heats up to the adjusted temperature and maintains it. During heating, temperature lamp stays on.
Switch off electric oven
Turn function knob and thermostat knob to off position (top).
Rack positions (For models with wire shelf) It is important to place the wire shelf onto the side rack correctly. Wire shelf must be inserted between the side racks as illustrated in the figure.
Do not let the wire shelf stand against the rear wall of the oven. Slide your wire shelf to the front section of the rack and settle it with the help of the door in order to obtain a good broil performance.
Operating modes
The order of operating modes shown here may be different from the arrangement on your product.
Top and bottom heating

Top and bottom heating are in operation. Food is heated simultaneously from the top and bottom. For example, it is suitable for cakes, pastries, or cakes and casseroles in baking moulds. Cook with one tray only.
Bottom heating

Only bottom heating is in operation. It is suitable for pizza and for subsequent browning of food from the bottom.
Fan suppo
rted bottom/top heating

Top heating, bottom heating plus fan (in the rear wall) are in operation. Hot air is evenly distributed throughout the oven rapidly by means of the fan. Cook with one tray only.
Operating with fan

The oven is not heated. Only the fan (in the rear wall) is in operation. Suitable for thawing frozen granular food slowly at room temperature and cooling down the cooked food.
Fan Heating

Warm air heated by the rear heater is evenly distributed throughout the oven rapidly by means of the fan. It is suitable for cooking your meals in different rack levels and preheating is not required in most cases. Suitable for cooking with multi trays.
"3D" function

Top heating, bottom heating and fan assisted heating (in the rear wall) are in operation. Food is cooked evenly and quickly all around. Cook with one tray only.
Broil

Large broil at the ceiling of the oven is in operation. It is suitable for broiling large amount of meat.
- Put big or medium-sized portions in correct rack position under the broil heater for broiling.
- Set the temperature to maximum level.
- Turn the food after half of the broiling time.
Broil with convection air

Broiling effect is not as strong as in Full Broil
- Put small or medium-sized portions in correct shelf position under the broil heater for broiling.
- Set the desired temperature.
- Turn the food after half of the broiling time.
Using the oven clock

text_image
1 2 3 4 5 6 ≡ eco 88:88 + - 12 11 10 9 8 71 Adjustment key
2 Keylock symbol
3 Clock symbol
4 Alarm volume symbol
5 Eco mode symbol
6 Plus key
7 Minus key
8 Time pie symbol
9 Alarm symbol
10 End of Cooking Time symbol
11 Cooking Time symbol
12 Program key
i Maximum time that can be set for end of cooking is 5 hours 59 minutes. Program will be cancelled in case of power failure. You must reprogram the oven.
While making any setting, related symbols will flash on the display. You must wait for a short time for the settings to take effect.
i If no cooking setting is made, time of the day cannot be set.
i Remaining time will be displayed if cooking time is set when the cooking starts.
Cooking by setting the cooking time;
You can set the oven so that it will stop at the end of the specified time by setting the cooking time on the timer.
- Select the function for cooking.
- Touch until symbol appears on display for cooking time.
- Set the cooking time with + keys.
» » After the cooking time is set, I symbol and the time slice will appear on display continuously.
- Place the dish into the oven and set the temperature with temperature knob. Cooking will start.
» Cooking time starts to count down on display when cooking starts and all parts of time slice symbol is lit. The set cooking time is divided into 4 equal parts and when the time of each parts ends, the symbol of that parts turns off. So you can understand the ratio of remaining cooking time to total cooking time easily.
Setting the the end of cooking time to a later time; (This feature is optional. It may not exist on your product.)
After setting the cooking time on the timer, you can set the end of cooking time to a later time.
- Select the function for cooking.
- Touch until symbol appears on display for cooking time.
- Set the cooking time with + keys.
» » Once the Cooking Time is set, I symbol will appear on display continuously. -
Touch until symbol appears on display for the end of cooking time.
-
Press + keys to set the end of cooking time.
» After the cooking time is set, |→symbol plus →| symbol and the time slice will appear on display continuously. Once the cooking starts, →| symbol disappears.
- Place the dish into the oven and set the temperature with temperature knob. Cooking will start.
» Oven timer calculates the startup time by deducting the cooking time from the end of cooking time you have set. Selected operating mode is activated when the startup time of cooking has come and the oven is heated up to the set temperature. It maintains this temperature until the end of cooking time.
» Cooking time starts to count down on display when cooking starts and all parts of time slice symbol is lit. The set cooking time is divided into 4 equal parts and when the time of each parts ends, the symbol of that parts turns off. So you can understand the ratio of remaining cooking time to total cooking time easily.
-
After the cooking process is completed, "End" appears on the displayed and the timer gives an audio warning.
-
Audio warning sounds for 2 minutes. To stop the audio warning, just press any key. Audio warning will be silenced and current time will be displayed.
If you press any key at the end of the audio warning, the oven will restart operating. Turn the temperature knob and function knob to "0" (off) position to switch off the oven in order to prevent re-operation of the oven at the end of warning.
Activating the keylock
You can prevent oven from being intervened with by activating the key lock function.
- Touch : until symbol appears on display.
» "OFF" will appear on the display. - Press +o activate the key lock.
» Once the key lock is activated, "On" appears on the display and the 🔒 symbol remains lit.
i Oven keys are not functional when the key lock is activated. Key lock will not be cancelled in case of power failure.
To deactivate the keylock
- Touch : until symbol appears on display.
» "On" will appear on the display. - Disable the key lock by pressing the key.
» "OFF" will be displayed once the keylock is deactivated.
Setting the alarm clock
You can use the timer of the product for any warning or reminder apart from the cooking program.
The alarm clock has no influence on the functions of the oven. It is only used as a warning. For example, this is useful when you want to turn food in the oven at a certain point of time. Timer will give an audio warning at the end of the set time.
- Touch until symbol appears on display.
Maximum alarm time can be 23 hours and 59 minutes. - Set the alarm duration by using + - keys.
i Function keys for alarm tone, time of day, display brightness and temperature keys should be at 0 (OFF) position.
» Symbol will remain lit and the alarm time will appear on the display once the alarm time is set.
3. At the end of the alarm time, symbol starts flashing and the audio warning is heard.
Turning off the alarm
- Audio warning sounds for 2 minutes. To stop the audio warning, just press any key.
» Audio warning will be silenced and current time will be displayed.
Cancelling the alarm;
- Touch Ⓤ until symbol appears on display in order to cancel the alarm.
- Press and hold key until "00:00" is displayed.
i Alarm time will be displayed. If the alarm time and cooking time are set concurrently, shortest time will be displayed.
Changing alarm tone
- Touch : until symbol appears on display.
- Adjust the desired alarm tone with + - keys.
- The tone you have set will be activated in a short time.
» Selected alarm tone will appear as "b-01", "b-02" or "b-03" on the display.
Changing the time of the day
To change the time of the day you have previously set:
- Touch : until symbol appears on display.
- Set the time of the day with + keys.
- The time you have set will be activated in a short time.
Economy mode
You can save energy with economy mode while cooking by setting cooking time in the oven.
This mode completes the cooking with the inner temperature of the oven by switching off the heaters before the end of cooking time.
Setting the economy mode
- Touch :symbol until eco symbol appears on display.
» "OFF" will appear on the display.
2. Enable economy mode by touching +key.
» Once the economy mode is activated, "On" appears on the display and the eco symbol remains lit.
Disabling economy mode
- Touch :symbol until eco symbol appears on display.
» "On" will appear on the display. - Disable economy mode by touching key.
» "Off" will be displayed once the eco mode is deactivated.
Setting the screen brightness
- Touch : until d-01 or d-02 or d-03 appears on display for display brightness.
- Set the desired brightness with + keys.
» The time you have set will be activated in a short time.
Cooking times table
① 1st rack of the oven is the bottom rack.
Maximum load capacity of oven tray: 4 kg (8.8 lb).
The timings in this chart are meant as a guide. Timings may vary due to temperature of food, thickness, type and your own preference of cooking.
Baking and roasting
| Dish | Cooking level number | Operating Mode (see p.21) | Rack position | Temperature (°F) | Cooking time (approx. in min.) |
| Cakes in tray* | One level | 4 | 350 | 25... 30 | |
| Cakes in mould* | One level | 2 | 355 | 40 ... 50 | |
| Cakes in cooking paper* | One level | 3 | 350 | 25 ... 30 | |
| 2 levels | 1 - 5 | 350 | 30 ... 40 | ||
| 3 levels | 1 - 3 - 5 | 360 | 45 ... 55 | ||
| Sponge cake* | One level | 3 | 390 | 5 ... 10 | |
| 2 levels | 1 - 5 | 350 | 20 ... 30 | ||
| Cookies* | One level | 3 | 350 | 25 ... 30 | |
| 2 levels | 1 - 5 | 350 ... 375 | 30 ... 40 | ||
| 3 levels | 1 - 3 - 5 | 350 | 35 ... 45 | ||
| Dough pastry* | One level | 2 | 390 | 30 ... 40 | |
| 2 levels | 1 - 5 | 390 | 45 ... 55 | ||
| 3 levels | 1 - 3 - 5 | 390 | 55 ... 65 | ||
| Filled savory pastry* | One level | 2 | 390 | 25 ... 35 | |
| 2 levels | 1 - 5 | 390 | 35 ... 45 | ||
| 3 levels | 1 - 3 - 5 | 375 | 45 ... 55 | ||
| Leaven* | One level | 2 | 390 | 35 ... 45 | |
| 2 levels | 1 - 3 | 375 | 35 ... 45 | ||
| Lasagna* | One level | 2 - 3 | 390 | 30 ... 40 | |
| Pizza* | One level | 2 | 390... 430 | 15 ... 20 | |
| Beef steak (whole) / Roast | One level | 3 | 25 min. max, then 355 ... 375 | 100 ... 120 | |
| Leg of Lamb (casserole) | One level | 3 | 25 min. max, then 355 ... 375 | 70 ... 90 | |
| Roasted chicken | One level | 3 | 15 min. max, then 355 ... 375 | 55 ... 65 | |
| One level | 2 | 15 min. max, then 355 ... 375 | 55 ... 65 | ||
| Turkey (5.5 kg) | One level | 2 | 25 min. max, then 355 ... 375 | 150 ... 210 | |
| One level | 2 | 25 min. max, then 355 ... 375 | 150 ... 210 | ||
| Fish | One level | 2 | 390 | 20 ... 30 | |
| One level | 3 | 390 | 20 ... 30 | ||
| When cooking with 2 trays at the same time, place the deeper tray on the upper rack and the other one on the lower rack.* It is suggested to perform preheating for all foods. | |||||
(**) In a cooking that requires preheating, preheat at the beginning of cooking until the thermostat lamp turns off.
Tips for baking cake
- If the cake is too dry, increase the temperature by 50^ (10°C) and decrease the cooking time.
- If the cake is wet, use less liquid or lower the temperature by 50^ (10°C).
- If the cake is too dark on top, place it on a lower rack, lower the temperature and increase the cooking time.
- If cooked well on the inside but sticky on the outside, use less liquid, lower the temperature and increase the cooking time.
Tips for baking pastry
- If the pastry is too dry, increase the temperature by 50^ (10°C) and decrease the cooking time. Dampen the layers of dough with a sauce composed of milk, oil, egg and yoghurt.
- If the pastry takes too long to bake, pay care that the thickness of the pastry you have prepared does not exceed the depth of the tray.
- If the upper side of the pastry gets browned, but the lower part is not cooked, make sure that the amount of sauce you have used for the pastry is not too much at the bottom of the pastry. Try to scatter the sauce equally between the dough layers and on the top of pastry for an even browning.
i Cook the pastry in accordance with the mode and temperature given in the cooking table. If the bottom part is still not browned enough, place it on one lower rack next time.
Tips for cooking vegetables
- If the vegetable dish runs out of juice and gets too dry, cook it in a pan with a lid
instead of a tray. Closed vessels will preserve the juice of the dish.
- If a vegetable dish does not get cooked, boil the vegetables beforehand or prepare them like canned food and put in the oven.
How to operate the broil
Before using the oven the clock time must be set. If the clock time is not set, the main oven will not work.
WARNING
Hot surfaces may cause burns! Keep children away from the product.
Close oven door during broiling.
Switching on Broil
- Set the function knob onto the broil symbol.
- Set broil temperature.
- Preheat for approximately 5 minutes, if it is necessary.
» The thermostat lamp is switched on.
Switch off broil
- Turn the function and thermostat knobs to off (upper) position.
| Food | Rack position | Broiling time (approx.) |
| Fish | 4...5 | 20...25 min. # |
| Sliced chicken | 4...5 | 25...35 min. |
| Lamb chops | 4...5 | 20...25 min. |
| Roast beef | 4...5 | 25...30 min. # |
| Veal chops | 4...5 | 25...30 min. # |
| Toast bread | 4 | 1...2 min. |
| # depending on thickness | ||
Care and cleaning
General information
Service life of the product will extend and the possibility of problems will decrease if the product is cleaned at regular intervals.

DANGER: Disconnect the product from main supply before starting maintenance and cleaning works.
There is the risk of electric shock!

DANGER: Allow the product to cool down before you clean it.
Hot surfaces may cause burns!
- Clean the product thoroughly after each use. In this way it will be possible to remove cooking residues more easily, thus avoiding these from burning the next time the appliance is used.
- No special cleaning agents are required for cleaning the product. Use warm water with washing liquid, a soft cloth or sponge to clean the product and wipe it with a dry cloth.
- Do not use any abrasive cleaning materials!
- Do not use cleaning agents that contain acid or chloride to clean the stainless or inox surfaces and the handle. Use a soft cloth with a liquid detergent (not abrasive) to wipe those parts clean, paying attention to sweep in one direction.

IMPORTANT: The surface might get haged by some detergents or cleaning serials. Do not use aggressive detergents, lighting powders/creams or any sharpects during cleaning. Do not use harshasive cleaners or sharp metal scrapers to paint the oven door glass since they can match the surface, which may result in ttering of the glass.

IMPORTANT: Do not use steam ners to clean the appliance as this may se an electric shock.

CAUTION: The accessories and parts of appliance are not suitable for using in a dishwasher.
Cleaning the burner/plate
Ceramic hobs
Always rinse off fully with a clean cloth wrung out in clean water (as residue could damage the ceramic glass surface next time the hob is used).
In no case should crusts be scratched off with serrated edge knives, steel wool or the like. Remove calcium stains (yellow staining) with small amounts of decalcifying agents such as Durgol, vinegar or lemon juice.
Do not allow vinegar, coffee, milk, saltwater, lemon or tomato juice to remain in contact with enamel parts (i.e. inside the oven).
Apply agent with a sponge and, in the event of heavier soiling, let it work in for a longer period of time. Afterwards, wash off hob with water.

WARNING: Sugar-based food such as hard and syrup should immediately be ped off without waiting for the surface to down. Otherwise the burner/plate may be manently
Cleaning the control panel
Clean the control panel and knobs with a damp cloth and wipe them dry.

IMPORTANT: Do not remove the control bs for control panel cleaning.
Cleaning the oven
No oven cleaner or any other special cleaning agent is required for cleaning the oven. It is recommended to wipe the oven with a damp cloth while it is still warm.
Do not allow fat or oils to build up in the oven base, or oven accessories.
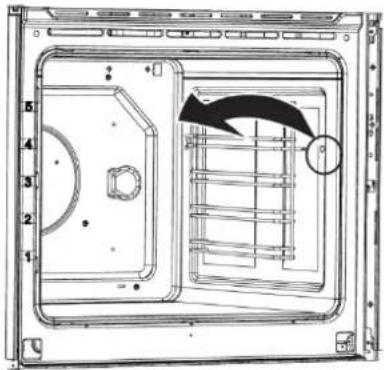
To clean the side wall
- Remove the front section of the side rack by pulling it in the opposite direction of the side wall.
- Remove the side rack completely by pulling it towards you.
natural_image
Technical line drawing of a mechanical housing or enclosure with internal components and a directional arrow (no text or symbols)Clean oven door
To clean the oven door, use warm water with washing liquid, a soft cloth or sponge to clean the product and wipe it with a dry cloth.
Don't use any harsh abrasive cleaners or sharp metal scrapers for cleaning the oven door. They could scratch the surface and destroy the glass.
Removing the oven door
When removing the oven door, make sure oven is cool and power to the oven has been turned off before removing the door.
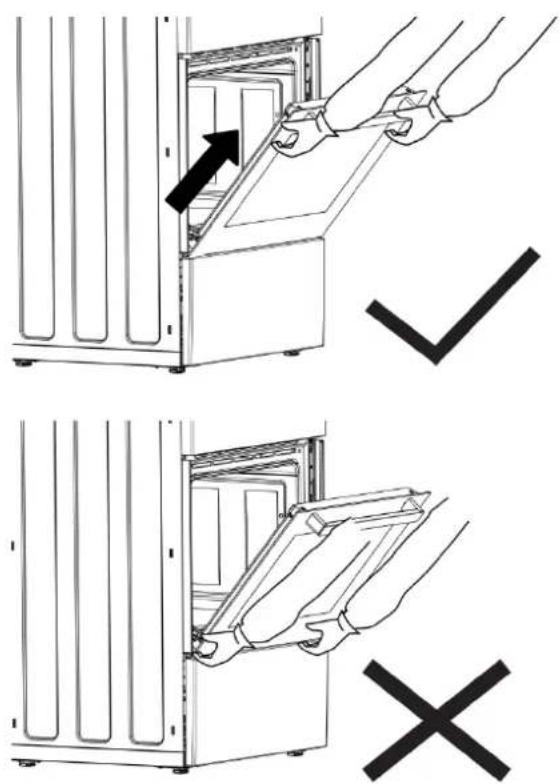
text_image
Diagram showing two steps of installing or removing a refrigerator panel, with arrows indicating removal and rejection.
CAUTION: When removing the product over, do not hold it under the cover.
Failure to do so could result in electrical shock or burns. The oven door is heavy and parts of it are fragile. Use both hands to remove the oven door. The door front is glass. Handle carefully to avoid breakage. Grasp only the sides of the oven door. Do not grasp the handle as it may swing in your hand and cause damage or injury. Failure to grasp the oven door firmly and properly could result in personal injury or product damage. To avoid injury from hinge bracket snapping closed, be sure that both levers are securely in place before removing the door. Also, do not force door open or closed—the hinge could be damaged and injury could result. Do not lay removed door on sharp or pointed objects as this could break the glass. Lay on a flat, smooth surface, positioned so that the door cannot fall over.
- Open the front door (1).
- Open the clips at the hinge housing (2) on the right and left hand sides of the front door by pressing them down as illustrated in the figure.
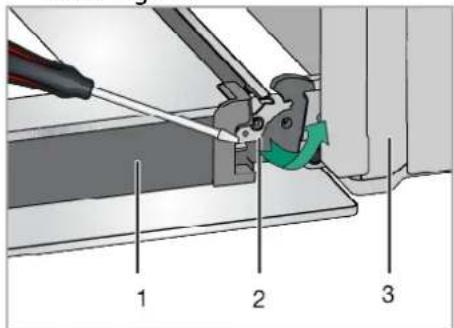
text_image
Technical diagram showing mechanical assembly with numbered components and a green arrow indicating motion direction1 Door
2 Hinge lock(closed position)
3 Oven
4 Hinge lock(open position)
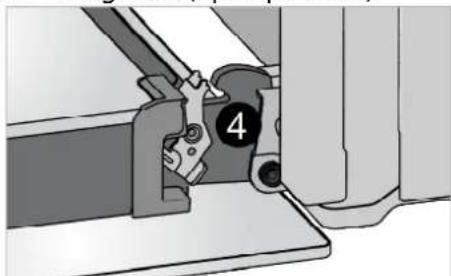
natural_image
Mechanical assembly diagram showing a clamping tool interacting with a bracket (no text or symbols visible)- Move the front door to half-way.
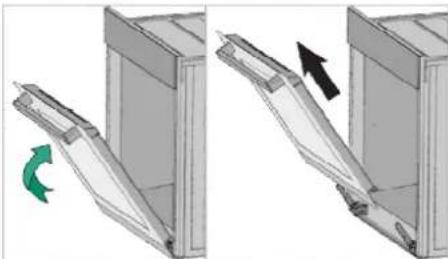
natural_image
Diagram showing two mechanical components with directional arrows indicating movement, no text or symbols present- Remove the front door by pulling it upwards to release it from the right and left hinges.
i Steps carried out during removing process should be performed in reverse order to install the door. Do not forget to close the clips at the hinge housing when reinstalling the door.
Replacing the oven lamp
DANGER:
Before replacing the oven lamp, make sure that the product is disconnected from mains and cooled down in order to avoid the risk of an electrical shock. Hot surfaces may cause burns!
i The lenses must be in place when using the oven.
The lenses serve to protect the light bulb from breaking.
The lenses are made of glass. Handle carefully to avoid breakage. Broken glass could cause an injury.
(i) Position of lamp might vary from the figure.
Oven lamps can be obtained from Authorised Service Agents or technician with license.
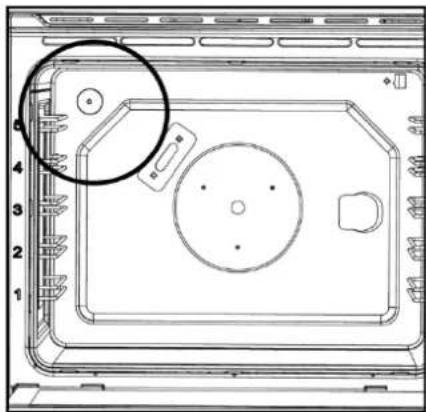
natural_image
Top-down schematic of a device casing with internal components and a highlighted circular area (no text or symbols)Each oven is equipped with one halogen lights located in the back wall of the oven. The lights are switched on when the door is opened or when the oven is in a cooking cycle. The oven lights are not illuminated during self clean. Each light assembly consists of a removable lens, a light bulb as well as a light socket housing that is fixed in place. Light bulb replacement is considered to be a routine maintenance item.
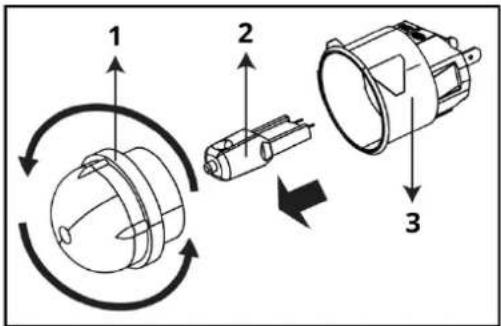
text_image
Diagram illustrating three-step assembly of a mechanical component with labeled parts and directional arrows indicating rotation or assembly.1 Lens
2 Halogen bulb
3 Bulb socket (fixed in place)
- Disconnect the product from mains.
- Turn the glass cover counter clockwise to remove it.
- Pull out the oven lamp from its socket and replace it with the new one.
• Install the glass cover.
Troubleshooting
Consult the Authorised Service Agent or technician with license or the dealer where you have purchased the product if you cannot remedy the trouble although you have implemented the instructions in this section. Never attempt to repair a defective product yourself.
If one of the symbols above persists, call the after sales service.
| Problem | Possible Cause | Solution |
| Oven emits steam when it is in use. | It is normal that steam escapes during operation. | This is not a fault. |
| Product emits metal noises while heating and cooling. | When the metal parts are heated, they may expand and cause noise. | This is not a fault. |
| There is no ignition spark No current. Check fuses in the fuse box. | ||
| Oven light does not work. | Oven lamp is defective. | Replace oven lamp. |
| Power is cut. | Check if there is power. Check the fuses in the fuse box. If necessary, replace or reset the fuses. | |
| Product does not operate | The mains fuse is defective or has tripped | Check fuses in the fuse box. If necessary, replace or reset them. |
| Product is not plugged into the (grounded) socket | Check the plug connection. | |
| Oven does not heat | Function and/or Temperature are not set | Set the function and the temperature with the Function and/or Temperature knob/key. |
| In models equipped with a timer, the timer is not adjusted | Adjust the time. | |
| Power is cut | Check if there is power. Check the fuses in the fuse box. If necessary, replace or reset the fuses. | |
| Clock display is blinking or clock symbol is on | A previous power outage has occurred. | Adjust the time / Switch of the product and switch it on again. |
| The hob or the cooking zone doesn't start-up | The hob is badly connected on the electrical network. | |
| The protection fuse cut-off. | ||
| The looking function is activated. | ||
| The sensitive keys are covered of grease or water. | ||
| An object is put on a key. | ||
| The control panel displays [U] | There is no pan on the cooking zone. | |
| The pan is not compatible with induction. | ||
| The bottom diameter of the pan is too small. | ||
| The bottom diameter of the pan is too small | The electronic system is defective. | |
| Disconnect and replug the hob. | ||
| Call after sales | ||
| One or all cooking zone cut-off | The safety system functioned. | |
| You forgot to cut-off the cooking zone for a long time. One or more sensitive keys are covered. | ||
| The pan is empty and its bottom overheated. | ||
| The hob also has an automatic reduction of Booster level and breaking Automatic overheating | ||
| Continuous ventilation after cutting off the hob | This is not a failure, the fan continuous to protect the electronic device. | |
| The fan cooling stops automatically. | ||
| The automatic cooking system doesn't start-up | The cooking zone is still hot [H]. | |
| The highest Booster level is set [9]. | ||
| The control panel displays [☐] | Refer to the chapter "Keep warm". | |
| The control panel displays [II] | Refer to the chapter "Stop&Go" | |
| The control panel displays [☐] or [Er03] | An object or liquid covers the control keys. The symbol disappear as soon as the key is released or cleaned. | |
| The control panel displays [E2] | The hob is overheated, let it cool and then turn it on again | |
| The control panel displays [E8] | The air inlet of the ventilator is obstructed, release it | |
| Use the control panel displays [U400] | The hob is not connected to the network. Check the connection and reconnect the hob. | |
| The control panel displays [E47] | The hob is not connected to the network. Check the connection and reconnect the hob. | |
| The control panel displays [E] | The electronic system is defective. | |
| Disconnect and replug the hob. | ||
| Call after sales. | ||
Technical data
| GENERAL | |
| External dimensions (height / width / depth) | 33 1/3 /23 1/2 x 23 1/2 inches |
| Voltage / frequency/ Total electric power | 120/240 V;60 Hz 2N ~ 9,8 kW120/208 V;60 Hz 2N ~ 7,4 kW |
| Fuse protection | Min. 40 A |
| Cable type / section | DTR 4x10 AWG |
| Cable length | max. 6 ft |
| Cooking plates | |
| Rear left | Induction cooking plate |
| Size | 5,7" (145 mm) |
| Power | 1400/2200 W |
| Front left | Induction cooking plate |
| Size | 8,3 " (210 mm) |
| Power | 2300/3700 W |
| Right | Induction cooking plate |
| Size | 10,3 " (260 mm) |
| Power | 2600/ 3700 W |
| OVEN/BROIL | |
| Broil | 2,2 kW |
i Technical specifications may be changed without prior notice to improve the quality of the product.
i Figures in this manual are schematic and may not exactly match your product
Values stated on the product labels or in the documentation accompanying it are obtained in laboratory conditions in accordance with relevant standards. Depending on operational and environmental conditions of the product, these values may vary.
Your oven heat setting recommendations are provided based on the 240 volt power source as the product is designed with. If your product is powered with 208 volt source, duration of cooking may take longer as the same heat settings apply.
IKEA limited guarantee
How long is the IKEA guarantee valid?
This guarantee is valid for five (5) years from the original date of purchase of Your appliance at IKEA, unless the appliance is named LAGAN or TILLREDA in which case two (2) years of guarantee apply. The original sales receipt is required as proof of purchase. If service work is carried out under guarantee, this will not extend the guarantee period for the appliance.
Who will execute the service?
IKEA "Service Provider" will provide the service through its own service operations or authorized service partner network.
What does this guarantee cover?
The guarantee covers faults of the appliance which have been caused by faulty construction or material faults from the date of purchase from IKEA. This guarantee applies to domestic use only. Some exceptions not guaranteed are specified under the headline "What is not covered under this guarantee?" Within the guarantee period, the costs to remedy the fault (e.g., repairs, parts, labour and travel) will be covered, provided that the appliance is accessible for repair without special expenditure. On these conditions the local regulations are applicable. Replaced parts become the property of IKEA.
What will IKEA do to correct the problem?
IKEA appointed Service Provider will examine the product and decide, at its sole discretion, if it is covered under this guarantee. If considered covered, IKEA Service Provider or its authorized service partner through its own service operations, will then, at its sole discretion, either repair the defective product or replace it with the same or a comparable product.
What is not covered under this guarantee?
•Normal wear and tear.
- Deliberate or negligent damage, damage caused by failure to observe operating instructions, incorrect installation or by connection to the wrong voltage, damage caused by chemical or electro-chemical reaction, rust, corrosion or water damage including but not limited to damage caused by excessive lime in the water supply, damage caused by abnormal environmental conditions.
- Consumable parts including batteries and lamps.
• Non-functional and decorative parts which do not affect normal use of the appliance, including any scratches and possible colour differences.
- Accidental damage caused by foreign objects or substances and cleaning or unblocking of filters, drainage systems or soap drawers.
- Damage to the following parts: ceramic glass, accessories, crockery and cutlery baskets, feed and drainage pipes, seals, lamps and lamp covers, screens, knobs, casings and parts of casings. Unless such damages can be proved to have been caused by production faults.
- Cases where no fault could be found during a technician's visit.
- Repairs not carried out by our appointed service providers and/or an authorized service contractual partner or where non-original parts have been used.
- Repairs caused by installation which is faulty or not according to specification.
- The use of the appliance in a non-domestic environment i.e. professional use.
- Transportation damages. If a customer transports the product to his home or another address, IKEA is not liable for any damage that may occur during transport. However, if IKEA delivers the product to the customer's delivery address, then damage to the product that occurs during this delivery will be covered by IKEA.
- Cost for carrying out the initial installation of the IKEA appliance. However, if an IKEA appointed Service Provider or its authorized service partner repairs or replaces the
appliance under the terms of this guarantee, the appointed Service Provider or its authorized service partner will reinstall the repaired appliance or install the replacement, if necessary.
How country law applies
The IKEA guarantee gives you specific legal rights, and you may also have other rights which vary from state to state or jurisdiction to jurisdiction. However these conditions do not limit in any way consumer rights described in the local legislation.
Area of validity
For appliances which are purchased in United States or Canada, or moved to one of the mentioned countries, the services will be provided in the framework of the guarantee conditions normal in the specified country. An obligation to carry out services in the framework of the guarantee exists only if the appliance complies and is installed in accordance with:
- the technical specifications of the country in which the guarantee claim is made;
- the Assembly Instructions and User Manual Safety Information.
The dedicated AFTER SALES for IKEA appliances
Please don't hesitate to contact IKEA appointed After Sales Service Provider to:
- make a service request under this guarantee;
- ask for clarifications on installation of the IKEA appliance in the dedicated IKEA kitchen furniture;
- ask for clarification on functions of IKEA appliances.

You can find phone numbers of the IKEA appointed After Sales Service Providers at the end of this manual.
To ensure that we provide you with the best assistance, please read carefully the Assembly Instructions and/or the User Manual before contacting us.
How to reach us if you need our service
In order to provide you a quicker service, we recommend to use the specific phone numbers listed on this manual. Always refer to the numbers listed in the booklet of the specific appliance you need an assistance for.
Please also always refer to the IKEA article number (8 digit code) placed on the rating plate of your appliance.
SAVE THE SALES RECEIPT!
It is your proof of purchase and required for the guarantee to apply. The sales receipt also reports the IKEA name and article number (8 digit code) for each of the appliances you have purchased.
Do you need extra help?
For any additional questions not related to After Sales of your appliances, please contact our nearest IKEA store call centre. We recommend you read the appliance documentation carefully before contacting us.
CONSIGNES DE SÉCURITÉ IMPORTANTES LISEZ ET CONSERVEZ CES INSTRUCTIONS

natural_image
Silhouette of a person pushing a large block with a stick figure nearby (no text or symbols)
AVERTISSEMENT
natural_image
Silhouette of a person bending over a box with an arrow indicating motion (no text or symbols)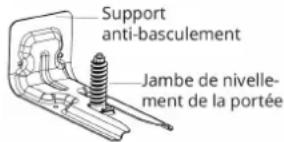
text_image
Technical diagram of an oven with numbered parts labeled 1, 2, and 3 for identification.1 Trous de ventilation
3 Lampe
natural_image
Isometric line drawing of a rectangular metal grate or rack (no text or symbols)natural_image
Technical line drawing of an open refrigerator with a mesh insulation panel (no text or symbols)4. Island trim
natural_image
Technical line drawing of a mechanical assembly with no visible text or symbols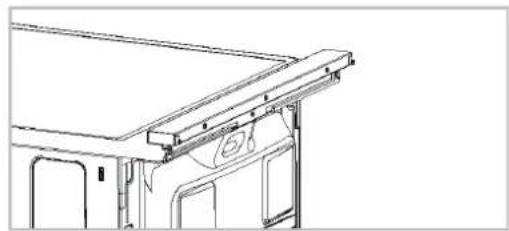
natural_image
Technical line drawing of a vehicle roof structure with no visible text or symbols
text_image
Diagram showing three cooking methods: boiling, heating, and boiling with crossed-out X marks indicating prohibition.natural_image
Technical line drawing of a mechanical housing or enclosure with internal components and a directional arrow (no text or symbols)natural_image
Illustration of hands installing or removing a door panel into a cabinet (no text or symbols present)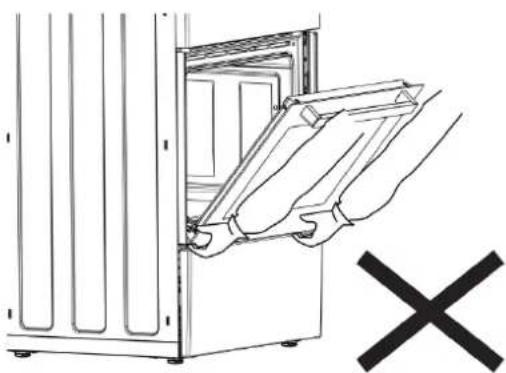
natural_image
Line drawing of a cabinet with open door and hand inserting a tray, no text or symbols presenttext_image
Technical diagram showing mechanical assembly with labeled parts 1, 2, and 3, including a tool and green directional arrow indicating motion.natural_image
Mechanical assembly diagram showing a clamping mechanism with labeled component 4 (no text or symbols beyond the number)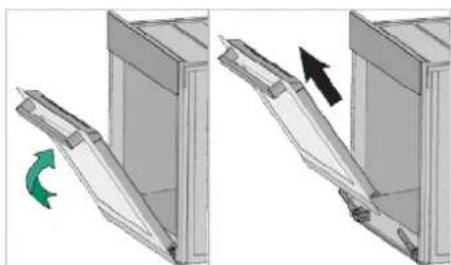
natural_image
Diagram showing two views of a mechanical component with a green arrow indicating rotation (no text or symbols)natural_image
Top-down schematic of a device casing with numbered components and a highlighted circular area (no text or symbols)text_image
Diagram illustrating the working principle of a rotary switch mechanism with labeled components and rotation arrows1 Lentille
2 Ampoule halogène
Site web IKEA.us/appliancesupport
Sitio Web :
CANADA- CANADA- CANADAÁ
Numéro de téléphone
Site web IKEA.ca/appliancesupport
Site web fr.IKEA.ca/soutienelectromenagers
Sitio Web :